


VR Weight Loss Tips and Oculus Quest Weight Loss Guide
If weight loss is on your mind and you’re wondering how to use VR for an enjoyable weight loss experience, then look no further than this Oculus weight loss guide. Of course you don’t need an Oculus Quest 2 to see Virtual Reality weight loss results, and no matter what HMD you use you can see fantastic results when using VR for exercise and weight loss.
If weight loss is on your mind and you’re wondering how to use VR for an enjoyable weight loss experience, then look no further than this Oculus weight loss guide. Of course you don’t need an Oculus Quest 2 to see Virtual Reality weight loss results, and no matter what HMD you use you can see fantastic results when using VR for exercise and weight loss.
Why The Oculus For Weight Loss?
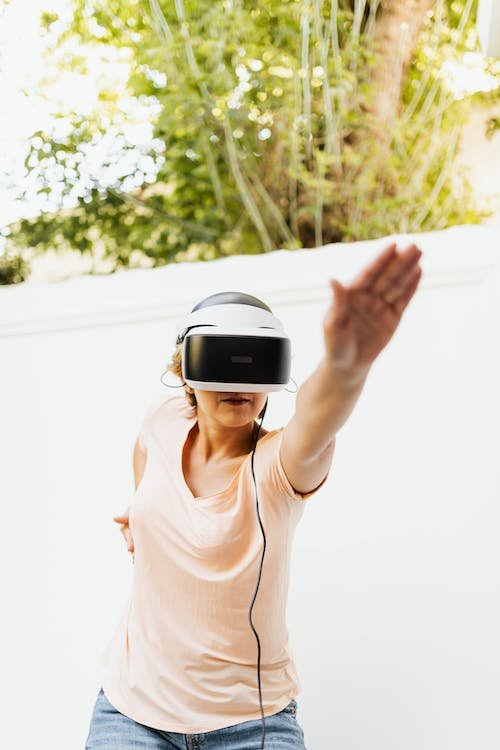
While you don’t necessarily need an Oculus Quest 2 to see VR weight loss results, using a standalone VR headset like the Meta Quest 2 will give you much greater range of movement, because you won’t need to constantly have a cable tethered to your head while working out in VR.

An Oculus Quest 1 also works as would any other standalone VR headset like the Pico 4. Being able to freely move vigorously is key to a comfortable VR weight loss experience when using VR gaming as exercise.
How Does VR Help With Weight Loss?
Before we get into the details, do note that we are not medical professionals, and that everyone’s body is different. If you are really serious about weight loss then make sure to consult your doctor about your current weight and any underlying medical conditions you may have which might affect your weight loss journey.
That being said, VR is a fantastic way to lose weight by providing a fun and interesting way to exercise. Not everyone likes exercise, and that’s okay. With new advancements in VR technology we now have better and better ways to make moving our bodies a fun and enjoyable experience even for those that are not so inclined.
That’s how Virtual Reality helps you with weight loss, by providing a fun way to burn calories and build muscle. Keep in mind that proper diet and portioning of meals is also a very important factor in losing weight, as well as good nutrition. In this article we’ll be focusing on using standalone, untethered VR with the Oculus Quest 2 to provide you with good and fun exercise that you’ll be looking forward to instead of dreading.
VR Exercise Games With The Oculus Quest 2 - Upper Body
So you’ve got your Quest 2 or other standalone VR headset and you’re wondering where to begin. Naturally we will start with some VR workout games. There’s quite a few, like Supernatural, that are specifically targeted to weight loss fanatics and those who want good exercise. Still, there are much better options that feel less like exercise and more like fun. For instance, do you like boxing?

If you do then there’s a great boxing experience that makes for a fantastic workout in Thrill Of the Fight. Unlike most other VR boxing games you’ll find that Thrill Of the Fight is a very intense experience that forces you to push yourself physically in order to win. Fast punches and quick movement are encouraged in this game, and you will easily find yourself panting and sweating when trying to defeat an opponent. It’s easy to get so lost in the fight that you don’t even realize how much exercise you’re doing.
Thrill Of the Fight is great for working on your arms and cardio. All of the movement makes you work your heart and lungs a lot, and all of the punching will make your arms sore and tired. If you have a big enough play area you can even move around the ring and move your legs a little, though it’s not too much of a leg workout unless you duck and weave a lot.

When playing Thrill Of the Fight be very careful of where you set your guardian boundary so that you don’t punch a wall, furniture, pet, or person. This goes for all VR games. As for yourself, since you’re not punching a physical target it is possible to overextend your arms and pull a muscle or injure your shoulder. So be careful to keep your punches close and not overextend your arms.
If Thrill Of the Fight sounds interesting and you want more background then check out our other article on it here. If you’ve already tried Thrill Of the Fight and want more intense fighting games in VR then Virtual Boxing League gives a less polished but also very enjoyable boxing experience. Dragon Fist: VR Kung Fu is also a lot of fun, though it tends to be a little less intense than these two boxing games, you’ll break a sweat at least though.
VR Exercise Games With The Oculus Quest 2 - Lower Body
While fighting games make for great upper arm workouts and cardio, what about your legs and lower body? They’ll need some love too. While a lot of VR games that are good for exercise and weight loss make you move your legs, there are a few which will really blast those leg muscles and give you a good workout. Chief among these is Pistol Whip.
If you’ve played some Pistol Whip or seen videos about it, you might not have thought that this would be a great game for Virtual Reality weight loss. That’s because Pistol Whip is incredibly easy and slow by default. Just like in Thrill Of the Fight, you’ll need to up the difficulty to really push yourself and get a great leg workout.
Pistol Whip can be really intense because it makes you do a ton of squats. Squats are the best single all around exercise for your legs, and Pistol Whip makes you squat a lot at high difficulties. By setting the difficulty to Hard and putting on some modifiers that make more bullets come at you, you’ll find that your legs will be burning after each Pistol Whip session.
To dodge incoming bullets you’ll need to quickly squad, duck, and contort your body. This gives your legs and even abs a great workout. It’s great cardio too, because all of the fast movements the game forces you to do will get your heart pumping and lungs working.

For more specific tips on how to turn Pistol Whip into an intense workout, check out our Pistol Whip exercise guide here. There are some other games that are great for your legs too. If you love to dance then an intense session of Dance Central VR can be great for your legs. OhShape is a lesser known game that makes you move your legs a lot, and also your arms for more of a hybrid workout.
VR Weight Loss Tips and VR Exercise Tips
These aren’t the only games for VR exercise, if you want more options go to the “Have Fun” tip below for a big list of other games. Now that you’ve got some options for Virtual Reality games to play to get some fun exercise during your VR exercise, here are some more tips and advice.
Have Fun
The best way to get more exercise, burn more calories, and build more muscle, is to have fun. That’s the whole point of VR exercise and why Virtual Reality so so great for weight loss. It makes exercise more fun and makes you want to keep coming back to do it. So make sure you’re having a good time, and if you don’t have as much fun with the games in this article, look a little further. Here’s a brief list of other games that we haven’t covered here that could make for very fun exercise:
Audioshield
Beat Saber (Make sure to swing your whole arm and not just your wrist, or it’s not exercise at all)
BoxVR
Supernatural (Paid Subscription though, a little too pricey unless you really love it)
Holoball
Eleven Table Tennis VR (Great for an after workout cooldown, but not much exercise on it’s own)
FitXR (A lot like a traditional workout)
HOLOFIT (Rowing in VR!)
Ragnarok (Decent for arms)
Until You Fall (Not the most intense either but a lot of fun and can be some exercise for your arms and legs if you play it really quickly)
Get The Biggest Playspace Possible
It is possible to play most VR Fitness games using a stationary guardian boundary, which is basically just a little circle that you can’t step out of, but you won’t have the most fun you could playing this way. Utilize the biggest play area that you can with a Roomscale Boundary so that you have more room to move around. More movement is key, and freeing yourself to move your entire body naturally while playing will not only get you better exercise and weight loss results, but also make everything more enjoyable.
When you’re picking a playspace though, be careful that no natural sunlight hits the lenses of your VR headset. Natural Light will burn the lenses and leave dead pixels on it that will ruin your immersion and enjoyment. Also make sure that your playspace will be clear of pets and other people, and doesn’t have furniture or objects on the floor around you.
Keep Sweat Out Of Your Eyes and VR Headset
Sweat can be a big problem when you’re wearing a computer on your face and trying to exercise. You’ll find that sweat will pool on your face where it meets the foam cover of your headset. This will make the headset slip on your face and make the whole experience uncomfortable. Not to mention that this sweat can build up in the foam and increase bacteria on your skin that may cause skin problems like acne.
To help with this consider getting a new face cover that is made of silicone or another sweat repelling material. This will keep your headset from smelling and building bacteria. There are plenty of different ones out there, but the most reliable choice is VR Cover, that offers new facial interfaces and accessories not just for the Oculus Quest 2, but basically every VR headset out there.
Make sure to clean your face cover with disinfectant when you’re done exercising (but don’t get any on your lenses) and wipe your face and face cover with a clean towel periodically when exercising in VR.

Avoid Injury
Injuring yourself from exercising not only effects your life outside of weight loss and fitness, but also means that you’ll have to take a break from exercise until you heal. Injuring yourself will cause you to lose more exercise and fun VR play time overall. So avoid injury at all costs by making sure not to overextend yourself or hit a wall or object with your hand. Keep steady and don’t fall over either. If a muscle or joint starts hurting then give it a rest. If you ever have a persistent pain while doing VR weight loss or any exercise at all then consult a medical professional.
Try Adding A Little Traditional Exercise
To hit more muscle groups and have a more complete workout you might want to add some traditional exercise to your VR weight loss regimen after you get into the habit of exercise. Exercises that utilize your body weight like pushups and lunges can be a great way to supplement your VR weight loss adventure. You can try having some fun with a VR workout and then moving on to some other exercise, or do some other exercises in between VR sessions to keep your weight loss exciting and different.

Add Weights For Even Harder Exercise
If you’ve been using VR for weight loss for a while and don’t feel the burn quite like you used to you can enhance your Virtual Reality exercise even further by adding some weights. Wrist weights like these here are great because they include a thumbstrap that will keep them from slipping off of your wrists while you’re playing. Ankle weights like these can make movement harder and more intense as well.
Exercise Consistently and Watch Your Diet
If you want to see weight loss results when exercising with Virtual Reality, then you’ll only ever see progress when you exercise consistently. A little exercise every day of the week is better than a lot of exercise one day of the week. Exercise and weight loss is as much a series of habits as it is your desire and drive to do it. It can be helpful to exercise at the same time every day, or to start with just a little bit of exercise and work your way up. Consistency is more important than immediate results, though consistency will bring results if you keep slowly increasing the intensity.
Also keep in mind that all the VR exercise in the world won’t make you lose weight alone. Getting enough sleep and having a proper diet are also very important. Unfortunately there’s no Virtual Reality app yet that can help you with those, though there are plenty that make for a good workout.
Well there you have it, a guide and tips for VR weight loss by using VR for fun exercise. If you’ve read this and found Virtual Reality to be helpful on your weight loss journey then please leave a comment. It would be great to hear from everyone that VR has helped become more fit and lose weight.

The Walking Dead Saints and Sinners Walkthrough and Guide - Part 9 - The Shallows Again
Stuck in The Walking Dead Saints and Sinners? Wondering where to go next? Maybe you just like to see what is in store for you before you get there, or want to look back and see if you missed anything in The Walking Dead: Saints & Sinners. Well don’t worry we’ve got you covered with this complete walkthrough. This is the ninth part, where you go back to the Shallows to get another package for May.
Stuck in The Walking Dead Saints and Sinners? Wondering where to go next? Maybe you just like to see what is in store for you before you get there, or want to look back and see if you missed anything in The Walking Dead: Saints & Sinners. Well don’t worry we’ve got you covered with this complete walkthrough. This is the ninth part, where you go back to the Shallows to get another package for May.
This article will detail how to progress through the main story missions as quickly as possible, with a couple of guiding tips thrown in here and there to make your adventure smoother. Only those recipes that are convenient to get when doing a task for the first time are included. For a full list of all recipes in The Walking Dead: Saints & Sinners, check out our recipe guide article. Spoilers will be as light as possible, but there will be story spoilers by necessity in this walkthrough, but there won’t be any explanation of what is going on in the story beyond what is necessary to make the walkthrough make sense.
All Walkthrough Parts:
The Walking Dead Saints and Sinners Walkthrough and Guide - Part 1 - The Graveyard
The Walking Dead Saints and Sinners Walkthrough and Guide - Part 2 - The Shallows
The Walking Dead Saints and Sinners Walkthrough and Guide - Part 3 - Via Corolla
The Walking Dead Saints and Sinners Walkthrough and Guide - Part 7 - Old Town and Another Stash
The Walking Dead Saints and Sinners Walkthrough and Guide - Part 8 - Rampart
The Walking Dead Saints and Sinners Walkthrough and Guide - Part 9 - The Shallows Again
The Walking Dead Saints and Sinners Walkthrough and Guide - Part 10 - Bastion and The Reserve Key
The Walking Dead Saints and Sinners Walkthrough and Guide - Part 11 - The Reserve and the Ending
The Resting Place
Welcome to another day in New Orleans. After you wake up you’ll notice that the lantern on the pole overtop the tomb is lit up again. So go over there and get your new task from May out of the coffin. There’s a picture of the location as always, and a letter from May that you should read to get a little more background on her.

You might recognize it from the photo, but that is a window in the Blue Mansion located in the Shallows, the very first place you went to in The Walking Dead: Saints and Sinners for the radio microphone!
It’s not going to be quite so easy to get into the Blue Mansion this time though. There will be a lot of Tower soldiers guarding the place inside and outside. Be prepared for heavy combat. Grab the best guns that you have. By now hopefully you’ll at least have access to the FS92M 9MM Pistol, or even the Nova 1014 Shotgun. If you do, bring them, but if not that’s okay.

This mission is totally possible with a Double Barreled Shotgun or Hunting Rifle. Just be aware that you’ll have to do some close quarters fighting inside the building no matter how you approach this. So a good pistol is very helpful. Make sure you’ve got plenty of ammo and durability on those guns too, you’ll need to use them a lot.
You may also want to eat some stat boosting food like Gumbo, which gives you 25% more max health. There will still be zombies though, as always, so make sure you’ve got some melee options on hand as well. Whenever you’re geared for some human on human combat and ready to rock, head over to the boat and sail to The Shallows.

The Shallows (Again)
This time when you arrive in The Shallows you will spawn in on the skiff in the upper right corner of the map. Just down the road in front of you and on the right is the Blue Palace. You might hear some shooting after you spawn in, get ready.

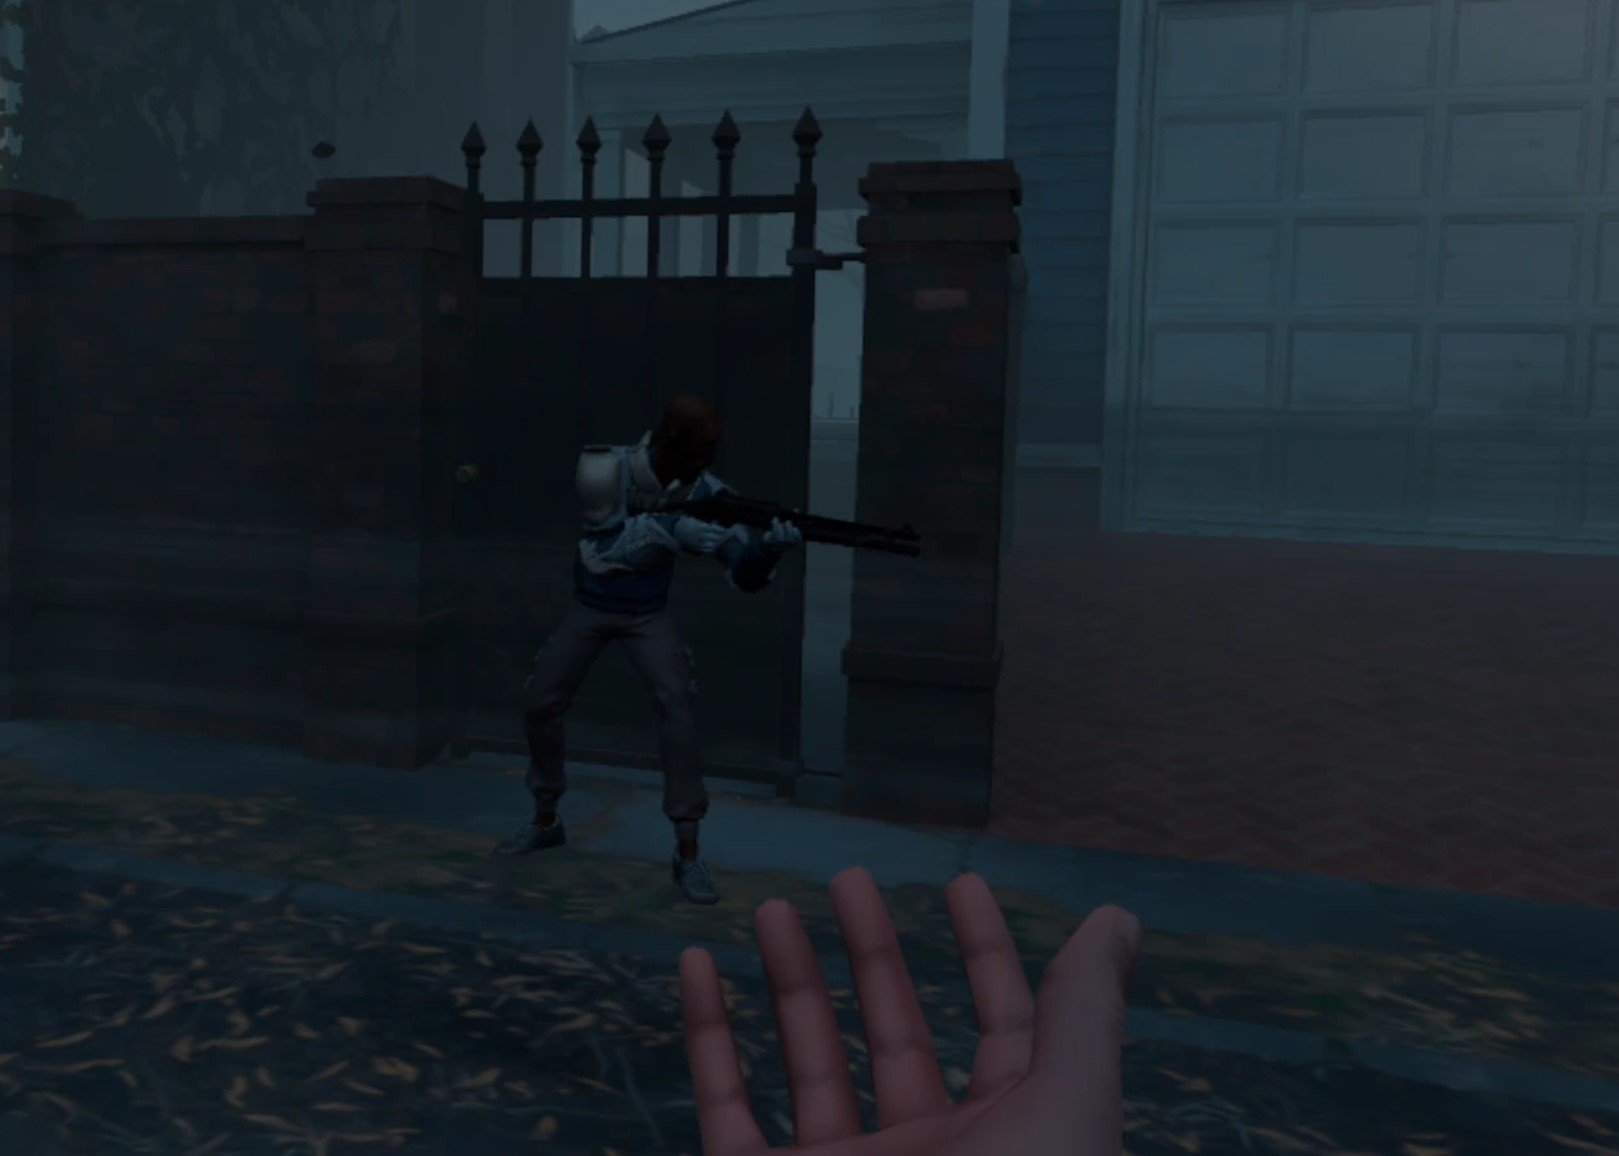
Once you start walking down Bordeaux and make it to the truck right in front of where you spawn in, two Reclaimed soldiers with rifles will come running over from a side street. Don’t shoot, they’re actually on your side here, and can make getting into the Blue Palace much easier.

The first Tower soldiers guarding the Blue Palace are on the other side of the truck, and the two Reclaimed will pause for a few moments, and then walk around the front of the truck and start fighting them.

You’ve got a lot of options here. The Tower soldiers won’t actually attack you until you attack them first or get too close to the building, or go into the backyard behind the Blue Palace. So you can always just run past the fighting between the Tower and Reclaimed forces, bypassing most of the external Tower defenders, and take one of several paths inside (more on that later). Though once you’re inside the Blue Palace you will have to fight.
You can also fight alongside The Reclaimed soldiers. They will fight the first group near the skiff, and then go on to attack the Tower soldiers in front of the front door to the Blue Palace. Unfortunately the front door is heavily barricaded now and you can’t go through it. If the Reclaimed soldiers are still alive, they’ll go around the front of the building to the open garage, and fight the Tower defenders there.
If the Reclaimed soldiers somehow survive all of this, they’ll mill around on the street. Once all the Tower defenders are clear you might as well just walk in through the open garage door.

For the fun of a chaotic shootout and the loot that dead enemies will drop (potentially including Worn AR-416 Assault Rifles) fighting through the Tower forces on the street is definitely recommended. There are few moments that are so action packed in the first The Walking Dead: Saints and Sinners game that you’ll be missing out if you ignore it.
Still, if you prefer stealth gameplay or just want to avoid fighting as much as possible, there are several routes you can take to avoid fighting the Tower soldiers outside. They are mostly the same as those from the first time you came to The Shallows, just with a bunch of Tower guards added in.
As mentioned earlier you can run past them and they won’t be immediately hostile. If you’re quick you can duck in through a hole near the front door that leads to the crawlspace beneath the house, and from there pop up through the broken floorboards into several rooms inside.

You can also just not go down Bordeaux street from the very beginning, and instead walk to the little lot that the Reclaimed grunts run in from at the start. Further down is a big gate with a Tower soldier defending it. If you walk through the gate the soldier will attack, but it’s only one. There’s a small courtyard on the other side with a hole in another wall, crawl through it and you’ll be in the backyard behind the Blue Palace.
There are only a couple of Tower guards in the backyard, so take them out and you can climb up a gutter pipe to the second floor, crawl down into another crawlspace hole, or just walk in through the back door.

You can also just walk down the street, past the open garage and into a small side gate with a single guard in front of it. You can quickly shoot the guard and slip inside, or just run through the gate before he notices, and you’re in the backyard.
As you can see there are a ton of ways to get inside. For the least amount of combat though, you’re best off just using the first option presented here and going through the crawlspace hole at the front of the house.
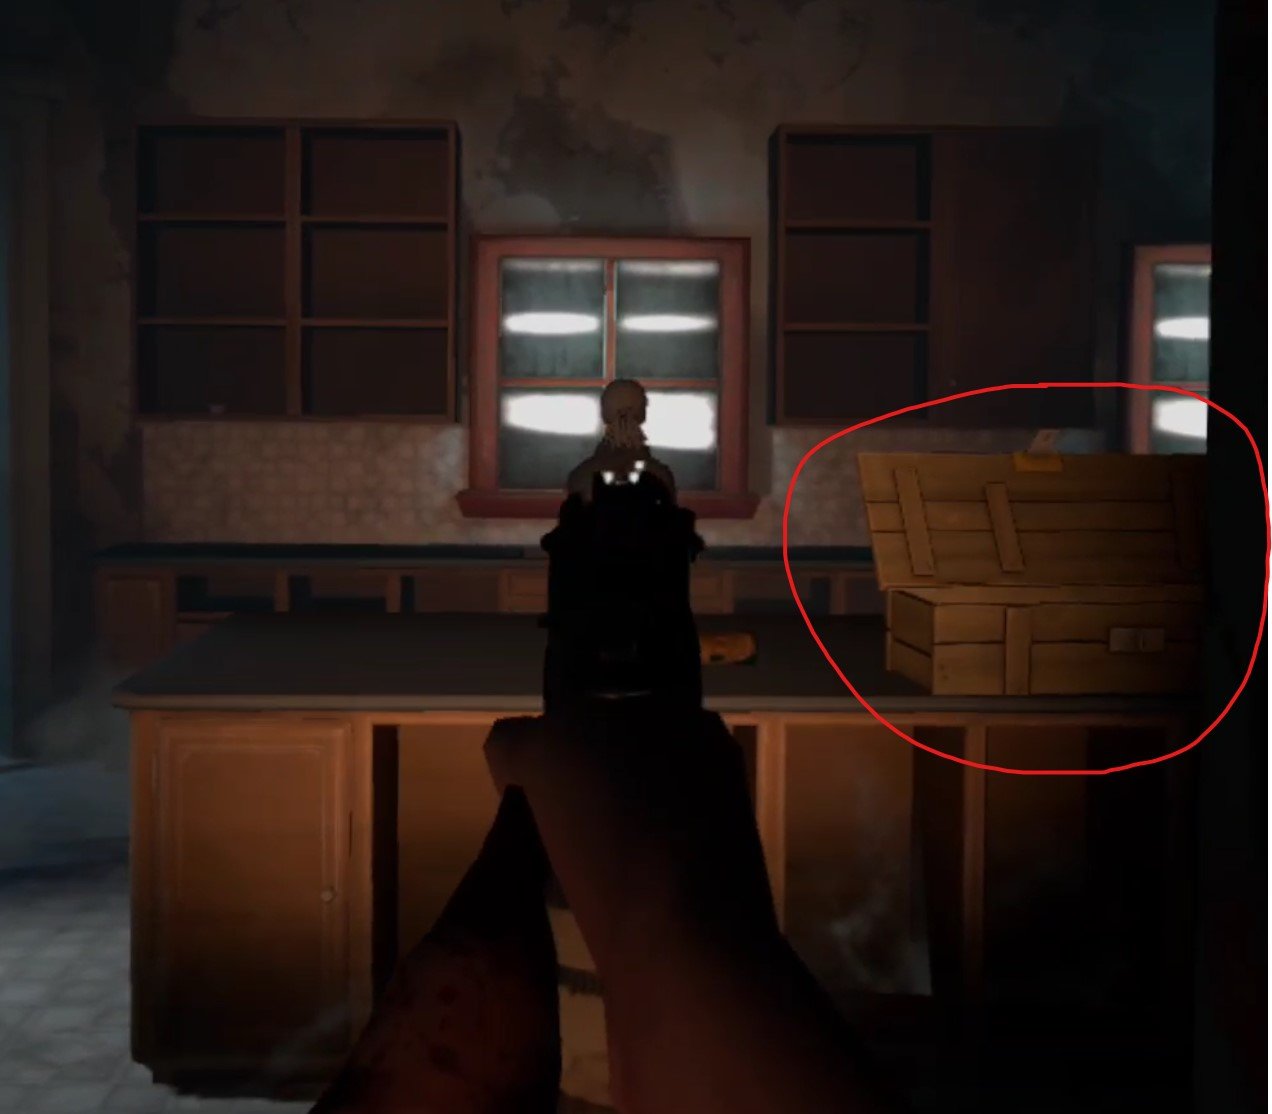
Once you’re inside the layout and loot spawns are mostly the same as the first time you were here. For more information on the loot spawns in the Blue Palace, check out the walkthrough article for the first Shallows mission here. The differences this time are a few crates scattered around, like in the kitchen on the main floor. These open crates contain Boxes of Loot, which are the best loot item in the game.
There are also, of course, Tower soldiers everywhere now. About one for every room, so always have your gun ready when going through a door or rounding a corner. Go through the house and gather loot, or don’t, it’s up to you, there will also be some good stuff by your objective, which is upstairs.
If you wander around the second floor long enough you will inevitably run across it. It’s the small, long room with the pool table in the middle of it. That Pool Table now holds the intel you need, and some goodies. Though there are two Tower soldiers in the intel room, and some in the adjoining room.
If you’re running into those barbed wire traps with cans hanging from them, then you’re going in the right direction. Oh, and in case you’ve forgotten you can easily disarm those by tapping the wire with a gun, melee weapon, or your flashlight.
If you’re having trouble finding the intel room then the fastest way to get there is to climb up the main stairs to the second floor, and go down the long hallway that leads past two doors, one on the left (goes to the attic), and one on the right. At the end of that hallway is another door, and that least directly to the intel room.

Once you’ve got the goods you can just retrace your steps and leave the way you came. As long as any guards that might be remaining outside don’t see you inside the perimeter of the house then they won’t shoot at you.
Oh, and if you never opened the safe to get the .45 Revolver Recipe the first time you came here, the code for that should be on the ground by the carport with the ruined car in it on the road right by the skiff in the top left corner of the map, where the woman was the first time you go to The Shallows.
The Resting Place
Once you’re back do the usual, scrap loot items, store useful items like the timer bombs that you found next to the intel, and put the folder from the stash into the coffin. Congratulations, you’ve survived The Shallows twice! Have a good sleep.

Need a guide on what comes next? Want to find out where the final Pump Part for Casey is? Then head over to Part 10.
Easily Install Blade and Sorcery: Nomad Mods WITHOUT A PC | How to Install Blade & Sorcery Mods Directly On Quest 2
Want to install mods for Blade and Sorcery: Nomad but don’t have a PC, or don’t want to go through all of the hassle to plug your headset into your computer every time you want to install new mods for Blade & Sorcery: Nomad? Well good thing you don’t have to, because you can download and install Blade and Sorcery Mods directly on to your Quest 2 without needing a PC at all! Here’s a guide on how.
Want to install mods for Blade and Sorcery: Nomad but don’t have a PC, or don’t want to go through all of the hassle to plug your headset into your computer every time you want to install new mods for Blade & Sorcery: Nomad? Well good thing you don’t have to, because you can download and install Blade and Sorcery Mods directly on to your Quest 2 without needing a PC at all! Here’s a guide on how.
The Blade and Sorcery U12 Mod Menu
With the release of U12, Blade & Sorcery: Nomad and Blade & Sorcery for PCVR both have an integrated mod manager that can be used on either platform to install mods directly from mod.io. If you still want to install a mod manually then go to the “How To Download Blade and Sorcery Mods Manually” section below and read on from there. For the most straightforward method, you’re in the right place.
First off you’ll need to have a mod.io account. So go to mod.io on your phone, or directly through your Quest 2 if you like, and sign up for an account with an email address. No password is needed, just make sure you can access the email so that you can provide the security code that mod.io will send to that email. Once you’ve made an account and entered the code, start up Blade and Sorcery: Nomad on your headset.
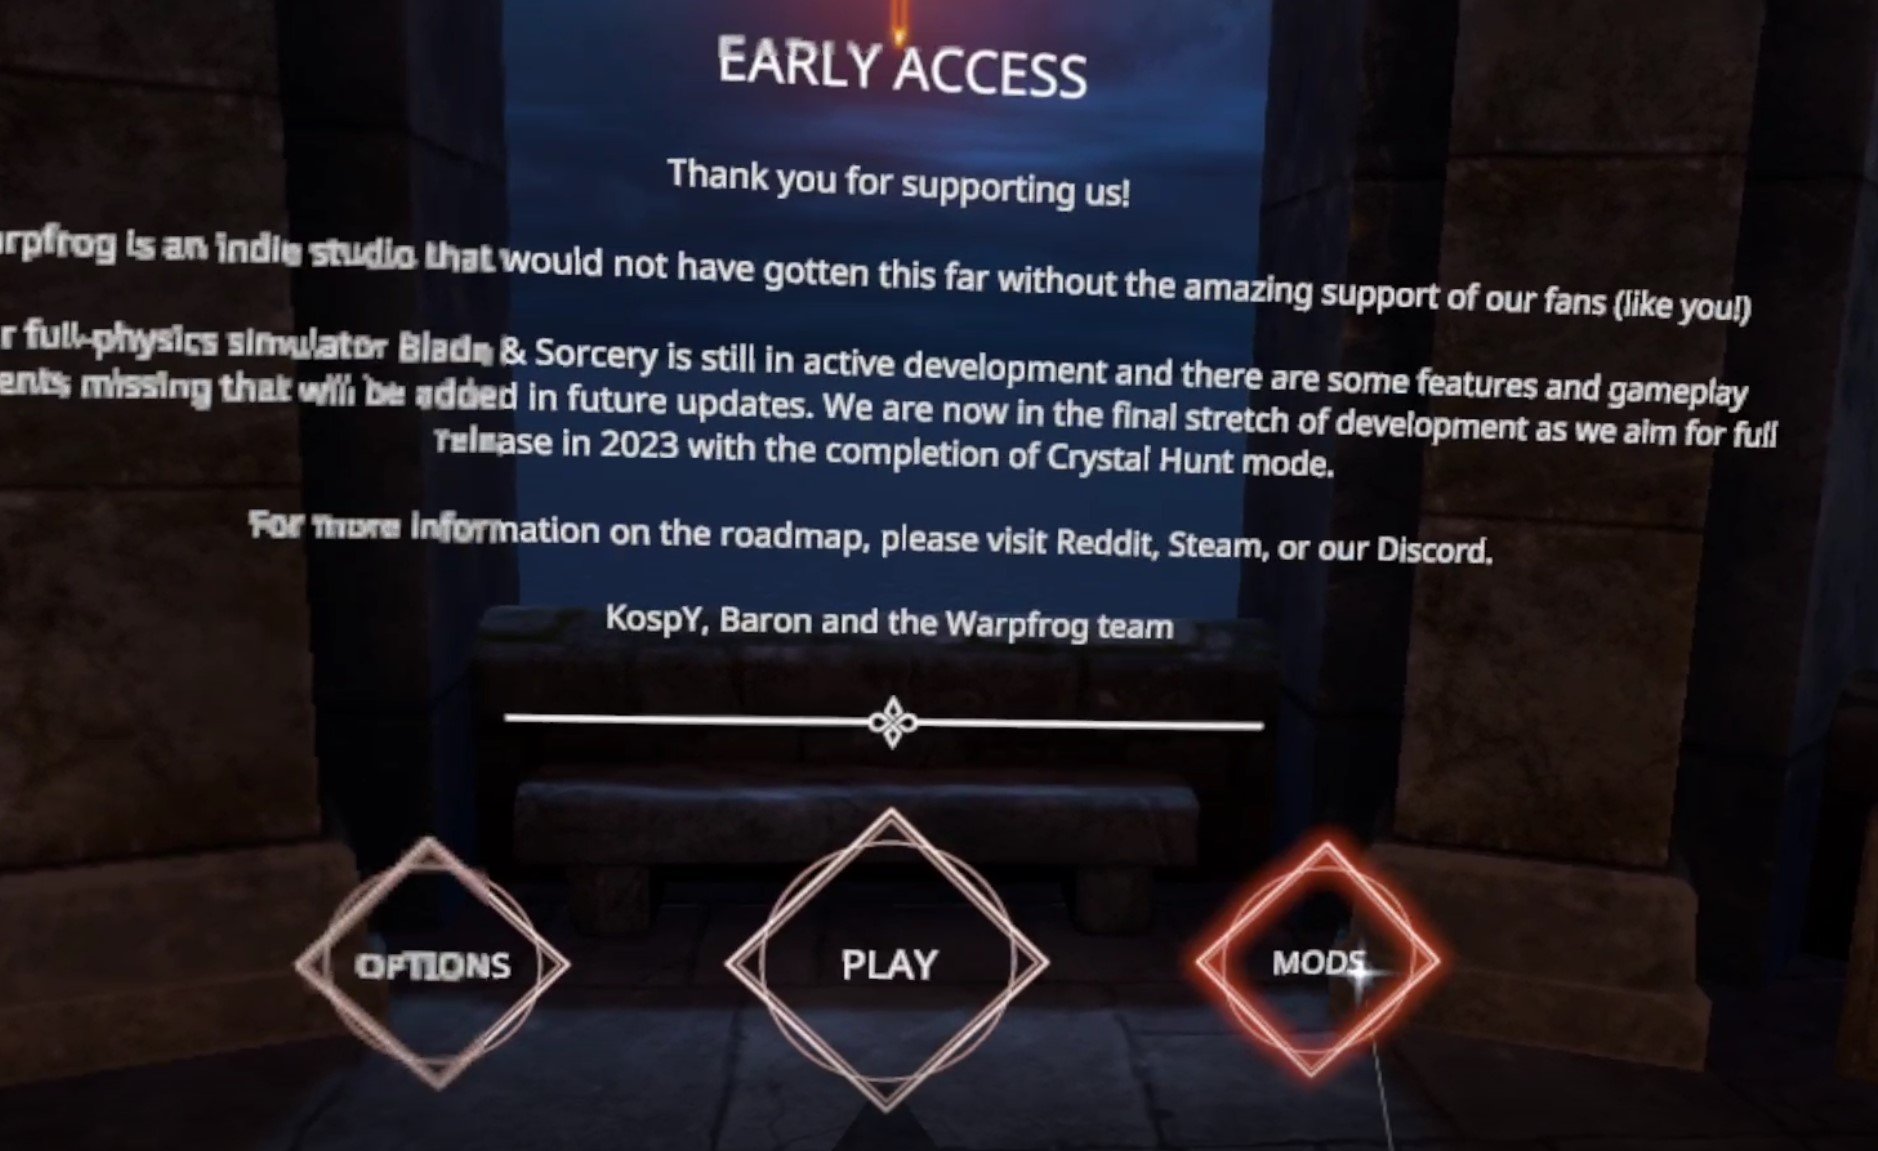
Next to the usual “Play” button on the first screen after the Warp Frog logo, you’ll see a new “Mods” button on the right, hit that, before being presented with a prompt to enter your mod.io email address. This will link your mod.io account to the Blade and Sorcery: Nomad game on your headset to manage mods. Enter the email you used to create your account. You may get an email with another activation code to enter into the game, and once all of that is done you’re presented with the new U12 Blade and Sorcery Mod Manager.

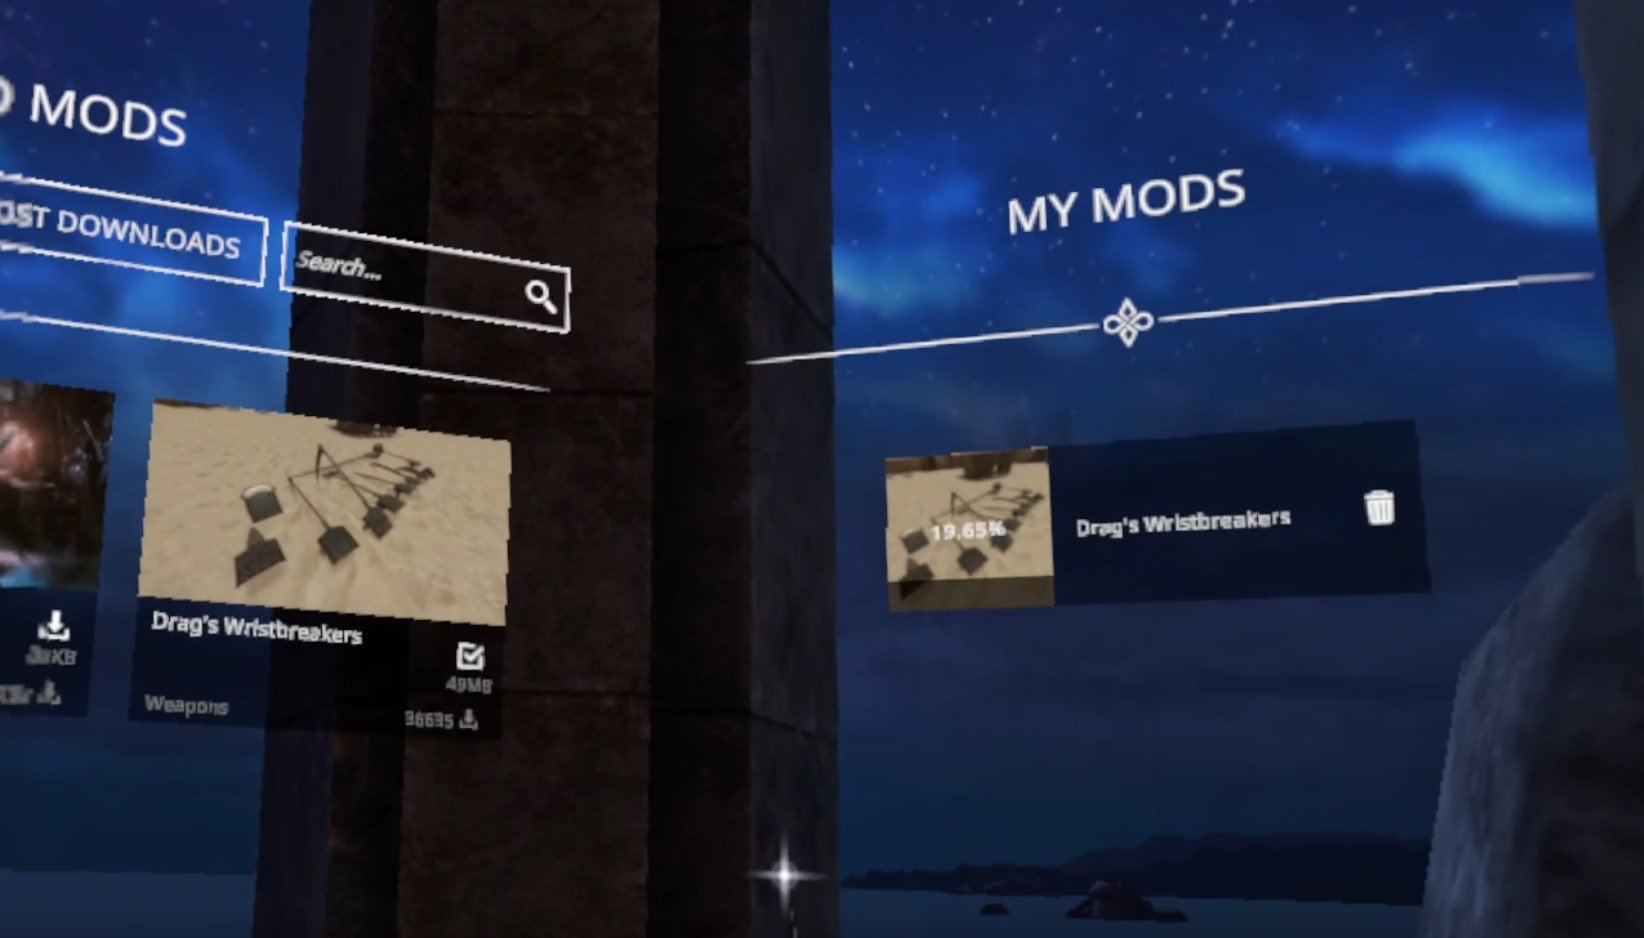
Here in the Mod Manager you can view and download mods as you like. There is a panel on the right to show already installed mods, even those you might have installed manually. You can search for a specific mod in the search bar at the top, or filter with the filter options on the left. Note that any nexusmods.com mods aren’t present here, only those on mod.io.

For this example we’ll be installing Drag’s Wristbreakers, a collection of weapons. Download and installation is easy, just hit the little arrow icon to the right of the name of the mod, and you’ll see the download and installation progress in the “My Mods” panel on the right.
Once you’ve installed all the mods you like, just click the “Back” button on the bottom of the center of the Mod Manager to go back to the first screen, and then hit “Play” like always, and select your character. Once you’re back in the game, you can see what mods are installed through the In Game Menu, which you can open by pressing the menu button on your left controller, and clicking on the “Mods” button.

Though you should know that even if the mod shows up in the menus it may not appear ingame. If this happens to you try restarting Blade and Sorcery: Nomad and if the mods still are not appearing, restart your entire headset.
For our example, Drag’s Wristbreakers appears as a “Grippables” menu in the weapon spawner book. Make sure to check mod descriptions for where they should appear, some might appear in already existing menus like the “Swords” category.

Now we can spawn any of our new modded weapons as we like! Enjoy downloading and installing all the Blade & Sorcery: Nomad mods you like super easily!

How To Download Blade and Sorcery Mods Manually
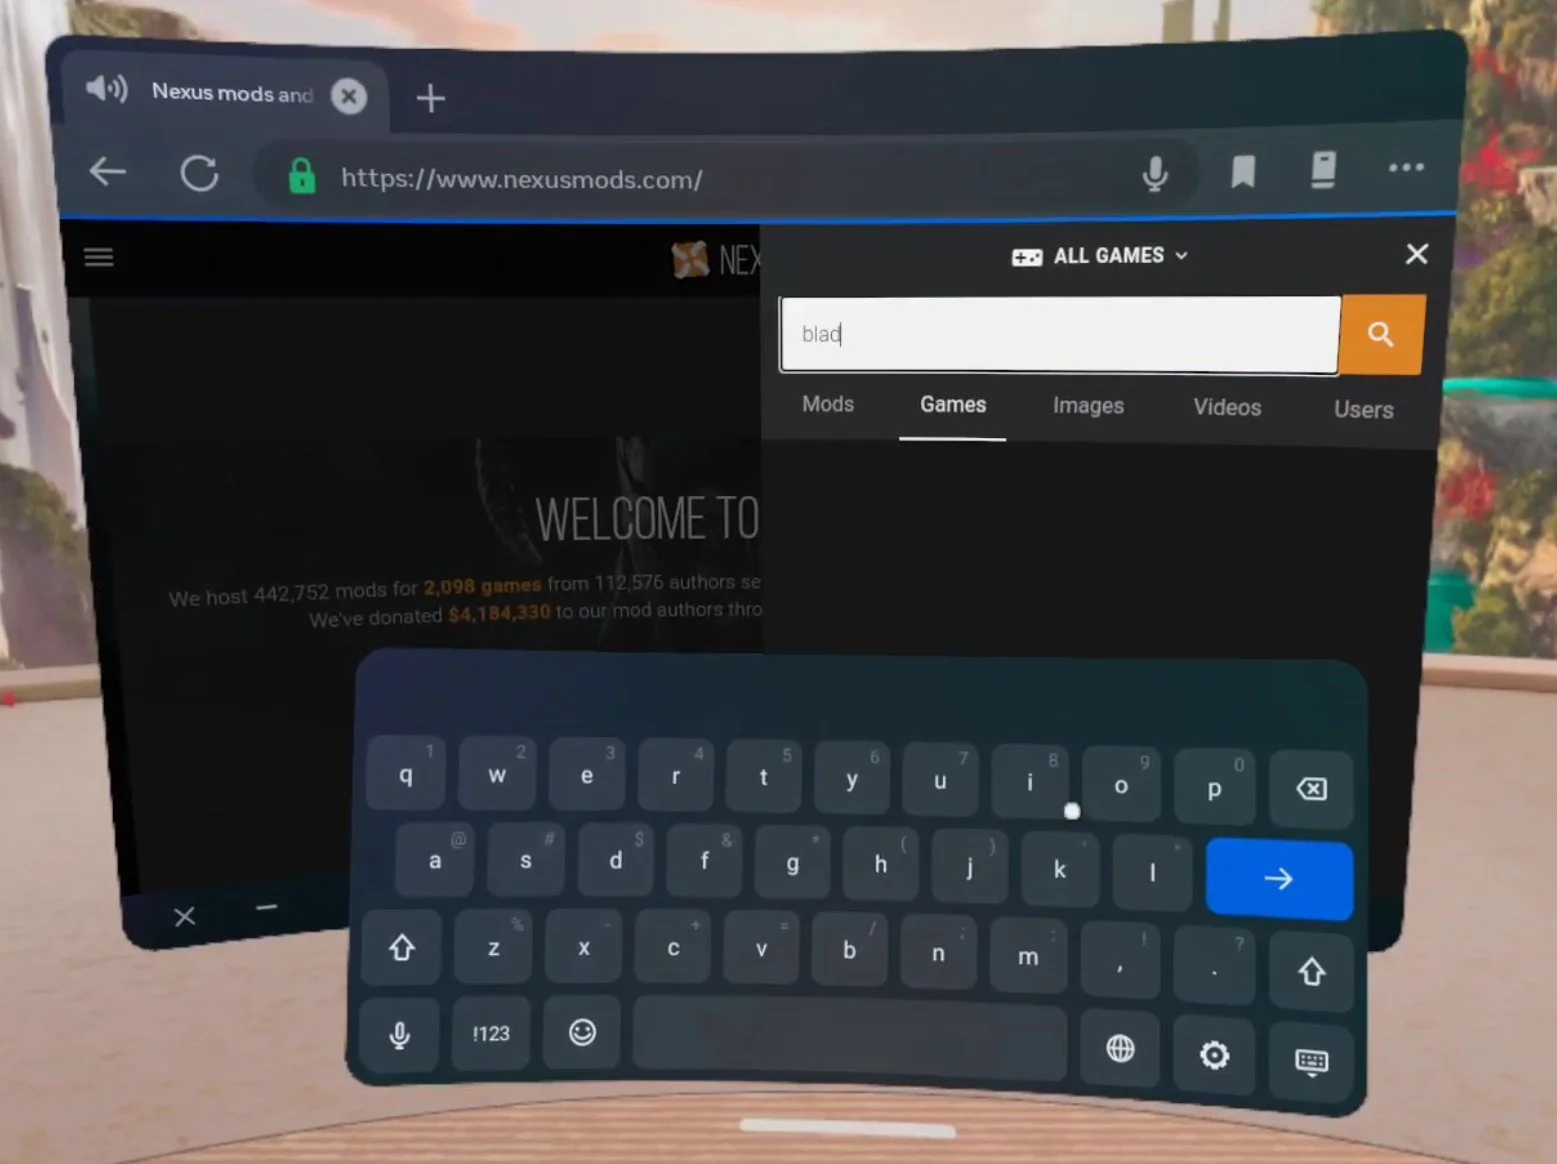
If you want to install Blade & Sorcery: Nomad mods the old fashioned way without using the built in Mod Manager, then here’s how. Let’s start with the fun part, finding all of the Blade & Sorcery mods that you can download! In your Quest 2 go to the “Meta Quest Browser” app (the one you can use to browse the internet on your headset) and go to the website nexusmods.com.

Hit the little search spyglass in the top right and then select “Games” to search by game. Then type in “Blade & Sorcery” to search for Blade & Sorcery: Nomad. Make sure to use “&” instead of “and” as searching “Blade and Sorcery” will give you no results.
After you search for Blade & Sorcery, make sure you select Blade & Sorcery: Nomad and not regular Blade & Sorcery, because mods downloaded for PCVR Blade and Sorcery will not work on your Quest 2. Once you’re on the Blade and Sorcery: Nomad page it will look something like this.

The most popular and trending mods are displayed here at the front page, but you can also use the search spyglass in the top right corner again to search for whatever you want. In this example we’ll be installing a lightsaber mod, and found one by searching for “lightsaber”. Selecting a mod here displays the mod page.
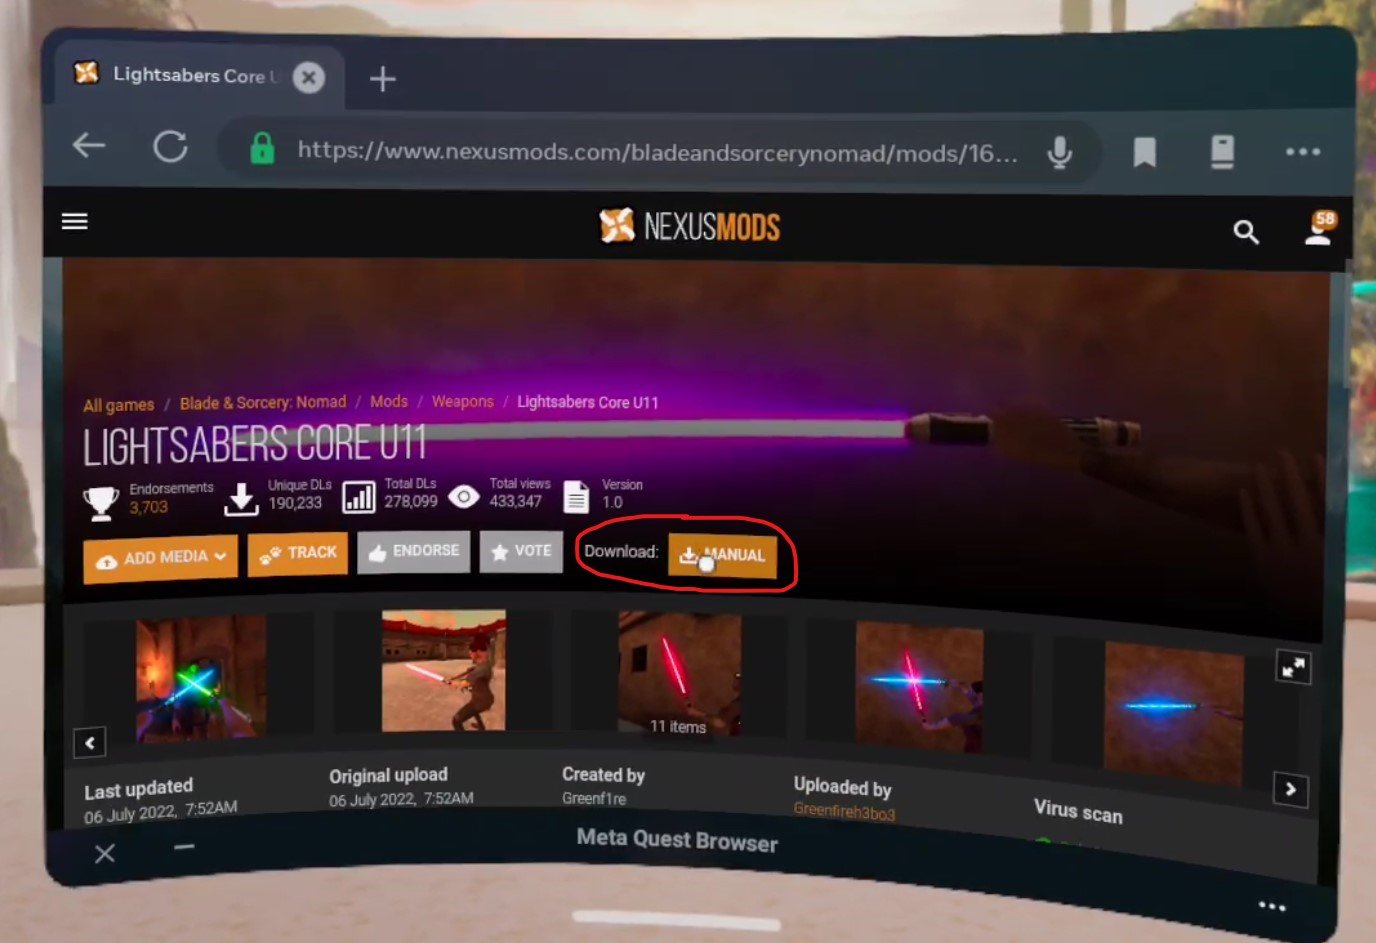
When you’re on the mod page select the “Download: MANUAL” button or go to the Files tab and download from there. One unfortunate thing here is that even on a Quest 2, Nexus Mods will force you to log into an account in order to download a file. Luckily the accounts are free, though putting your login information into a Quest 2 can be a little annoying. Either way once you select the Download button and are logged in, select the “Slow Download” button if you’re using a free account.

The page will change and you’ll have to wait about 5 seconds for the download to begin, but once it does you’ll see a little popup on your screen that will tell you how it’s going and when it is done. Once you’ve downloaded whatever Blade and Sorcery mods you want it’s time to install them!
How To Install Blade & Sorcery: Nomad Mods Manually
So now you’ve got your .zip files downloaded and you’re ready to install your shiny new mods directly on to your Quest 2 without a PC. To help you with this you’ll need a new App on your Quest. Don’t worry, it doesn’t cost any money and is completely free. It’s called Mobile VR Station and you can install it through the Quest store when using your headset, or through the Quest mobile app, just like you would any other Quest app on the App Lab.
Keep in mind that Mobile VR Station is on the App Lab, so it may be a little harder to find than most Quest applications in the store. Make sure to type in the entire name of the app letter for letter or it may not appear. Anyway, once you’ve got Mobile VR Station downloaded and installed (it shouldn’t take long, it’s not a very big app) go ahead and launch it.

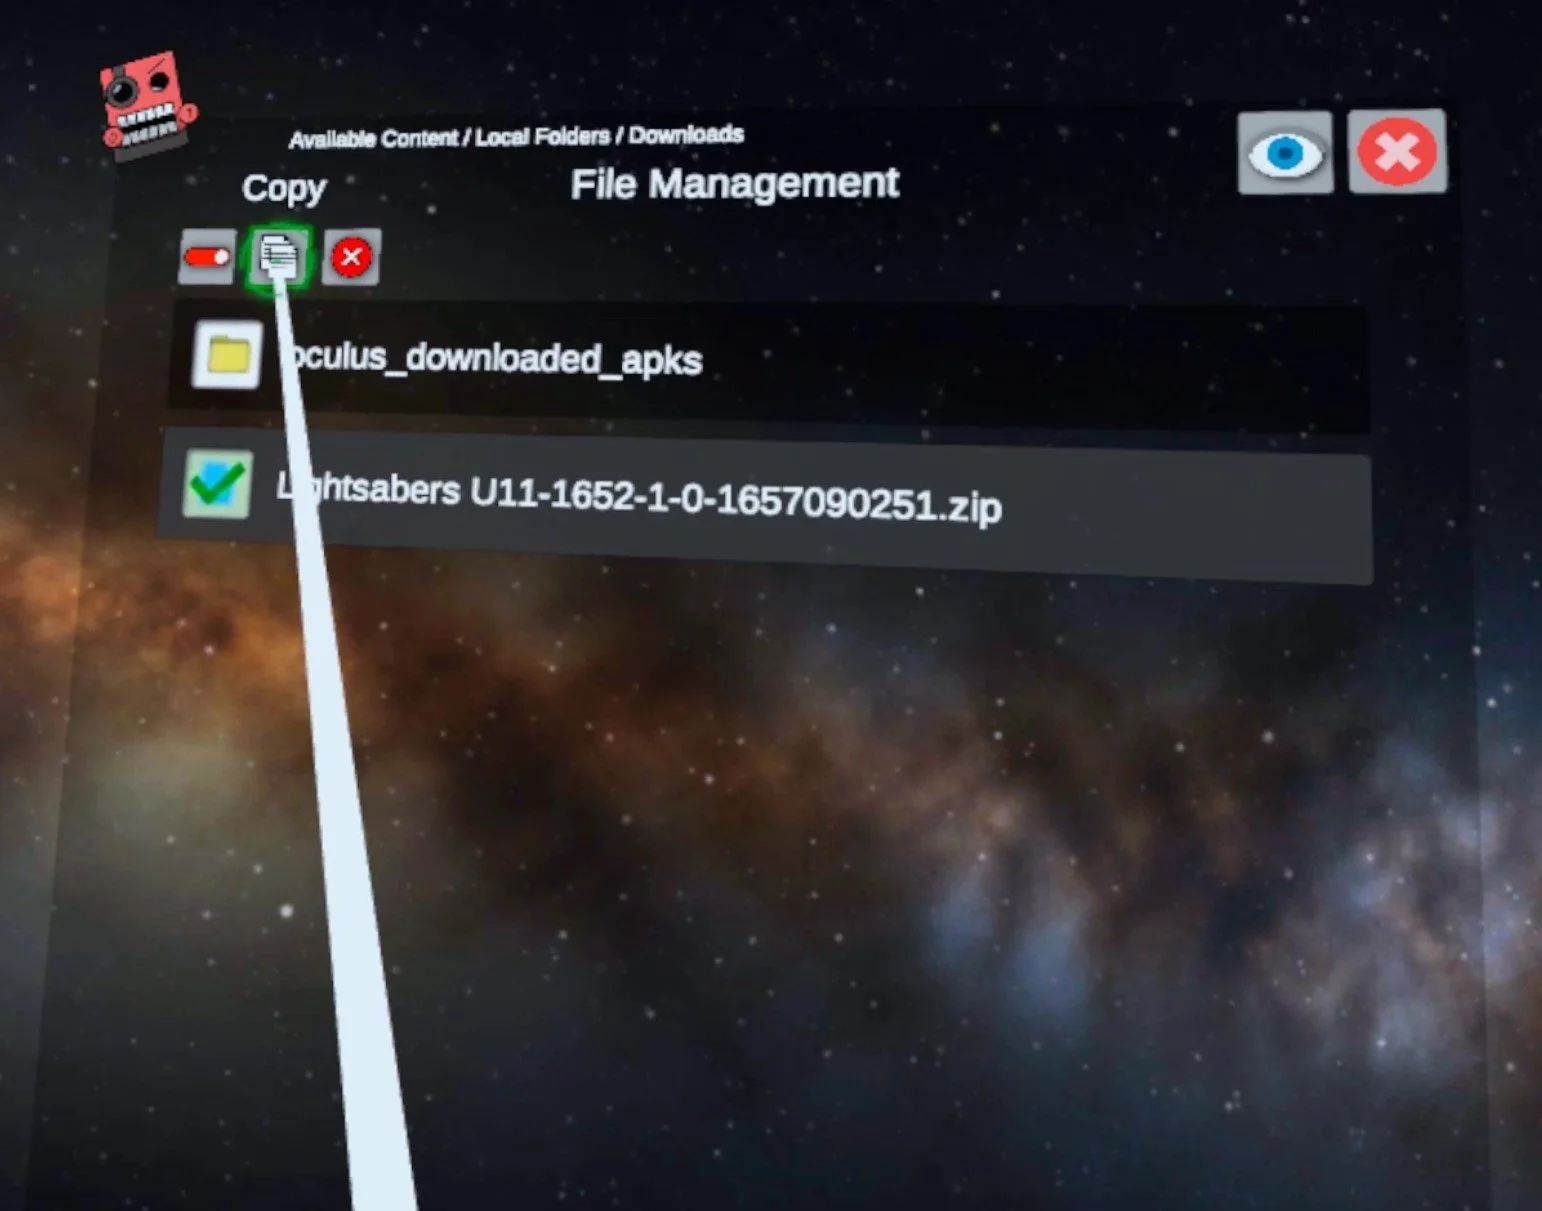
Now that you’re in go to Local Files, and then Downloads. So the File Path at the top of the screen will show Available Content / Local Folders at the top, with the name of the Folder you are in “Download” in big letters below it. This is where the mod you downloaded before ended up.

Now that you can access the .zip folder for your mod, click the blue View/Edit Toggle in the top left corner. Once you hit it you’re given new options to affect the files in the folder you are in. Click the .zip file for your mod. When you do that it will have a green check mark over its file icon. Then hit the copy button in the top left corner (it looks like two sheets of paper). Then click the View/Edit Toggle again, it will be red now.
Now that you’ve copied the mod file and exited View/Edit mode, hit the Arrow pointing upwards in the top left corner, you’ll see text saying “Previous Folder” when your pointer is over it. Do this twice, so you’re back in “Local Folders” where you started. Now go to “All Folders” at the top, and you’ll be shown all of the Folders of files in your Oculus device.
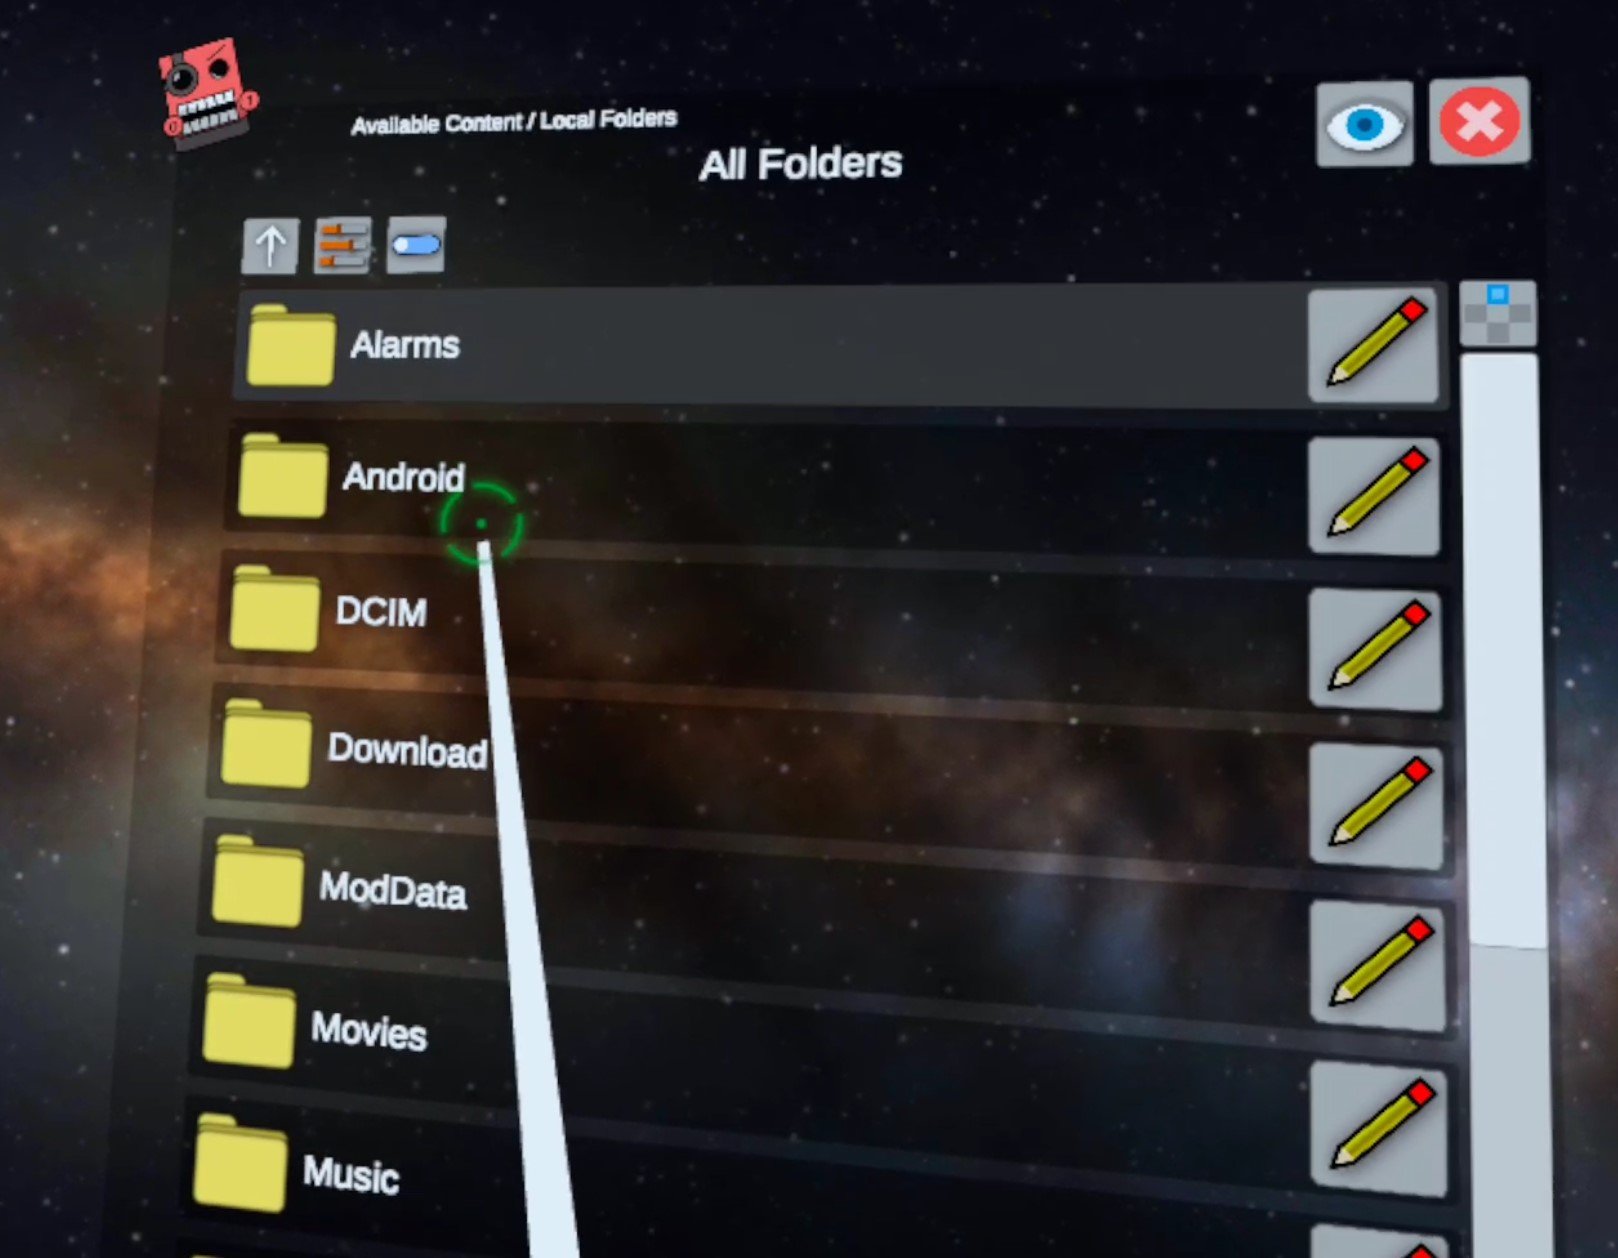
Luckily what we’re looking for will be at the top again, go to “Android” then “data” and you’ll now have a list of every installed application on your Meta Quest 2. Scroll around until you find the “com.Warpfrog.BladeAndSorcery” folder and select it.

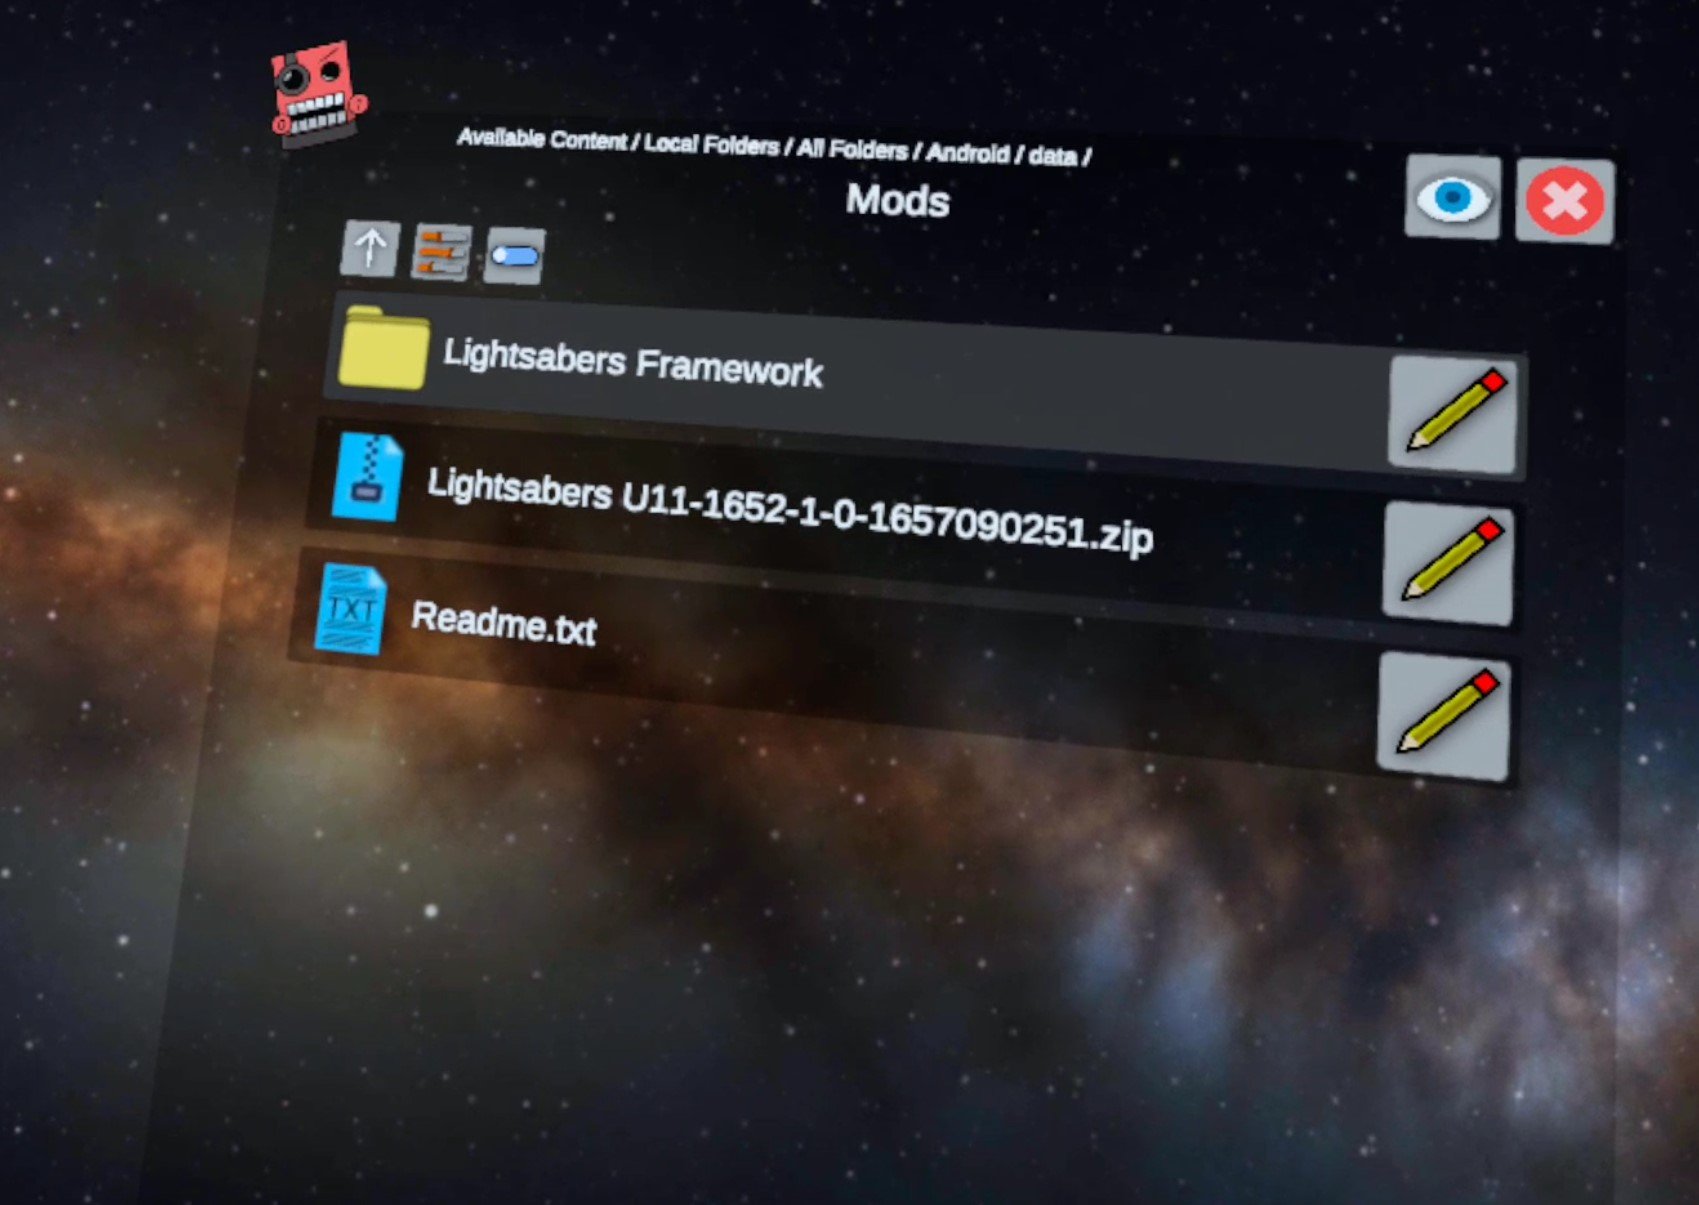
When you’re in the Blade And Sorcery folder, finally go to “files” and then “Mods” which will bring you to your destination, the folder we’ll need to extract our Blade and Sorcery: Nomad Mods to. If you’ve never installed a mod before it will only have a Readme.txt file in it.

All that’s left to do is paste your copied mod folder here and unzip it. So hit the blue View/Edit Toggle in the top left again and select the Paste (Move) button that looks like a clipboard with a piece of paper that has a pair of scissors drawn on it. A green checkmark button with “Finished” beside it will appear, press that too. Hit the View/Edit Toggle to exit View/Edit mode. Now you’ve moved your .zip Blade & Sorcery: Nomad Mod into the Blade & Sorcery: Nomad mod folder!

Now that the .zip is where you want it to be, just click on it’s file icon (no need to hit the View/Edit Toggle) then select the new “Extract Files” button that shows up. After a brief wait it will say “Files Extracted” then click the Okay button that appears beneath it. You should now see a regular folder for your mod in this folder.
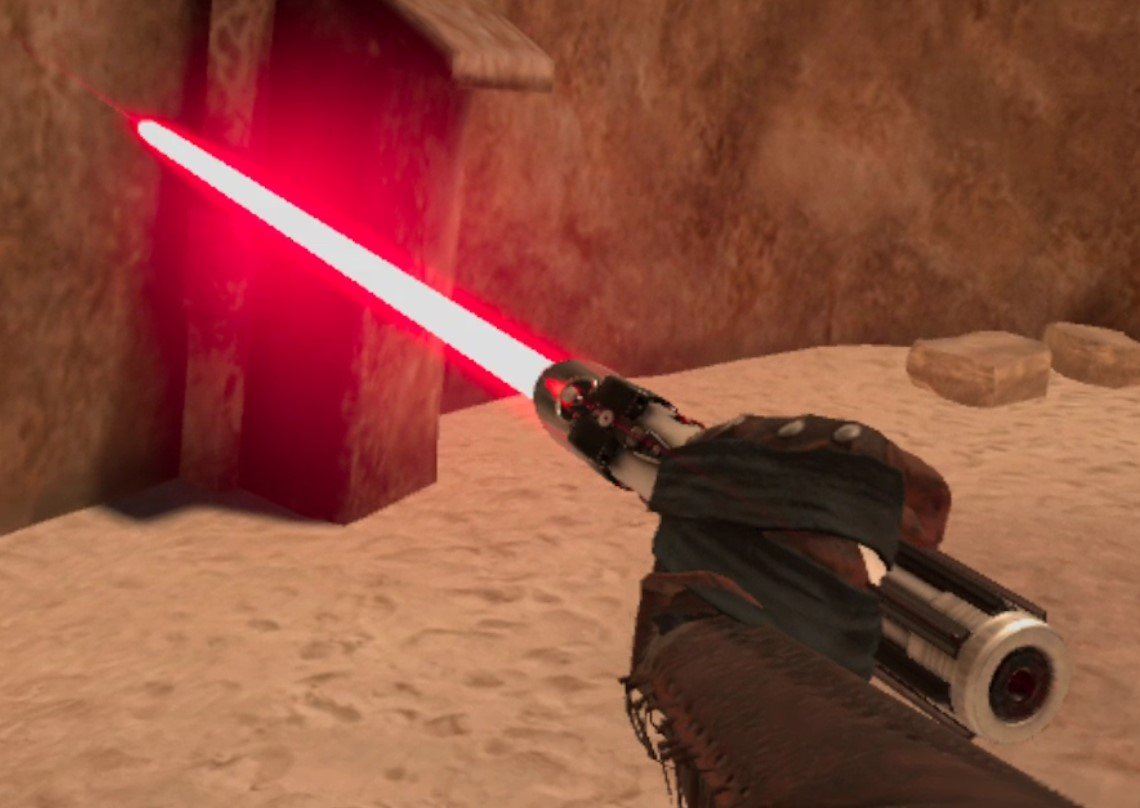
Congratulations! Your mod is now successfully installed. Exit out of Mobile VR Station and go to Blade and Sorcery: Nomad to check it out. In the game we can confirm that the lightsaber mod is installed successfully by starting a Sandbox game and checking the book that you spawn weapons from for a new category.

From here we can spawn our new Lightsabers and go to town with them. Of course other types of mods may appear elsewhere, like the Enemy spawning book or the Map Menu, depending on what type of mod it is.
Hopefully this helps you enjoy Blade and Sorcery: Nomad Mods more conveniently since you won’t need to chain your Quest 2 to a PC to download and install them. Have fun out there!
All Classes In The Light Brigade VR and How To Unlock Them
The Light Brigade VR is a fantastic game that gives you a lot of class options that give you a ton of interesting ways to play and win. Each class comes with different weapons and passive bonuses which can appeal to different playstyles, so be sure to try them all. If you want to find out more about the classes that are available to you in The Light Brigade and how to unlock them then this is the place.
The Light Brigade VR is a fantastic game that gives you a lot of class options that give you a ton of interesting ways to play and win.
Each class comes with different weapons and passive bonuses which can appeal to different playstyles, so be sure to try them all. If you want to find out more about the classes that are available to you in The Light Brigade and how to unlock them then this is the place.
Rifleman

The Rifleman Class Loadout
The Rifleman is the class that you start with first in The Light Brigade. It’s very solid, and with a little luck and some VR shooting skills you can definitely complete a full run on your first try using the Rifleman.
Still, you should definitely try other classes once you defeat Altair for the first time and unlock the Scout and Pistolier.
The Rifleman’s Gewehr 43 is semi-automatic, but has a magazine carrying 10 rounds and is easy to reload. It’s effective at long ranges and deals great damage per hit.
Still, you won’t be one shotting even basic enemies unless you get a headshot, and the extreme recoil of the Gewehr 43 means that you have to take a moment to line up the rifle again before reliably hitting a follow-up shot.

Firing the Gewehr 43
The Rifleman doesn’t start with a pistol, though all later classes will, so you should get a Pistol as soon as possible in case you run out of rounds in your rifle and have an enemy in your face.
The Rifleman’s headshot damage bonus means that if you can reliably hit headshots consistently it will have the best damage output of all classes by far. That is, if you hit your headshots.
Scout

The Scout Class Loadout
The Scout is unlocked by getting the Rifleman class to level 5. The Scout is great because it not only gives you access to your first fully Automatic weapon, but also comes with a Pistol right off the bat.
The Scout does solid damage, though the M3 “Grease Gun” Submachine Gun has a pretty sharp damage falloff at longer ranges. Still, this is a very good class if you can learn to control the recoil of its main weapon and consistently land hits from close range.

Checking out the M3 SMG
Having to completely empty the Scout’s Mauser pistol before reloading it is a little annoying, but for a sidearm the Mauser deals great damage and is extremely accurate.
The Scout is a solid short range counterpart to the Rifleman. If you want to play more aggressively, teleporting closer and closer to your enemies before blasting away at close range, then the Scout is a great class for that.
The more hits you land, the more likely you will be able to take advantage of this class’s sweet Critical Hit bonus.
Pistolier

The Pistolier class loadout
The Pistolier is unlocked by attaining level 5 with the Scout class. The Pistolier is the ultimate short ranged class with two Colt 1911 pistols in two different holsters on either side of your belt.
The Pistolier also has two ammo pouches, though the biggest drawback of this class is that it only gives you two pouches to hold items in. That’s what keeps the Pistoleer from being a potentially great class for the ambidextrous.

Dual Colt 1911 pistols are pretty awesome
If you can hit shots with both pistols at the same time the Pistolier does some serious damage, but otherwise it can be very hard to aim with your non dominant hand, so the advantage of having two pistols is offset hard by the lack of a longer ranged firearm and being limited to two item slots.
It’s a lot of fun for a little while though.
Assault

The Assault Class Loadout
After defeating Agnes to rescue Prudence and getting the Pistoleer to level 5 you unlock the Assault Class.
The Assault class is fantastic, and is one of the strongest in the game. Depending on your personal preference it might be the strongest overall.
The STG assault rifle that comes with this class can be effective at the same ranges as the Rifleman class, but is also fully automatic. The recoil is very forgiving too, meaning that you can keep hitting your target when firing fully automatic much more easily than with other classes like the Scout class.

The STG 44 is very effective
If you want more firepower at range, but less accuracy than the Rifleman, the Assault class is a very solid choice because it performs well at long and close ranges.
The Health Bonus this class receives also makes it more survivable than others, though the lack of any damage bonuses means that you might not have the damage potential that other classes do. Still, as far as reliable damage goes the Assault is a great class.
Militia

The Militia Class Loadout
The Militia class is unlocked by defeating Duncan and completing a run as well as Getting the Assault Class to Level 5. The Militia class might not seem very strong due to the Volkssturmgewehr VG-5 that is its primary weapon.
This gun doesn’t do well at range and also isn’t automatic, though it’s low recoil means you can still fire it pretty quickly semi automatically.

The Volksturmgewehr VG-5 looks very cool
What makes the Militia class great is its special ability that passively increases the rarity of all loot. Getting health upgrades and weapon attachments is never easier than when you’re using the Militia class.
You’ll often also end up with more money than you can even spend near the end of a run.
Whether this makes up for its middling primary weapon is up to you. Though the Militia class also gets a great secondary weapon with the Colt 1911 pistol, though that also is not great at medium to long ranges.
Sniper

The Sniper Class Loadout
The Sniper class is unlocked by defeating Duncan and completing a run as well as getting the Militia class to level 10. The Sniper class does exactly what it says on the box, gives you the ability to snipe with its Karabiner 98k rifle.
This bolt action rifle does the most damage per shot in the game and is effective at all ranges. You can easily one shot lesser enemies if you hit them in the body or head with this baby.

The Karabiner 98k is extremely powerful
Combining the Power Field wand that this class can start with also gives you a lot of extra damage to take down opponents with a lot of armor and health, because the Power Field increases the damage of all bullets that you shoot through it.
The 1911 is also a great sidearm and does great damage per shot at close range in case enemies get too close.
Of course the Karabiner 98k is a bolt action rifle, so you better be accurate with it and get really good at working the bolt. This is not only the most labor intense weapon in The Light Brigade VR, but also by far the slowest firing by its nature as a bolt action rifle.
Levels with close in fighting and a lot of enemies can be rough as the Sniper, but it’s still a very satisfying class to play for the one shot kills and incredible range.
Breacher

The Breacher Class Loadout
The Breacher class was recently added in the “Memories of War” update and brings a shotgun to the table with the Winchester 1897. If you’ve ever heard of a “Trench Gun” from World War 1 or 2, then that’s exactly what the Breacher gets.
As you might expect from a shotgun, it’s not very good at long ranges, but it is very effective at quickly bringing down enemies at close range. A lot of the weaker opponents you’ll run across will melt in a single shot, and so it’s sort of like a close range sniper rifle.
It also gives a lot of that one shot satisfaction that the sniper rifle does.
Nothing like a shotgun for close encounters
The Winchester 1897 basically fires a lot of little shots, each doing a small amount of damage. So at longer distances a lot of those little buckshots will go off at an odd angle and miss even if you aimed right on target.
Just like the rifleman, the Breacher also gets a headshot damage bonus, which means that aiming for the head is especially useful especially when you’re trying to quickly take out tougher enemies at short range.
The shotgun only holds 7 total rounds, and it is very dangerous to run out of ammunition in the tube during combat.
That’s because you need to take out your shells, load the first round, put the shells back into your ammo pouch, rack the slide, then take the shells back out and load it. So running it completely dry will leave your vulnerable for several seconds.
Of course the Walter P38 sidearm helps to mitigate this risk, and so does the Soul Sphere wand this class gets. It is highly recommended you get the Walter as soon as possible as a backup for emergencies.
Loading the Winchester also takes some getting used to, and has a similar learning curve to learning how to quickly load the Karabiner 98k for the sniper class. A quick tip is to move your hand back and forth over the breach of the gun quickly to load shells as fast as possible.
Overall the Breacher is a fantastic addition to the game, though it can be frustrating to use in zones with wide open spaces. You need to teleport to close distances quickly, and disengage quickly if you run out of shells.
Engineer
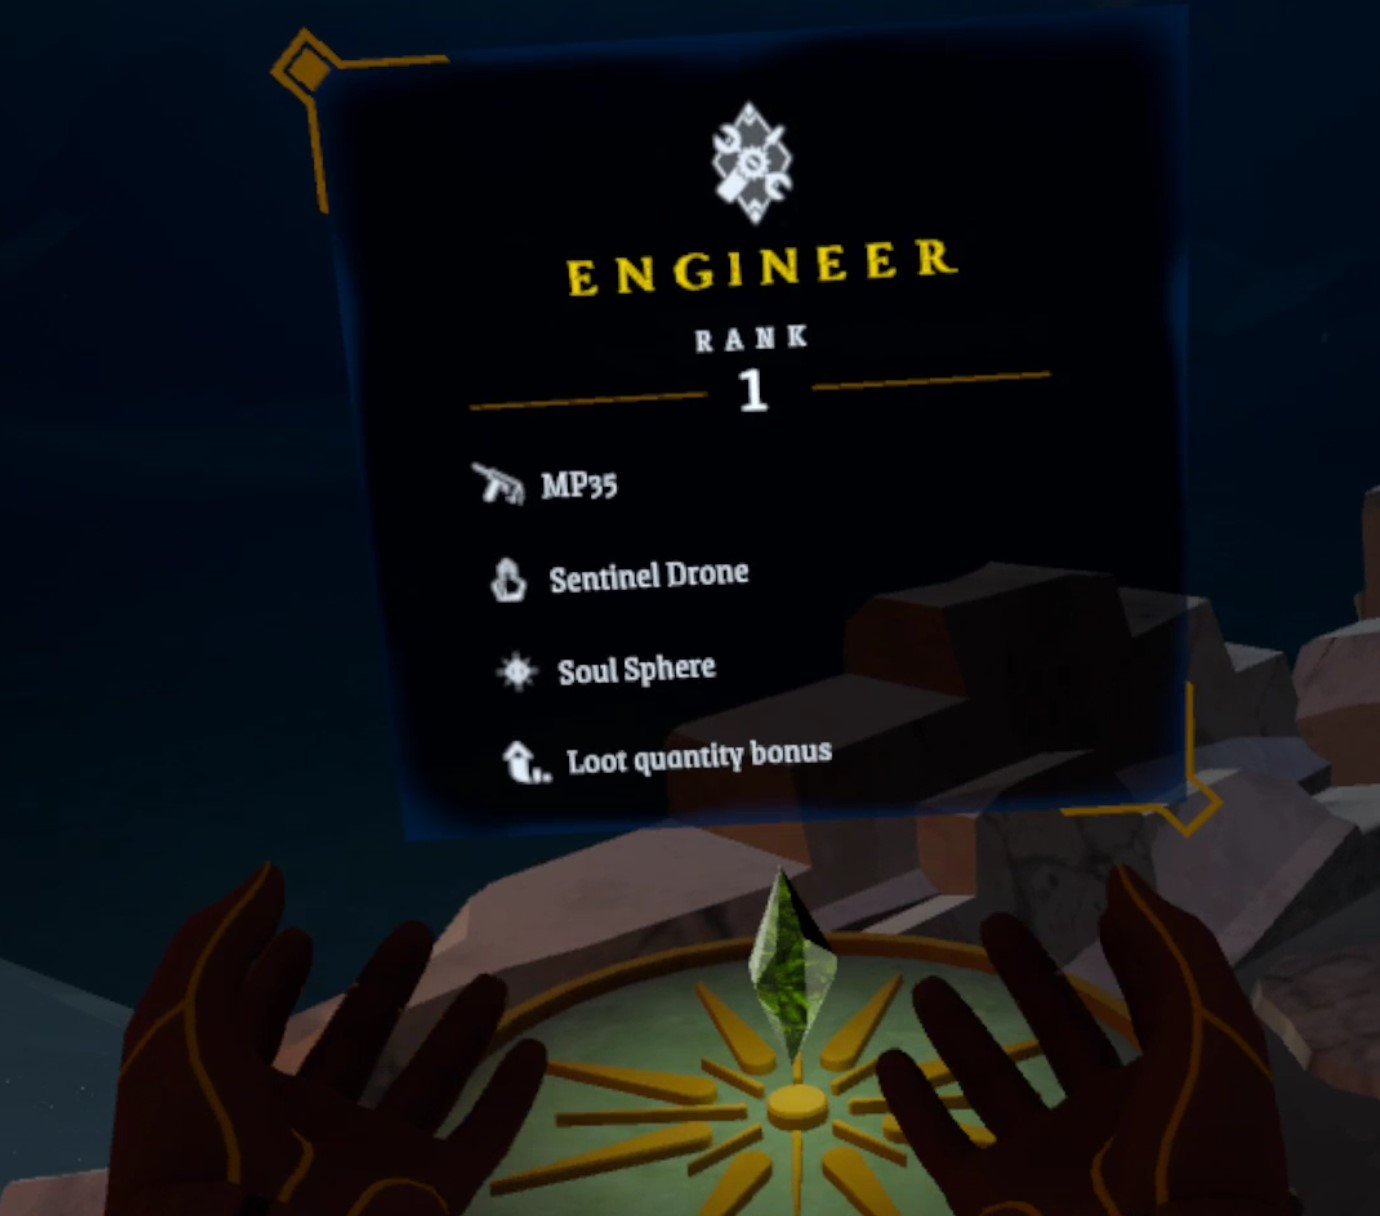
The Engineer Class Loadout
You need to be at least level 5 with the Breacher class to unlock the Engineer. This is another new class added in the “Memories of War” update, and is even more unique than the Breacher class.
While the MP35 is a new weapon and has a funky magazine sticking out of the side that you is designed for you to load with your shooting hand, that isn’t the unique part of this class.

The MP35 is pretty accurate for an SMG
What really stands out for the Engineer is the Sentinel Drone that it gets.
The Sentinel Drone is a completely autonomous little flying metal robot that you control from a joystick attached to your item pouches. It even has a little gun on it.
The drone is invulnerable, but is limited by time. Enemies will shoot at it, but when the yellow bar over the drone runs out it will automatically return to your item belt to recharge.
Still, the Sentinel Drone is a fantastic way to scout for or attack a group of enemies at very little risk to yourself. Though you will still need to see the drone to know where it’s going. It doesn’t have a camera or anything for you to look through.

The Sentinel Drone makes being a coward feel so much fun
The drone’s gun might also seem very difficult to aim at first, but if the drone stays stationary for a moment it will automatically lock on to the closest enemy.
With this ability the Drone actually does pretty good damage. So does the MP35 that the Engineer gets. Though like all SMGs it is better at short range, and this one in particular has slightly higher recoil than most.
The Engineer also has a great Loot Quantity bonus that means they’ll likely end up with a ton of items and gold, especially if you’re willing to clean out every map after clearing it.
So this makes the Engineer a class especially useful for the patient that are willing to loot every nook and cranny for useful items, and wait for their drone to recharge. Getting a lot of useful grenades and healing items means you’ll also have many more to blow through to make challenging fights easier,
Hunter

The Hunter Class Loadout
The Hunter class was added in the “Shadow Hunter Update.”
It’s pretty obvious what makes this class unique in The Light Brigade, the weapons. The hunter’s main weapon is a recurve bow that is silent and powerful.
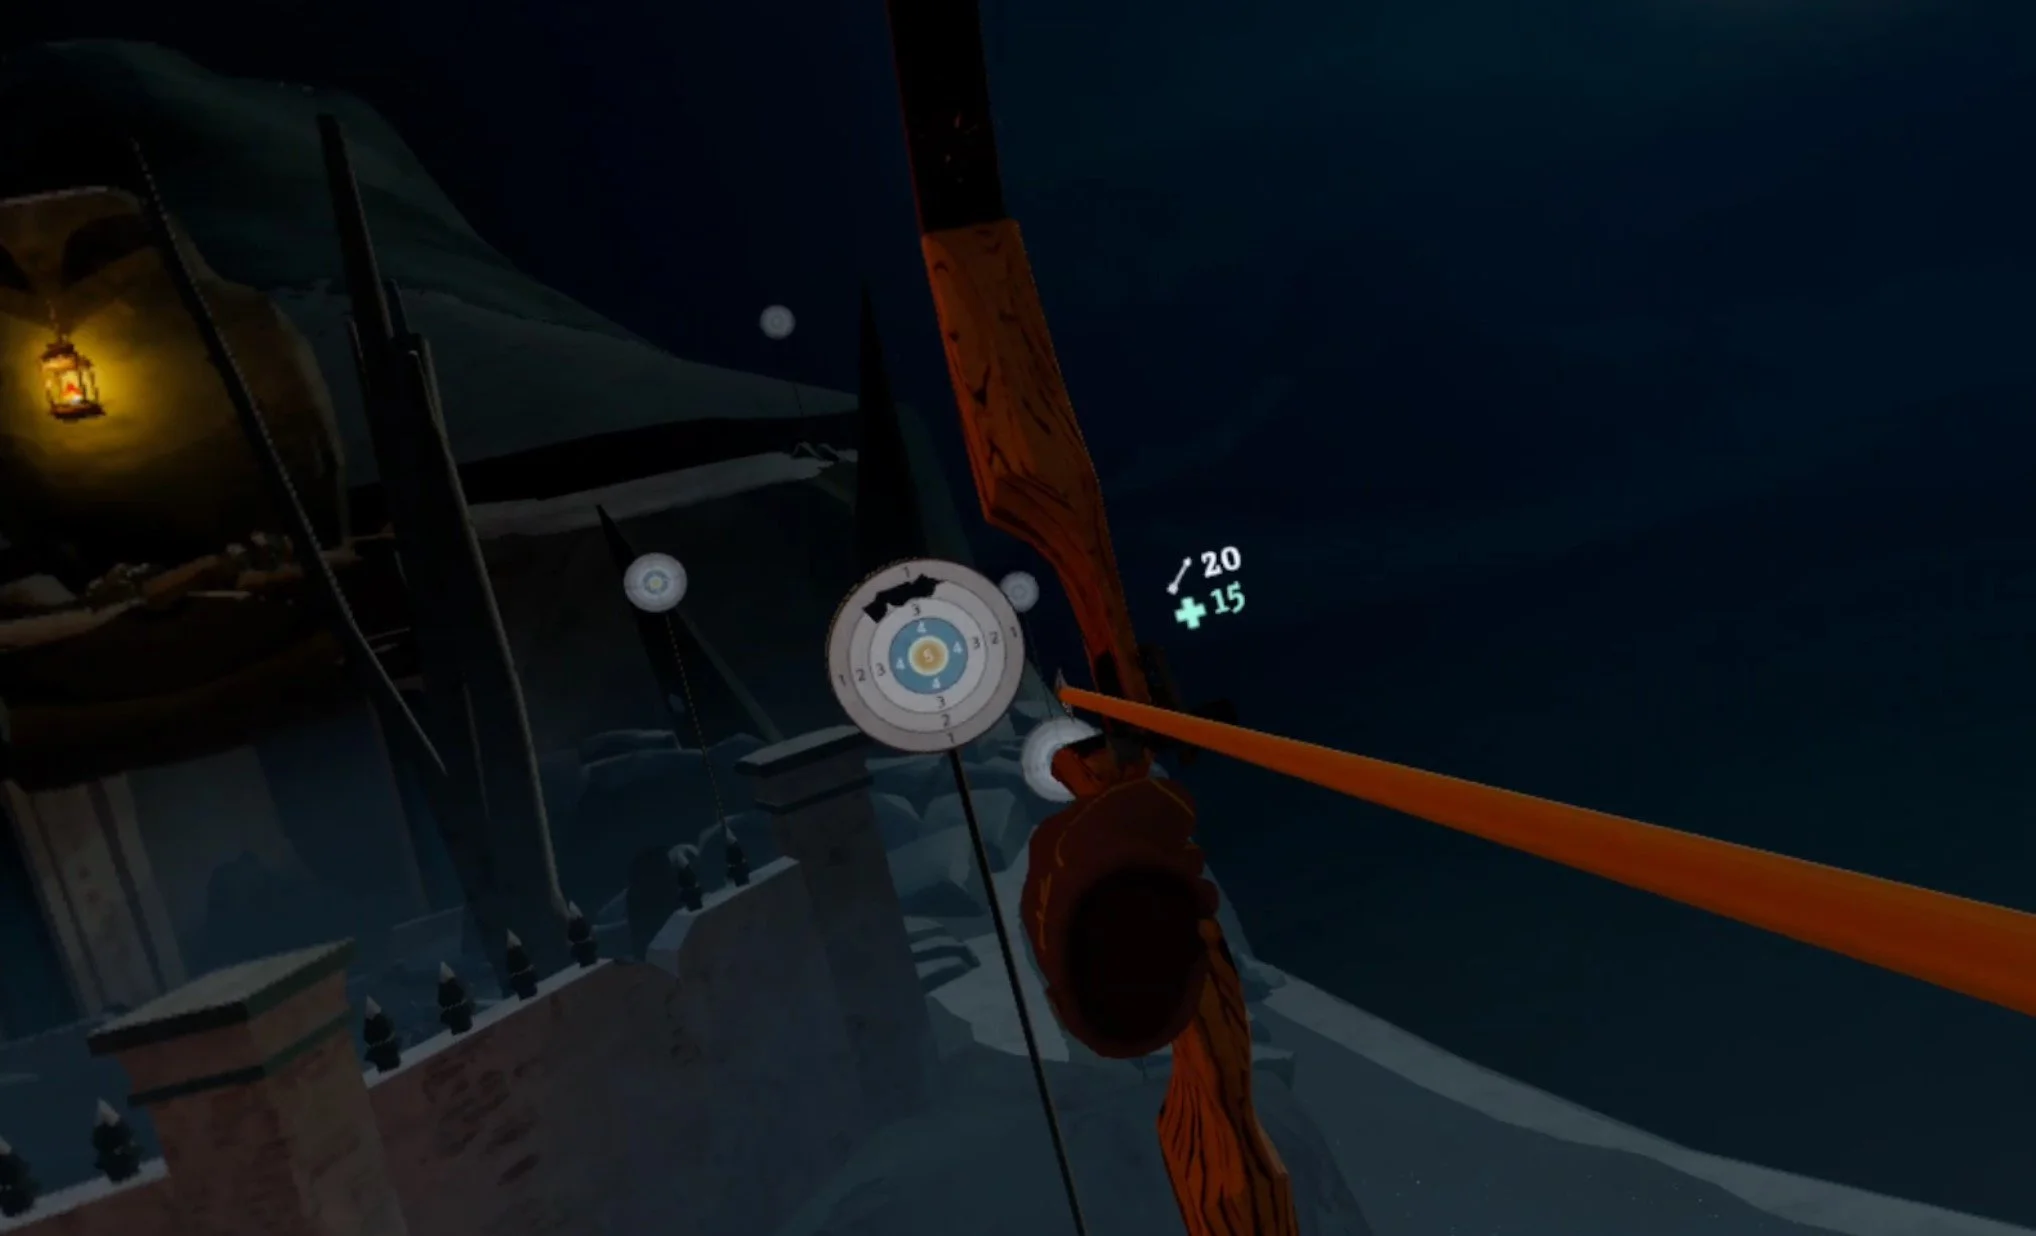
The bow is silent and does great damage
This bow and the accompanying throwing knives that fill in as the Hunter’s backup weapon makes the Hunter class The Light Brigade’s premier stealth option.
Your shots will not immediately attract attention just because they make noise, meaning that the Hunter can silently pick off enemies one by one if they are very careful and don’t get seen.
The bow does tremendous damage per shot, and the throwing knives aren’t bad either at close range. What makes the hunter more difficult is that it loses the benefits of being stealthy during boss fights, but makes up for it with the “Hunter’s Mark” passive ability that makes the Hunter deal more damage with each successively successful hit.
Of course it goes without saying that it is much harder to land your shots with a bow than with a firearm, making the Hunter a much more skill reliant class as far as shooting goes, but a very fun one
There you have it, all classes in The Light Brigade and how to unlock them. Feel free to leave a comment about your favorite class.
All Weapons in Blade and Sorcery: Nomad - Complete Weapon List
Wondering what weapons there are in Blade and Sorcery: Nomad? Well don’t worry, the complete list of all weapons in Blade and Sorcery is right here! This applies for the PC and Quest versions, so whether you use standalone or PCVR all of the weapons are right here.
Wondering what weapons there are in Blade and Sorcery: Nomad? Well don’t worry, the complete list of all weapons in Blade and Sorcery is right here! This applies for the PC and Quest versions, so whether you use standalone or PCVR all of the weapons are right here. Currently this list only applies to the Quest version of the game, but will be updated to reflect the weapons added in the 1.0 Update in the future.
Oh, and there are even a few secret weapons you can find as well.
Table of Contents:
Daggers
Daggers are all little guys, basically just knives or really small swords. If you want to get in close to your enemy and do some quick stabbing, then they’re a great way to Julius Caesar someone.
Common Dagger

Ah, the Common Dagger. Definitely the best dagger option out there (outside of a spicier option in the Exotics section here). If you just want a little blade to do some quick stabs with, or show off with some sweet tricks then this is the greatest option out there. Throw it around, flip it over your hand, whatever you want to do, the Common Dagger is good for it.
Skinning Knife

The Skinning Knife is the Common Daggers less stylish and poor cousin. Sure it can technically do everything the Common Dagger can, but just look at it. Its smaller, which can be a plus, but it’s all rusty and the handle is starting to split. Still if you want to cosplay a crazy person living in the woods this is a fine choice for the aesthetic.
Swords
If you want to do some Medieval style fighting then swords are such a great option. You might picture yourself as a knight valiantly slaying your foes. Put on some Plate Armor too, go crazy. Swords pair really well with Shields, and are overall great at slicing and stabbing all in one package, though the smaller varieties of sword aren’t great at cutting through armor. Still, some of the bigger two handed ones can basically beat an enemy to death in Blade and Sorcery: Nomad.
Antique Great Sword

Want a two handed sword that feels like it’s been sitting on an old mans mantlepiece for a decade? Well the Antique Great Sword definitely gives you that feeling. Its got a really cool crossguard that’s curved outwards, great for catching incoming blows, and is pretty long and heavy, though not the heaviest or longest around. The blade looks rusty and chipped for that “hardly been used in a while” look that you might crave.
Claymore

The Claymore is a classic Scottish weapon used by the Highlanders for generations, and even in times when muskets were the main weapon of choice. In Blade and Sorcery: Nomad this weapon is a great combination of cutting and slashing. Good luck stabbing someone with this thing, but it has a ton of weight to it. Once you get the hang of the Claymore it’s really satisfying to swing around in a wide arc and chop foes in half with. It’s also got a huge and ornate crossguard for defense and style.
Greatsword

The Greatsword is a bit shorter than other two handed swords in Blade & Sorcery, but it is also super heavy. It’s got a pretty bland and straight crossguard, but a really sweet and heavy pommel that can be used in a pinch to smash a scallywag in the face. The biggest upside is not only the huge handle, but also that you can hold it by that piece of leather you can see just above the crossguard, meaning that you can use this two handed beast at closer ranges than others.
Longsword

When you think of a sword from medieval times, you’re probably thinking of the Longsword. It can be held easily it one hand, but for a little more oomph you can use both hands to swing it hard. The blade isn’t as long as that on your typical two handed sword, but its smaller and better for chopping and stabbing. If you want a versatile sword with some heft to it then the Longsword is the perfect balance of all Blade & Sorcery: Nomad sword qualities.
War Sword

The War Sword is the Longsword’s edgier brother. It’s got all the same middle of the road qualities, but has a bit of a cooler and sleeker look with an outwardly curved crossguard. It’s better for stabbing too, and seems a little lighter. If you want a darker and more radical looking Longsword then try out the War Sword.
Reverend Sword

The Reverend Sword can be used with two hands, if you like, and is decent at chopping and not much else. Still it’s got a cool look with its wooden handle, and the lack of a crossguard might fit what look you want to go for in your Blade & Sorcery weapon. Still it’s a solid sword for chaining some sweet slashing attacks that have the weight needed to stun an enemy with force alone.
Antique Sword

The Antique Sword is basically a smaller Reverend Sword. You can’t fit both of your hands on the handle, but it’s much quicker and great for stabbing as well.
Short Sword

The short sword is a great quick stabbing sword. What it lacks in reach it makes up for in being light and able to cut and stab quickly. It’s like a hybrid between the Daggers and swords in Blade and Sorcery: Nomad.
Riding Sword

The Riding Sword has a pretty cool look and a very fancy crossguard, it’s very pointy too. A little smaller than a longsword, a little bigger than a shortsword. It’s definitely got that menacing evil knight feel to it.
Axes
Axes are awesome. They’re the ultimate combination of a blade and bashing capability. They can lob an enemy’s head off and also beat them into submission.
Bardiche

The Bardiche is a sweet two handed weapon in Blade and Sorcery: Nomad. It has a huge blade so it’s not as easy to miss your target as with other two handed axes, though it has more weight to it and is slow to swing around. It’s not as cool as a halberd would be, but as far as European polearms from medieval times, it’s a solid substitude.
Northern Axe

If you want to cosplay an angry viking with a two handed axe then here’s your chance. While it can be easy to miss an enemy and hit them with the haft of this axe if they get to close, you can always just jab them with the top of it to get some distance. The blade might not be as big as the Bardiche’s, but the Northern Axe can still generate a lot of power.
Old Lumber Axe

Want all the two handed axe fun of a northern axe but with the beaten up look of an old farm implement? Then try out the Old Lumber Axe. It’s got the rusted blade and dirty handle look that a lot of Blade & Sorcery weapons love to lean into, and is great for chopping wood and skulls.
Axe

Intended for use with one hand, the axe is just what it says on the label, a pretty basic axe. The axiest of the axes. Hold one of these in each hand and have fun wailing around like a Viking Berserker. You might not notice if you’re actually cutting your opponent or beating them down, but either way it’s a ton of fun.
Hatchet

The Hatchet is basically a baby axe, and doesn’t have a whole lot of weight to it. Still the hatchet is great for throwing and is the easiest to throw out of all the axes because of its lightness and small size. The hatchet is also great if you want to challenge yourself with a tiny weapon. Overall it’s very weak to actually swing, but look at how cute and tiny it is.
War Axe

The war axe isn’t necessarily a two handed weapon, but it can be. A bigger and fancier version of the regular axe, the war axe adds an extra level of fun with the spike on the back. So you can reverse it and try using that side for a little stabbing action. Overall a great combination of weight and speed.
Spears
Want to poke your enemy and not let them get too close in the process? Then spears are the weapons for you. Historically the best and cheapest weapon to arm a mob of peasants with, you can now prove that spears are for great warrior sorcerers too.
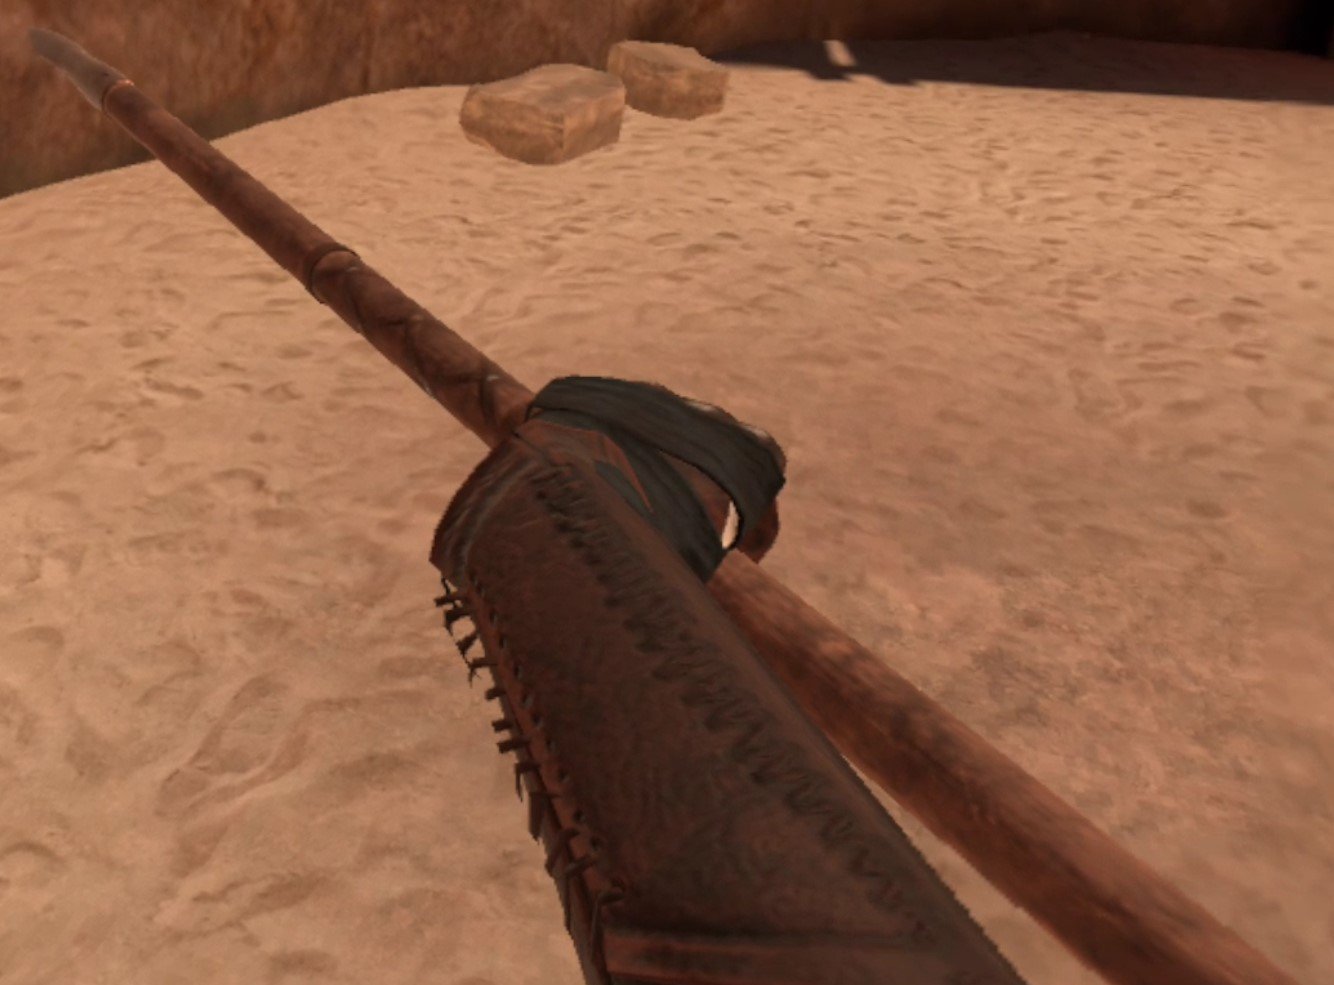
Boar Spear

Currently the longest and pokiest spear available without mods, the Boar Spear is very sharp on the tip, and is even heavy enough to give someone a decent whack with the handle if you put enough strength into it. It even has two little knobs near the top so that a shiskebabed opponent doesn’t slide up the haft of it.
Javelin
Want to be a Spartan? Maybe a Roman Legionnaire? Well the Javelin is your classic throwing weapon made famous during the Ancient Ages of antiquity. It throws incredibly well, and can also serve as a great short stabbing weapon that is very light and can be pulled back for another stab quickly.
Blunt
Ah Blunt weapons, the simplest of all. Get a stick, put a heavy thing on one end of it, and swing it with all your might to literally crush the enemy. Especially great against armored opponents, and a great way to let off some steam on some Blade and Sorcery enemies after you’ve had a bad day. These weapons generate enough power to send an enemy literally flying if you hit them right.
Mallet

The mallet is made entirely of wood and is basically a huge Looney Tune weapon. While there might not be a way to mod Tom and Jerry into Blade and Sorcery: Nomad just yet, you can get some very satisfying bonking in with this piece of wood on a stick.
Maul

The Maul is the Mallet but bigger, more metallic, and heavier. Think a sledgehammer that’s meant for people instead of concrete. If you really want to bash something with a piece of heavy metal on a stick then the Maul delivers in a way that the Mallet can’t compare to. Since the top of it is kind of small it can be easy to accidentally hit an enemy with the haft of the Maul instead of the business end, but it’s still a ton of fun. You’ll be swinging it slowly though, because it’s heavy.
Flanged Warmace

The Flanged Warmace is the two handed flanged mace, and while it’s super heavy and slow to swing it generates a ton of power, and even cuts and pierces enemies if it hits flesh. That’s because the “flanged” parts of this weapon on the head of it are sharp and can cut, though the main damage from this mace comes from the force generated by swinging it and crushing.
Blacksmith Hammer

The Blacksmith Hammer is tiny, and doesn’t generate a ton of force on impact compared to bigger maces, but it’s also got that rusted tool aesthetic that Blade and Sorcery loves. It’s hilarious to throw at something, but not very effective, and can be swung incredibly quickly for a blunt weapon.
Trench Mace

The Trench Mace has got some knobs at the top, but it’s really more of a piece of metal on a stick. It’s really effective for quick bashing strikes though, and two handing these is very fun because you can whirlwind attack with both really quickly. For such a small weapon it’s very easy to knock an opponent off their feet with it.
Flanged Mace

The Flanged Mace is the little brother of the Flanged Warmace, that can be lifted and swung with one hand. It’s got the metal for bashing and the flanges for cutting. While it’s a bit slower than other one handed maces it hits the hardest out of all of them and is super satisfying to use. Not even shields are protection from this thing.
Rock

The Rock is possibly the oldest weapon known to humans, and is just as effective as when tool use was first invented. It can also be thrown, but don’t expect to do more than stun an opponent doing that. If you really want to get in touch with your primitive hunter gatherer side you can also beat an opponent down with it.
Exotics
Exotics are an odd collection of weapons that kind of fit in other categories, but the good people over at Warpfrog decided to put in it’s own category. A lot aren’t necessarily from the European medieval period in history like the others here, but they’re all very cool.
Dual Bladed Staff

Ah the Dual Bladed staff, the best way to act like Darth Maul in Blade & Sorcery. It’s a sweet weapon, with both ends being great for slashing and stabbing. It’s also light and easy to twirl around. Just like the Javelin it can even be thrown, and throws pretty well. This is an artist’s weapon.
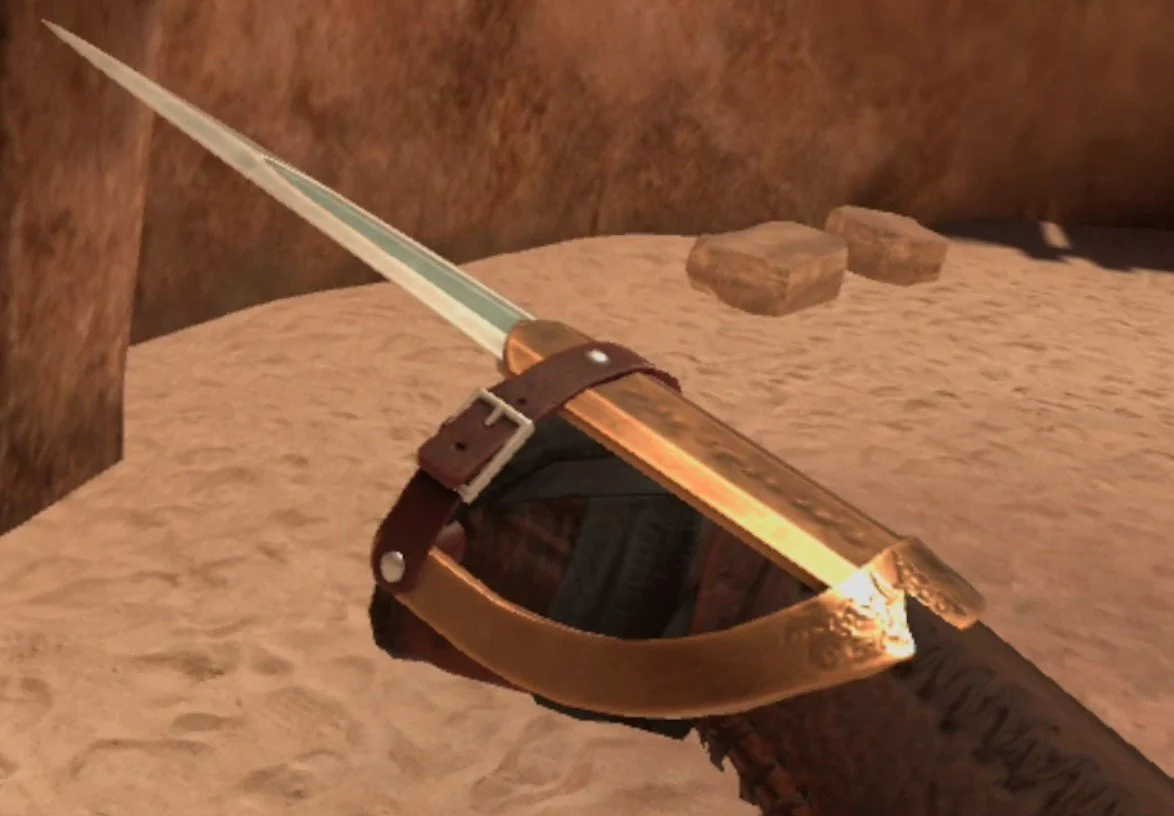
Rapier

The Rapier is the ultimate stabbing weapon in Blade & Sorcery. It can block incoming attacks and weave in and out of your opponent’s guard to deliver a quick poke. It goes really well when combined with lightning, because then you can easily electrocute your opponent with the tip and then stab them for the kill. If you want to feel like a dueling aristocrat then there’s nothing better than a rapier.
Wrist Blade
If you’re an Assassin’s Creed fan then you’ll love the wrist blade. It’s basically like lethally punching an enemy, and it fits so snugly in your hand. Something truly unique and fun, it will enhance your fists of fury to be truly deadly.
Bow
The bow is a bow, it shoots arrows. What’s a VR combat game without a bow? They’re practically required by this point and Blade & Sorcery: Nomad is no exception. You’ll need a quiver in one of your body slots to draw arrows from, and each quiver holds 50. The arrows are solid and so is the bow. It can even block some attacks if you manage to get it between a blade and your face. Arrow physics is very good in Blade & Sorcery, so if you want to be an archer that’s totally viable.

Staves
Staves don’t seem like much other than a really fancy bonking stick. Well they’re really more like Gandalf’s staff, because when you imbue them with magic you can use that magic with the staves. Imbued with fire it can shoot fireballs! Also if you hit an enemy with either end of the staff it will reproduce the effect. You can even do the old “You shall not pass” trick by applying gravity magic to your staff and slamming the bottom end of it into the ground.
Druidic Staff

The Druidic staff is the most basic staff, and you’ll find sorcerer enemies using it. It looks pretty cool, very Lord of the Rings. As far as staves go there’s really not much of a difference between them.
Shaman Staff

The Shaman staff shows as tier 2… but it’s really no better or worse than the Druidic staff. It does look a lot simpler though, so if you want that home grown Hedge Wizard that just picked up a stick and started doing magic with it look, here you go.
Shields
Shields are great. You can use them to defend yourself, so maybe they’re not technically weapons, but they’re also awesome at bashing an opponent (it really helps if you put your shoulder into it) and putting them off guard so you can strike with your weapon in another hand. If you’re really wild you can always have a shield in both hands and really flail around with them like they’re blunt weapons.
Buckler

There’s a hilariously tiny weapon in each of these categories, and even though shields aren’t technically weapons, they’re no different. The Buckler is small, even cute, and made entirely of metal. If you’re really skilled though, you can easily block blows with this small shield, because it’s extremely easy to move around quickly. Your character will hold it so that it comes right out of their fist, and so you can basically just punch with this shield in hand for some extra power. Bucklers are a lot more fun and versatile than they seem.
Kite Shield

Playing it safe? Want a big shield to stay between you and your opponent? Well then the Kite Shield is for you. It’s a long kind of diamond shape that you can lift up to protect your whole head and upper body, but also has a long tapered bottom that you can use to block blows to your lower body and feet. This is the ultimate medieval knight shield in Blade and Sorcery: Nomad.
Round Shield

The round shield isn’t as little as the buckler, but isn’t as heavy and unwieldly as the Kite Shield. It’s a perfect balance between the two, and has kind of a viking look to it. Combines very well with the axe.
Torch
Finally we have the Torch. It’s under the “Utility” category, and sure is basically a utility item, but once you light it up it’s actually great for trolling an enemy by hitting them with the hot end.

There are all of the weapons in Blade & Sorcery: Nomad. If you’ve got more weapons you’d like to see the developers add, leave a comment about it. If you have any weapon mods you’d like to recommend, or mods in general for Blade & Sorcery, feel free to mention that too.