


The 5 Best VR Drumming Games For Quest PCVR and PSVR
If you feel the urge to hit things to create music then you’ll be excited to hear that those things don’t actually have to be physical anymore.
So if you’re an experienced drummer looking for new ways to play your favorite instrument, someone looking to practice and learn how to drum better, or just want to have some fun with some drums, here are the Best VR Drumming games out there.
If you feel the urge to hit things to create music then you’ll be excited to hear that those things don’t actually have to be physical anymore.
Yep, you don’t have to worry about wearing out your drumheads because there are a ton of fantastic VR Drumming Games that you can play to have the same fun you could with a physical set of drums, but in Virtual Reality! Just like all sorts of VR music games, there are some great options for playing the drums in VR.
This is even better because actual drums or drum sets are huge and expensive. Now with just a VR headset like the Oculus Quest 3 or 2 you can have fun playing percussion in a variety of ways in any of these fun and engaging VR games.
So if you’re an experienced drummer looking for new ways to play your favorite instrument, someone looking to practice and learn how to drum better, or just want to have some fun with some drums, here are the Best VR Drumming games out there.
All of these games are available for the Oculus Quest, most are available on Steam for PCVR, and the last two on this list, Ragnarock and Drum Rock are available for PSVR. Each game will have its platforms noted at the bottom of their respective sections.
Smash Drums - A Guitar Hero VR Drumming Experience

The Smash Drums Logo
Remember the Guitar Hero drum set? Well if you were lucky enough to have one you’ve probably got fond memories of hitting it to the beat of the notes on screen.
Well now you don’t need to invest the money and space into having a plastic drum set in your house to experience Guitar Hero drumming like you used to have to.
Now with the VR Drum Game Smash Drums you can get the same sort of experience, but with just a VR headset.

Smash Drums is just like Guitar Hero drumming in VR
Smash Drums is a guided VR Drum experience that shows you the notes as they come at you. All you have to do is hit the correct piece of your drum set to match the notes as they reach the end of the bar, just like Guitar Hero!
There’s a ton of songs and levels to try, with different difficulty modes, so you can jam out to any number of amazing songs and feel like a real rock star on the drums. Smash Drums also has different game modes and a scoring system that will make you always want to beat your last streak and perfect your playing.
For the casual VR drummer that wants to feel like a master on a modern drum set Smash Drums is a ton of fun and feels as satisfying as ever in Virtual Reality when you keep the beat and hit those notes just right.
Smash Drums however, is only available on the Meta Quest platform.
Taiko Frenzy - Traditional Japanese VR Drumming

The Taiko Frenzy Logo
Taiko Frenzy is another very fun VR Drumming game with a classic twist on it, and some very fun vibes inspired by traditional Japanese culture and modern Japanese arcade games.
That’s because in this game you don’t play a drum set, instead you play a Taiko, which is the word for “drum” in Japanese and also refers to the drums used by the Japanese for centuries.
Taiko Frenzy is entirely about playing the Taiko, a single huge one right in front of you. You might think at first that just hitting a single drum wouldn’t be very hard, but Taiko Frenzy actually has a lot of different ways for you to hit the Taiko in order to match the notes that roll down it towards you.

Playing the Taiko in Virtual Reality is a ton of fun
You hit the drum head, sure, but just like when played by a professional you hit the Taiko on the sides as well to produce a different sound, kind of like hitting a wood block. Some notes need to be hit harder than others, and sometimes you have to do a drum roll for a while. It’s surprisingly difficult.
As you play there are other instruments joining you in the song as well, and if you love traditional Japanese music then you will absolutely love the way this game sounds. Taiko Frenzy is a unique and cultured take on the VR Drum Game genre, and is easy to learn but hard to master.
Taiko Frenzy is available on the Meta Quest platform, and soon from the time of writing will be available on Steam for PCVR.
Paradiddle - A VR Drumming Simulation

The Paradiddle Logo
For those who want less of a VR Drumming Game and more of a VR Drum Simulation, then Paradiddle is exactly what you are looking for.
Paradiddle aims to be less of a game than a way to learn and practice how to drum on a drum set for real in Virtual Reality. While using VR does lack some of the physical sensation of actually hitting a drumhead with an actual drum stick, Paradiddle gives you everything else you could want when practicing the drums.
You can set up your drum kit any way you like in VR within a number of virtual spaces. You can even drum in your actual real life surroundings by using the Mixed Reality mode. Put a drum set anywhere in your house that you want and have at it!

Some Paradiddle gameplay of a cover of the song Chop Suey! Check out the whole song on their youtube channel.
There are even lessons if you’re out of practice or just starting out. So Paradiddle is a great way to learn how to play the drums in VR. You can even customize your drums with different layouts and pieces of equipment. All without having to spend hundreds to figure out just how you like your setup.
While Virtual Reality does have its limitations (for instance using the base drum without your feet being tracked) Paradiddle is the closest to a real VR Drumming experience as you can get in Virtual Reality.
The game even has a library of songs that can play as you drum to them, making you feel like a part of an actual band, or giving great practice for covering those songs with one. So if you want to learn how to drum or want a great and easy way to practice drumming wherever you are with your VR headset, Paradiddle is an unmatched VR Drumming simulator.
Paradiddle is available on the Meta Quest store and Steam for PCVR.
Ragnarock - VR Viking Longship Drumming

The Ragnarock Logo
Ragnarock is another unique take on a VR Drumming Game, and a very cool looking one too.
Imagine this. You’re at the helm of a Viking Longship. In front of you are all of your crewmates, rowing and rowing as the ship glides down a river through caves, forests, and ancient ruins. There are four drums in front of you in a line, and there is a hammer in both of your hands.
Runes fly towards you over your crewmates’ heads, and just as they reach one of the four drums you smack it with a hammer. That’s the essence of playing Ragnarock, and while it sounds very simple it is extremely fun.

Sailing through a spooky forest while drumming looks and feels great in Ragnarock
Rocking out and hitting your drums as the ship cruises past the varied and beautiful landscape is a ton of fun in Ragnarock. Not to mention the fun selection of music you can rock out to.
While as the name implies Ragnarock is focused on rock, hard rock, and heavy metal type of tracks, those are the perfect genres of music for intensely smashing those four drums as you cruise along.
Ragnarock is probably the easiest to learn of any of these games, it’s downright intuitive, but it is still extremely fun and quick to get into if you want a way to quickly hit some drums and play a song. Like all drumming games it is pretty intense, but Ragnarock is so much so that it’s practically a Virtual Reality workout when you play it on higher difficulties.
So if you’ve ever wanted to be the drummer on a Viking longship, or just want to cruise your way to Valhalla while drumming your heart out, give Ragnarock a look, it’s a fun time.
Ragnarock is available for the Meta Quest, on Steam for PCVR, and on Playstation VR.
Drums Rock - A Heavy Metal Take On A VR Guitar Hero Drumming Game

The Drums Rock
Drums Rock is another Guitar Hero inspired VR drumming game like Smash Drums is.
The concept is largely the same. You’ve got your drum set in front of you, and hit you hit the right piece as its note flies towards you except… these aren’t normal notes.
They don’t look like what you might expect from a Guitar Hero style drumming game at all, they’re more like little Imps or demons. Oh, and you’re not drumming in a room or on a stage. You’re drumming on a lake of fire in this VR Drum game.

Drums Rock is a very interesting looking VR Drumming Game
The look of Drums Rock is definitely much wilder and more creative, and it plays just as well, with maybe a little more leeway on the timing of hit notes. It is also available on PSVR 1 and 2. So if you’re looking for a great Guitar Hero drumming experience on the Playstation VR platform then this is it.
Drums Rock also has a very wide selection of songs, some of which you won’t find elsewhere. While the look might be very heavy metal inspired, you’ll find that the songs are largely rock or even pop.
Though the number one thing that makes Drums Rock stand out is its ability to let you add custom songs. So if you’ve got some particular songs in mind that you’d like to try then this is the game for you.
Drums Rock is available on the Meta Quest, Steam for PCVR, and Playstation VR platforms.
Well that’s all of the Best VR Drumming Games out there. Whether you want to drum professionally or just have fun banging on some drums to the notes flying towards you, there are a ton of great VR games out there for you to try. Have fun with your Virtual Reality drums and enjoy!

The Awesome Gorilla Tag Caves Map
The Gorilla Tag Caves Map is pretty awesome, and very unique as far as the many maps in Gorilla Tag go.
This is because the caves in Gorilla Tag aren’t quite like any other map. You see, while most Gorilla Tag maps have a lot of wide open spaces, cliffs to climb, and things to jump off of high into the air, the Gorilla Tag caves are much smaller with low ceilings and tight spaces.
So playing in the caves of Gorilla Tag feels less like swinging from tree to tree like in the Gorilla Tag forest map, or swimming in the wide open waters of the Gorilla Tag beach map.
Playing infection in the caves feels more like playing hide and seek, with a lot of corners to hide in, and hallways to run away from a tagged player in.
So the Gorilla Tag caves are actually pretty great for new players who don’t yet have the skills to wall climb in Gorilla Tag or do a lot of fancy tricks and get to the hard to reach hiding spots.
So whether you’re a new player just getting into the game or an experienced monkey that wants a different way to play the game, check out the Gorilla Tag caves. Here we’ll talk about how to get to the cave in Gorilla Tag, and all of the sweet things you’ll find in the Gorilla Tag cave.
You might also be interested in:
How To Get To The Gorilla Tag Caves
To find the caves in Gorilla Tag is a pretty easy thing.
When you spawn into your monke treehouse like always when you start the game, don’t go out of any of the holes in the sides of the treehouse like you usually would to get to the forest, canyon, or city.
Instead check out the hole in the bottom of the treehouse, between the cosmetics station and the way to the canyon.

The way to the Gorilla Tag caves
You can already see the glowing of some of the pink crystals down there, more on that later.
For now jump down the hole, and make your way down the twisting passage. You’ll start to hear water, and then you’ll see it.

Follow the waterfall to find the center of the cave
A little waterfall leading into a stream that leads further down into the caves. Pretty awesome!
Keep following the water downwards.
Oh, and if you want to feel like you’re on a slip and slide, a huge one, and don’t want to go all the way down to the beach to use one of the water slides there, just get into the water and slide your way down. It’s a ton of fun.
The water will pull you further down into the caves, where you’ll see the giant crystal.

This giant beautiful crystal dominates the center of the caves
The crystal is the center of the Gorilla Tag caves map, and once you’ve made it here you’re really ready to start caving in Gorilla Tag.
The scoreboard is down at the bottom of the crystal, and if the river slides you to the bottom, don’t worry, there are a couple of ropes next to the crystal that you can use to climb back up.
You’ll also notice that when you touch the crystal it will make a musical sounds, all of the glowing crystals inside the cave do that.
This is great, because not only does it sound nice, but you can also hear when other monkeys are touching the crystals, which can give you a huge advantage in knowing where they are.
Anyway now that we know how to get to the caves map in Gorilla Tag, let’s talk about all of the amazing things there are to find inside of them.
How To Get Around the Gorilla Tag Caves
So to give you an idea of how the caves in Gorilla Tag are laid out, we’re going to split them into levels, like the floors of a house.
The highest level, or the top floor, is where you enter the caves, the big open pit surrounding the crystal. This area does give you a lot of space to wall climb (though that’s really hard here) and try to juke opponents. At least it has more space than the rest of the cave.
It’s got some crystals, the two ropes to climb up in the center, and a bunch of rocks to bounce around on, good fun but not what makes the cave map really unique.

As far as the cave goes this is actually pretty spacious, a lot of room to run around
You can see the next floor, we’ll call it the third floor, below here on some of the little wooden ledges that surround the big crystal in the center.
The highest ones are little cubby holes with some rocks in them. Not really big, and not fantastic for hiding, but if you play it just right you can juke out someone chasing you by running into and out of them really quickly.

These upper ledges just lead into small rooms
There are a few of these holes, but below them is where things get really interesting.
The next lowest level, we’ll call it the second floor, is where the Gorilla Tag caves really start to become caves.
Near the scoreboard on the ground floor you’ll see another wooden ledge in the side of the wall, but this one leads into a cave mouth that you can’t see all the way inside of.
It’s a little high off of the ground, but if you jump really hard with both arms you can easily make it from the ground up to this ledge. This is the entrance to the second floor of the caves.

The way to the second floor from the central crystal
The second floor is pretty interesting because it’s smaller than the lowest floor, the one below it, but still has a lot of fun twisting passageways and places to hide.
If you’re trying to tag someone you can also hang out on the second floor and wait for them to pass by below you, before jumping down at them and tagging them when they least expect it.

The second floor has a lot of places to jump down to the lowest floor of the Gorilla Tag caves
The second floor has a lot of spots that hang out over the biggest caverns of the lower floor below it, and there are also some spots where you can jump up to the second floor from the lowest floor.
So if you want to get really tricky you can hang out on the second floor to hide, or surprise someone.
Now for where the magic really happens, the lowest floor of the caves. There are two entrances to it. One is next to the ledge leading to the second floor.

One of the entrances to the lowest floor from the central crystal
Another entrance is nearby on the other side of the scoreboard from this entrance.
It’s where the stream of water starting at the waterfall at the entrance to the caves leads, right through the doorway.

The other entrance to the lowest floor of the Gorilla Tag cave, just follow the water
The lowest floor of the caves is the biggest by far, and has a ton of great things to explore and see.
So now that we’ve covered how to get to each area of the cave, and how the floors are laid out, let’s talk about all of the awesome things there are to find.
The Awesome Things in the Gorilla Tag Caves
So what’s so great about the Gorilla Tag cave? Well a lot of things that you won’t find anywhere else in this VR game.
First there’s a little animal friend for you to make. No, not another monkey, or all of the friends you might make playing Gorilla Tag, a little bat!
You’ll know the bat in the caves is nearby when you hear it’s wings beating the air and going whoosh whoosh.
The bat flies around, mostly in the center around the big crystal, randomly and kind of bounces off of the walls. If you manage to get close and grab it you can even hold them.

You can catch the bat
When you let go, the bat goes back to flying around.
There’s also some pools of water to swim around (and maybe hide in). They even have an underwater passage leading from one to the other, a great way to move around without being seen easily.

Swimming is always fun in Gorilla Tag, and the caves have some pools you can swim in
This and all of the caverns and passages leading to it make the caves a great Gorilla Tag map for hiding and running around in.
Playing infection in this map is fantastic even if you’re new to the game, and has a lot of easy walls and slopes to climb and bounce around in. It’s not as wide open as other maps and gives you a lot of places to hide.
I’ve saved the best for last for you though, with something you might have noticed in our previous screenshots.
Remember the big crystal? How it and all of the other ones in the cave walls made sounds whenever you touched them? Well it gets even better.
All around the lowest floor of the caves are these colorful crystals, and each makes a different sound when you touch them.

These musical crystals are all over the lowest floor
Some form little paths too, and you practically make music while you move over top of them.
It sounds very cool and gives a musical vibe to the cave ambiance that otherwise would just be echoes and the dripping of water off of stalagtites.
There’s even a circular ring of these colorful stones that form a piano that stretches around you while you’re in the center. You could actually play a song on this thing.

A crystal piano, very cool
So even if you’re not playing Infection and just want to hang out in Casual, there are a lot of awesome things to play around with and explore in the caverns.
You could even play a regular game of hide and seek, or even make music in the Gorilla Tag caves.
That’s all we’ve got for you about the Gorilla Tag caves. This is definitely a unique and fun Gorilla Tag map that doesn’t quite feel like any others, and will definitely give you a lot of intense and heart pounding memories as you’re sprinting down its small hallways as fast as your monke arms can carry you. Enjoy!
You might also be interested in:

How To Use UEVR To Play Unreal Engine Games in Virtual Reality
UEVR is a fantastic new mod from the talented Flatscreen to Virtual Reality modder praydog.
UEVR allows you to “inject” 6DOF (six degrees of freedom) VR controls and head tracking into practically any game made with Unreal Engine, a game engine used to make many indie and AAA titles.
So if you want to get access to a whole new suite of VR games using the UEVR mod, then you’ve come to the right place. Here I’ll show you how to use the UEVR mod to play Unreal Engine games in VR. Here’s how to play Unreal Engine games in Virtual Reality with UEVR.
UEVR is a fantastic new mod from the talented Flatscreen to Virtual Reality modder praydog.
They have made many VR mods over the years such as the popular REFramework that allows some Resident Evil games such as Resident Evil 8 to be played comfortably on PCVR.
Though it is praydog’s most recent flatscreen to Virtual Reality mod that has taken the VR community by storm, the UEVR injector mod.
UEVR allows you to “inject” 6DOF (six degrees of freedom) VR controls and head tracking into practically any game made with Unreal Engine, a game engine used to make many indie and AAA titles.
Using UEVR allows you to use your VR headset to experience full 360 degree immersion in Virtual Reality in a huge new catalog of games that were previously only available to play traditionally on a monitor. Though unfortunately older Unreal Engine games still won’t work, the mod will only work with games using Unreal Engine 4 or later versions.
Of course to use this fantastic mod you’ll need to be able to connect your headset to a PC to run PCVR games, which is completely possible even if you’re using an Oculus Quest 3 or Oculus Quest 2 device.
So if you want to get access to a whole new suite of VR games using the UEVR mod, then you’ve come to the right place. Here I’ll show you how to use the UEVR mod to play Unreal Engine games in VR. Here’s how to play Unreal Engine games in Virtual Reality with UEVR.
Download UEVR
First things first, to use UEVR you’re going to need to download it.
This is easy, just head over to the UEVR github page and click on the latest release in the “Releases” section on the right.

Go to the Releases section to download UEVR
There should be a link at the top of the page for the release, right next to “Just looking for the download? Here:”. Click that link and a UEVR.zip file will be downloaded to your computer’s downloads folder.
Go to your Downloads folder, or whichever folder you have configured your browser to download files to, and find the UEVR.zip folder you just downloaded. All you’ve got to do is uncompress the .zip file into a regular folder by right clicking on it and selecting “Extract All…” and confirming the name of the folder to extract to. Leave it at the default name “UEVR” to avoid confusion.
Run A Game In UEVR
Now you’ve got a folder named UEVR, and inside it is an application called “UEVRInjector”. That’s what you’ll be running to play Unreal Engine games in VR.
Run UEVRInjector.exe as an administrator by right clicking on it and selecting “Run as administrator”. You’ll get a prompt asking you to confirm this, hit Yes.
Now you’ve started UEVR, let’s get a game to work in it.

A freshly launched UEVR instance, make sure to run it as an Administrator
To give you an example of a game that we can now play in Virtual Reality with UEVR, we’ll be using the SWAT tactical shooting game Ready Or Not.
First Person Shooter games like Ready Or Not are generally easier and more straightforward to get working in UEVR, as you won’t have to mess around with the HMD settings too much to get your headset view to align with your character in the game, since the game is already in the first person.
If you’re wondering what games work in UEVR and how well, then you should check out this list of games rated on how well they function with the UEVR mod.
Now that we’ve got UEVR running go ahead and connect your VR headset to your PC. You can do this even with a wireless standalone quest device by using Oculus Airlink or Virtual Desktop or an Oculus Link Cable. Steam Link also works with UEVR, provided you are running the Unreal Engine game through Steam.
Once your headset is connected to your PC run the game you want to play in VR using UEVR. It doesn’t matter which platform you are using to run the game, whether it’s through Steam, Epic Games, GOG, or itch.io. Once the game is launched go back to the UEVR application and select the game in the dropdown near the top.

Don’t worry about this popup
Once the game is selected you might get a popup saying something about plugins, don’t worry about this popup and just click “OK”. If another popup asks you if you want to view the plugins directory then don’t worry about it and hit No.
Now that your game is selected in the drop down then select the “Inject” button. If you don’t see the game in the drop down then it may be because the game is a Multiplayer game with an Anti-Cheat client. We’ll talk more about that in the troubleshooting section further down in this article.

Once the game is selected you can mess with some options before hitting “Inject” to start the game in Virtual Reality
Once you hit the inject button put your headset on and wait for a moment. If you’re running a game through Steam you may see the Steam VR client appear first, but shortly the game should appear in front of you in VR.
If it doesn’t then make sure that you have the game opened on your Desktop, and click inside of it to make sure it is the active application. Once UEVR has done its injecting thing you should see something like this.
Press “Insert” to enable or disable this menu
Congratulations! You’ve successfully run the game in VR using UEVR. You can look around with your VR headset and move the mouse using your usual mouse and keyboard but you might be wondering how you really play the game now.
Configure and Use UEVR
I’m going to continue to use Ready Or Not as an example, but keep in mind that some things might be different depending on which game you are trying to run.
A non first person game might have a different camera that you need to play with to get looking right in VR, or a different control scheme that might work better or worse. Though when in doubt just using your mouse and keyboard as you normally would is a solid way to get reliable controls.
So first thing first, you’ve got this big menu in front of your face. Get rid of it by hitting the “Insert” key. We’ll be coming back to this menu, and you can always get it back by hitting the “Insert” key on your keyboard again.
In Ready Or Not the main menu is very far away from where your head is by default, this can be fixed by messing with the camera controls as we’ll see later, but you can also just squint at the menu options and use your mouse to select one, like a Singleplayer practice mission.

The Ready Or Not main menu in UEVR
After starting a mission we get our hands on some weaponry and actually start to play the game… but you might notice that the weapon you see in your character’s hands doesn’t exactly line up with where you’re looking.
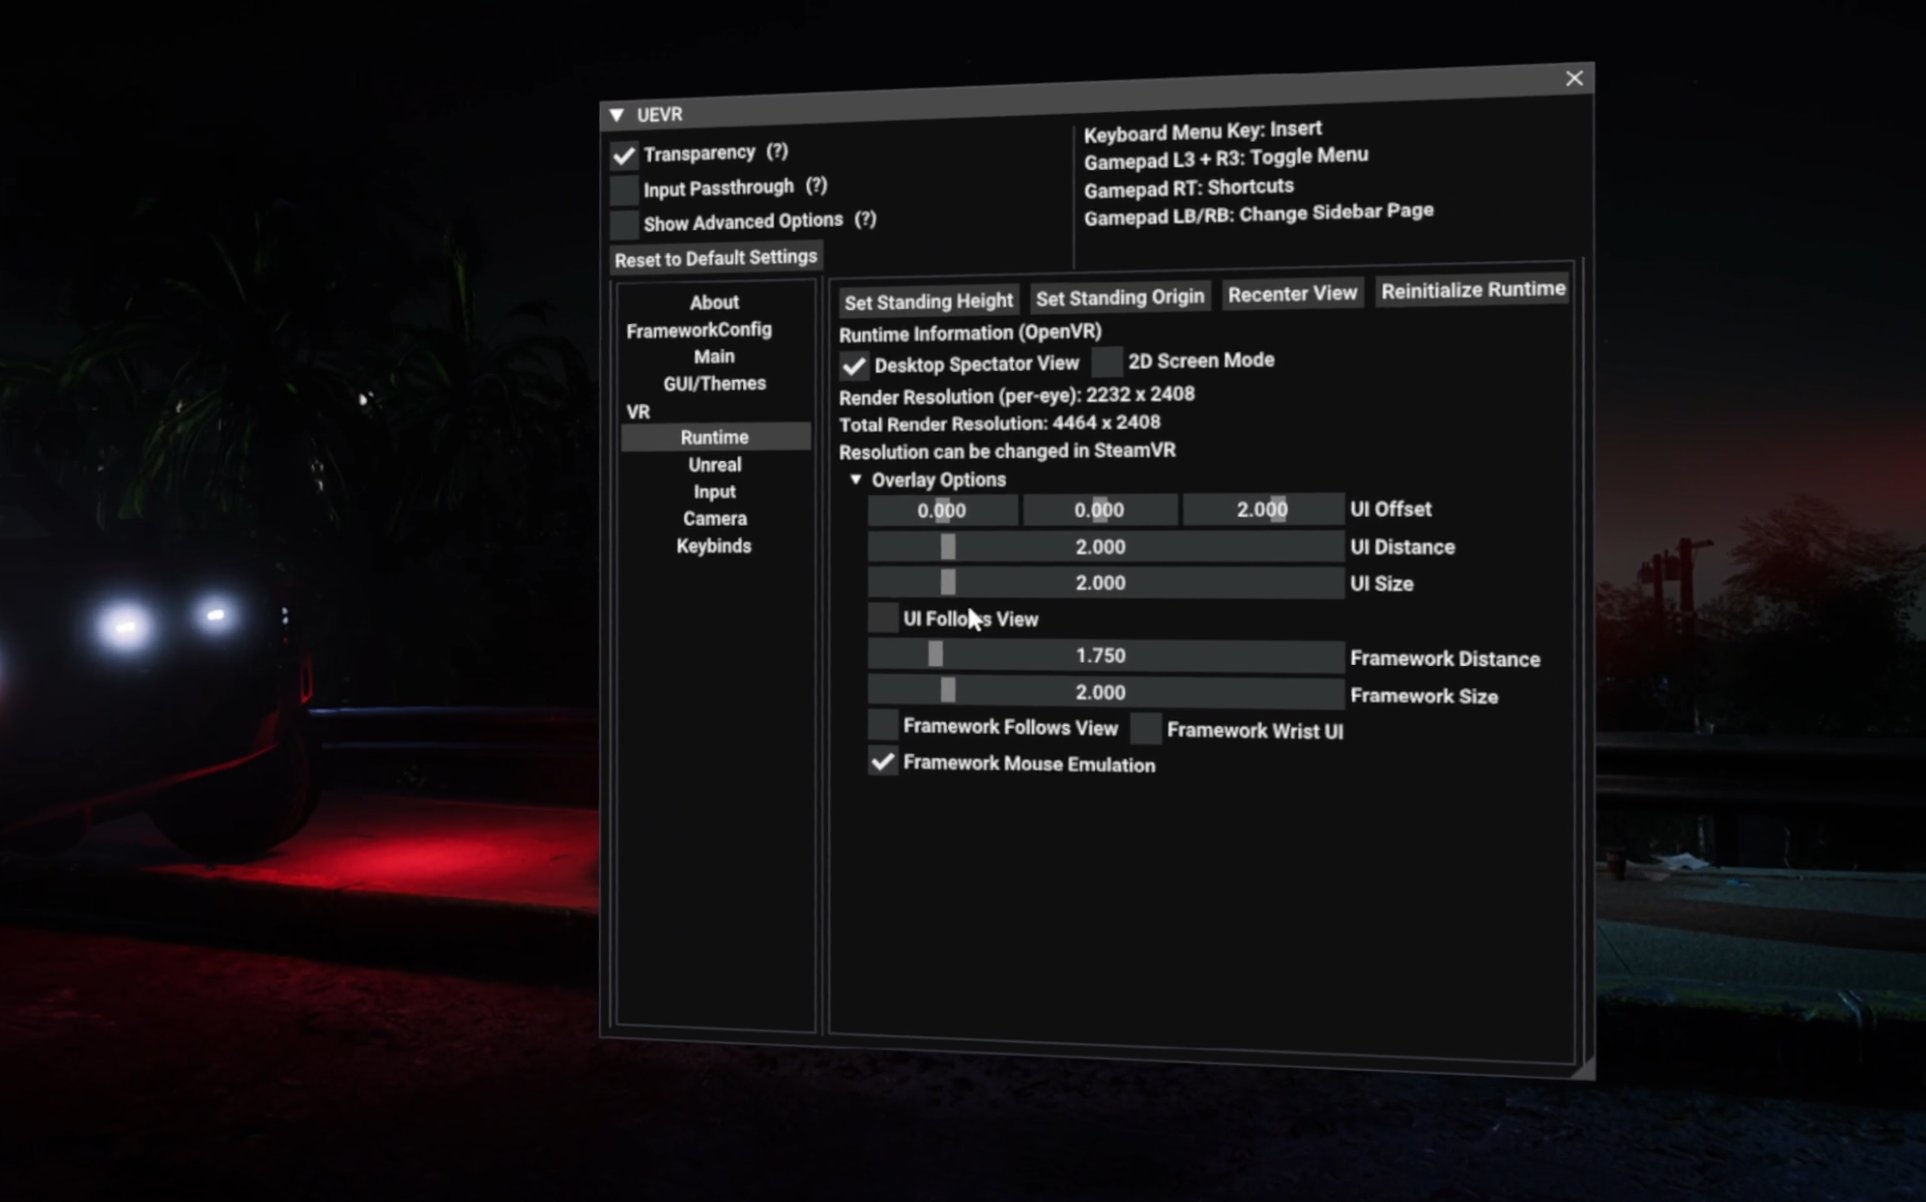
Luckily UEVR gives you some easy to use Camera tools that let you adjust your VR view in the game. Here in Ready Or Not the camera is already focused in first person, but to tweak it just a little bit so that the gunsights align with your eyes you just have to hit “Insert” to bring up the UEVR ingame menu, click on the Camera tab, and then click “Set Standing Height”, “Set Standing Origin”, and finally “Recenter View.”

The camera menu gives you a lot of options for changing your view of the game
This pretty reliably sets the position of the camera to your current head height, making aiming down the sights much easier. Always keep in mind that in UEVR there are also a ton of options to make the game look, run, and feel different. Way too many for us to cover completely here. So if something doesn’t feel right, experiment.
For instance you can also manually change the camera position in this screen with a number of sliders in the “Camera” menu. With this you can even turn Ready Or Not into a Third Person Shooter instead of a first person one.

Virtual Reality makes everything more intense
There are an absolute ton of options in the UEVR options menu, but what we’ve outlined here will get a first person shooter working fairly well with your mouse and keyboard and VR headset.
Of course you can also use different control schemes when playing an Unreal Engine game with the UEVR mod. It’s possible to use your touch controllers, and also to aim and look around with your headset, so that your cursor in the game follows where you look.
I’d recommend trying and messing around with these in the “Input” tab of the UEVR menu. Some games might not work at all with some of these options, and some might work better or worse. You can change the controls by changing the “Type” dropdown under “Aim Method.” in the Input menu.
There’s no guarantee that your touch controls will work smoothly with a game running in UEVR, this is a mod after all.

Try changing the input options, they’re a lot of fun
That’s all you need to know to play an FPS game in UEVR. There are still a lot of options to play around with to make your setup optimal, and so I’ll leave you with a few troubleshooting tips just in case you run into problems.
UEVR Troubleshooting
The first potential issue with your UEVR setup that you’ll probably notice is a big warning in the UEVR screen stating that you might want to disable Hardware-accelerated GPU scheduling.
Doing so makes things run a little more smoothly in UEVR, at least in general. So if you’re having performance issues then you should disable Hardware-accelerated GPU scheduling.
Keep in mind that even when doing this you might still have performance troubles depending on the PC that you’re running the game on. VR is very intense for a computer, since it has to render everything twice instead of once, and so games that you can normally run just fine on the flatscreen might have stutters or other performance issues in VR.
So you might also want to turn down the graphical settings on whatever game you are playing in addition to this.
Anyway to turn off Hardware-accelerated GPU scheduling press Windows Key + i to open windows settings, and then navigate to System, then Display, and then Graphics.

The Change default graphics settings link
Once you’re in the graphics menu click the “Change default graphics settings” link as circled above.

This menu lets you turn off Hardware-accelerated GPU scheduling
Finally turn off Hardware-accelerated GPU scheduling in the Default graphics settings screen and restart your PC for the change to take effect.
You also might notice that certain games won’t appear in the injection dropdown menu when they’re running, for instance the multiplayer military shooter Squad.
While not all Unreal Engine 4 or later games are guaranteed to work, most do, and in the case of those like Squad they may not appear due to the Anti-Cheat client that runs with the game. Anti-Cheats common to multiplayer games like Squad will block the detection and execution of UEVR.
This isn’t a bad thing really, because you could easily be permanently banned from one of these games for suspected cheating by these anti-cheat clients when using UEVR. Though if you really want to run one of them then go to the game’s folder in Steam and run the game application directly, which will run the game with no anti-cheat.
For instance with Squad you’d want to run it from: (Path to your Steam installation)/steamapps/common/Squad/SquadGame/Binaries/Win64/SquadGame.exe. To get the game to show up in the UEVR injector.
This will make playing a Multiplayer game awfully hard, but you can at least mess around in the firing range.

Another day on the firing range
If you’re still having problems running a game in UEVR or getting it work properly then also check out the official UEVR documentation.
There are still a lot of things that might not work as expected, and always keep in mind that this is a mod that covers a lot of games, and so some weirdness is to be expected from time to time.
Whatever Unreal Engine game you decide to try in Virtual Reality with the UEVR mod you should be ready to tackle it now. Enjoy!

All Into The Radius VR Endings and How To Reach Them
So you’re wondering what happens at the end of Into the Radius.
Well whether you’ve come here out of curiosity, are wondering what different Into the Radius endings there are, or just completed our walkthrough on the final mission of Into the Radius VR, Ouroboros, we’ve got you covered with this complete list of each Into the Radius VR ending.
This article will, of course, spoil the ending to Into the Radius. If you haven’t experienced it already by completing the game then I highly recommend you do so before ruining the surprise for yourself.
Into the Radius Endings - How To Beat The Game
To beat Into the Radius and reach the ending you’ll need to complete every Top Priority mission of the game.
These missions can be accepted on your mission terminal in your home base of Vanno, and sometimes won’t appear until you’ve completed some repeatable missions first.

Complete all Top Priority missions to beat Into the Radius
These Top Priority missions bring you further and further into the zone to new areas, and become generally harder over time.
So to complete the game you’ll have to unlock each successive map as well, and eventually find yourself in the center of the Pechorsk Radius at Pechorsk Castle.
When you accept the final mission of the game, Ouroboros, the castle gates open and let you in

The entrance to Pechorsk Castle and the final mission of the game
As described in our walkthrough article on this final Into the Radius mission, you then have to fight your way to the central keep of the castle, and pick up the Grail artifact found inside.
That is when the endings commence.
This is your last warning for spoilers, because here is what each of the endings of Into the Radius VR are. The conversation and choice at the ending is a huge source of Into the Radius lore, and experiencing the lead up to it first hand makes those answers even more appealing.
All Into the Radius VR Endings
Once you pick up the Grail you’ll find yourself surrounded by Katya statues.

After picking up the grail you’ll be surrounded by Katya statues
After a few moments you’ll see a loading screen, and find yourself transported to somewhere you’ve never been before.
The ground below you is stranger than it has ever been before, a weird swamp of red shifting water. Above you is a ceiling of eyes looking down, and in each direction are trees and darkness.
In front of you are some floating rocks, and your friend Katya held by a black hand.
Even more strangely there’s another figure, a black statue with a head covered in white spikes.

Katya and a Stranger at the final confrontation
A voice you’ve never heard before, the voice of this new stranger, starts to speak. Out of every bit of Into the Radius lore you’ve found in the game so far, this conversation is the most revealing.
It congratulates you, Explorer #61, on making it to the center of the zone. It says that you acted just according to plan. Katya interjects as well, wondering what this new voice is.
The new voice asks you what it’s like being a hero, and whether or not you evoked the “event” that created the zone.
The voice seems to have multiple people speaking from time to time, sometimes saying words on top of each other to maybe disguise, or maybe reveal the true meaning of what it is saying.

Instead of the usual orb in the center of the radius, now eyes look down on you from above
The ending is certainly very surreal, and also very open to interpretation, but here’s a summary of the conversation between the stranger and Katya, to which you are a silent observer.
The stranger says that you and Katya are not real people, that both of you are just made up composites of a variety of actual people. She is just an image of all of the innocents who suffered at the hands of the radius and served as your bait and motivator to travel to the center of the castle. While you are just a composite of all of the explorers of the radius, and also not a real person.
The stranger says “Iteration successful” and seems to indicate that the center of the zone has been reached before and will be again in the same fashion by you or by possibly other explorers. Though whether this stranger can be trusted at all isn’t clear.
Either way the stranger says they are pleased, and offers you a reward and a choice. It comes in the form of a pistol.
Katya selflessly says that she doesn’t trust the stranger and is willing to be destroyed, especially if neither of you is real in the first place. The stranger says that you can’t harm the radius if you try, and that the “work in progress” there will continue.

The Into the Radius VR Ending gives you one more gun, and a choice
The pistol looks like a Makarov, but it is no normal pistol.
There is no way to avoid this choice. The pistol cannot be dropped or holstered. You cannot move or run away. Trying to shoot the pistol empty or remove all of the bullets from it is impossible, it will never run out of ammunition.
You can try and shoot whatever you like but there are only three choices here. You can shoot Katya and see if the stranger will live up to their promise of giving you a normal life, or you can shoot the stranger and free (or possibly create) Katya.
What you might not realize is an option, and what the stranger doesn’t say, is that you can also shoot yourself.
Into the Radius VR Endings - Shooting Katya

Sacrificing Katya gives you a normal life
If you shoot Katya her white statue will break into pieces and start to drift off.
She will still thank you for freeing her from the radius, and says farewell.

Your normal apartment and normal life
After a brief loading screen you find yourself in an ordinary looking apartment, surrounded by the creature comforts of an ordinary life.
You can walk around your apartment and can hear the sounds of a distant city around you. More importantly you can hear and see a narration with a voice that sounds just like Katya.
It tells you that an ancient consciousness is what is speaking to you, and that that consciousness was awakened sixteen years ago in the Pechorsk radius.
It also says that you were freed from the radius a year ago, and that you now have a human form, an identity, and a place to live and work. You live a normal, mundane life now, and even have a partner who is not Katya.
Despite your freedom and normal life, the voice says that you think about Katya a lot, and that you never do stop thinking about her and the Zone. Your questions still are not fully answered, and the zone is still out there.
Into the Radius VR Endings - Shooting The Stranger

Shooting the stranger frees Katya
If you shoot the stranger they will break into pieces and those pieces will drift off.
Its odd voice will say “All the necessary data has been recorded.” Katya exclaims that something is happening to her and then you’re surrounded by TVs.

These floating TVs and narration are your last connection to Katya
Each shows a young girl in an idyllic field, and all around them are ruined trees and more red swamps.
You can’t move. You can only listen as Katya tells you about her becoming real. She says she was separated from the being she only just knew she was a part of, and that just before she was separated the being told her that an act of self sacrificed was performed for her.
Then Katya tells you that she woke up in a field full of wildflowers, and to a normal life with a little sister and a mother and father.
Katya takes a moment to spread out in the grass, and she thanks you for sacrificing yourself for her.
Into the Radius VR Endings - Shooting Yourself
There is a hidden third option here that the stranger doesn’t offer you.
Maybe it’s the only way to interfere with its data collection, or whatever the purpose of the radius is. Maybe it’s your only way to strike back for being treated like a rat in a maze.
You can use the pistol to shoot yourself.

The final option
While generally not recommended in VR games, it’s very possible that this third option is the only true ay to get one over on the committee, or whatever being is running the radius.
It’s hard to tell though, because once you watch your body hits the floor all you hear is a scream from the stranger. Maybe of pain, maybe of frustration, or maybe of just annoyance.
That’s it.
After the Endings
Once you’ve gotten whatever ending you want, the game is still not effectively over.

Once you choose your ending you’re spit back out at Vanno
There won’t be any more Top Priority missions to do, but you’ll wake up in front of the gates of Vanno much like when you started the game.
Except this time you have all of your equipment that you had when you picked up the Grail, and everything else you had in your home before you left.

Revealing the grail after completing Into the Radius VR
As a final reward you can use your detector, which will start beeping like mad, to reveal the Grail artifact next to your mission terminal.
You might remember that the promised reward for the Ouroboros mission was 10000 dollars. Well the Grail is how this reward is delivered to you.
The Grail is the most valuable artifact in the game
While this artifact has no obvious uses it does sell for 10000 dollars, a lot of money in this game.
You’re not free to explore and mess around in Pechorsk however you like.
If you want to collect all of the weapons in the game, or explore more of the radius, you’re free to do so. The whole zone is still available, and there are still repeatable missions to be done. Congratulations! You beat Into the Radius VR. Those are all of the Into the Radius VR Endings.

Into The Radius Walkthrough And Guide - The Final Mission - Ouroboros
Stuck in Into The Radius? Wondering where to go and how to get there for your next mission?
Well don’t worry we’ve got you covered with this walkthrough and guide for Into the Radius VR.
Here we’ll be talking about the final mission of Into The Radius, Ouroboros, which brings you to Pechorsk Castle to get some answers, and more mysteries, at the center of the Radius. Ouroboros is the final Top Priority mission of this game, and the most illuminating and difficult of all of them.
Stuck in Into The Radius? Wondering where to go and how to get there for your next mission?
Maybe you would just like to see what is in store for you before you get there, or you’d like to know if you’re properly prepared for your next mission in the Pechorsk Zone.
Well don’t worry we’ve got you covered with this walkthrough and guide for Into the Radius VR.
In this Into the Radius walkthrough we’ll detail how to progress through the main story “Top Priority” missions, with a couple of guiding tips thrown in here and there to make your adventure smoother.
The focus of these walkthrough articles will be the story missions, but we’ll throw in some general gameplay tips and other useful loot locations near your objectives.
These articles will also assume you’re playing the game on the Normal difficulty mode with Tutorials turned on, which is highly recommended for your first playthrough. This walkthrough will still be useful if you’re playing on Realistic difficulty, but some details like vendor prices or enemy placement and numbers will be different.
Here is every article in our complete Into the Radius VR Walkthrough:
Into The Radius Walkthrough And Guide - The First Mission - Equipment Retrieval
Into The Radius Walkthrough And Guide - The Second Mission - Total Recall
Into The Radius Walkthrough And Guide - The Third Mission - Fixing A Leak
Into The Radius Walkthrough And Guide - The Fourth Mission - Flash In The Dark
Into The Radius Walkthrough And Guide - The Fifth Mission - A Probing Move
Into The Radius Walkthrough And Guide - The Sixth Mission - The Intrusion
Into The Radius Walkthrough And Guide - The Seventh Mission - A Farewell Feast
Into The Radius Walkthrough And Guide - The Eighth Mission - Kids Playground
Into The Radius Walkthrough And Guide - The Final Mission - Ouroboros
Here we’ll be talking about the final mission of Into The Radius, Ouroboros, which brings you to Pechorsk Castle to get some answers, and more mysteries, at the center of the Radius. Ouroboros is the final Top Priority mission of this game, and the most illuminating and difficult of all of them.
Ouroboros - Loadout
Congratulations, you’ve made it to the final mission of Into the Radius! Get ready for the hardest fighting in the most difficult map of the game. More than ever being properly prepared is important and will help you win.
This mission brings you to Pechorsk Castle, which has a variety of indoor and outdoor areas. As you make your way through the inside and outside of Pechorsk Castle, you’ll be fighting a lot of enemies in both very close quarters, and once or twice from far away. So it’s best to be prepared for a lot of close range, and some long range combat.
There will be a smattering of all of the enemies you have encountered so far like Fragments, Spawn, Seekers, and Sliders. Though most dangerously of all you’ll be coming up against a lot of heavily armed and armored Mimics like Mimic Soldiers, Mimic SWAT, and Mimic Snipers.
The automatic weapons they’ll be using are very effective and if you aren’t careful can take you down in a few short bursts at close range, so it’s best to arm yourself with weapons that are capable of taking down Mimics very quickly.
So more than anything rifles that hit heavily and have a decent rate of fire are recommended like the FN 17 “SCAR” that you can see in this example loadout. They can hit enemies at medium and long ranges with some skill and patience, and also offer more than enough firepower for close ranged fighting.
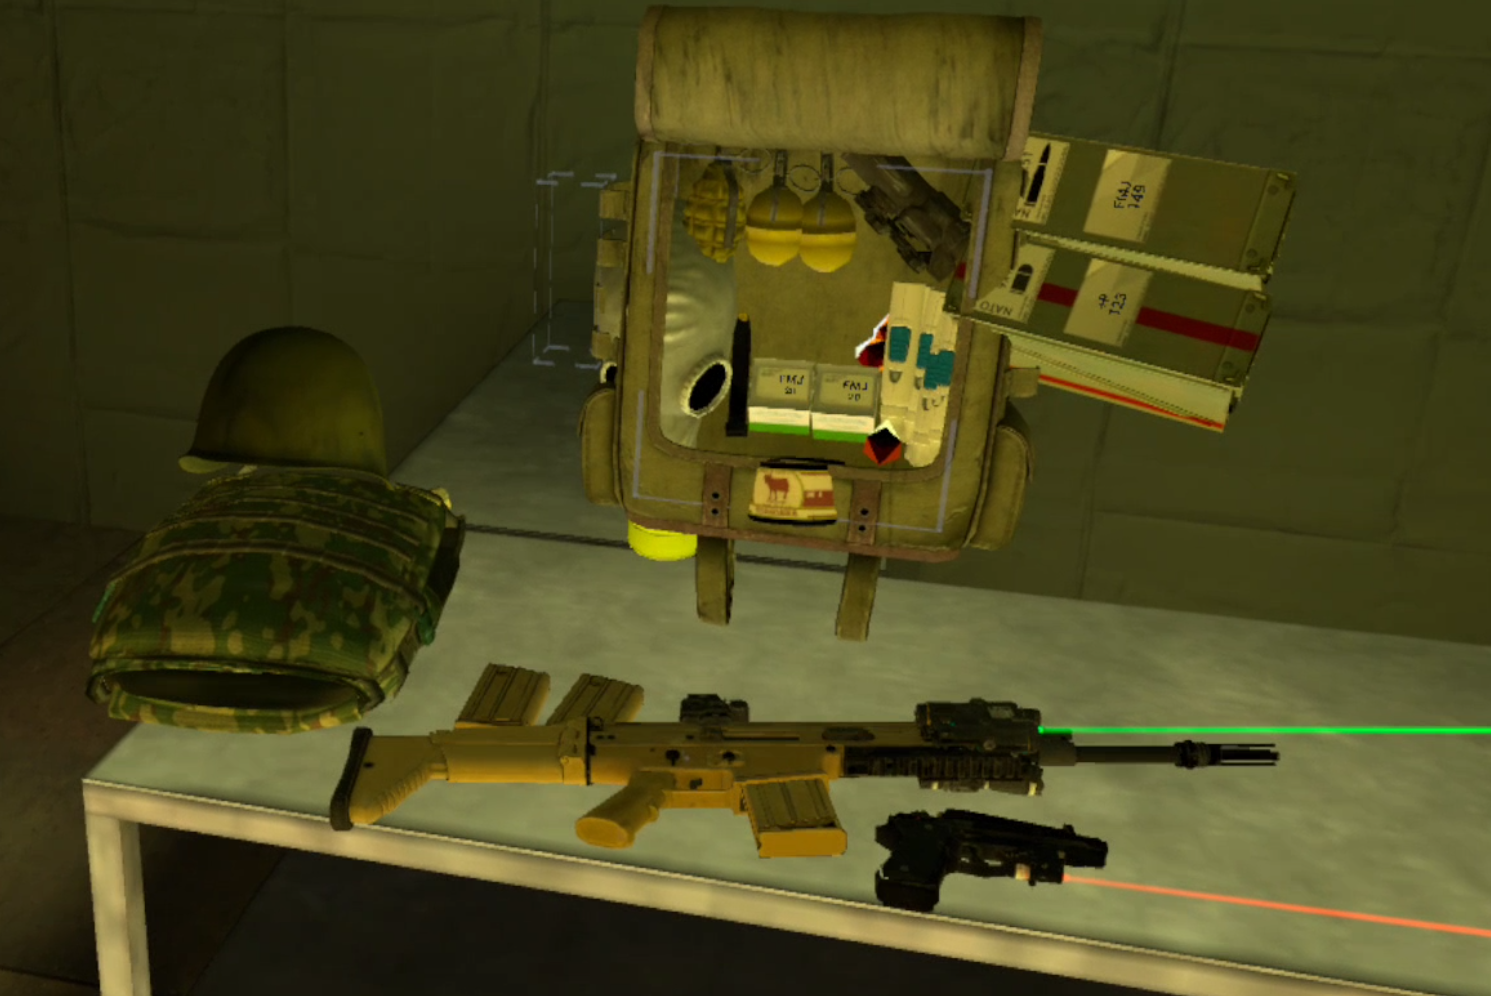
A sample loadout for the last Into the Radius mission
This is the final mission and so there’s no need to spare any expense on your equipment. A good sidearm is also very useful in the close quarters fighting you’ll be doing inside of the castle, preferably with a laser pointer for easy aiming as well.
Having a good pistol to quickly switch to if your main gun runs dry is more helpful in the final mission than anywhere else, and more likely to happen and save your life. While I used the M9 in this sample loadout, which is an all around very reliable and hard hitting pistol, you may want to use the extremely heavy hitting Desert Eagle, or something that can fire automatically like the OC-33.
It’s also not a bad idea to bring two long arms, one for up close and medium ranges, and another for longer ranged shooting. Though you don’t necessarily have to have a sniper rifle with you it can be helpful, and you can always keep a longer ranged optic in your pack to swap on to your rifle, as you can see in the top right hand corner of the backpack in the example loadout.

Upgrading an M9 before heading out on the final mission
You also might want to upgrade what weapons you do bring with you if you can afford it, and adding attachments like optics or lasers if you haven’t already can be extremely helpful.
More than anything else make sure you have a lot of healing items like Healing Injectors and Regen artifacts. Bring more than you think you’ll need. In this mission one wrong step can drain most if not all of your health pool.
Also invest in the best possible ammunition for whatever weapons you are bringing, and bring at least a whole crate of it. As always healing items and ammunition are the number one thing that might force you to quit and turn back. So go ahead and get the best, and have a lot of it.
A little food is a good idea to have, though you’ll find more in various loot areas inside the Castle, and you will definitely want to bring your Gas Mask. While not strictly necessary it will make some of the anomaly fields in the exterior of the castle a lot simpler to navigate and survive.
You’ll also notice that I brought a few grenades. While not necessary they can be useful in flushing out Mimics that are waiting to ambush you in the next room, and so they’re worth having a few of just in case.
You’ll also notice in this loadout that there aren’t any silencers or subsonic ammunition. Unlike in other missions stealth isn’t very useful in Ouroboros, as your enemies will generally be right in your path and impossible to avoid, so don’t bother, this will be a loud mission.
Of course the usual Head Lamp, Detector, Probes, and melee weapon of some sort are necessary as well. Make sure all of your equipment is fully repaired and loaded before you head out. Don’t spare any expense, you’re about to finally enter the center of the radius and master it.
The Last Mission - Entering Pechorsk Castle
As always accept the mission at the terminal before heading out. You’ll see that you’re in for a challenge as the briefing ominously indicates. Don’t worry, you’ll be alright.

The briefing for the last mission of Into the Radius. Combat Training will definitely be required.
Once you do head out of the gate, double check your gear, and take the left most rope line out, which leads to Kolkhoz Zarya.
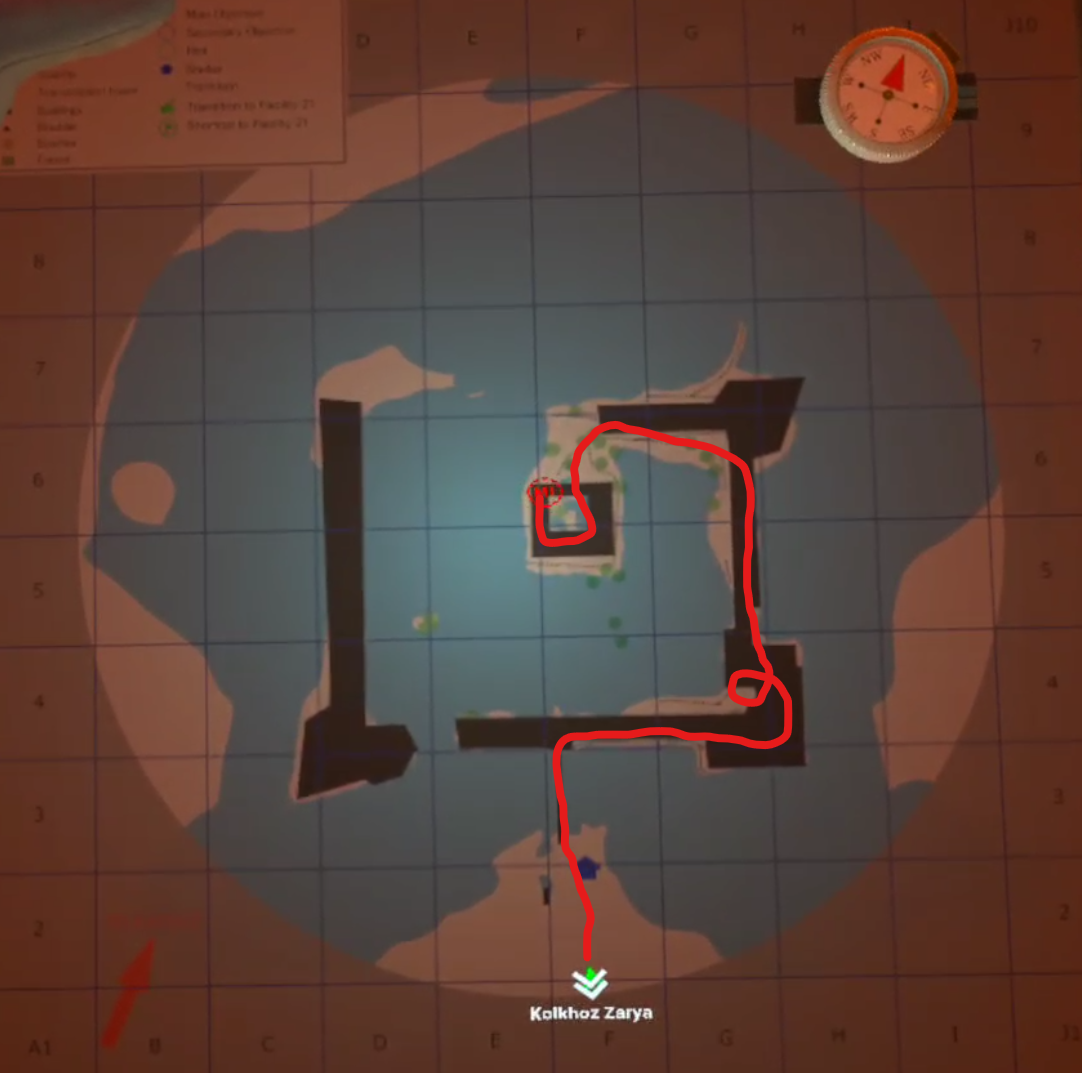
Once you find yourself in Kolkhoz Zarya take a look at your map and get your bearings.

The path from Kolkhoz Zarya to Pechorsk Castle
Luckily you won’t have to go far to get to Pechorsk Castle, though there will be some enemies and anomalies in your way.
You can head straight down the railway in front of you towards the bridge and fight your way through the Mimics that patrol by the bridge before taking a left down the road.

The Mimics guarding the bridge. You can sneak past them by going through the woods.
You can also go left off of the railway down the embankment, swim through the water, and skirt around the anomaly field in the trees to avoid those mimics if you like. Either way you should be very prepared for a fight if there is one, and these few enemies will be the least of your worries.
However you get there, enter the rope line heading to Pechorsk Castle.
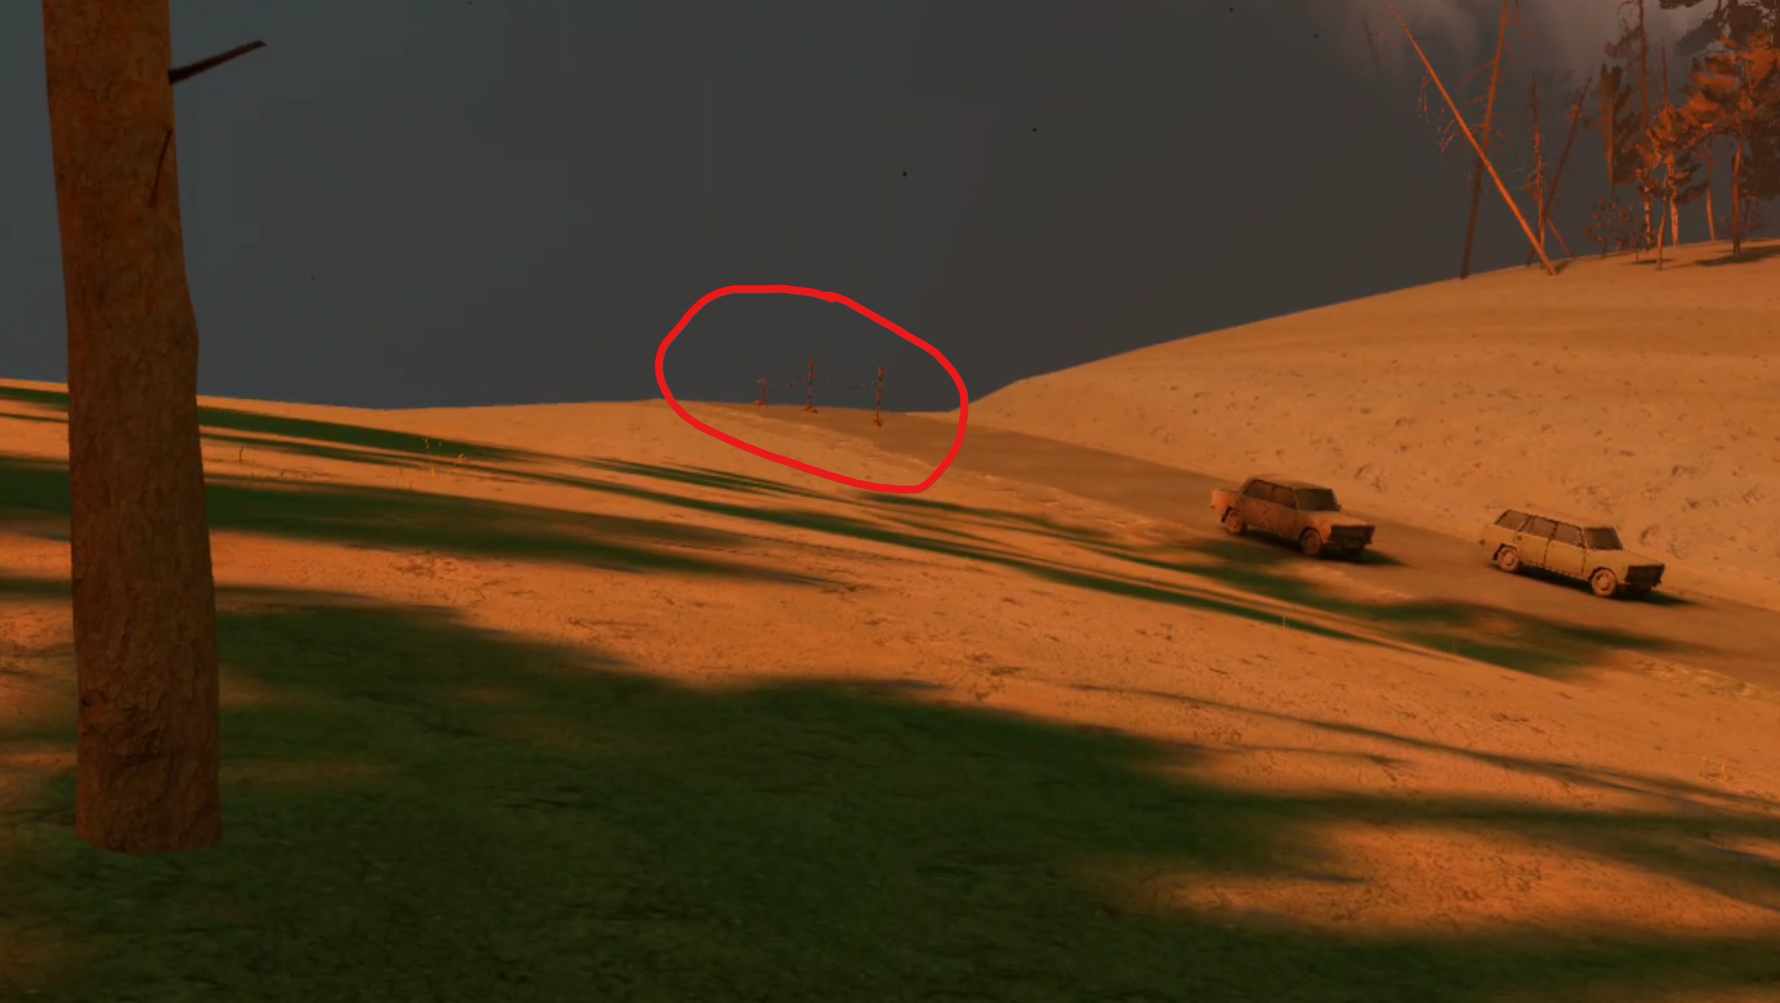
The rope line leading to Pechorsk Castle, the final map of the game
Once you’re through to Pechorsk Castle you’ll see a large house ahead of you, and hear a lot of Stomper Anomalies around. Just head towards the house, eliminating the few Fragments and Spawn that might see you on your way towards the castle.
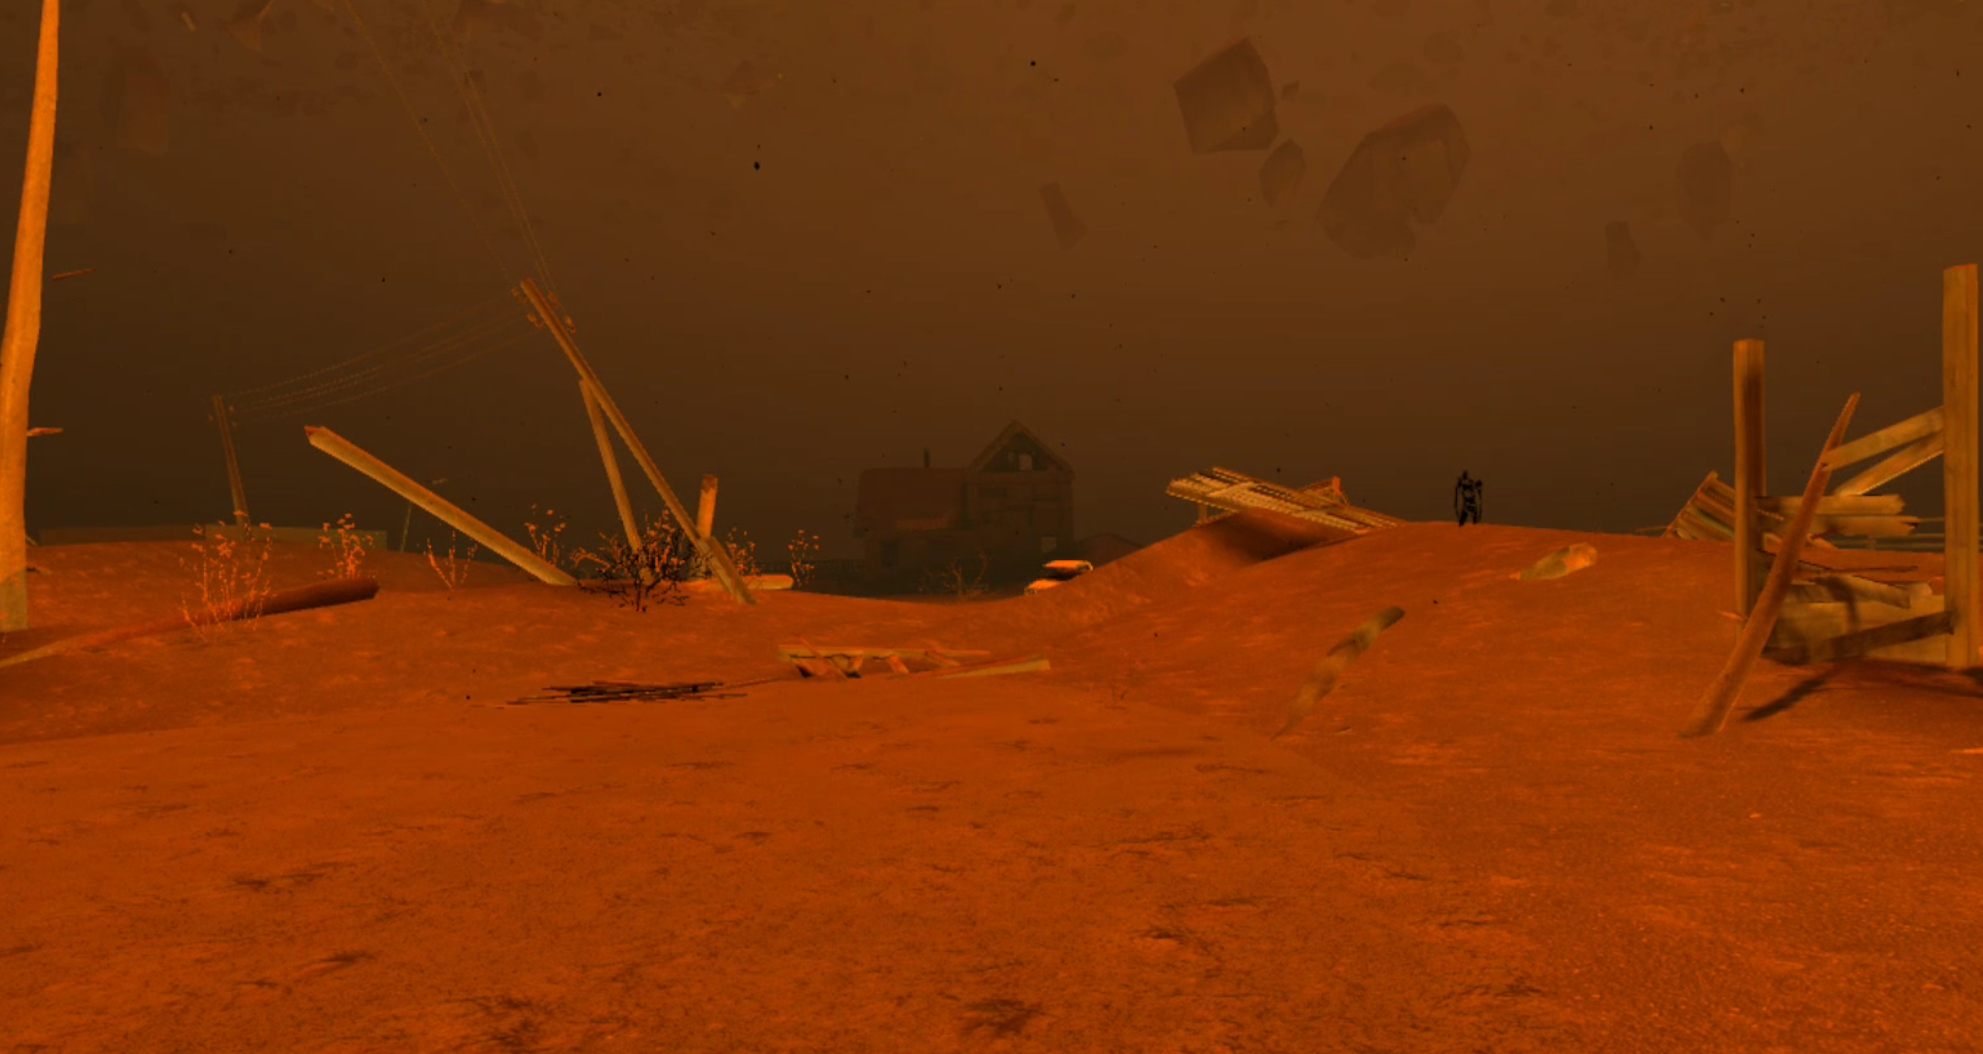
Head towards the house, and you’ll see the bridge heading into the castle right past it
You’ll soon see the castle ahead with a bridge leading to it.
As usual during a Top Priority mission you’ll also see the white form of friend Katya standing near the bridge. Touch her to get some more story details before you head inside.

Katya once again waits for you
Then double check and make sure you’re completely ready. Load your magazines, and make a save if you’re not playing in Ironman mode.
When you look from the end of the bridge towards the castle entrance you’ll see that the gate is open and the way in. The orb that has always stood in the center of the radius is just above you.
It’s time to complete the final mission of the game and discover what is at the center of the zone. Here’s where things get heavy.

Fighting Through The Castle
Take a glance at your map, while it won’t be as useful here as in other missions, this is the approximate route we’ll be taking through the castle.
The route through the Castle for the Ouroboros mission
It’s pretty linear, so you’ll have a hard time getting lost even if you tried.
Steel yourself and walk across the bridge. You’ll hear a lot of enemies inside, and a stray Mimic or Spawn might greet you by coming through the gate and attacking, so keep an eye on it and your weapon drawn as you approach.
Though if you decide to go down the dirt path directly to the right of the gate you can follow it past the walls and find a grate with a dead soldier in front of it and a small stash of Saiga 12 magazines and shotgun slugs.
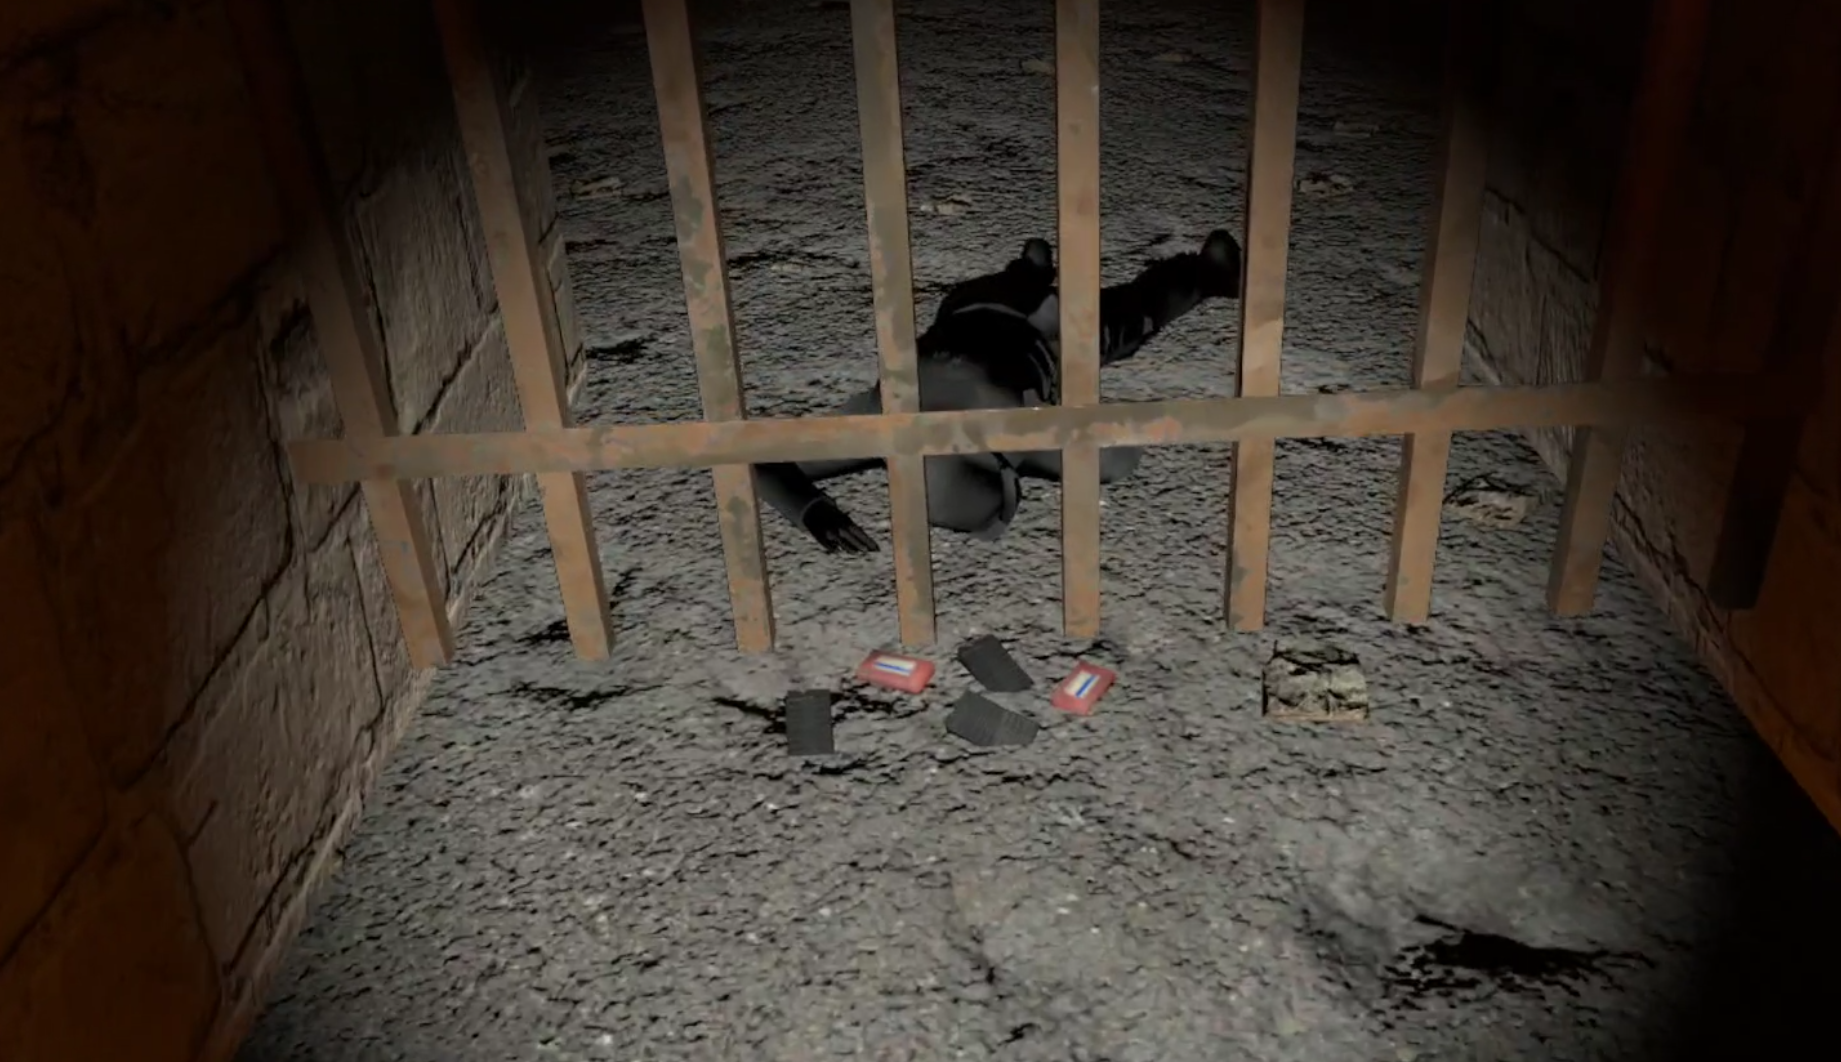
A small stash of Saiga 12 magazines and shotgun slugs
Go out of your way to pick them up or don’t, it’s up to you, and you can always get them later inside the castle. Either way there’s no way through around the side, you have to go through the front gate.
From here on out be ready for enemies around every corner.
Through the gate you’ll see a dark version of Katya, who you can touch for some more story dialog. You’ll be seeing her periodically throughout the Castle, and there will also be other black statues that you can touch for some extra lore.
I won’t be pointing all of them out here, from now on we’ll focus on fighting your way through to the end. There are also numerous crates and small side areas throughout the castle that you’ll find with a ton of loot. Since this is the final mission of the game we won’t be focusing much on looting in this walkthrough guide either, and will be focusing on getting you into the central keep and completing the game.
Directly to the right as you enter the gate is a doorway, and that’s where your enemies will be coming from. Expect Seekers, Fragments, and Spawn to come rushing out.
Gunning down a Seeker as it rushes out of the castle
When you see one shoot them down and push forwards to destroy the Rift Anomaly on the other side before it spawns any more enemies.
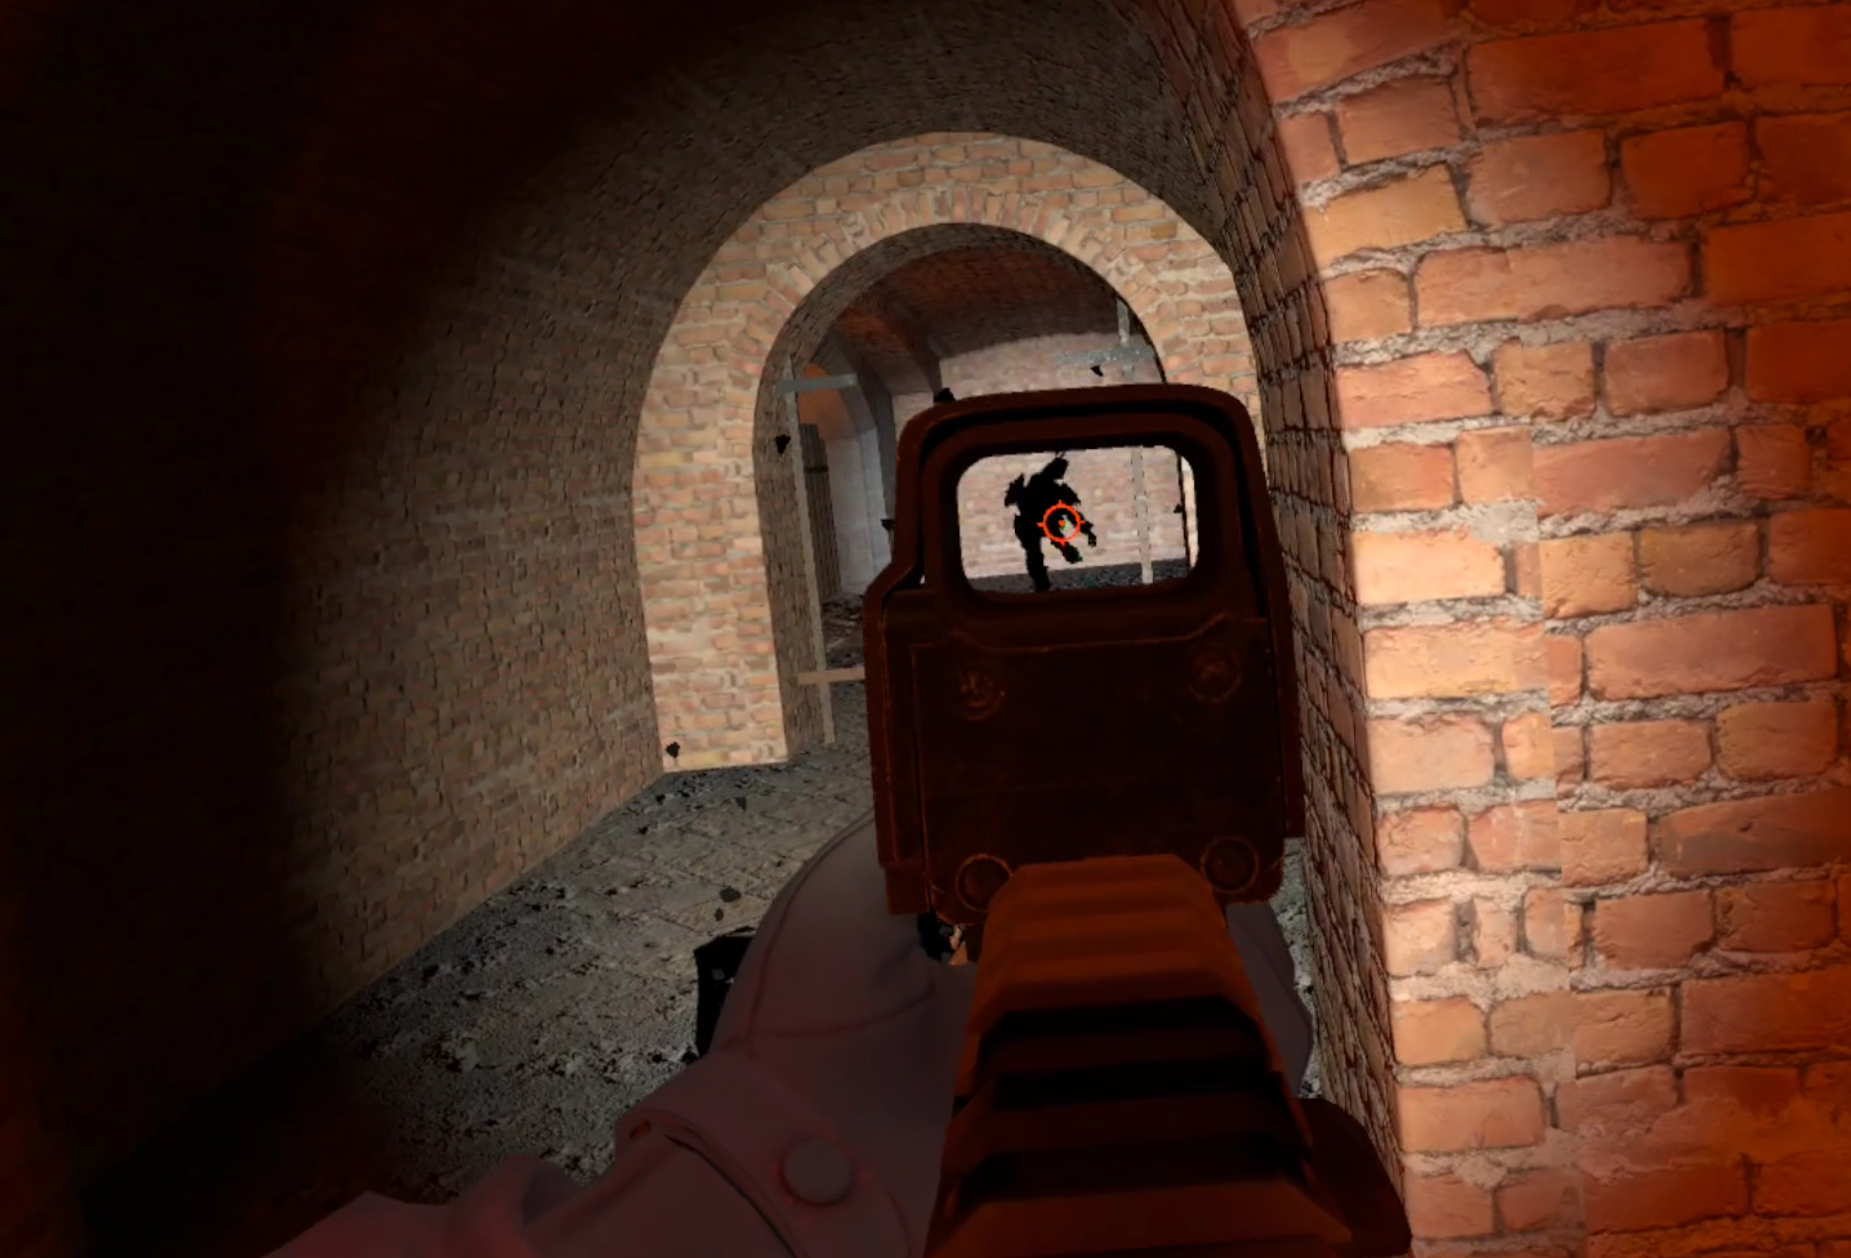
A Rift Anomaly right inside the castle entrance
It’s a good idea to wait for at least a few seconds after you’ve made a bunch of noise with gunfire to see if any more enemies run around the corner to attack you.
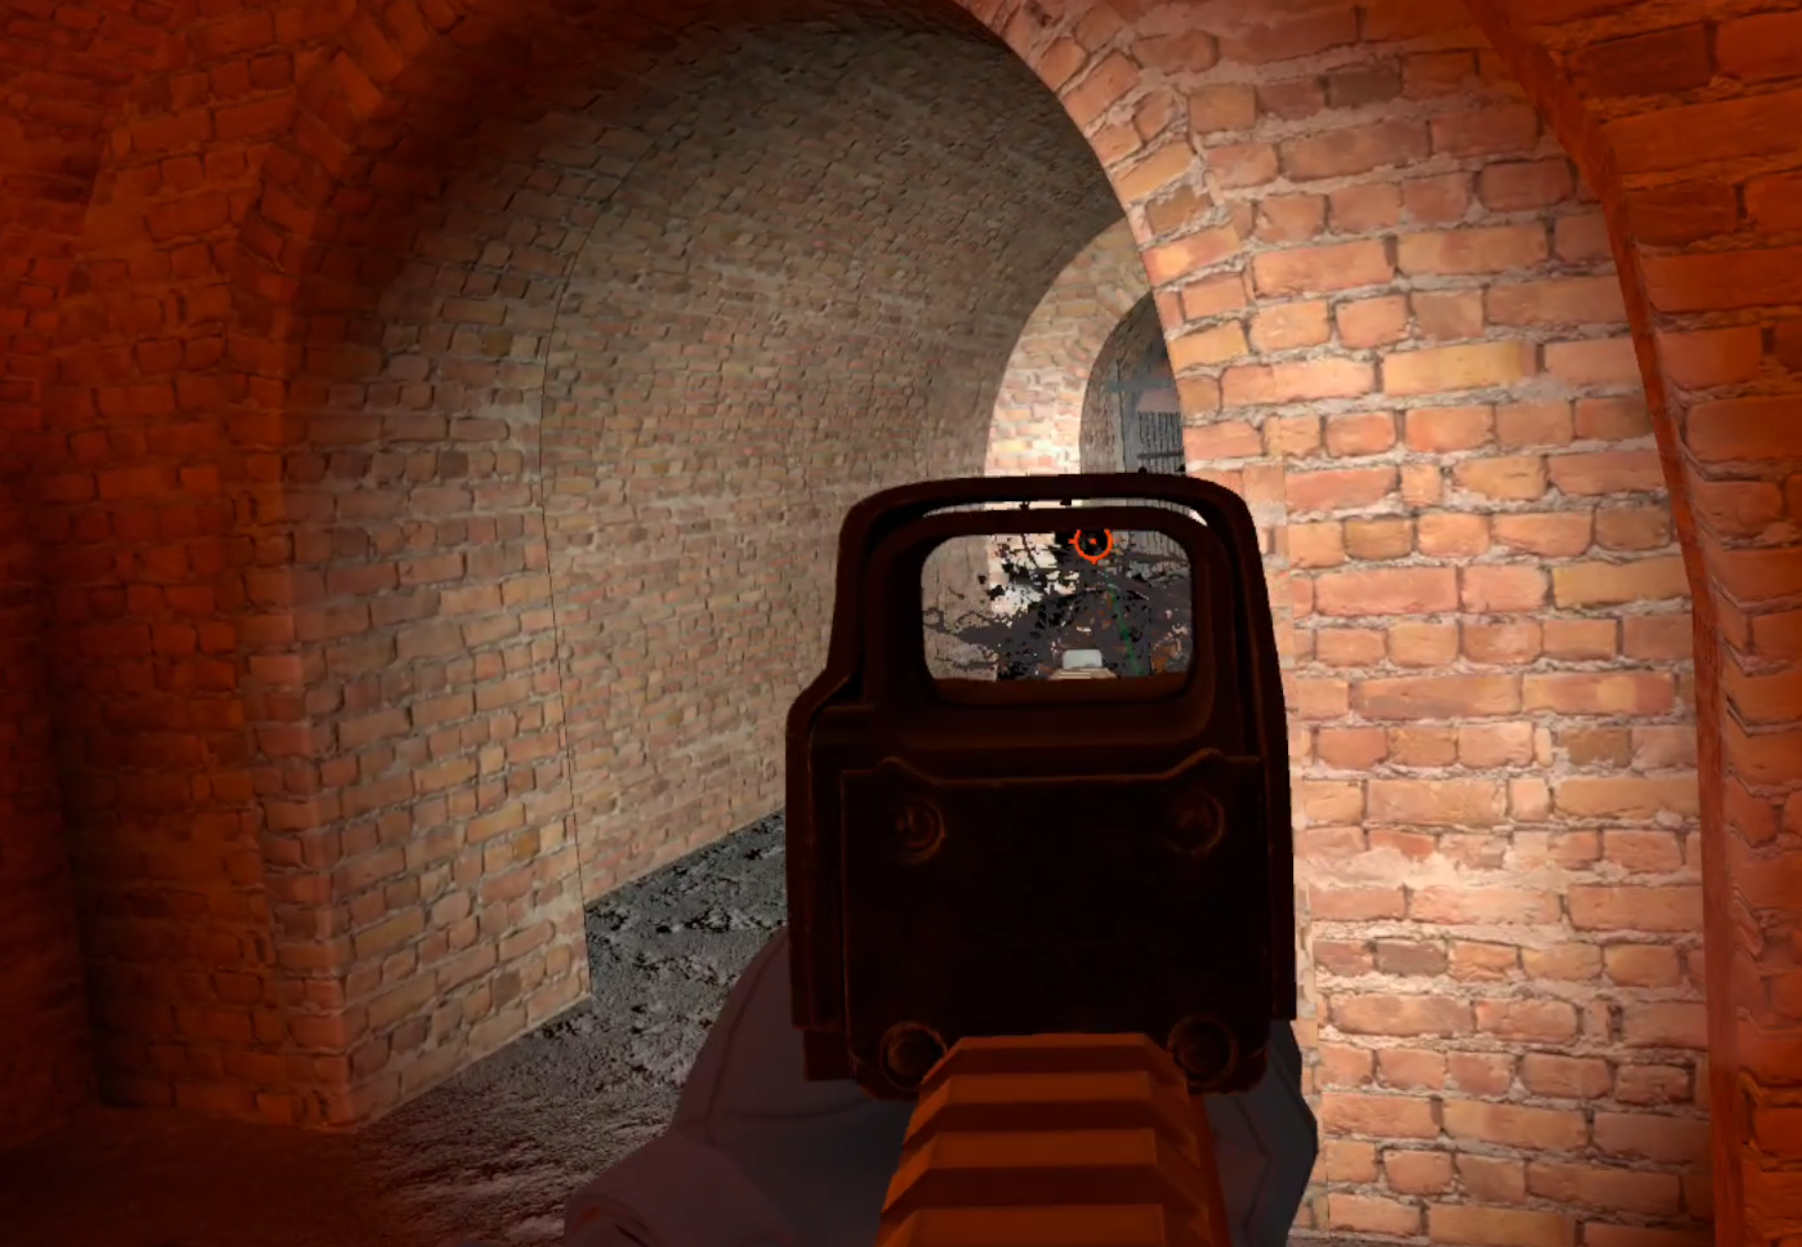
Once the coast is clear head forwards and take a right. Past the room containing the Rift you’ll take a quick left down a very short hallway pictured below into another. Be careful here. It doesn’t look like it but this room expands to your left and right, and there will be a squad of mimics in the next room waiting to ambush you.
If you wait for a moment or two you can hear them talking. If you’re lucky one or two might walk out to meet you, but most likely they’ll wait for you to walk further inside.

Mimic Soldiers wait in ambush around each corner here
You can flush them out by throwing some grenades around each corner, or try blind firing around the corners when you hear them, or quickly peak, take a shot, and fall back. You can also push a little bit into the room and hide behind the pillars inside to block the lines of sight of the other Mimics inside.
This many mimics can take you down very quickly if they fire together, so don’t expose yourself for too long. Once you’ve made some noise and have their attention fall back, heal, and then peeking back in to take one or two down quickly, or try to bait them into coming towards you.
This is definitely the section of the castle where grenades are the most useful, so don’t spare them if you’ve got them. You’ll probably have to take a few shots, but this room is very clearable if you’re careful and quick about it.

The bed inside the castle, just ahead and to the right is a doorway leading forwards
Past this room you can take a left and see a long corridor with a bed in it. This bed is actually useable, though right now isn’t a very good time to use it. As you walk towards it there will undoubtably be more enemies through the doorway on your right, which is also guarded by a patch of Black Grass.
There will also be some arches that you can’t walk through because they have grates on them, don’t be lulled into a false sense of security by these grates. Mimics can still shoot through them, and so can you, so always watch them as you go by.
Once you’ve cleared the first group of Mimics, and whatever Fragments lied beyond them near the bed, your path continues past the Reflector anomaly after the doorway covered in Black Grass.

A Mimic lying in wait past the indoor Reflector Anomaly. Always stay alert while you go forwards
As always constantly be on the lookout for enemies ahead of you, and squeeze past the anomaly on the left to go to the store room beyond it.
This room will have some shelves with various pieces of loot on them, so feel free to grab a snack. This is also not a bad place to reload some magazines and heal.
There is a short period of relative calm here after the huge firefight you just had. Keep going forwards through the corridors. You’ll pass some metal beams and large pieces of concrete, and a room that’s dominated by natural rocks.

A caved in room inside the castle
There may be some sparse enemies here, but most if not all will have been drawn by your huge firefight earlier.
After the caved in hallways you’ll find yourself in a large room, the room on the other side of the grate with the dead soldier near the entrance. If you didn’t grab those Saiga 12 magazines you can grab them here as well.

The other side of the grate with the saiga magazines
Going to the other side of the huge room you’ll see another manifestation of dark Katya facing another doorway.
Head through it, and be wary that more enemies might come at you as you make your way through the next hallways, which are all full of Black Grass.
Use your Head Lamp to deactivate the anomalies and run through them. Though you’ll start to hear the telltale sounds of Lightning anomalies as you head into this room.

Be careful in this room, it is full of lighting anomalies
This room is filled with Bolt Anomalies, though luckily they are all very small and it is complete possible to make your way through without being hit by a single one of them.
Throw a probe very gently, and just a little bit in front of you. If the probe doesn’t trigger the anomaly then follow its path directly, just a little deviation can get you a serious shock and a lot of damage.
First hug the left hand wall and then head between the shelf and the cable reel to the left of it. Then go straight towards the shelf next to the doorway leading out and hug that shelf as you go through the doorway.

The doorway leading out of the Lightning Anomaly room
Take your time and you’ll be alright, you can make it through the Lightning Anomaly Room. Once you’re through there will be another room with some Black Grass in your way.
Though once you find yourself at some wooden planks leading across some water be careful, as there’s very likely going to be a Mimic waiting to ambush you on the other side.

Ambushed by a Mimic. Always stay on your toes in the Castle
After dealing with this ambush keep going onwards past a ton more Black Grass.
Making your way past this anomaly should be easy by now, and after shining your way through some more patches of it you will find yourself finally free from the confines of the inside of the castle, with the light of day greeting you.

The ladder up to the walls
Past a blue wall you’ll see a ladder leading upwards to the walls of the castle. Head towards it and climb up.
Once you’re at the top take a left instead of going straight forward from the ladder, so that you’re facing this tower and the huge anomaly field surrounding it.
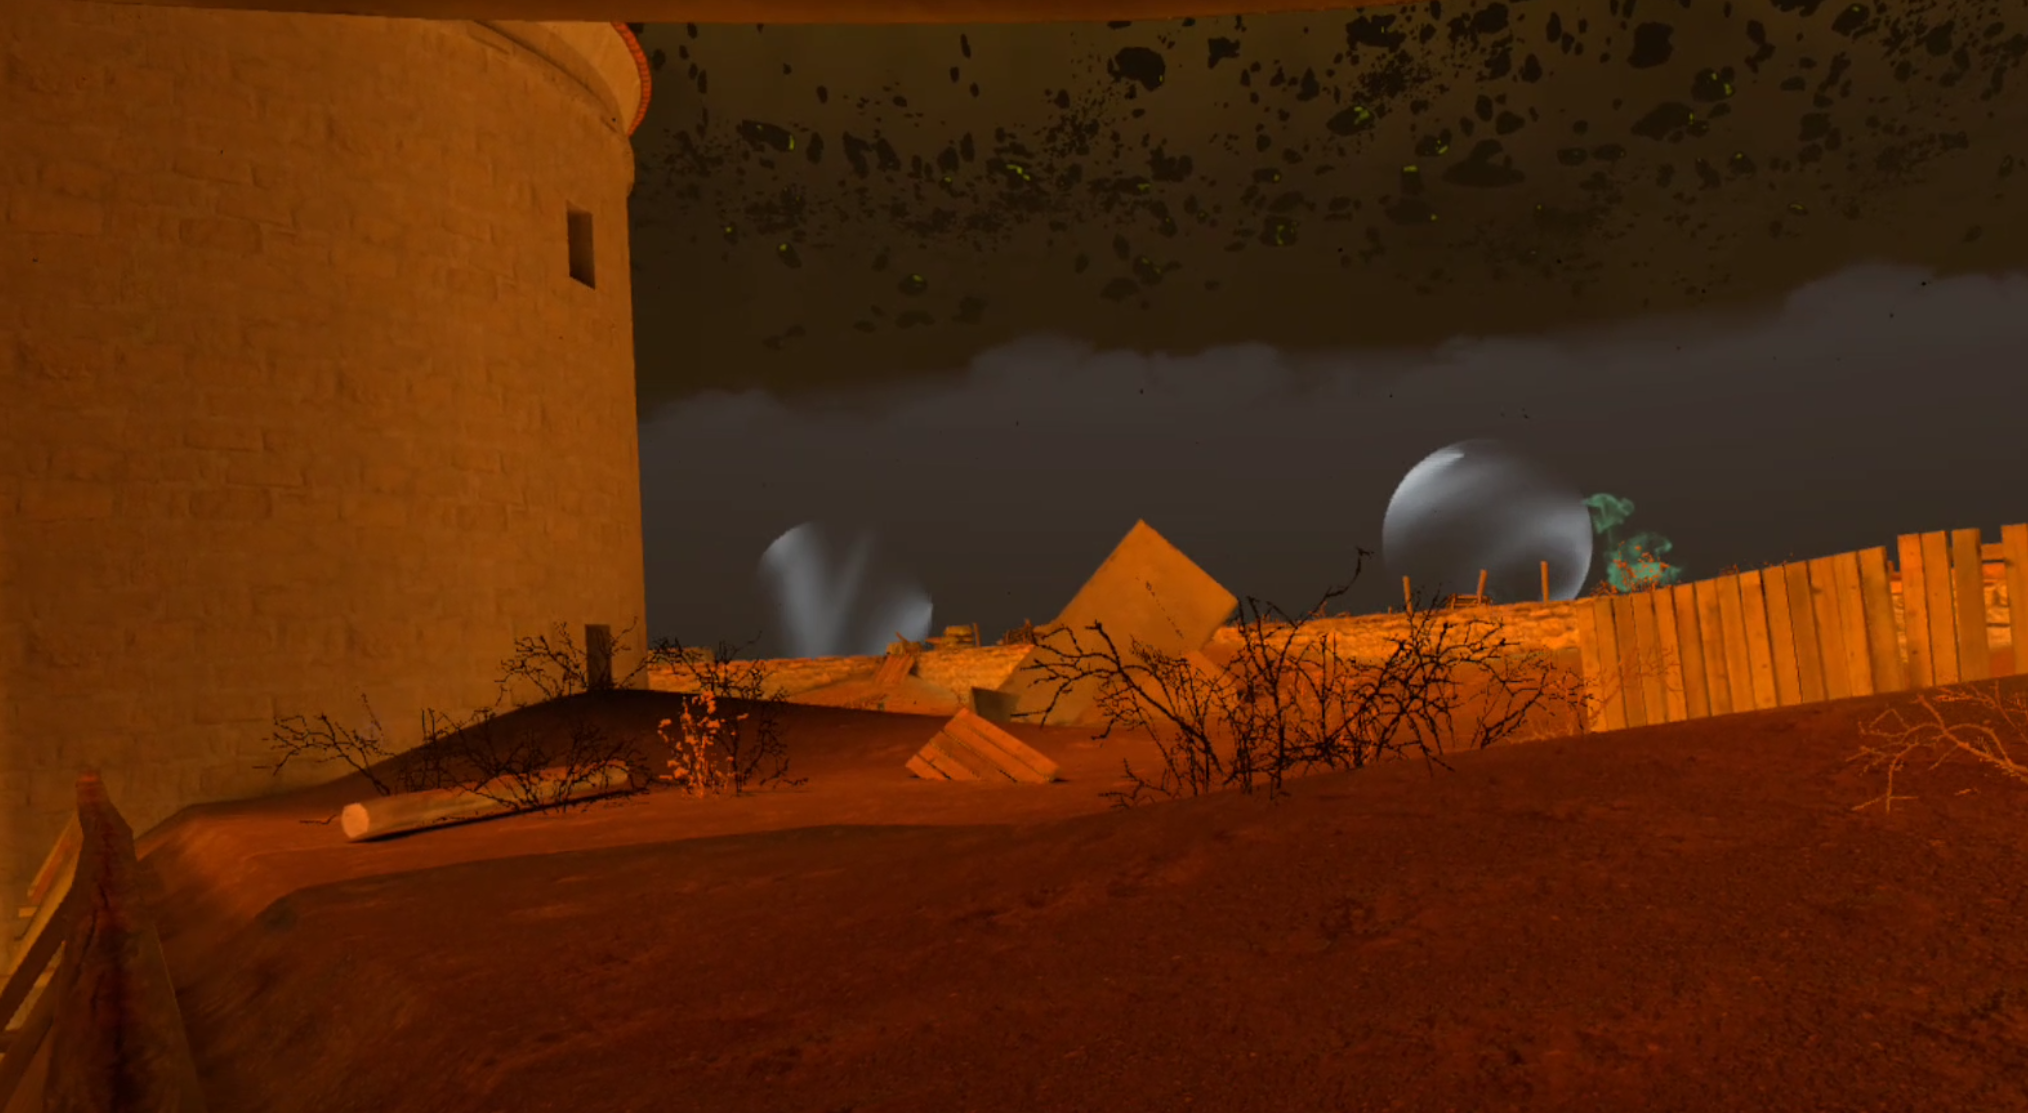
A huge anomaly field you’ll have to find your way through
Now is a good time to take off your helmet and put on your gas mask. You’ll have to head straight through this anomaly field.
It should be pretty easy if you use your probes, you should have a lot of practice by now. At first the anomalies will be mostly Reflector and Distortion Anomalies that you’ve been avoiding ever since the very first map of the game.
Weave your way through the anomalies until you’re on the other side of the tower, and take a little wooden ramp leading up to the top of the wall.

This ramp leads between the anomalies and up to the next level of the wall
You’ll start to see some more gas anomalies once you’re on the upper level, just keep making your way to the north.
You’ll see more gas anomalies once you’re on the other side of the tower, that’s why it’s so important to have brought a gas mask. Once you’ve made your way through the worse of the field you’ll see a long stretch of open wall in front of you.
Now is a good time to get your long ranged weapon ready. If there was ever a time for a little sniping in Into the Radius, it’s coming up now.

A long ranged scope is very useful here
Make sure your magazines are loaded. Once you go further down the wall you’ll see the central keep of Pechorsk Castle on your left.
In front of the gate leading in on the north end of the keep, and ahead of you on the wall, there will be another group of mimics spread out. There will also be at least one sniper among them.
As you make your way up the wall through the gas anomalies it’s important to stick to cover as much as possible. The Sniper Mimic will inevitably see you and open fire, though at such a long range they’ll probably miss at least the first few times.

The keep is on the left, keep going up the wall to your right and stick to cover
Where the two walls meet and become a corner you’ll also see some rocks floating in the air.

The floating rock formation at the corner of the walls
The Sniper will be perched on the wall to the left of these rocks, and other Mimics of various types will be near the sniper, near the rocks, or near the front of the castle to your left.
There are a number of ways to approach this situation. Sniping is the easiest, start by taking out the Mimic Sniper and then pick off the others as they try to sneak closer to you.
You can also get closer to them by moving a little down the wall to your right and advancing forwards towards the rock anomaly. There’s a lot of cover near it that you can work your way through to get closer to the enemy Mimics. Though this comes with the risk of being surprised and gunned down.
Also keep in mind that you’re also very likely to be attacked by Sliders, and possibly Spawn and other melee enemies. If you hear the telltale sound of Sliders teleporting closer to you then immediately break off fighting the Mimics and wait for the Sliders to appear, gun them down immediately. It can be easy to be clawed to death by the sliders while you’re busy with a firefight.
As always take your time when you can, and if you take a hit take cover and heal up.
Once you’ve cleared a path through the Mimics the entrance to the Keep is on the north side of it. Get ready for the final leg of your assault. Load your magazines before heading to the gate.

The entrance to the inner keep of the castle
Ouroboros - Finishing The Mission
Be careful going through the gateway to the inner keep. Immediately inside of it is a large courtyard, and just running out into it is very dangerous.
Instead keep your eyes upward and look to the top of the wall surrounding the inner courtyard. There will be mimics all around it waiting to shoot you.

The courtyard is a death trap if you don’t snipe the Mimics before they all see you
Slowly walk into the gateway, and when you see a Mimic stop and take them down. Rinse and repeat until you slowly reveal the entire wall.
If multiple Mimics see you at once it can be an easy recipe for disaster, but taking them out one by one makes this ambush very easy to fight through.

Carefully clear these walls before walking out into the open
Once the courtyard is clear of Mimics walk up the wooden stairway to the second level, and continue around the wall.
You’ll see a doorway leading to some stairs headed upwards, and another Rift Anomaly inside as well.

Be careful going up these stairways
Go up the stairway and through the small maze of rooms and stairways leading upwards. Be very careful turning each corner.
There can be Spawn, Mimics, and other enemies waiting inside, though hopefully at least some of them have been drawn out by your previous battle through the courtyard.
Be very careful when you see the light of day again. The last stairway leading to the top will have a Mimic waiting to ambush you on it.

This Mimic can take you down by himself if you let him
Once you’ve fought your way through them you’ll find yourself in the room at the very top of the keep, and your Detector beeping like crazy.
Next to you is another black Katya, and a pedestal.
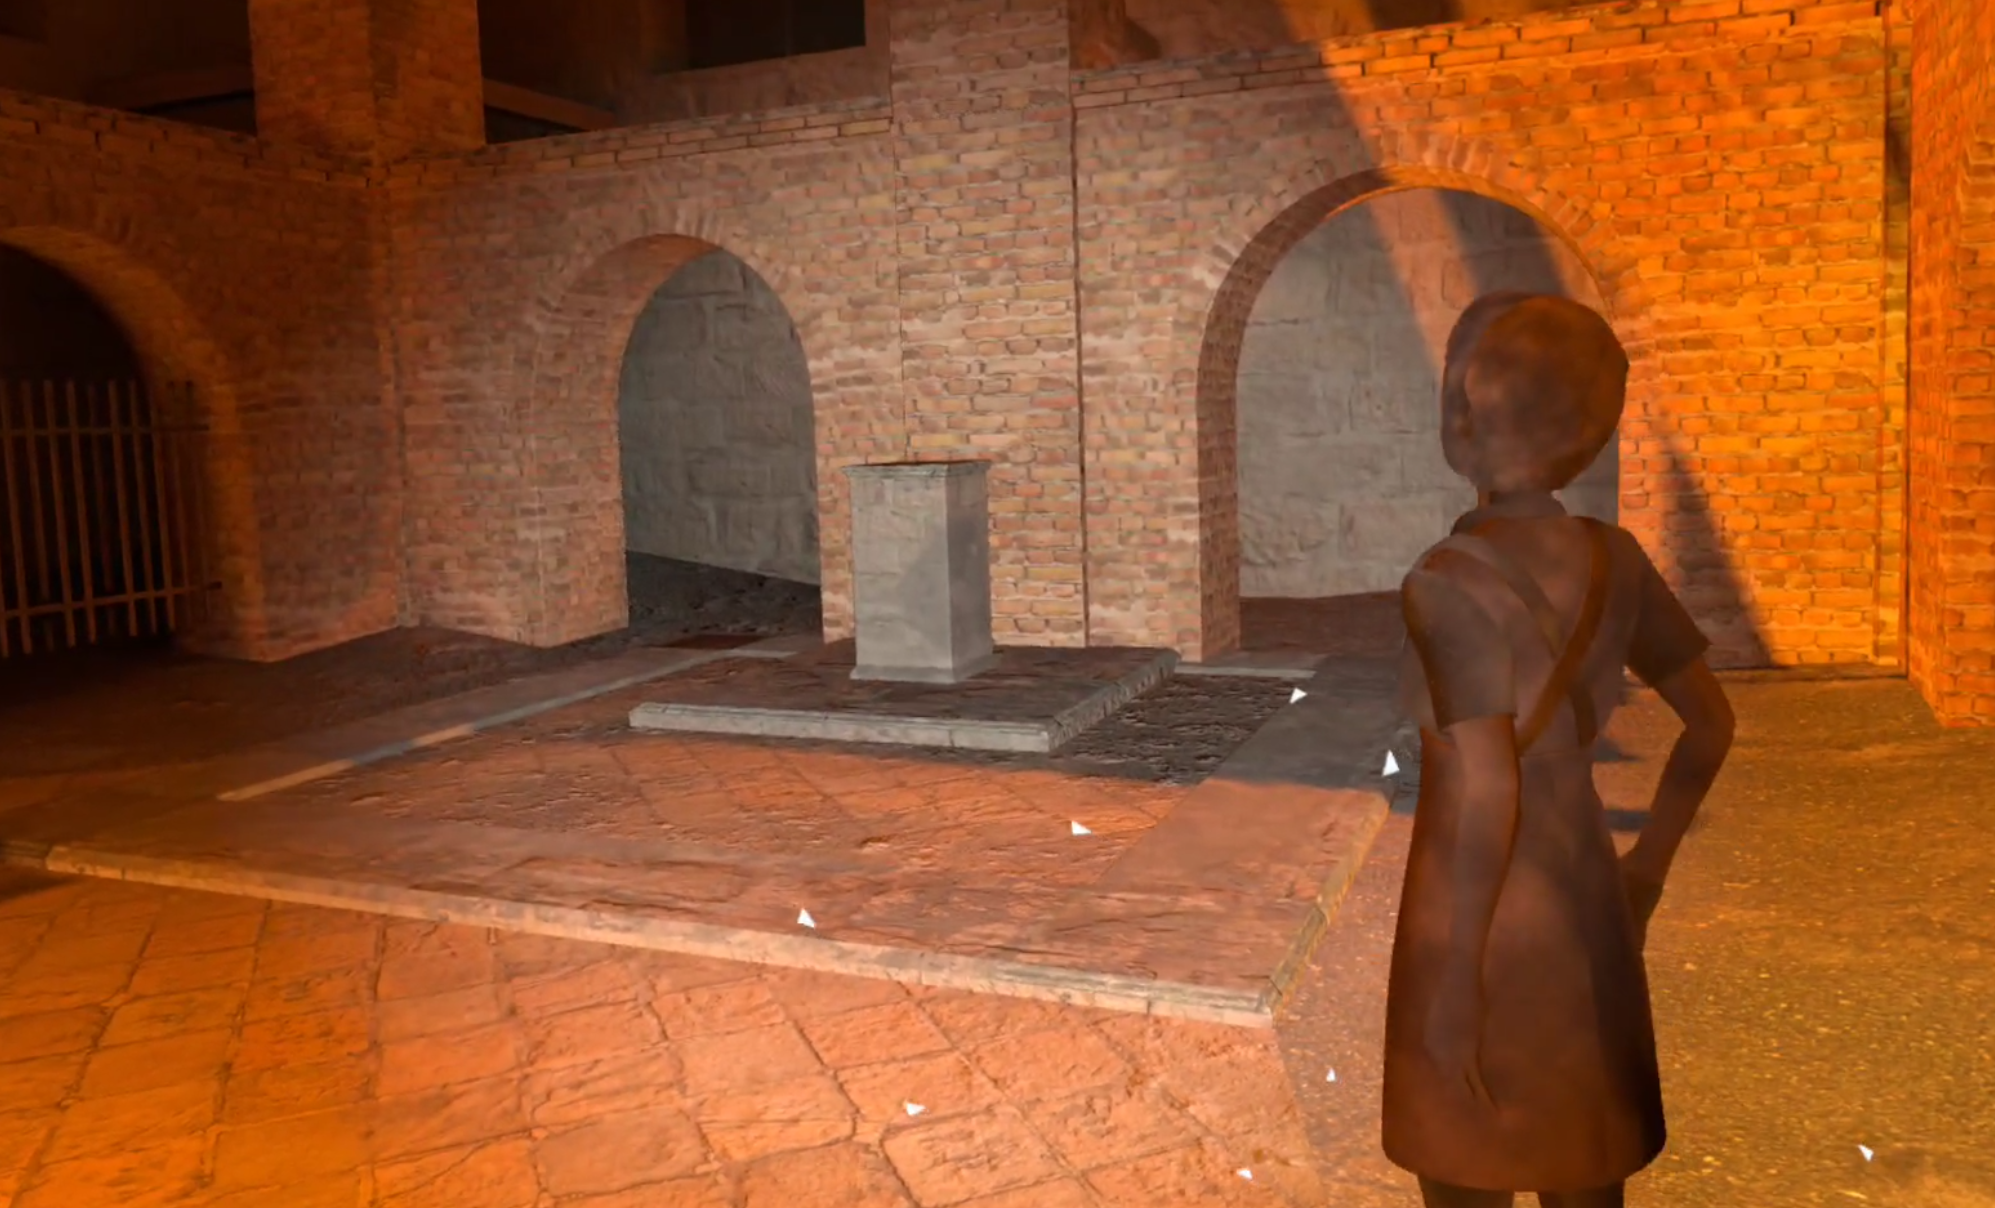
The final room of the game with the final Katya of the game
That pedestal contains the goal of this final mission, and the game. This is the end of Into the Radius. Once you’ve made it here you’ve made it to the end.
Take out your detector and use it to reveal the final artifact, the Grail, on the pedestal.

The Grail artifact revealed
Pick up the grail to reveal the ending to the game, though to avoid spoilers we won’t be talking about that here.
I highly recommend that you play through this level, experience it, and experience the ending of Into the Radius before reading about it here. This game is fantastic, and it deserves to be experienced first hand if you can do so.
For now this is everything you need to know to complete the final mission of Into the Radius Ouroboros. Whether you’ve already completed it or not, or when you do, take a moment before picking up the Grail to be satisfied with your accomplishment.
Getting this far is really hard, and Into the Radius is a very challenging game. So congratulations! Once you pick up the Grail you’ve accomplished a truly difficult victory in the world of VR gaming.
Also take a moment to think about the wonderful people over at CM Games who made this fantastic VR experience. Into the Radius took years of hard work from them to create, and they deserve some gratitude for crafting such a wonderful game.
If you want to see what happens at the end of the game after you’ve completed this last mission, then head over to our endings guide.