

Into The Radius Walkthrough And Guide - The Eighth Mission - Kids Playground
Stuck in Into The Radius? Wondering where to go and how to get there for your next mission?
Maybe you would just like to see what is in store for you before you get there, or you’d like to know if you’re properly prepared for your next mission in the Pechorsk Zone.
Well don’t worry we’ve got you covered with this walkthrough and guide for Into the Radius VR.
In this Into the Radius walkthrough we’ll detail how to progress through the main story “Top Priority” missions, with a couple of guiding tips thrown in here and there to make your adventure smoother.
The focus of these walkthrough articles will be the story missions, but we’ll throw in some general gameplay tips and other useful loot locations near your objectives.
These articles will also assume you’re playing the game on the Normal difficulty mode with Tutorials turned on, which is highly recommended for your first playthrough. This walkthrough will still be useful if you’re playing on Realistic difficulty, but some details like vendor prices or enemy placement and numbers will be different.
Here is every article in our complete Into the Radius VR Walkthrough:
Into The Radius Walkthrough And Guide - The First Mission - Equipment Retrieval
Into The Radius Walkthrough And Guide - The Second Mission - Total Recall
Into The Radius Walkthrough And Guide - The Third Mission - Fixing A Leak
Into The Radius Walkthrough And Guide - The Fourth Mission - Flash In The Dark
Into The Radius Walkthrough And Guide - The Fifth Mission - A Probing Move
Into The Radius Walkthrough And Guide - The Sixth Mission - The Intrusion
Into The Radius Walkthrough And Guide - The Seventh Mission - A Farewell Feast
Into The Radius Walkthrough And Guide - The Eighth Mission - Kids Playground
Into The Radius Walkthrough And Guide - The Final Mission - Ouroboros
Here we’ll be talking about the eighth Top Priority mission that you get in Into The Radius, A Farewell Feast, which brings you back to Kolkhoz Zarya to explore and fight your way through the train station and summon a ghost train with a one of a kind artifact.
Kids Playground - Loadout
The Kids Playground mission involves a lot of medium to close range combat, so you don’t want to bring a weapon that’s meant for long ranges. Most of your fighting will be done in and around the train station, so an assault or battle rifle is ideal.
Since at this point you’ll be Security Level 5, you might as well sprint for the best. That’s why we’re using the FN17, the most powerful and versatile assault rifle in Into the Radius.
It does degrade quickly, but not so quickly that you will need to bring along cleaning supplies for this mission if using this weapon in your loadout.
Of course you don’t have to bring the FN17 (aka SCAR) yourself, and this mission is perfectly manageable with an upgraded SMG or Security Level 3 or 4 rifle. At this point you know what you like best, but make sure you’re ready for very heavy resistance.

A sample loadout for the Kids Playground mission
Other than your primary weapon you may want to upgrade your sidearm as well if you haven’t for a while. In this sample loadout we’re using the Desert Eagle, but other powerful pistols like the OC-33 or M9 are also great end game firearms.
If you can’t afford the upgrades just yet then don’t worry, you can still finish this mission as long as you have plenty of ammunition, healing items, and a full set of armor. While in many missions silencers can be helpful, for the Kids Playground mission they are actually arguably a drawback, and in any case are unnecessary.
Other than that this loadout is fairly standard, though if you have some grenades sitting around now might be a good time to bring some along and use them. They might come in handy when clearing out the train station, but they are not a requirement to complete the mission.
As always once you’re kitted out accept the mission and head off.

The mission description for Kids Playground on the Terminal
Getting to Kolkhoz Zarya
Just like in the last mission you’ll be headed back to Kolkhoz Zarya, and we’ll be taking the same route through Bolotky Village as last time.
So take the rope line leading to Bolotky and then immediately turn north. Your destination is at the northern end of the train tracks.
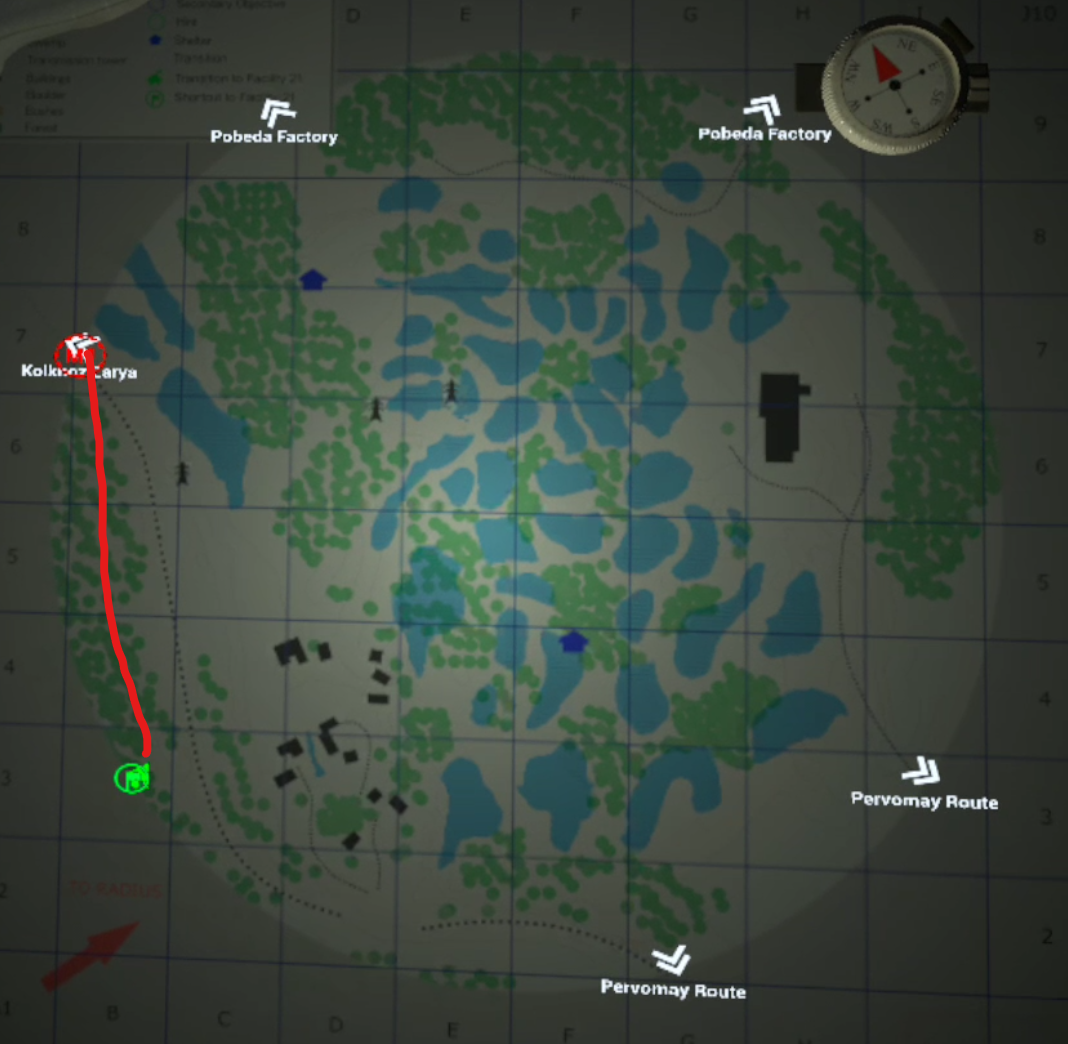
The route through Bolotky Village
Shoot the few enemies in the woods as you head north, and avoid the Web Anomalies.
As always you’ll probably run into a small cluster of enemies by the oil tanker near the rope line to Kolkhoz Zarya. They should be really easy for you by this point in the game, so don’t worry too much about them.

The route to Kolkhoz Zarya
Once you’re at the rope make sure your health is topped up, you’re well fed, and your magazines are fully loaded. Kolkhoz Zarya is where the fight really begins.
Kids Playground - The Train Station
Very conveniently this path will spit you out right next to the train station in Kolkhoz Zarya.
So you’re already near your objective, but you still have a choice of how to get inside. You could walk along the train tracks along the left side of the building and take the front entrance.
This is riskier than it may seem, as you can attract enemies from the fields further to the west, and even be spotted by the BTR. Not to mention once you get inside you’ll be in the middle of the trainyard and potentially surrounded by enemies on all sides. As you’ll see from this route we won’t be doing that.

The route to the train station in Kolkhoz Zarya
A less exposed approach to the train station, and the one that we will take, is to head around the right hand, eastern side of the building.

Go around the right side of the train station
Once you get on the east side of the wall you’ll see an anomaly field beside the building. Luckily you can get inside without having to walk through any anomlies.
Though there will certainly be enemies roaming around the exterior of the wall, so take them down. Once the outside of the wall is clear of enemies you’ll see a gate leading inside the train station compound.

The gate leading into the compound on the east side
Be careful when going through this gate. Once you go through you’ll possibly be exposed to a Mimic Solider in the rafters inside the train station.
A lot of mimics hide up in the upper catwalks and on top of the train cards inside of the train station. So one or two might be able to see you and fire on you as you go through the gate.

Taking out a Mimic Soldier from the gate
Take that mimic out and any that might walk outside to try and support it. Once the coast is clear get out of the gate and go to the right, where there is a long building.
You could go straight inside the train station if you want, you’ll want to clear it out anyway, but there will be mimics on either side of the opening leading into it on this side.
There are a ton of mimics inside the train station itself, and if you want to even the odds in the fight you have a few options.
Clearing Out The Train Station
There is a puzzle of sorts to spawn the train which carries the artifact, and we’ll get to that soon, but the main obstacle to your success in the Kids Playground mission is definitely the large amount of firearm equipped mimics in and around the train station.
Just running in is risky and will likely end up with you getting mowed down from a hidden mimic up in a rafter or waiting in ambush by one of the entrances.
So let’s play this smart. Once you’re inside the compound go the train yard through another gate, just keep going around the train station the way you’ve already been headed after taking that right from the gate.

The Train Yard
There are some train cars scattered around, and most likely a few enemies around them.
Take those enemies out, so that any that are left will only be inside the train station. Keep in mind that there’s likely also a Rift around, and if that Rift is inside of the train station it will respawn enemies if you take too long.
Either way you have some time, so a good strategy to use to lure some enemies out of the train station is to make some noise outside, which you likely did when clearing the enemies out outside of the train station anyway.
This will cause some of them to come wandering out, which makes them much easier targets.

Try to draw some of the mimics outside if you can
So take out whatever enemies you can lure, and then when you’re ready to go outside take the entrance on the western most side of the train station.
This way in has the fewest enemies watching it, and has plenty of cover.
Always keep an eye on the ceiling as there will be a few mimics that hang out up there and shoot down at you when they can see you.
Your first target should be the Rift if you can hear it. Once you’re inside go from firing position to firing position, wait for the mimics to come to you, and if they don’t go a little deeper.
Make sure you stay healed and methodically clear out the train station. There will likely be enemies hanging out in the corners and platforms, especially near the huge hangar door on the east side of the building.
The easiest way to get taken down is to be ambushed while out in the open, so stay near cover and be ready to react.

A lot of mimics will be on top of train cars or in hiding up high
Grenades aren’t necessary but can be especially helpful in flushing enemy pockets out without having to expose yourself to them, though grenades aren’t extremely effective in Into the Radius, so they’re more useful as a tool to force enemies to change position than to actually destroy them.
Once the train station is clear of enemies worry about completing the mission. Regardless there are some good loot spawns in there, and clearing the place out makes it easy to take everything that you can. Luckily you won’t have to walk back to Vanno.
Kids Playground - Solving the Train Puzzle
The puzzle to spawn the ghost train and the artifact it carries is actually very easy, you might even do it by accident while fighting the mimics in the station.
It starts with a black statue of a child out in the trainyard near the bridge to the north of the train yard.
The first child statue
Touch the statue and you’ll get your first clue: “If the driver’s cab is red, point your flashlight straight ahead!”
This refers to the train right in front of the smaller of the two gates into the train station. You’ll see it’s light glowing red. Shine a Head Lamp or other flashlight at the red light and you’ll hear a click as it disappears.
That’s the first half of the puzzle.

The train with the red light
Once you’ve done that, you’ll notice another child statue inside of the train station in front of one of the gates leading into the train yard itself.
Touch this statue to get the second clue: “If the driver’s cab in green, point your light and you will win!”

The second child statue
This refers to a second train that is right beside this second child statue.
Just as with the first train shine a Head Lamp or other flashlight on to the green light and you’ll hear a click as it disappears.

The green train
Once you do that just walk back out to the train yard, and you’ll see a big black train that looks like a mimic version of a train right in front of the gate that we took to get inside of the train station, or rather the gate with the train that had the red light.
This is the “ghost train” that I mentioned earlier.

The train that appears when you solve the puzzle
When you get close you’ll also notice your detector beeping.
Climb up one of the ladders on to the train car and use your detector to uncover the artifact that is the goal of your mission.

Uncovering the artifact on the train. Turn it in to complete the mission
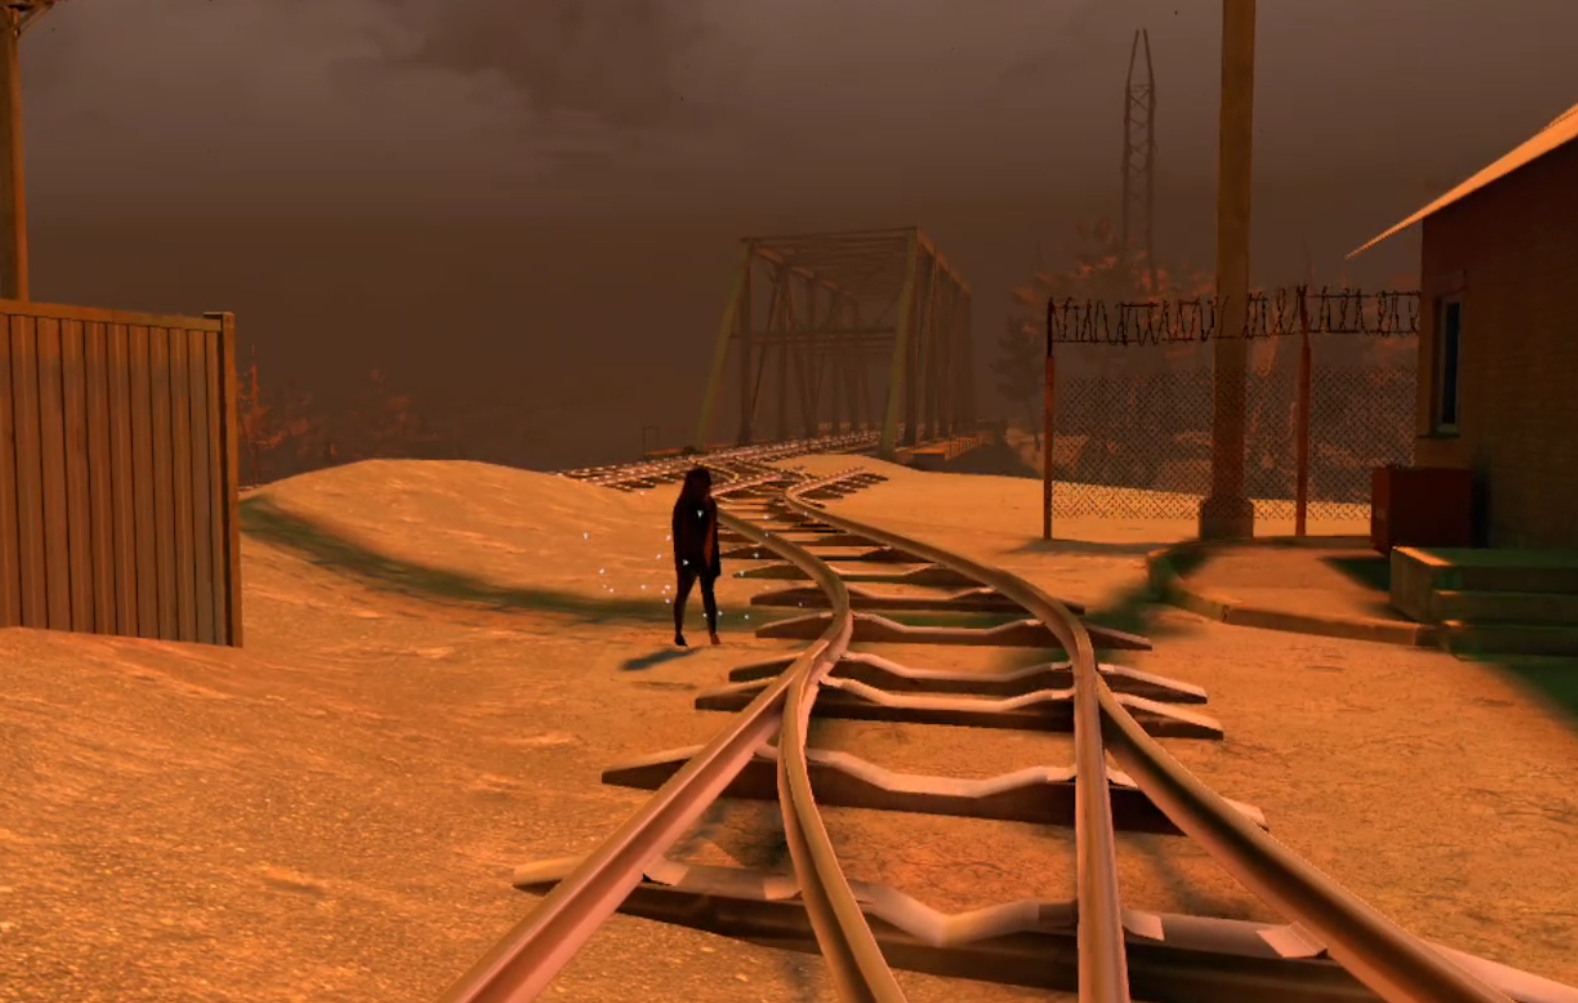
Now all you have to do is leave. You can go back the way you came, or you can stay on the train.
It will shortly begin moving down the tracks, towards the little green flag on the edge of your map that marks a path back to Vanno.
If you haven’t already taken this path back and unlocked it then I highly recommend you stay on the train. Though if you haven’t already cleared the bridge that it will go across of enemies then they will fire at you as you pass by.

Escaping on the train
Luckily the train makes for an excellent piece of cover, so the fight shouldn’t be so hard, and you can just wait until the enemies are next to the train before lighting them up.
Of course if you prefer you can also just make your way across the bridge normally. If your playstyle is more methodical then being forced to constantly move towards enemies might not be ideal.
Once you’re back in Vanno turn in the artifact and you’ve completed the mission.
Whether you take the train or not, make sure to come back and open up that route back to Vanno, as we’ll be using it in the next, and final mission of Into the Radius, which I’ll cover in our final Into the Radius VR walkthrough article.