

Into The Radius Walkthrough And Guide - The Fourth Mission - Flash In The Dark
Stuck in Into The Radius? Wondering where to go and how to get there for your next mission?
Maybe you would just like to see what is in store for you before you get there, or you’d like to know if you’re properly prepared for your next mission in the Pechorsk Zone.
Well don’t worry we’ve got you covered with this walkthrough and guide for Into the Radius VR.
In this Into the Radius walkthrough we’ll detail how to progress through the main story “Top Priority” missions, with a couple of guiding tips thrown in here and there to make your adventure smoother.
The focus of these walkthrough articles will be the story missions, but we’ll throw in some general gameplay tips and other useful loot locations near your objectives.
These articles will also assume you’re playing the game on the Normal difficulty mode with Tutorials turned on, which is highly recommended for your first playthrough. This walkthrough will still be useful if you’re playing on Realistic difficulty, but some details like vendor prices or enemy placement and numbers will be different.
Here is every article in our complete Into the Radius VR Walkthrough:
Into The Radius Walkthrough And Guide - The First Mission - Equipment Retrieval
Into The Radius Walkthrough And Guide - The Second Mission - Total Recall
Into The Radius Walkthrough And Guide - The Third Mission - Fixing A Leak
Into The Radius Walkthrough And Guide - The Fourth Mission - Flash In The Dark
Into The Radius Walkthrough And Guide - The Fifth Mission - A Probing Move
Into The Radius Walkthrough And Guide - The Sixth Mission - The Intrusion
Into The Radius Walkthrough And Guide - The Seventh Mission - A Farewell Feast
Into The Radius Walkthrough And Guide - The Eighth Mission - Kids Playground
Into The Radius Walkthrough And Guide - The Final Mission - Ouroboros
Here we’ll be talking about the fourth Top Priority mission that you get in Into The Radius, Flash In The Dark, which has you investigating the big gas anomaly in Bolotky Village. As far as Top Priority missions go this one is pretty straightforward and risk free.
The Fourth Mission - Flash In The Dark - Loadout
After completing the Fixing A Leak mission you can immediately accept Flash In The Dark from the Terminal.
As always make sure to accept the mission at the terminal when preparing.
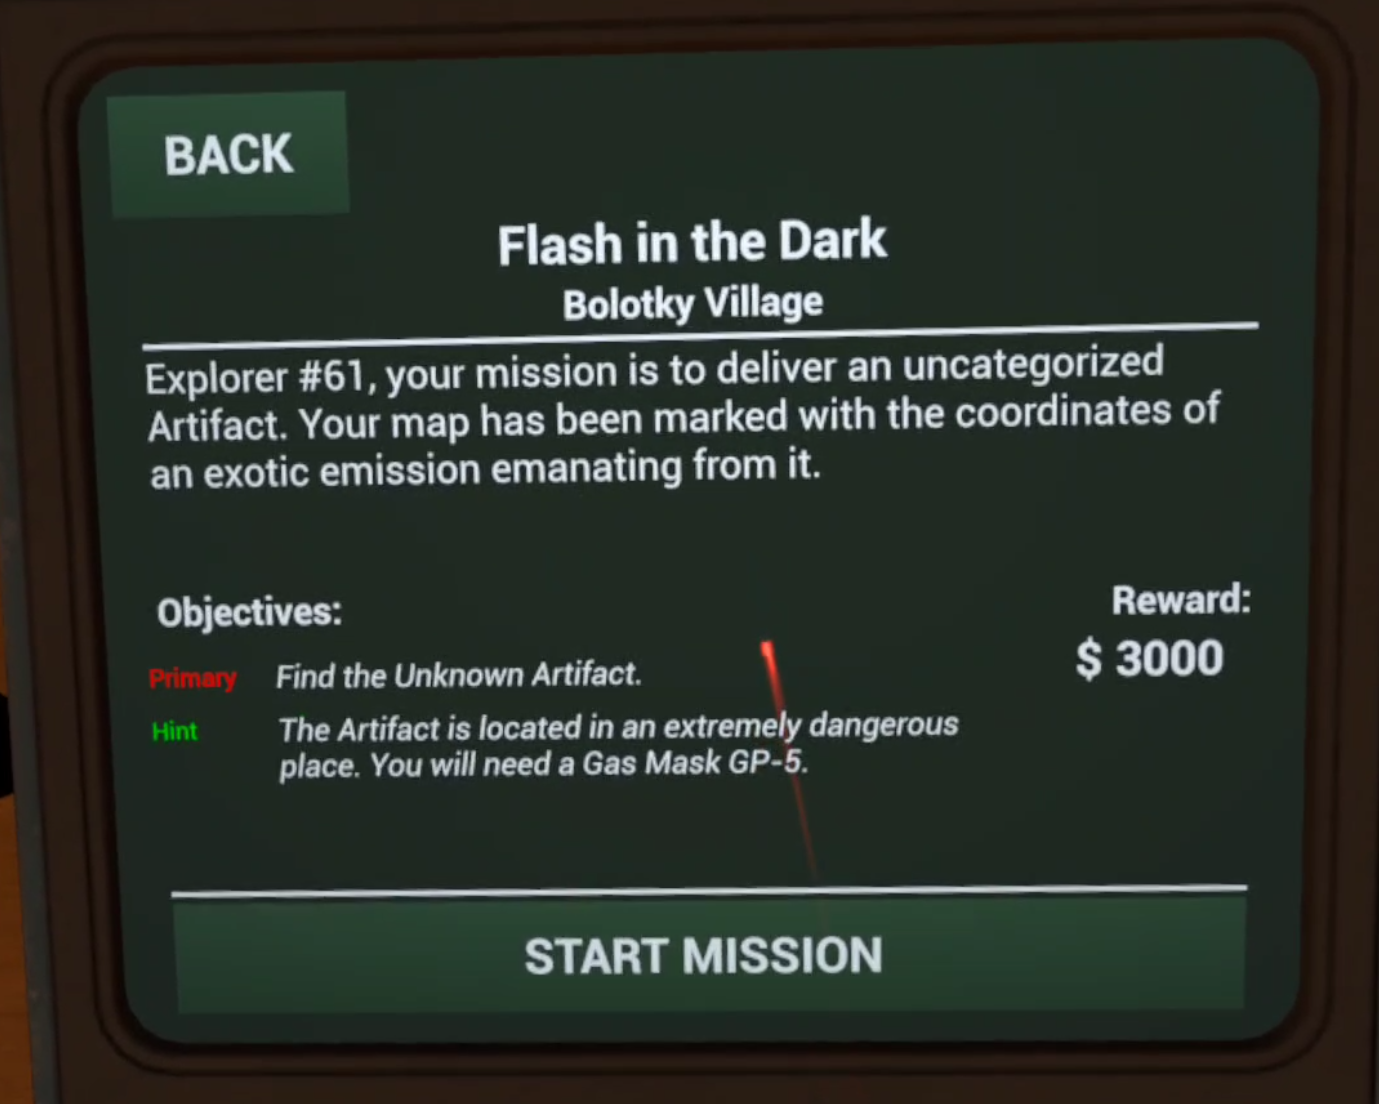
The mission briefing for the Flash In The Dark mission in Into The Radius
Now that you’re Security Level 2 you have a ton of pistols and SMGs to choose from at the shop. Not to mention shotguns.
At this point in the game you can always artifact hunt and do repeatable missions if you need more cash. Though you might want to save some of your money, because after the mission following this one, which also won’t involve a lot of combat, you’ll be hitting Security Level 3. This will give you a ton of options that are more powerful than anything at Security Level 2, and are also pretty expensive.
You won’t need a ton of firepower for this mission anyway. You’ll see in the sample loadout that I took along an SKS, but that is by no means necessary. There will be a few enemies around the anomaly field that you’re better off taking out, but you’ll be fine with just a pistol.

A sample loadout for the mission Flash In The Dark
Other than the gas mask and at least one weapon there’s all the usual stuff like food and some healing. Really the food and spare ammunition aren’t super necessary here either, but it’s always not a bad idea to err on the side of caution.
Probes and a Detector are even more vital than usual here as well, and aren’t pictured in the sample loadout.
For this mission there’s really no need to upgrade from the sawn off shotgun yet, but if you do having a better weapon is always a good idea if you’re planning on doing a lot of artifact hunting and repeatable missions afterwards.
Flash In The Dark - Getting To The Anomaly And Grabbing The Artifact
Now for the meat of the Flash In The Dark mission. As far as top priority missions go this one is very easy to pull off as long as you have a gas mask.
Head out through your new rope line to Bolotky Village. Once you’re there check your map.
Here’s the route we’re going to take.
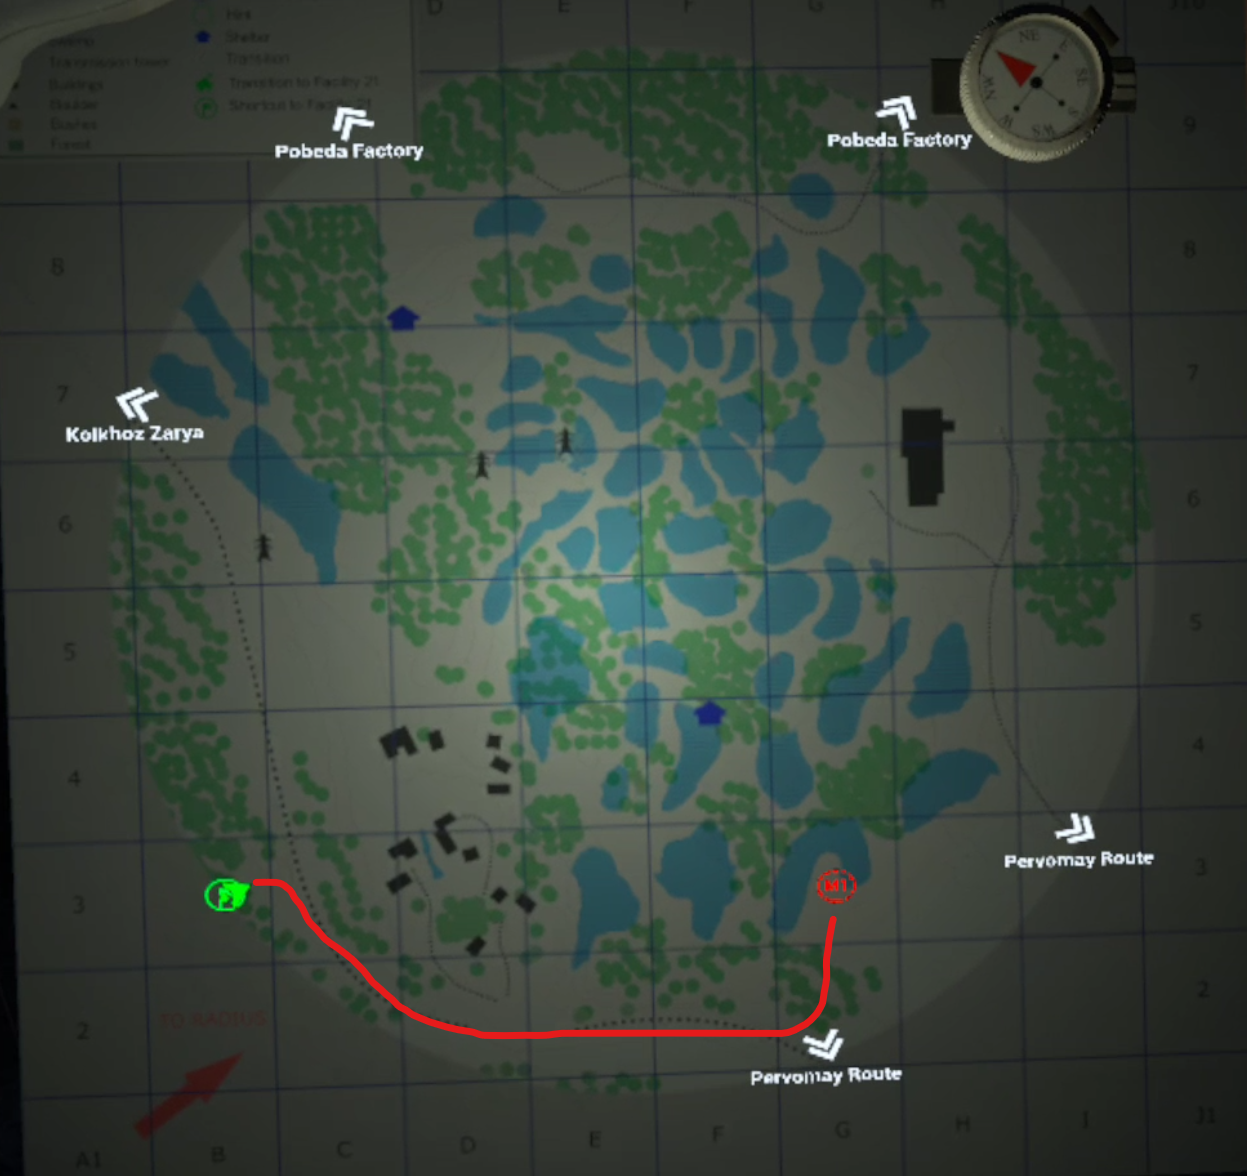
The route to the anomaly field with the objective of Flash In The Dark in it
Pretty simple. There may be a few enemies in the woods right outside of where you spawn in.
They’ll likely be Fragments and Spawn, so you can just run away down the train tracks without fighting them. Mostly you’ll just want to avoid drawing in enemies from the Village. So don’t get pinned down in the forest and keep moving.
Once you’re beside the tracks avoid the few anomalies in your way and keep following the rails until you see the rope line leading back to Pervomay Route.

The rope line leading to Pervomay Route, turn left here
Once you see it turn to the left (towards the north) and you’ll see a ruined mess of concrete and rebar with some green gas clouds floating around it.
Hop down the hill the railroad tracks are up on. You don’t have to take fall damage, there’s a little ramp of dirt leading up to the rails.
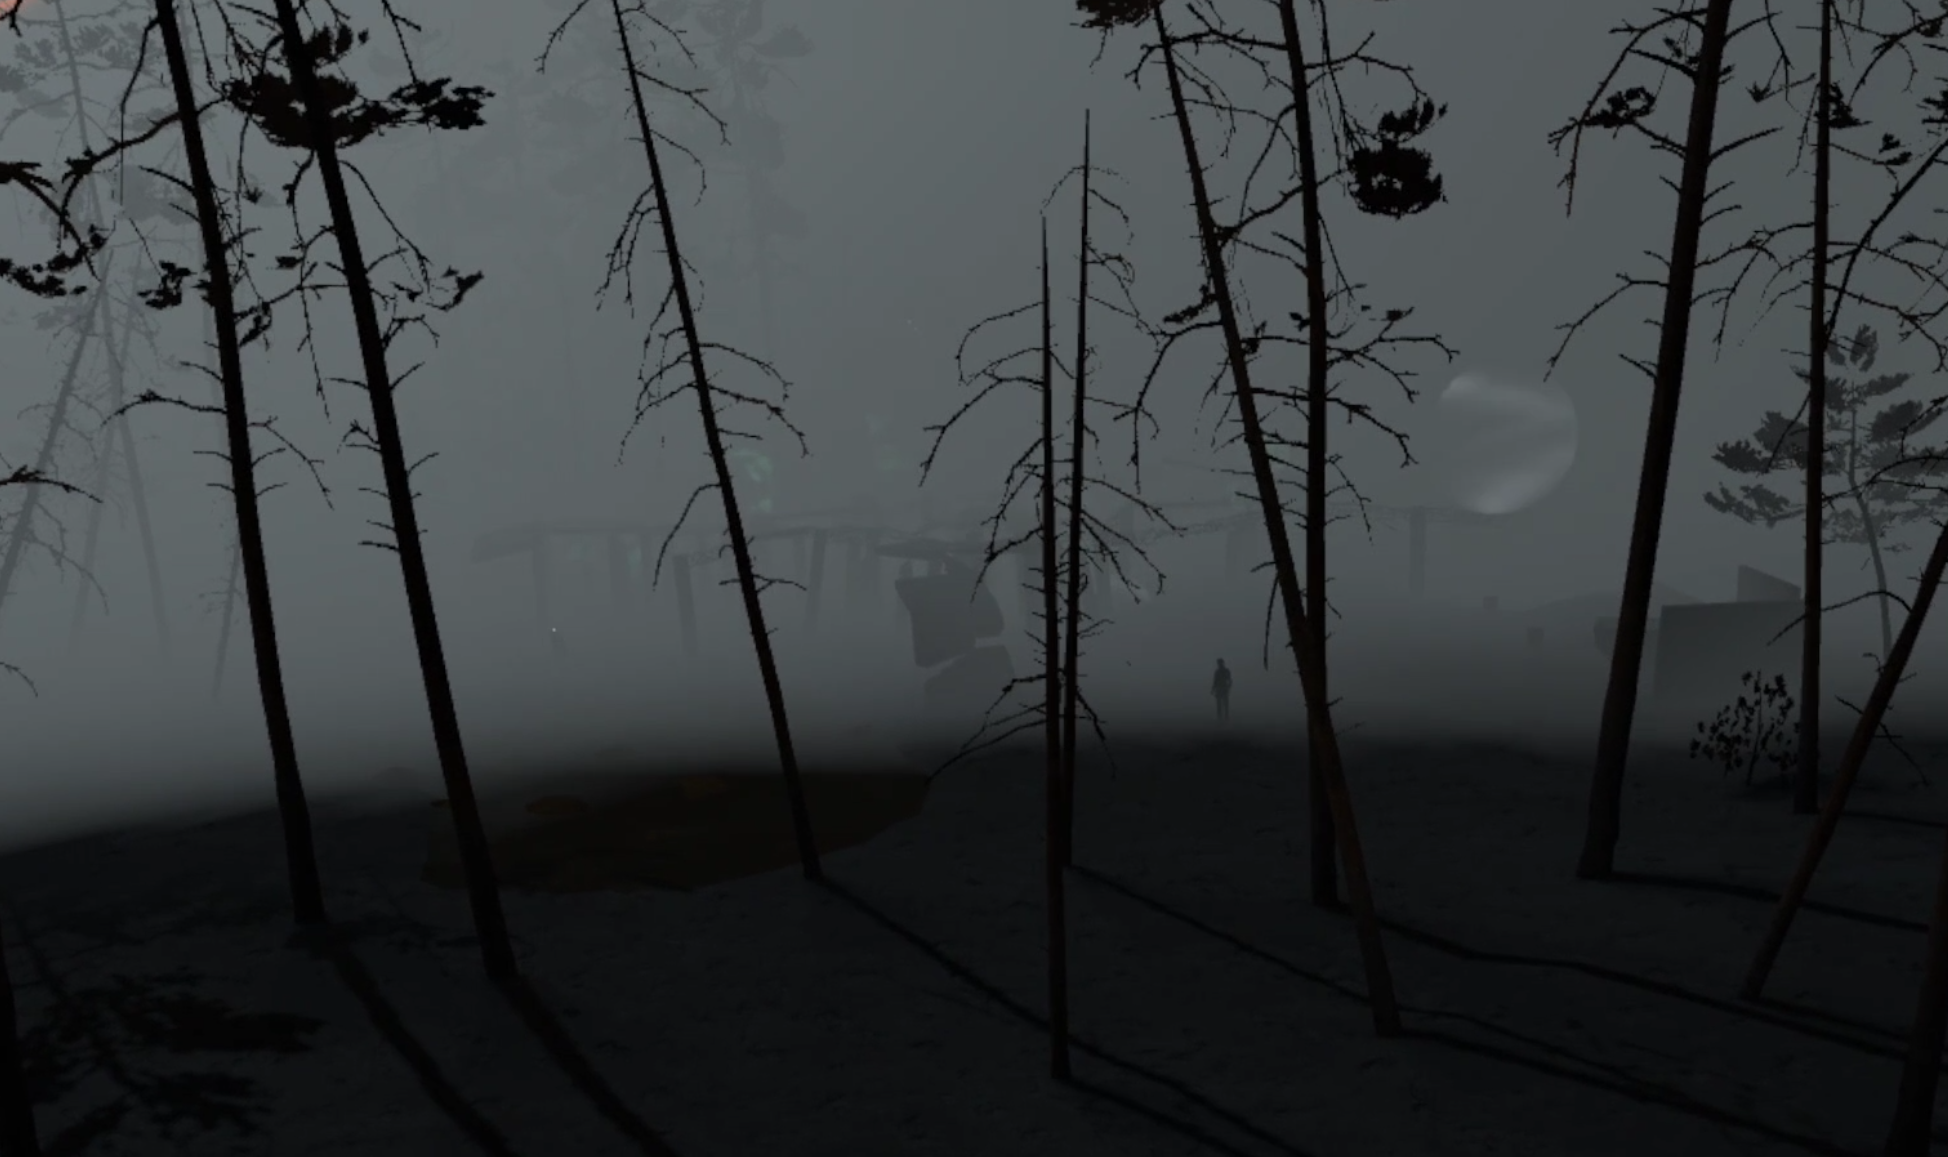
The anomaly field with the mission objective in it
There’ll be a black statue man with some dialog if you touch him, and at least one Seeker hanging around.
Take them down. One or two more might get drawn from further into the swamps, but as far as fights in Bolotky Village go it will be a very easy fight. If you get unlucky and a Mimic Policeman gets drawn in you can always take cover by the dumpster next to the anomaly field, wait for them to get close, and pop a few rounds into them.
Near the man you’ll see a ramp going up into the anomaly. You’ll also hear your detector beeping as you get close.
Make sure there aren’t any enemies on your tail before you head in, and when you’re ready put your gas mask on and go up the stairs by the black statue. There won’t be any artifacts on the ground floor, they’re all up on top of the concrete and rebar maze.

The stairway leading up into the area with the artifacts inside
You must have your gas mask on or the gas clouds will kill you quickly. Once you’re up the stairs get your probes and detector out.
You need to focus on not walking into the few Anomalies that are up on top of the ruins, and not falling down into the field of anomalies below you.
If you do fall you won’t take any damage unless you fall into an anomaly, and then you can work your way out of the field and go up the stairs again.
Carefully walk along the concrete and rebar. The artifact you’re looking for will likely be on one of the concrete platforms.
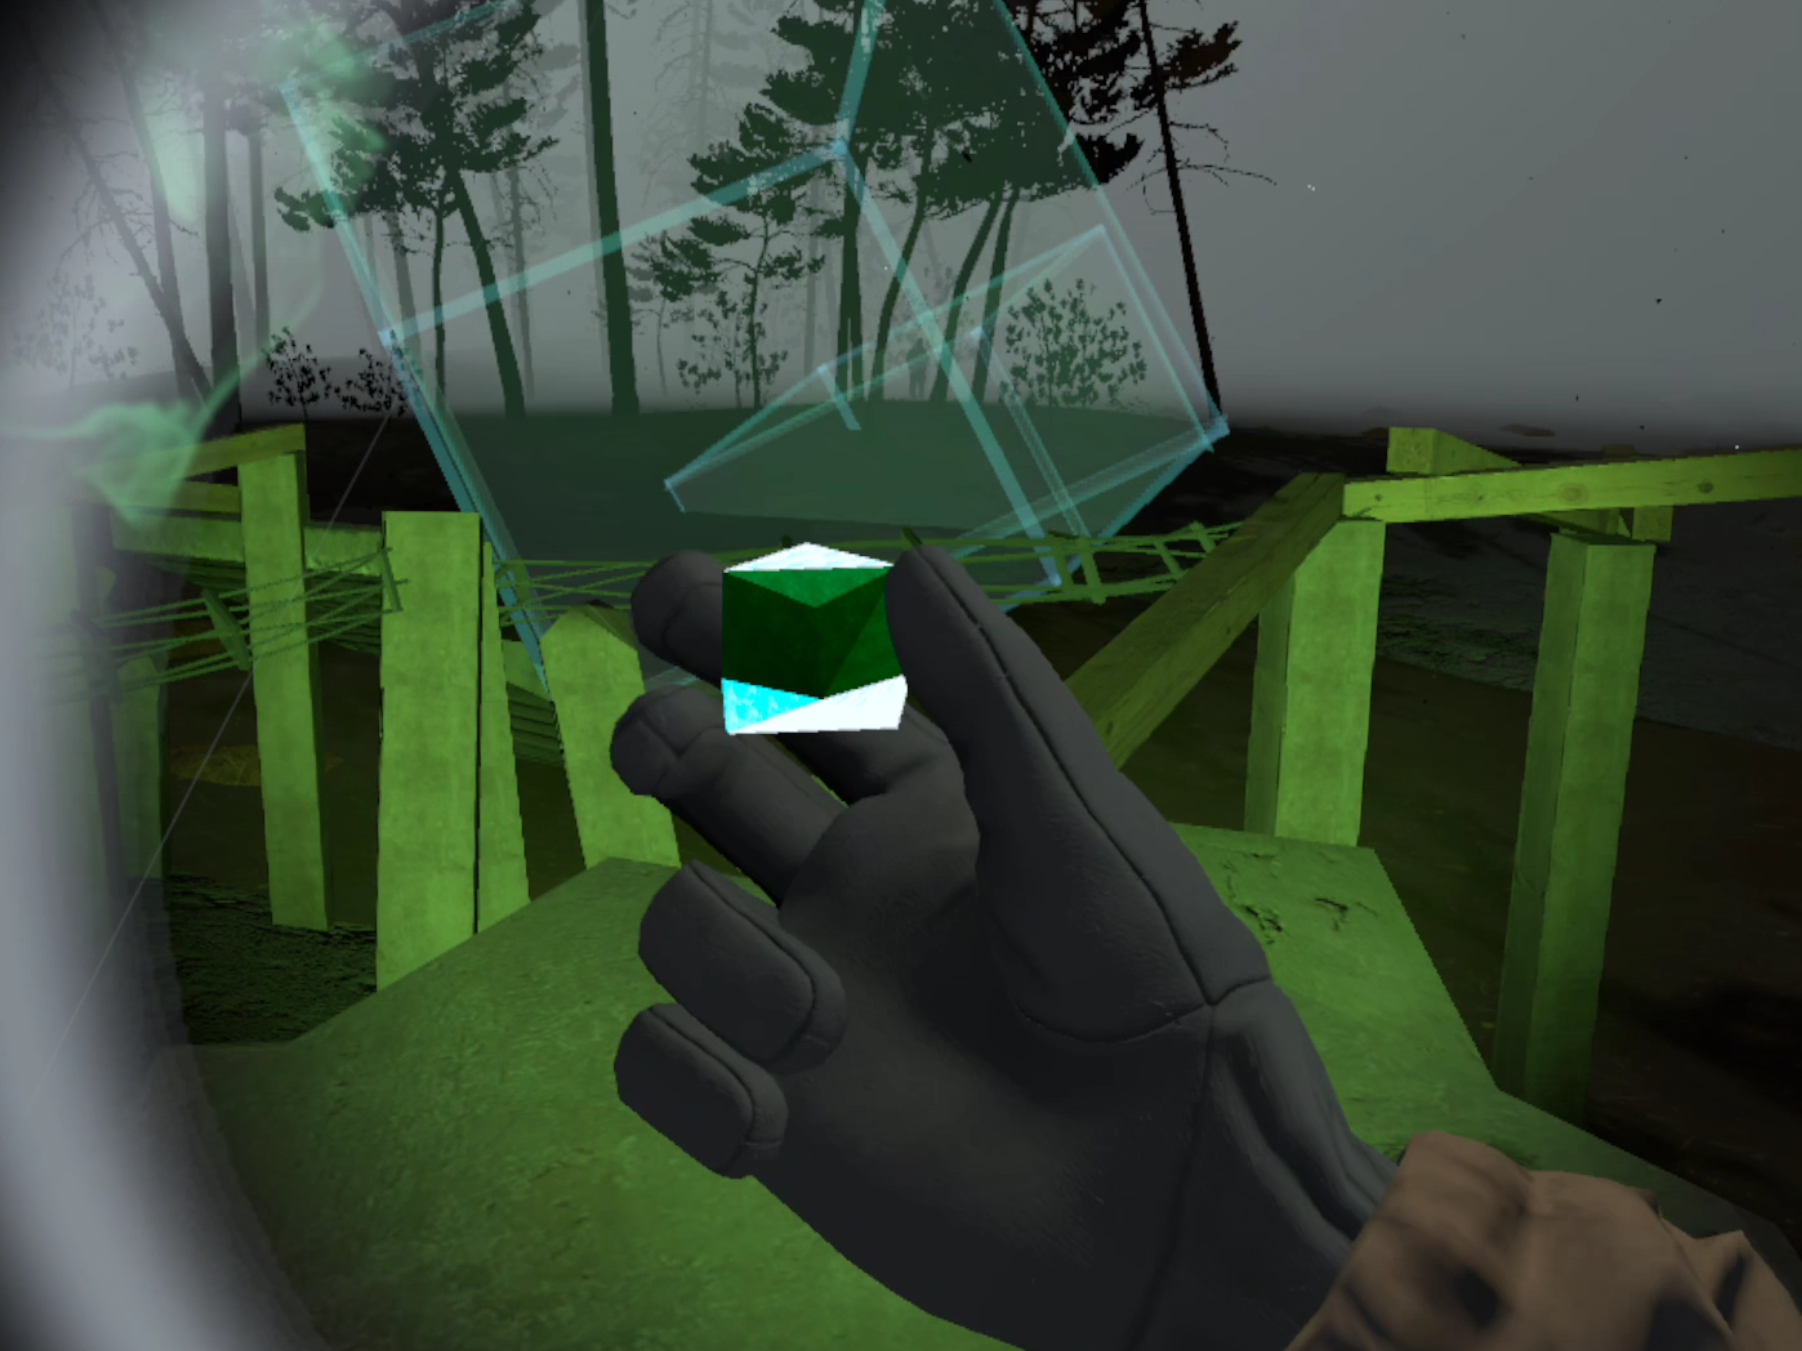
The Unknown artifact needed to complete the mission
Of course that won’t be the only artifact here in the ruin, and while you’re here you might as well collect all of them for the extra cash.
There will always be a way around the anomalies to artifacts without having to walk through one, so if you feel stuck just be patient, use your probes, and find a different route.
If you want more advice on artifact hunting then check out this artifact hunting guide.
Once you’ve got the goods and some extra artifacts to boot just go back down the stairs and hike towards the train tracks. Walk back up the hill and return to Vanno the way you came. Easy mission, easy money.
Congratulations on completing the fourth mission! Next time we’ll be talking about the fifth Top Priority mission in Into The Radius in Part Six of our Into The Radius VR Walkthrough.