

Into The Radius Walkthrough And Guide - The Fifth Mission - A Probing Move
Stuck in Into The Radius? Wondering where to go and how to get there for your next mission?
Maybe you would just like to see what is in store for you before you get there, or you’d like to know if you’re properly prepared for your next mission in the Pechorsk Zone.
Well don’t worry we’ve got you covered with this walkthrough and guide for Into the Radius VR.
In this Into the Radius walkthrough we’ll detail how to progress through the main story “Top Priority” missions, with a couple of guiding tips thrown in here and there to make your adventure smoother.
The focus of these walkthrough articles will be the story missions, but we’ll throw in some general gameplay tips and other useful loot locations near your objectives.
These articles will also assume you’re playing the game on the Normal difficulty mode with Tutorials turned on, which is highly recommended for your first playthrough. This walkthrough will still be useful if you’re playing on Realistic difficulty, but some details like vendor prices or enemy placement and numbers will be different.
Here is every article in our complete Into the Radius VR Walkthrough:
Into The Radius Walkthrough And Guide - The First Mission - Equipment Retrieval
Into The Radius Walkthrough And Guide - The Second Mission - Total Recall
Into The Radius Walkthrough And Guide - The Third Mission - Fixing A Leak
Into The Radius Walkthrough And Guide - The Fourth Mission - Flash In The Dark
Into The Radius Walkthrough And Guide - The Fifth Mission - A Probing Move
Into The Radius Walkthrough And Guide - The Sixth Mission - The Intrusion
Into The Radius Walkthrough And Guide - The Seventh Mission - A Farewell Feast
Into The Radius Walkthrough And Guide - The Eighth Mission - Kids Playground
Into The Radius Walkthrough And Guide - The Final Mission - Ouroboros
Here we’ll be talking about the fifth Top Priority mission that you get in Into The Radius, A Probing Move, which includes your first trip to the third map of the game, Pobeda Factory. All you’ve got to do is get in, grab a tape recorder, and get out.
The Fifth Mission - A Probing Move - Loadout
After completing the Flash In The Dark mission you’ll have to do a repeatable mission before A Probing Move will appear on your terminal.
It’s not a bad idea to get some extra money before completing a Probing Move. As you’ll see from the mission description you’ll reach Security Level 3 after completing it, and at Security Level 3 a lot of new and very good weapons and armor become available.
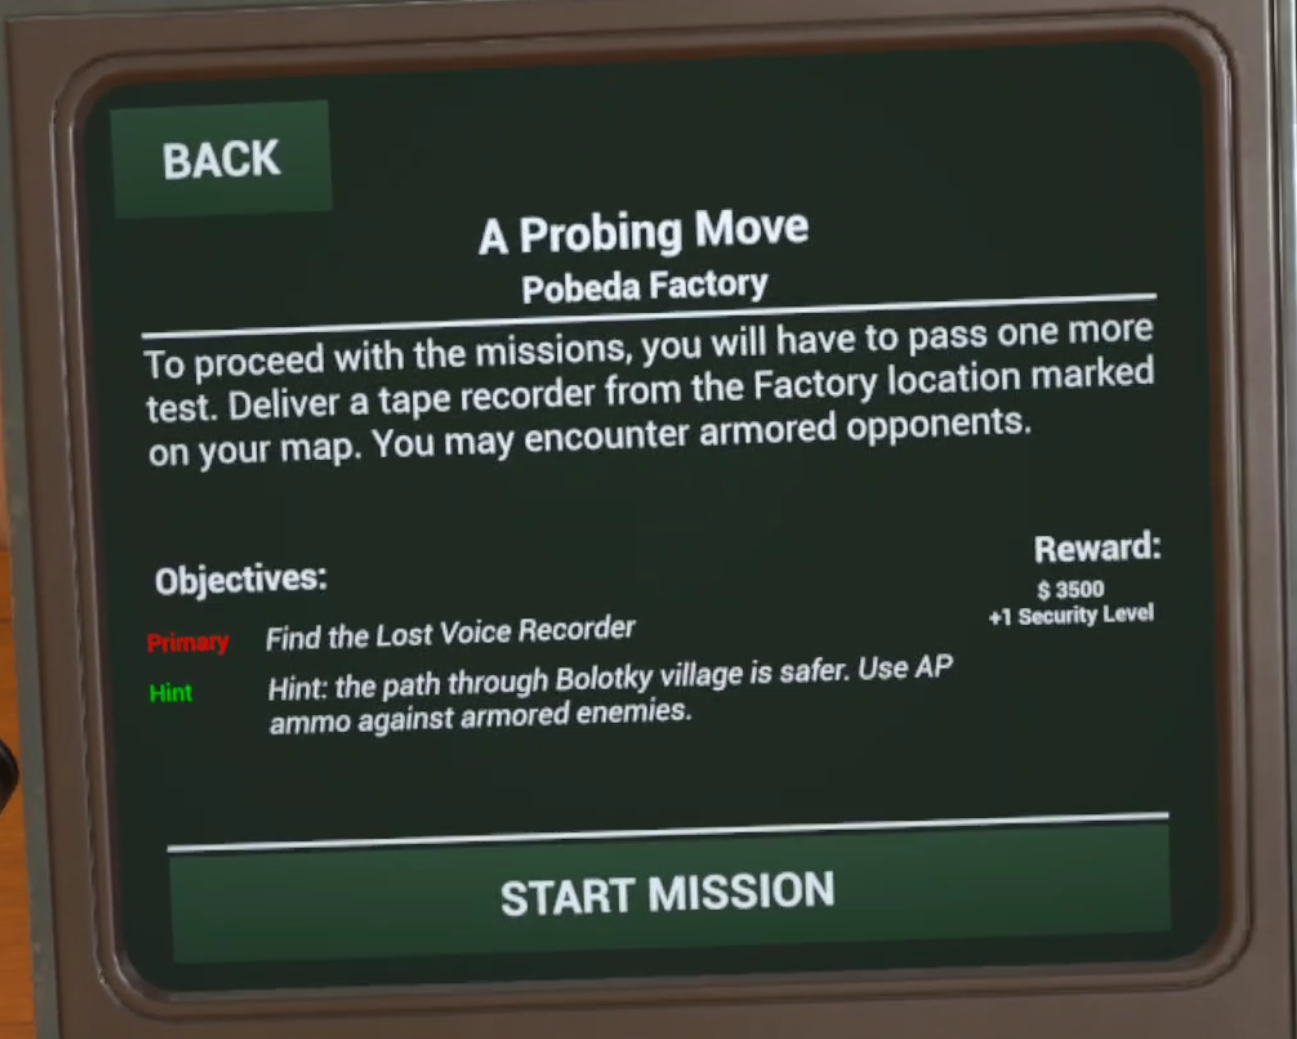
The mission description of A Probing Move
The fighting will actually be even easier than clearing Bolotky Village for the Fixing A Leak mission so if you’ve made it this far you don’t strictly need to buy any upgrades.
That being said, Into The Radius is a game that you should have fun in. If you really want an upgrade go for it with the knowledge that you can always wait for the Tide to come by sleeping through a few days and then do repeatable missions and artifact hunt in Pervomay or Bolotky for more cash.
The sample loadout for this mission isn’t the most extravagant, but isn’t strictly necessary either. You can pull this off with just a pistol if you’re careful.

A sample loadout for this Into the Radius mission
Still, it doesn’t hurt to bring a little extra firepower and the SKS sure was a lot of fun during and after this mission. You should at the very least have a decent pistol by now like the GSH-18 or Glock 17.
Not shown in this Loadout are the usual knife, detector, head lamp, and probes that you should always have on you.
You’ll need to use a bit of ammo, so a spare mag or two and a box or two extra will be fine. The huge box of SKS ammunition you see in the picture above was definitely overkill, and so were the amount of healing items and the gas mask. The gas mask also isn’t strictly necessary.
The reason I brought so much when doing this mission was that I planned to go the extra mile and grab a couple of stashes, which we will also show here. If this is your first time doing the A Probing Move mission then I recommend you just focus on finishing the mission and getting some Security Level 3 equipment before moving on to the stashes that are shown in this article.
Though if you want to try to grab whatever you can in one run then go ahead and go for it, but if you do a decent weapon and a decent amount of ammo is much more important, like in the loadout above.
A Probing Move - Travelling through Bolotky
This walkthrough assumes that the tide has just come in and all enemies are freshly spawned. Now for the first, and oddly the most difficult part of this Into the Radius mission.
Getting through Bolotky is actually the most combat heavy part of completing this mission with the method shown in this walkthrough.
Take the rope line from your home base of Vanno back to Bolotky Village, and immediately make sure your surroundings are clear of enemies.

A Spawn charging through the woods
As always keep your distance from the train tracks and don’t attract the many enemies in the village. As we usually do we will be avoiding them. There’s no reason to get into an unnecessary firefight.
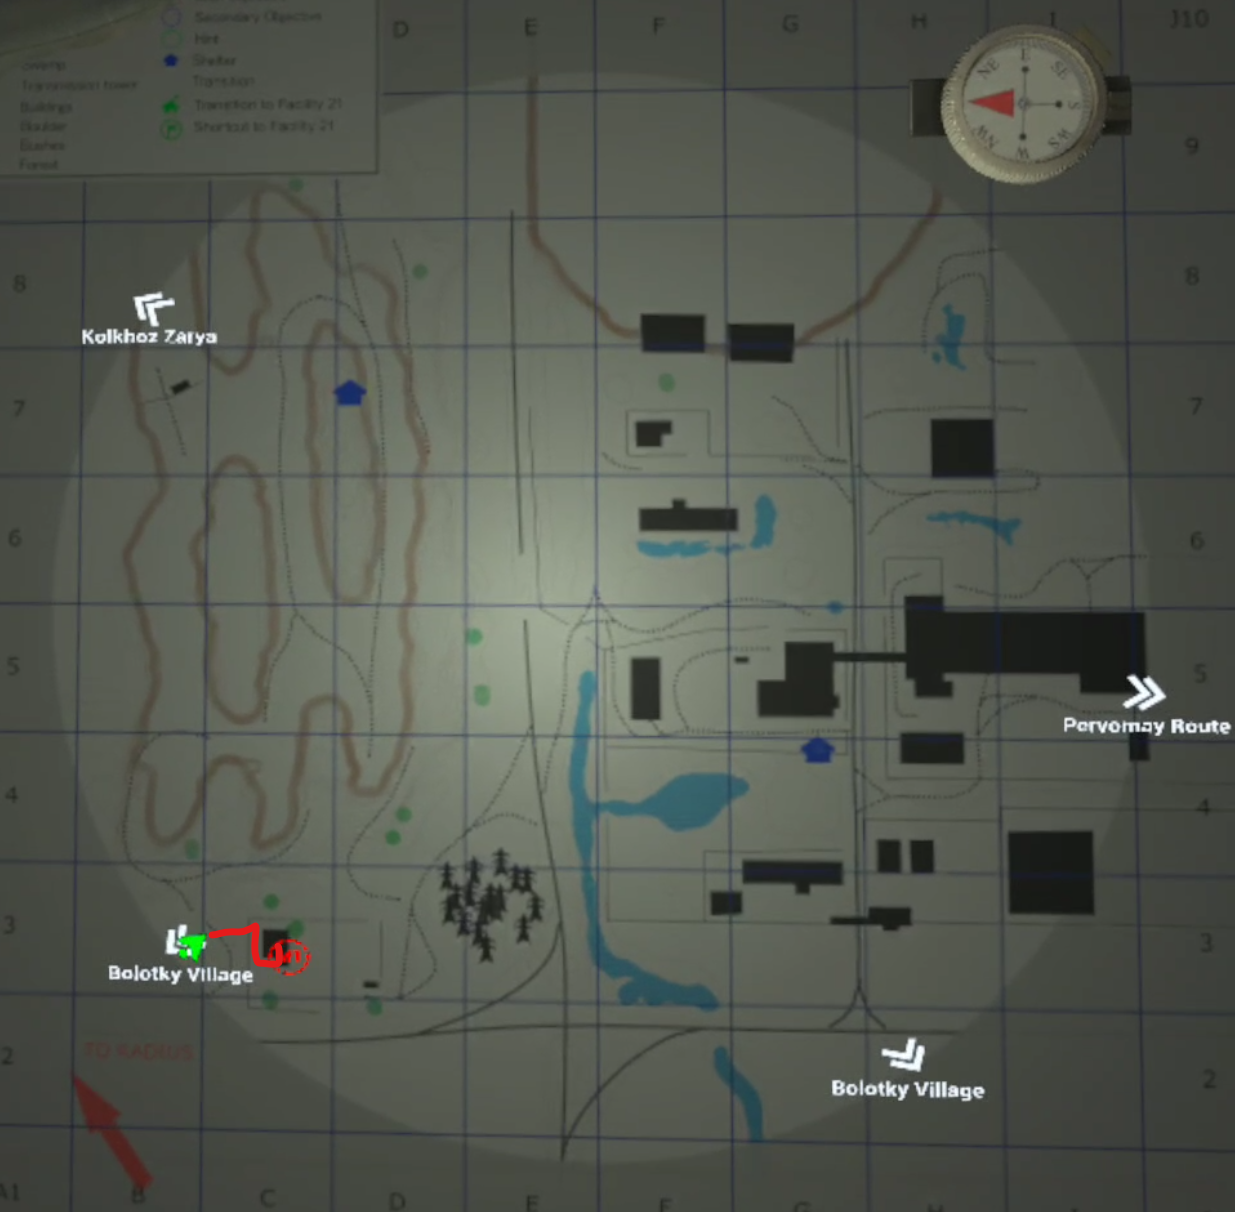
Once you’re sure nothing is coming after you take a look at your map. Here is the route that we’ll be taking for this mission.

The route to take to complete the A Probing Move mission easily
You’ll need to continue north through the woods you spawned in, sticking to the left side of the train tracks.
Once you can see the rope line at the end of the tracks which leads to Kolkhoz Zarya, note the ruined oil tank by the lakes.

The crashed oil tank and the path between the lakes to the forest on the other side
You’ll likely have run into an enemy or two by the time you see it, but they’ll be pretty manageable opponents like Fragments, Spawn, and Seekers.
That’s most of what you’ll be running into on this route. Go past the oil tanker and between the lakes to the forest on the other side, but be careful.
This is the area where combat will be the heaviest, as the noise of gunshots will attract more enemies from the swamps nearby and the forest that you’ll be heading towards.
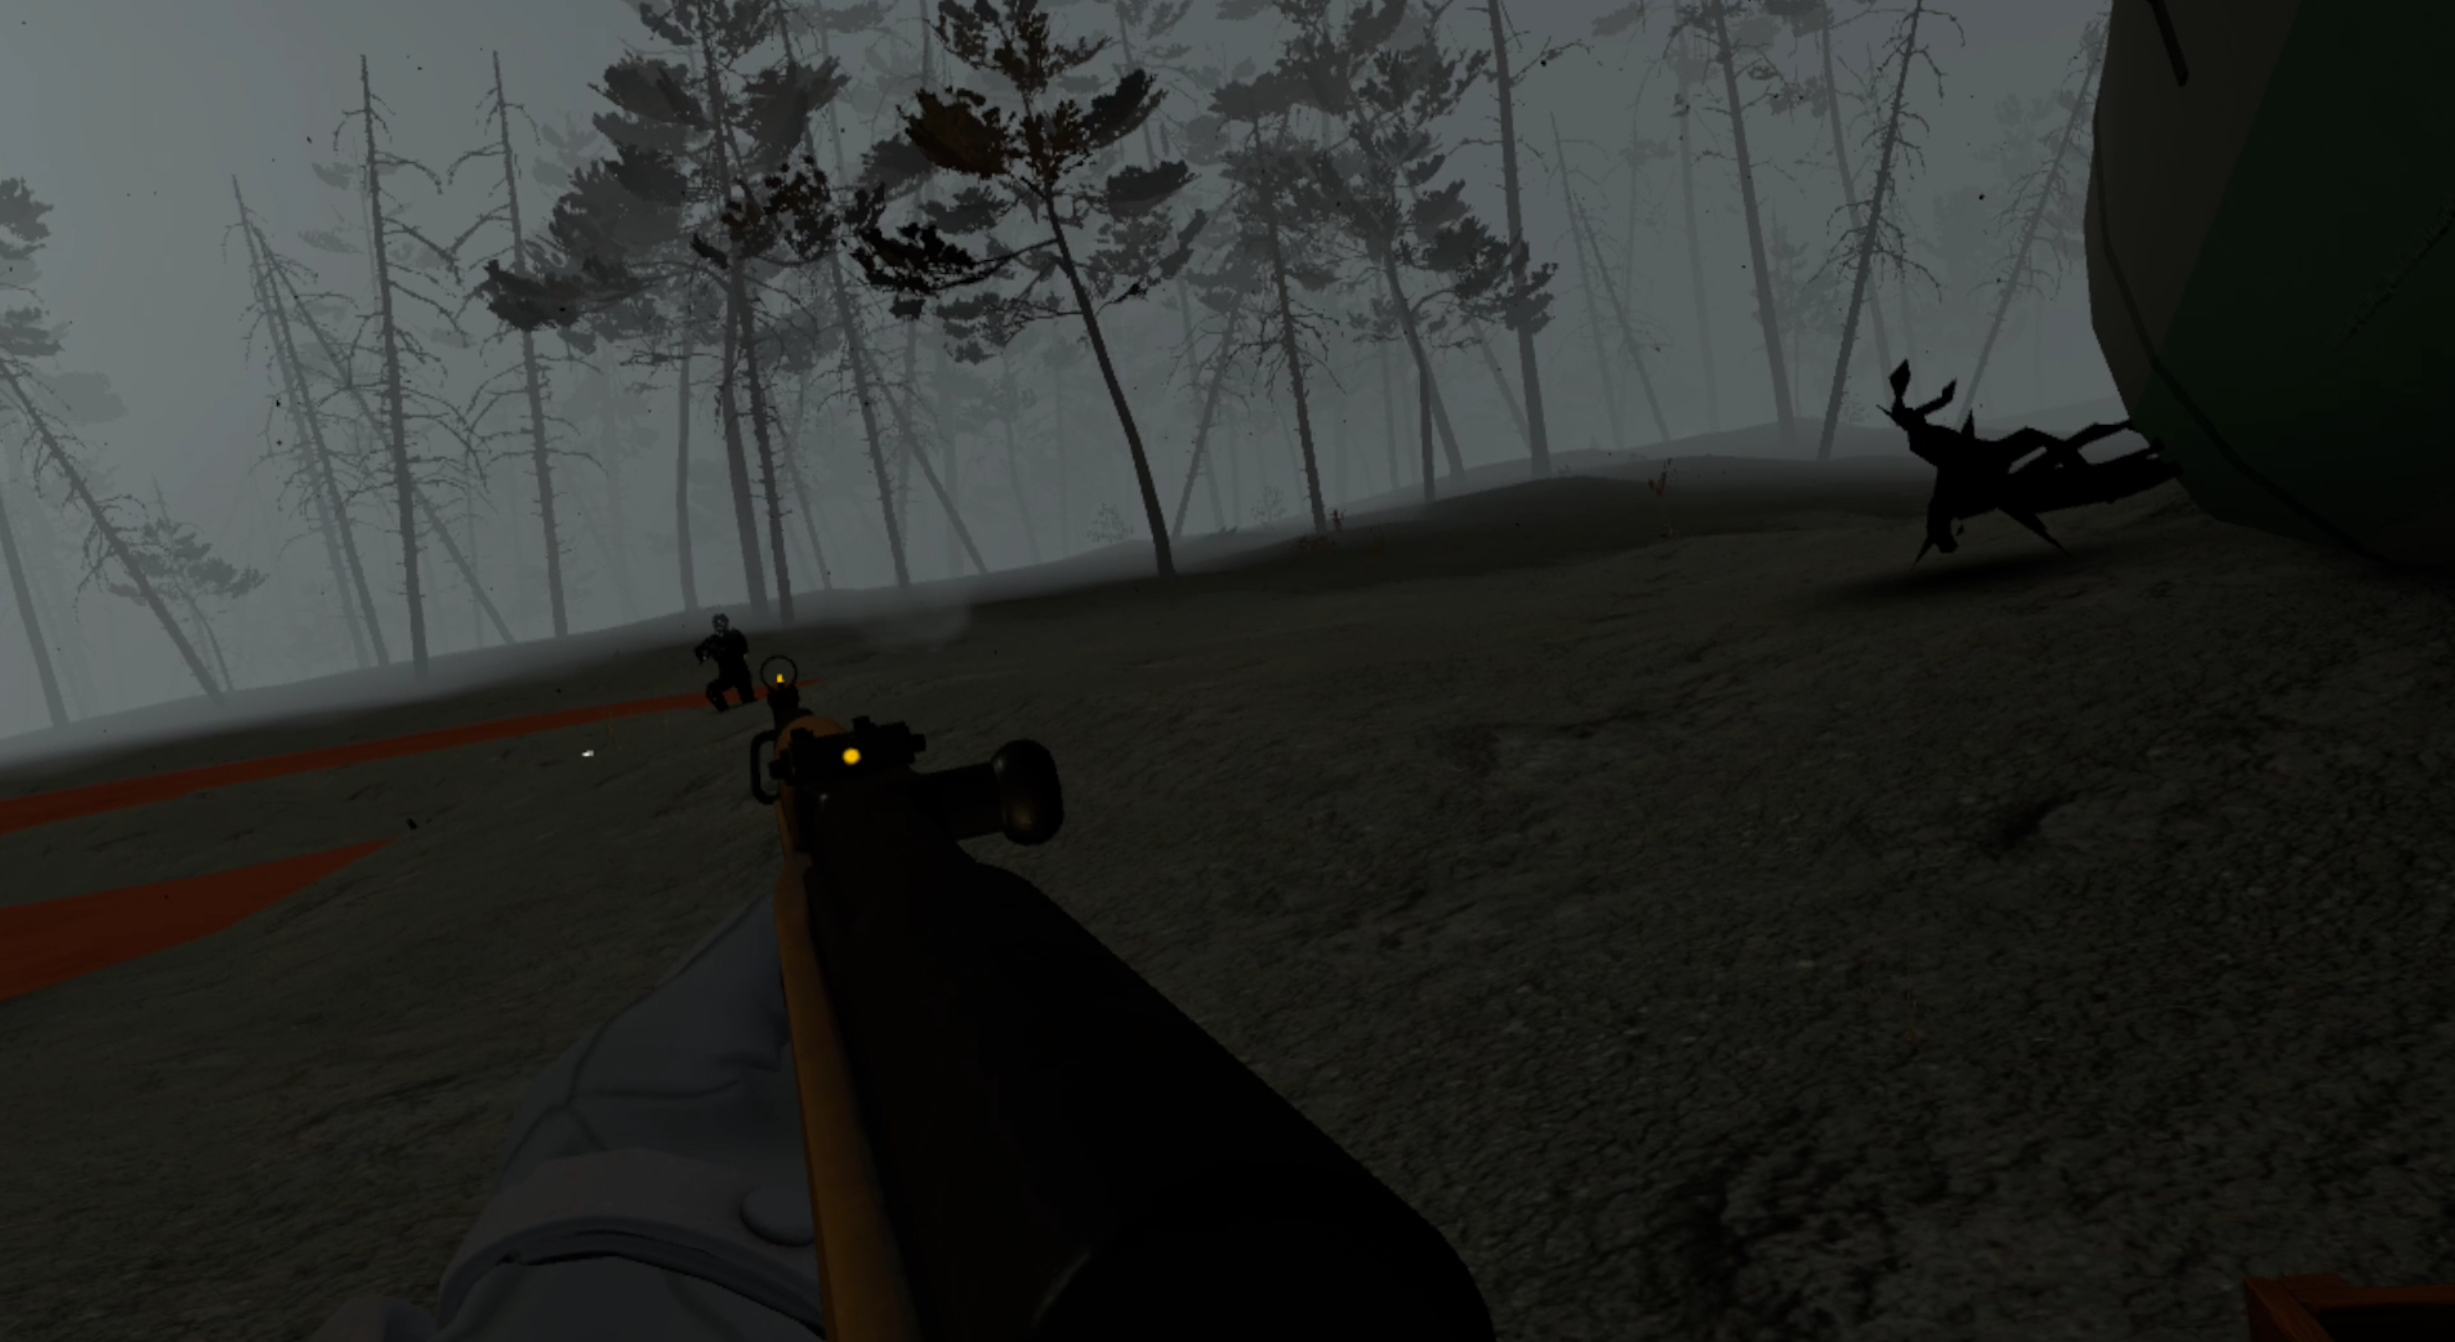
Fighting a shotgun armed mimic and Spawn near the lakes
There is likely to be at least one firearm equipped enemy in the woods ahead, and they’re going to get drawn out by any unsuppressed gunshots. Holding your ground and letting them come to you will give you an advantage.
As with any big fight in this Into the Radius VR walkthrough always make sure you’ve got a path of retreat back across the train tracks. If the fight becomes too tough you can always run back into the woods you came from and get some time and distance.
Though if you’re a more stealth inclined player using a silenced weapon and coming at night is also a viable strategy.
However you get past the enemies make your way past the lakes and through the forest when they stop coming at you. Make sure to keep an eye out for Web Anomalies in the trees.
Once you’re on the other side of the woods you’ll see a big tower that is one of the safehouses marked by a blue house icon on your map.

The tower safehouse near the Pobeda Factory exit
You’re basically home free when you see this, though there might be a few scattered enemies nearby, depending on how much noise you made earlier and where you made it.
Check your map and from the tower make a beeline for the exit to Pobeda Factory.

The exit to Pobeda Factory
Bolotky Village - Kedr Stash
You can take a slight detour on your way to Pobeda Factory, or come later to get a stash that’s near the Pobeda Factory exit.
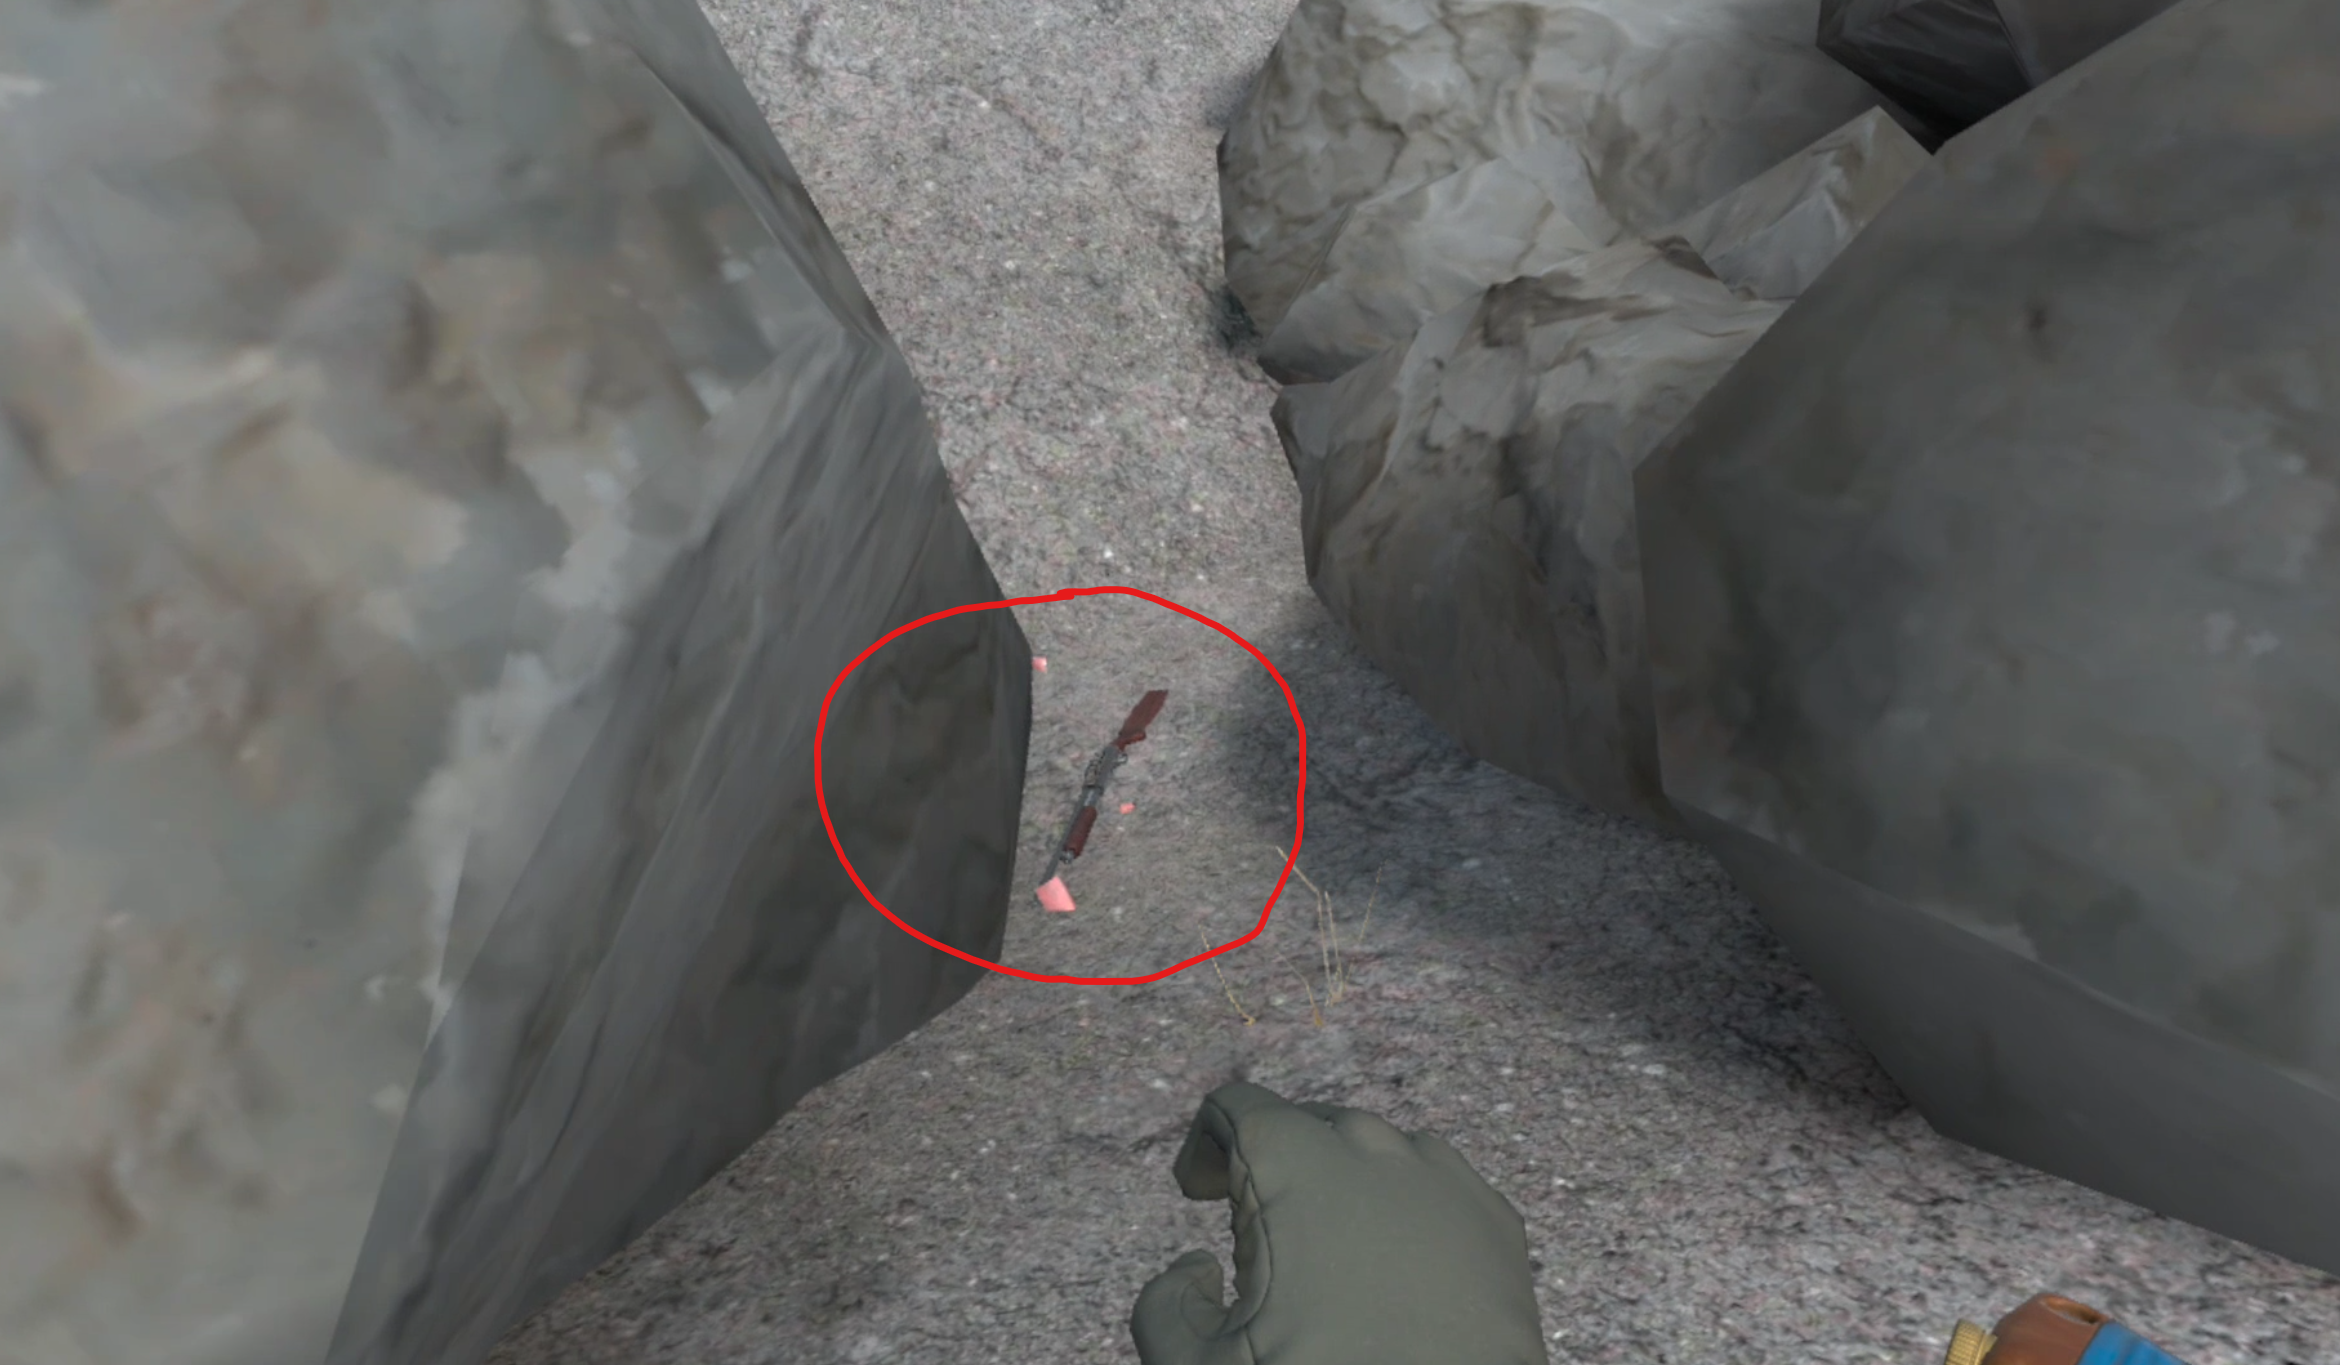
To the east of the exit, and on the northern end of the swamp that dominates the center of the Bolotky Village map is a red valve poking out of the water just south of a circle of rocks and trees filled with anomalies (and artifacts).

The red valve marking the PP-91 Kedr stash
You’ll likely run into a few enemies like Spawn, Seekers, or Fragments. It’s safest to approach this stash from the west from the direction of the tower safehouse we just talked about.
When you’re next to the Valve you’ll notice a little boat. Point your hand towards the water until you see a circle appear. Actually bending down to grab the items in the stash is extremely hard, so it’s better to just distance grab all of them.

Distance grabbing the contents of the stash
Keep in mind that you only have one slot on your back and another in your backpack to hold two handed weapons like the Kedr. This is a good stash to hit during this mission if you’ve got the ammunition and don’t plan on taking on the riskier stashes in Pobeda Factory once you’re there.
Of course you can always come back another time to get it. The stash contains a PP-91 Kedr, two magazines for it, a silencer compatible to it, and a box of 9x18 ammunition.

The location of the Kedr stash in Bolotky Village
All of these items won’t be in very good condition and will need to be repaired in the repair box at the train car in Vanno.
Pobeda Factory - Getting The Tape Recorder
Now for the last leg of the A Probing Move mission, and surprisingly the easiest part.
You might have noticed in the mission description that you were warned you would have to fight armored enemies, and there are armored enemies near the mission objective.
What you’ll know from reading this Into the Radius walkthrough though, is that you don’t have to fight them. It’s really easy to sneak in, take the tape recorder, and leave. Check out the route on the map.
The route to the objective for the A Probing Move mission in Into the Radius
Right after you spawn in by the rope line there will be a small hill ahead of you, walk up it and you’ll see the outer wall of the compound with the tape recorder. Oh, and make sure you watch out for Stomper Anomalies.
You will also see a gap in that wall. That is your way inside.

The hole in the wall you should sneak through
Sneak in through the gap. Don’t run, fire your weapons, or do anything that makes a lot of noise. Stealth is definitely the best option here.
Once you’re through the hole you’ll see and hear a Rift Anomaly around the back of the large building. Make sure there aren’t any enemies patrolling on the other side of it that might see you, and then destroy it with your knife for an easy Shard artifact.

The Rift Anomaly around the back of the building
Once you’re through with that, or decide to just ignore it, take the right just after the entrance and sneak around the side of the building.
You’ll see a dumpster, and right past it a blue sheet metal room attached to the huge brick building.

This blue room has the Tape Recorder inside
Watch out for enemies on the other side of the building. There will be a few patrolling around. While they’re not the toughest you’ll run into in Into the Radius they will have armor, and there’s really no reason to fight them.
Remember that enemies in Into the Radius are drawn to sound, and can see you if you’re in front of them. So if their side or back is turned to you and you’re crouch walking to make less noise they won’t notice you.
They’ll likely also be far away, and so it’s easy to walk up the concrete steps and into the blue room.

The Tape Recorder on top of a desk
The Tape Recorder you came here for is on one of the desks.
There’s also a black statue with some glowing white particles near it that you can touch for some dialog.
You can loot around if you want, just keep in mind that an enemy can spot you through the windows so it’s a better idea to keep a low profile. Still if you have the tape recorder you can always just run back to the rope line and leave instead of fight.
After you have the Tape Recorder, that’s it. Just go back to base the way you came.
Congratulations! After turning in this mission you will be Security Level 3, and a ton of options will be open to you. We’ll talk more about them in the next mission walkthrough (coming soon).
For now let’s get into a couple of great stashes that aren’t too far away from your objective in A Probing Move that you can pick up after you get the Tape Recorder, or on later forays into Pobeda Factory.
Pobeda Factory - The IZh-81 Shotgun Stash
The stash to get a free IZh-81 pump action shotgun along with some slug rounds for it is just north of the compound that contains the Tape Recorder.
The biggest obstacle to getting to it is a watchtower containing a Mimic Sniper. You’ll see it just after going a little north of the Tape Recorder compound and looking down into the entrance to the canyons below.

The watchtower overlooking the canyon
You could try throwing a grenade into the tower, but if you miss you’ve got a good chance of blowing yourself up. The easiest way to take them out is by climbing the ladder and shooting the mimic with a pistol in one hand while you hang on the ladder with the other.
There will also be some Spawn and Fragments roaming around the road leading into the quarry to the west of the watchtower. The anomaly field by the tower is also a good place to hit while you’re there, and can even contain Regen Artifacts.
Of course keep in mind that any gunshots can still draw enemies like armored Fragments and Mimic Policemen from the compound. So make sure you’ve got some firepower when attempting this.
Once you’re done with the tower take the road down into the canyon and go to the location marked on this map.

The location of the IZh-81 shotgun stash
The stash is hidden behind some big boulders, so make sure you look behind them.
This stash contains the Izh-81 pump action shotgun in great condition along with several boxes of shells and a Combat Knife. The shotgun even already has a modification adding a Rail B system to the top of it, which can mount optics for easier aiming.
The shotgun stash
Pobeda Factory - The AUG Stash
If you feel a little riskier there’s another stash to the north, and this stash contains an AUG assault rifle.
It’s a little further away than the IZh-81 stash but you’ll only run into a few enemies on the walk up the far eastern canyon towards the stash.

The location of the AUG stash
Unless you take the western canyon up, which you definitely shouldn’t do. The entrance to Kolkhoz Zarya there is protected by a heavily armed group of Mimic Soldiers that you should avoid at all costs.
They’ve got multiple snipers and several armed with assault weapons. You don’t need to fight them and if you do it will be very hard to win.
So head up the eastern canyon that runs past the safehouse marked by the blue house symbol, and at the end of the road you’ll see another watchtower and a bunch of gas clouds around these strange stone spires.

The path going towards the AUG stash with the watchtower circled and the truck containing the stash circled
That watchtower has another mimic sniper inside. Though even during the daytime it’s possible to rush him. Run forward from rock to rock. If your health is full you can take a couple of shots and keep going.
If you’re fast and a little lucky the sniper won’t notice you at all. Depending on your equipment you could also try to shoot them from a distance, or use smoke grenades to mask your approach.
The same technique of shooting the mimic with a pistol while hanging on to the ladder with one hand works just as well here if you manage to get underneath the watchtower.
Make sure to watch out for Gas Anomalies though, there is one that wanders near the watchtower, though it is avoidable. Once the tower is clear go to the cliff next to it and you’ll see this truck on top of a pillar.

The AUG stash
You might not have noticed without reading this walkthrough, but an AUG, a magazine for it, and a couple of ammo boxes are on top of it, right behind the cab.
So run off of the cliff full speed and land on top of the truck. Of course once you collect the stash you better have a gas mask. Your only way out is to fall into the anomaly field below. As long as you keep your gas mask on and don’t fall into an anomaly you’ll be fine.
The AUG is in pretty bad shape though, and will need to be repaired at Vanno’s repair box.
Those are all of the stashes we’ve got for now. Congratulations on completing the fifth mission! Next time we’ll be talking about the sixth Top Priority mission in Into The Radius in Part Seven of our Into The Radius VR Walkthrough.