

Into The Radius Walkthrough And Guide - The Seventh Mission - A Farewell Feast
Stuck in Into The Radius? Wondering where to go and how to get there for your next mission?
Maybe you would just like to see what is in store for you before you get there, or you’d like to know if you’re properly prepared for your next mission in the Pechorsk Zone.
Well don’t worry we’ve got you covered with this walkthrough and guide for Into the Radius VR.
In this Into the Radius walkthrough we’ll detail how to progress through the main story “Top Priority” missions, with a couple of guiding tips thrown in here and there to make your adventure smoother.
The focus of these walkthrough articles will be the story missions, but we’ll throw in some general gameplay tips and other useful loot locations near your objectives.
These articles will also assume you’re playing the game on the Normal difficulty mode with Tutorials turned on, which is highly recommended for your first playthrough. This walkthrough will still be useful if you’re playing on Realistic difficulty, but some details like vendor prices or enemy placement and numbers will be different.
Here is every article in our complete Into the Radius VR Walkthrough:
Into The Radius Walkthrough And Guide - The First Mission - Equipment Retrieval
Into The Radius Walkthrough And Guide - The Second Mission - Total Recall
Into The Radius Walkthrough And Guide - The Third Mission - Fixing A Leak
Into The Radius Walkthrough And Guide - The Fourth Mission - Flash In The Dark
Into The Radius Walkthrough And Guide - The Fifth Mission - A Probing Move
Into The Radius Walkthrough And Guide - The Sixth Mission - The Intrusion
Into The Radius Walkthrough And Guide - The Seventh Mission - A Farewell Feast
Into The Radius Walkthrough And Guide - The Eighth Mission - Kids Playground
Into The Radius Walkthrough And Guide - The Final Mission - Ouroboros
Here we’ll be talking about the seventh Top Priority mission that you get in Into The Radius, A Farewell Feast, which is the first mission to bring you to Kolkhoz Zarya where you deliver some food to a house and retrieve a rare artifact.
A Farewell Feast - Loadout
Since the previous mission, The Intrusion, you now have access to Security Level 4, and after completing A Farewell Feast you’ll also have access to Security Level 5.
Of course you’ll have to have completed several repeatable missions in between The Intrusion and A Farewell Feast, so you will be forced to make some additional money in the interim, but you don’t strictly need to have invested that money into any new Security Level 4 weapons to effectively tackle A Farewell Feast.
As you’ll see in this example loadout, Security Level 3 weapons will serve you just fine, and even they aren’t strictly necessary, though at a minimum a solid assault rifle like a NATO or AK series rifle is highly recommended.
As always what works best is up to you in terms of weaponry, but as always you should have a rifle and a sidearm at a minimum. YOu should also keep in mind that Kolkhoz Zarya is a little different from other maps.
Here you will be confronted with far more firearm wielding enemies than before, and far more wide open spaces.
Now more than ever having a weapon that is effective at long ranges is extremely helpful, though you’ll still want to be effective at close ranges for when you reach your objective or an enemy gets close to you quickly, like the Sliders that appear in Kolkhoz Zarya.
So with that in mind here’s our sample loadout for A Farewell Feast.

A sample loadout for A Farewell Feast
You’ll notice that unlike in previous missions we’ve got two rifles here, the AUG for medium to close range engagements and the Mosin Nagant for sniping at long ranges.
Bringing two weapons isn’t strictly necessary, and while it’s useful to have a sniper rifle and an assault rifle at the same time both will add a lot of weight to your loadout and make retrieving any rifles that you find in the radius more difficult.
Taking a long range scope for an assault rifle is also viable, if not as effective. Bringing just a long range rifle is also not a bad idea if you don’t mind relying on your handgun for close up fighting.
Staying quiet is also more useful than ever in Kolkhoz Zarya because of the unkillable BTR that roams around the map. So silencing your weapons, despite not being pictured above, is more recommended than ever before.
You may even want to invest in subsonic ammunition that is less effective, but extremely quiet.
The usual spare can of food and collection of healing items are also must haves, as well as spare ammunition, though you’ll notice we won’t need as much as in the previous Top Priority mission. While there will be some heavy fighting it won’t last for as long as in the more combat focused missions in Into the Radius. Still, bringing too much ammo is always better than bringing too little.
The most important thing to note here is that you won’t be needing a gas mask to complete this mission, and the large amount of food items in the bag.
That’s because you’ll need these food items to complete the mission, and you’d be hard pressed to find all of them out in the field, it’s easier to bring them along.
Here’s the complete list of what you’ll need, as seen on a note next to the objective.

The list of items you’ll need to complete A Farewell Feast
I highly recommend you bring all of these food items with you, while you can find some in the objective house and elsewhere in the village surrounding it, it’s better to be sure that you have everything you need the first time than be forced to make multiple trips.
If you’re short of any of these items then you can buy them in the “Food” category of the shop for food or “Combat Equipment” category for the Boom Grenades.
“Boom Grenades” just means explosive grenades, two of the RGD or F1 explosive grenades will do.
Oh, and make sure you’re bringing the right cans of food. The pineapple cans look a lot like the big beef cans, but have different text on the label. Large Beef cans are the beef cans that have a cow on the front and are as big as pineapple cans. The small cans with the orange label will not do, make sure they’re the large red cans with the cow on the label.
With all your gear collected accept the mission at the terminal and set off.

The mission briefing
A Farewell Feast - Getting to Kolkhoz Zarya
Luckily the most efficient path to Kolkhoz Zarya is one we’ve already passed by many times in previous Into the Radius walkthroughs, and so you should be familiar with it by now.
Take the rope line leading out to Bolotky Village, and immediately head north through the village to the path leading to Kolkhoz Zarya at the end of the train tracks.

The route to Kolkhoz Zarya
There will be a few enemies as always, especially at the tanker next to the rope line, but they should be child’s play for you at this point in the game.
Just avoid the Web Anomalies in the woods as always, and try not to leave any enemies next to the rope line that might surprise you on your return trip.

The rope line leading to Kolkhoz Zarya
Before you head into Kolkhoz Zarya make sure you’re healthy, fed, and your magazines are topped up.
Kolkhoz Zarya - Getting To The Farewell Feast
Once you arrive in Kolkhoz Zarya you’ll be greeted by the imposing sight of the train station right in front of you.

The train station
Luckily we won’t be headed into there yet, that’s for a later mission. For now we will be avoiding combat as much as possible.
Take a look at your map, here’s the route we’ll be taking today.

The route to the house containing the objective for the A Farewell Feast mission
As you can see the objective is in the village that dominates the south eastern part of Kolkhoz Zarya, and luckily we can avoid the wide open spaces in the center of the map to get there by immediately turning south and skirting along the edge.
As you make your way through the trees you’ll find yourself passing a huge anomaly field and abandoned power substation. You’ll see some enemies in the distance.
Luckily being very far away from enemies means they are unable to notice you, so just keep going as long as they don’t get close enough to spot you.

Walk over this hill and avoid enemies
Once you’re past the power substation you’ll see the trees on the other side of the hill.
Past those trees is a small road, and on your right you’ll see some ruined houses.

Past these trees is the road leading to the village
On the left, where the road reading past the houses reaches the edge of the map, is a broken rope line that leads to Pobeda Factory. When you get down there you might as well take it to unlock the route and have it show up on your map.
Regardless of whether you do or don’t, you will definitely run into some enemies as you go down the hill and into the trees.
Since this is Kolkhoz Zarya anything is possible here. There may be Sliders, the usual Seekers, Fragments, and Spawn, and likely at least one enemy equipped with a gun like Mimic Hunters or Mimic Soldiers.
Clear your way through them and follow the road towards the village. Here is an especially good opportunity to have a long ranged weapon, as there will be a Mimic Sniper on top of the roof of one of the houses next to the river.

The edge of the village with the Mimic Sniper circled
It’s better to take them out at range, as crossing the bridge to get closer means allowing the sniper to take many shots at you while you have no cover to hide behind and heal.
So this bridge and the open ground on either side of it are really dangerous, especially because of the BTR, which roams around Kolkhoz Zarya.
If there’s a lot of noise, or you’re just unlucky enough for it to be nearby, the BTR can park itself nearby and hit you hard as you try to cross this bridge. So if you hear engine noise just hang tight in a building and wait for it to go away.
However you get to the village, it’s recommended that you take cover in a building right as you get there, but be careful, because just like the village in Bolotky, this one is choked full of enemies.

The fight in the village is tough, but short
You’ll hear them walking around, or coming towards you. Just like in Bolotky Village the best course of action is to find a defensible position and let them come to you.
If they don’t come to you then make some noise, perhaps with an unsuppressed weapon, and they’ll come right for you.
So get yourself a little breathing room, and while there are a fair amount of enemies in the village it’s nothing you can’t handle, though those enemies will be tougher varieties than you might be used to fighting in such large numbers. Make sure you don’t run out of ammunition in your magazines.
As you can see on your map you’ve made it to the objective. Go to the house marked on it, which is the one closest to the bridge that the sniper was standing on, and you’ll see a bunch of black statues gathered outside.
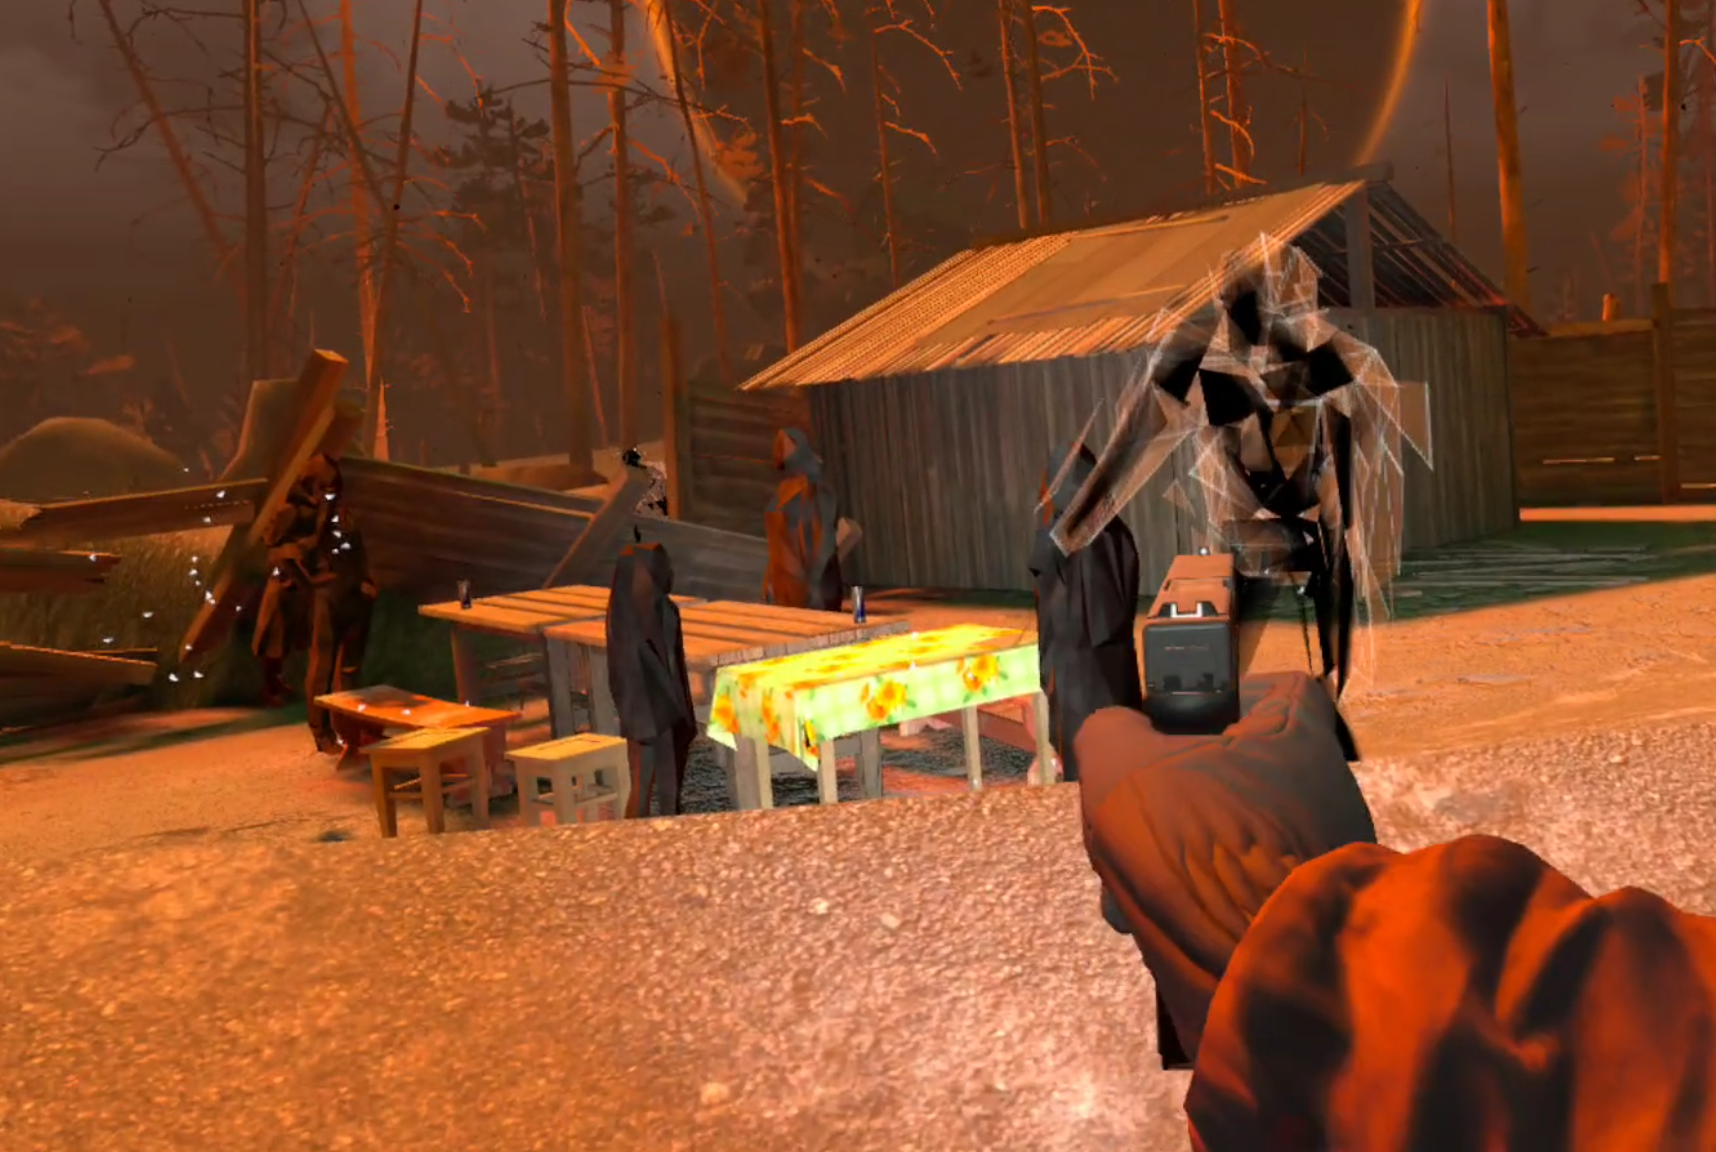
There are a lot of black statues around the house with the objective
There’s a few scattered around that you can touch for dialog, but to complete A Farewell Feast you need to head inside the house itself.
Completing A Farewell Feast
Once you’re in the house there’s not much left to do before you’ve completed this Into the Radius mission.
Take a look in the corner next to the windows, you’ll see a table with a red tablecloth.

The table with the red tablecloth
Now take all of the items off of the list and put them on top of that table.
Once all of the items are on the table they will disappear before a loud noise and an explosion. Then your detector will start beeping.
Use the light on your detector to reveal an artifact now hovering above the table, just like revealing any other artifact as you’ve done many times by now.
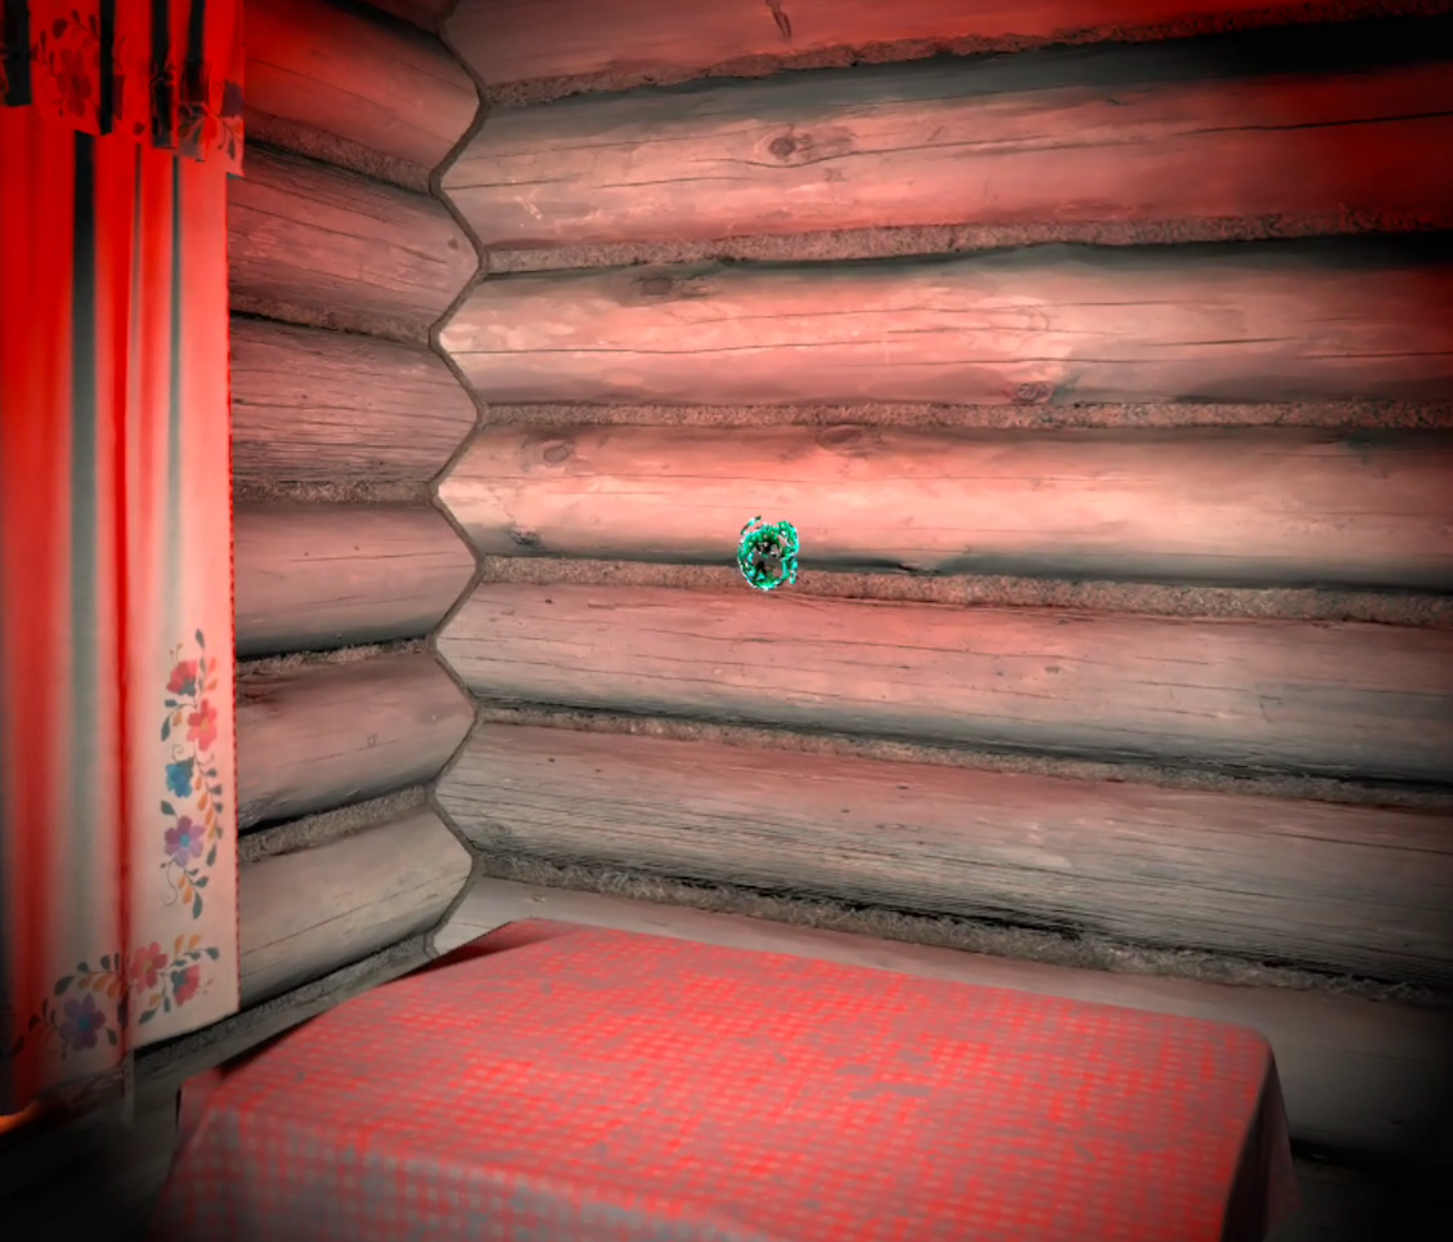
The artifact that appears after adding the items to the table
Take the artifact and then retrace your steps back to Vanno.
Normally this would be simple, but the BTR may complicate your way back. Just remember that if the BTR is blocking your path just wait in cover where it can’t see you until it goes away.
Buildings are the best places to hide from the BTR.
Anyway once you get back and turn in the artifact congratulations! You’re now Security Level 5, the highest Security Level in the game.

Security Level 5 achieved
You now have access to every single piece of equipment in Into the Radius, which is good because you’ll need them to complete the final two missions of the game.
Next time we’ll be talking about one of those in the eighth Top Priority mission in Into The Radius in Part Nine of our Into The Radius VR Walkthrough.