


Into the Radius 2 Will Have Multiplayer Coop
The entire Into the Radius community has been clamoring for Into the Radius multiplayer for a long time now, and wondering if Into the Radius 2 will feature Multiplayer.
Well now the wait to find out is over, because Into the Radius 2 will have Cooperative Multiplayer for up to four people at once.
That’s right, CM Games, the Estonian developer behind Into the Radius and Into the Radius 2 announced this exciting new development today, and the launch of the Into the Radius 2 Steam page.
So if you’re half as excited as I am, go to the page and wishlist the game! It’s already promising to be the excellent sequel to Into the Radius that we all hope it’s going to be. Here’s what we know about it so far.
Into the Radius Multiplayer Is Coming

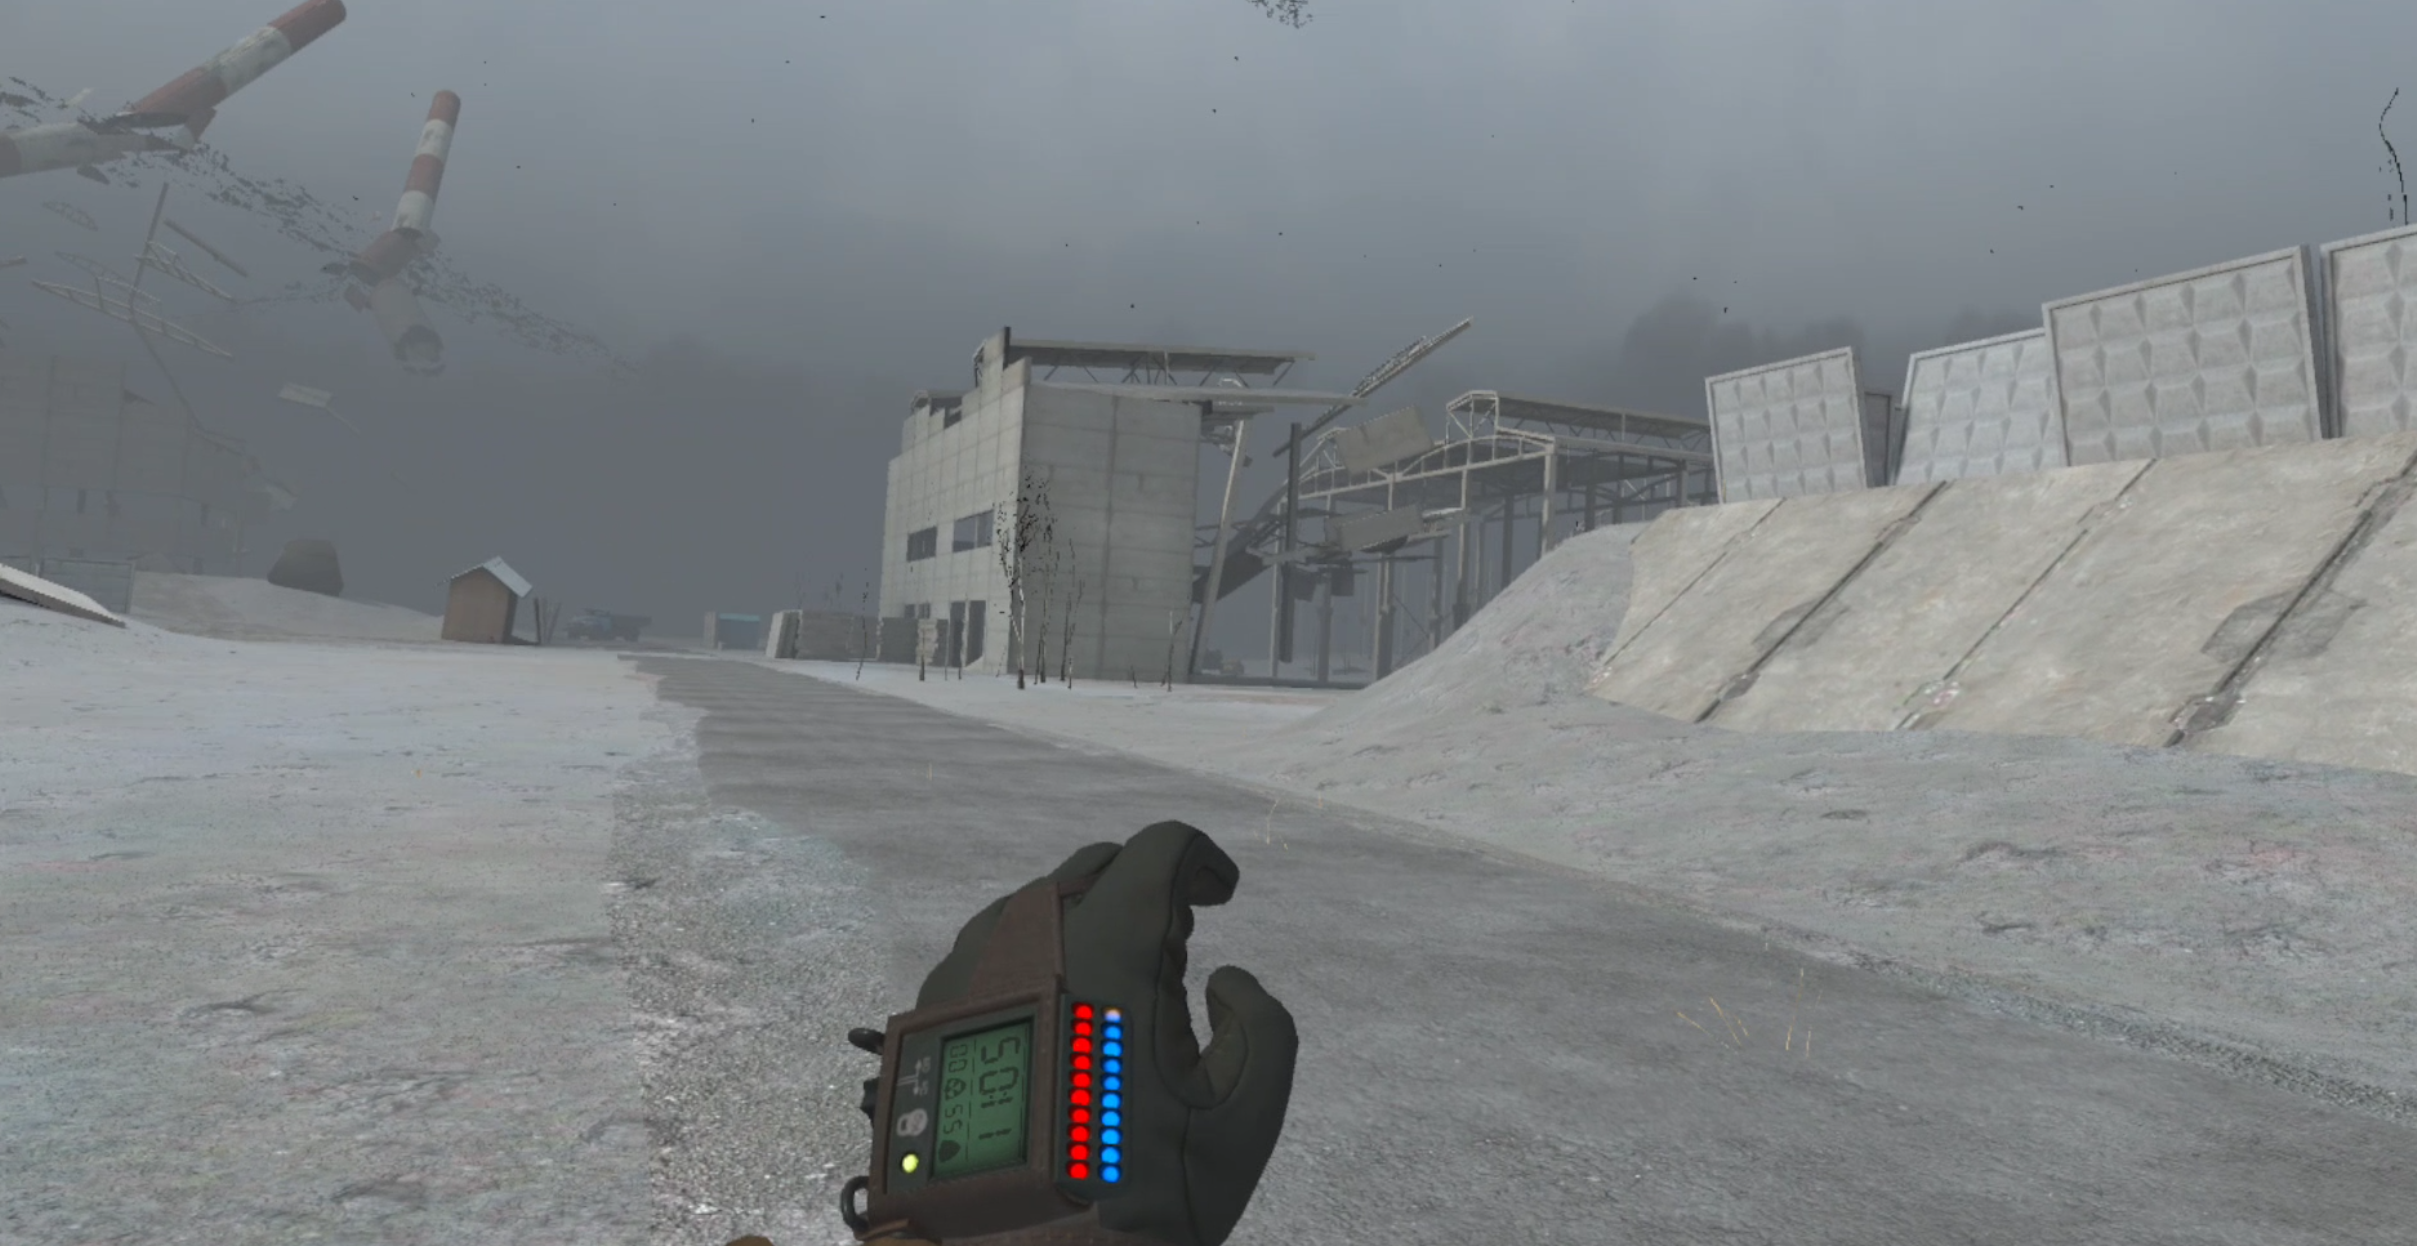
A game screenshot provided by CM Games, just look at that sky!
Of course you probably want to get your hands on Into the Radius 2 and play some Coop Multiplayer with your friends.
Well that’s where the good news ends for now. Into the Radius 2 won’t be releasing into Early Access until some time in 2024 with a full release planned for late 2025.
Fortunately the Multiplayer Coop for Into the Radius 2 will be included in the Early Access version, so you should be able to play Into the Radius 2 Multiplayer immediately when it releases into Early Access, as well as in Singleplayer.

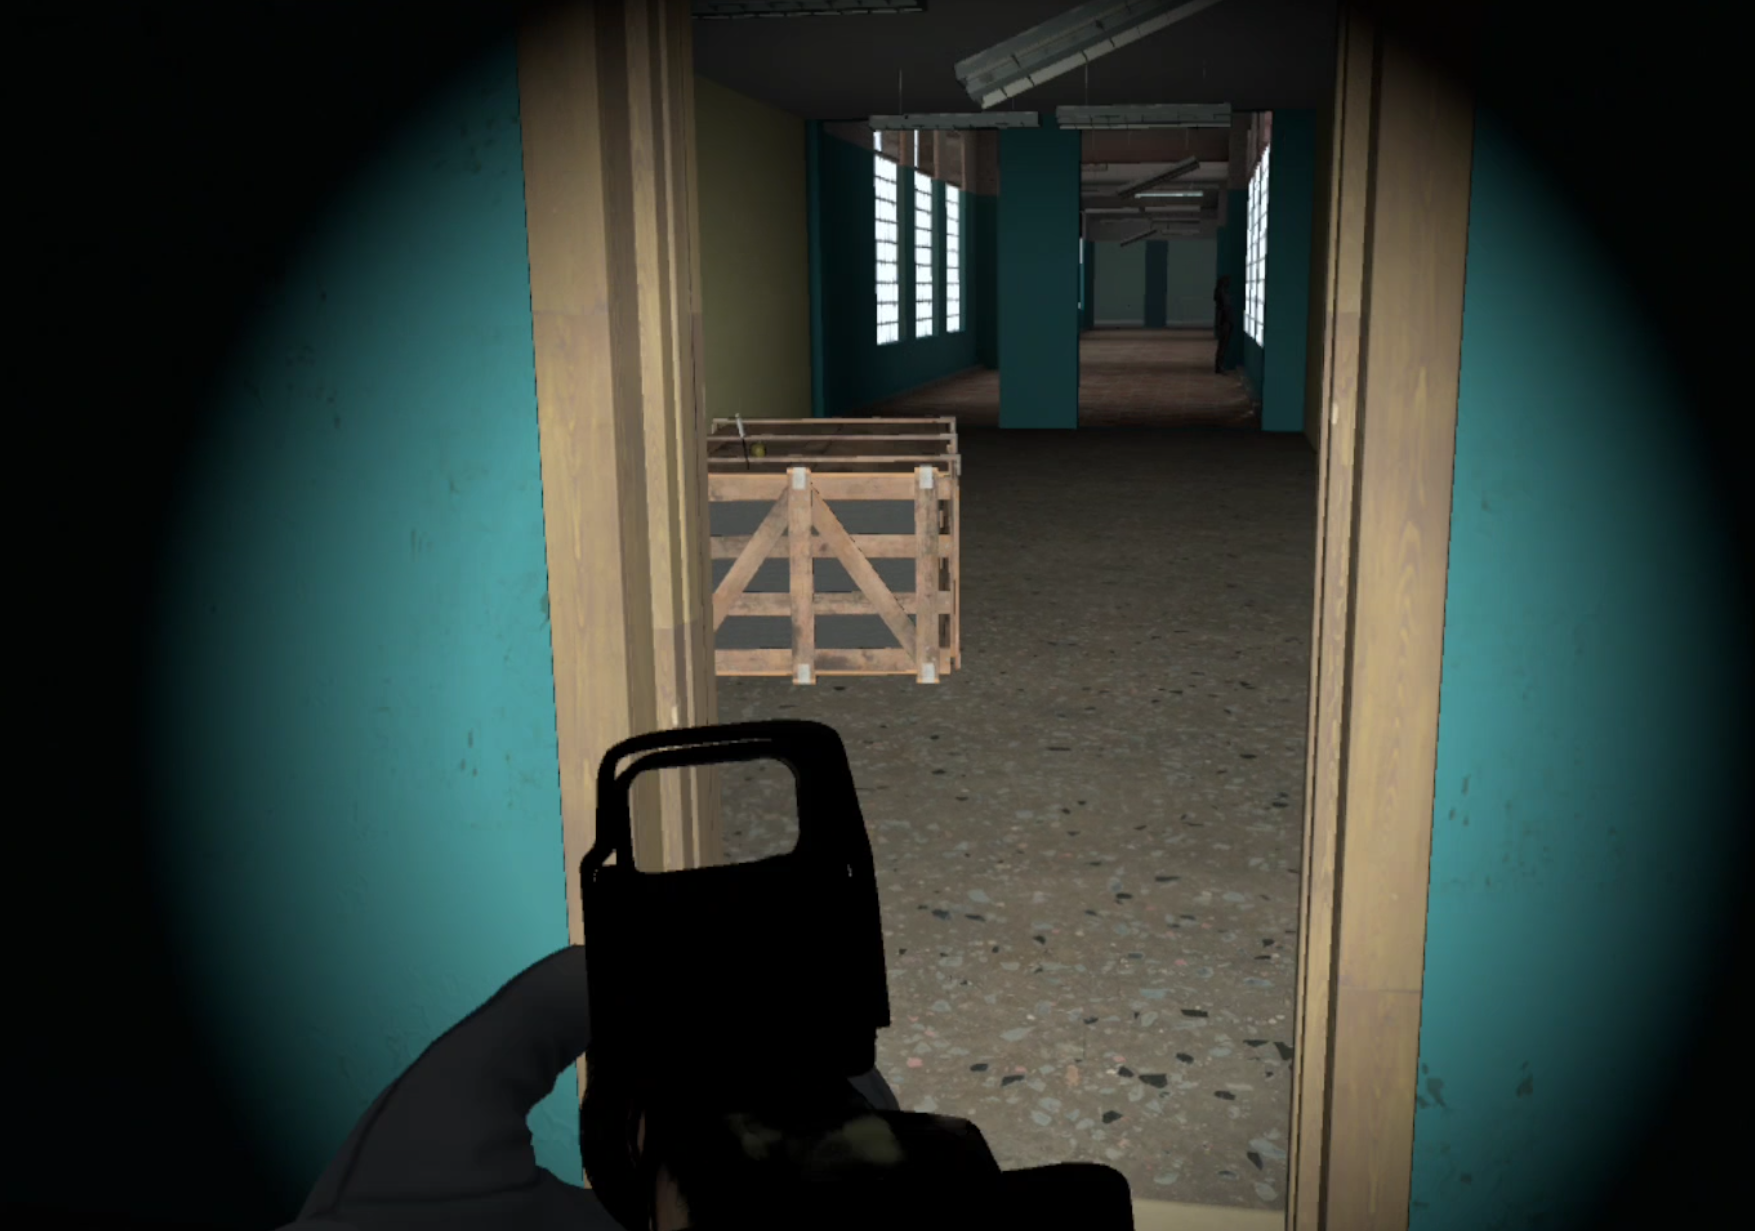
An Into the Radius Multiplayer screenshot provided by CM Games
Just as with the first game, CM Games plans to take player feedback into deep consideration when working on Into the Radius 2 during Early Access.
So if you want to take a part in the development of Into the Radius’s sequel, your chance will come when Into the Radius 2 releases into Early access some time in 2024.
After the early access release CM Games plans to add “more locations to explore, an expanded arsenal of weapons and attachments, new enemy types, more anomalies, enhanced artifacts, and additional gameplay mechanics and lore.”
This just gets more and more exciting.
Into the Radius 2 promises to be larger and more ambitious game than the original Into the Radius, and the announcement of Multiplayer just adds to the excitement surrounding it.

An Into the Radius 2 screenshot provided by CM Games, anomalies are looking better than ever.
To keep up to date with Into the Radius 2 make sure to wishlist it on its new Steam page, follow the Into the Radius subreddit, join the Into the Radius Discord, or check out CM Games on Twitter or Instagram.
Of course any major developments like this one will also be featured here on Reality Remake. Enjoy yourselves out there in VR!

Into The Radius Walkthrough And Guide - The Sixth Mission - The Intrusion
Stuck in Into The Radius? Wondering where to go and how to get there for your next mission?
Well don’t worry we’ve got you covered with this walkthrough and guide for Into the Radius VR.
Here we’ll be talking about the sixth Top Priority mission that you get in Into The Radius, The Intrusion, which brings you back to Pobeda Factory to collect a bomb, fight your way through a factory, blow up a door, and steal a case of documents.
Stuck in Into The Radius? Wondering where to go and how to get there for your next mission?
Maybe you would just like to see what is in store for you before you get there, or you’d like to know if you’re properly prepared for your next mission in the Pechorsk Zone.
Well don’t worry we’ve got you covered with this walkthrough and guide for Into the Radius VR.
In this Into the Radius walkthrough we’ll detail how to progress through the main story “Top Priority” missions, with a couple of guiding tips thrown in here and there to make your adventure smoother.
The focus of these walkthrough articles will be the story missions, but we’ll throw in some general gameplay tips and other useful loot locations near your objectives.
These articles will also assume you’re playing the game on the Normal difficulty mode with Tutorials turned on, which is highly recommended for your first playthrough. This walkthrough will still be useful if you’re playing on Realistic difficulty, but some details like vendor prices or enemy placement and numbers will be different.
Here is every article in our complete Into the Radius VR Walkthrough:
Into The Radius Walkthrough And Guide - The First Mission - Equipment Retrieval
Into The Radius Walkthrough And Guide - The Second Mission - Total Recall
Into The Radius Walkthrough And Guide - The Third Mission - Fixing A Leak
Into The Radius Walkthrough And Guide - The Fourth Mission - Flash In The Dark
Into The Radius Walkthrough And Guide - The Fifth Mission - A Probing Move
Into The Radius Walkthrough And Guide - The Sixth Mission - The Intrusion
Into The Radius Walkthrough And Guide - The Seventh Mission - A Farewell Feast
Into The Radius Walkthrough And Guide - The Eighth Mission - Kids Playground
Into The Radius Walkthrough And Guide - The Final Mission - Ouroboros
Here we’ll be talking about the sixth Top Priority mission that you get in Into The Radius, The Intrusion, which brings you back to Pobeda Factory to collect a bomb, fight your way through a factory, blow up a door, and steal a case of documents.
The Sixth Mission - The Intrusion - Loadout
Now that you’ve got Security Level 3 your loadout options have expanded a lot.
By now you’ve likely got some favorites among the weapons that you’ve tried, and so if your loadout looks different than what I’ve got here don’t worry about it.
Just make sure you’re ready for some fighting out in the open at medium ranges, but also fighting inside of buildings in close quarters and small rooms. You will have to fight a lot of enemies at close range in this mission.
Whatever works best for you is up to you, though if you’re unsure, having trouble completing the mission, or want to have a tried and true loadout to use then here’s a sample one.

A sample loadout for the The Intrusion mission
As you can see here our loadouts have come a very long way in this game, from a Makarov and a dream to something a soldier wouldn’t feel ashamed to carry on to a battlefield.
First of all let’s talk about the armor you can see on the left. Wearing both the SSH-40 Helmet and Army Bulletproof Vest is highly recommended and not super expensive. The extra protection from bullets will undoubtedly save your life many times in the Zone. Oh, and of course you should have a Head Lamp as well.
Speaking of armor you might notice that our Gas Mask is missing. Since we’ll be carrying a lot of stuff and avoiding anomaly fields then it’s pretty unnecessary and will just add weight to a heavy loadout. The route we’ll be taking does pass a few anomaly fields though, and at least one contains a bunch of gas clouds. So if you want to take some artifact hunting detours feel free to take one.
Now for the weapons. Once you hit Security Level 3 I highly recommend that you invest into an Assault Rifle of some kind whether that be an AK-74 variant, AKM, AUG, or M4A1.
If you’re unfamiliar with the various weapons in Into The Radius these assault rifles are highly effective at short and medium ranges, can fit a variety of attachments, and do good damage to both armored and unarmored opponents. They are fantastic all around weapons.
You’ll also notice that the M4A1 in this picture has a silencer. While not strictly necessary, bringing a silencer for your rifle is not only pretty cheap, but also very helpful in the initial infiltration into Pobeda Factory during this mission.
This mission will take you a while, and while you will probably find some food on your way, it doesn’t hurt to bring a can to be safe.
Lastly as the Mission Briefing says, there are a ton of the Zone’s hostile inhabitants between you and your objective.

The description of The Intrusion mission
So bring a TON of ammunition and healing items. You’ll be using a lot of ammo, and possibly a lot of heals. Grenades can be useful since a lot of fighting will be in close quarters, but they are just as dangerous to yourself as to your enemies and aren’t necessary.
As for the type of ammunition to bring, FMJ for rifles should work out just fine. Though you can spend some extra for AP rounds, which deal less damage but penetrate through armor much more effectively.
That’s up to personal preference. FMJ is perfectly capable of taking down an armored enemy as long as you hit them rapidly. Though you may want to upgrade the ammunition you use for your sidearm to +P rounds in case you need to use it against an armored opponent. +P rounds not only penetrate armor better, but also deal more damage. They’re well worth the cost.
The Intrusion - Getting To Pobeda Factory
So after checking your loadout and accepting the mission head out to the Bolotky Village exit from Vanno.
This walkthrough also assumes that the Tide has just come in and it is daytime. I’d recommend leaving at around 7 or 8 AM to give yourself enough daylight to make it if you want to do this during the day.
While going at night does make navigating an unfamiliar area a lot harder, it does give you a huge advantage in stealth as long as you don’t use any lights. I’d recommend going during the day the first time you complete this mission unless you’ve been doing more sneaking than fighting up to this point. Regardless there’s no way around fighting your way through the factory, so you better be ready for one.
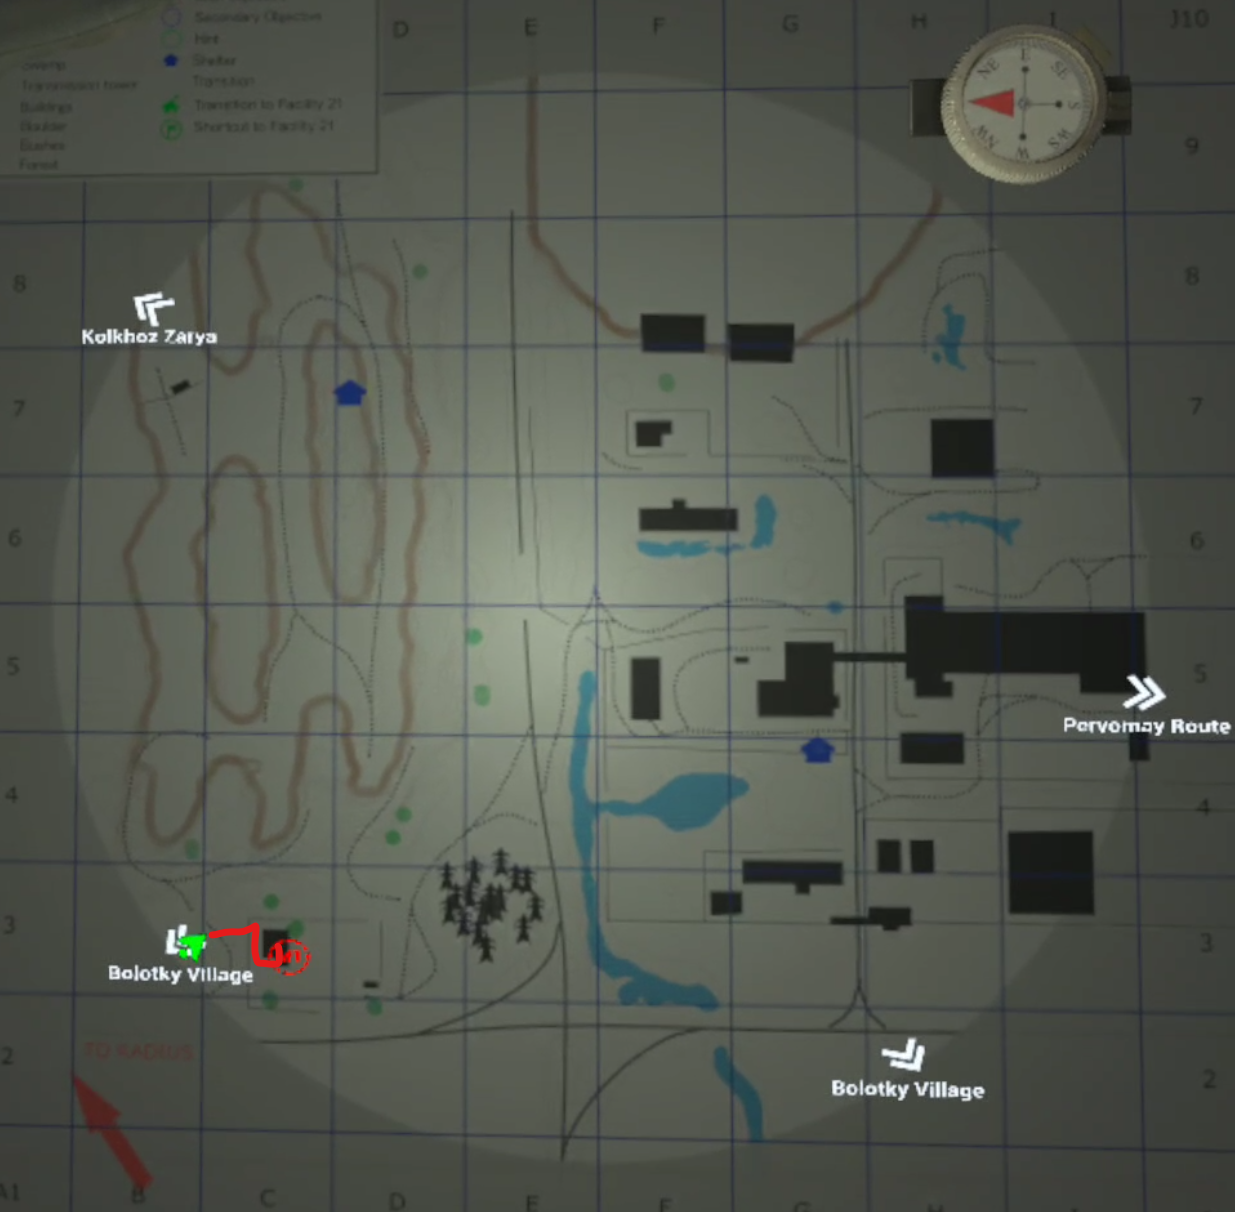
Let’s take a look at the map and plot our route through Bolotky Village.

The route we will take through Bolotky Village
As with our previous walkthrough on the A Probing Move mission, we’ll be avoiding the hotspots of Bolotky Village like the village itself and the construction site across the swamp.
You’ll run into the most enemies near the ruined tanker by the lakes next to the Kolkhoz Zarya exit. The rest of the way you’ll undoubtedly run into a few more, but they shouldn’t be much of a problem at this point in the game.
Bolotky Village is the easy part of this mission, and if you forgot something or want to reequip before heading to Pobeda Factory you can easily just go back the way you came to Vanno.
So just like last time immediately cut north through the forest taking down the few enemies that will be there, and when you see the exit to Kolkhoz Zarya next to the ruined tanker cut to the east and go across the narrow strip of land in between the red lakes.

The path between the lakes by the ruined oil tanker
You’ll run into a few enemies here, mostly those that attack you in melee range like Fragments, Spawn, and Seekers, though there will be at least one firearm equipped enemy in the forest you’re headed towards.
Go through the strip of forest past the lakes, while watching out for Web Anomalies.
Once you’re on the other side of the trees you’ll be next to the tower safehouse marked with a blue house on your map.

The safehouse tower
Instead of taking the exit to Pobeda Factory near this tower like last time, keep going past it to the northeast and you’ll run across a small road past more trees and a patch of swamp water.

The path near the top of Bolotky Village
Follow this road, you can also see it on your map.
It will lead you directly to the exit to Pobeda Factory. There are quite a few anomaly fields next to it, and you’ll probably run into a few enemies, but nothing you can’t handle.
Before taking the exit to Pobeda Factory make sure to ready yourself, eat if you’re hungry, and load your magazines.

The rope line to Pobeda Factory
The Intrusion - Getting The Bomb
Once you’re in Pobeda Factory take a look at your map.
Here is the route we’ll be taking. There are a few ways to get to the bomb, and all of them risk combat, so you might as well take the shortest route.

The route we will be taking through Pobeda Factory
Pobeda Factory does have quite a few enemies in it from Mimic Policemen, Mimic Commandos, and even some of the more lightly armed Mimic Soldiers.
Don’t worry though, you’ve got quite a bit of experience in Into The Radius by now and you can handle this.
If you brought a silencer now is the right time to make sure you’ve got it on your weapon. Being quiet as you push across the factory complex to the bomb will make the whole experience a lot easier.
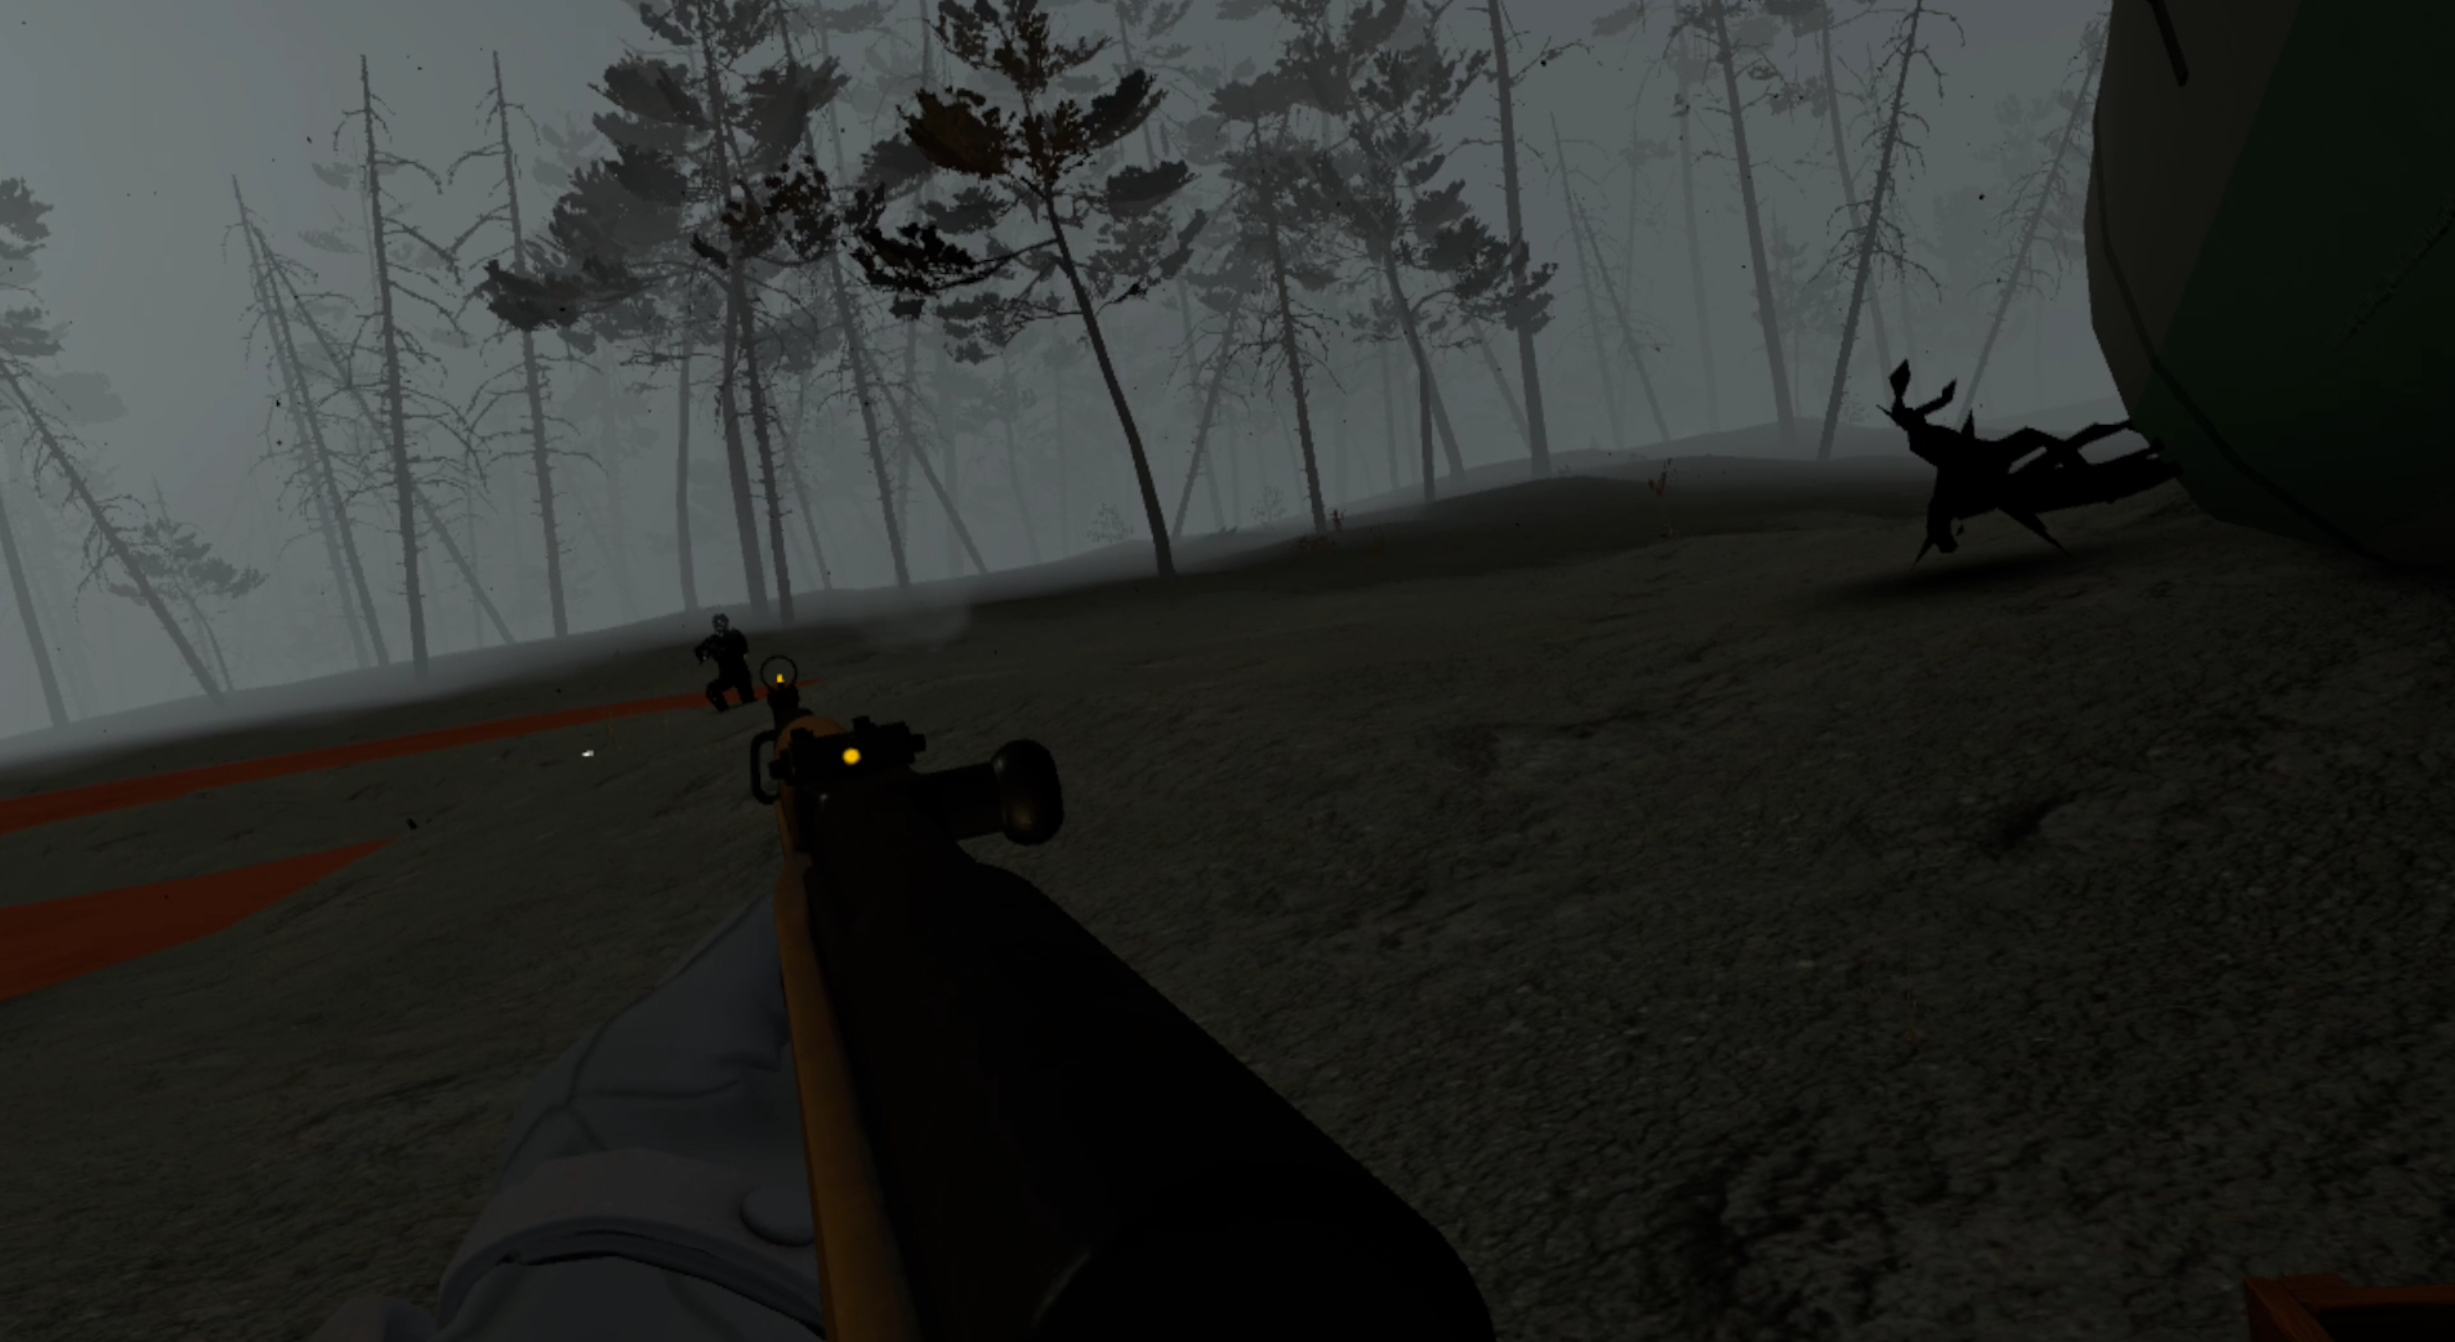
When you’re ready walk up to the main gate. You’ll notice an anomaly field in the parking lot on your left, and your friend standing in front of the entrance.

Our friend at the entrance of the factory. The outer gate is just past her
Touch her for some extra dialog and keep moving. Right through the gate you’ll be in a sort of small courtyard with buildings on either side of you. Don’t bother going left or right, there will be enemies patrolling near those buildings.
Just go straight through the inner gate.

The inner gate on the main road of Pobeda Factory
There will be another anomaly field on your left with more enemies patrolling around it.
At some point an enemy will probably spot you. If they do then take them down with your silenced weapon quickly and keep moving.
If you don’t have a silenced weapon then any gunshot of yours will attract a crowd of enemies. If you aren’t taking the stealthy approach you may want to consider holding your position and letting your enemies come to you, as unsilenced shots will draw enemies from all directions.
Either way there won’t be too many, but there will be more equipped with firearms than you’ll be used to from Bolotky Village. Hopefully you’re also wearing your armor.
Whether you can sneak past or have to fight the enemies near the entrance, keep following the road through the center of the factory complex past the second gate.
When the walls around the buildings on either side of the road give way you’ll see a ruined building with a floating anomaly field in front of you and on your right.
The anomaly field in the ruined building near the bomb
That anomaly field is just to the west of the bomb’s location. You don’t have to go through it, so instead head to the east a little bit and pass by the field.
Get through this area quickly. The area to the west of that anomaly field is full of enemies among those buildings, and there might be more wandering around the hills and ruins. You can play it safe, dig in and fight them all, or run through and take down any that see you with a silenced rifle.
As always distance helps with avoiding being spotted, so the sooner you get over to the bomb the less likely they are to spot you, though there might be a stray enemy or two near the bomb they won’t be hard to deal with.
You can see the location of the bomb on your map. It’s inside a crate in a pit.

The crate containing the bomb
Grab it and put it in your backpack. There will be a lot more combat before you need it.
The Intrusion - Close Quarters Combat
The bomb pit should be relatively safe, so reload your magazines and keep an ear out for enemies sneaking up on you.
When you’re ready get out of the pit and take a look at the big building just to the south.

The entrance is just to the left of that truck
As you can see on the route plotted on our map there’s an entrance to the factory interior on the eastern end of this large building.

The route we’re taking through Pobeda Factory, again
The doorway is next to a high wall and hidden behind some piles of concrete pads. If you follow the northern wall of the building to the east you’ll run into it eventually.
Once you get next to the entrance you’ll probably hear a lot of footsteps. If you’re using a silencer then you can take it off now.
Time to go loud.

The entrance to the interior of the Pobeda Factory
There’s really no reason to try and stay quiet anymore.
From here on out there will be enemies directly between you and where you need to go, with no way to maneuver around them or avoid them.
In the factory interior there are no clever routes, no secret back entrances, just a straight up running firefight between you and a small army of radius entities.
Immediately find cover as you enter the warehouse. Watch out for the Web Anomalies and Gas Anomalies floating around the place.
There will be about five or so Mimic Soldiers between you and where you need to go, which is a stairway that leads up above the warehouse floor that you’re on. Just keep heading east. Stay in cover and listen for footsteps.
Play it smart and you can get the drop on the enemies in your way. If you take some hits don’t worry, that’s what the armor and healing items you brought are for.

Fighting through the Mimic Soldiers
Once you’re on the other side of the warehouse look for the stairway leading up.
There may also be a Mimic on top of them firing down at you. It’s just to the right of the red sheet metal room jutting out of the wall.

The stairway leading further into the factory
Head up the stairs, there will likely be a Rift Anomaly in the locker room that the catwalk leads into.
Destroy it so that it doesn’t respawn any enemies, and continue forwards into the small office adjoining the locker room.
There will likely be more enemies around, so make sure you take care of them, and also make sure you loot the place. Some great loot spawns in that room, and there’s even a crate on one of the tables that can spawn a weapon inside.
Oh, and if you’re worried about the condition of your weapons there’s even a brush and cleaning spray on one of the window sills.

Some free cleaning supplies
Once you’re done looting continue forwards. There’s some black grass in the next hallway.
You’ll run into the Black Grass anomaly multiple times in this building. Even if you’ve got just a Head Lamp it’s easy enough to get past by simply looking at it for a few moments, and then quickly walking over it while looking down at your feet.
Once you’re past the black grass take a right and you’ll see a long hallway.
The long hallway, be careful down there
This hallway is the skybridge that joins the large warehouse/factory you’ve been in to the building on the other side of the road.
Be very careful crossing it. There is very little cover. The easiest way to clear this area is to draw enemies towards you so that you can shoot them as they advance across the open ground, instead of advancing towards them and getting shot up in the open.
If you brought some grenades and have a good throwing arm you can also toss a couple down the hallway to clear out the next room as well.
However you make it across, keep your ammunition count in mind and make sure all of your magazines don’t run dry.
Take a left down another hallway in the next room. There will be more Black Grass at the end of it, and probably another enemy or two. There will be enemies spread throughout this building.

There’s a lot of Black Grass in the factory
Go down the stairs where there will probably be, you guessed it, even more enemies.

There’s a lot of stairways too
You might be able to see why I recommended bringing so many healing items and so much ammunition.
There will be yet another hallway full of black grass and a stairwell leading downwards. Don’t worry, you’re getting close to the end by now.
If you’re not in a hurry though there is a great opportunity to grab some extra loot by taking a left into another hallway before going down the stairs.

Make sure to go down this side hallway to get more loot
Down this hallway is another crate of loot which might contain a weapon, and some other things scattered around.
There should be yet another loot crate if you walk out on the fire escape and go up the stairs. Though be careful that you don’t get shot at by any stray enemies while you’re up there.

The view from the fire escape, don’t fall down!
When you’re done looting head back to the stairway and down the stairs.
There will probably another enemy or two lurking around, and you might hear a lot of footsteps around you if you haven’t cleared the whole outside area when you were on your way in.
Don’t worry, enemies outside the walls are basically harmless until you leave, and you’ll be leaving very shortly. Next to another ruined staircase that has a ramp leading up to yet another crate, you’ll find the door.

The door to the final room and the black statue in front of it
There’s also a black statue that you can touch to get a hint, basically that you need to blow the door down and then escape out of the window, which is just what you’re going to do.
Get the bomb out of your backpack and then place it into the small highlighted area on the door.
Be ready for when you do though, the bomb will immediately arm. Run as soon as you place it. The bomb will blow in a few seconds.
Once the door is gone head into the office beyond it.
There will be an absolute ton of loot in there. Various pieces will be scattered around including some items that will certainly sell for lots of cash, a Pecho plushie, and another of the white crates that may spawn a firearm.
On the floor behind the desk is your target, the case of documents.

The case of documents to bring back
The thing about this case is that unlike previous mission items you can’t put it into your backpack. Instead you need to carry it in one of your hands, which makes leaving a little tricker than usual.
Of course you can always drop it to regain the use of both of your hands, but this can still make moving while being ready for a fight difficult since you won’t be able to hold your rifle while walking with the case.
Also the case is very heavy and will slow you down. Regardless the hard part is behind you now. Time to get out.
Load your mags and get ready for the trip home before climbing out of the window with your case in hand, a little wooden ramp is leading up to it.

The window you can jump out of to leave
Keep a watch out for enemies, and take a left once you’re out of the building. Go to the road that leads through the center of the factory.
On the road turn right (south) and follow it back out through the main gate the way you came in.
If you chose to take the stealthy approach to getting into the factory complex you might have an enemy or two between you and the exit. You could also choose to wait for nightfall by sleeping in the safehouse nearby marked by the blue house symbol on your map.
Just take your time and you’ll be fine. You’ll probably be so overloaded with loot that you’ll be forced to take your time anyway.
Whenever you make it back to Vanno turn the case in and you’ll get a stack of cash and Security Level 4!

Security Level 4
Congratulations! You’re now the master of Pobeda Factory, and you’re one away from the highest Security Level in Into The Radius.
The Intrusion is definitely a hard mission, but by being properly prepared and planning ahead you can make it through no problem, and with a pack full of loot to boot.
Next time we’ll be talking about the seventh Top Priority mission in Into The Radius in Part Eight of our Into The Radius VR Walkthrough.
Steam Link Gives Alternative to Airlink for Oculus Quest 2 and 3 PCVR
If you’ve been playing PCVR games on your Oculus Quest 2 or Oculus Quest 3 with Airlink or Virtual Desktop then you might have had some trouble with it at some point.
Valve (the company behind Steam) has partnered with Meta to update their Steam Link application so that it will run Steam VR games directly from your PC to your headset without the in between step of launching Virtual Desktop or Airlink.
If you’ve been playing PCVR games on your Oculus Quest 2 or Oculus Quest 3 with Airlink or Virtual Desktop then you might have wondered if there are any alternatives.
To play Steam PCVR games on a Meta Quest 2 or 3 you always had to start Airlink or start Virtual Desktop, and then run Steam VR inside of them.
So basically you always had to run two applications, one on top of another, to get a PCVR game in Steam to appear on your Quest headset.
Well it looks like those days might be over, because Valve (the company behind Steam) has partnered with Meta to update their Steam Link application so that it will run Steam VR games directly from your PC to your headset without the in between step of launching Virtual Desktop or Airlink.
How To Use Steam Link
First, just as with Airlink, make sure your PC running Steam and your Quest device are on the same WiFi network. Oh, and make sure Steam is up and running on your computer as well.
Also keep in mind that streaming a VR game to your headset is very demanding on your network. You may experience a lot of lag and framerate drops if the network connection to your PC isn’t up to the task. It’s ideal to have your router, PC, and headset in the same room.
A 5GHz connection is also recommended, and an ethernet cable connecting your PC to your router.
When you’re ready to try Steam Link then download the Steam Link app on to your Quest device. You can find it on the Oculus Store via the Oculus app on your phone, or via the Store app in your headset.
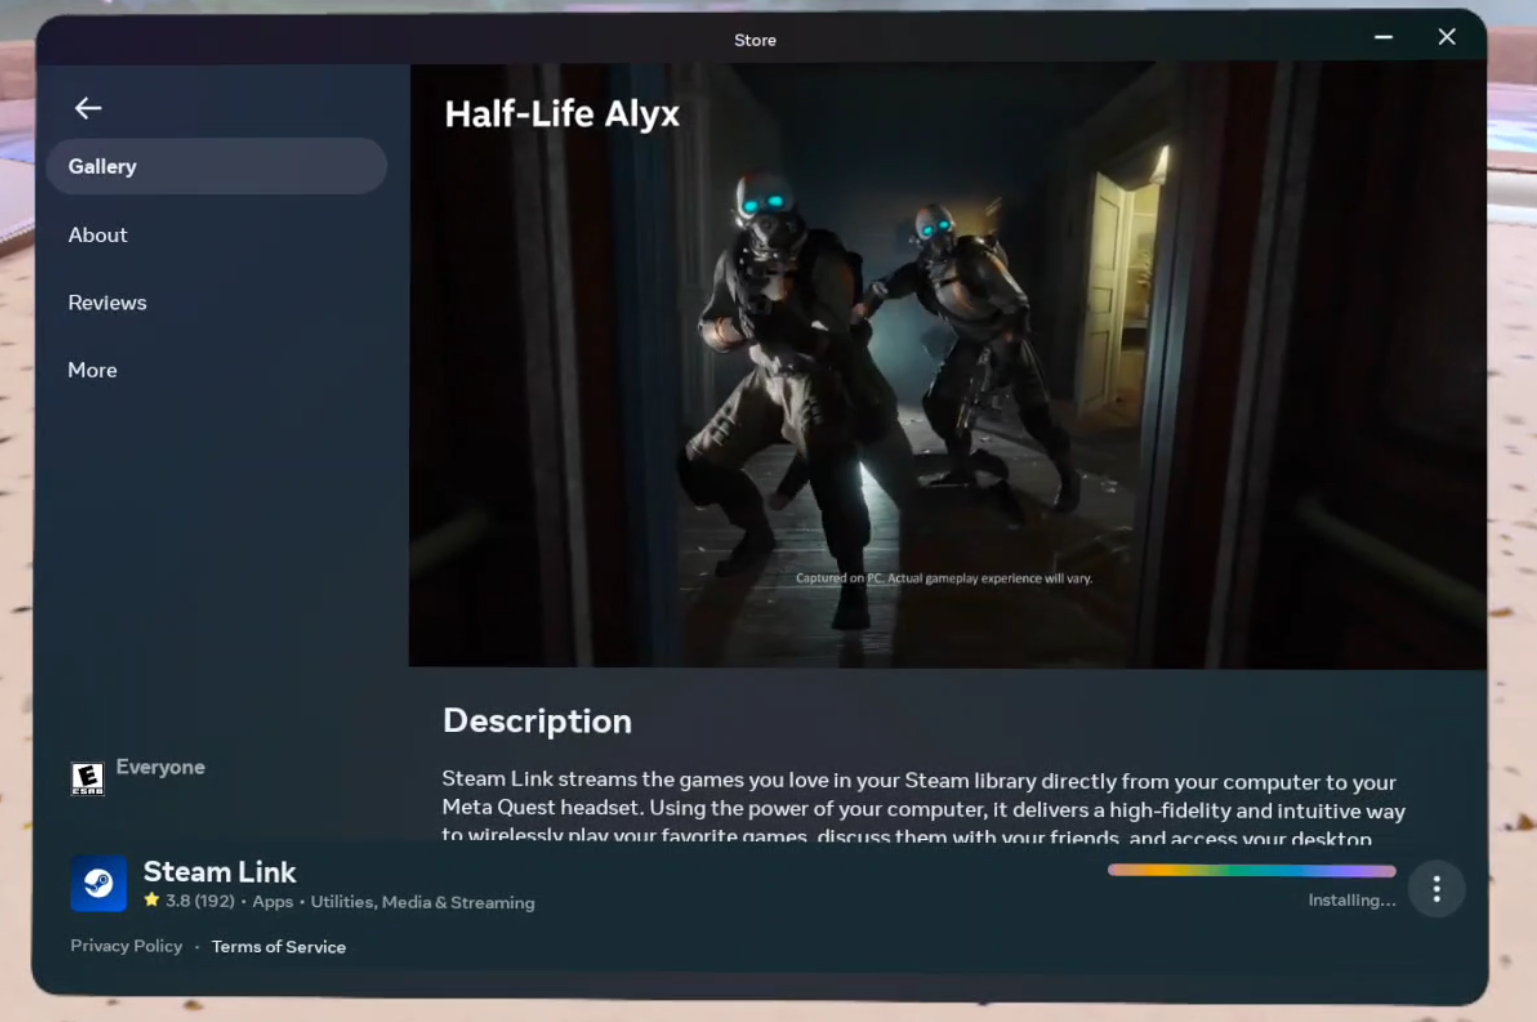
Downloading Steam Link in the Oculus App Store
Open the Steam Link app on your headset and you’ll see some instructions for running Steam VR apps from your PC.
You’ll need to link your headset to your computer running Steam. It’s really quick and really easy, even easier than setting up Airlink.
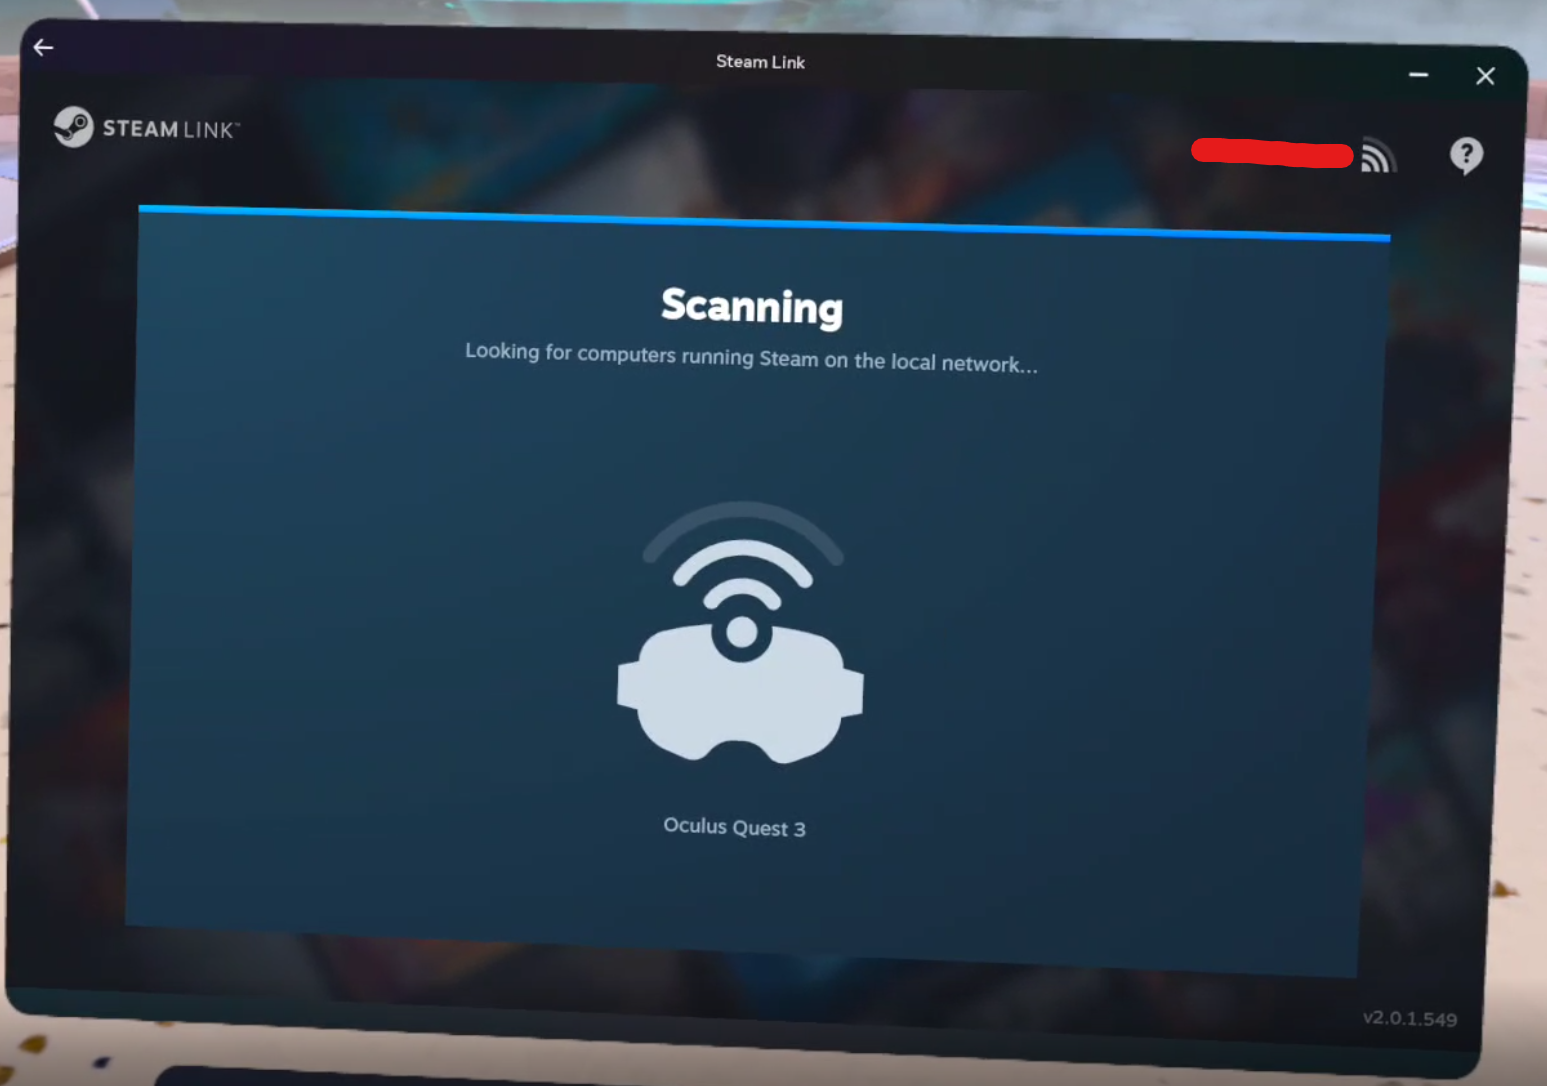
Steam Link scanning for PCs running Steam on the WiFi network
After Steam Link scans your network for a computer to stream from you’ll be prompted to select that computer on your network.
You’ll probably see some prompts asking for permissions, hit “Allow” on each of those prompts.
Finally all you have to do is enter the Pairing Code that appears in your headset in a popup on your PC.
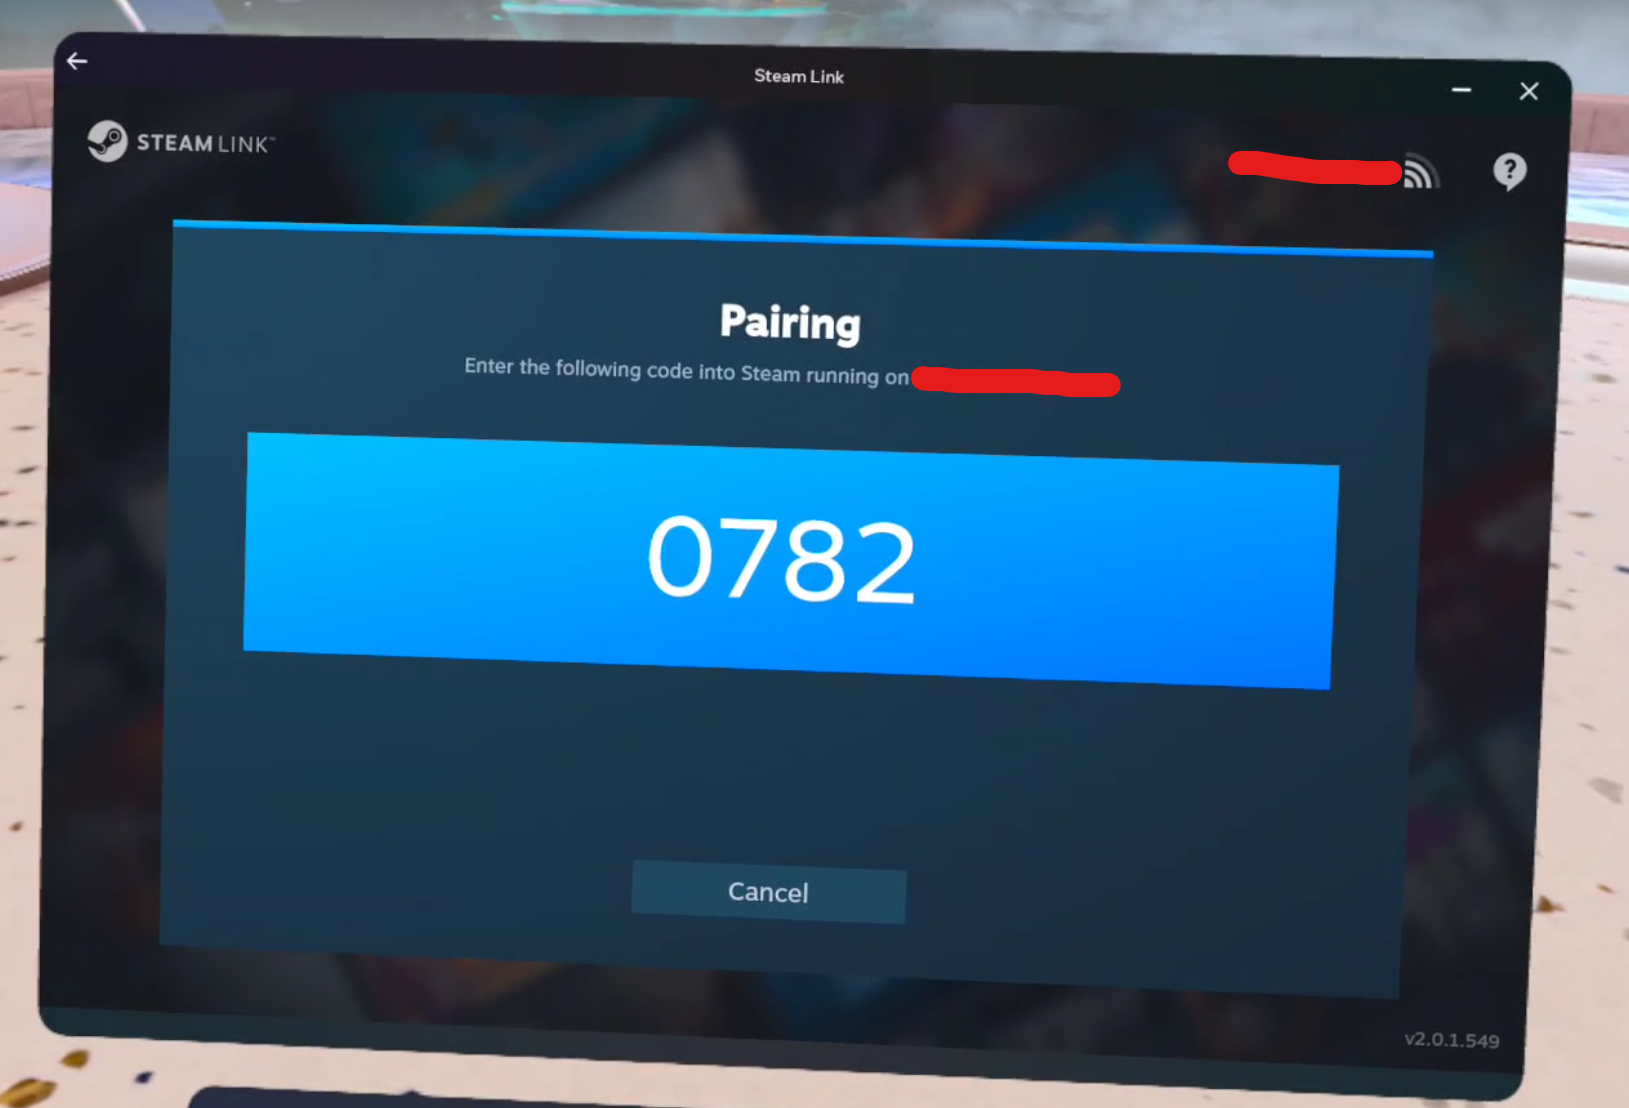
Once you pair your PC to your Quest headset with your code then you’re ready to go
Then Steam VR will launch and you’ll find yourself in your SteamVR home!
From there you can launch any SteamVR games you like. They’ll appear both on your PC and in your headset.
As far as setup goes Steam Link was incredibly easy to get working, and gets you in game significantly faster than the previous method of launching SteamVR through a Virtual Desktop or Airlink connection.
Is Steam Link Worth It?
That being said not everyone has had such an easy experience, at least according to Steam Link’s user reviews on the Oculus App store.
While most agree that the setup is easy, many have also been having trouble with massive bugs that have cut out audio, affect the headset’s display, or break the connection between the PC and headset.

Bugs have kept a lot of people from using Steam Link. Hopefully they will be fixed in time
Making Steam Link work for a Quest headset must have been hard, even for a company with Valve’s resources, and there are a ton of different hardware setups to account for, not to mention just straight up bugs that need to be ironed out.
If Steam Link works well for you then it is entirely worth it if you want to run PCVR apps via Steam on your headset. Trying it out myself I found that it ran very smoothly and was much more convenient than the old methods.
Of course Steam Link might not work out for you if you run into any of these bugs, so whether or not Steam Link is worth it is up to whether or not it functions properly for you.
Most likely these issues will be ironed out over time anyway,
Whether or not you use Steam Link to run PCVR games on your Oculus Quest 2 or Oculus Quest 3 headset I hope you’ve found this informative and helpful. Enjoy!

The Best VR Pickleball Game On The Oculus Quest 2 and 3
Imagine playing a game of Pickleball in your living room. It’s too cold or too hot outside, you don’t want to go anywhere, but you really want to get some practice in and have some fun with the fastest growing sport.
Well the magic of Virtual Reality can make that desire a reality with a wonderful Pickleball VR game. With an Oculus Quest 2 or an Oculus Quest 3 there’s nothing stopping you from enjoying a game of Pickleball in VR whenever you want to.
Whether you’re already an avid Pickleball player or want to see how much you’d like the sport yourself, VR Pickleball is a great way to not only learn the rules and how the game plays, but also discover the joy of playing Pickleball.
There are currently three Pickleball games available on the Meta Quest 3 and Meta Quest 2 platform, and to spoil the rest of this article I’ll let you know right now that there is one clear winner out of the three, and that is Pickleball One.
If you’d like to know why, and what features are available in this fantastic Pickleball VR game, then keep reading.
Oh, and a quick disclaimer before we get into these games. You’re going to want a bit of space to play them.
So if you want to enjoy VR Pickleball as much as possible with these games make sure you’ve got the biggest playspace you can get. Having enough space to swing the paddle around is important.
Anyhow without further ado here is the Best of all VR Pickleball games on the Oculus Quest 2 and 3.
You May Also Be Interested In:
VR Pickleball Games - The Ones You Want To Avoid
Before I start singing the praises of Pickleball One, let’s talk about why the other two Pickleball games available on the Quest store aren’t worth your time and money in comparison.
I had really hoped that, despite both being available through the App Lab, one of these games would be a strong contender to Pickleball One and would have offered unique alternatives to that game. Unfortunately both were disappointments.
First let’s talk about one that, while not being much right now, does have quite a bit of potential for the future assuming development keeps up. That would be Pickleball Pro.

The Pickleball Pro Logo
Pickleball Pro has all of the makings of a decent Pickleball VR game. A nice loading screen, a quick tutorial, and a good looking main menu.
Unfortunately the main problem with this game is apparent when you look at that main menu.

The main menu of Pickleball Pro. There aren’t a whole lot of options here
At the time of writing only Training and Practice modes are available for this game, and as far as a VR Pickleball game goes those aren’t much.
Going up against a ball throwing machine is nice and all, but at the end of the day it’s hard to call a Pickleball VR game an actual Pickleball game without being able to play a match of Pickleball at least against an AI opponent.
It looks like that just isn’t available at the moment, and even the practice modes weren’t great. The ball machine doesn’t even have the capability to throw the ball at you in random directions.
Nope, instead you need to manually tell it where and how to spit the ball out at you.

I guess a random automatic ball machine is too much to ask for
That being said there’s the makings of a decent game here. It looks good enough, and the ball physics aren’t bad either. Though the ball does tend to react a little too violently to your swing, but not often.
It’s getting the opportunity to hit the Pickleball that’s sort of a drag, and even if AI matches were available I doubt they’d be much fun since the only way you can move around is by thumbstick movement, which slides you across the court incredibly slowly.
So maybe one day I can update this article and tell you that Pickleball Pro is worth taking a look at if you want an alternative to Pickleball One, for now it feels like your money is being stolen to get so little game for a price of 20 dollars.
Speaking of games that feel like scams, let’s talk about the simply named Pickleball, our other bad example of a VR Pickleball game.

The Pickleball Logo
Playing Pickleball feels like playing the sort of game that is secretly mining bitcoin while you play it.
It looks clunky, the UI is terrible, and it was hard to figure out how to even start a match. Though it does have a leg up on Pickleball Pro by at least having the option to play a Singleplayer match.
Still, just look at this mess of a main menu.
The Pickleball main menu. It looks even worse in Virtual Reality
It hardly looks like something that warrants a 15 dollar price tag. It looks like an alpha of a game that is yet to be released to the public.
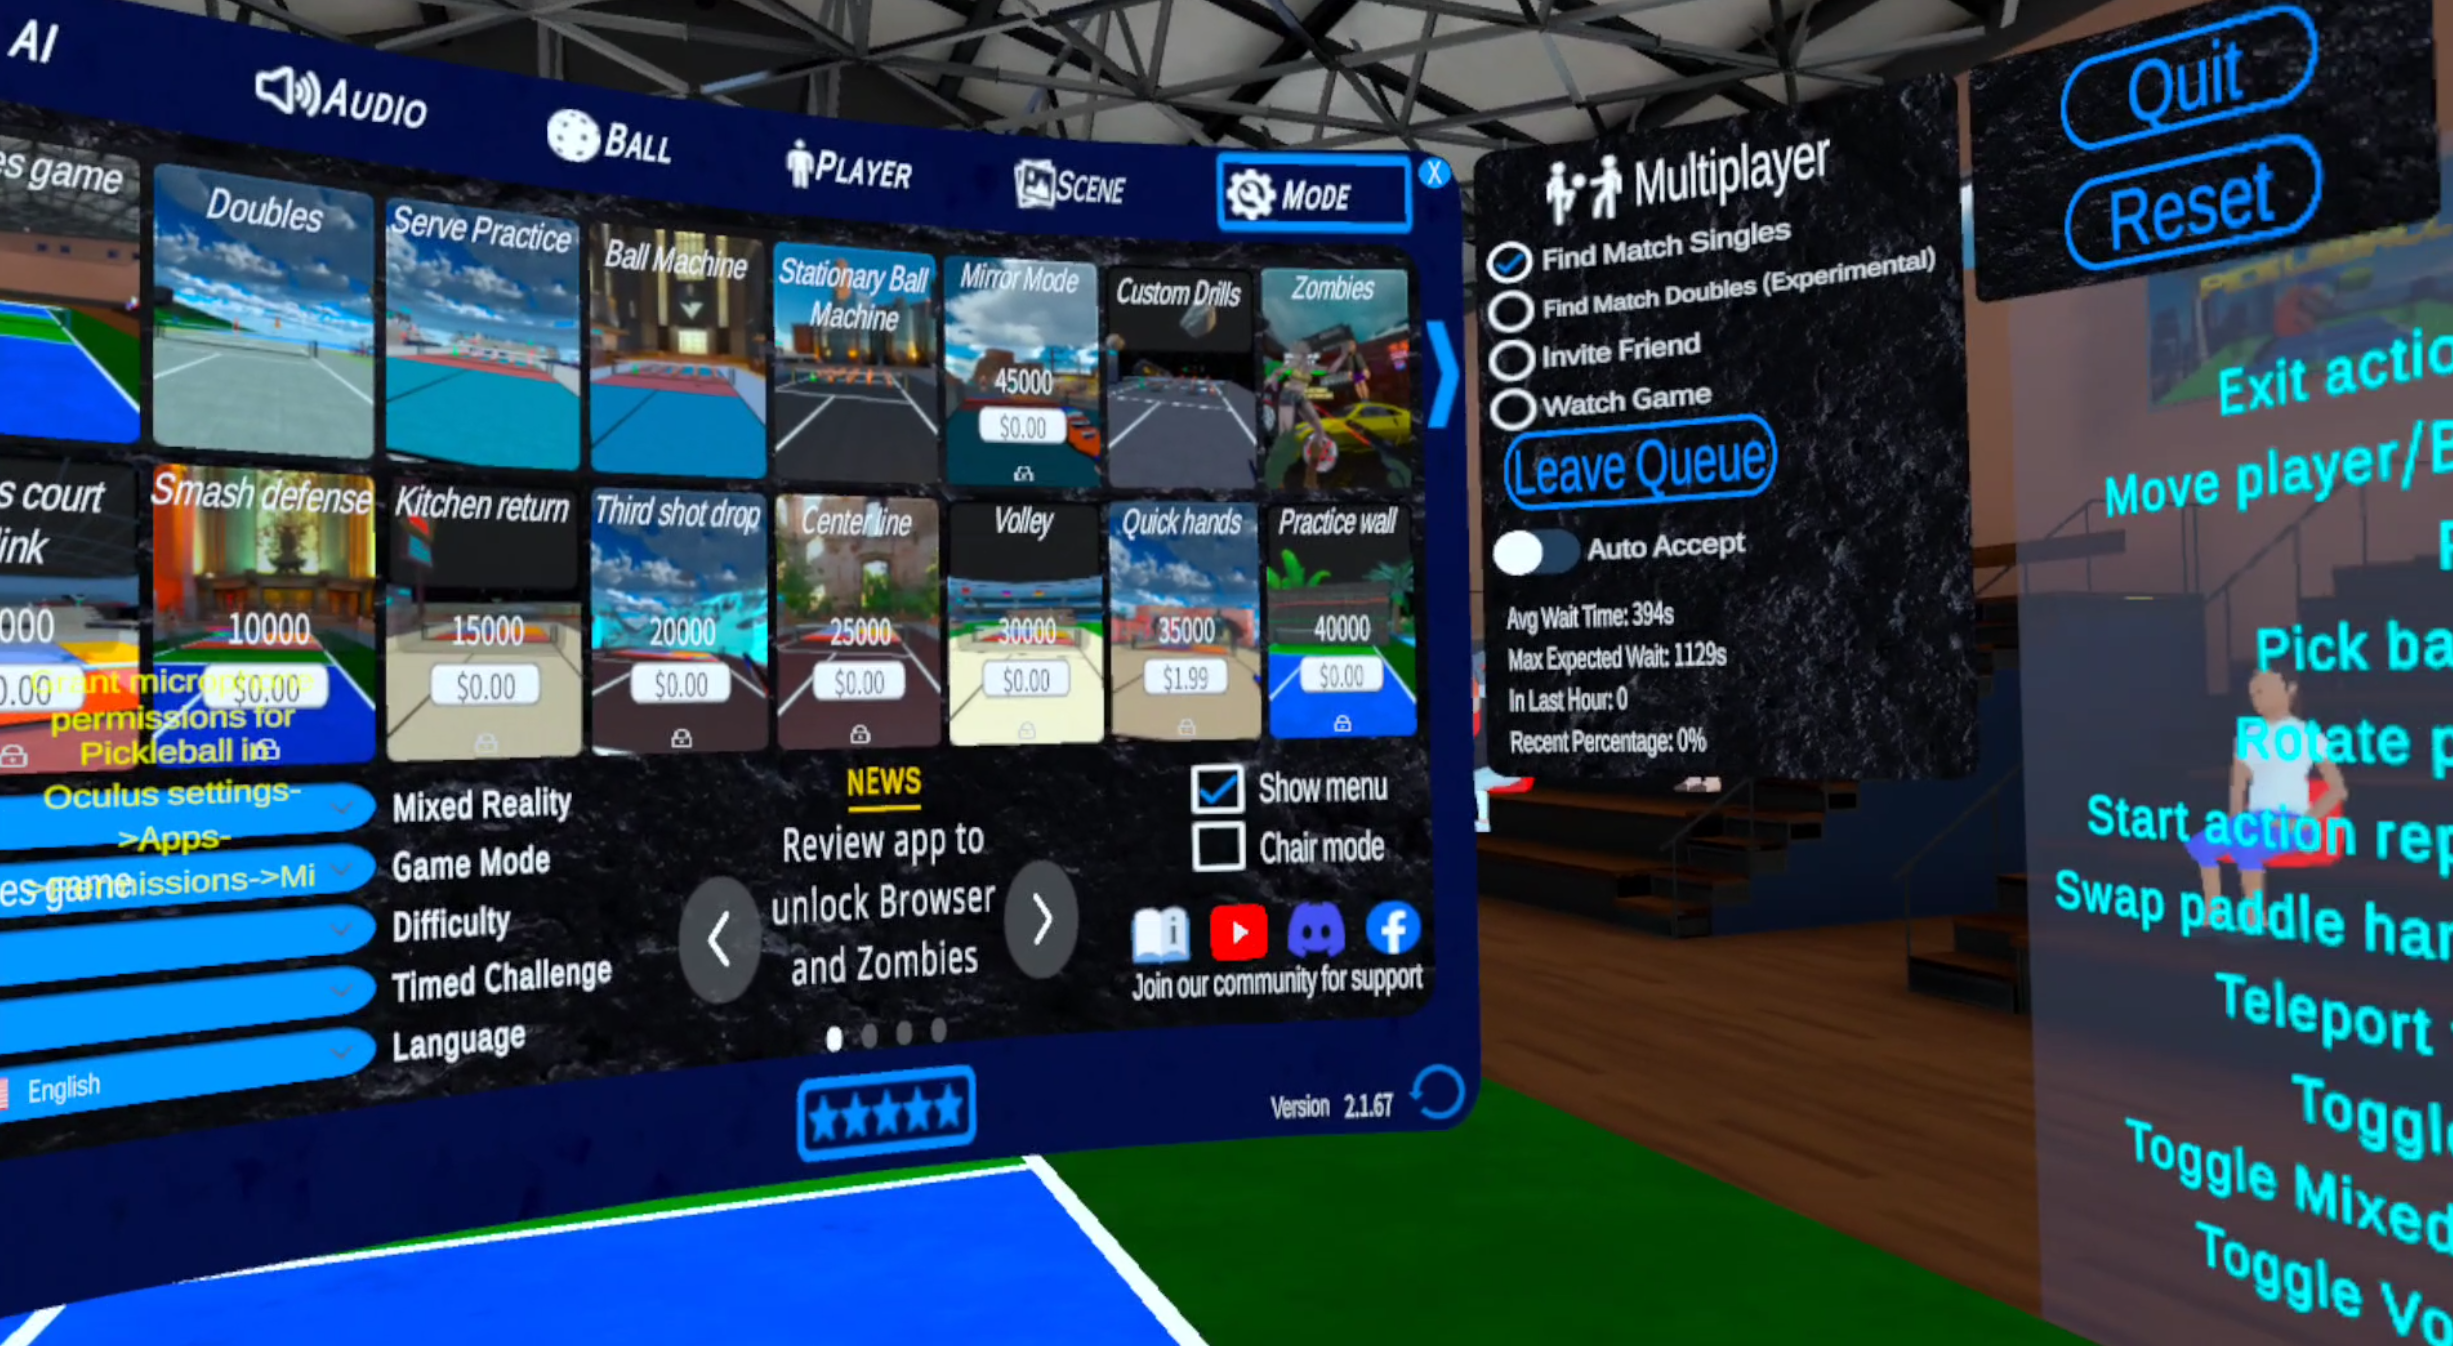
Unfortunately, it plays like one too. First, you need to go to the “AI” section and set up your AI opponent, and then you need to go over to the “Mode” menu to actually start the match. This didn’t make a whole lot of sense.
It didn’t help that a couple of players were trying to invite me to multiplayer matches, which I would have gladly started if I could figure out how to actually start the match after accepting. I’m not even sure it was working. I’d join and not even hear them say anything.
The Singleplayer match against a bot was every bit as odd and janky as the main menu.

A bot swinging at a ball that is nowhere near them, and that they don’t hit anyway
The most heinous and most obvious thing I noticed when starting the first match was how choppy and unoptimized the game itself was. Even on a Quest 3 with all the latest standalone hardware it would stutter constantly.
The ball physics are also kind of all over the place and the ball moves a little too quickly, though to be fair there were a number of options in the settings menu to change this.
That doesn’t make the game look any less terrible though, with the bot constantly doing animations that not properly timed with them actually hitting the ball, and the extremely generic music constantly looping in the background to the point that it was extremely grating.
Turning off the music didn’t end the jankiness though. Every time the ball lands in your court you are teleported to it, and while teleportation might be fine for some, I’ve been spoiled by VR Tennis games and find being teleported across the court to be extremely jarring.
The game would also teleport you too close to where the ball was. While there was also an option that would make the teleportation happen only when you take an action, like pressing a button, the weird looking bot, constant framerate drops, bad pickleball physics, horrendous visuals, and overall impression of low quality made it not very fun.

In Pickleball the game adds challenge by teleporting you so that the ball is at your feet
The game feels like a low effort cash grab, made all the more obvious by how it kept asking me to review it over and over again.
Oh, and if you want a more specific example of what I mean by “janky” then here’s one. Your pickleball paddle will disappear when you bring it close to your face. Not even that close, about a foot or so away.

The paddle (and your hand) start to disappear about a foot from your face in Pickleball. It’s uncomfortable
If Pickleball One didn’t exist I’d say that Pickleball is better than nothing, but Pickleball One does exist, so if you’re going to buy a VR Pickleball game make it the good one.
Why Pickleball One Is The Best VR Pickleball Game

The Pickleball One Logo
So I’ve hyped it enough, why is Pickleball One so good compared to these other games?
Let’s start with the tutorial. Before I played this game I knew nothing about the rules of Pickleball.
Twenty or so minutes later, with very little effort on my part, and I now know them all, and all of the controls in this VR Pickleball game.

Serving training in Pickleball One
The tutorial was great, better than any tutorial for any VR sports game I’ve ever played, and it kept getting better when I tried my luck against some AI opponents after that.
They had a few different difficulty modes, looked as good as a Facebook Metaverse avatar can look, and all of their animations matched up to what they were doing in the game.

A bot hitting the ball back in Pickleball One
There’s no constant annoying music, and there are a lot of useful in game audio cues.
Each time the ball is hit there is a noise that sounds a little bit like how an actual Pickleball hitting a paddle sounds, and the same goes for the ball hitting the floor of the court.
Every time the server loses a point and the server changes there is a call of “side out” to indicate that is the case. The sound design is minimalistic but pleasant.
So are the AI opponents. Easy truly is easy, even when I was a novice I had a shot at winning, and Hard is extremely difficult. After some solid hours of play I got to the point where I had a chance of winning against a Medium difficulty bot. I felt like I was making progress.

Returning the ball in Pickleball One
The paddle physics are also great, if that wasn’t obvious by now. You do really have to whack the ball hard to get a serve in, but in general you don’t have to exert yourself to hit a Pickleball to the other side of the court. If you accidentally send it flying into the stands it’s because your hit is too hard and not because the physics decided to break.
Even outside of the matches there was a lot of great stuff to try, and some of it even things you might not expect. The Training and Fitness menu has all of the usual greatest hits, like a ball machine and a wall to smack the ball against so it bounces back at you.
What was really surprising were the Fitness options. Pickleball One does give a good Pickleball experience, but it’s also secretly kind of a fitness game.
In fitness mode a song plays, usually a fairly catchy if generic tune, and robots launch Pickleballs at you that you need to hit to get points.

The workout mode of Pickleball One. It’s really fun
It’s a very novel way to not only practice hitting Pickleballs, but get a bit of a leg workout, test your reflexes, and sweat it out in Virtual Reality. Or even Mixed Reality, because Pickleball One also includes a mixed reality mode.
While this is by no means the most intense VR fitness game, it is a lot of fun and great practice. I never expected a feature like this in a VR Pickleball game, but I’m really glad it’s there and have had a lot of fun with it.
Pickleball One also has Multiplayer, and while you might have trouble finding an opponent at certain times of day or in certain regions of the world, it functions extremely well.

The Multiplayer works extremely well
There was little lag, and the game worked just as well as it did in Singleplayer. Overall an almost seamless Pickleball experience against another person in VR. There was just occasionally a split second of lag when someone would hit the Pickleball with their paddle, and that was still only occasionally.
I really have no complaints about Pickleball One. It’s everything you might want in a Pickleball VR experience and then some.
So if you want to play VR Pickleball ignore all the other games and spend your time and money on Pickleball One, it’s really the best of them all.

Into The Radius Walkthrough And Guide - The Fifth Mission - A Probing Move
Stuck in Into The Radius? Wondering where to go and how to get there for your next mission?
Well don’t worry we’ve got you covered with this walkthrough and guide for Into the Radius VR.
Here we’ll be talking about the fifth Top Priority mission that you get in Into The Radius, A Probing Move, which includes your first trip to the third map of the game, Pobeda Factory. All you’ve got to do is get in, grab a little tape recorder, and get out.
Stuck in Into The Radius? Wondering where to go and how to get there for your next mission?
Maybe you would just like to see what is in store for you before you get there, or you’d like to know if you’re properly prepared for your next mission in the Pechorsk Zone.
Well don’t worry we’ve got you covered with this walkthrough and guide for Into the Radius VR.
In this Into the Radius walkthrough we’ll detail how to progress through the main story “Top Priority” missions, with a couple of guiding tips thrown in here and there to make your adventure smoother.
The focus of these walkthrough articles will be the story missions, but we’ll throw in some general gameplay tips and other useful loot locations near your objectives.
These articles will also assume you’re playing the game on the Normal difficulty mode with Tutorials turned on, which is highly recommended for your first playthrough. This walkthrough will still be useful if you’re playing on Realistic difficulty, but some details like vendor prices or enemy placement and numbers will be different.
Here is every article in our complete Into the Radius VR Walkthrough:
Into The Radius Walkthrough And Guide - The First Mission - Equipment Retrieval
Into The Radius Walkthrough And Guide - The Second Mission - Total Recall
Into The Radius Walkthrough And Guide - The Third Mission - Fixing A Leak
Into The Radius Walkthrough And Guide - The Fourth Mission - Flash In The Dark
Into The Radius Walkthrough And Guide - The Fifth Mission - A Probing Move
Into The Radius Walkthrough And Guide - The Sixth Mission - The Intrusion
Into The Radius Walkthrough And Guide - The Seventh Mission - A Farewell Feast
Into The Radius Walkthrough And Guide - The Eighth Mission - Kids Playground
Into The Radius Walkthrough And Guide - The Final Mission - Ouroboros
Here we’ll be talking about the fifth Top Priority mission that you get in Into The Radius, A Probing Move, which includes your first trip to the third map of the game, Pobeda Factory. All you’ve got to do is get in, grab a tape recorder, and get out.
The Fifth Mission - A Probing Move - Loadout
After completing the Flash In The Dark mission you’ll have to do a repeatable mission before A Probing Move will appear on your terminal.
It’s not a bad idea to get some extra money before completing a Probing Move. As you’ll see from the mission description you’ll reach Security Level 3 after completing it, and at Security Level 3 a lot of new and very good weapons and armor become available.
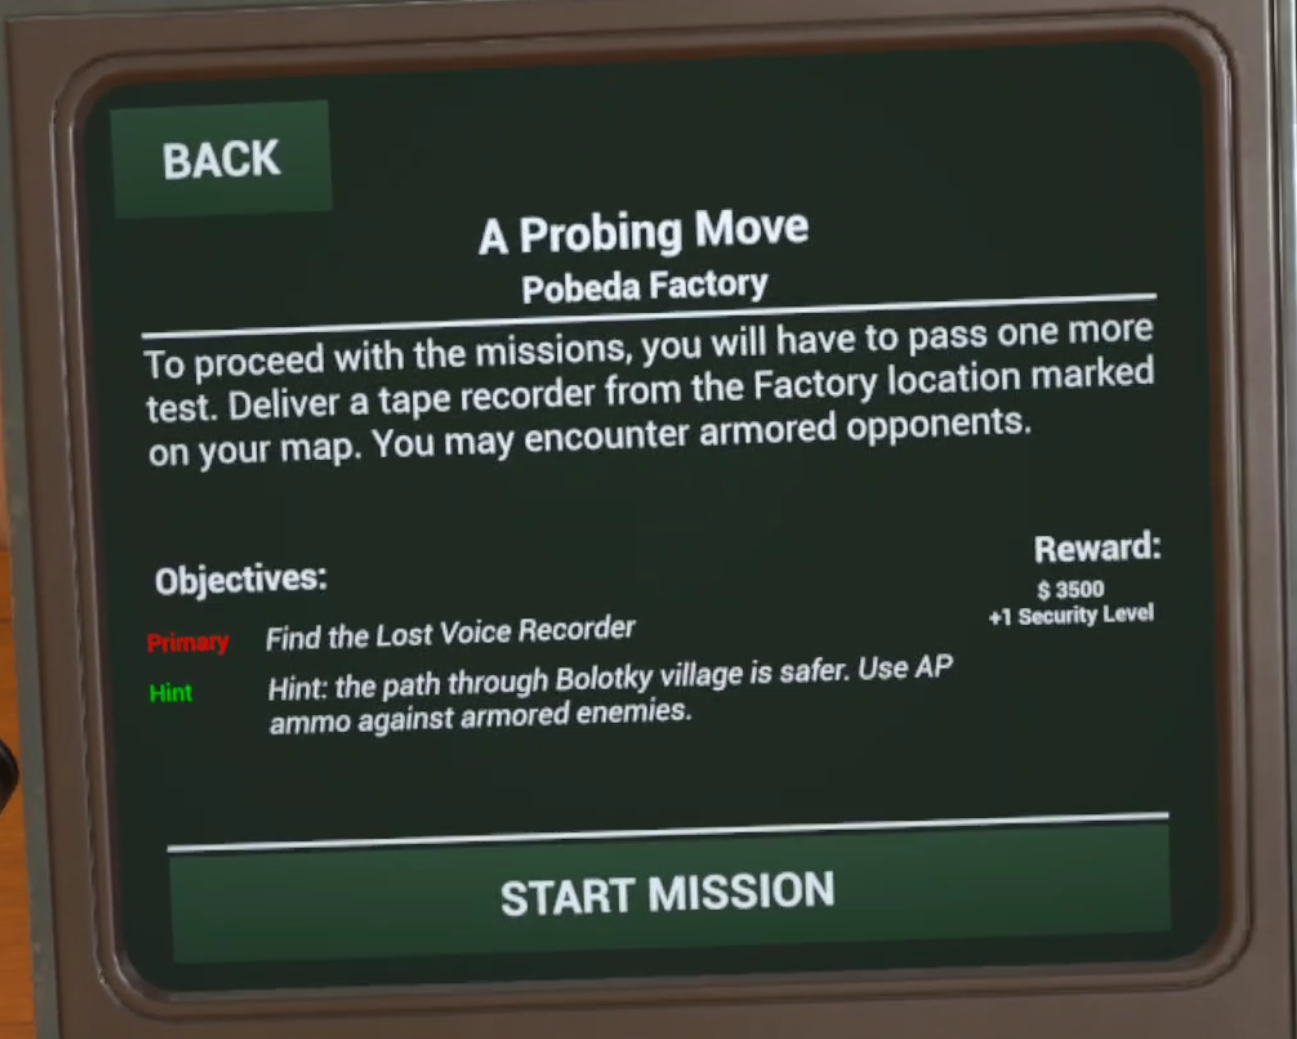
The mission description of A Probing Move
The fighting will actually be even easier than clearing Bolotky Village for the Fixing A Leak mission so if you’ve made it this far you don’t strictly need to buy any upgrades.
That being said, Into The Radius is a game that you should have fun in. If you really want an upgrade go for it with the knowledge that you can always wait for the Tide to come by sleeping through a few days and then do repeatable missions and artifact hunt in Pervomay or Bolotky for more cash.
The sample loadout for this mission isn’t the most extravagant, but isn’t strictly necessary either. You can pull this off with just a pistol if you’re careful.

A sample loadout for this Into the Radius mission
Still, it doesn’t hurt to bring a little extra firepower and the SKS sure was a lot of fun during and after this mission. You should at the very least have a decent pistol by now like the GSH-18 or Glock 17.
Not shown in this Loadout are the usual knife, detector, head lamp, and probes that you should always have on you.
You’ll need to use a bit of ammo, so a spare mag or two and a box or two extra will be fine. The huge box of SKS ammunition you see in the picture above was definitely overkill, and so were the amount of healing items and the gas mask. The gas mask also isn’t strictly necessary.
The reason I brought so much when doing this mission was that I planned to go the extra mile and grab a couple of stashes, which we will also show here. If this is your first time doing the A Probing Move mission then I recommend you just focus on finishing the mission and getting some Security Level 3 equipment before moving on to the stashes that are shown in this article.
Though if you want to try to grab whatever you can in one run then go ahead and go for it, but if you do a decent weapon and a decent amount of ammo is much more important, like in the loadout above.
A Probing Move - Travelling through Bolotky
This walkthrough assumes that the tide has just come in and all enemies are freshly spawned. Now for the first, and oddly the most difficult part of this Into the Radius mission.
Getting through Bolotky is actually the most combat heavy part of completing this mission with the method shown in this walkthrough.
Take the rope line from your home base of Vanno back to Bolotky Village, and immediately make sure your surroundings are clear of enemies.

A Spawn charging through the woods
As always keep your distance from the train tracks and don’t attract the many enemies in the village. As we usually do we will be avoiding them. There’s no reason to get into an unnecessary firefight.
Once you’re sure nothing is coming after you take a look at your map. Here is the route that we’ll be taking for this mission.

The route to take to complete the A Probing Move mission easily
You’ll need to continue north through the woods you spawned in, sticking to the left side of the train tracks.
Once you can see the rope line at the end of the tracks which leads to Kolkhoz Zarya, note the ruined oil tank by the lakes.

The crashed oil tank and the path between the lakes to the forest on the other side
You’ll likely have run into an enemy or two by the time you see it, but they’ll be pretty manageable opponents like Fragments, Spawn, and Seekers.
That’s most of what you’ll be running into on this route. Go past the oil tanker and between the lakes to the forest on the other side, but be careful.
This is the area where combat will be the heaviest, as the noise of gunshots will attract more enemies from the swamps nearby and the forest that you’ll be heading towards.
Fighting a shotgun armed mimic and Spawn near the lakes
There is likely to be at least one firearm equipped enemy in the woods ahead, and they’re going to get drawn out by any unsuppressed gunshots. Holding your ground and letting them come to you will give you an advantage.
As with any big fight in this Into the Radius VR walkthrough always make sure you’ve got a path of retreat back across the train tracks. If the fight becomes too tough you can always run back into the woods you came from and get some time and distance.
Though if you’re a more stealth inclined player using a silenced weapon and coming at night is also a viable strategy.
However you get past the enemies make your way past the lakes and through the forest when they stop coming at you. Make sure to keep an eye out for Web Anomalies in the trees.
Once you’re on the other side of the woods you’ll see a big tower that is one of the safehouses marked by a blue house icon on your map.

The tower safehouse near the Pobeda Factory exit
You’re basically home free when you see this, though there might be a few scattered enemies nearby, depending on how much noise you made earlier and where you made it.
Check your map and from the tower make a beeline for the exit to Pobeda Factory.

The exit to Pobeda Factory
Bolotky Village - Kedr Stash
You can take a slight detour on your way to Pobeda Factory, or come later to get a stash that’s near the Pobeda Factory exit.
To the east of the exit, and on the northern end of the swamp that dominates the center of the Bolotky Village map is a red valve poking out of the water just south of a circle of rocks and trees filled with anomalies (and artifacts).

The red valve marking the PP-91 Kedr stash
You’ll likely run into a few enemies like Spawn, Seekers, or Fragments. It’s safest to approach this stash from the west from the direction of the tower safehouse we just talked about.
When you’re next to the Valve you’ll notice a little boat. Point your hand towards the water until you see a circle appear. Actually bending down to grab the items in the stash is extremely hard, so it’s better to just distance grab all of them.

Distance grabbing the contents of the stash
Keep in mind that you only have one slot on your back and another in your backpack to hold two handed weapons like the Kedr. This is a good stash to hit during this mission if you’ve got the ammunition and don’t plan on taking on the riskier stashes in Pobeda Factory once you’re there.
Of course you can always come back another time to get it. The stash contains a PP-91 Kedr, two magazines for it, a silencer compatible to it, and a box of 9x18 ammunition.

The location of the Kedr stash in Bolotky Village
All of these items won’t be in very good condition and will need to be repaired in the repair box at the train car in Vanno.
Pobeda Factory - Getting The Tape Recorder
Now for the last leg of the A Probing Move mission, and surprisingly the easiest part.
You might have noticed in the mission description that you were warned you would have to fight armored enemies, and there are armored enemies near the mission objective.
What you’ll know from reading this Into the Radius walkthrough though, is that you don’t have to fight them. It’s really easy to sneak in, take the tape recorder, and leave. Check out the route on the map.
The route to the objective for the A Probing Move mission in Into the Radius
Right after you spawn in by the rope line there will be a small hill ahead of you, walk up it and you’ll see the outer wall of the compound with the tape recorder. Oh, and make sure you watch out for Stomper Anomalies.
You will also see a gap in that wall. That is your way inside.

The hole in the wall you should sneak through
Sneak in through the gap. Don’t run, fire your weapons, or do anything that makes a lot of noise. Stealth is definitely the best option here.
Once you’re through the hole you’ll see and hear a Rift Anomaly around the back of the large building. Make sure there aren’t any enemies patrolling on the other side of it that might see you, and then destroy it with your knife for an easy Shard artifact.

The Rift Anomaly around the back of the building
Once you’re through with that, or decide to just ignore it, take the right just after the entrance and sneak around the side of the building.
You’ll see a dumpster, and right past it a blue sheet metal room attached to the huge brick building.

This blue room has the Tape Recorder inside
Watch out for enemies on the other side of the building. There will be a few patrolling around. While they’re not the toughest you’ll run into in Into the Radius they will have armor, and there’s really no reason to fight them.
Remember that enemies in Into the Radius are drawn to sound, and can see you if you’re in front of them. So if their side or back is turned to you and you’re crouch walking to make less noise they won’t notice you.
They’ll likely also be far away, and so it’s easy to walk up the concrete steps and into the blue room.

The Tape Recorder on top of a desk
The Tape Recorder you came here for is on one of the desks.
There’s also a black statue with some glowing white particles near it that you can touch for some dialog.
You can loot around if you want, just keep in mind that an enemy can spot you through the windows so it’s a better idea to keep a low profile. Still if you have the tape recorder you can always just run back to the rope line and leave instead of fight.
After you have the Tape Recorder, that’s it. Just go back to base the way you came.
Congratulations! After turning in this mission you will be Security Level 3, and a ton of options will be open to you. We’ll talk more about them in the next mission walkthrough (coming soon).
For now let’s get into a couple of great stashes that aren’t too far away from your objective in A Probing Move that you can pick up after you get the Tape Recorder, or on later forays into Pobeda Factory.
Pobeda Factory - The IZh-81 Shotgun Stash
The stash to get a free IZh-81 pump action shotgun along with some slug rounds for it is just north of the compound that contains the Tape Recorder.
The biggest obstacle to getting to it is a watchtower containing a Mimic Sniper. You’ll see it just after going a little north of the Tape Recorder compound and looking down into the entrance to the canyons below.

The watchtower overlooking the canyon
You could try throwing a grenade into the tower, but if you miss you’ve got a good chance of blowing yourself up. The easiest way to take them out is by climbing the ladder and shooting the mimic with a pistol in one hand while you hang on the ladder with the other.
There will also be some Spawn and Fragments roaming around the road leading into the quarry to the west of the watchtower. The anomaly field by the tower is also a good place to hit while you’re there, and can even contain Regen Artifacts.
Of course keep in mind that any gunshots can still draw enemies like armored Fragments and Mimic Policemen from the compound. So make sure you’ve got some firepower when attempting this.
Once you’re done with the tower take the road down into the canyon and go to the location marked on this map.

The location of the IZh-81 shotgun stash
The stash is hidden behind some big boulders, so make sure you look behind them.
This stash contains the Izh-81 pump action shotgun in great condition along with several boxes of shells and a Combat Knife. The shotgun even already has a modification adding a Rail B system to the top of it, which can mount optics for easier aiming.
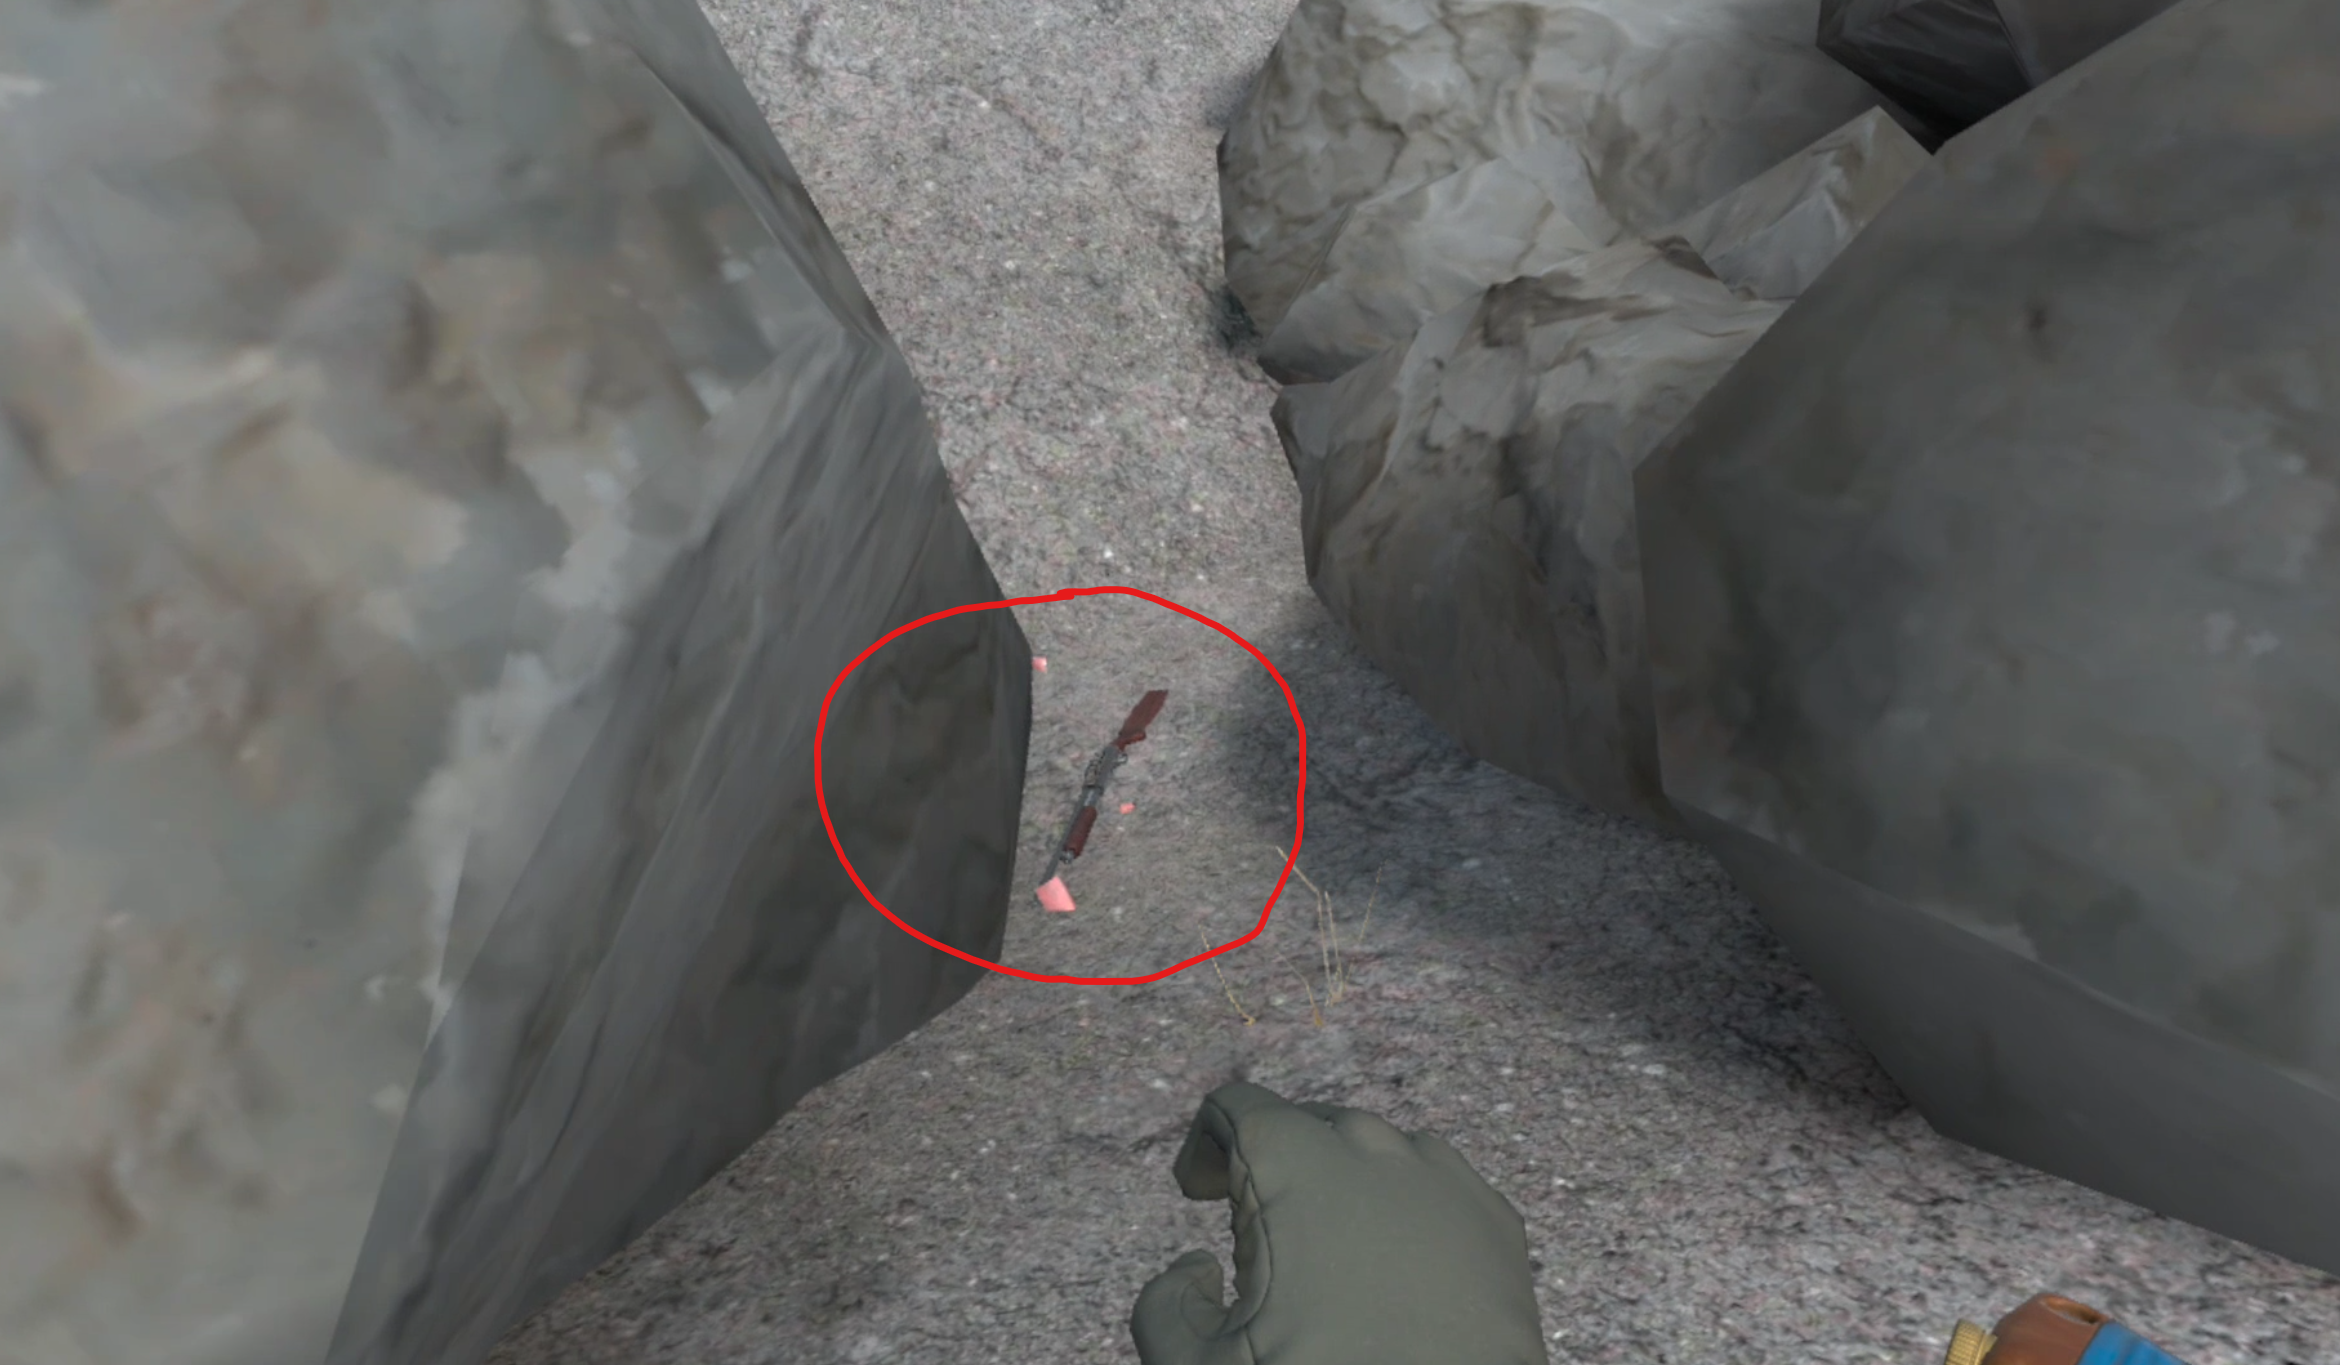
The shotgun stash
Pobeda Factory - The AUG Stash
If you feel a little riskier there’s another stash to the north, and this stash contains an AUG assault rifle.
It’s a little further away than the IZh-81 stash but you’ll only run into a few enemies on the walk up the far eastern canyon towards the stash.

The location of the AUG stash
Unless you take the western canyon up, which you definitely shouldn’t do. The entrance to Kolkhoz Zarya there is protected by a heavily armed group of Mimic Soldiers that you should avoid at all costs.
They’ve got multiple snipers and several armed with assault weapons. You don’t need to fight them and if you do it will be very hard to win.
So head up the eastern canyon that runs past the safehouse marked by the blue house symbol, and at the end of the road you’ll see another watchtower and a bunch of gas clouds around these strange stone spires.

The path going towards the AUG stash with the watchtower circled and the truck containing the stash circled
That watchtower has another mimic sniper inside. Though even during the daytime it’s possible to rush him. Run forward from rock to rock. If your health is full you can take a couple of shots and keep going.
If you’re fast and a little lucky the sniper won’t notice you at all. Depending on your equipment you could also try to shoot them from a distance, or use smoke grenades to mask your approach.
The same technique of shooting the mimic with a pistol while hanging on to the ladder with one hand works just as well here if you manage to get underneath the watchtower.
Make sure to watch out for Gas Anomalies though, there is one that wanders near the watchtower, though it is avoidable. Once the tower is clear go to the cliff next to it and you’ll see this truck on top of a pillar.

The AUG stash
You might not have noticed without reading this walkthrough, but an AUG, a magazine for it, and a couple of ammo boxes are on top of it, right behind the cab.
So run off of the cliff full speed and land on top of the truck. Of course once you collect the stash you better have a gas mask. Your only way out is to fall into the anomaly field below. As long as you keep your gas mask on and don’t fall into an anomaly you’ll be fine.
The AUG is in pretty bad shape though, and will need to be repaired at Vanno’s repair box.
Those are all of the stashes we’ve got for now. Congratulations on completing the fifth mission! Next time we’ll be talking about the sixth Top Priority mission in Into The Radius in Part Seven of our Into The Radius VR Walkthrough.