


The Best VR Pickleball Game On The Oculus Quest 2 and 3
Imagine playing a game of Pickleball in your living room. It’s too cold or too hot outside, you don’t want to go anywhere, but you really want to get some practice in and have some fun with the fastest growing sport.
Well the magic of Virtual Reality can make that desire a reality with a wonderful Pickleball VR game. With an Oculus Quest 2 or an Oculus Quest 3 there’s nothing stopping you from enjoying a game of Pickleball in VR whenever you want to.
Whether you’re already an avid Pickleball player or want to see how much you’d like the sport yourself, VR Pickleball is a great way to not only learn the rules and how the game plays, but also discover the joy of playing Pickleball.
There are currently three Pickleball games available on the Meta Quest 3 and Meta Quest 2 platform, and to spoil the rest of this article I’ll let you know right now that there is one clear winner out of the three, and that is Pickleball One.
If you’d like to know why, and what features are available in this fantastic Pickleball VR game, then keep reading.
Oh, and a quick disclaimer before we get into these games. You’re going to want a bit of space to play them.
So if you want to enjoy VR Pickleball as much as possible with these games make sure you’ve got the biggest playspace you can get. Having enough space to swing the paddle around is important.
Anyhow without further ado here is the Best of all VR Pickleball games on the Oculus Quest 2 and 3.
You May Also Be Interested In:
VR Pickleball Games - The Ones You Want To Avoid
Before I start singing the praises of Pickleball One, let’s talk about why the other two Pickleball games available on the Quest store aren’t worth your time and money in comparison.
I had really hoped that, despite both being available through the App Lab, one of these games would be a strong contender to Pickleball One and would have offered unique alternatives to that game. Unfortunately both were disappointments.
First let’s talk about one that, while not being much right now, does have quite a bit of potential for the future assuming development keeps up. That would be Pickleball Pro.

The Pickleball Pro Logo
Pickleball Pro has all of the makings of a decent Pickleball VR game. A nice loading screen, a quick tutorial, and a good looking main menu.
Unfortunately the main problem with this game is apparent when you look at that main menu.

The main menu of Pickleball Pro. There aren’t a whole lot of options here
At the time of writing only Training and Practice modes are available for this game, and as far as a VR Pickleball game goes those aren’t much.
Going up against a ball throwing machine is nice and all, but at the end of the day it’s hard to call a Pickleball VR game an actual Pickleball game without being able to play a match of Pickleball at least against an AI opponent.
It looks like that just isn’t available at the moment, and even the practice modes weren’t great. The ball machine doesn’t even have the capability to throw the ball at you in random directions.
Nope, instead you need to manually tell it where and how to spit the ball out at you.

I guess a random automatic ball machine is too much to ask for
That being said there’s the makings of a decent game here. It looks good enough, and the ball physics aren’t bad either. Though the ball does tend to react a little too violently to your swing, but not often.
It’s getting the opportunity to hit the Pickleball that’s sort of a drag, and even if AI matches were available I doubt they’d be much fun since the only way you can move around is by thumbstick movement, which slides you across the court incredibly slowly.
So maybe one day I can update this article and tell you that Pickleball Pro is worth taking a look at if you want an alternative to Pickleball One, for now it feels like your money is being stolen to get so little game for a price of 20 dollars.
Speaking of games that feel like scams, let’s talk about the simply named Pickleball, our other bad example of a VR Pickleball game.

The Pickleball Logo
Playing Pickleball feels like playing the sort of game that is secretly mining bitcoin while you play it.
It looks clunky, the UI is terrible, and it was hard to figure out how to even start a match. Though it does have a leg up on Pickleball Pro by at least having the option to play a Singleplayer match.
Still, just look at this mess of a main menu.
The Pickleball main menu. It looks even worse in Virtual Reality
It hardly looks like something that warrants a 15 dollar price tag. It looks like an alpha of a game that is yet to be released to the public.
Unfortunately, it plays like one too. First, you need to go to the “AI” section and set up your AI opponent, and then you need to go over to the “Mode” menu to actually start the match. This didn’t make a whole lot of sense.
It didn’t help that a couple of players were trying to invite me to multiplayer matches, which I would have gladly started if I could figure out how to actually start the match after accepting. I’m not even sure it was working. I’d join and not even hear them say anything.
The Singleplayer match against a bot was every bit as odd and janky as the main menu.

A bot swinging at a ball that is nowhere near them, and that they don’t hit anyway
The most heinous and most obvious thing I noticed when starting the first match was how choppy and unoptimized the game itself was. Even on a Quest 3 with all the latest standalone hardware it would stutter constantly.
The ball physics are also kind of all over the place and the ball moves a little too quickly, though to be fair there were a number of options in the settings menu to change this.
That doesn’t make the game look any less terrible though, with the bot constantly doing animations that not properly timed with them actually hitting the ball, and the extremely generic music constantly looping in the background to the point that it was extremely grating.
Turning off the music didn’t end the jankiness though. Every time the ball lands in your court you are teleported to it, and while teleportation might be fine for some, I’ve been spoiled by VR Tennis games and find being teleported across the court to be extremely jarring.
The game would also teleport you too close to where the ball was. While there was also an option that would make the teleportation happen only when you take an action, like pressing a button, the weird looking bot, constant framerate drops, bad pickleball physics, horrendous visuals, and overall impression of low quality made it not very fun.

In Pickleball the game adds challenge by teleporting you so that the ball is at your feet
The game feels like a low effort cash grab, made all the more obvious by how it kept asking me to review it over and over again.
Oh, and if you want a more specific example of what I mean by “janky” then here’s one. Your pickleball paddle will disappear when you bring it close to your face. Not even that close, about a foot or so away.

The paddle (and your hand) start to disappear about a foot from your face in Pickleball. It’s uncomfortable
If Pickleball One didn’t exist I’d say that Pickleball is better than nothing, but Pickleball One does exist, so if you’re going to buy a VR Pickleball game make it the good one.
Why Pickleball One Is The Best VR Pickleball Game

The Pickleball One Logo
So I’ve hyped it enough, why is Pickleball One so good compared to these other games?
Let’s start with the tutorial. Before I played this game I knew nothing about the rules of Pickleball.
Twenty or so minutes later, with very little effort on my part, and I now know them all, and all of the controls in this VR Pickleball game.

Serving training in Pickleball One
The tutorial was great, better than any tutorial for any VR sports game I’ve ever played, and it kept getting better when I tried my luck against some AI opponents after that.
They had a few different difficulty modes, looked as good as a Facebook Metaverse avatar can look, and all of their animations matched up to what they were doing in the game.

A bot hitting the ball back in Pickleball One
There’s no constant annoying music, and there are a lot of useful in game audio cues.
Each time the ball is hit there is a noise that sounds a little bit like how an actual Pickleball hitting a paddle sounds, and the same goes for the ball hitting the floor of the court.
Every time the server loses a point and the server changes there is a call of “side out” to indicate that is the case. The sound design is minimalistic but pleasant.
So are the AI opponents. Easy truly is easy, even when I was a novice I had a shot at winning, and Hard is extremely difficult. After some solid hours of play I got to the point where I had a chance of winning against a Medium difficulty bot. I felt like I was making progress.

Returning the ball in Pickleball One
The paddle physics are also great, if that wasn’t obvious by now. You do really have to whack the ball hard to get a serve in, but in general you don’t have to exert yourself to hit a Pickleball to the other side of the court. If you accidentally send it flying into the stands it’s because your hit is too hard and not because the physics decided to break.
Even outside of the matches there was a lot of great stuff to try, and some of it even things you might not expect. The Training and Fitness menu has all of the usual greatest hits, like a ball machine and a wall to smack the ball against so it bounces back at you.
What was really surprising were the Fitness options. Pickleball One does give a good Pickleball experience, but it’s also secretly kind of a fitness game.
In fitness mode a song plays, usually a fairly catchy if generic tune, and robots launch Pickleballs at you that you need to hit to get points.

The workout mode of Pickleball One. It’s really fun
It’s a very novel way to not only practice hitting Pickleballs, but get a bit of a leg workout, test your reflexes, and sweat it out in Virtual Reality. Or even Mixed Reality, because Pickleball One also includes a mixed reality mode.
While this is by no means the most intense VR fitness game, it is a lot of fun and great practice. I never expected a feature like this in a VR Pickleball game, but I’m really glad it’s there and have had a lot of fun with it.
Pickleball One also has Multiplayer, and while you might have trouble finding an opponent at certain times of day or in certain regions of the world, it functions extremely well.

The Multiplayer works extremely well
There was little lag, and the game worked just as well as it did in Singleplayer. Overall an almost seamless Pickleball experience against another person in VR. There was just occasionally a split second of lag when someone would hit the Pickleball with their paddle, and that was still only occasionally.
I really have no complaints about Pickleball One. It’s everything you might want in a Pickleball VR experience and then some.
So if you want to play VR Pickleball ignore all the other games and spend your time and money on Pickleball One, it’s really the best of them all.

Into The Radius Walkthrough And Guide - The Fifth Mission - A Probing Move
Stuck in Into The Radius? Wondering where to go and how to get there for your next mission?
Well don’t worry we’ve got you covered with this walkthrough and guide for Into the Radius VR.
Here we’ll be talking about the fifth Top Priority mission that you get in Into The Radius, A Probing Move, which includes your first trip to the third map of the game, Pobeda Factory. All you’ve got to do is get in, grab a little tape recorder, and get out.
Stuck in Into The Radius? Wondering where to go and how to get there for your next mission?
Maybe you would just like to see what is in store for you before you get there, or you’d like to know if you’re properly prepared for your next mission in the Pechorsk Zone.
Well don’t worry we’ve got you covered with this walkthrough and guide for Into the Radius VR.
In this Into the Radius walkthrough we’ll detail how to progress through the main story “Top Priority” missions, with a couple of guiding tips thrown in here and there to make your adventure smoother.
The focus of these walkthrough articles will be the story missions, but we’ll throw in some general gameplay tips and other useful loot locations near your objectives.
These articles will also assume you’re playing the game on the Normal difficulty mode with Tutorials turned on, which is highly recommended for your first playthrough. This walkthrough will still be useful if you’re playing on Realistic difficulty, but some details like vendor prices or enemy placement and numbers will be different.
Here is every article in our complete Into the Radius VR Walkthrough:
Into The Radius Walkthrough And Guide - The First Mission - Equipment Retrieval
Into The Radius Walkthrough And Guide - The Second Mission - Total Recall
Into The Radius Walkthrough And Guide - The Third Mission - Fixing A Leak
Into The Radius Walkthrough And Guide - The Fourth Mission - Flash In The Dark
Into The Radius Walkthrough And Guide - The Fifth Mission - A Probing Move
Into The Radius Walkthrough And Guide - The Sixth Mission - The Intrusion
Into The Radius Walkthrough And Guide - The Seventh Mission - A Farewell Feast
Into The Radius Walkthrough And Guide - The Eighth Mission - Kids Playground
Into The Radius Walkthrough And Guide - The Final Mission - Ouroboros
Here we’ll be talking about the fifth Top Priority mission that you get in Into The Radius, A Probing Move, which includes your first trip to the third map of the game, Pobeda Factory. All you’ve got to do is get in, grab a tape recorder, and get out.
The Fifth Mission - A Probing Move - Loadout
After completing the Flash In The Dark mission you’ll have to do a repeatable mission before A Probing Move will appear on your terminal.
It’s not a bad idea to get some extra money before completing a Probing Move. As you’ll see from the mission description you’ll reach Security Level 3 after completing it, and at Security Level 3 a lot of new and very good weapons and armor become available.
The mission description of A Probing Move
The fighting will actually be even easier than clearing Bolotky Village for the Fixing A Leak mission so if you’ve made it this far you don’t strictly need to buy any upgrades.
That being said, Into The Radius is a game that you should have fun in. If you really want an upgrade go for it with the knowledge that you can always wait for the Tide to come by sleeping through a few days and then do repeatable missions and artifact hunt in Pervomay or Bolotky for more cash.
The sample loadout for this mission isn’t the most extravagant, but isn’t strictly necessary either. You can pull this off with just a pistol if you’re careful.

A sample loadout for this Into the Radius mission
Still, it doesn’t hurt to bring a little extra firepower and the SKS sure was a lot of fun during and after this mission. You should at the very least have a decent pistol by now like the GSH-18 or Glock 17.
Not shown in this Loadout are the usual knife, detector, head lamp, and probes that you should always have on you.
You’ll need to use a bit of ammo, so a spare mag or two and a box or two extra will be fine. The huge box of SKS ammunition you see in the picture above was definitely overkill, and so were the amount of healing items and the gas mask. The gas mask also isn’t strictly necessary.
The reason I brought so much when doing this mission was that I planned to go the extra mile and grab a couple of stashes, which we will also show here. If this is your first time doing the A Probing Move mission then I recommend you just focus on finishing the mission and getting some Security Level 3 equipment before moving on to the stashes that are shown in this article.
Though if you want to try to grab whatever you can in one run then go ahead and go for it, but if you do a decent weapon and a decent amount of ammo is much more important, like in the loadout above.
A Probing Move - Travelling through Bolotky
This walkthrough assumes that the tide has just come in and all enemies are freshly spawned. Now for the first, and oddly the most difficult part of this Into the Radius mission.
Getting through Bolotky is actually the most combat heavy part of completing this mission with the method shown in this walkthrough.
Take the rope line from your home base of Vanno back to Bolotky Village, and immediately make sure your surroundings are clear of enemies.

A Spawn charging through the woods
As always keep your distance from the train tracks and don’t attract the many enemies in the village. As we usually do we will be avoiding them. There’s no reason to get into an unnecessary firefight.
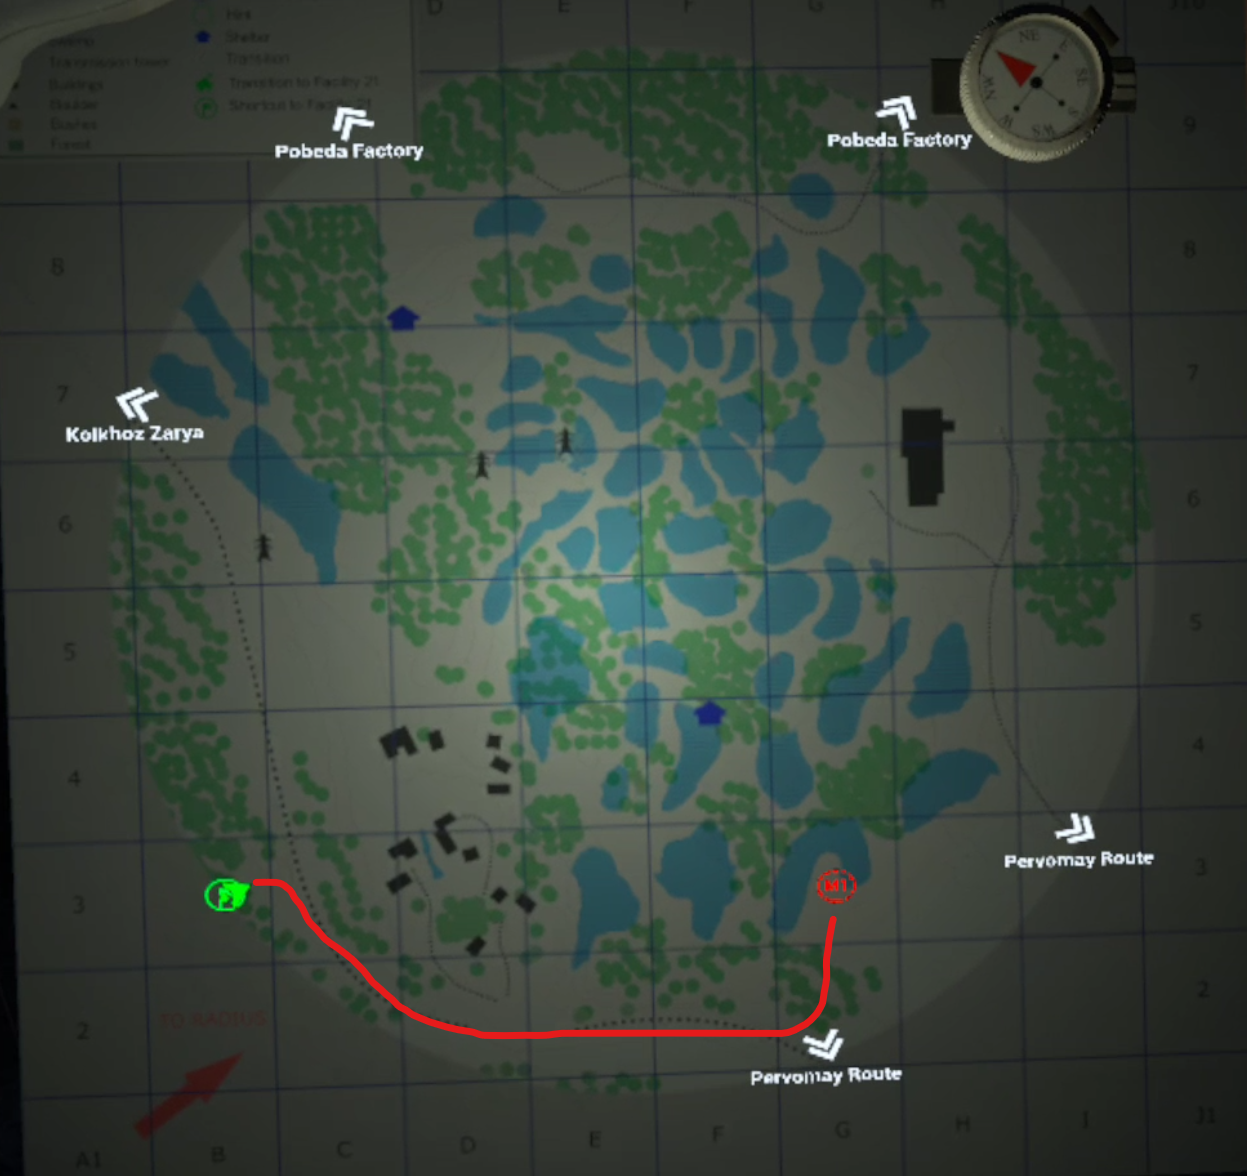
Once you’re sure nothing is coming after you take a look at your map. Here is the route that we’ll be taking for this mission.

The route to take to complete the A Probing Move mission easily
You’ll need to continue north through the woods you spawned in, sticking to the left side of the train tracks.
Once you can see the rope line at the end of the tracks which leads to Kolkhoz Zarya, note the ruined oil tank by the lakes.

The crashed oil tank and the path between the lakes to the forest on the other side
You’ll likely have run into an enemy or two by the time you see it, but they’ll be pretty manageable opponents like Fragments, Spawn, and Seekers.
That’s most of what you’ll be running into on this route. Go past the oil tanker and between the lakes to the forest on the other side, but be careful.
This is the area where combat will be the heaviest, as the noise of gunshots will attract more enemies from the swamps nearby and the forest that you’ll be heading towards.
Fighting a shotgun armed mimic and Spawn near the lakes
There is likely to be at least one firearm equipped enemy in the woods ahead, and they’re going to get drawn out by any unsuppressed gunshots. Holding your ground and letting them come to you will give you an advantage.
As with any big fight in this Into the Radius VR walkthrough always make sure you’ve got a path of retreat back across the train tracks. If the fight becomes too tough you can always run back into the woods you came from and get some time and distance.
Though if you’re a more stealth inclined player using a silenced weapon and coming at night is also a viable strategy.
However you get past the enemies make your way past the lakes and through the forest when they stop coming at you. Make sure to keep an eye out for Web Anomalies in the trees.
Once you’re on the other side of the woods you’ll see a big tower that is one of the safehouses marked by a blue house icon on your map.

The tower safehouse near the Pobeda Factory exit
You’re basically home free when you see this, though there might be a few scattered enemies nearby, depending on how much noise you made earlier and where you made it.
Check your map and from the tower make a beeline for the exit to Pobeda Factory.

The exit to Pobeda Factory
Bolotky Village - Kedr Stash
You can take a slight detour on your way to Pobeda Factory, or come later to get a stash that’s near the Pobeda Factory exit.
To the east of the exit, and on the northern end of the swamp that dominates the center of the Bolotky Village map is a red valve poking out of the water just south of a circle of rocks and trees filled with anomalies (and artifacts).

The red valve marking the PP-91 Kedr stash
You’ll likely run into a few enemies like Spawn, Seekers, or Fragments. It’s safest to approach this stash from the west from the direction of the tower safehouse we just talked about.
When you’re next to the Valve you’ll notice a little boat. Point your hand towards the water until you see a circle appear. Actually bending down to grab the items in the stash is extremely hard, so it’s better to just distance grab all of them.

Distance grabbing the contents of the stash
Keep in mind that you only have one slot on your back and another in your backpack to hold two handed weapons like the Kedr. This is a good stash to hit during this mission if you’ve got the ammunition and don’t plan on taking on the riskier stashes in Pobeda Factory once you’re there.
Of course you can always come back another time to get it. The stash contains a PP-91 Kedr, two magazines for it, a silencer compatible to it, and a box of 9x18 ammunition.

The location of the Kedr stash in Bolotky Village
All of these items won’t be in very good condition and will need to be repaired in the repair box at the train car in Vanno.
Pobeda Factory - Getting The Tape Recorder
Now for the last leg of the A Probing Move mission, and surprisingly the easiest part.
You might have noticed in the mission description that you were warned you would have to fight armored enemies, and there are armored enemies near the mission objective.
What you’ll know from reading this Into the Radius walkthrough though, is that you don’t have to fight them. It’s really easy to sneak in, take the tape recorder, and leave. Check out the route on the map.
The route to the objective for the A Probing Move mission in Into the Radius
Right after you spawn in by the rope line there will be a small hill ahead of you, walk up it and you’ll see the outer wall of the compound with the tape recorder. Oh, and make sure you watch out for Stomper Anomalies.
You will also see a gap in that wall. That is your way inside.

The hole in the wall you should sneak through
Sneak in through the gap. Don’t run, fire your weapons, or do anything that makes a lot of noise. Stealth is definitely the best option here.
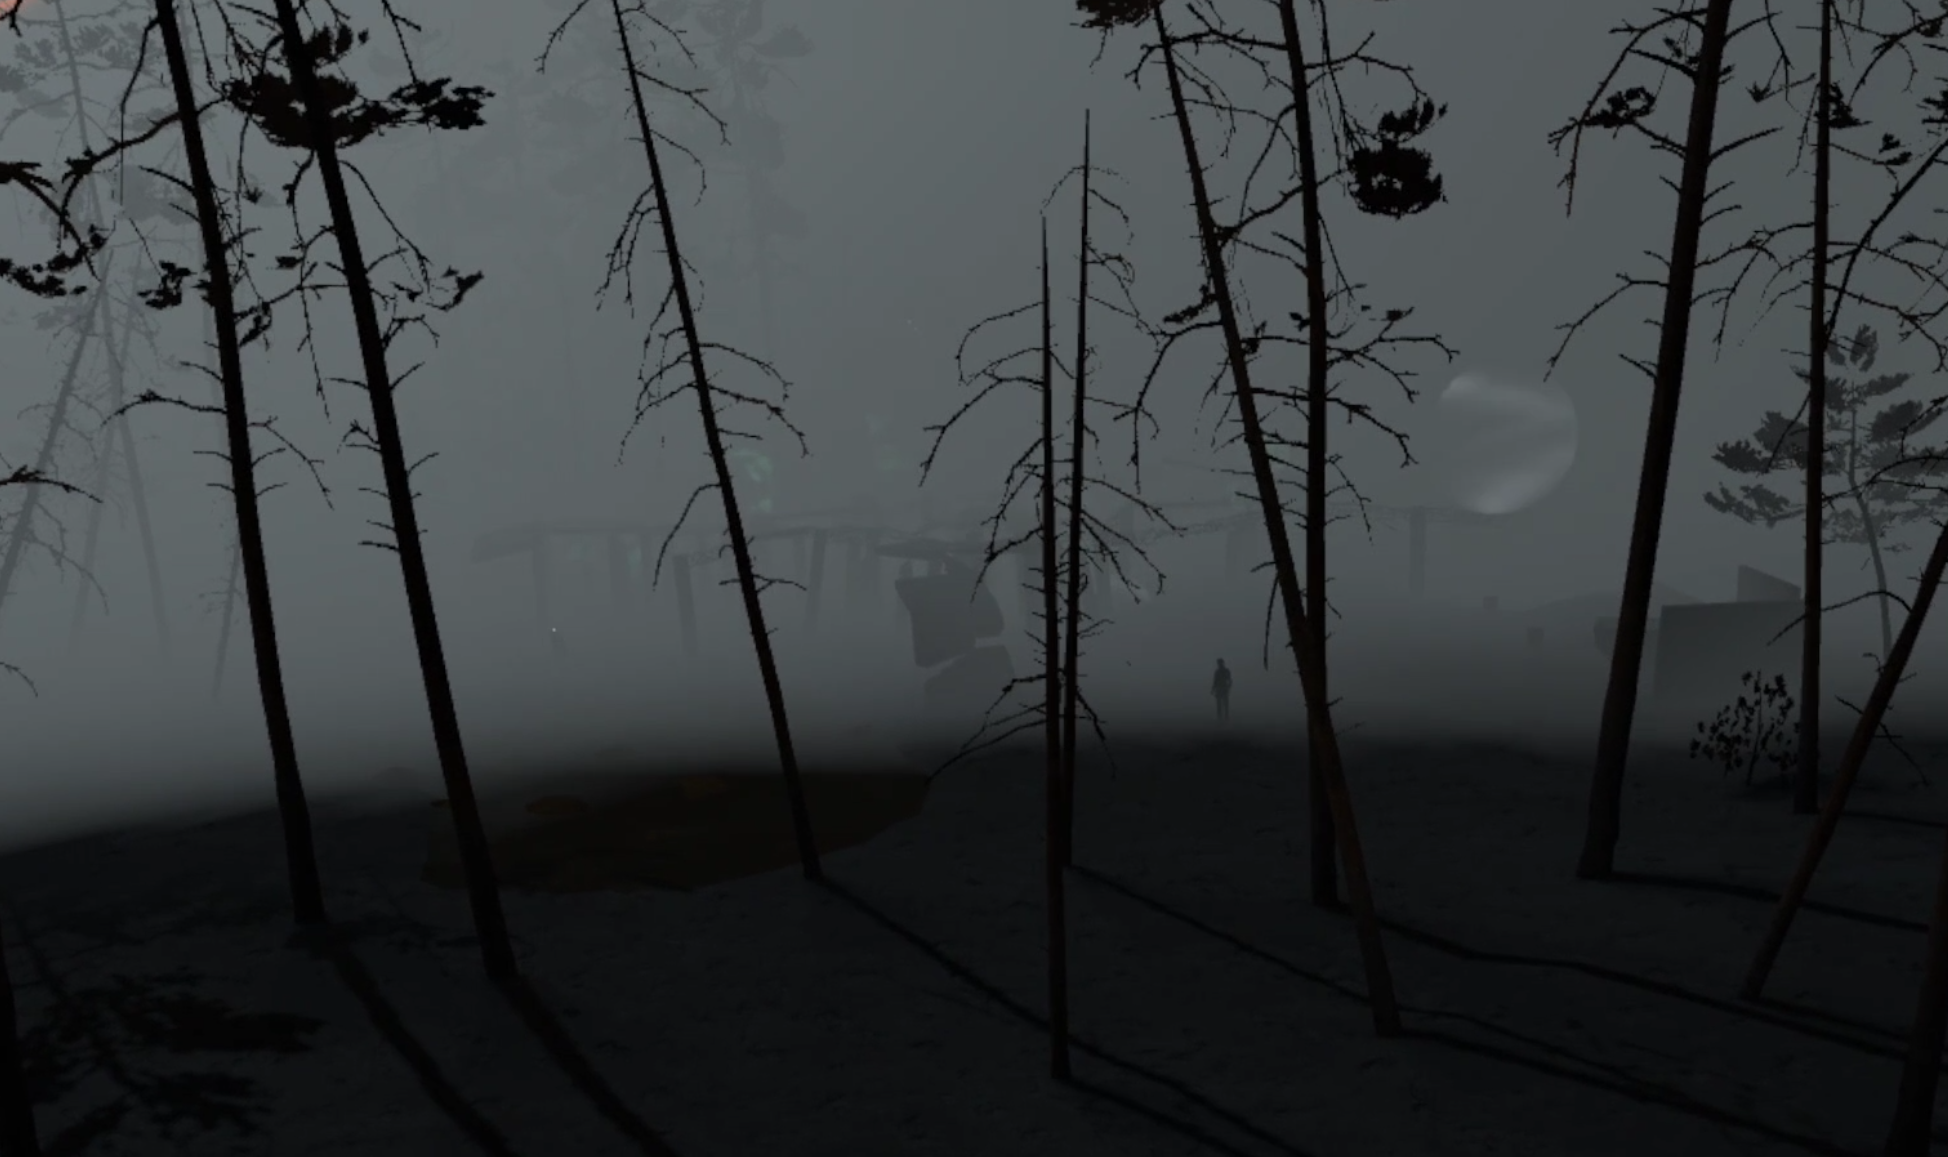
Once you’re through the hole you’ll see and hear a Rift Anomaly around the back of the large building. Make sure there aren’t any enemies patrolling on the other side of it that might see you, and then destroy it with your knife for an easy Shard artifact.

The Rift Anomaly around the back of the building
Once you’re through with that, or decide to just ignore it, take the right just after the entrance and sneak around the side of the building.
You’ll see a dumpster, and right past it a blue sheet metal room attached to the huge brick building.

This blue room has the Tape Recorder inside
Watch out for enemies on the other side of the building. There will be a few patrolling around. While they’re not the toughest you’ll run into in Into the Radius they will have armor, and there’s really no reason to fight them.
Remember that enemies in Into the Radius are drawn to sound, and can see you if you’re in front of them. So if their side or back is turned to you and you’re crouch walking to make less noise they won’t notice you.
They’ll likely also be far away, and so it’s easy to walk up the concrete steps and into the blue room.

The Tape Recorder on top of a desk
The Tape Recorder you came here for is on one of the desks.
There’s also a black statue with some glowing white particles near it that you can touch for some dialog.
You can loot around if you want, just keep in mind that an enemy can spot you through the windows so it’s a better idea to keep a low profile. Still if you have the tape recorder you can always just run back to the rope line and leave instead of fight.
After you have the Tape Recorder, that’s it. Just go back to base the way you came.
Congratulations! After turning in this mission you will be Security Level 3, and a ton of options will be open to you. We’ll talk more about them in the next mission walkthrough (coming soon).
For now let’s get into a couple of great stashes that aren’t too far away from your objective in A Probing Move that you can pick up after you get the Tape Recorder, or on later forays into Pobeda Factory.
Pobeda Factory - The IZh-81 Shotgun Stash
The stash to get a free IZh-81 pump action shotgun along with some slug rounds for it is just north of the compound that contains the Tape Recorder.
The biggest obstacle to getting to it is a watchtower containing a Mimic Sniper. You’ll see it just after going a little north of the Tape Recorder compound and looking down into the entrance to the canyons below.

The watchtower overlooking the canyon
You could try throwing a grenade into the tower, but if you miss you’ve got a good chance of blowing yourself up. The easiest way to take them out is by climbing the ladder and shooting the mimic with a pistol in one hand while you hang on the ladder with the other.
There will also be some Spawn and Fragments roaming around the road leading into the quarry to the west of the watchtower. The anomaly field by the tower is also a good place to hit while you’re there, and can even contain Regen Artifacts.
Of course keep in mind that any gunshots can still draw enemies like armored Fragments and Mimic Policemen from the compound. So make sure you’ve got some firepower when attempting this.
Once you’re done with the tower take the road down into the canyon and go to the location marked on this map.

The location of the IZh-81 shotgun stash
The stash is hidden behind some big boulders, so make sure you look behind them.
This stash contains the Izh-81 pump action shotgun in great condition along with several boxes of shells and a Combat Knife. The shotgun even already has a modification adding a Rail B system to the top of it, which can mount optics for easier aiming.
The shotgun stash
Pobeda Factory - The AUG Stash
If you feel a little riskier there’s another stash to the north, and this stash contains an AUG assault rifle.
It’s a little further away than the IZh-81 stash but you’ll only run into a few enemies on the walk up the far eastern canyon towards the stash.

The location of the AUG stash
Unless you take the western canyon up, which you definitely shouldn’t do. The entrance to Kolkhoz Zarya there is protected by a heavily armed group of Mimic Soldiers that you should avoid at all costs.
They’ve got multiple snipers and several armed with assault weapons. You don’t need to fight them and if you do it will be very hard to win.
So head up the eastern canyon that runs past the safehouse marked by the blue house symbol, and at the end of the road you’ll see another watchtower and a bunch of gas clouds around these strange stone spires.

The path going towards the AUG stash with the watchtower circled and the truck containing the stash circled
That watchtower has another mimic sniper inside. Though even during the daytime it’s possible to rush him. Run forward from rock to rock. If your health is full you can take a couple of shots and keep going.
If you’re fast and a little lucky the sniper won’t notice you at all. Depending on your equipment you could also try to shoot them from a distance, or use smoke grenades to mask your approach.
The same technique of shooting the mimic with a pistol while hanging on to the ladder with one hand works just as well here if you manage to get underneath the watchtower.
Make sure to watch out for Gas Anomalies though, there is one that wanders near the watchtower, though it is avoidable. Once the tower is clear go to the cliff next to it and you’ll see this truck on top of a pillar.

The AUG stash
You might not have noticed without reading this walkthrough, but an AUG, a magazine for it, and a couple of ammo boxes are on top of it, right behind the cab.
So run off of the cliff full speed and land on top of the truck. Of course once you collect the stash you better have a gas mask. Your only way out is to fall into the anomaly field below. As long as you keep your gas mask on and don’t fall into an anomaly you’ll be fine.
The AUG is in pretty bad shape though, and will need to be repaired at Vanno’s repair box.
Those are all of the stashes we’ve got for now. Congratulations on completing the fifth mission! Next time we’ll be talking about the sixth Top Priority mission in Into The Radius in Part Seven of our Into The Radius VR Walkthrough.

The Best Swordsman VR Weapons and Bows
So if you’ve played Swordsman VR for a bit you’ve probably realized just how much you benefit from having better weapons.
So if you’re collecting a lot of Gold from your fights in the various arenas of Swordsman VR and want to know what the best Swordsman VR weapons and Swordsman VR bows are, then you’ve come to the right place. Here we’ll tell you the best weapons in each category, and their strengths and weaknesses.
So if you’ve played Swordsman VR for a bit you’ve probably realized just how much you benefit from having better weapons.
Seriously, even a small upgrade from your starting gear to even let’s say, a Viking Sword, is an extremely huge boost to the damage you deal to enemies. Though raw damage numbers aren’t all there is to a weapon in Swordsman VR.
You’ve also got to factor in weight, length, and other considerations to truly know if a Swordsman VR weapon fits your playstyle, or just sounds like fun to use.
Though if you’re looking at the Blacksmith’s menu you’ll probably realize that the damage numbers tend to go up the further down you go on the list, and so do the prices.
Just like any VR game with RPG progression like Swordsman VR, the more expensive something is than generally the better it is, though that’s not always the case.
So if you’re collecting a lot of Gold from your fights in the various arenas of Swordsman VR and want to know what the best Swordsman VR weapons and Swordsman VR bows are, then you’ve come to the right place.
Here we’ll tell you the best weapons in each category, and their strengths and weaknesses. We’ll also talk about the boss weapons that you can get from defeating the various bosses in the game, and which of those are the best in each category.
Table Of Contents:
The Best Swordsman VR Weapons
So we’re going to start with non boss weapons in Swordsman VR in each category here. These are weapons that don’t need you to defeat one of the bosses to get it, and cost gold to buy in the shop.
While none of these weapons have any of the fantastic abilities given to you by the boss weapons, some of them are still very strong. Either way you’ll be forced to use them to take down a few bosses before you get any of the truly unique blades.
Then we’ll talk about some of the best boss weapons that you can get by defeating the various bosses in Swordsman VR.
Each of the boss weapons are free once you defeat the boss that unlocks them, and they’re more powerful than anything you' can buy with gold, though not all will be featured here as some are better than others.
If you want some guidance on how to defeat each boss in Swordsman VR then we’ve got an article covering each boss, their abilities, and most importantly their weaknesses. Also if you’re having trouble in general in this fantastic VR sword fighting game we’ve got some tips and tricks as well.
Swords - Non Boss Weapons
So let’s start with swords, the weapon type that gives you the most options by far in Swordsman VR, as you might have guessed by the title of the game, and the type of weapon that is also the most versatile.
While swords won’t do much damage when hitting enemy armor, their sharp points and edges are great when hitting an opponent’s weak spots.
These most powerful sword weapons in Swordsman VR all vary in size and length, but differ most in what part of the weapon does the most damage, the point for stabbing damage or the edge for slashing damage.
Let’s start with a powerful sword that does fantastically in both categories, the Royal Sword.

The Royal Sword stats in Swordsman VR
If you want an evenly balanced and powerful weapon in Swordsman VR then look no further than the Royal Sword. It does both great slashing and stabbing damage, with an average length and a very cool looking handle.
It’s basically the bigger, meaner older brother of weapons you’ll have unlocked previously like the Viking Sword, or the Half Sword that you start with.
It even has a strength requirement of 4 to get the most out of it, though can only be wielded with a single hand. Still, if you want a powerful weapon that does well in all situations and goes extremely well with a shield then the Royal Sword should be the one you save your gold for.
Now let’s move on to a sword that has a lot of the same properties as the Royal Sword, but really maximizes slashing damage, the Sabre.

The Sabre stats in Swordsman VR
The sabre also requires a strength of 4, but does a bit more slashing damage than the Royal Sword, and a little less slashing damage.
If you find yourself slashing your enemy’s weak spots a lot then this is a very good Swordsman VR weapon to do this with. Though it also can only be wielded with a single hand it also has a decent length.
While sabres were historically meant to be used from horseback, this is a great weapon, and for some boss fights, like the Hel boss fight, is actually better than most alternatives because of how easy it is to hit Hel with slashing attacks.
Of course this also means that the sabre only has a single sharp edge, unlike the other swords we’ll be talking about here, and so makes your opportunities for attacks more limited due to only one side of the blade being meant for striking.
Of course if you’re more into stabbing than slashing then you’ve got a few other options as well, but the most powerful before fighting bosses is definitely the Jian.

The Jian stats in Swordsman VR
While it doesn’t do as much slashing damage, and just a little more stabbing damage, the Jian is a very powerful weapon in Swordsman VR.
It also has the benefit of having a very low strength requirement of 3, and being very light. While being a better stabbing weapon the Jian is more than capable of slashing as well, but boy does it stab good.
You’ll likely notice that we won’t be talking much about the Royal Dagger, the best non boss weapon dagger in this game, and there’s a good reason for that. While the Royal Dagger is nice, if you want a short stabbing weapon before defeating Hel for her dagger, the Jian is much better.
Its short length makes it appropriate to block with, and its ability to do decent slashing damage with both sides of the blade makes it far more versatile if you do need to use a few slashing attacks.
Most importantly of all the Jian is fantastic for quick stabbing attacks with the point of the blade, and that makes how light it is, and the fact that it’s a little shorter than the other swords listed here, an asset instead of a drawback.
Before we get into the boss weapons you might notice we haven’t talked about any of the two handed swords here. Well not only are there a ton of two handed swords given by bosses that are incredibly strong, but two handed swords pre boss aren’t actually that great.
Their heaviness and unwieldiness isn’t matched by an appropriate amount of advantage in terms of damage. They don’t qualify as any of the best weapons because their drawbacks are much bigger than their advantages when comparing them to the three swords we’ve talked about here.
Swords - Boss Weapons
Now for the best Swordsman VR boss weapons in the sword category. There are some really great boss weapons to pick up, and for two handed weapons enjoyers some are also two handed. So let’s start with one of those.

The Solis stats in Swordsman VR
Solis is unlocked by defeating Baltok the Disgraced, and if you want a weapon that not only does good damage, but also makes you much more survivable, this is it.
When comparing the stats to our previous best Swordsman VR weapons you’ll see that, like most two handed swords, Solis doesn’t do the best damage despite being two handed, but what Solis does give you is vastly increased survivability, and so it does well when paired with heavy armors like the Knight and Royal armors.
You get a flat +35 HP, and you heal 25% faster when using Solis.
If you’re ever concerned about dying in a fight then this sword will make you much more survivable when wielded. This not only makes it unique among weapons in Swordsman VR, but also very useful if you’re frustrated with constant deaths during a battle.
For a more offensively themed powerful boss weapon look no further than Hellfire.

The Hellfire stats in Swordsman VR
You’ll immediately see that Hellfire does more damage in both the stabbing and slashing categories than any other weapon listed here. In terms of raw power it is unmatched in Swordsman VR.
Though this raw power does come with some drawbacks. Hellfire weighs a whopping 10 pounds, and has a strength requirement of 10, the maximum value.
What makes these drawbacks more than worth it though, is Hellfire’s special ability. Once charged it can shoot out flames in front of or around you. These flames will instantly destroy common enemies and do fantastic damage to bosses.
Though the biggest downside to Hellfire is that to acquire it you have to defeat The Jotunn, basically the final boss of the game, so once you get it you’re basically on top already.
Still, it’s quite good in arena and horde mode once you’ve defeated The Jotunn, and is also insanely fun to use.
Now for a sword that you can acquire much earlier and easier, and is much lighter and faster. Kodoku.
The Kodoku stats in Swordsman VR
You acquire Kodoku by defeating Yagami the Warchief. It’s a one handed weapon that, at first glance, doesn’t do incredible damage.
It’s equally good at stabbing and slashing, but you’ll see that it has a single leading edge for slashing, and the fact that it’s a little curved makes its stabbing capabilities a little awkward.
What makes Kodoku one of the most powerful boss swords in this game is its poison ability. Despite the 5 pounds of weight and required strength level of 5, this ability makes it very powerful for a certain playstyle.
If you’re the type of swordsman in Swordsman VR that likes to dart in and out of combat for one or two attacks before backing off and waiting for another opening, then this sword is for you.
The poison ability randomly activates on hit, and boy does it do a ton of damage over a short period of time, usually enough to down an enemy when combined with the damage of the hit that applied it (but not always).
This poison is also very potent against bosses, who have very high health pools and generally more armor than most opponents. So if you like to dart in, hit your opponent a few times to apply poison, and dart away, this is a fantastic sword.
Of course not everyone is into more subtle methods of sword fighting and fencing in VR, so let’s talk about the least subtle sword of them all. The Gun Sword.

The Gun Sword stats in Swordsman VR
The Gun Sword is not only a fantastic stabbing sword with a massive 125 stabbing damage, but also the only firearm in all of Swordsman VR. You acquire it by defeating the pirate boss Brownbeard.
Its short length and huge stabbing damage are great and all, making it somewhat similar to the Jian, but what really makes the Gun Sword an absolute beast of a weapon are the guns mounted on top of the hand guard.
They charge like other boss weapon abilities, but the guns charge much quicker than most after just a few strikes, and boy do they pack a punch.
Pointing the blade at a close enemy and letting them rip results in an easy kill if it hits, and a spectacular one too. The only downside is how inaccurate the guns are, and how hard they are to aim.
Still, it’s hard to miss at point blank range. So use the guns when close to an enemy, but not too close.
Maces
So what if you aren’t so good at aiming for weak spots in Swordsman VR? Well then sink a lot of experience into strength and buy a mace, because maces don’t care how armored an enemy is.
Well they do, a little bit, maces deal incredible amounts of Blunt damage. Blunt damage is still mitigated by enemy armor, but not nearly as much as slashing or stabbing damage is.
So if you just want to pound your enemy with massive, strong blows until they go down then Maces are for you.
Here are the most powerful maces in Swordsman VR, starting with the one you can buy with gold, the Royal Mace.

The Royal Mace stats in Swordsman VR
Of course you’ll notice that the Royal Mace is also the only Mace option to buy with gold. It’s also very expensive at the beginning of the game, which means maces in general are more of a late game option.
Hopefully more will be added in the future, but still when compared to swords the Royal Mace is a pretty good weapon.
It won’t take enemies down as quickly as a stab to a weak spot with a sword of similar cost, but boy is it fun and simple to wail on your opponents with this thing until they fall over or ragdoll hilariously.
Though as you might guess this weapon weighs a decent bit at 6 pounds, and has a minimum strength requirement of 6, higher than all of the non boss swords we talked about previously.
What really makes maces worth it in Swordsman VR is the single boss mace that you can get, and boy is it really one of the best and most powerful weapons in this game if you like the sound of the mace playstyle.

The Tombstone stats in Swordsman VR
Tombstone is an absolute beast that you get from defeating Batu the Executioner.
It’s very heavy and has a high strength requirement of 8 to use, but can be wielded with two hands and… boy is it fun smacking enemies around with this thing.
Now you’ll notice in the screenshot that the blunt damage is weirdly low for a mace weapon. I’m not sure if this is a bug, but hitting enemies on the armor is still extremely effective with Tombstone, and so the same playstyle as you might try with the Royal Mace is more than viable with Tombstone.
Tombstone also has the bonus of doing even more damage when hitting an unarmored part of an enemy’s body with the sharp flanges on the head of the mace, and having a flat damage bonus of +30, which is massive.
Tombstone’s special ability is also incredibly potent, though it does take a while to charge. Still, when you use it an earthquake will erupt from the floor and immediately ragdoll all enemies it touches.
Just like with Hellfire this ability will delete regular foes and do incredible damage to boss enemies.
Daggers
Now for Daggers. As far as the best weapons in Swordsman VR go, the best option that doesn’t involve defeating a boss isn’t really that great.
The Royal Dagger does decent damage, but doesn’t make up for its shortness in length with sufficient damage to overcome the risk of getting so close to an enemy to use it. Overall the Jian is a better short stabbing weapon if you want to get in close, as mentioned in the Swords section above.
Though Reaper, the dagger you receive for defeating Hel, is absolutely one of the most powerful and best weapons in this VR sword fighting game.

The Reaper stats in Swordsman VR
It’s light, can hit extremely quickly, and does an insane 130 stabbing damage. Reaper can one shot an enemy easily with a single stab.
Using it makes you feel incredibly powerful, and the ability to quickly demolish most enemies with a strike or two more than makes up for the lack of defensive options with such a short weapon.
Reaper’s special ability makes it even better. When using a dagger the hardest part is getting close to your opponent and stabbing at a vulnerable place. Reaper makes that easy with its Dimension Jump ability.
Basically you go invisible for a couple of seconds and become very fast. This ability can be used very often, unlike most boss weapon abilities, and it makes it incredibly easy to teleport behind an opponent or right in their face and stab them before they can react.
The only downside to Reaper is that the game doesn’t let you dual wield it.
Axes
Axes aren’t a fantastic weapon category in Swordsman VR, they generally play like swords that have a very small effective striking area on the weapon.
They don’t do fantastic blunt damage, and they’re very hard to stab with. The hardest part with using axes in Swordsman VR is that you have to be very careful to hit an opponent with the blade instead of the handle.
So most axes don’t fit easily into the “best” category, but if you really want to try an axe in Swordsman VR go with the Viking Axe.

The Viking Axe stats in Swordsman VR
Why? Well despite not being very long and not doing the best damage, wow is it much easier to use than the only other decent option, the Battle Axe.
The Battle Axe is so hilariously short that it’s unusable. It’s hardly longer than a dagger and is somehow intended for slashing. Using the Battle Axe feels like trying to hit your opponents with a brick. It does more damage, but at the cost of making it extremely hard to hit anything.
Alternatively the Viking Axe is just long enough to feel like a real weapon, but still suffers from all of the drawbacks mentioned above. One decent part of this weapon is that it does good Blunt damage for a bladed weapon, and so punishes you less for hitting armored spots than swords do.
If you really want to try an axe with some length and power to it in Swordsman VR then defeat Bjorn The Savage to get his axe Stormbringer.

The Stormbringer stats in Swordsman VR
Stormbringer is great if you want a two handed axe. While its +5% crit change effect isn’t the best bonus, it does have a very cool special ability.
Once charged you can point the axe at an enemy and use the ability to shoot lightning at them. This will easily take down most enemies and does great damage to bosses.
Otherwise it can be pretty fun to swing this massive axe at enemies for a while, but if you want a good two handed weapon you’re better off using Solis or even another two handed sword like Claus’s Frostbite. They’re all much easier to use.
Bows
There are three bow options in Swordsman VR, and none of them are strictly the “Best”. To explain this let’s start by looking at the Longbow.
The Longbow stats in Swordsman VR
So you see in the description, longer draw, stores a lot of energy. The longbow does great damage, so it must be better, right?
Now look at the Recurve Bow.

The Recurve Bow stats in Swordsman VR
So it won’t do as much damage as a longbow, but it’s much smaller and faster to draw. In the close quarters fighting arenas of Swordsman VR, that sounds like quite an advantage, right?
Okay now let’s look at the Crossbow. It’s small, easy to shoot, but is harder to load.

The Crossbow stats in Swordsman VR
Depending on your personal preference the Crossbow might also be harder to aim. Some have an easier time with it, or an easier time with either of the bows.
Though the crossbow does do the most damage per shot, it also weighs more and has a fairly high strength requirement of 5. So each bow in Swordsman VR has benefits and drawbacks. Whichever is the best comes down a lot to personal preference and playstyle.
Go to the shooting range next to the Blacksmith and try all of them out. See which one you can hit shots most easily with. In terms of straight up power the Longbow is the best bow and the Crossbow is the best overall, but power isn’t the only consideration as you’ve seen earlier in this article.
So the best bow in Swordsman VR is up to you. The arrows are a little different though, and also should be a consideration when you pick your favorite bow.
Arrows
So the best arrows in Swordsman VR are the Poison Arrows, hands down.

The Poison Quiver stats in Swordsman VR
The Poison Quiver is very similar to the Kodoku weapon. Except with the Poison arrows you are guaranteed to poison your target with each hit.
This makes them extremely potent, with each arrow capable of dealing a ton of damage to an enemy if you hit a weak point. This power is reflected in the price of the poison quiver, they’re the most expensive arrows of all.
There is an alternative option with the Piercing Quiver though, combining the Piercing Quiver with a crossbow does give you the opportunity to try to punch through some enemy armor… but this is an unreliable tactic at best.
Still as far as straight up stabbing damage goes, the Piercing Quiver does better than the Poison Quiver.

The Piercing Quiver stats in Swordsman VR
If you want the best arrows then buy the poison arrows and hit your opponents weak spots with them for huge poison damage.
Well there you are, the best Swordsman VR weapons and bows. There are quite a few options out there, but these are the best ones in the game. No matter which weapon you pick and decide to use, enjoy!

Into The Radius Walkthrough And Guide - The Fourth Mission - Flash In The Dark
Stuck in Into The Radius? Wondering where to go and how to get there for your next mission?
Well don’t worry we’ve got you covered with this walkthrough and guide for Into the Radius VR.
Here we’ll be talking about the fourth Top Priority mission that you get in Into The Radius, Flash In The Dark, which has you investigating the big gas anomaly in Bolotky Village. As far as Top Priority missions go this one is pretty straightforward and risk free.
Stuck in Into The Radius? Wondering where to go and how to get there for your next mission?
Maybe you would just like to see what is in store for you before you get there, or you’d like to know if you’re properly prepared for your next mission in the Pechorsk Zone.
Well don’t worry we’ve got you covered with this walkthrough and guide for Into the Radius VR.
In this Into the Radius walkthrough we’ll detail how to progress through the main story “Top Priority” missions, with a couple of guiding tips thrown in here and there to make your adventure smoother.
The focus of these walkthrough articles will be the story missions, but we’ll throw in some general gameplay tips and other useful loot locations near your objectives.
These articles will also assume you’re playing the game on the Normal difficulty mode with Tutorials turned on, which is highly recommended for your first playthrough. This walkthrough will still be useful if you’re playing on Realistic difficulty, but some details like vendor prices or enemy placement and numbers will be different.
Here is every article in our complete Into the Radius VR Walkthrough:
Into The Radius Walkthrough And Guide - The First Mission - Equipment Retrieval
Into The Radius Walkthrough And Guide - The Second Mission - Total Recall
Into The Radius Walkthrough And Guide - The Third Mission - Fixing A Leak
Into The Radius Walkthrough And Guide - The Fourth Mission - Flash In The Dark
Into The Radius Walkthrough And Guide - The Fifth Mission - A Probing Move
Into The Radius Walkthrough And Guide - The Sixth Mission - The Intrusion
Into The Radius Walkthrough And Guide - The Seventh Mission - A Farewell Feast
Into The Radius Walkthrough And Guide - The Eighth Mission - Kids Playground
Into The Radius Walkthrough And Guide - The Final Mission - Ouroboros
Here we’ll be talking about the fourth Top Priority mission that you get in Into The Radius, Flash In The Dark, which has you investigating the big gas anomaly in Bolotky Village. As far as Top Priority missions go this one is pretty straightforward and risk free.
The Fourth Mission - Flash In The Dark - Loadout
After completing the Fixing A Leak mission you can immediately accept Flash In The Dark from the Terminal.
As always make sure to accept the mission at the terminal when preparing.
The mission briefing for the Flash In The Dark mission in Into The Radius
Now that you’re Security Level 2 you have a ton of pistols and SMGs to choose from at the shop. Not to mention shotguns.
At this point in the game you can always artifact hunt and do repeatable missions if you need more cash. Though you might want to save some of your money, because after the mission following this one, which also won’t involve a lot of combat, you’ll be hitting Security Level 3. This will give you a ton of options that are more powerful than anything at Security Level 2, and are also pretty expensive.
You won’t need a ton of firepower for this mission anyway. You’ll see in the sample loadout that I took along an SKS, but that is by no means necessary. There will be a few enemies around the anomaly field that you’re better off taking out, but you’ll be fine with just a pistol.

A sample loadout for the mission Flash In The Dark
Other than the gas mask and at least one weapon there’s all the usual stuff like food and some healing. Really the food and spare ammunition aren’t super necessary here either, but it’s always not a bad idea to err on the side of caution.
Probes and a Detector are even more vital than usual here as well, and aren’t pictured in the sample loadout.
For this mission there’s really no need to upgrade from the sawn off shotgun yet, but if you do having a better weapon is always a good idea if you’re planning on doing a lot of artifact hunting and repeatable missions afterwards.
Flash In The Dark - Getting To The Anomaly And Grabbing The Artifact
Now for the meat of the Flash In The Dark mission. As far as top priority missions go this one is very easy to pull off as long as you have a gas mask.
Head out through your new rope line to Bolotky Village. Once you’re there check your map.
Here’s the route we’re going to take.
The route to the anomaly field with the objective of Flash In The Dark in it
Pretty simple. There may be a few enemies in the woods right outside of where you spawn in.
They’ll likely be Fragments and Spawn, so you can just run away down the train tracks without fighting them. Mostly you’ll just want to avoid drawing in enemies from the Village. So don’t get pinned down in the forest and keep moving.
Once you’re beside the tracks avoid the few anomalies in your way and keep following the rails until you see the rope line leading back to Pervomay Route.

The rope line leading to Pervomay Route, turn left here
Once you see it turn to the left (towards the north) and you’ll see a ruined mess of concrete and rebar with some green gas clouds floating around it.
Hop down the hill the railroad tracks are up on. You don’t have to take fall damage, there’s a little ramp of dirt leading up to the rails.
The anomaly field with the mission objective in it
There’ll be a black statue man with some dialog if you touch him, and at least one Seeker hanging around.
Take them down. One or two more might get drawn from further into the swamps, but as far as fights in Bolotky Village go it will be a very easy fight. If you get unlucky and a Mimic Policeman gets drawn in you can always take cover by the dumpster next to the anomaly field, wait for them to get close, and pop a few rounds into them.
Near the man you’ll see a ramp going up into the anomaly. You’ll also hear your detector beeping as you get close.
Make sure there aren’t any enemies on your tail before you head in, and when you’re ready put your gas mask on and go up the stairs by the black statue. There won’t be any artifacts on the ground floor, they’re all up on top of the concrete and rebar maze.

The stairway leading up into the area with the artifacts inside
You must have your gas mask on or the gas clouds will kill you quickly. Once you’re up the stairs get your probes and detector out.
You need to focus on not walking into the few Anomalies that are up on top of the ruins, and not falling down into the field of anomalies below you.
If you do fall you won’t take any damage unless you fall into an anomaly, and then you can work your way out of the field and go up the stairs again.
Carefully walk along the concrete and rebar. The artifact you’re looking for will likely be on one of the concrete platforms.
The Unknown artifact needed to complete the mission
Of course that won’t be the only artifact here in the ruin, and while you’re here you might as well collect all of them for the extra cash.
There will always be a way around the anomalies to artifacts without having to walk through one, so if you feel stuck just be patient, use your probes, and find a different route.
If you want more advice on artifact hunting then check out this artifact hunting guide.
Once you’ve got the goods and some extra artifacts to boot just go back down the stairs and hike towards the train tracks. Walk back up the hill and return to Vanno the way you came. Easy mission, easy money.
Congratulations on completing the fourth mission! Next time we’ll be talking about the fifth Top Priority mission in Into The Radius in Part Six of our Into The Radius VR Walkthrough.

Into The Radius Walkthrough And Guide - The Third Mission - Fixing A Leak
Stuck in Into The Radius? Wondering where to go and how to get there for your next mission?
Well don’t worry we’ve got you covered with this walkthrough and guide for Into the Radius VR.
Here we’ll be talking about the third Top Priority mission that you get in Into The Radius, Fixing A Leak, which has you discovering a new map, Bolotky Village, and snatching some documents for the committee.
Stuck in Into The Radius? Wondering where to go and how to get there for your next mission?
Maybe you would just like to see what is in store for you before you get there, or you’d like to know if you’re properly prepared for your next mission in the Pechorsk Zone.
Well don’t worry we’ve got you covered with this walkthrough and guide for Into the Radius VR.
In this Into the Radius walkthrough we’ll detail how to progress through the main story “Top Priority” missions, with a couple of guiding tips thrown in here and there to make your adventure smoother.
The focus of these walkthrough articles will be the story missions, but we’ll throw in some general gameplay tips and other useful loot locations near your objectives.
These articles will also assume you’re playing the game on the Normal difficulty mode with Tutorials turned on, which is highly recommended for your first playthrough. This walkthrough will still be useful if you’re playing on Realistic difficulty, but some details like vendor prices or enemy placement and numbers will be different.
Here is every article in our complete Into the Radius VR Walkthrough:
Into The Radius Walkthrough And Guide - The First Mission - Equipment Retrieval
Into The Radius Walkthrough And Guide - The Second Mission - Total Recall
Into The Radius Walkthrough And Guide - The Third Mission - Fixing A Leak
Into The Radius Walkthrough And Guide - The Fourth Mission - Flash In The Dark
Into The Radius Walkthrough And Guide - The Fifth Mission - A Probing Move
Into The Radius Walkthrough And Guide - The Sixth Mission - The Intrusion
Into The Radius Walkthrough And Guide - The Seventh Mission - A Farewell Feast
Into The Radius Walkthrough And Guide - The Eighth Mission - Kids Playground
Into The Radius Walkthrough And Guide - The Final Mission - Ouroboros
Here we’ll be talking about the third Top Priority mission that you get in Into The Radius, Fixing A Leak, which has you discovering a new map, Bolotky Village, and snatching some documents for the committee.
The Third Mission - Fixing A Leak
After you’ve done at least two repeatable missions in our previous guide on them you’re able to accept the third Top Priority mission in Into The Radius, Fixing A Leak.
As always make sure to accept the mission at the terminal when preparing.

The mission description for Into The Radius’s third mission, Fixing A Leak
Fixing A Leak - Loadout
If you’ve been following this walkthrough then by now you’ve already got a few weapon choices from what the game gives you to start out, and from the stashes you’ve found with the help of this walkthrough.
Even though you’re still at Security Level 1 you also have some options for new weapons. Since you’re just about to hit Security Level 2 after completing this mission, it might be more frugal to save your money for the better sorts of weapons you can get at the next Security Level.
If you don’t mind taking the time to do more artifact hunting and repeatable missions later on then don’t worry about the money. You can do this mission with just a Makarov and your double barrel if you like.
However it’s a good idea to get a pistol upgrade by this point in the game. While you won’t have access to the best pistols around yet it is still a good idea to go in with a little extra firepower if this is your first time.
Every map in Into the Radius gets a fair bit more dangerous than the last one. This mission will involve going to an area with a higher concentration of enemies than you’ll find anywhere in Pervomay Route, and a few of those enemies will be Mimic Policemen. Prepare for a fight, especially if the Tide has come in and all of the enemies in Pervomay Route have respawned.
So for this example loadout the Makarov has been upgraded to the Glock 17 found in the stash found during the Total Recall mission. After being repaired in the train car’s repair box of course.

A sample loadout for the Fixing A Leak mission
Since Glock 17 magazines hold twice as many bullets as Makarov magazines there are two extra magazines, though there’s also a fair amount of spare ammunition for it in the backpack.
If you really like using the shotgun feel free to bring more buckshot. Bringing more than a single healing injector is also a very good idea (you can’t see the second one in the photo) especially if you’ve used up your Regen artifact. In fact bring three just in case.
As always a can of food and the usual Pocket Lamp, Knife, Detector, and Probes are must haves as well.
Now that you have more loadout options you can also start thinking more of how you would like to play the game. Aggressively or stealthily, or maybe both.
If you’ve recovered the TT-33 stash then you now have a silenced pistol option. If you don’t want to fight all of the enemies, or are having a hard time, then you could always bring a silenced weapon and try to stealthily take the objective and sneak away. More on that in the walkthrough.
That’s all for the loadout, upgrading your pistol will make this easier, and you should be able to afford it by now.
Fixing A Leak - Getting to Bolotky Village
As always consult your map before getting underway.
Here’s the route we’ll be taking for this mission through Pervomay. As always this isn’t the only possible route.

The route through Pervomay Route to Bolotky Village
You’ll notice that there are two ways into Bolotky Village and we will be taking the lefthand one. This route also assumes that all enemies are alive and not dealt with (i.e. right after the tide) and so we’ll be doing our best to avoid concentrations of them.
First set out down the road outside of the entrance to Vanno, but go straight past the blockhouse and through the broken wall beside it.
Then pass the floating train car marked with a blue house icon on the map.

The floating traincar safehouse in Pervomay Route
You’ll run into a few roaming Fragments, and possibly Spawn along the way. As long as you keep moving and avoid getting too close to major concentrations of enemies you should have an easy time.
It might get a little harder as you near the train station though. There’s usually at least one Mimic Policeman patrolling near the tanker car floating over the crater near the entrance, and another around the high catwalk.

The floating tanker car marking the entrance to the Train Station in Pervomay Route
If you want to avoid them then follow the route mapped out above, this will take you past the lake and up through the hills that sit on the east side of the Train Station.
Those hills are very sparsely populated with enemies. Though if you’ve already cleared the Train Station or want to fight your way through then feel free.
Around the top right side of the station’s wall is a door that you can slip into if you’ve skirted around the side of the station, and there’s another door on the right side of the wall into the station as well. Both are yellow gates with doorways in them.
However you get inside go through the big open gate at the back and take the rope line leading to Bolotky Village.

The rear entrance to the Train Station in Pervomay Route, and the exit to Bolotky Village
Fixing A Leak - Finding The Folder In Bolotky
Welcome to Bolotky Village.
This new map is mostly swamp with scattered enemies and anomaly fields, with groups of rocks, trees, and buildings around the edges.
The cluster of buildings we’ll be concerning ourselves with in this walkthrough is the village in the southwestern section of the map.
That’s where the folder you need to complete the mission is. Here’s the map with the route.

Two possible routes to the objective. Red for loud and green for quiet
As you can see there are two routes. The more direct one in red is better if you plan on going loud and fighting all of the enemies in the village.
The route highlighted in green is better if you want to stealthily sneak your way to the house containing the folder, grab it, and leave.
Regardless of how you want to tackle this mission you’ll want to get closer to the village by following the train tracks leading towards the village.

The floating traincar next to the southern entrance to the village
You know you’re close when you see the floating box car.
Fixing A Leak - The Loud Way
First let’s walk through attacking the village by following the red route.
At the floating box car take a right and walk past the fence and into the village from the south.
Stay in cover and keep your weapon ready. You should be able to get past the gate and at least near the outhouse without engaging any enemies. You should be able to hear their footsteps though, and get a general idea for where the enemies closest to you are.

Starting the fight in the southern area of the village
Your most important targets are the Mimic Policemen. They’re the greatest threat, so try to start the fight by ambushing one of them. The footsteps that sound like a boot hitting a hardwood floor are theirs, so listen for those.
Once you fire your first shots it will attract other enemies. Get to and stay in a good position in cover that also allows you to retreat if you need to.
The first set of houses in front of the outhouse are decent, and so is the house next to the outhouse.
If you need to you can run all the way back to the train tracks, or hug the bottom of the hill that the village sits on.

Fighting in the center of the village
Wait and see if more enemies come at you, they’ll all make noises as they approach except for a new enemy, the Seeker.
If the Seeker gets close to you they’ll shoot energy beams out of their head that deal damage. They’re pretty quiet and run very quickly. If one is charging at you drop them quickly.
The enemies should get drawn towards you as you make more noise. So as long as you’re prepared to ambush them as they approach, or fall back if you’re overwhelmed and then ambush them, you’ll make your way through.
Take your time, make sure your weapons don’t run dry, and if you need to regroup just run back to the train tracks. You can do it.
Fixing A Leak - The Quiet Way
If you want to avoid combat as much as possible when doing the Fixing A Leak mission, then take the green route on the Bolotky Village Map.
If you want to do this quietly then it’s a good idea to bring a silenced pistol, so that you can take down an enemy or two without bringing the entire village down on yourself.
You may also want to attempt to do this quietly during nighttime, or later in the day when it’s not so sunny out. This will make sneaking around enemies, especially the Mimic Policemen, easier.

The routes for attacking the village
Once you’re at the floating traincar stay on the railway line so that you’re hugging the left side of the tracks.
Then eliminate the Seeker and other enemies near the green flag on the left side of the map. You don’t want any enemies behind you if you want to run. Use your silenced weapon for this so you don’t draw the enemies in the town over to you.
This is also a good opportunity to eliminate the Seeker for the optional objective (more on that later) and find the broken rope line marked by the flag on the map (more on that later).
If you make too much noise and a firefight breaks out you can run away and try to sneak in another time.
Once you’re close sneak over the railway past where the train cars are sitting on it. The house with the folder is right past it through some trees.
If you’re doing this quietly then try to avoid shooting anything until you’re spotted. Even a silenced weapon still makes some noise, and fighting the enemies inside of the village is going to be harder if you’re right next to them and surrounded.
Fixing A Leak - Looting And Leaving
Whether you tried to clear the area or sneak in quietly your objective is the house with the blueish roof and blueish porch.

The house containing the folder in the village
You can find the folder inside in the living room on a green couch.

The folder that is the main objective of Fixing A Leak
After you take it there is also a stash conveniently located inside the oven in the green house beside it.
Here’s the location of the stash on your map.

The location of the stash in the village on a map
Open up the oven and inside are a couple of AK74 magazines, some bullets, and a grenade.

The stash is inside this oven
Getting this stash might be risky if you’re sneaking, but if you cleared the village of enemies you can loot to your hearts desire.
There are quite a few buildings in this village and having your run of the place, despite the risks, comes with the advantage of being able to take whatever you want without any worries.
Though there will likely be a Rift Anomaly in the half completed brick building at the north end of town, so make sure to take that out before it starts respawning enemies.

The Rift Anomaly located on the north end of the village
You won’t have to worry too much about getting overloaded since the exit is so close. When you’re ready to leave go back to the train tracks and walk over them where the trains are parked on the tracks.
If you’ve cleared the town the loud way the Seeker guarding your exit will probably have been drawn in by the noise and already taken care of, otherwise make sure to find them in the woods and destroy them to complete the optional objective. It’s easy money. There might be another enemy or two lurking around as well.
Oh, and be careful of the Web Anomalies that you’ll see in the woods all over the place in the Bolotky Village map.

A straggling enemy and a web anomaly in the trees (circled)
Finally go back to Vanno by walking into the broken rope line marked by the green flag on your map.

The broken rope line leading back to Vanno
Fixing A Leak - Back At Vanno
Once you’re back at Vanno you’ll notice that you’ve got a new rope line leading out of your base. This rope line leads right back to where you just came from in Bolotky Village, and functions the same as the one you’ve been using to get to Pervomay Route.
You’ll be using this new rope line quite a lot in the coming missions.
Once you turn in the mission you’ll be promoted to Security Level 2 and be told to do some more training, which also gives you some extra money to go with your mission reward. Do that training and you can now buy Security Level 2 items.
This comes with a lot of tantalizing new options in firearms and equipment, and you should immediately spend it on two items, a Gas Mask and a Head Lamp. The Head Lamp can be found under “Survival Equipment” and the Gas Mask can be found under “Armor.”

Buying the Gas Mask and Head Lamp in Into the Radius
The Head Lamp means you can finally get rid of that Pocket Lamp on your shoulder. You’ll always have all the lighting you need sitting right on top of your head.
The Gas mask is absolutely vital for the next Top Priority mission, and is the only item in the game that gives you extra protection from anomalies. It also makes you completely immune to the gas anomaly. Of course keep in mind that you have to wear the mask to get these benefits, and it’s a little restricting on your sight.
Congratulations on completing the third mission! Next time we’ll be talking about the fourth Top Priority mission in Into The Radius in Part Five of our Into The Radius VR Walkthrough.