


Into The Radius Walkthrough And Guide - The Fourth Mission - Flash In The Dark
Stuck in Into The Radius? Wondering where to go and how to get there for your next mission?
Well don’t worry we’ve got you covered with this walkthrough and guide for Into the Radius VR.
Here we’ll be talking about the fourth Top Priority mission that you get in Into The Radius, Flash In The Dark, which has you investigating the big gas anomaly in Bolotky Village. As far as Top Priority missions go this one is pretty straightforward and risk free.
Stuck in Into The Radius? Wondering where to go and how to get there for your next mission?
Maybe you would just like to see what is in store for you before you get there, or you’d like to know if you’re properly prepared for your next mission in the Pechorsk Zone.
Well don’t worry we’ve got you covered with this walkthrough and guide for Into the Radius VR.
In this Into the Radius walkthrough we’ll detail how to progress through the main story “Top Priority” missions, with a couple of guiding tips thrown in here and there to make your adventure smoother.
The focus of these walkthrough articles will be the story missions, but we’ll throw in some general gameplay tips and other useful loot locations near your objectives.
These articles will also assume you’re playing the game on the Normal difficulty mode with Tutorials turned on, which is highly recommended for your first playthrough. This walkthrough will still be useful if you’re playing on Realistic difficulty, but some details like vendor prices or enemy placement and numbers will be different.
Here is every article in our complete Into the Radius VR Walkthrough:
Into The Radius Walkthrough And Guide - The First Mission - Equipment Retrieval
Into The Radius Walkthrough And Guide - The Second Mission - Total Recall
Into The Radius Walkthrough And Guide - The Third Mission - Fixing A Leak
Into The Radius Walkthrough And Guide - The Fourth Mission - Flash In The Dark
Into The Radius Walkthrough And Guide - The Fifth Mission - A Probing Move
Into The Radius Walkthrough And Guide - The Sixth Mission - The Intrusion
Into The Radius Walkthrough And Guide - The Seventh Mission - A Farewell Feast
Into The Radius Walkthrough And Guide - The Eighth Mission - Kids Playground
Into The Radius Walkthrough And Guide - The Final Mission - Ouroboros
Here we’ll be talking about the fourth Top Priority mission that you get in Into The Radius, Flash In The Dark, which has you investigating the big gas anomaly in Bolotky Village. As far as Top Priority missions go this one is pretty straightforward and risk free.
The Fourth Mission - Flash In The Dark - Loadout
After completing the Fixing A Leak mission you can immediately accept Flash In The Dark from the Terminal.
As always make sure to accept the mission at the terminal when preparing.
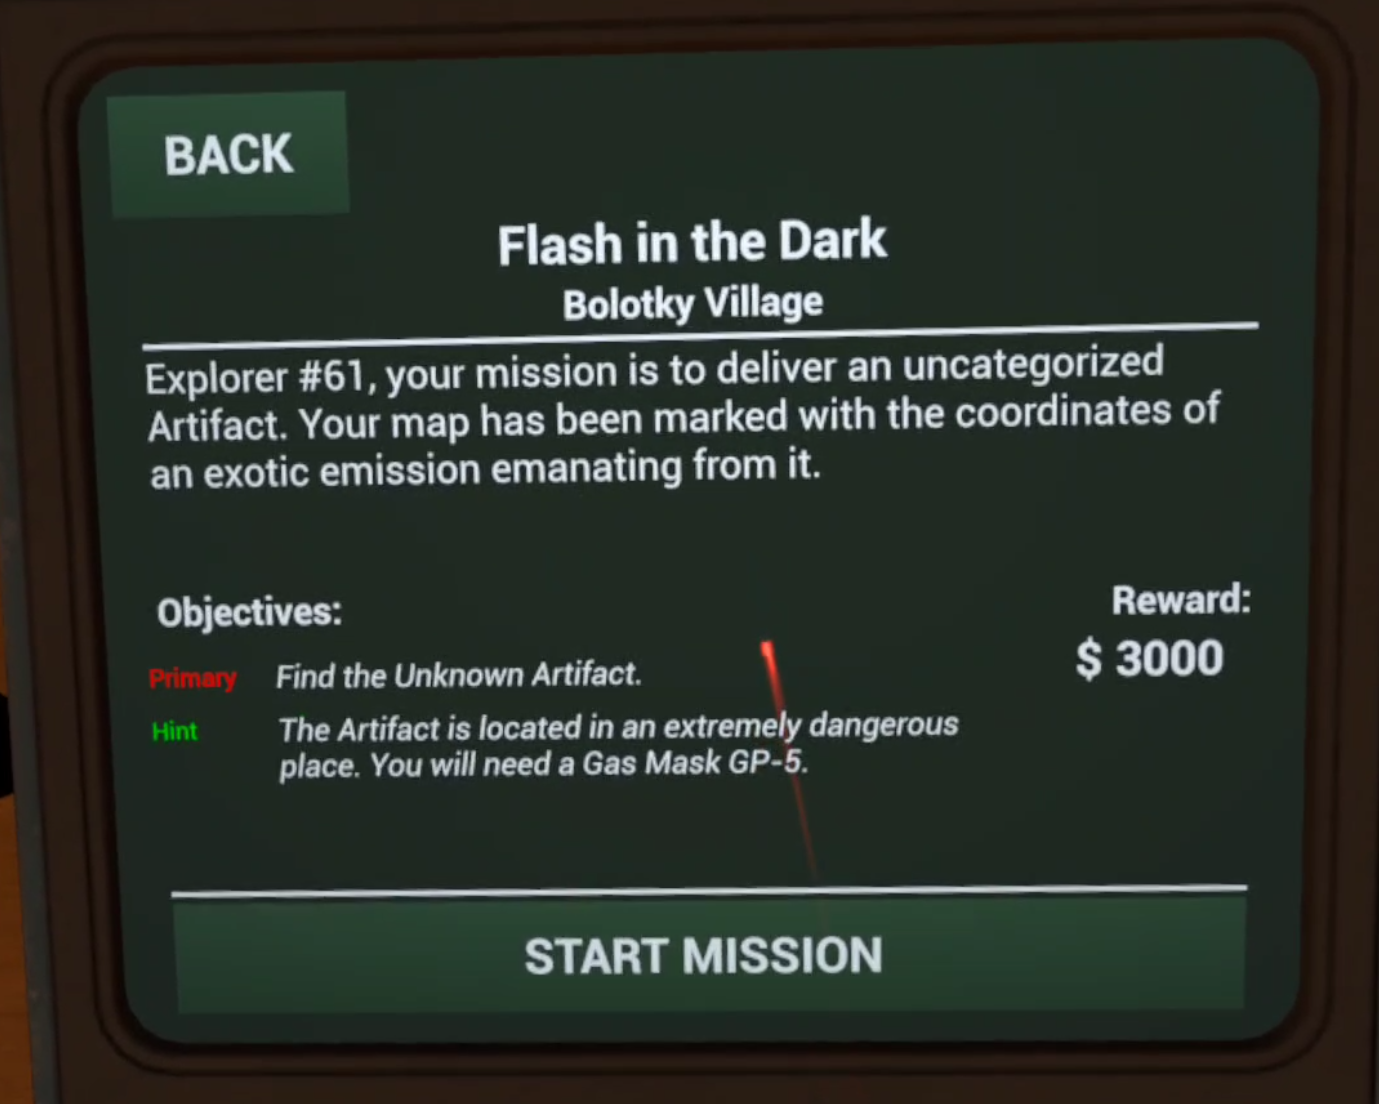
The mission briefing for the Flash In The Dark mission in Into The Radius
Now that you’re Security Level 2 you have a ton of pistols and SMGs to choose from at the shop. Not to mention shotguns.
At this point in the game you can always artifact hunt and do repeatable missions if you need more cash. Though you might want to save some of your money, because after the mission following this one, which also won’t involve a lot of combat, you’ll be hitting Security Level 3. This will give you a ton of options that are more powerful than anything at Security Level 2, and are also pretty expensive.
You won’t need a ton of firepower for this mission anyway. You’ll see in the sample loadout that I took along an SKS, but that is by no means necessary. There will be a few enemies around the anomaly field that you’re better off taking out, but you’ll be fine with just a pistol.

A sample loadout for the mission Flash In The Dark
Other than the gas mask and at least one weapon there’s all the usual stuff like food and some healing. Really the food and spare ammunition aren’t super necessary here either, but it’s always not a bad idea to err on the side of caution.
Probes and a Detector are even more vital than usual here as well, and aren’t pictured in the sample loadout.
For this mission there’s really no need to upgrade from the sawn off shotgun yet, but if you do having a better weapon is always a good idea if you’re planning on doing a lot of artifact hunting and repeatable missions afterwards.
Flash In The Dark - Getting To The Anomaly And Grabbing The Artifact
Now for the meat of the Flash In The Dark mission. As far as top priority missions go this one is very easy to pull off as long as you have a gas mask.
Head out through your new rope line to Bolotky Village. Once you’re there check your map.
Here’s the route we’re going to take.
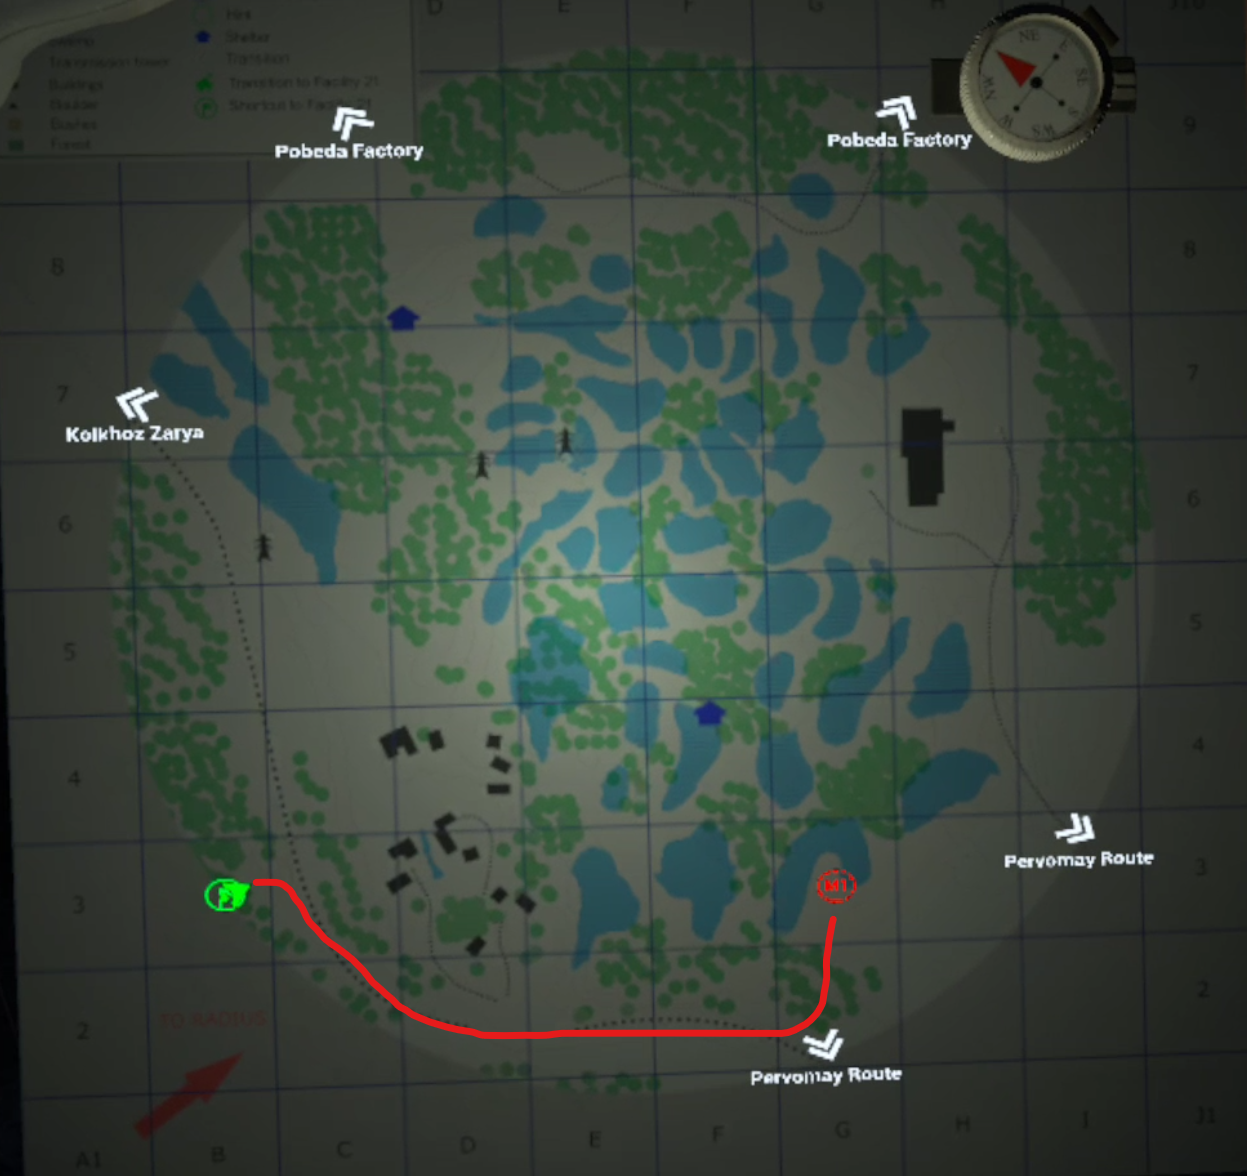
The route to the anomaly field with the objective of Flash In The Dark in it
Pretty simple. There may be a few enemies in the woods right outside of where you spawn in.
They’ll likely be Fragments and Spawn, so you can just run away down the train tracks without fighting them. Mostly you’ll just want to avoid drawing in enemies from the Village. So don’t get pinned down in the forest and keep moving.
Once you’re beside the tracks avoid the few anomalies in your way and keep following the rails until you see the rope line leading back to Pervomay Route.

The rope line leading to Pervomay Route, turn left here
Once you see it turn to the left (towards the north) and you’ll see a ruined mess of concrete and rebar with some green gas clouds floating around it.
Hop down the hill the railroad tracks are up on. You don’t have to take fall damage, there’s a little ramp of dirt leading up to the rails.
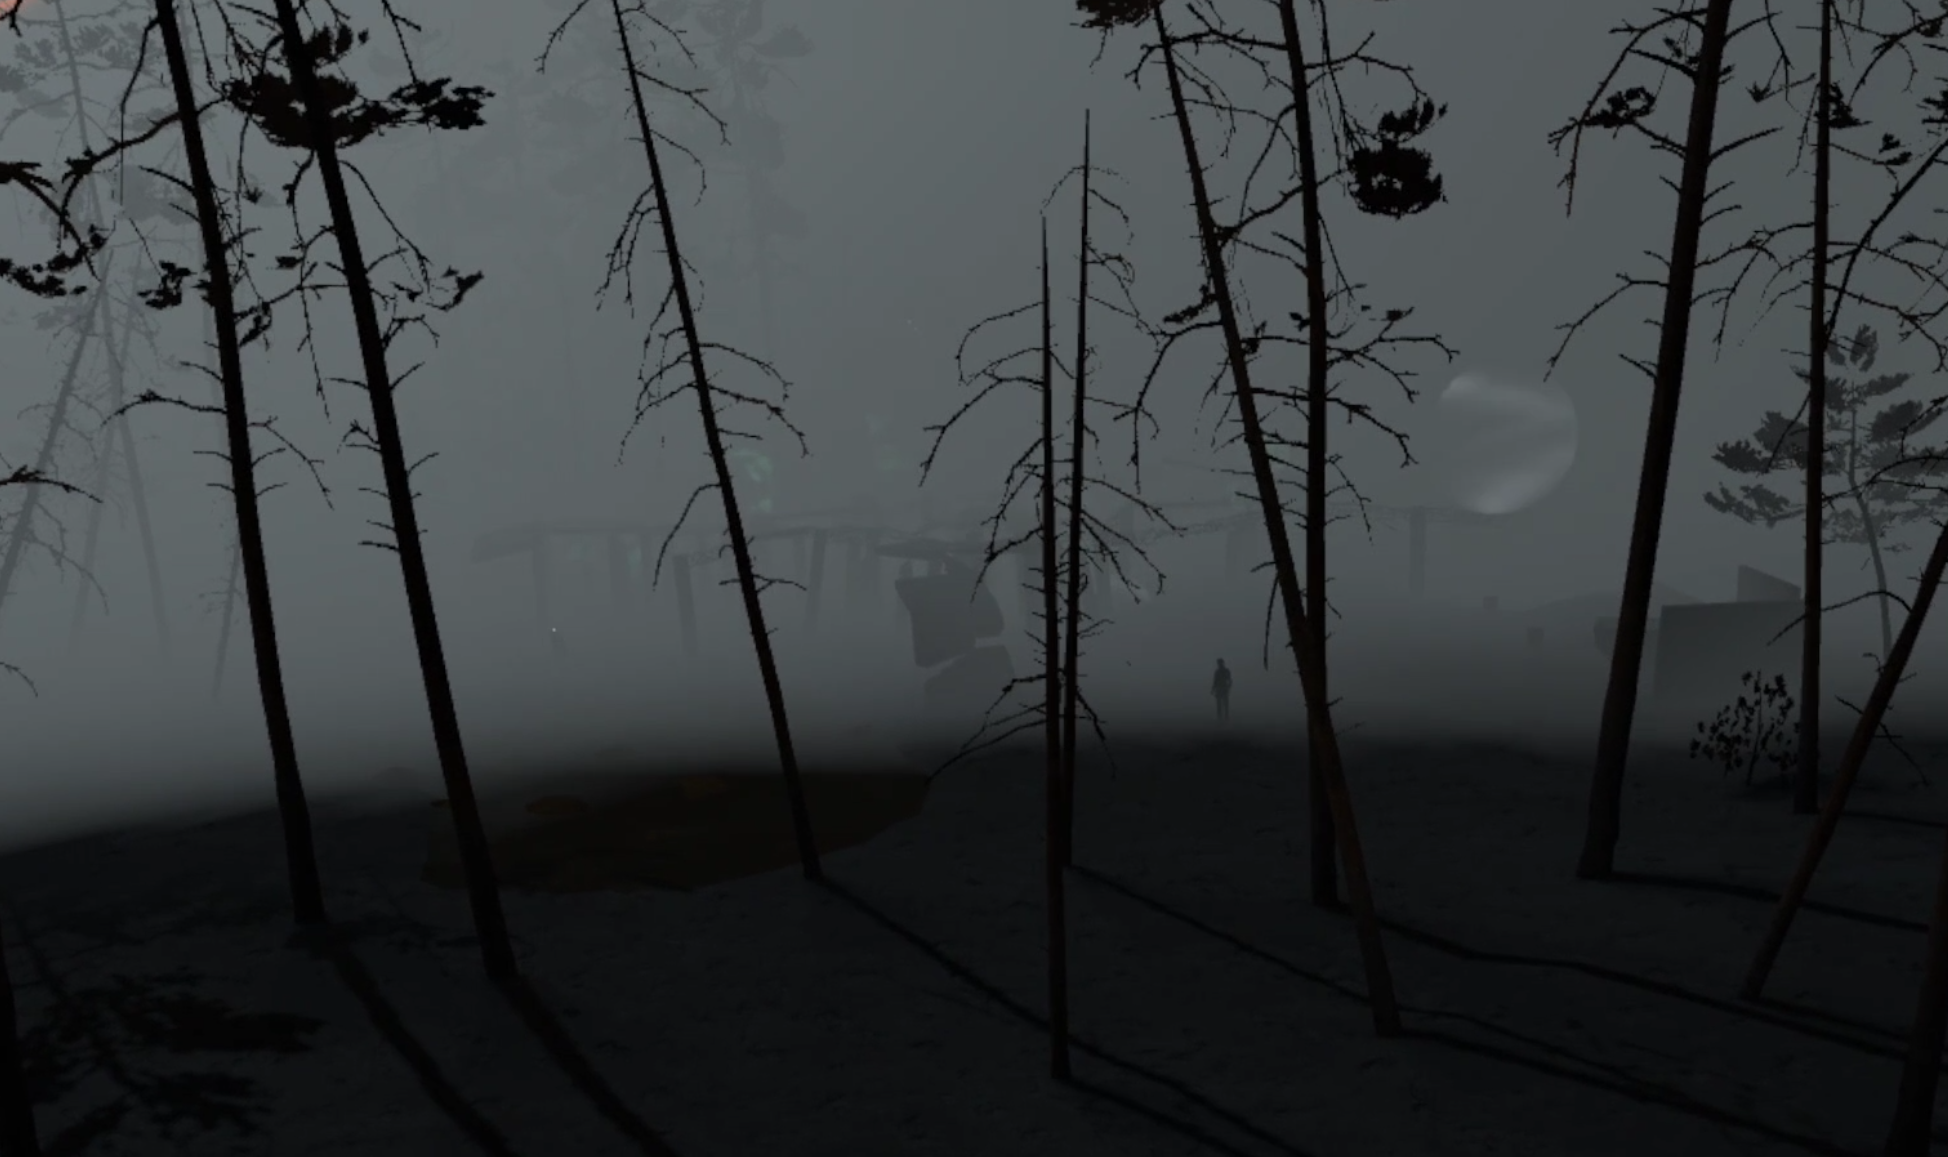
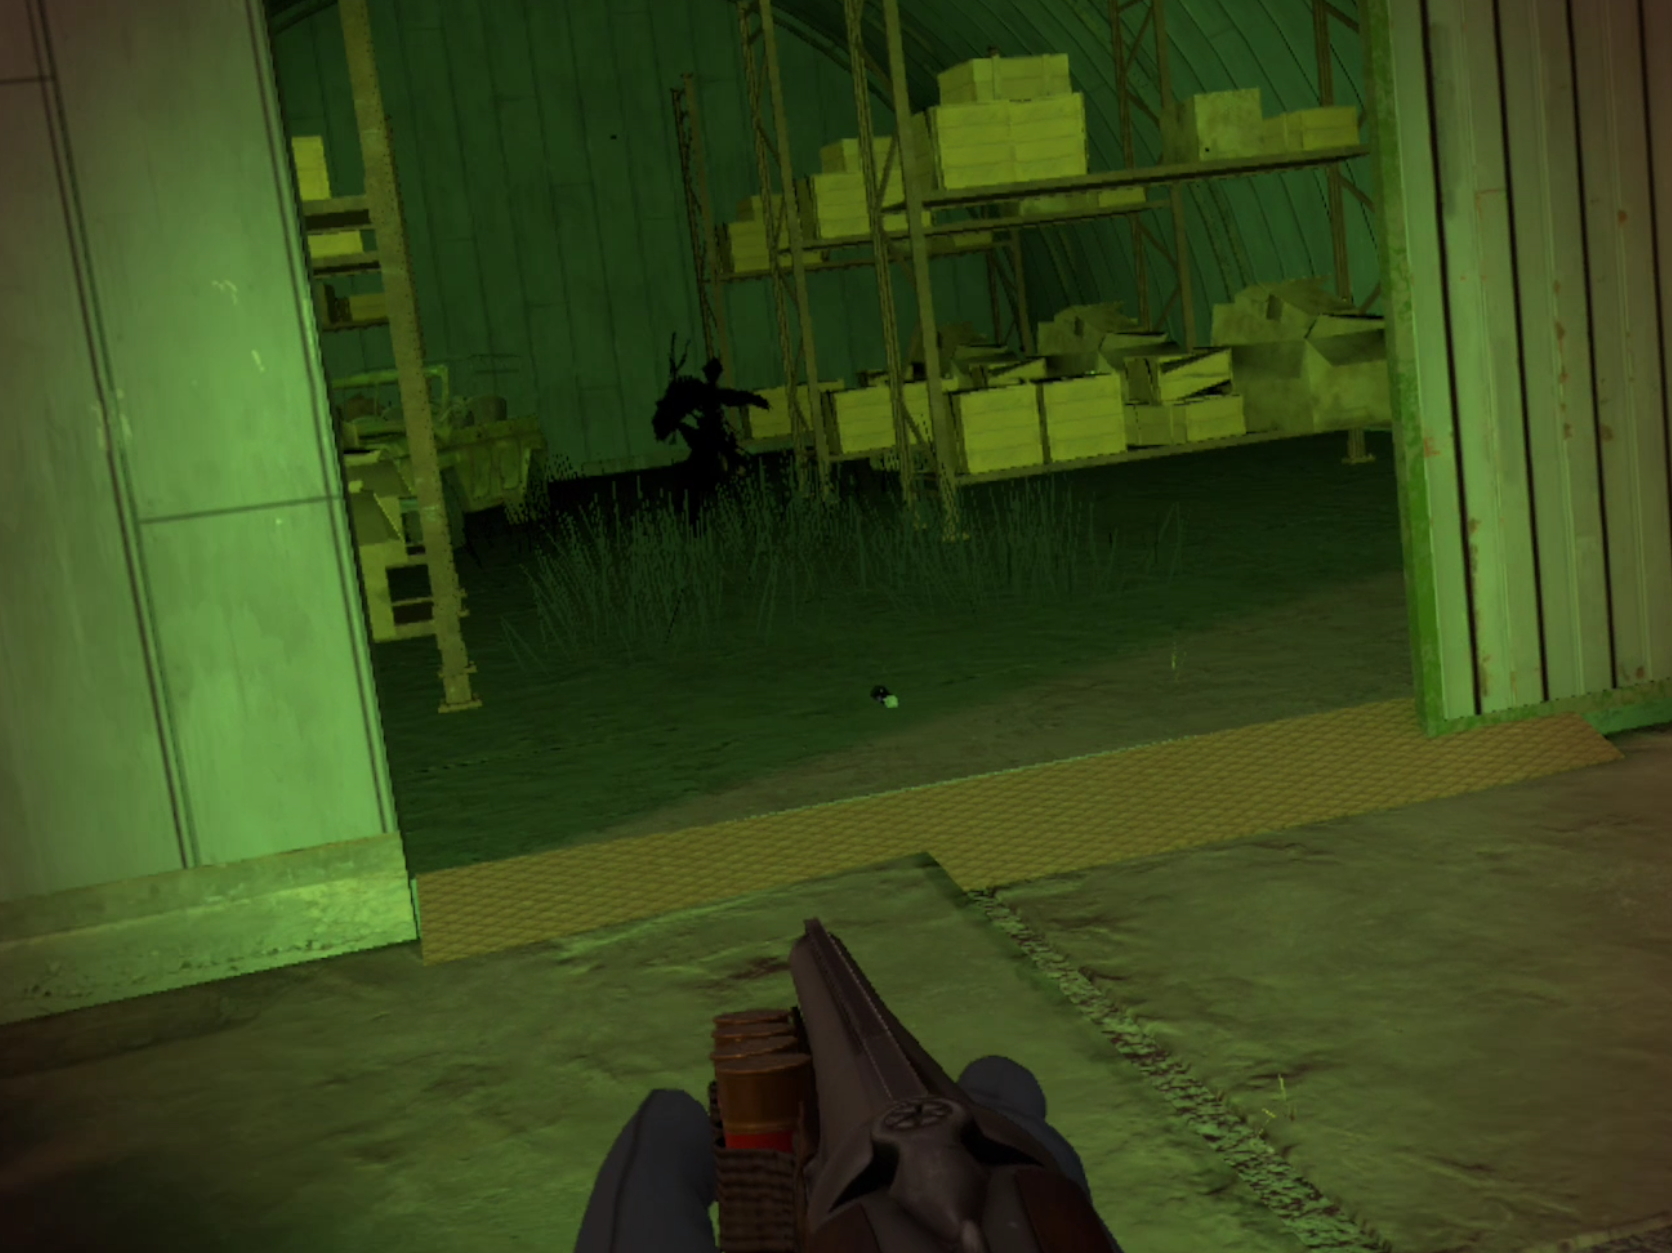
The anomaly field with the mission objective in it
There’ll be a black statue man with some dialog if you touch him, and at least one Seeker hanging around.
Take them down. One or two more might get drawn from further into the swamps, but as far as fights in Bolotky Village go it will be a very easy fight. If you get unlucky and a Mimic Policeman gets drawn in you can always take cover by the dumpster next to the anomaly field, wait for them to get close, and pop a few rounds into them.
Near the man you’ll see a ramp going up into the anomaly. You’ll also hear your detector beeping as you get close.
Make sure there aren’t any enemies on your tail before you head in, and when you’re ready put your gas mask on and go up the stairs by the black statue. There won’t be any artifacts on the ground floor, they’re all up on top of the concrete and rebar maze.

The stairway leading up into the area with the artifacts inside
You must have your gas mask on or the gas clouds will kill you quickly. Once you’re up the stairs get your probes and detector out.
You need to focus on not walking into the few Anomalies that are up on top of the ruins, and not falling down into the field of anomalies below you.
If you do fall you won’t take any damage unless you fall into an anomaly, and then you can work your way out of the field and go up the stairs again.
Carefully walk along the concrete and rebar. The artifact you’re looking for will likely be on one of the concrete platforms.
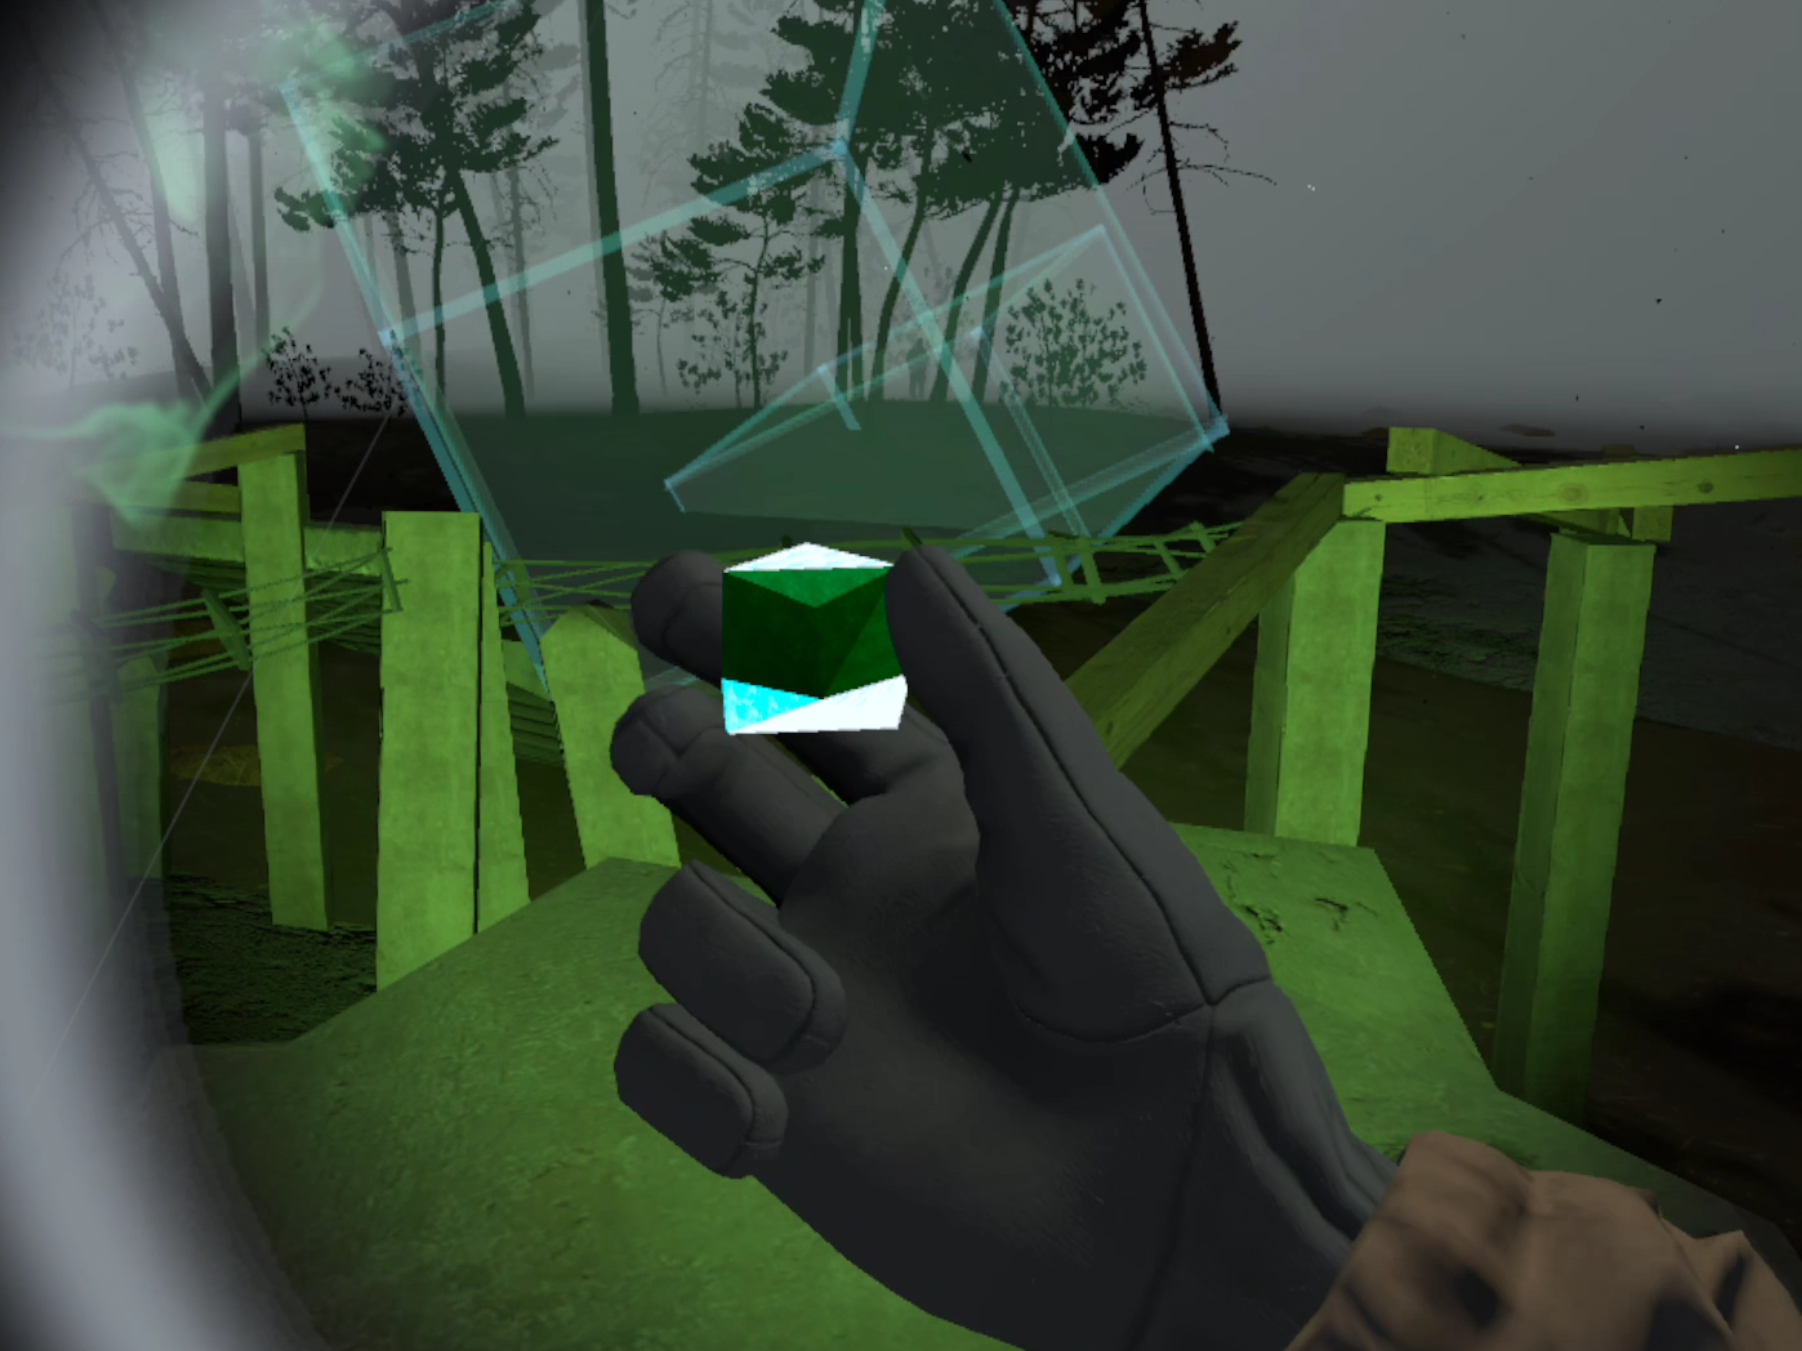
The Unknown artifact needed to complete the mission
Of course that won’t be the only artifact here in the ruin, and while you’re here you might as well collect all of them for the extra cash.
There will always be a way around the anomalies to artifacts without having to walk through one, so if you feel stuck just be patient, use your probes, and find a different route.
If you want more advice on artifact hunting then check out this artifact hunting guide.
Once you’ve got the goods and some extra artifacts to boot just go back down the stairs and hike towards the train tracks. Walk back up the hill and return to Vanno the way you came. Easy mission, easy money.
Congratulations on completing the fourth mission! Next time we’ll be talking about the fifth Top Priority mission in Into The Radius in Part Six of our Into The Radius VR Walkthrough.

Into The Radius Walkthrough And Guide - The Third Mission - Fixing A Leak
Stuck in Into The Radius? Wondering where to go and how to get there for your next mission?
Well don’t worry we’ve got you covered with this walkthrough and guide for Into the Radius VR.
Here we’ll be talking about the third Top Priority mission that you get in Into The Radius, Fixing A Leak, which has you discovering a new map, Bolotky Village, and snatching some documents for the committee.
Stuck in Into The Radius? Wondering where to go and how to get there for your next mission?
Maybe you would just like to see what is in store for you before you get there, or you’d like to know if you’re properly prepared for your next mission in the Pechorsk Zone.
Well don’t worry we’ve got you covered with this walkthrough and guide for Into the Radius VR.
In this Into the Radius walkthrough we’ll detail how to progress through the main story “Top Priority” missions, with a couple of guiding tips thrown in here and there to make your adventure smoother.
The focus of these walkthrough articles will be the story missions, but we’ll throw in some general gameplay tips and other useful loot locations near your objectives.
These articles will also assume you’re playing the game on the Normal difficulty mode with Tutorials turned on, which is highly recommended for your first playthrough. This walkthrough will still be useful if you’re playing on Realistic difficulty, but some details like vendor prices or enemy placement and numbers will be different.
Here is every article in our complete Into the Radius VR Walkthrough:
Into The Radius Walkthrough And Guide - The First Mission - Equipment Retrieval
Into The Radius Walkthrough And Guide - The Second Mission - Total Recall
Into The Radius Walkthrough And Guide - The Third Mission - Fixing A Leak
Into The Radius Walkthrough And Guide - The Fourth Mission - Flash In The Dark
Into The Radius Walkthrough And Guide - The Fifth Mission - A Probing Move
Into The Radius Walkthrough And Guide - The Sixth Mission - The Intrusion
Into The Radius Walkthrough And Guide - The Seventh Mission - A Farewell Feast
Into The Radius Walkthrough And Guide - The Eighth Mission - Kids Playground
Into The Radius Walkthrough And Guide - The Final Mission - Ouroboros
Here we’ll be talking about the third Top Priority mission that you get in Into The Radius, Fixing A Leak, which has you discovering a new map, Bolotky Village, and snatching some documents for the committee.
The Third Mission - Fixing A Leak
After you’ve done at least two repeatable missions in our previous guide on them you’re able to accept the third Top Priority mission in Into The Radius, Fixing A Leak.
As always make sure to accept the mission at the terminal when preparing.

The mission description for Into The Radius’s third mission, Fixing A Leak
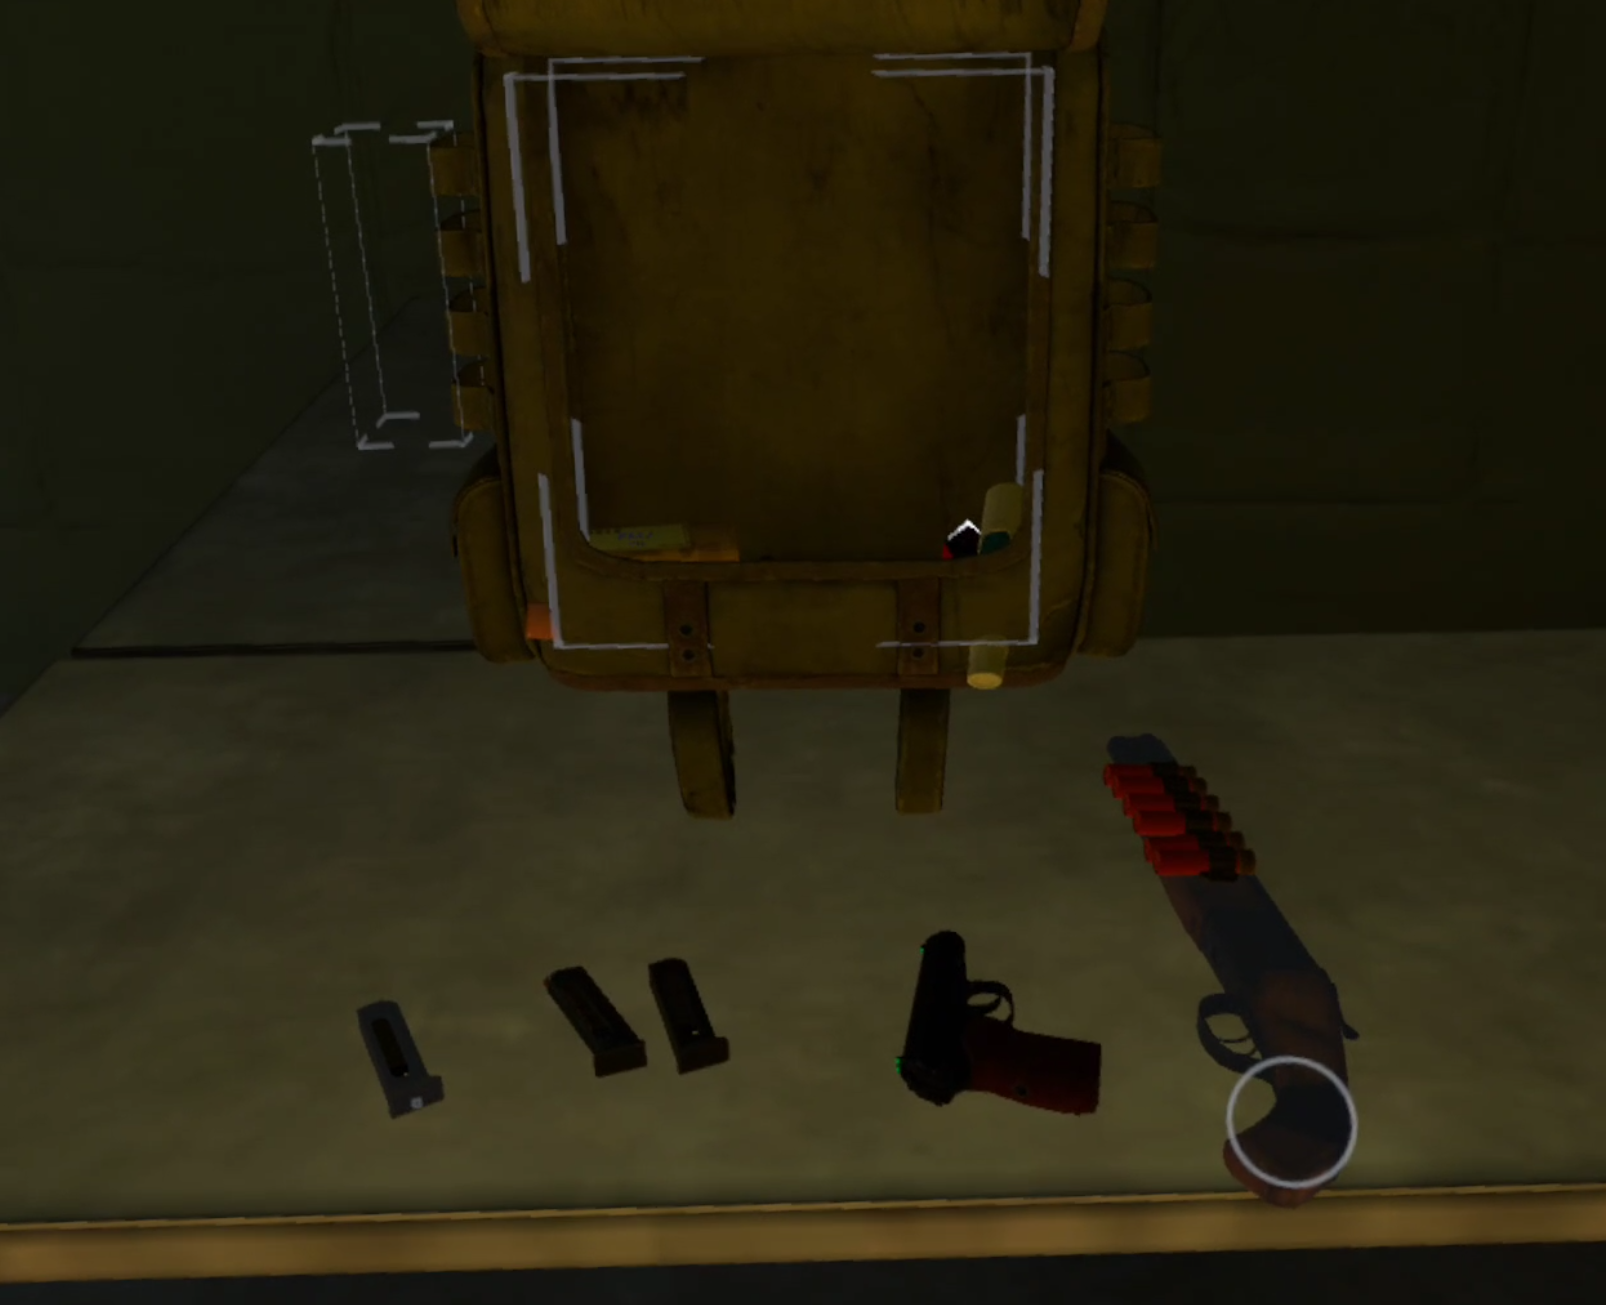
Fixing A Leak - Loadout
If you’ve been following this walkthrough then by now you’ve already got a few weapon choices from what the game gives you to start out, and from the stashes you’ve found with the help of this walkthrough.
Even though you’re still at Security Level 1 you also have some options for new weapons. Since you’re just about to hit Security Level 2 after completing this mission, it might be more frugal to save your money for the better sorts of weapons you can get at the next Security Level.
If you don’t mind taking the time to do more artifact hunting and repeatable missions later on then don’t worry about the money. You can do this mission with just a Makarov and your double barrel if you like.
However it’s a good idea to get a pistol upgrade by this point in the game. While you won’t have access to the best pistols around yet it is still a good idea to go in with a little extra firepower if this is your first time.
Every map in Into the Radius gets a fair bit more dangerous than the last one. This mission will involve going to an area with a higher concentration of enemies than you’ll find anywhere in Pervomay Route, and a few of those enemies will be Mimic Policemen. Prepare for a fight, especially if the Tide has come in and all of the enemies in Pervomay Route have respawned.
So for this example loadout the Makarov has been upgraded to the Glock 17 found in the stash found during the Total Recall mission. After being repaired in the train car’s repair box of course.

A sample loadout for the Fixing A Leak mission
Since Glock 17 magazines hold twice as many bullets as Makarov magazines there are two extra magazines, though there’s also a fair amount of spare ammunition for it in the backpack.
If you really like using the shotgun feel free to bring more buckshot. Bringing more than a single healing injector is also a very good idea (you can’t see the second one in the photo) especially if you’ve used up your Regen artifact. In fact bring three just in case.
As always a can of food and the usual Pocket Lamp, Knife, Detector, and Probes are must haves as well.
Now that you have more loadout options you can also start thinking more of how you would like to play the game. Aggressively or stealthily, or maybe both.
If you’ve recovered the TT-33 stash then you now have a silenced pistol option. If you don’t want to fight all of the enemies, or are having a hard time, then you could always bring a silenced weapon and try to stealthily take the objective and sneak away. More on that in the walkthrough.
That’s all for the loadout, upgrading your pistol will make this easier, and you should be able to afford it by now.
Fixing A Leak - Getting to Bolotky Village
As always consult your map before getting underway.
Here’s the route we’ll be taking for this mission through Pervomay. As always this isn’t the only possible route.

The route through Pervomay Route to Bolotky Village
You’ll notice that there are two ways into Bolotky Village and we will be taking the lefthand one. This route also assumes that all enemies are alive and not dealt with (i.e. right after the tide) and so we’ll be doing our best to avoid concentrations of them.
First set out down the road outside of the entrance to Vanno, but go straight past the blockhouse and through the broken wall beside it.
Then pass the floating train car marked with a blue house icon on the map.

The floating traincar safehouse in Pervomay Route
You’ll run into a few roaming Fragments, and possibly Spawn along the way. As long as you keep moving and avoid getting too close to major concentrations of enemies you should have an easy time.
It might get a little harder as you near the train station though. There’s usually at least one Mimic Policeman patrolling near the tanker car floating over the crater near the entrance, and another around the high catwalk.

The floating tanker car marking the entrance to the Train Station in Pervomay Route
If you want to avoid them then follow the route mapped out above, this will take you past the lake and up through the hills that sit on the east side of the Train Station.
Those hills are very sparsely populated with enemies. Though if you’ve already cleared the Train Station or want to fight your way through then feel free.
Around the top right side of the station’s wall is a door that you can slip into if you’ve skirted around the side of the station, and there’s another door on the right side of the wall into the station as well. Both are yellow gates with doorways in them.
However you get inside go through the big open gate at the back and take the rope line leading to Bolotky Village.

The rear entrance to the Train Station in Pervomay Route, and the exit to Bolotky Village
Fixing A Leak - Finding The Folder In Bolotky
Welcome to Bolotky Village.
This new map is mostly swamp with scattered enemies and anomaly fields, with groups of rocks, trees, and buildings around the edges.
The cluster of buildings we’ll be concerning ourselves with in this walkthrough is the village in the southwestern section of the map.
That’s where the folder you need to complete the mission is. Here’s the map with the route.

Two possible routes to the objective. Red for loud and green for quiet
As you can see there are two routes. The more direct one in red is better if you plan on going loud and fighting all of the enemies in the village.
The route highlighted in green is better if you want to stealthily sneak your way to the house containing the folder, grab it, and leave.
Regardless of how you want to tackle this mission you’ll want to get closer to the village by following the train tracks leading towards the village.

The floating traincar next to the southern entrance to the village
You know you’re close when you see the floating box car.
Fixing A Leak - The Loud Way
First let’s walk through attacking the village by following the red route.
At the floating box car take a right and walk past the fence and into the village from the south.
Stay in cover and keep your weapon ready. You should be able to get past the gate and at least near the outhouse without engaging any enemies. You should be able to hear their footsteps though, and get a general idea for where the enemies closest to you are.

Starting the fight in the southern area of the village
Your most important targets are the Mimic Policemen. They’re the greatest threat, so try to start the fight by ambushing one of them. The footsteps that sound like a boot hitting a hardwood floor are theirs, so listen for those.
Once you fire your first shots it will attract other enemies. Get to and stay in a good position in cover that also allows you to retreat if you need to.
The first set of houses in front of the outhouse are decent, and so is the house next to the outhouse.
If you need to you can run all the way back to the train tracks, or hug the bottom of the hill that the village sits on.

Fighting in the center of the village
Wait and see if more enemies come at you, they’ll all make noises as they approach except for a new enemy, the Seeker.
If the Seeker gets close to you they’ll shoot energy beams out of their head that deal damage. They’re pretty quiet and run very quickly. If one is charging at you drop them quickly.
The enemies should get drawn towards you as you make more noise. So as long as you’re prepared to ambush them as they approach, or fall back if you’re overwhelmed and then ambush them, you’ll make your way through.
Take your time, make sure your weapons don’t run dry, and if you need to regroup just run back to the train tracks. You can do it.
Fixing A Leak - The Quiet Way
If you want to avoid combat as much as possible when doing the Fixing A Leak mission, then take the green route on the Bolotky Village Map.
If you want to do this quietly then it’s a good idea to bring a silenced pistol, so that you can take down an enemy or two without bringing the entire village down on yourself.
You may also want to attempt to do this quietly during nighttime, or later in the day when it’s not so sunny out. This will make sneaking around enemies, especially the Mimic Policemen, easier.

The routes for attacking the village
Once you’re at the floating traincar stay on the railway line so that you’re hugging the left side of the tracks.
Then eliminate the Seeker and other enemies near the green flag on the left side of the map. You don’t want any enemies behind you if you want to run. Use your silenced weapon for this so you don’t draw the enemies in the town over to you.
This is also a good opportunity to eliminate the Seeker for the optional objective (more on that later) and find the broken rope line marked by the flag on the map (more on that later).
If you make too much noise and a firefight breaks out you can run away and try to sneak in another time.
Once you’re close sneak over the railway past where the train cars are sitting on it. The house with the folder is right past it through some trees.
If you’re doing this quietly then try to avoid shooting anything until you’re spotted. Even a silenced weapon still makes some noise, and fighting the enemies inside of the village is going to be harder if you’re right next to them and surrounded.
Fixing A Leak - Looting And Leaving
Whether you tried to clear the area or sneak in quietly your objective is the house with the blueish roof and blueish porch.

The house containing the folder in the village
You can find the folder inside in the living room on a green couch.

The folder that is the main objective of Fixing A Leak
After you take it there is also a stash conveniently located inside the oven in the green house beside it.
Here’s the location of the stash on your map.

The location of the stash in the village on a map
Open up the oven and inside are a couple of AK74 magazines, some bullets, and a grenade.

The stash is inside this oven
Getting this stash might be risky if you’re sneaking, but if you cleared the village of enemies you can loot to your hearts desire.
There are quite a few buildings in this village and having your run of the place, despite the risks, comes with the advantage of being able to take whatever you want without any worries.
Though there will likely be a Rift Anomaly in the half completed brick building at the north end of town, so make sure to take that out before it starts respawning enemies.

The Rift Anomaly located on the north end of the village
You won’t have to worry too much about getting overloaded since the exit is so close. When you’re ready to leave go back to the train tracks and walk over them where the trains are parked on the tracks.
If you’ve cleared the town the loud way the Seeker guarding your exit will probably have been drawn in by the noise and already taken care of, otherwise make sure to find them in the woods and destroy them to complete the optional objective. It’s easy money. There might be another enemy or two lurking around as well.
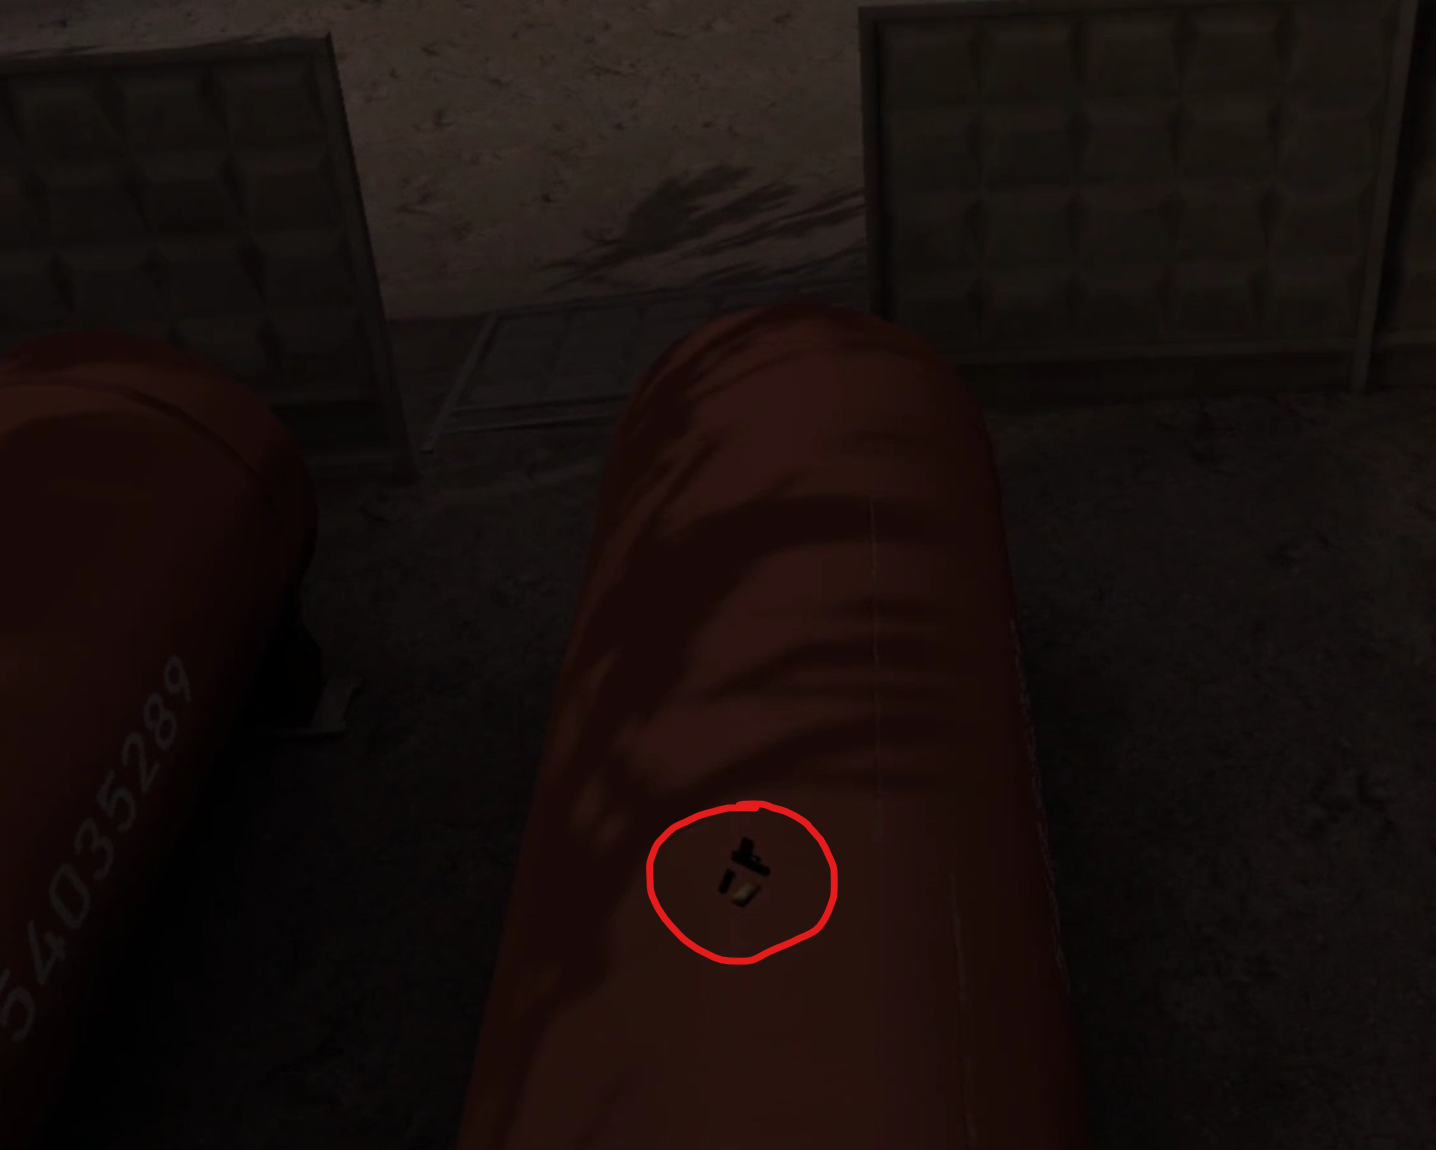
Oh, and be careful of the Web Anomalies that you’ll see in the woods all over the place in the Bolotky Village map.

A straggling enemy and a web anomaly in the trees (circled)
Finally go back to Vanno by walking into the broken rope line marked by the green flag on your map.

The broken rope line leading back to Vanno
Fixing A Leak - Back At Vanno
Once you’re back at Vanno you’ll notice that you’ve got a new rope line leading out of your base. This rope line leads right back to where you just came from in Bolotky Village, and functions the same as the one you’ve been using to get to Pervomay Route.
You’ll be using this new rope line quite a lot in the coming missions.
Once you turn in the mission you’ll be promoted to Security Level 2 and be told to do some more training, which also gives you some extra money to go with your mission reward. Do that training and you can now buy Security Level 2 items.
This comes with a lot of tantalizing new options in firearms and equipment, and you should immediately spend it on two items, a Gas Mask and a Head Lamp. The Head Lamp can be found under “Survival Equipment” and the Gas Mask can be found under “Armor.”

Buying the Gas Mask and Head Lamp in Into the Radius
The Head Lamp means you can finally get rid of that Pocket Lamp on your shoulder. You’ll always have all the lighting you need sitting right on top of your head.
The Gas mask is absolutely vital for the next Top Priority mission, and is the only item in the game that gives you extra protection from anomalies. It also makes you completely immune to the gas anomaly. Of course keep in mind that you have to wear the mask to get these benefits, and it’s a little restricting on your sight.
Congratulations on completing the third mission! Next time we’ll be talking about the fourth Top Priority mission in Into The Radius in Part Five of our Into The Radius VR Walkthrough.
Into The Radius Walkthrough And Guide - Repeatable Missions
Stuck in Into The Radius? Wondering where to go and how to get there for your next mission?
Well don’t worry we’ve got you covered with this walkthrough and guide for Into the Radius VR.
Here we’ll be talking about the repeatable missions in Into The Radius. After Total Recall you’ll have to complete two to unlock the next Top Priority mission. These are missions that you can completely infinitely for additional cash, and to unlock some Top Priority missions you’ll have to do a few repeatable ones.
Stuck in Into The Radius? Wondering where to go and how to get there for your next mission?
Maybe you would just like to see what is in store for you before you get there, or you’d like to know if you’re properly prepared for your next mission in the Pechorsk Zone.
Well don’t worry we’ve got you covered with this walkthrough and guide for Into the Radius VR.
Here we’ll detail how to progress through the main story “Top Priority” missions, with a couple of guiding tips thrown in here and there to make your adventure smoother.
The focus of these articles will be the story missions, but we’ll throw in some general gameplay tips and other useful loot locations near your objectives.
These articles will also assume you’re playing the game on the Normal difficulty mode with Tutorials turned on, which is highly recommended for your first playthrough. This walkthrough will still be useful if you’re playing on Realistic difficulty, but some details like vendor prices or enemy placement and numbers will be different.
Here is every article in our complete Into the Radius VR Walkthrough:
Into The Radius Walkthrough And Guide - The First Mission - Equipment Retrieval
Into The Radius Walkthrough And Guide - The Second Mission - Total Recall
Into The Radius Walkthrough And Guide - Repeatable Missions
Into The Radius Walkthrough And Guide - The Third Mission - Fixing A Leak
Into The Radius Walkthrough And Guide - The Fourth Mission - Flash In The Dark
Into The Radius Walkthrough And Guide - The Fifth Mission - A Probing Move
Into The Radius Walkthrough And Guide - The Sixth Mission - The Intrusion
Into The Radius Walkthrough And Guide - The Seventh Mission - A Farewell Feast
Into The Radius Walkthrough And Guide - The Eighth Mission - Kids Playground
Into The Radius Walkthrough And Guide - The Final Mission - Ouroboros
Here we’ll be talking about the repeatable missions in Into The Radius. After Total Recall you’ll have to complete two to unlock the next Top Priority mission. These are missions that you can completely infinitely for additional cash, and to unlock some Top Priority missions you’ll have to do a few repeatable ones.
Into the Radius VR Walkthrough - Repeatable Missions
This walkthrough guide for Into the Radius picks up where our previous guide left off, just after completing the Total Recall Top Priority mission.
Once you go to the mission terminal you’ll notice that there are no missions marked Top Priority, instead you’ll have a few missions of various names listed.

The mission terminal telling you how many more repeatable missions you need to do before unlocking the next Top Priority mission
These sorts of missions will now be available throughout the game, and can be completed an infinite number of times to get you more money, which is awesome.
So you’ll need to do two of these. You can also do all three. Since the only location you have gone to so far is Pervomay Route, they will all be located there, but in the future when you go deeper into the zone they will be located in any of the maps you’ve been to.
So accept just two, or accept them all, it’s up to you, but the more missions you do the more you stand to gain.
As for your loadout, try to pack light to leave room for loot and artifacts, but make sure you’ve got plenty of ammunition in case you run into clusters of enemies, and always have some food and healing items on you as well. The usual Combat Knife, Probes, Detector, and Pocket Lamp are also must haves of course.
You’ll be doing repeatable missions throughout the game, and so your loadout for them will change over time as you acquire better equipment.
If things go wrong you can always just go back home or rest in one of the safehouses marked with a blue house icon on the map. You’ll get a feel for how much to bring depending on where you’re going over time.
Plan accordingly for whatever route you take. If you’ve been following this walkthrough there’s about half of Pervomay you have yet to discover, and the final location that one of these missions will likely bring you to is the Train station in the northwestern section of the map.
The Train Station marked on the map of Pervomay Route
This train station is the last location in Pervomay Route that you haven’t already been to which is exceptionally dangerous.
In the train station you’ll find multiple Mimic Policemen, and Fragments and Phantoms will be spread all over the map.
You’re also likely to run into Spawn at some point. The secret to beating them is to hold your knife out in front of you when they attack and catch them in mid air. If you’re concerned about getting hit strafe around them and then attack when they jump at you and miss.
Oh, and if you run into the big anomaly with green clouds floating around it, don’t go inside, those clouds will quickly kill you since you don’t have a gas mask yet.
The Train Station - Free Silenced TT-33
Whether you avoid the inside of the Train Station or not, if you want a free TT-33 pistol with magazines, ammunition, and a silencer, there’s a stash near the train station you can pick up while you’re doing these missions.
When you reach the train station head over to the slightly wooded area next to it to the west. If you’re facing the train station from the direction of the floating train car it will be on the left.

The woods leading to the TT-33 stash
Go up into those hills and keep walking until you see a concrete pipe.
Inside the pipe is the TT-33, a pistol silencer, magazines for it, and ammunition for it. The TT-33 is already modified to take a silencer, and is almost in perfect condition.

The location of the TT-33 stash
Though if you want to use the silencer make sure to repair it using the repair box at your base first, since it will be in bad shape when you find it.
This silenced pistol is great if you want to play the game more stealthily.

The pipe holding the TT-33 stash by the train station
Repeatable Missions - Types Of Missions
Since the missions are random we can’t go into detail on how to complete each one specifically.
So instead we’ll go through every type of repeatable mission in Into the Radius and give you a general walkthrough on what is expected to complete them.
You’ll be doing a lot of these missions as you progress through the game and explore the zone further, so come back here if you have any questions on them.
Otherwise you can also find more information on these missions just like with Top Priority missions by looking at your mission log in your Journal.
Sample Courier
The Sample Courier Mission has you going out into the Pechorsk zone and finding a special sample container.
The sample container will be next to a dead scientist in an orange hazmat suit, or dead soldier in dark tactical gear, and will have some enemies near it.

Enemies guarding a sample container for the Sample Courier mission
You can try to run in and grab the container before running, or dispatch the enemies and take it at your leasure.
Either way once you have the container you turn it in for the reward.

The Sample Container for the Sample Courier mission
Warren’s Legacy
Warren’s Legacy is a mission that you will find later on in the game, and is essentially a harder version of Sample Courier.
This mission has you find a Black Box instead of a Sample Container next to a body surrounded by enemies.
You must retrieve a Black Box to complete the Warren’s Legacy mission
The main difference is that the Black Box will be much heavier, and won’t fit in your backpack. So you’ll have to carry it in one of your hands. It’s easiest to do this mission shortly before returning to Vanno.
Papers Drive Me Crazy
The Papers Drive Me Crazy mission is virtually the same as the Sample Container Mission.
It will also spawn enemies near the objective, though the objective will more often be in an area where loot is normally found rather than next to a body out in a field somewhere. So expect to have to go indoors.

The papers to be retrieved for the Papers Drive Me Crazy mission
Data Recovery
The Data Recovery mission is awfully like the first mission you receive, Equipment Retrieval.

A wristwatch you can retrieve for the Data Recovery quest
You need to retrieve a wristwatch that looks exactly like the one you found in that first mission.
The wristwatch may be next to the body of the unfortunate explorer who lost it, somewhere on the ground near the mission marker, or in a crate.
Usually the watch is found in an area heavy in anomalies or enemies or both.
In And Out/Radius Treasures
This is a very straightforward type of mission. Simply go into the artifact field marked on your map and bring back a unique artifact found inside.

The Neon artifact for the In And Out repeatable mission in Into The Radius
A lot of these missions will bring you to larger artifact fields that can contain multiple artifacts.
So it’s very profitable to not only get the mission artifact, but others as well if your detector keeps beeping. Some anomaly fields are more dangerous than others, but if you take your time they’re all possible to navigate.
Later on you may have to collect multiple artifacts for these missions.
Metastasis
Metastasis also involves hunting for an artifact, but in this case that artifact is inside of a Special Rift instead of a field of anomalies.
These rifts work just like normal rifts, except they look different. They’reort of like several normal Rifts smashed together, and drop a Broken Shard to hand in instead of a normal shard.

The special rift for the Metastasis mission
Later on in the game you will often have to collect several Broken Shards to complete the mission.
You don’t get anything if you don’t have all of the shards, and this mission must be completed before the next Tide.
Paparazzi
The Paparazzi repeatable mission in Into The Radius is arguably one of the more dangerous and annoying.
Not to mention that to complete the mission you will also have to pony up 50 dollars for a camera, found in the “Science Equipment” category.
Despite having two handles you can only hold this camera with one hand at a time, and there is a very small viewport that shows you what you’re taking a picture of.
For the paparazzi mission you’ll need to take photos of multiple enemies out in Pechorsk. What makes this mission dangerous is that pictures generally don’t come out well unless you are very close to your enemy, which can be problematic when those enemies wield automatic weapons.
Though luckily this mission is not tied to a particular zone, you can take the pictures wherever you want. On a successful picture you’ll see the text “That’s a Nice Shot!” appear.
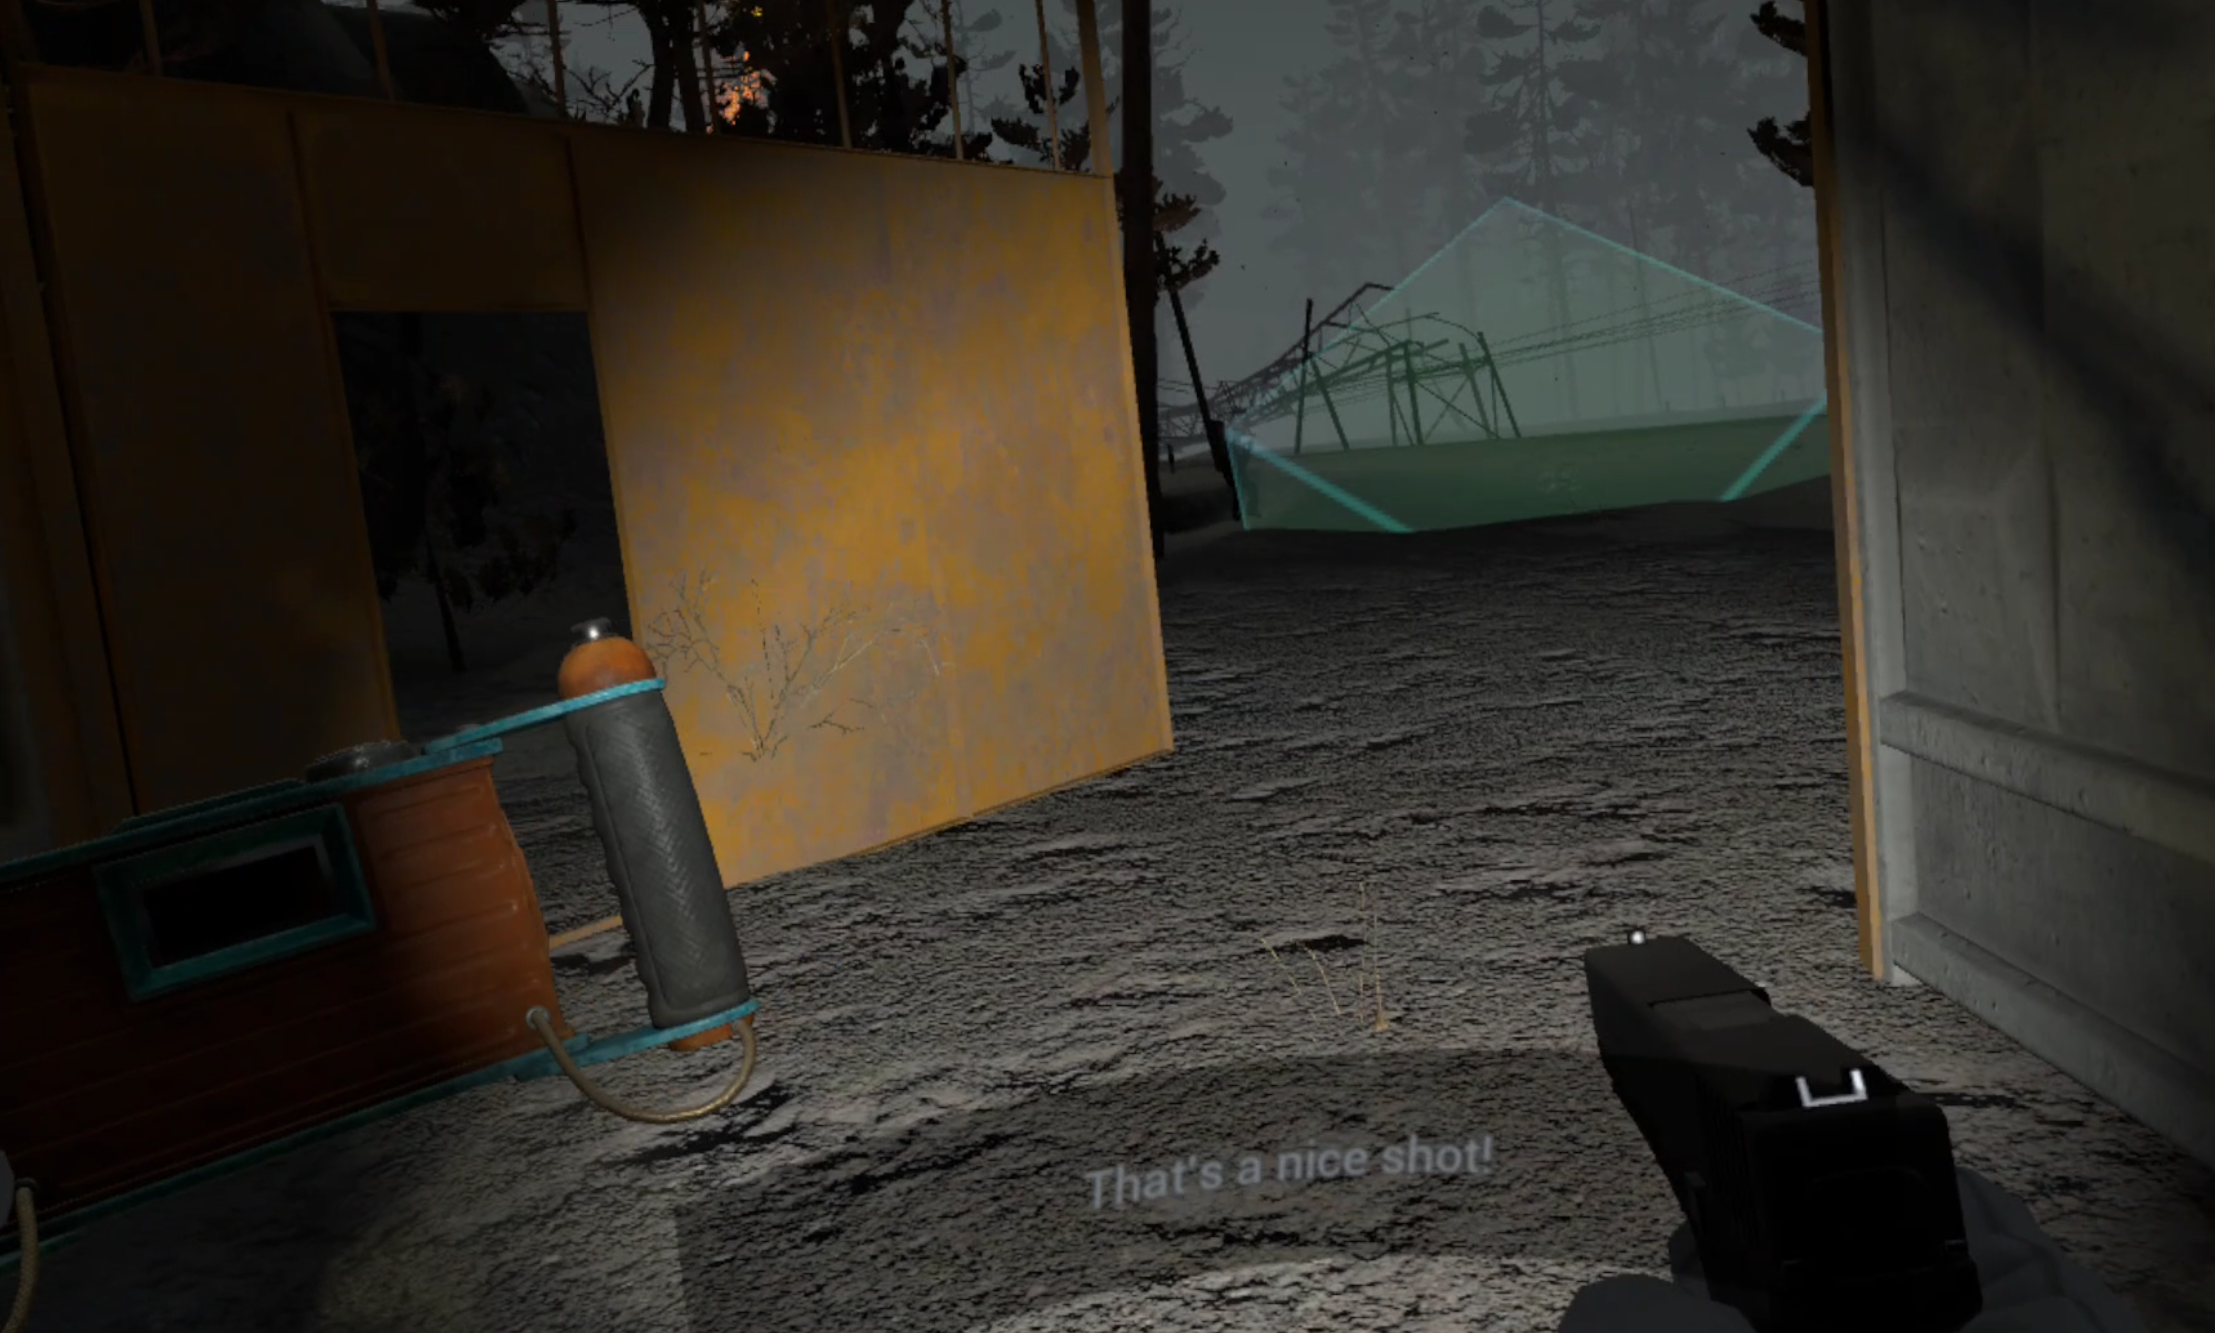
Moments after taking a picture for the Paparazzi mission
Once all of the pictures are taken turning in the camera completes the mission.
Operation Cleanup
Operation Cleanup is an extremely straightforward mission.
Accepting it will spawn a certain number of enemies where the mission marker is, and the number of those enemies are visible next to the mission in your journal.
Simply destroy all of the enemies spawned by the mission and you complete it.
Banshee Hunt
So just like In and Out and Radius Treasures, you’re supposed to find an artifact in an anomaly field for the Banshee Hunt mission.
The catch? The Crier artifact that you find when doing this mission doesn’t just sit inertly in your bag after you take it.
Nope, instead it will make a shrieking noise pretty often, which will give away your position and draw in all nearby enemies. Not only is this noise very annoying, but it could potentially cost you your life.

The Crier artifact that you have to uncover and turn in for the Banshee Hunt mission
So it’s recommended to grab the Crier for the Banshee Hunt mission after the area is clear, or when you’re heading back home through a safeish area.
Those are all of the repeatable missions in Into The Radius, and some tips on how to complete them. After you do two of these you’ll be ready to tackle the third Top Priority mission in the game, Fixing A Leak, which we will cover in part four of this Into The Radius Walkthrough.
Other Guides You Might Find Helpful:

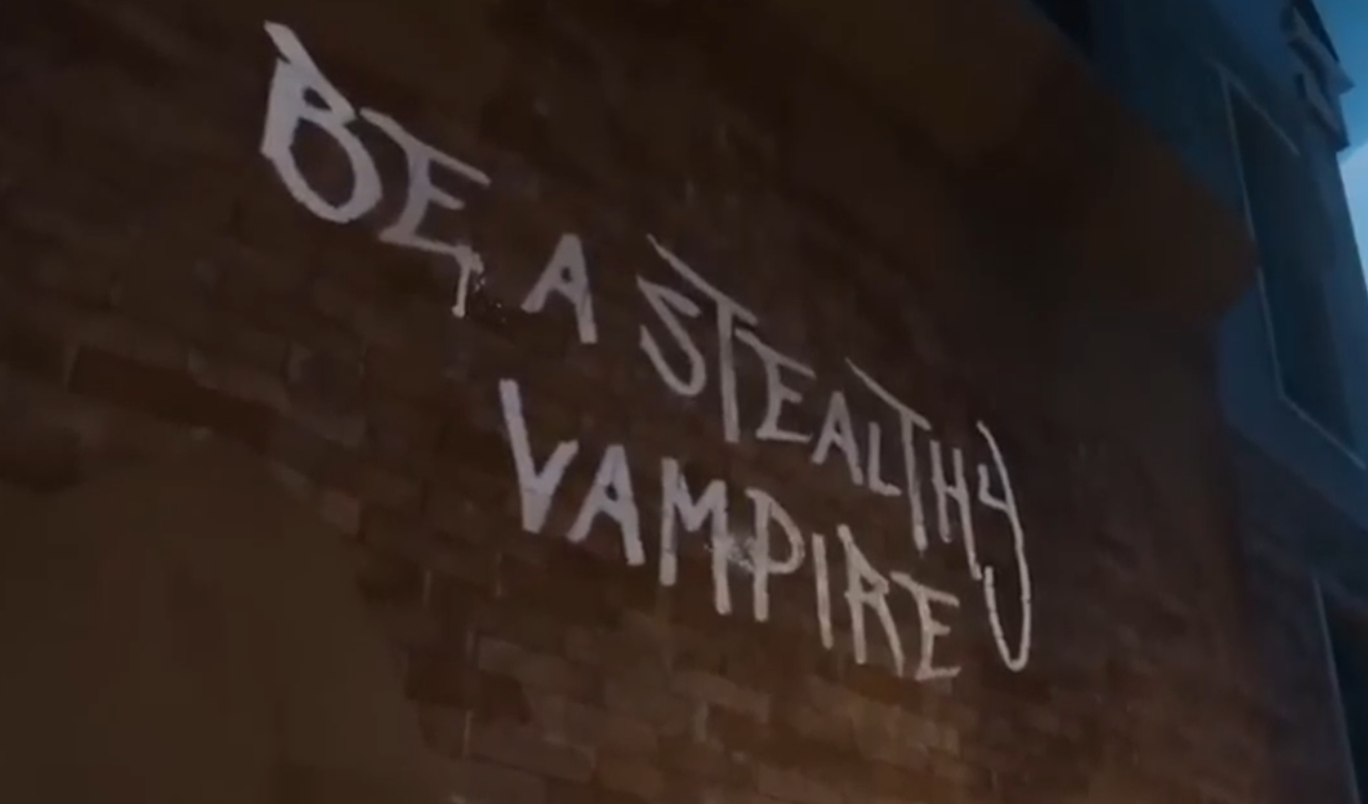
Vampire: The Masquerade - Justice Review After One Playthrough
After completing a full playthrough of Vampire: The Masquerade - Justice, and here's some quick thoughts on the game.
Overall this is a pretty fun vampire assassination and steath VR game. What it does best is the feeling of being a supernatural assassin. Sneaking from spot to spot and taking out your enemies one by one.
After completing a full playthrough of Vampire: The Masquerade - Justice here's some quick thoughts and a review about the game.
Overall this is a pretty fun vampire assassination and stealth VR game. What it does best is the feeling of being a supernatural assassin. Sneaking from spot to spot and taking out your enemies one by one.
Your need for blood will also force you to get up close and personal to borrow some from an enemy, which is always a risk, and keeps you from just using your most powerful abilities over and over.
You suck on a lot of necks in this game
This is the core of Vampire: The Masquerade - Justice and what it does well. Put a lot of enemies between you and where you need to be and let you figure out how to sneak or kill your way past them.
It also gives you the choice between being patient or going a little crazy and seeing if you can quickly fight your way through.
There are sections where I found sneaking to be the best option, and other parts where I just went on a wild killing spree until only I was left standing. Either way I was having a good time.
Though of course going for the aggressive approach comes with a lot of risks as your enemies are capable and if they spot you will take you out pretty quickly.
The upgrade tree in Vampire: The Masquerade - Justice
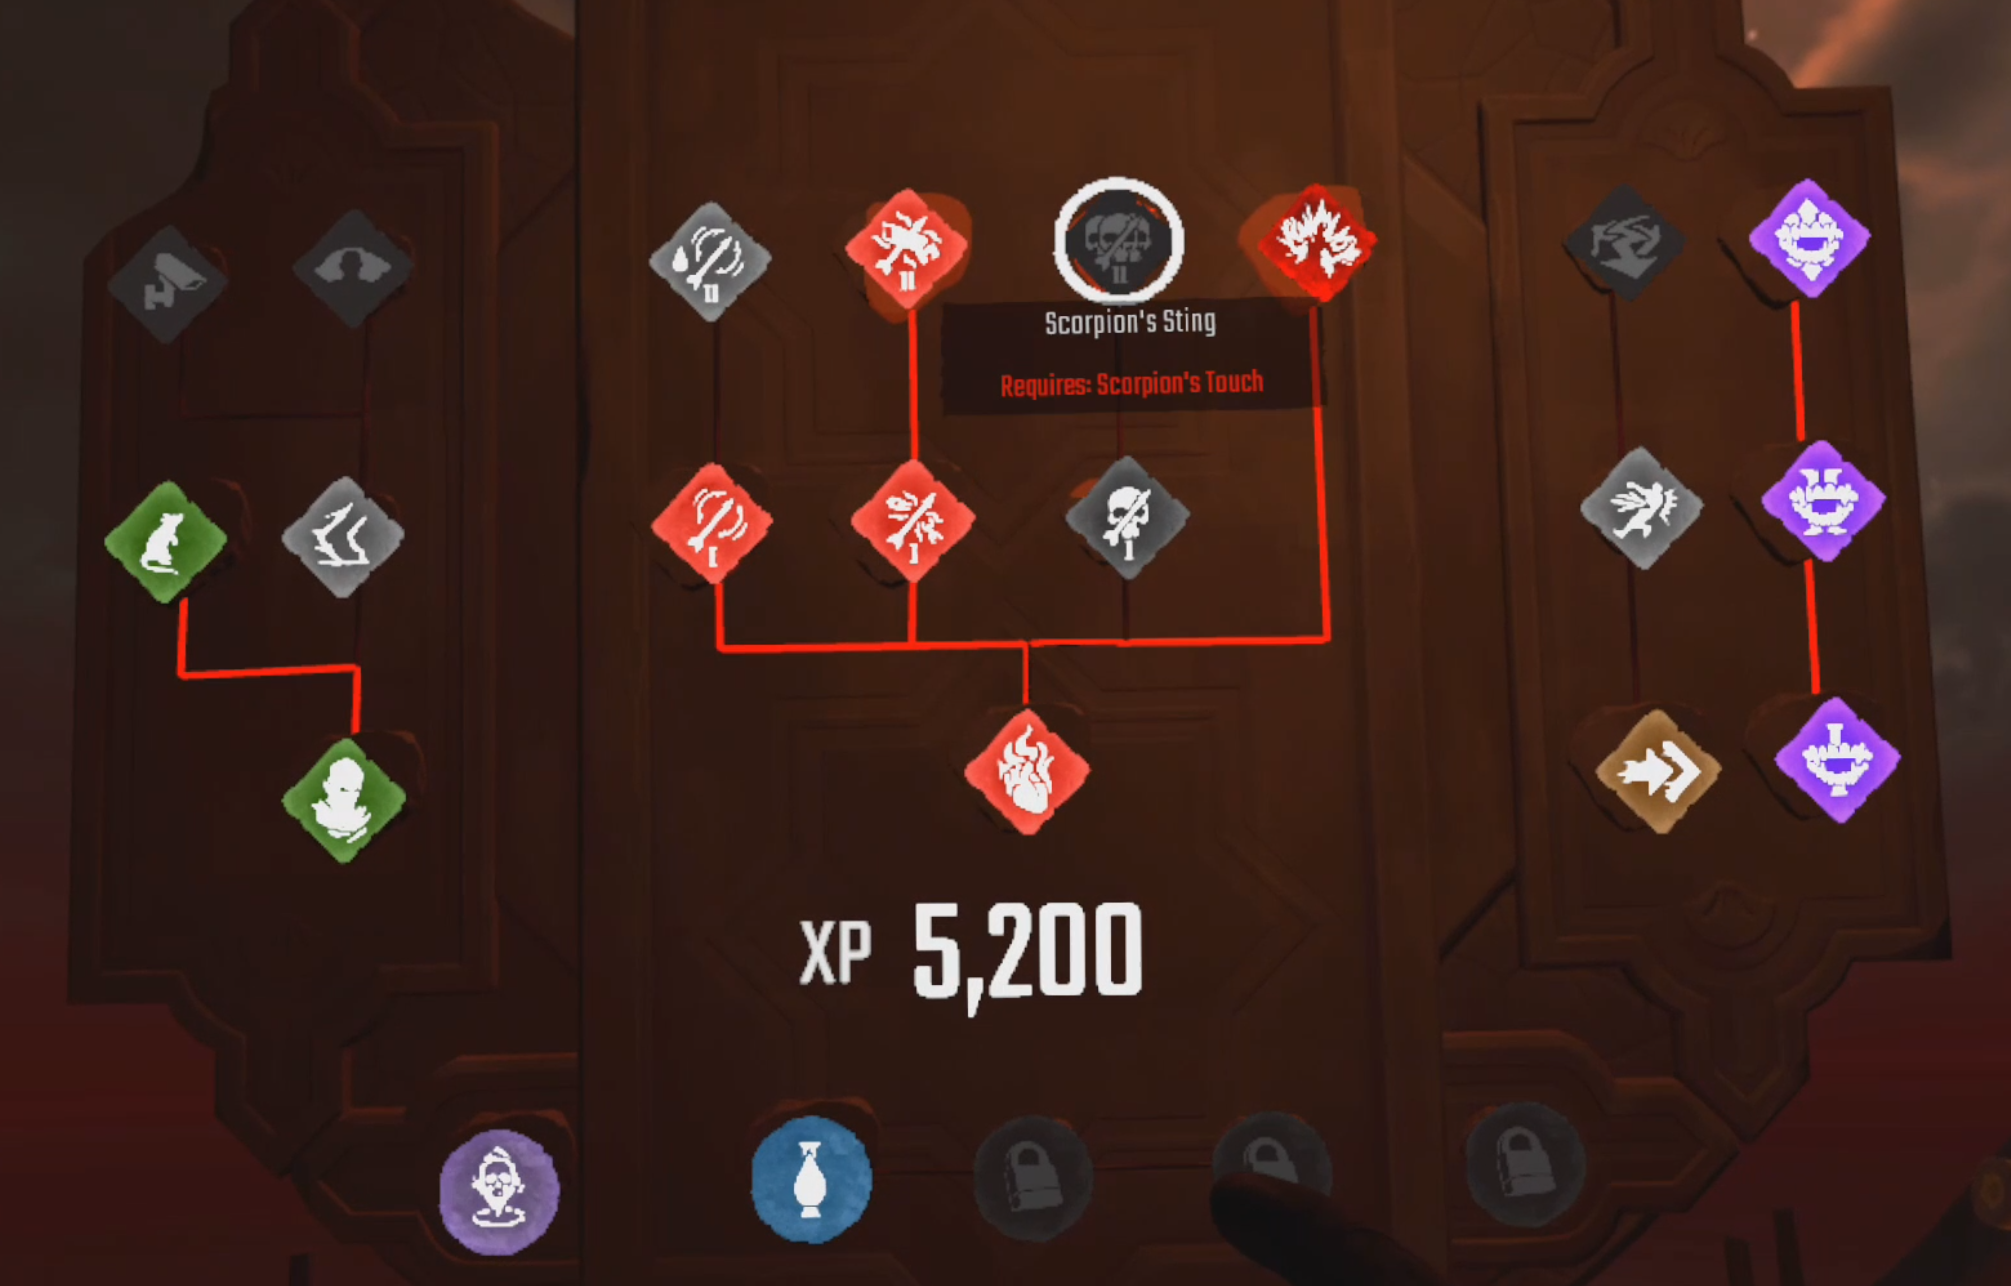
Speaking of options, there's an upgrade tree, and the choices of which upgrade to take were pretty compelling, and you'll always want more upgrade points which really incentivizes you to look for collectibles or complete optional objectives for more.
Even at the end of the game I still want to find out what other abilities and upgrades I could use.
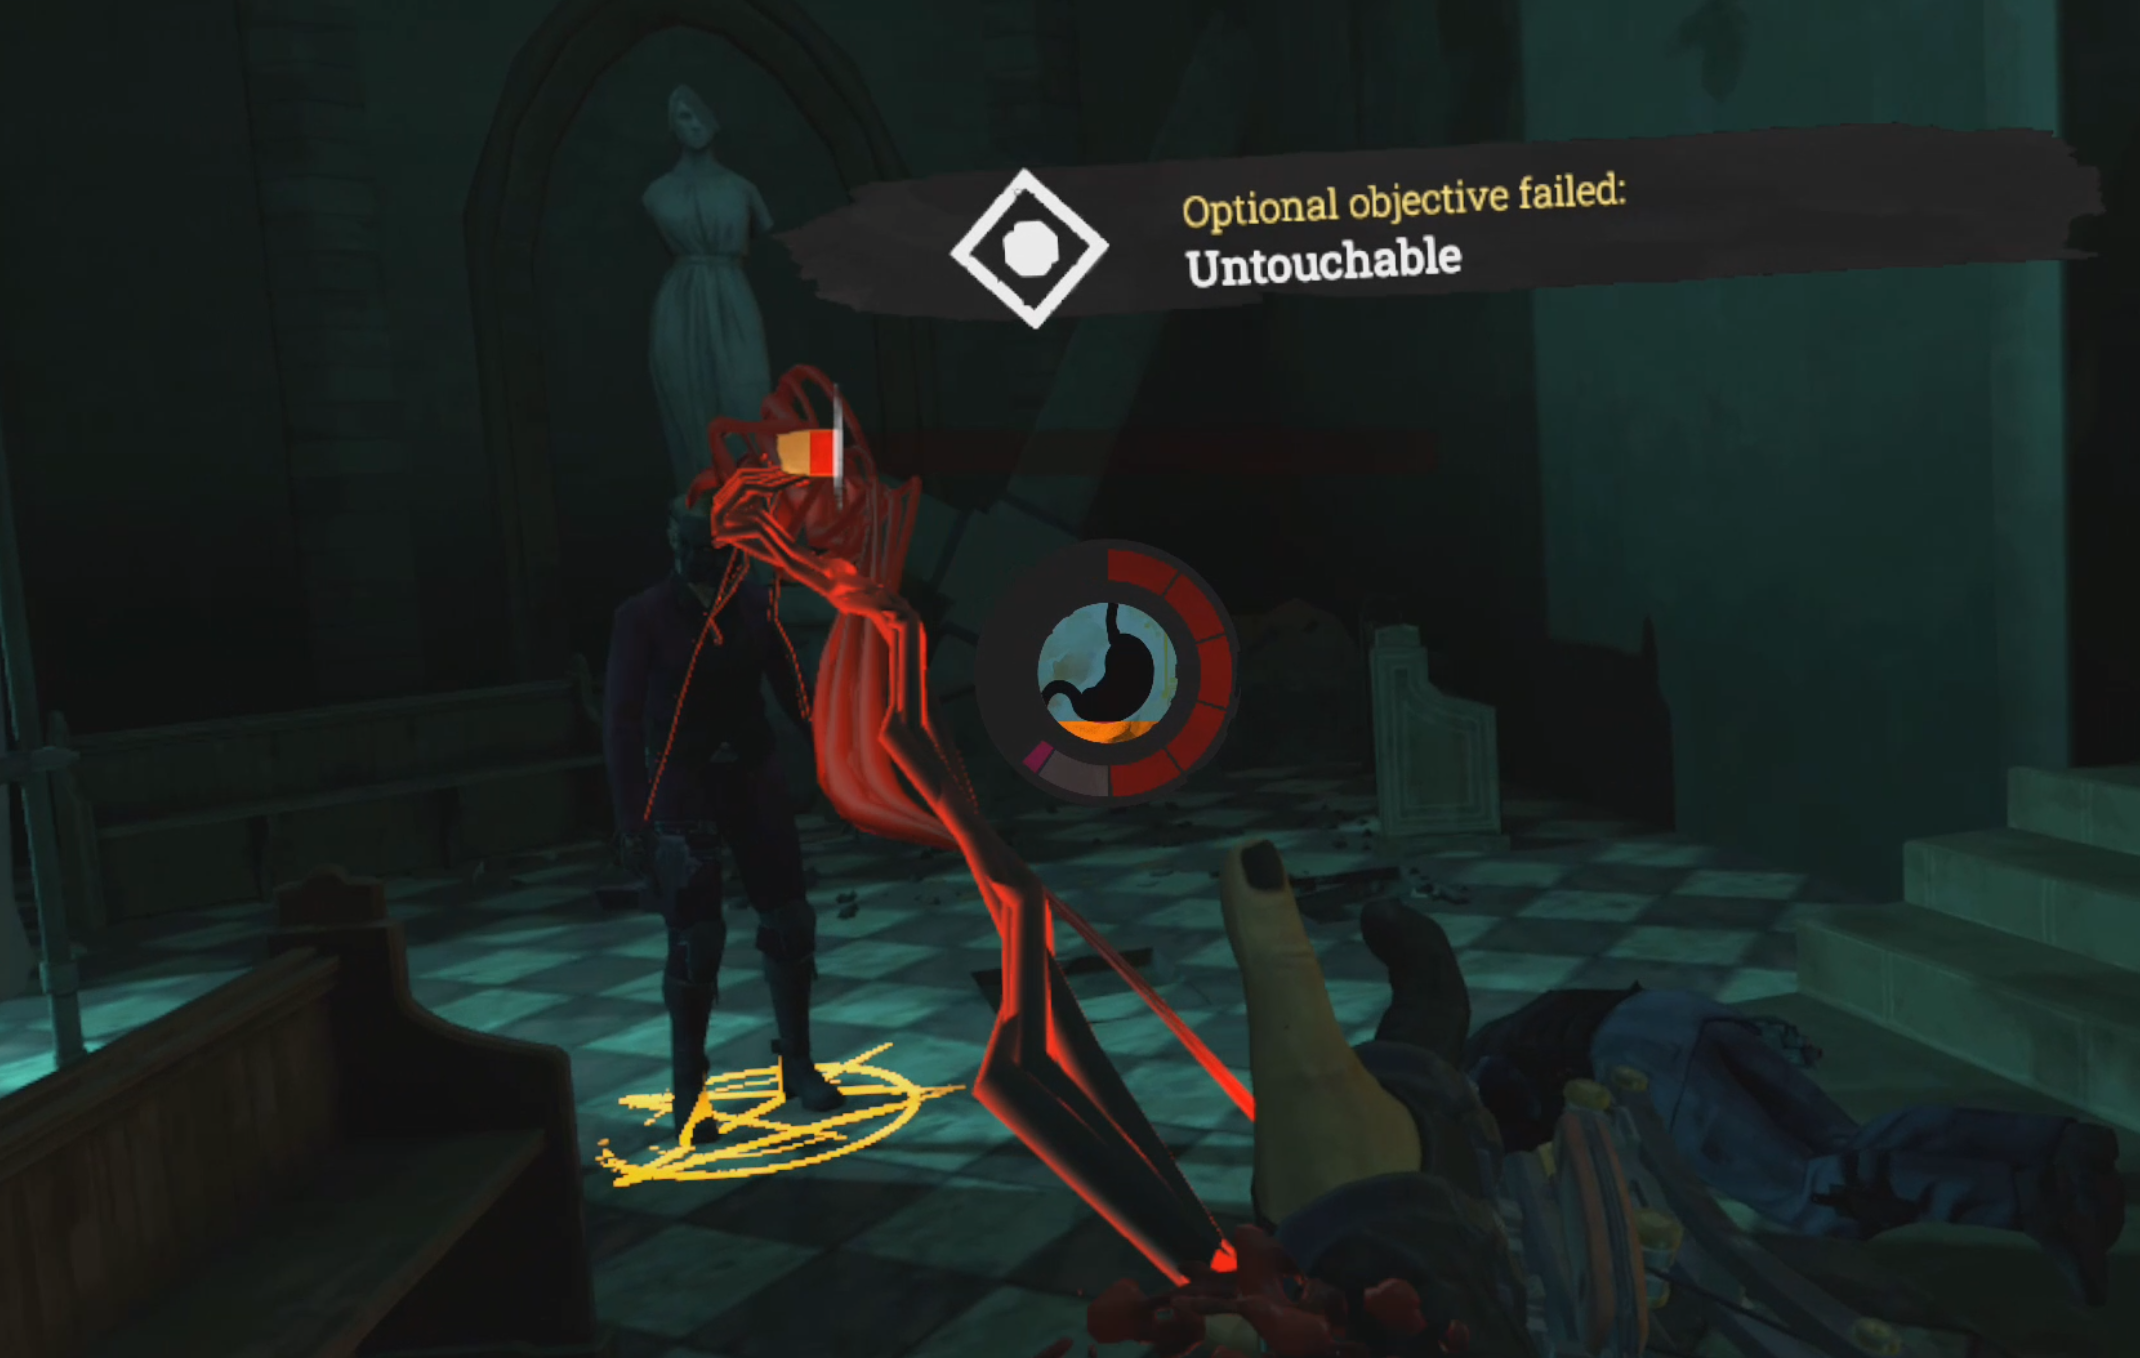
The optional objectives did occasionally make me want to replay a mission later as well, which is a good sign. Though there is sometimes an optional objective to do a mission without killing anyone, and that feels pretty dumb.
Most of your abilities are aimed at murder, you are a vampire assassin after all, and not using those abilities for the pacifist optional objective feels so limiting and takes away most of your options in a given situation.
Using an incredible vampire ability on a poor guard
It feels like a disjointed design choice, and so do other parts of this game as well. For instance the snipers that appear only at the beginning and end of the game, and the boss fights.
There aren't many boss fights, and they all take away most of your abilities and reduce you to your blinking teleport and your punching. Try as I did I couldn't find any other ability that did anything in the boss fights, and that also felt very limiting.
My upgrade choices didn't matter, and neither did my skill at most of what the game had me doing, sneaking and assassinating.

Dodging these is most of what you do in boss fights
Speaking of choices that don't matter, let's talk about the story. Vampire: The Masquerade - Justice bills itself as a story driven game that lets you explore Venice and make choices in the seedy back stabbing World Of Darkness setting.
It doesn't really do that, if you want to come to this game to have fun in the world of vampire power politics, then don't expect much of that. The focus of this game is the fun assassination and sneaking gameplay.
Without spoiling too much, you rarely get choices, and even sinking some ugprade points into Intimidation skills didn't help that much either.
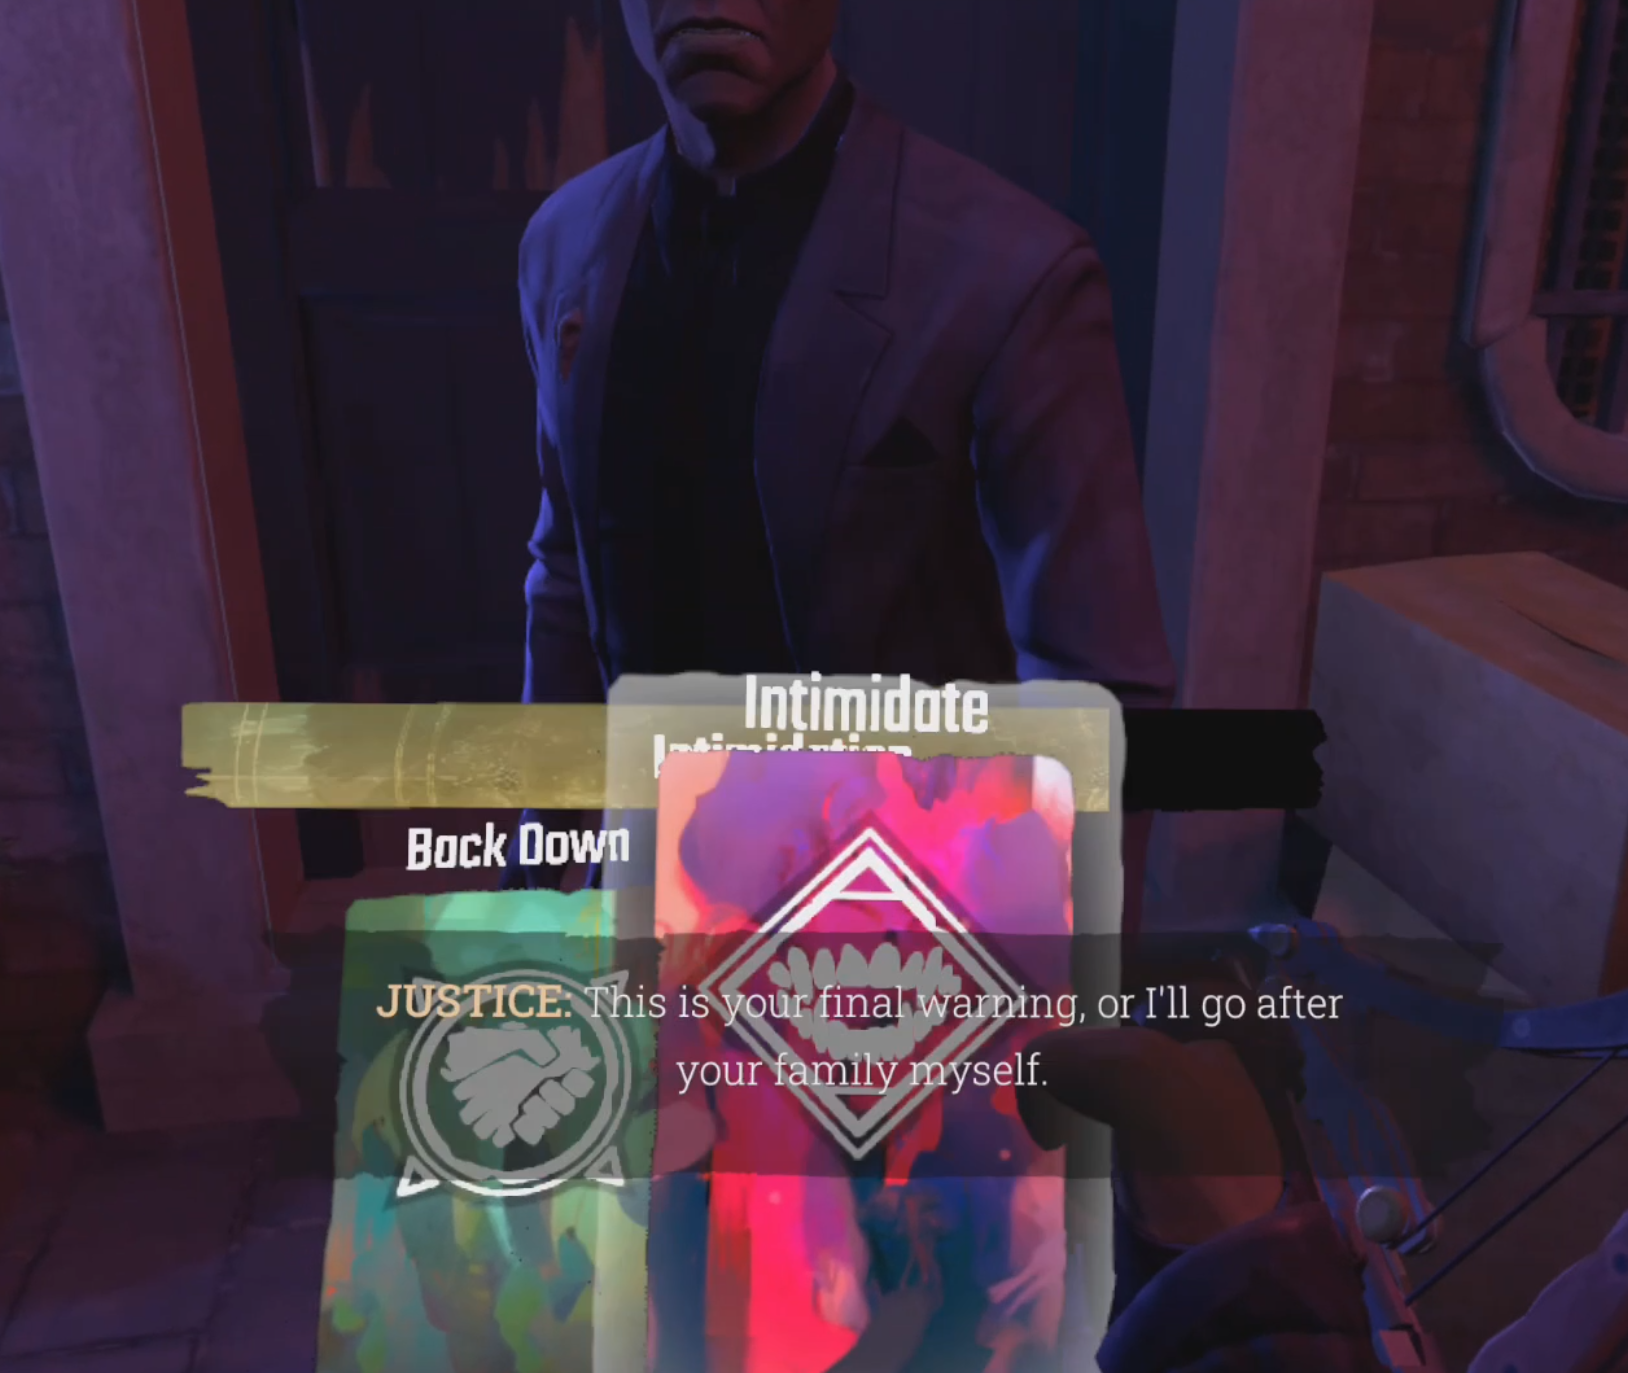
Intimidating for an extremely minor advantage
Your choices really come down to being nice to people or being mean to people, which isn't much choice at all.
Only a couple of times did I notice actions I took in the game changing things later in a throw away line of dialog or a slight difference in a mission.
Maybe my choices were changing things more than I thought, but I didn't really notice that my limited decisions had any effect on anything.
Mostly events just happen to you, and those events are pretty flat.
So are the characters. Your buddy Pietro helps you out, and all the other Vampires are opponents that aren't really sympathetic or deep at all. Except maybe for one, but I never had the chance to take their side.

Despite not being very interesting Pietro is pretty great
This ties into the big twist that clearly meant to feel like a twist, but didn't.
Overall the most disappointing thing in the entire game was at the end where what should have been a big choice on how to treat all the main characters, but that didn't happen.
Their fates were already decided. Maybe my actions earlier had predestined that, but it would have been good to have some indication if that was the case.
The gameplay was pretty awesome though, and the feeling of sneaking through an area and picking off the hapless opponents one by one, or the scary thrill of running away or trying to not be destroyed in a tense fight was fantastic.
This screenshot from the Vampire: The Masquerade - Justice summarizes this entire review
Vampire: The Masquerade - Justice delivers in its gameplay promises, though it does stumble from time to time when it loses focus of what makes it a fun game.
All in all I'd give it a B. If you really love the World Of Darkness or want to do some sneaky assassination as a vampire, then this game is an easy recommendation.
If you're looking for a deep story where your decisions have consequences or you're looking for a more head to head combat focused experience then look elsewhere.
If you've got some thoughts on this game yourself feel free to leave a comment.

Into The Radius Walkthrough And Guide - The Second Mission - Total Recall
Stuck in Into The Radius? Wondering where to go and how to get there for your next mission?
Well don’t worry we’ve got you covered with this walkthrough and guide for Into the Radius VR.
Here we’ll be talking about the second mission that you get in Into The Radius, Total Recall, which has you delving further into Pervomay Route, fighting new enemies, and dealing with new anomalies.
Stuck in Into The Radius? Wondering where to go and how to get there for your next mission?
Maybe you would just like to see what is in store for you before you get there, or you’d like to know if you’re properly prepared for your next mission in the Pechorsk Zone.
Well don’t worry we’ve got you covered with this walkthrough and guide for Into the Radius VR.
In this Into the Radius walkthrough we’ll detail how to progress through the main story “Top Priority” missions, with a couple of guiding tips thrown in here and there to make your adventure smoother.
The focus of these walkthroughs will be the story missions, but we’ll throw in some general gameplay tips and other useful loot locations near your objectives.
These articles will also assume you’re playing the game on the Normal difficulty mode with Tutorials turned on, which is highly recommended for your first playthrough. This walkthrough will still be useful if you’re playing on Realistic difficulty, but some details like vendor prices or enemy placement and numbers will be different.
Here is every article in our complete Into the Radius VR Walkthrough:
Into The Radius Walkthrough And Guide - The First Mission - Equipment Retrieval
Into The Radius Walkthrough And Guide - The Second Mission - Total Recall
Into The Radius Walkthrough And Guide - The Third Mission - Fixing A Leak
Into The Radius Walkthrough And Guide - The Fourth Mission - Flash In The Dark
Into The Radius Walkthrough And Guide - The Fifth Mission - A Probing Move
Into The Radius Walkthrough And Guide - The Sixth Mission - The Intrusion
Into The Radius Walkthrough And Guide - The Seventh Mission - A Farewell Feast
Into The Radius Walkthrough And Guide - The Eighth Mission - Kids Playground
Into The Radius Walkthrough And Guide - The Final Mission - Ouroboros
Here we’ll be talking about the second mission that you get in Into The Radius, Total Recall, which has you delving further into Pervomay Route, fighting new enemies, and dealing with new anomalies.
The Second Mission - Loadout
This walkthrough picks up where our previous one left off.
You’ve completed the first mission, gotten security level 1, and done the training in the shooting range.
What you may have already noticed is that your bedroom has some new and very useful items in it which you’ll want to take.
First on the bedside table is a detector and a Regen artifact.

The free Detector and Regen artifact on your beside table
As you were taught in the shooting range tutorial, you’ll need the detector to find and reveal artifacts.
You will always want to bring a Detector with you into the zone, so make sure to pick it up and preferably put it on one of your body slots like one of your shoulders.
This way you can hear it ticking when you’re close to an artifact and can quickly whip it out and put it back away.
The Regen artifact is a more rare tool, and while the one on the table isn’t in the best of shape, it’s still a great source of healing that can top off your health when you’re not hurt enough to justify using a healing syringe.
Even better you can now find a free double barreled sawn off shotgun on top of your mission terminal.

The free sawn off shotgun on top of your mission terminal
It also comes with a box of shells, and hopefully you found some other shells while off on the first mission to supplement them.
While buckshot isn’t very effective at longer ranges, it is great for taking out fragments and phantoms.
You can store the shotgun behind your right shoulder, where you can quickly take it out for use in combat. It can also hold reserve shells in the shell holders on its side.
While you’re at your base it’s also highly recommended that you get some cleaning supplies and clean out your Makarov, the cleaning rod and paper can be found in the “Weapon Cleaning” category and are very cheap.
More importantly if you haven’t found a Pocket Lamp then you should buy one. While you’ll be replacing it later on it’s also cheap, and is an easy way to mount a light on your body so that your hands are free.
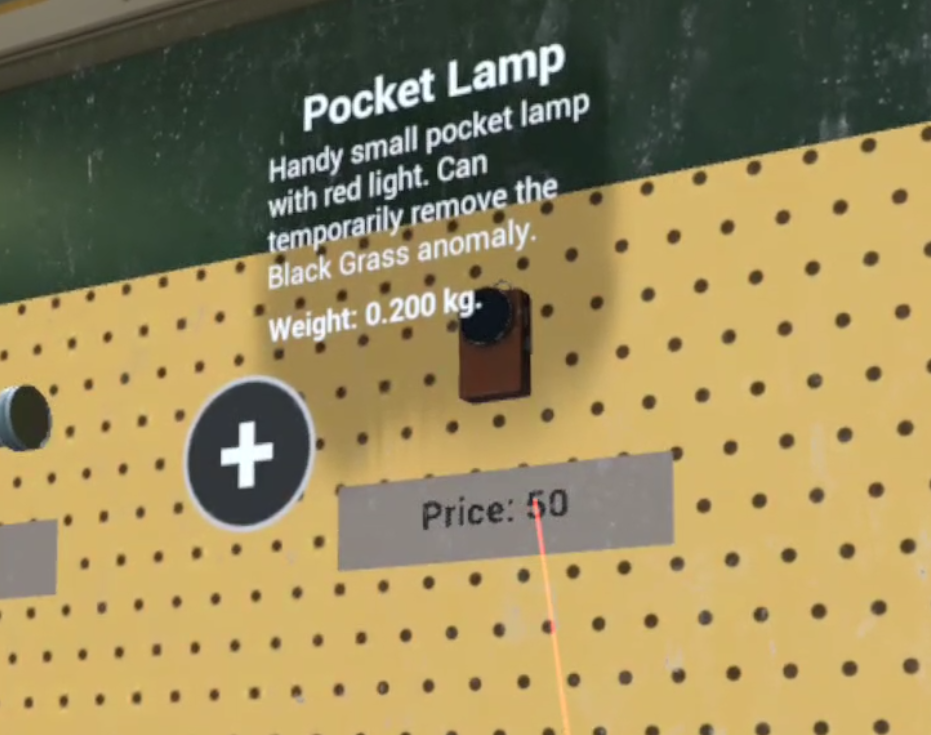
The Pocket Lamp in the store in Into The Radius
It can be found in the “Survival Equipment” category and can be turned on and then placed in a shoulder slot.
It will then shine a light directly in front of you, so it will light in front of you wherever your body is turned and doesn’t need to be held in your hand to do so. Very useful.
As for your loadout you still don’t have many options. You can spend what money you got from your first mission, and from selling anything you don’t want or need, on a limited selection of new weapons.
The Glock 17 pistol, the GSH-18 pistol, and the short barrelled PPSh are the most noteable options. If you’re truly struggling then they’re all solid upgrades to your Makarov and sawn off shotgun.
Though at least for your first try I’d recommend that you try to do this mission with just your Makarov and shotgun that you already have. You’ll need the money that you’ve got later for other upgrades, and when you get your security level to 2 in the mission after this one you’ll have even better options.
Also I’ll be showing you how to get a Glock 17 easily in this article, and at some point how to find an upgraded TT-33 pistol in practically mint condition.
So this loadout is maybe a little frugal, but you can certainly complete the second mission with it. Bring some spare shells for your shotgun and spare ammunition, as well as three spare magazines for your Makarov.
You’ll also want to bring at least one healing syringe and the regen artifact. If you’ve still got two syringes you might as well bring both just in case. You can also buy more if you need them.
An example loadout for the second mission - Total Recall
Not pictured is the equipment on your body. Make sure you’ve got the probes you started the game with, a combat knife, a detector, and a pocket lamp.
The probes and knife are good to have easily accessible on your arm slots, while the Detector and Pocket Lamp can go on your shoulder slots. If you prefer a different way of storing and using your items then go for it. Part of the fun of Into The Radius is customizing your equipment as you like.
The Second Mission - Total Recall
When you’re ready accept the mission from your terminal and make your way out to Pervomay Route just like before.

The mission briefing for Total Recall
Check your watch and keep in mind that, depending how long you took on the last mission, it might get dark soon.
You can always go back and sleep until morning (7 AM) if it is late and you don’t want to be out at night. you’ll probably have plenty of time though.
Once you’re out there take a look at your map and get your bearings.
You’ll see that the mission marker is inside a walled compound near the center of the area.

The route we will take to the mission objective
We’re going to be roughly following the route on the map above. Just like in most Into The Radius missions there are multiple ways to get to a given area.
You could also go north east through the woods and enter the rear of the compound from there to get to the objective more quickly. The route we’ll be taking in this guide is meant to optimize the amount of loot that you’ll bring back home with you.
Every one of these Into The Radius walkthroughs for the main missions will take you along a prescribed path. Usually this path will be the most direct and conflict free one possible, but for the Second Mission you’re really going to want some extra cash and loot to help you with your start to the game.
Anyway now to really begin, start off down the road towards the first mission, but this time when you take a right go through the big rift in the ground that split the blockhouse in half.

The rift that tore the blockhouse in half
You won’t have to worry about anomalies until you reach the end of the rift, but once you do, get your probes out.
There’s a ton of anomalies in the crater covered field beyond the blockhouse, but as usual when there are a ton of anomalies, there are artifacts.

Entering the anomaly field and throwing probes
As mentioned earlier, there are definitely easier routes to the objective for the second mission, but this is a very good chance to get some experience with parts of the game that you’ll need to know how to overcome later on… oh and get some money too.
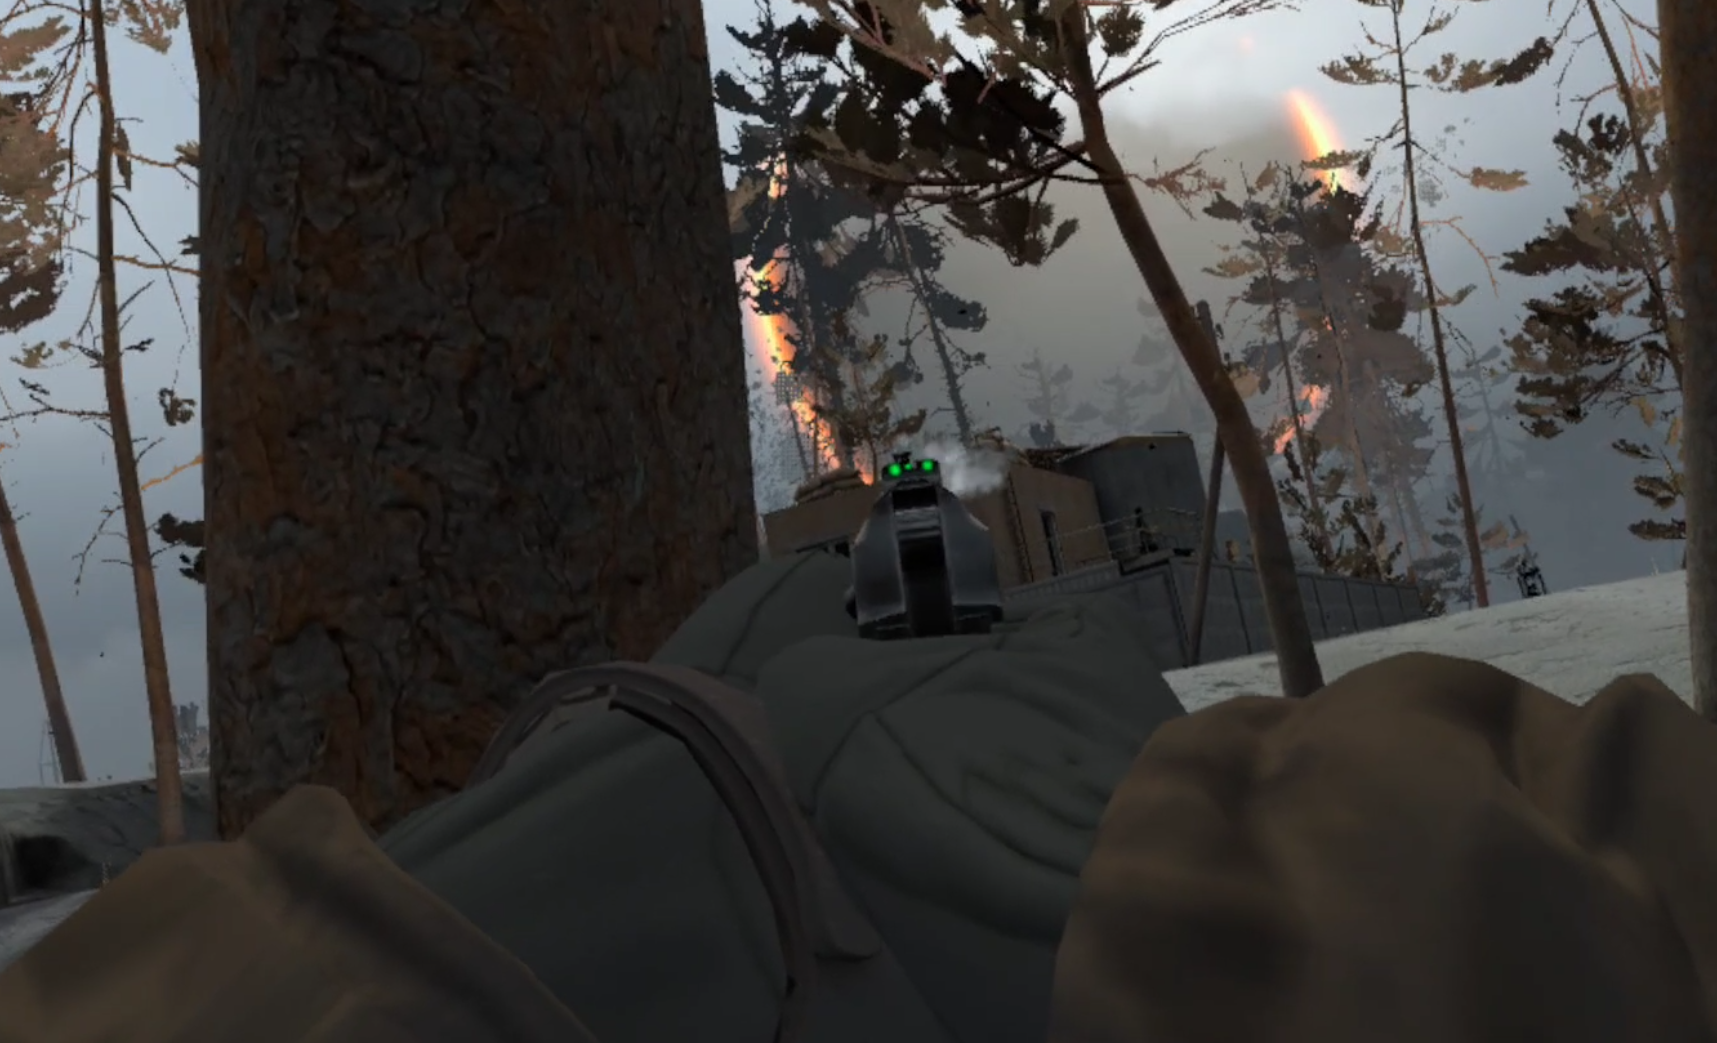
So use your probes, take your time, and work your way through the anomalies. Be especially careful of the white orbs. They’re called Reflector anomalies and will shoot out some sort of energy back in whatever direction a probe hits them.
Your detector should start beeping near the hump in the ground in the middle of the anomaly field. Use it like you did in the tutorial.
The Detector beeps faster when you’re close to an artifact, and when it’s pointed in the direction of an artifact the light will turn more green.
There’s also a guide on how to hunt for artifacts if you’re having some trouble.

Anomalies surrounding the artifact in the crater field
Find the artifact in the field or don’t, it’s up to you, but artifacts do sell for a good deal of cash you’ll be needing later, and learning how to find them now is easier than learning later.
When you’re past the anomaly field you’ll want to head towards the trees on the other end of the craters. The next place you’re headed is the building just past them.

The building past the trees that we’ll head to next
This building will have another new enemy type that you haven’t encountered before, the Mimic Policeman.
They will be your first encounter with firearm equipped enemies, though luckily they only have a Makarov pistol.
Still, that makes them pretty dangerous when you’re just starting out, you’ll most likely see this mimic policeman on the roof of the building.
If you’re a good shot you can take them out from the trees with your Makarov. If you’re not a good shot then your best bet is to either run towards the wall surrounding the building before they notice you and take your shots from there.
You could also go up the stairs leading to the roof, climb the ladder, and take them out from close range by hanging on to the ladder with one hand and using your Makarov with the other.
Sniping the Mimic Policeman with a Makarov
What makes these other options dangerous is that there are also Fragments and Phantoms hanging around the building, and the sound of gunshots will attract more from nearby.
If the firefight doesn’t go your way you can always pull back to the edge of the crater field and take cover behind the boulders there. The Fragments and Phantoms will follow you and you can take them down without worrying about the policeman on the roof.
However you get rid of the policeman and clear the building, once it’s clear you’ll probably find at least one crate around it on top of the dumpster at ground level, or on top of the roof.

A randomized loot crate that may or may not be there
The inside has some potential loot as well inside the cabinets and drawers. There is also a chance that your detector will start beeping due to a Rift Anomaly.
The shooting range tutorial told you about them, they will respawn enemies if left for too long, so if your detector beeps find the Rift and hit it with your knife to destroy it and get a Shard artifact to sell.
You also might hear more Fragments and Phantoms approach while you’re looting, take them down as they come. If you’ve arrived prepared you should have plenty of ammunition.

A rift inside the second story of the building
When the area is clear take a chance to get your bearings. Make sure your weapons and spare magazines are fully loaded. Check your health and hunger.
Check the time, if it’s getting late and the sky is getting darker you may want to retrace your steps and head back if you don’t want to explore at night.
Night time does have the plus of making you harder to see, but it also has the downside of making it harder for you to see. Your pocket lamp on your shoulder does making lighting more convenient, but it also makes you a shiny target in the middle of a dark night.
If you want to wait until morning or get more ammunition or other supplies then head back to Vanno the way you came. None of the enemies will respawn until the Tide comes in (assuming you destroyed any rifts in the area).
When you’re ready to keep pushing head out of the building and head out to the road running beside it. Turn back towards the crater field and you’ll see a broken down car at the intersection there.

The crashed car with the stash of ammunition
This car is a stash, and you may or may not have found the note hinting at it earlier on.
Inside of it underneath the seats are a ton of ammunition boxes of various types. Take all of them. The more ammo the better.
If you’re having a hard time finding the car here’s where it is on the map.

The location of the car on the map
You can also skip it if you like and just head straight to the compound that you can see to the northeast of it where the “M1” symbol is.
That’s where you’re headed next. There are some anomalies scattered about, and a pretty thick field of them at the road intersection in front of the main entrance.
You can go in through the gate or one of the broken sections of the wall surrounding the place.

A back way into the compound through the broken wall
However you enter the base make sure you’re ready for a fight.
There is another Mimic Policeman hanging out in the area. Though they might even have been drawn outside of the walls by noise earlier, and there’s also the possibility of Fragments and Phantoms as well.
This policeman will be much easier to deal with than the last, because he’ll be on ground level with you and won’t have such an easy time seeing you coming.
However you deal with the enemies and get inside the base you’ll hear your detector ticking. That’s because inside one of the hangars is another Rift Anomaly.
The rift in one of the hangars. There is a handheld flashlight on the ground if you need it
See that grass spread out around it? Well that’s no regular grass. That’s the Black Grass anomaly.
It will hurt you if you touch it, but will temporarily shrink if light is shone on it. See that flashlight? Well take it for now as it will be really helpful here.
You can always shoot the Rift and try to distance grab the Shard artifact that it drops. Either way it’s a good time to familiarize yourself with how Black Grass works. You’ll have to deal with more soon.
Oh, you’ll also see your friend near the entrance of the base if you haven’t already.

Your friend hanging out at the base
Touch her to get some more background dialog. There’s also a note and some loot in the basement of the ruined brick building behind her.
That’s not your mission objective though, the film you came here for is inside of the long building opposite the two hangars. The entrance to this building is right beside the front gate.
Once you’re in there’s a black statue that gives you some dialog, and in the main hallway is your last obstacle to the film.
More Black Grass.

Black Grass is your final obstacle in the mission
The hallway is chocked full of the stuff, so hopefully you got that flashlight from the hangar.
While you can make your way through with just a pocket lamp it will be much easier with an extra source of light.
If you’re playing Into The Radius on PCVR you can always turn the flashlight on and leave it on the ground, which will keep shining on the Black Grass and leave a clear path.
Unfortunately standalone Meta Quest versions of the game will turn off the flashlight once you drop it.
Focus on the grass on the right. You’ll want to disable it and then quickly dash past it into the first doorway on your right.
If you’re fast you won’t take much damage even if the Grass does regrow too quickly. Though it is very possible to get through without being hurt at all.
Once you make it through the doorway the film is on top of one of the desks.

The film that you came here for sitting on a desk
Grab it, and if you like loot the rest of the building. There’s usually some decent stuff lying around.
Though you’ll have to make your way back through the Black Grass to exit the way you came in.
You can go back to Vanno to turn in the Film and complete the mission, though if you’re willing to stay for a little longer there’s a free Glock 17 stash inside of the base.
It’s on top of one of the Red fuel tanks at the northeast end of the base, beside one of the hangars.
You can’t jump in Into The Radius VR, but there is a convenient ramp going up to the top of the beat up awning that is right beside the tanks.
The way up to the awning over the G17 stash
Once you’re up there go to the edge that hangs over the fuel tanks and look down. You’ll see the G17, a magazine for it, and a box of ammunition sitting on top.
To get to them run off of the edge of the awning towards the fuel tank. If you miss and hit the ground just try again. Be careful of fall damage if you’re low on health though.
The G17 stash on top of the red fuel tank
The Glock and magazine are in very rough condition, but you can always repair them using the terminal that you do deliveries with back at base.
Loot and Film in hand, head back to Vanno the way you came to sell your loot, repair your weapons, and complete the mission by turning the film in just like the watch from the first mission.
Congratulations on completing the second mission! We’ll talk about what you’re going to need to do next, repeatable missions, and some more great places to explore and stashes to find in Pervomay Route in Part 3 of our Into The Radius VR Walkthrough.