


Arc Raiders Ultimate Skill Tree Guide 2026: Best Perks And Skills
With the addition of respecing, now is the perfect time to figure out what skills are actually worth your precious points — and which ones you should skip.
Let’s break down the arc raiders skill tree in this guide so you know what to pick first and why.
Arc Raider’s skill tree is one of those things that sounds good on paper but often leaves you wondering, “Does this actually do anything?” The game doesn’t do the best job explaining what perks really do, and until recently — before respecs were added — you were basically stuck with your choices forever.
With the addition of respecing, now is the perfect time to figure out what skills are actually worth your precious points — and which ones you should skip. I spent hours testing these skills properly, including comparing footage and real in‑game results, so you can save time and build smarter.
Let’s break down the arc raiders skill tree in this guide so you know what to pick first and why.
It is recommended you pair this guide with the Arc Skill Tree Builder.
You may also be interested in:
ARC Raiders Guide: Where to Find Apricots & Lemons for Scrappy Upgrades
Arc Raiders Blueprint Guide – Quest Rewards, Best Loot Containers & Pro Tips
Arc Raiders Ultimate Skill Tree Guide 2026: Best Perks And Skills
Conditioning Skills — Strength & Utility
Conditioning focuses on hiking stamina, reducing penalties, and general combat utility. Some skills are surprisingly useful; others… not so much.
Worth Taking (Mid to High Value)
Used to the Weight: Reduces movement penalty from carrying heavy shields. It feels better in play and helps keep your movement less clunky when running good kits with shields. This perk also makes Heavy Shields much more viable.
Proficient Prior: Speeds up breaching doors and containers — saves real time across a raid. Especially since you are noisy and vulnerable while breaching.
Fight or Flight: Regains a bit of stamina when damaged — situational but decent.
Downed but Determined: Extends your time downed before collapse — huge in team play since it gives your team mates more time to pick you up when you are downed.
A Little Extra: Drops free crafting resources once you breach a container. Since this is only a single point and more loot is always better this is a good perk.
Situational / Lower Value
Blast: Reduces explosive ringing — often too small of a difference to matter in real combat.
Gentle Pressure: Slightly quieter breaching — barely noticeable.
Survivor Stamina: Slight stamina regen when hurt — rare to benefit.
Effortless Swing: More melee swings — but usually not impactful in actual combat. Melee fighting is situational at best
Unburdened Roll: Situationally useful, though it is useful. Gives you an extra roll when your shield is broken.
Turtle Crawl: Take less damage when downed, but not by enough to be generally useful.
No‑Go Skills
Sky Clearing Swing & Fly Sweater: Supposed melee buffs that just don’t pan out. Using melee, even against ARC, is just riskier and inefficient and not worth investing points into.
Back on Your Feet: Health regen after critical injury is too slow to ever help.
Mobility Skills — Speed, Movement & Stamina
Mobility is one of the strongest trees overall. It’s all about speed, stamina efficiency, and movement options. Moving farther faster is always crucial.
Top Tier Mobility
Marathon Runner & Youthful Lungs: Instant favorites — more stamina and longer sprinting feels great and makes you more survivable.
Effortless Roll: Dodge rolls cost less stamina — huge quality‑of‑life improvement.
Heroic Leap: Another good improvement to dodge rolls if you use them often, hard to notice, but it can make the difference in close quarters.
Calming Stroll: Great for traveling long distances or if you like to keep your stamina topped up.
Solid Picks
Nimble Climber: Faster climbing and vaulting; decent value even if not flashy. Anything that makes you faster is always good.
Carry the Momentum: After a sprint dodge, sprint without stamina cost for a bit — nice addition and worth 1 point.
Crawl Before You Walk: Faster crawl — feels okay in clutch downed situations. Good for team play to get to cover so your teammates can revive you.
Vigorous Vaulter: No slowed climbing/vaulting when exhausted — this is a big deal situationally.
Lower Tier / Skip
Slip and Slide: Too subtle to notice. The 5 points for this skill are not worth it even if you slide constantly.
Sturdy Ankles: Minor fall damage reduction. Can be useful, but probably not worth 5 points.
Off the Wall / Heroic Leap: Janky, tiny benefits that aren’t worth it alone.
Ready to Roll: Timing window extension feels useless. Not worth it.
Big Mobility Bonus
Vaults on Vaults (and Vault Spring after that): You’ve likely heard about this — improving your vaulting movement makes traversal feel smooth and fun. If you go deep into mobility, these are worth it for playstyle enjoyment. If you go to the top of mobility then these two perks are the reason why. If you don’t want them then put your points in another tree after the first half of the mobility tree.
Survival Skills — Looting, Sustain, & Carry Capacity
Survival specializes in efficiency and sustain: loot bonuses, stamina regen, and carry weight.
High Value Survival
Looter’s Instinct: Slightly faster looting — saves many seconds over many actions. Always good.
Broad Shoulders: More carry weight — massive asset to avoid encumbrance.
Looters Luck: Chance to reveal two loot items at once — fantastic time saved over many raids. Always good.
Good as New: Better stamina regen while healing — small but helpful. Worth 1 point.
Security Breach: Looting lockers — can be good but inconsistent. These lockers were nerfed so they aren’t as good, but more loot is more loot.
Decent or Situational
In‑Round Crafting & Traveling Tinkerer: In Round Crafting is fantastic to create bandages and shield rechargers in raid. Traveling Tinkerer gives you more options but they are rarely that useful. Not bad for a point or two.
Revitalizing Squat: Okay, but only if you make sure to crouch and hide when you are regenerating stamina. Can be useful for running from cover to cover.
Minesweeper: Great in theory but hard to use. When encountering traps in combat you generally don’t have the time to make use of this. Situationally useful.
Skip or Low Value
Agile Croucher: Crouching speed increase rarely needed unless you crouch walk a lot.
Silent Scavenger / Suffer in Silence: Negligible audio effects, not worth priority points. You can still be heard even if maxed out.
Stubborn Mule: Minor stamina benefits while encumbered. Generally it’s better to just not be encumbered, but if you are a lot this can be worth it.
One Raider Scraps: Doesn’t seem to produce meaningful loot.
Three Deep Breaths: I can’t even find a difference or know what an “ability” is.
Skill Tier Summary (Short Version)
If you just want the gist, here’s a quick feel of how each tree shapes up:
Mobility = Very Strong
Conditioning = Solid Support
Survival = Great for getting more loot and crafting in raid
Best Arc Raiders Skill Path — Leveling Order
Here’s a friendly suggested route for leveling up your skills in Arc Raiders. No tables — just easy prose and bullets:
Early Levels (1–11): Get Mobility Rolling
Start with Nimble Climber (1 point)
Pump all points into Marathon Runner (5 points) and Youthful Lungs (5 points)
This gives you more stamina and better movement early — super noticeable in play.
Next Decisions (Level 12+)
Now you hit a fork in the road. You can push further in Conditioning or pivot into Survival.
If You Want Speed & Combat Fluidity First:
Head back into Conditioning
Grab 1 Slip and Slide 1 Sturdy Ankles and Calming Stroll
Get Effortless Roll and Heroic Leap
1 point in Crawl Before You Walk and then Vigorous Vaulter
Put 5 more points into skills to get 36 total (up to you but, but maxing a skill is better than putting a few points in multiple)
Get Vaults on Vaults on Vaults / Vault Spring
If You Prefer Carry / Loot Benefits Early:
Dive into Survival
Go straight for In Round Crafting.
Then max Looter’s Instincts.
Agile Croucher or Revitalizing Squat to get the first two perks Suffer in Silence and Good as New
Get Traveling Tinkerer since it is only 1 point
Max Broad Shoulders with 5 points then Looters Luck
Max Stubborn Mule and do whatever you want with the next 2 points
Get Security Breach and Minesweeper
This is especially worth it if you’re looting and hauling tons every raid.
Get Conditioning Skills Last (or after getting the first tiers of other skills, it is up to you)
Max Used To The Weight or Proficient Pryer first before getting Unburdened Roll
On the second tier of the tree get A Little Extra and Loaded Arms before anything else
Deep Build Options (Mid‑Late Game)
Once early goals are met:
If you love movement, push Mobility up to unlock Vaults on Vaults and Vault Spring — these make traversal delightful.
If you want late‑game survival, get deeper skills like Security Breach and more crafting perks.
There’s no one perfect build, just trade‑offs. Do you want to zip around like a ghost, or carry everything with ease? Either path is valid — it’s about how you like to play.
Here is a recommended final build, but this is just one way to do it. While some choices are no brainers (like going mobility for the first 12 levels) there are plenty of options later on that depend on preference and play style. Have fun out there raider!


Arc Raiders Blueprint Guide – Quest Rewards, Best Loot Containers & Pro Tips
Blueprints are the backbone of progression in Arc Raiders. They unlock access to powerful weapons, grenades, attachments, and gear that shape your combat style. Whether you're looking to upgrade your arsenal or complete your dream build, knowing where and how to find blueprints is key.
If you've ever asked, “Where do I find blueprints in Arc Raiders?” or “Which crate has the best blueprint drops?”, this guide is your ultimate answer.
You may also be interested in:
ARC Raiders Guide: Where to Find Apricots & Lemons for Scrappy Upgrades
Arc Raiders Ultimate Skill Tree Guide 2026: Best Perks And Skills
How Blueprint Drops Work in Arc Raiders
Pure RNG or Pattern?
Every lootable container in Arc Raiders has a chance to drop a blueprint. From trash cans to high-security lockers, it's technically all possible. But… some containers seem to have better odds than others.
Does Looting Container Type Matter?
Players have noticed patterns: certain blueprint types seem to drop more often from specific containers. While not officially confirmed, this theory holds up with consistent community data — and it's your best bet at improving blueprint farming efficiency.
Best Containers for Specific Blueprint Drops
Raider Caches
High-priority loot source
Often includes general blueprints and valuable gear
Ammo & Weapon Cases
Known for dropping weapon blueprints like the Osprey sniper and Anvil revolver
Weapon cases are also a strong source of attachments
Residential Containers
Includes drawers, fridges, trash bins, and suitcases
Often yields Wolfpack blueprints, snap hook BPs, and attachments
Red Lockers
Absolute wildcard with a massive blueprint loot pool
Contains guns, attachments, and more — don’t skip these
Rusty Breach Boxes
Annoying to open due to breaching, but worth it
High chance of dropping grenade blueprints
Security Lockers & Keycard Rooms
Locked behind skill tree upgrades or keycards
Reward you with top-tier loot, including rare blueprints
Blackbox Containers (Blue Gate)
Increased odds for augment blueprints
Air Supply Drops & Probes
Commonly yield weapon parts blueprints (light, medium, heavy)
Blueprint Quest Rewards Breakdown
You don't always have to rely on RNG. Several quests guarantee blueprint drops:
Quest 13 – Sparks Fly: Trigger Grenade BP
Quest 14 – Greasing Her Palms: Lure Grenade BP
Quest 32 – Industrial Espionage: Burletta BP
Quest 37 – Major’s Foot Locker: Hullcracker BP + Ammo BP (must haves for fighting the queen or the matriarch)
Don’t skip these if you want specific gear — it’s a surefire blueprint unlock.
Night Raids: Hidden Boost to Drop Rates
Nighttime raids significantly increase the chance of high-rarity loot, with some estimates suggesting up to a 150% boost. That includes blueprints.
If you’re up for the added challenge, night raids are arguably the best way to farm blueprints fast.
Event Exclusive Drops – Legendary Blueprints
The Harvester Event
If you want the legendary Jupiter or Equalizer weapon blueprints, the only way to get them is through the Harvester event. This random world event includes a minigame, but the reward is worth the time.
Watch for in-game alerts or check community tools to track when and where the next Harvester will appear.
Enemy Blueprint Drops: The Surveyor
That giant rolling orb known as the Surveyor? It's not just annoying — it also has a solid chance of dropping blueprints.
Trials & Blueprint Rewards
Unlockable at level 15, Trials offer excellent blueprint potential. Achieve three stars on any trial and you’ll receive three-tiered rewards, which often include blueprint drops.
Complete as many as you can weekly — they’re worth it.
Quick Recap: Top Containers to Prioritize
If you’re short on time and want the best chances at blueprints, loot these:
Weapon Cases
Ammo Crates
Utility Crates
Raider Caches
Security Lockers
Med Crates
They’re not guaranteed — but your odds are way better here than with standard trash bins.
You may also be interested in:

Arc Raiders vs Escape from Tarkov 1.0 — Which Extraction Shooter Wins in 2025?
If you’re into extraction shooters — you know, those tense looting runs where you’re praying you make it out alive — chances are you’ve been caught in the debate:
Arc Raiders… or Escape from Tarkov?
Both games are extraction shooters, but they feel very different once you’re in the raid. One might pull you in for long, sweaty sessions, and the other might be what gets your buddies to try to extract for the first time.
Let’s break it down in real gamer terms.
The Basic Differences — Arcade vs. Hardcore
Arc Raiders
Arc Raiders is the more mainstream, accessible extraction shooter. It blends action and quick decisions with the thrill of ransom runs — but with smoother movement and tighter loot loops.
People say it feels like the extraction genre but fun, not punishing — the kind of game you pick up after work with friends, run a few maps, laugh at wild moments, then log off.
If a game like this ever goes “mainstream,” Arc Raiders is the one — it’s cross‑platform, it runs on consoles, and it doesn’t require a high‑end PC just to load in. That’s a big deal.
Most players who’ve dipped their toes into both describe it like:
Arc Raiders is its own style of extraction shooter
It won’t replace Tarkov, but it will pull players away
It’s way more casual friendly
People who aren’t hardcore will play it more often
In short: Arc Raiders is the extraction shooter that feels like it could be a regular game people hop into, not just the elite handful of players who grind Tarkov and can head,eyes someone else instantly from 100 meters. Arc Raiders gives you a chance to react to being attacked and use movement and items to have more options in what you do in a fight. It’s also much simpler to get started in.
Escape from Tarkov
Tarkov is the original hardcore extraction shooter. It’s gritty, intense, unforgiving.
In Tarkov:
Every gunfight feels meaningful
Death means losing gear — maybe your best loot
Raids are long, tense, and every sound matters
You’ll hear people talk about RPD hitboxes, scavs sneaking from bushes, and trying to hit a guy mid‑air with a .50 cal
Tarkov IS extraction shooter culture. It pioneered the intense all or nothing raid that goes from casual to making your heart pump and adrenaline spike because you found that one item you need so badly and are so far away from the extraction point. Your end can be lurking around every corner and it can come in an instant.
But it’s also:
Complicated
Harder to run on average hardware (but still manageable)
Not very welcoming to casual players
Feels kinda niche
A lot of players ask, “Can Tarkov ever really appeal to casuals?” The answer — for now — feels like no. You need patience, and time to learn the systems. That alone shuts out a huge chunk of players. Though once you learn the game well enough to feel the rush of excitement every time you try to extract… well then you are hooked and no other game is quite the same.
Head‑to‑Head PvPvE — What Feels Better?
🎮 Combat & Movement
Arc Raiders
Action‑oriented
Fast paced
Third‑person mobility
More forgiving fights
Feels more like a shooter with extraction elements — not just a straight tactical sim.
Tarkov
Slow, methodical, hardcore
Every shot counts
First‑person tension
You’ll hear footsteps and lose sleep
It’s the classic “hard core” extraction experience. You may be loaded down with loot, low on ammo, injured, and trying to limp to the extraction while praying there isn’t another PMC around the next corner.
Which is better?
For straight combat fun? Many prefer Arc Raiders.
For tactical tension that lingers? Tarkov wins.
Accessibility & New Players
Arc Raiders shines here. It feels casual‑friendly — you don’t have to memorize ammo types, and people who’ve never played an extraction shooter can jump in and still have a good time pretty quickly.
A lot of folks think Arc Raiders might be the game that introduces extraction shooters to the masses. Imagine playing with your console friends after work, just running a map, laughing at weird AI robot fights, and having fun without feeling like you’re being punished for every mistake.
Tarkov? That’s still the veteran, hardcore playground. The systems are deep — weapon mods, ballistics, health, hideout, traders — and people love that depth, but it’s not casual‑friendly.
🏁 Final Verdict — Which Should You Play?
Here’s the takeaway based on how you like to play:
🔥 Play Arc Raiders if:
You want fun, fast‑paced action
You’re not looking for hardcore simulation
You want something you can play with console and PC friends
You want a game that doesn’t punish you for learning
💀 Play Escape from Tarkov if:
You crave tactical depth
You love tension, realism, and high stakes
You enjoy the hardcore grind and complex systems
You’re ready for a challenge that’s unlike most shooters
The Bottom Line
Arc Raiders and Escape From Tarkov are both extraction shooters — but they feel totally different once you’re in the raid.
Either way — you’re getting two very different but awesome experiences. Both are fantastic games, but in different ways.

Unlock Scrappy’s Upgrade: Hunt Mushrooms, Olives & Prickly Pears in ARC Raiders
Learn where to find mushrooms, olives, and prickly pears in ARC Raiders to level up Scrappy. This guide highlights reliable locations, spawn‑triggers, and efficient foraging loops.
In ARC Raiders, your feathered companion — Scrappy the rooster — is more than a mascot. He’s a key part of your progression: upgrading him unlocks extra benefits for your raider operations. To level him up, you’ll need to collect nature items like mushrooms, olives and prickly pears. These items may sound simple, but the post‑apocalyptic landscapes of ARC Raiders make them surprisingly elusive. In this guide, we’ll walk through exactly what these items are, how to recognize them, and where you’re most likely to find them so you can complete Scrappy’s upgrade path without wasting endless runs.
You may also be interested in:
What Are Mushrooms, Olives & Prickly Pears Good For in ARC Raiders?
Each of these nature items appears during your “topside” raids and is used to Train aka “Upgrade” Scrappy.
Mushrooms: These are fungus loot items that spawn in damp, shaded or flora‑rich zones. They often appear on tree trunks, planters or damp ground. They’re required for one of Scrappy’s higher tier upgrades.
Olives: Spawn at olive trees, usually on the ground beneath the trees or occasionally dropped by kicking the tree. They are part of the mid‑tier upgrade requirement for Scrappy.
Prickly Pears: These are fruits that spawn near cactus‑type plants in arid, sandy zones of the map. They’re more rare than the others and required along with olives for a major upgrade step.
Recognizing the visual cues in each zone helps: if you’re in a grove of olive trees, scan the base of the trees; in a cactus‑patch, search around the spiky plants. The spawn isn’t guaranteed every single run, so persistence and knowledge of where to look will save you time.
Best Locations to Find Mushrooms
Mushrooms spawn in areas with higher moisture or dense vegetation, even in a post‑desert world. One of the best cited zones is the map called Dam Battlegrounds, where inside the “Hydroponic Dome Complex” and nearby river trees you’ll often find mushrooms.
Location tip: Search around planters and tree clusters inside the hydroponic facility.
Alternate: On the same map, the “Water Treatment Control” top floor pipes also yield mushrooms, though spawn is less consistent.
Note: Mushrooms may appear more frequently when the “Lush Blooms” modifier is active (a world‑state that increases nature loot spawns).
If you’re farming mushrooms, try running a loop through the hydroponic dome then the adjacent river‑trees area, rinse and repeat until you accumulate the required amount for Scrappy.

An olive tree in Blue Gateyou can get olives from in Arc Raiders
Where to Hunt Olives
If you’re tracking olives, head to the map Blue Gate and specifically the area known as “Olive Grove.” This location is the most reliable for olive spawns.
Visual cue: Large olive trees, often grouped together at the outskirts of the grove.
Spawn behaviour: You’ll find olives laying under the trees; you can also kick some trees to make extras drop.
Note: Because this area is popular (many players know it), competition is high — you may encounter other raiders. A safe‑pocket loadout is encouraged.
Pro tip: While you’re in Olive Grove, pack light and be prepared for other players or bots. Your goal is speed: grab olives, move on, don’t linger in high‑traffic zones.
Finding Prickly Pears in the Wastelands
Prickly pears are the toughest of the trio. Your best map bets are either Dam Battlegrounds or Buried City. There are cactus patches all over the place on these maps.
Key spots:
Buried City: Head to the very southern edge of the map outside the city proper, into the arid cactus zone.
Dam Battlegrounds: Northern side, near the roads and outer perimeter, is a solid loop to find cacti.
What to look for:
Cactus plants: these are green/gray spiky plants that stand out in barren areas.
On the ground around them: the actual pear often lies next to the plant rather than on it.
Spawn is random: you might circle through a patch and find none, then next run you find several. Patience helps.
Bonus tip:
If the “Lush Blooms” modifier is active, you might also find nature baskets scattered around with prickly pears inside, increasing your chance.
Final Tips for Efficient Nature Farming
Loadout matters: Use the safe‑pocket augment if you’re collecting rare items. If you die, your precious mushrooms, olives or pears stay secured.
Route planning: Combine locations when possible. For example, you might start at Olive Grove for olives, then move to the cactus‑patch in Buried City for pears — this saves time versus running isolated loops.
Check world modifiers: If “Lush Blooms” is active, nature loot spawns are higher. Take advantage of these windows.
Avoid unnecessary conflict: In high‑traffic zones (Olive Grove, etc), don’t linger. Other players might contest the area and distract you.
Stay on the move: Because spawns are random and contested, keep a fast pace. Hop, collect, move, repeat.
Inventory management: Rare items might stack or have limits — keep slots free so you’re ready when you find them.
Multiple runs may be required: The spawn rate isn’t perfect. Factor in that you may need several raids to gather full sets of each item.
That’s it — a focused guide to finding Mushrooms, Olives and Prickly Pears in ARC Raiders so you can upgrade Scrappy without endless guesswork. 🐓
You may also be interested in:

How to Beat All ARC Enemies - Arc Raiders Guide
ARC Raiders throws you into an unforgiving sci-fi battlefield filled with relentless robotic enemies known as the Arc. From the sky-patrolling Wasp to the devastating Rocketeer and the massive Queen, every Arc enemy comes with its own unique behaviors, weaknesses, and high-stakes loot.
ARC Raiders throws you into an unforgiving sci-fi battlefield filled with relentless robotic enemies known as the Arc. From the sky-patrolling Wasp to the devastating Rocketeer and the massive Queen, every Arc enemy comes with its own unique behaviors, weaknesses, and high-stakes loot.
Whether you're a new raider or a seasoned squad leader, knowing how to counter each Arc efficiently is the key to survival. In this guide, we break down every ARC enemy, their attack patterns, weak points, and best strategies to defeat them—so you can stay one step ahead and maximize your rewards.
You may also be interested in:
ARC Raiders Guide: Where to Find Apricots & Lemons for Scrappy Upgrades
Arc Raiders Blueprint Guide – Quest Rewards, Best Loot Containers & Pro Tips
Arc Raiders Ultimate Skill Tree Guide 2026: Best Perks And Skills
The Wasp

The Arc Raiders Wasp
Small size doesn’t mean harmless — the Wasp floats around the skies and can turn your raid into a scramble if you underestimate it. It patrols in the air, often with other flying Arcs, scanning for sound and movement. When its search beam changes from blue to yellow, it’s preparing. Once it hits red, you’re in attack mode: it will charge in and unload a volley of light ammo attacks.
Weak points & strategy: Two good shots to either of the blade thrusters destabilises it. Even with one wing gone it keeps attacking, so your realistic goal is to destroy two thrusters. When you do, it crashes and explodes on impact.
Loot drops: Arc power cells (shield recharge material), light ammo, arc alloy, and a “wasp driver” item that sells well and is also used for a workbench upgrade.
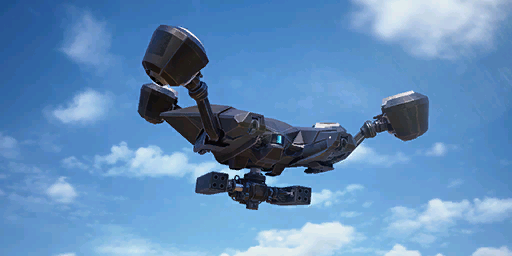
2. The Hornet

The Arc Raiders Hornet
Flying alongside Wasps, the Hornet is a medium aerial threat with one nasty twist: it fires slow‑traveling electric darts. If one hits you, you’ll be stunned and take heavy damage.
Weak points & strategy:
Focus on the two back thrusters. Shooting both brings it down to the ground.
While it tries to face you, you can crouch or sprint in a circular pattern (especially sideways) to get shots at its sides.
When a dart is launched, you don’t need to dive — sprint left or right or use cover. Diving drains stamina.
Prioritize the Wasps first (if they’re present) while using cover to dodge the Hornet.
Loot drops: Arc alloy, arc power cells, medium ammo, and a “hornet driver” component that sells well and is also used for a workbench upgrade.
3. The Snitch

The Arc Raiders Snitch
The Snitch is not out to kill you — at least not directly. Instead, it scans large areas and calls in backup (typically Wasps + Hornet) the moment it spots you.
Weak points & strategy:
Its outer rotor‑wiper blades: shoot all three quickly and you’ll take it out before the reinforcements arrive.
Sometimes you might let it spot you intentionally if you’re hunting loot/XP and can handle the backup spawn.
Loot drops: Arc alloy, arc power cells, and a “snitch scanner” — a grenade‑type tool that can spawn Arc enemies when thrown (very handy).
4. The Leaper
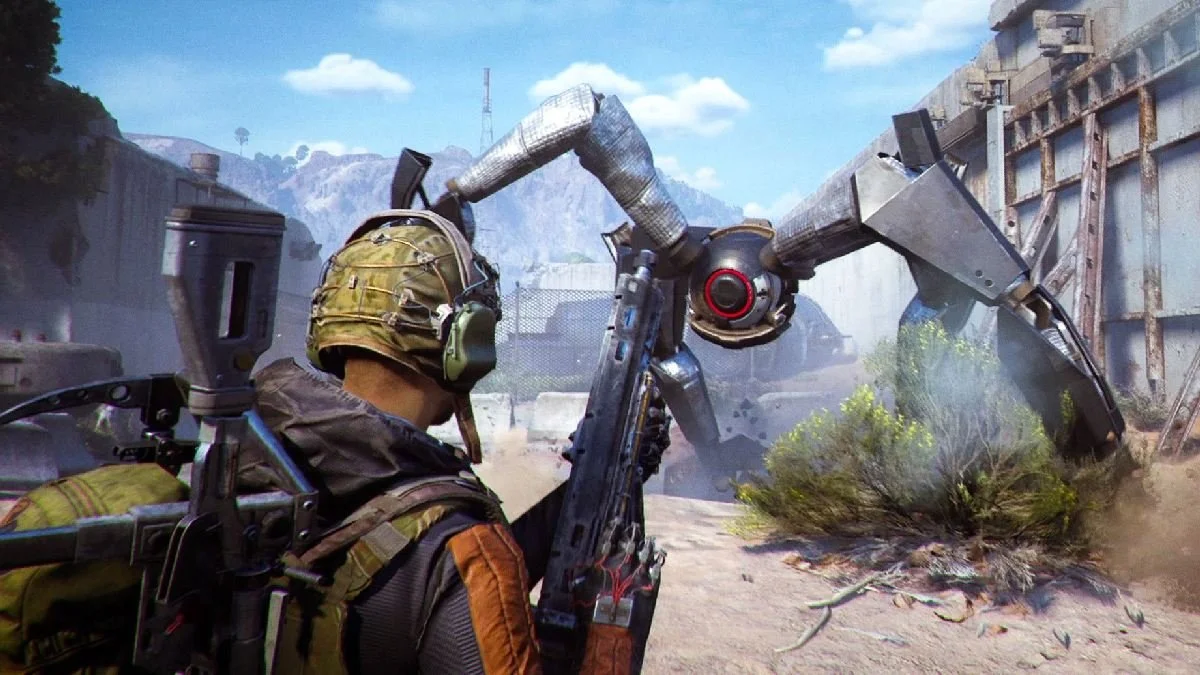
The Arc Raiders Leaper
This one is pure chaos if you catch it in the open. The Leaper is a large, spider‑like machine that will literally leap long distances and chase you into tight spots. It stomps, it launches shock waves in an area around it, and it will end your raid if you get caught unprepared.
Weak points & strategy:
Bring lots of ammo — this fight takes time.
Find a small building or structure where the Leaper can’t fit inside. Get it to leap onto the building.
Focus on its legs. Wear down the leg armour (better with high arc‑penetration weapons/gadgets) until inner metal shows, then break the leg segments. Repeat until it falls.
If you’re out in the open, you’ll die — hide in cover or inside structure.
Loot drops: Mid‑tier weapon parts, crafting materials. The Leaper breaks into pieces when destroyed.
5. The Bastion

The Arc Raiders Bastion
Slow‑moving but deadly. The Bastion trades mobility for raw firepower — its high‑RPM minigun chews through armour and shields in seconds.
Weak points & strategy:
Its yellow‑marked kneecaps or the yellow cylinder on the back are the weak zones. Shooting these deals damage through armour.
Once those weaken, inner metal is exposed — you can then target its core.
Use a solid piece of cover. Also: Wasps and Hornets often back it up, so clear air threats first before focusing the Bastion.
Loot drops: High‑value crafting items; Bastion also breaks into many pieces when destroyed.
6. The Bombardier

The Arc Raiders Bombardier
This one brings indirect fire to you: large missiles that arc into the sky then land near your position like punishment from above. It’s usually accompanied by a Spotter drone that designates targets.
Weak points & strategy:
Same weak points as the Bastion: focus the yellow kneecaps or back cylinder on the Bombardier.
Engage from a roof or building so you limit its ability to arc its missiles at you.
Watch out: if a Rocketeer is nearby too, the combination can be brutal.
Loot drops: Big haul — rocket ammo (used for the Hullcracker launcher), bombardier cells (key for a workbench upgrade), and premium materials.
7. The Rocketeer
The Arc Raiders Rocketeer
One of the toughest foes — the Rocketeer fires huge missile barrages with massive AoE damage. Even well‑equipped squads can struggle if they misplay this one.
Weak points & strategy:
Aggro it into a strong building with minimal windows and a roof. Missiles will still go through doors/windows somewhat, so you want strong cover.
Listen for the missile lock audio cues. After each barrage you get a small window to poke at its thrusters.
Use high‑penetration weapons — wear down armour, target thrusters when safe.
Expect a lengthy engagement and attract attention (other raiders may show up).
Loot drops: Rocketeer drivers ( item for explosives bench), heavy gun parts.
Tip: Unless you really need the loot or you’re confident, you might want to avoid this one for now.
8. The Tick

The Arc Raiders Tick
Tiny but annoying — the Tick hides inside buildings (walls, ceilings, dimly‑lit rooms) and leaps at your face. It’s not the biggest threat but it’s easy to get caught off guard.
Weak points & strategy:
No real exposed weak point — just shoot it when it jumps.
If it latches on you, you’ll get a “hug zone”: you’ll have to rapidly tap a prompt to throw it off, then still kill it.
Loot drops: Tick pods — early‑game quest material and equipment bench upgrade resource.
9. The Pop

The Arc Raiders Pop
The Pop is the classic “run‑at‑you and explode” enemy. Easy to kill, but if you’re not paying attention it can end your shield and health in seconds.
Weak points & strategy:
Just take a quick shot at it when it rolls toward you; one shot often does the job.
If you’re trying to evade, sprint away — its explosion has radius.
Loot drops: Basic crafting items, arc power cells, light ammo.
10. The Fireball

The Arc Raiders Fireball
A fire‑specialist arc that shows up inside buildings. If it gets near you, expect flamethrower damage and persistent fire zones on the floor.
Weak points & strategy:
Wait for its shell to open (signalling attack), then strike with a high‑penetration weapon.
Avoid standing in its flame zones — they burn you over time.
Loot drops: Fireball burners (used for quests/upgrades) and other crafting materials.
11. The Turret & The Sentinel
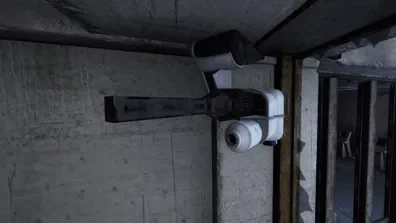
The Arc Raiders Turret
Turret
Wall‑ or ceiling‑mounted machine gun unit found indoors. It tracks you, fires heavily, and can be frustrating in close quarters.
Strategy: Use cover, wait for its reload pause, then peek and shoot.
Loot drops: Arc alloy, light ammo, simple gun parts.
Sentinel
A sniper‑turret version, found overlooking large areas. Its laser sight gives away its firing moment — use the cue to find cover, then counter‑shoot when it reloads.
Loot drops: Similar to Turret, with a little more value.
12. The Surveyor
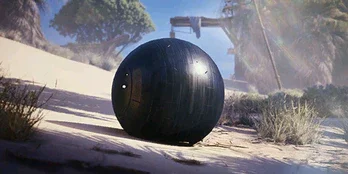
The Arc Raiders Surveyor
Not hostile in the direct sense: the Surveyor rolls around, pauses to scan via a radar array. When the radar opens, it’s vulnerable. Hitting the array directly deals critical damage, but the surveyor will flee instead of fight back, making it a tough enemy to catch up to. It goes REALLY quickly. Using stunning equipment like the Showstopper can help keep it close.
Weak points & strategy: Wait for the scanning radar to open, shoot the exposed section, then follow it when it rolls away. Trying to force it while it’s moving is a waste of time.
Loot drops: Crafting items, arc power cells, recyclable materials.
13. The Shredder

The Shredder in Arc Raiders
A new menace on Stella Montis — the Shredder skims just above the ground and unloads a brutal close-range shotgun blast that can drop even seasoned Raiders in a couple hits. Heavily armored and far more dangerous up close than Ticks, Pops, or Fireballs, the Shredder punishes anyone who gets careless.
Weak points & strategy:
Pull it into open space if you can. Stella Montis’ tight alleys make Shredders far more lethal, so fight them where you have room to dodge that wide blast.
Snap Blast Grenades are the cleanest counter. They stick to surfaces, are cheap to craft or buy, and two well-placed grenades will delete a Shredder outright — just get clear before they pop.
If you’re forced to shoot, aim for the bottom thrusters. Hitting them can stun the Shredder or cause its blast to whiff entirely. Heavy-penetration weapons like the Ferro or Anvil can break through its armor plating quickly.
Solo players should treat Shredders with respect — or avoid them altogether. But as soon as a squad focuses fire, they fall fast. They don’t dart around like Wasps or Hornets, so lining up follow-up shots is trivial once you stagger them. Listen for their audio cues; hearing a Shredder before it hears you gives you the advantage.
Loot drops: Standard ARC scrap and components
Tip: Unless you’re confident or hunting for Trials, avoid getting surprised in tight corridors. Shredders thrive at close range — deny them that, and they’re just another busted ARC chassis on the ground.
14. The Queen & The Harvester

The Arc Raiders Queen, which protects the Harvester
Queen
A massive behemoth enemy (think apartment‑building size) seen during special events. It’s heavily armed (artillery pods, beam attacks) and designed for serious squads.
Strategy: You’ll need high‑tier gear, team coordination, and time. Not recommended solo. A very in depth strategy is required to defeat the Queen.
Harvester
The structure the Queen guards. Looting the Harvester vaults can give big rewards, but you’ll likely face the Queen or serious resistance.
Loot drops: Highest‑tier crafting materials, rare quest drivers, special event items. Another article specifically about the Harvester is coming.
15. The Matriarch

The Matriarch in Arc Raiders
A towering ARC monstrosity — the Matriarch is a colossal walker that dwarfs even the Queen. With long-range artillery pods, sweeping beam weapons, and thick armor plating, the Matriarch is a true endgame threat meant to overwhelm unprepared Raiders. It can even spawn more ARC to defend itself. You also migh tnotice the Rocketeers following it in the picture above.
Just like the Queen it is difficult to defeat the Matriarch so an in depth strategy is required.
You may also be interested in:
ARC Raiders Guide: Where to Find Apricots & Lemons for Scrappy Upgrades
Unlock Scrappy’s Upgrade: Hunt Mushrooms, Olives & Prickly Pears in ARC Raiders
How to Defeat the The Queen in ARC Raiders Guide - Easiest Way Revealed
Final Tip
No matter which Arc you face, keep these core rules in mind:
Choose weapons with high arc‑armour penetration when you expect big enemies (typically those that use heavy ammo).
Use cover and terrain smartly.
Prioritise weak points (thrusters, kneecaps, yellow markers) over spraying bullets.
Be aware of support units (Wasps, Hornets, Spotters) — don’t tunnel‑vision on the big one while smaller ones pick you off.
Know your loot — many Arcs drop drivers or materials that unlock workbench upgrades or are quest items.