


5 Helpful Swordsman VR Tips and Tricks
Part of what makes this game so great is how hard it is. Swordsman VR aims to be a true sword fighting simulator, which is what makes it one of the best VR sword fighting games out there.
Of course this difficulty means you might have trouble winning fights at first, or just keep wailing on your enemy and wonder why they never seem to fall down.
Well don’t worry because in this Swordsman VR guide we’ve got 5 helpful Swordsman VR tips and tricks that are sure to help you whether you’re playing on the Oculus Quest 2 or 3, or on PCVR.
Swordsman VR is a fantastic game from Sinn Studio that is only getting better as the developers keep updating it.
Part of what makes this game so great is how hard it is. Swordsman VR aims to be a true sword fighting simulator, which is what makes it one of the best VR sword fighting games out there.
Of course this difficulty means you might have trouble winning fights at first, or just keep wailing on your enemy and wonder why they never seem to fall down.
Well don’t worry because in this Swordsman VR guide we’ve got 5 helpful Swordsman VR tips and tricks that are sure to help you whether you’re playing on the Oculus Quest 2 or 3, or on PCVR.
So without further ado sharpen your blade and get ready to get better at Swordsman VR.
Go For Weak Spots
If there is one Swordsman VR tip that will benefit your more than any other, it’s to learn to go for weak spots on your opponents (assuming you have turned armor physics on when starting the game, which you really should for a more fun experience).
Seriously, you will hardly do any damage if you just bang your blade against an opponent’s heavily armored parts over and over.
The way to do maximum damage in Swordsman VR is to look for weak spots. Each of the various types of opponents in this VR game have different weak spots, but once you find them they are consistent. So once you find them you’ll know exactly where to strike

Stabbing an enemy in the weak spot in their armor by their armpit
Basically you want to look for areas where their body isn’t covered by armor. If you strike a part of your enemy and hear a fleshy sound, see your blade sink in, and see blood, then you’re hitting them in the right place.
The upper torso, stomach and arms will often be defended by thick armor. Though that is not always the case as you’ll see in the tip after this one.
There’s always some sort of opening leading to the face, but those are very hard to hit and can be quite small on some enemies. Though hitting an opponent’s head does incredibly high damage.
So if you think you can finesse a hit to the face then go for it (especially if you parried successfully and activated slow motion).
Some opponents won’t wear helmets. So if you see a completely unprotected head always go for it for a quick victory.

An opponent with no helmet. An easy victory
Some enemy types have more armor and others have less, but all of them will have weak spots on their legs. Going for the legs is a very tried and true strategy in Swordsman VR.
While you’ll learn what enemies have armor in what spots over time through trial and error, start with the legs.
Even the bosses all have some unarmored part on their legs.
2. Certain Enemy Types Are Easier Than Others
When starting a new game in Swordsman VR you might be tempted to start from the left of the opponent list and do them in order.

The arena selection screen. You don’t have to go from left to right
The typical thought is that the beginner stuff is at the beginning of the list, right? Well no, that’s not the case in Swordsman VR.
The first entry on the list of opponent types to fight against in Swordsman VR are Knights. Knights are all extremely well armored and so very difficult to take down for a beginner.
Instead let’s take a lesson from our previous tip and start with opponent types that actually wear less armor and so are way easier to take down.
This way even with your starter gear and lack of stats you can get some victories under your belt and accumulate some wealth and levels that will make taking on the more difficult opponents easier.

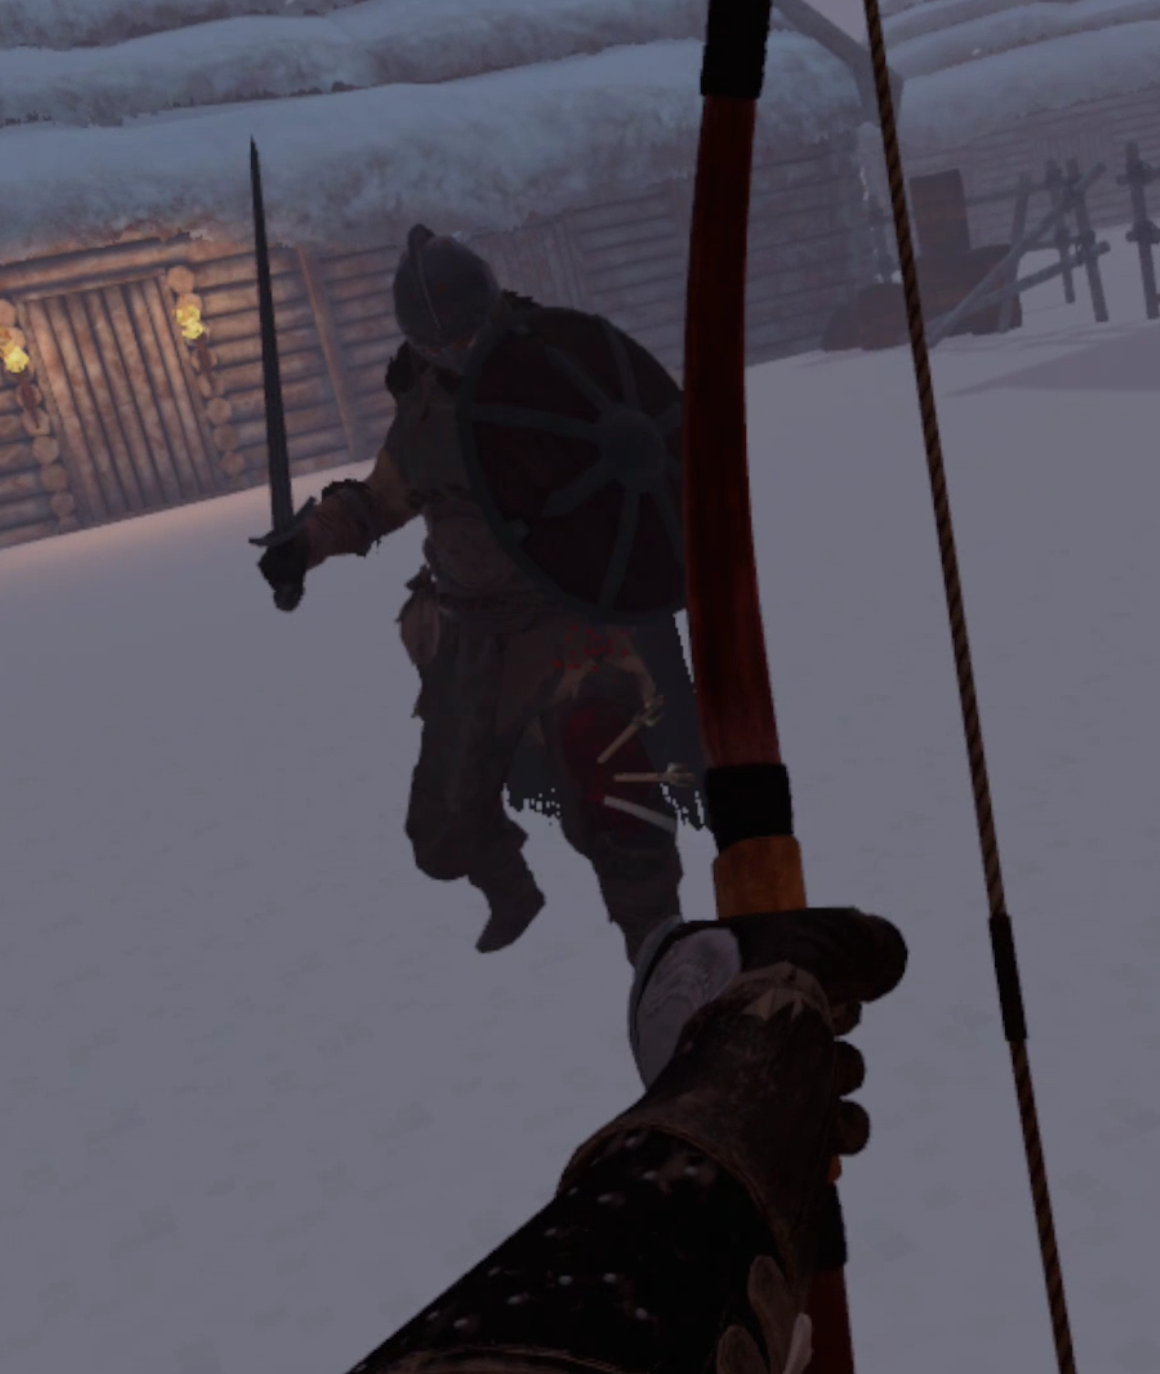
Vikings have no protection on their chests
I recommend that you start by fighting the Vikings or the Samurai.
Vikings are the least armored opponents in the game and you can even stab them right through the chest or side. Their only truly armored areas are their stomachs and heads.
Though the Vikings do do incredible damage to a low level player with no armor and can take you down in a hit or two if you’re not careful, so another alternative is starting by fighting the Samurai.
While the Samurai are more armored than their Viking counterparts their legs and most of their arms are basically free game, and some will even spawn without helmets for easy head chopping wins.
You can also just vary between the two if you get bored with one enemy type, but if you want to play optimally focus on getting a lot of victories so you’ll have gold and experience to spend to become more powerful.

Even helmeted samurais have unprotected faces
3. Upgrade Your Gear And Spend Your Money Wisely
There are three ways to become more powerful in Swordsman VR, by getting better weapons, better armor, and better stats.
Weapons and armor are bought with money, and stats are gained with experience. Both of which are earned from winning in the arena.
When you’re just starting out keep in mind that you can always pick up the weapons of fallen enemies, which can be much stronger than those you start with. You can view the stats of all weapons in the buy menu, and they apply to the weapons of your enemies as well.
Though you’ll probably notice in that buy menu that there are a few upgrades you can get for extremely cheap early on. The Viking Sword is extremely cheap and so is the Katana.
Both are big upgrades over your two starting options, the Cutlass and Half Sword.

The Katana is a great upgrade to your starting weapons
You also would benefit from buying the cheapest quiver of arrows even if you don’t plan on bringing in a bow. This still lets you pick up the bows of fallen enemies and use them.
Otherwise you won’t have any arrows on you, though enemies do drop a few if they came in with a bow, just like all other enemy equipment they will disappear when they’re on the ground for long enough.
Also keep in mind that you have a limited number of arrows, so if you were thinking of going straight for a bow and arrows to play keep away with your opponents, then think again because you can’t just plink them from a distance forever.
Though if you miss you can still pick up arrows off of the ground for a limited amount of time.
A more expensive upgrade is armor, but investing just a few thousand into armor can make you significantly stronger early on in the game.
My recommendation is to go for the Viking Armor and Helmet as soon as possible. It not only is a great upgrade in defense, but also makes you do a TON more damage.
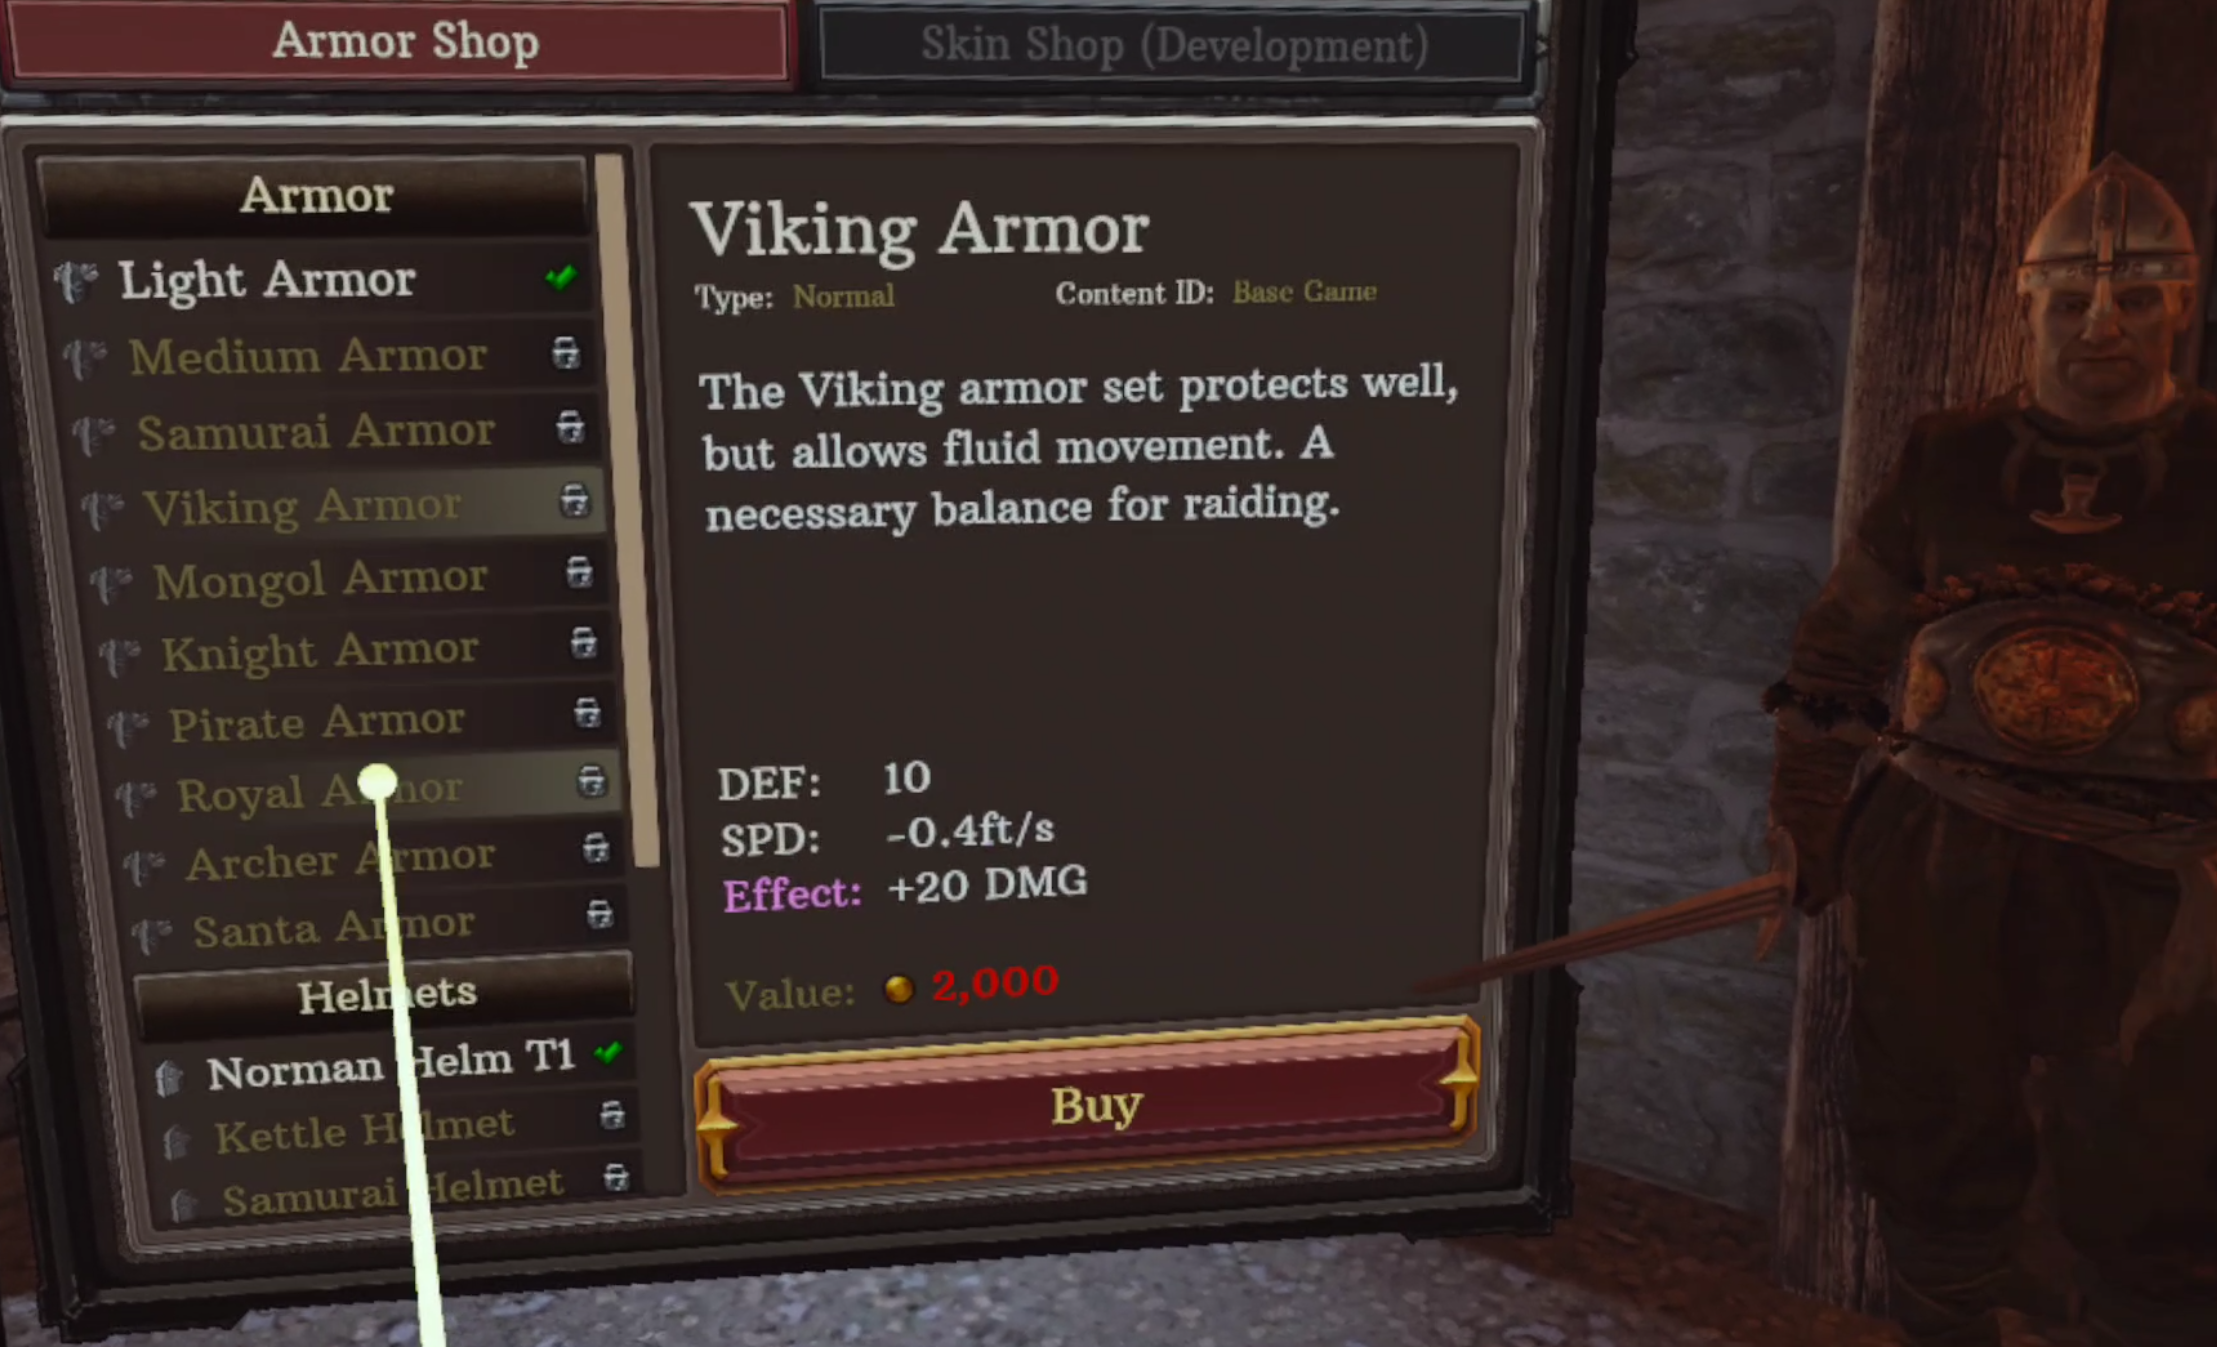
The Viking Armor gives both defense and damage
Oh, and if you have a problem with getting hit and losing a lot then try going with a shield and weapon combo. A shield is a great way to not get hit and a very easy defensive measure.
You can even hit an enemy with your shield to throw them off balance. It’s more effective than kicking.
4. Upgrade Your Stats and Spend Experience Wisely
So we’ve already mentioned that you get experience alongside gold.
Well just like gold you have some options of how to spend it, and if you want to get powerful and start challenging bosses you’re going to want to think about how you spend it.

Even knights have unprotected legs
There are a lot of stats to choose from and a lot of different playstyles you can try with different combinations of stats.
You could maximize your chances for slow motion so that you can use slow motion to go for quick face stabs on your enemies.
You can maximize speed and run around using up your arrows and doing hit and run attacks.
The simplest long term plan is just to increase your damage and health by investing into Vitality and Strength. A lot of weapons also have a minimum Strength requirement to use.
Luckily you can always respec later when you’re rich and powerful, and so you can spend your experience like you want without having to worry about needing to start all over again to try a different combination.

The Greed stat gives you more gold
So to get rich and powerful as quickly as possible you can try to accelerate your growth by investing early into the Greed and Intelligence stats.
These will increase how much money and experience you get for winning. Since the early levels are very cheap it’s worth getting a few before your first respec so that you get better rewards when you need them the most.
Of course once Greed and Intelligence levels start becoming expensive you might want to spend your experience elsewhere so that you have the stats to keep up with your opponents and be stronger in a fight.
5. Be Patient
Your biggest advantage against your enemies in Swordsman VR, except maybe for the fact that you are a human and can outsmart the AI opponents, is that you regenerate health.
When you take damage you’ll notice your screen going dark and the edges and your vision greying.
Whenever you see this immediately back off from the fight and just focus on defense for a while.

Hiding behind a big shield is a very effective defensive tactic
Your enemies will generally be very slow to catch up and keep attacking (unless you’re up against a ranged enemy, so hopefully you’ve got a shield or something to hide behind, though you can always just constantly strafe around at a distance so they miss).
You’ll regenerate your health and your vision will return to normal. Your enemies, with the exception of one boss that can heal himself, do not.
This advice holds the best up against bosses. They have incredible amounts of health, and fighting them is a marathon.
Even with good weapons and high damage stats you’ll need to hit them a LOT for them to go down. Push your luck once when you’re wounded and you’ll have to start all over.
A bow is also a great way to attack from a safe distance
So if you get hit be patient and wait until you’re back to full strength to continue the attack.
Well those are all of our Swordsman VR tips and tricks. I hope you’ve gotten something useful out of this guide and wish you the best of luck in the arena. Enjoy!
You Might Also Be Interested In:
How To Play Pistol Whip Custom Songs And Pistol Whip Mods
While you used to have to do a ton of complicated and annoying steps to enjoy custom songs in this fantastic VR rhythm game, it’s now as easy as point and click!
Oh, and if you’ve always wanted to make mods for Pistol Whip yourself with great custom songs and maps, then check out the end of this article to find out about the fantastic modding tools that have also been released.
So you’re a Pistol Whip fan and want to learn how to play custom songs in Pistol Whip.
Well you’ve come to the right place to learn how to play Pistol Whip mods with custom songs! Luckily it’s way easier to play custom songs than it used to be thanks to a new update from the developers at Cloudhead Games.
While you used to have to do a ton of complicated and annoying steps to enjoy custom songs in this fantastic VR rhythm game, it’s now as easy as point and click!
Oh, and if you’ve always wanted to make mods for Pistol Whip yourself with great custom songs and maps, then check out the end of this article to find out about the fantastic modding tools that have also been released.
You Might Also Be Interested In:
How To Play Pistol Whip Custom Songs
So, as usual, start the game and hit start at the first screen.
If it’s been a while since you last played Pistol Whip you might be put into the tutorial immediately, but luckily you can skip that if you like, or play through it for a refresher on how to play the game.
Now for the fun part, playing Pistol Whip custom songs.
In the main menu look at the big center screen labelled “Start” where you’d normally start a song in Arcade, Campaign, or Contracts mode. You’ll see a new button in the bottom right, “Remixes.”

Entering the remixes menu from the Start menu in Pistol Whip
The Pistol Whip developers have made custom songs available in the game. You don’t have to change any of the game files or do anything like that. The remixes menu will be available when you start the game.
Once you go into the remixes menu you’ll be treated to a ton of options for custom songs made by the community to try.
There are all sorts of themes and music to choose from. Even songs you might have heard before and always thought would make for a great Pistol Whip map.
Well now Pistol Whip modders have been making custom maps for these songs and adding them to the game.
If you want some help finding a good song there are some filtering options below by your feet.

There are a lot of filtering options for Pistol Whip custom songs
To try one find one that you like and click on it and its detail page will appear with some cover art, the song used, and a description of the custom song.
Now you might go straight for the play button and wonder why it’s greyed out and not working. Well that’s because you need to subscribe to the song to play it.
So hit the subscribe button in the bottom left of the song’s description page.

You have to subscribe to a Pistol Whip remix to download and play it
You will, of course, need an internet connection to do this. The Pistol Whip mod will automatically download to your game.
Once it’s complete you can hit play and enjoy the Pistol Whip custom song!
Oh, and just like with Pistol Whip’s main catalog in Arcade mode, you can add all of the modifiers and use any of Pistol Whip’s many choices of equipment by selecting them in the window on your left.

You can select any modifier you want in Pistol Whip remixes
Of course always keep in mind that these custom songs are made by hobbyists and modders for fun.
So even if the song is great (and it might not be), the quality and difficulty of the level may vary.
For your level of skill at Pistol Whip some might be extremely hard or extremely easy, and some Pistol Whip custom songs have maps that aren’t very detailed.
Though you can always make Pistol Whip mods harder with modifiers if you want a really intense experience.

Some custom songs have more effort put into them than others
Of course there are also a ton of custom songs that are fantastic and you’ll come back to time and time again.
You can always view the custom songs that you are subscribed to by hitting the “Subscribed” button on the left side of the Remix menu.
It is so fantastic to see the great work that community members are doing, and there are some really fantastic new levels in Pistol Whip because of the support for custom songs.
The best part is they are super easy to download and play! That’s something a lot of VR Rhythm and Music games don’t have.

There are so many fantastic custom songs in Pistol Whip to try
Make Your Own Pistol Whip Custom Songs With Pistol Mix
If you want to mod Pistol Whip yourself and create a fantastic custom song that you’ve always wanted to make, well now you can with Pistol Mix.
The update to the game that included the Remixes menu also included a release of this fantastic mod tool from the developer. With it you can make Pistol Whip mods and Pistol Whip custom songs pretty easily.
Now it’s simple and fun to make your own custom songs with Pistol Mix and upload them to the Remixes menu to play yourself, share with others, or see who in the community decides to try it.
While we won’t go in depth on Pistol Mix here, there’s a fantastic starter guide if you’re interested to try it out and make your own custom songs in Pistol Whip.
Well that’s it for how to play and make custom songs in Pistol Whip. Feel free to come back later and comment about which Pistol Whip custom song is your favorite so that we can give it a try and enjoy it too. Have fun!
You Might Also Be Interested In:

How To Play Gorilla Tag On the Oculus Quest 3 and 2 - Beginner’s Gorilla Tag Tutorial
Here you’ll learn how to play Gorilla Tag for free on the Oculus Quest 2 or Oculus Quest 3 (or any other Meta Quest device).
So let’s get started. First we’ll tell you how to get the game and start it, and then we’ll get into the basic Gorilla Tag controls and how you move around in the game, and a beginner’s tutorial on how to play Gorilla Tag.
So you’ve heard a lot about Gorilla Tag and want to get in on the fun.
First of all, welcome to Gorilla Tag! You’ve probably heard about how great this game is, and I can say from all of the fun times I’ve had in this game that there isn’t anything quite like it in Virtual Reality or anywhere else.
The feeling of being a monkey bouncing and flying around in VR is so satisfying when you learn how to do it, and believe it or not part of the fun is learning how to move around well.
Even better, Gorilla Tag is free to play on Meta Quest devices and PCVR!
You’ve come to the right place. Here you’ll learn how to play Gorilla Tag for free on the Oculus Quest 2 or Oculus Quest 3 (or any other Meta Quest device).
You’ll also need a VR headset to play Gorilla Tag properly… but if you don’t have one we do have an article on how to play Gorilla Tag on PC without a VR headset for free.
So let’s get started. First we’ll tell you how to get the game and start it, and then we’ll get into the basic Gorilla Tag controls and how you move around in the game, and a beginner’s tutorial on how to play Gorilla Tag.
How To Install and Play Gorilla Tag On An Oculus Quest 2 or 3
If you’ve already got Gorilla Tag installed on your Quest then scroll down to the next section called “How To Play Gorilla Tag - The Beginner’s Gorilla Tag Tutorial.”
If you’re wondering how to get into the game in the first place then keep reading here first. We’ll start with how to get Gorilla Tag on the most common platform it is played on, the Oculus Quest 3 (or 2).
Installing Gorilla Tag on an Oculus Quest is really easy. First put the headset on.
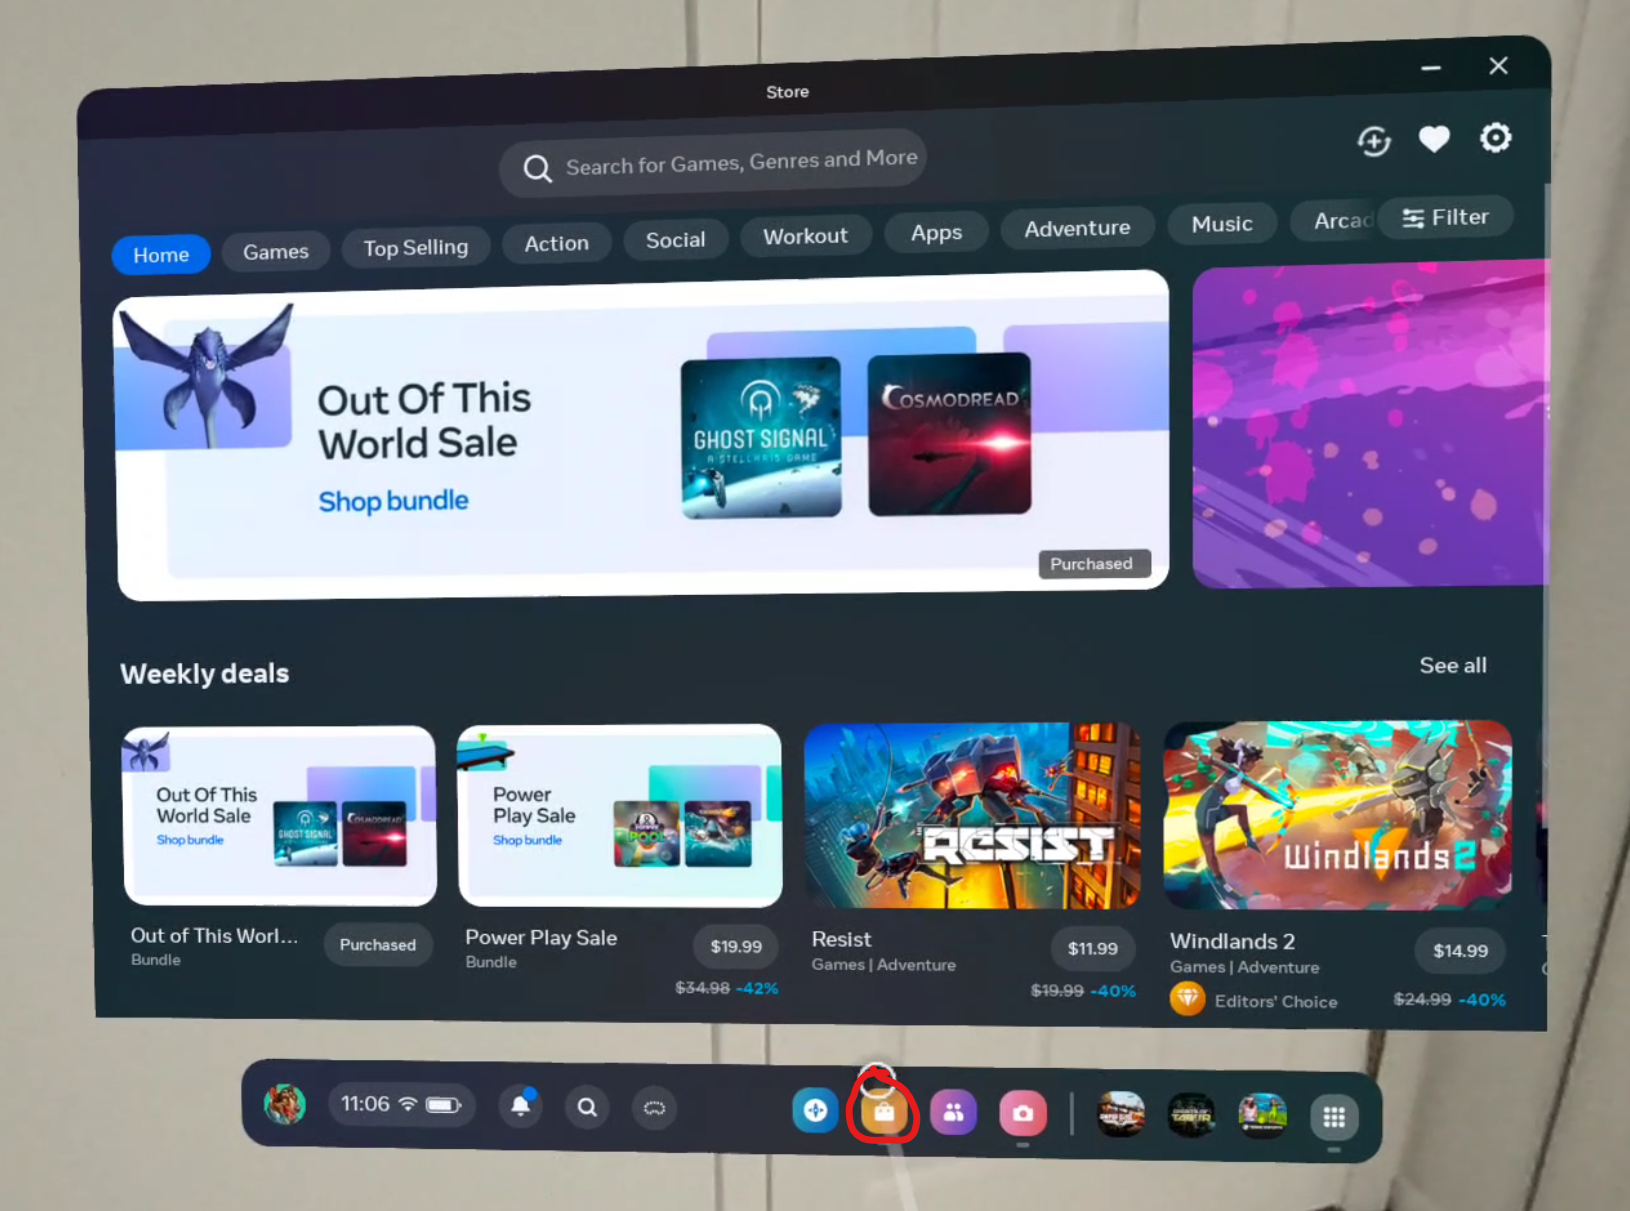
When you’re in your home screen you can open the store by hitting the orange button at the bottom with the shopping bag on it (when you point your controller pointer at it a bubble will show up saying “Store”).
Oh, and your headset will need to be connected to a WiFi network for this to work, so if you aren’t already, get some WiFi on your Quest!
The Meta Quest Store
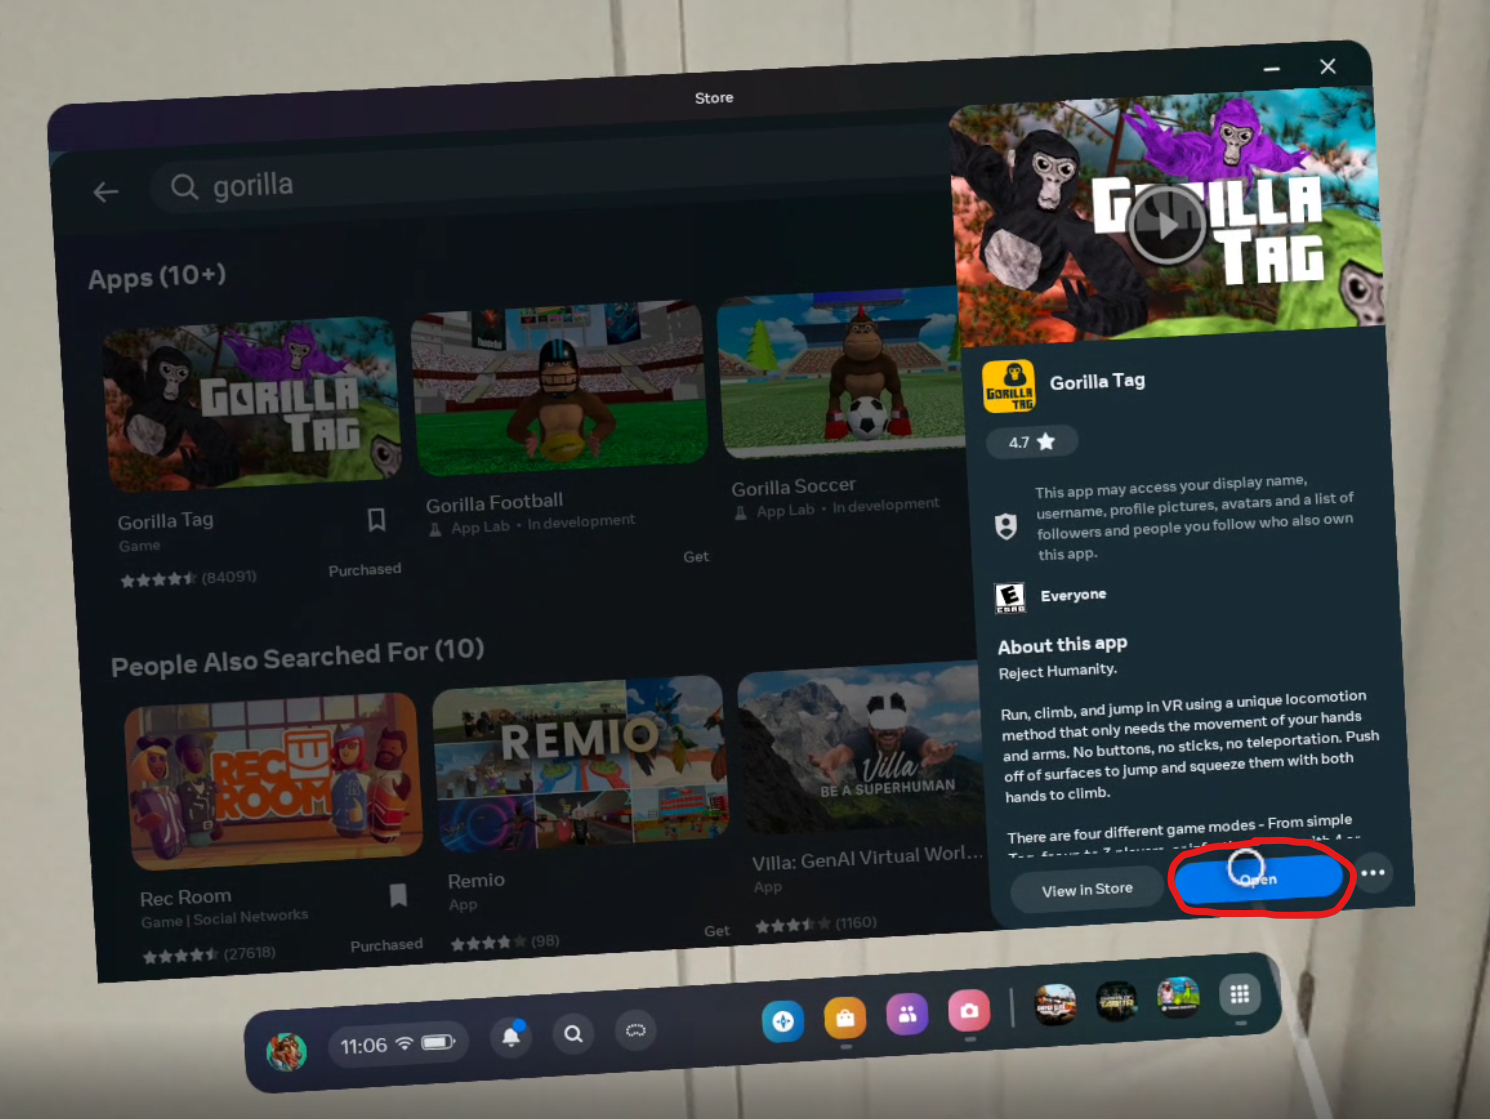
Then at the top of the store screen click on the search bar.
A little keyboard will show up below. Start typing “Gorilla Tag” into the search bar and hit the blue arrow to search for it.
Then click on the Gorilla Tag icon under “Apps.”
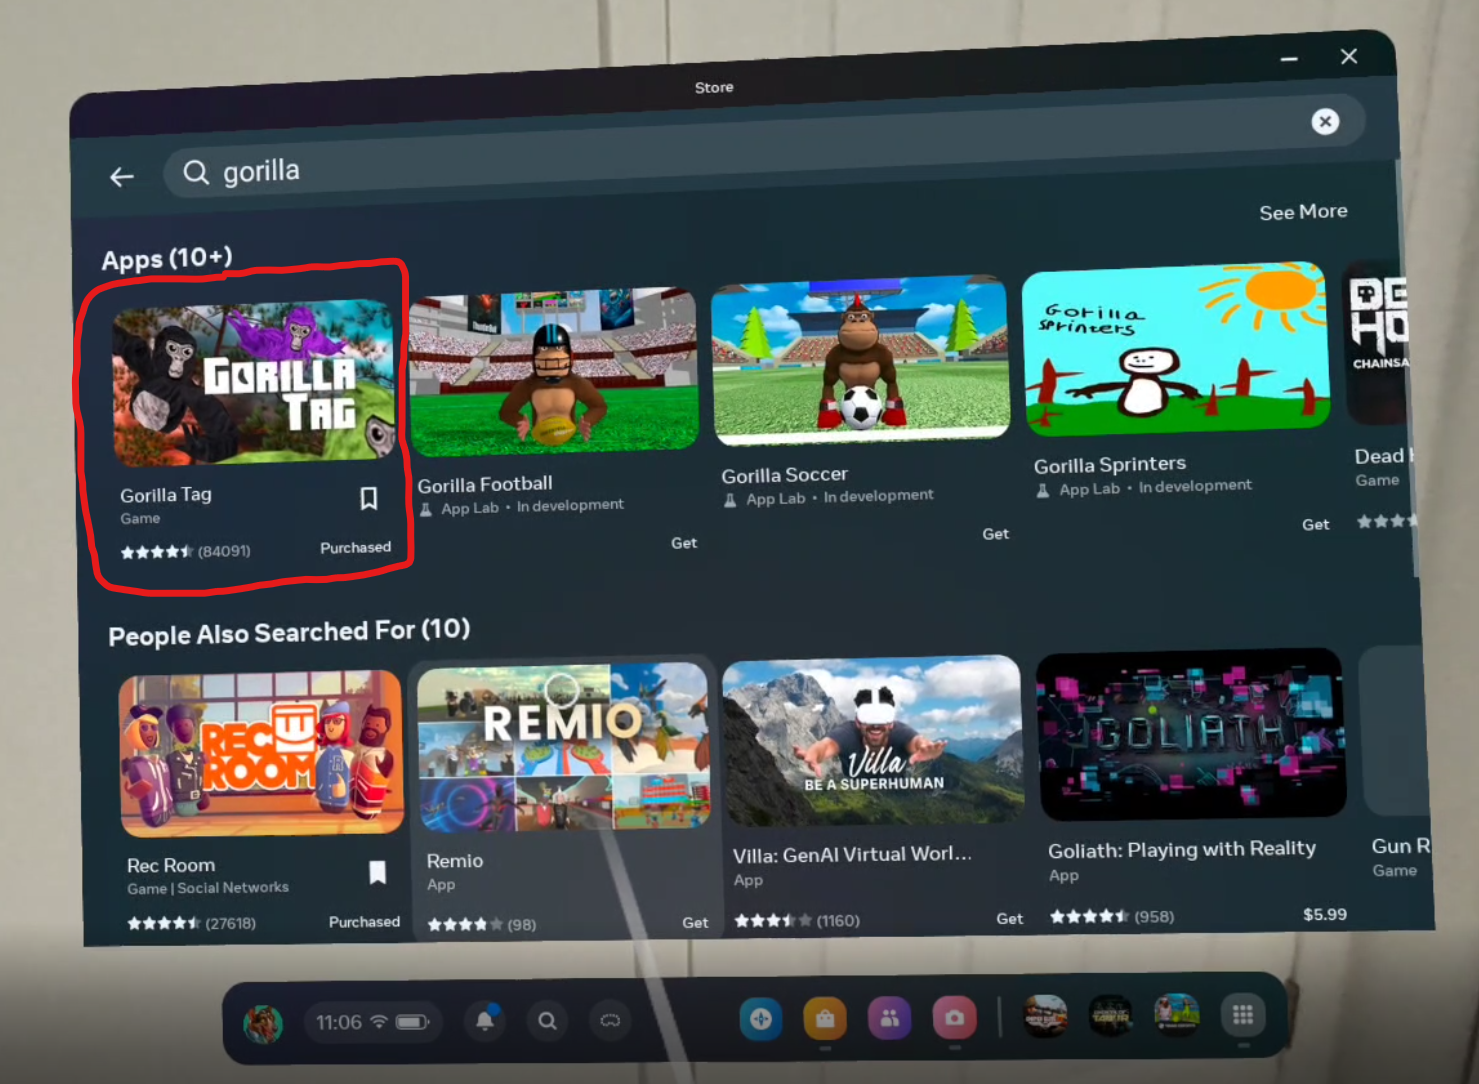
Searching for Gorilla Tag in the store
You’ll see a new bar pop up on the right side of the store window.
This shows you some more information about Gorilla Tag, and you could hit “View In Store” to see a video about the game and some screenshots.
You already know that you want to get Gorilla Tag though, so just hit the “Install” button in the bottom right.
Installing Gorilla Tag in the store
Alright so Gorilla Tag is installing. It shouldn’t take too long, but may take longer if your WiFi connection to your headset isn’t very good.
To see how long Gorilla Tag is taking to install, and how to run it, click the button in the bottom right that looks like a grid of 9 squares to go to your app library.
Once you’re there you can see all of the apps that you have installed.
You’ll probably see Gorilla Tag there, but you can also search for it in the search bar at the top just like you did in the Store.
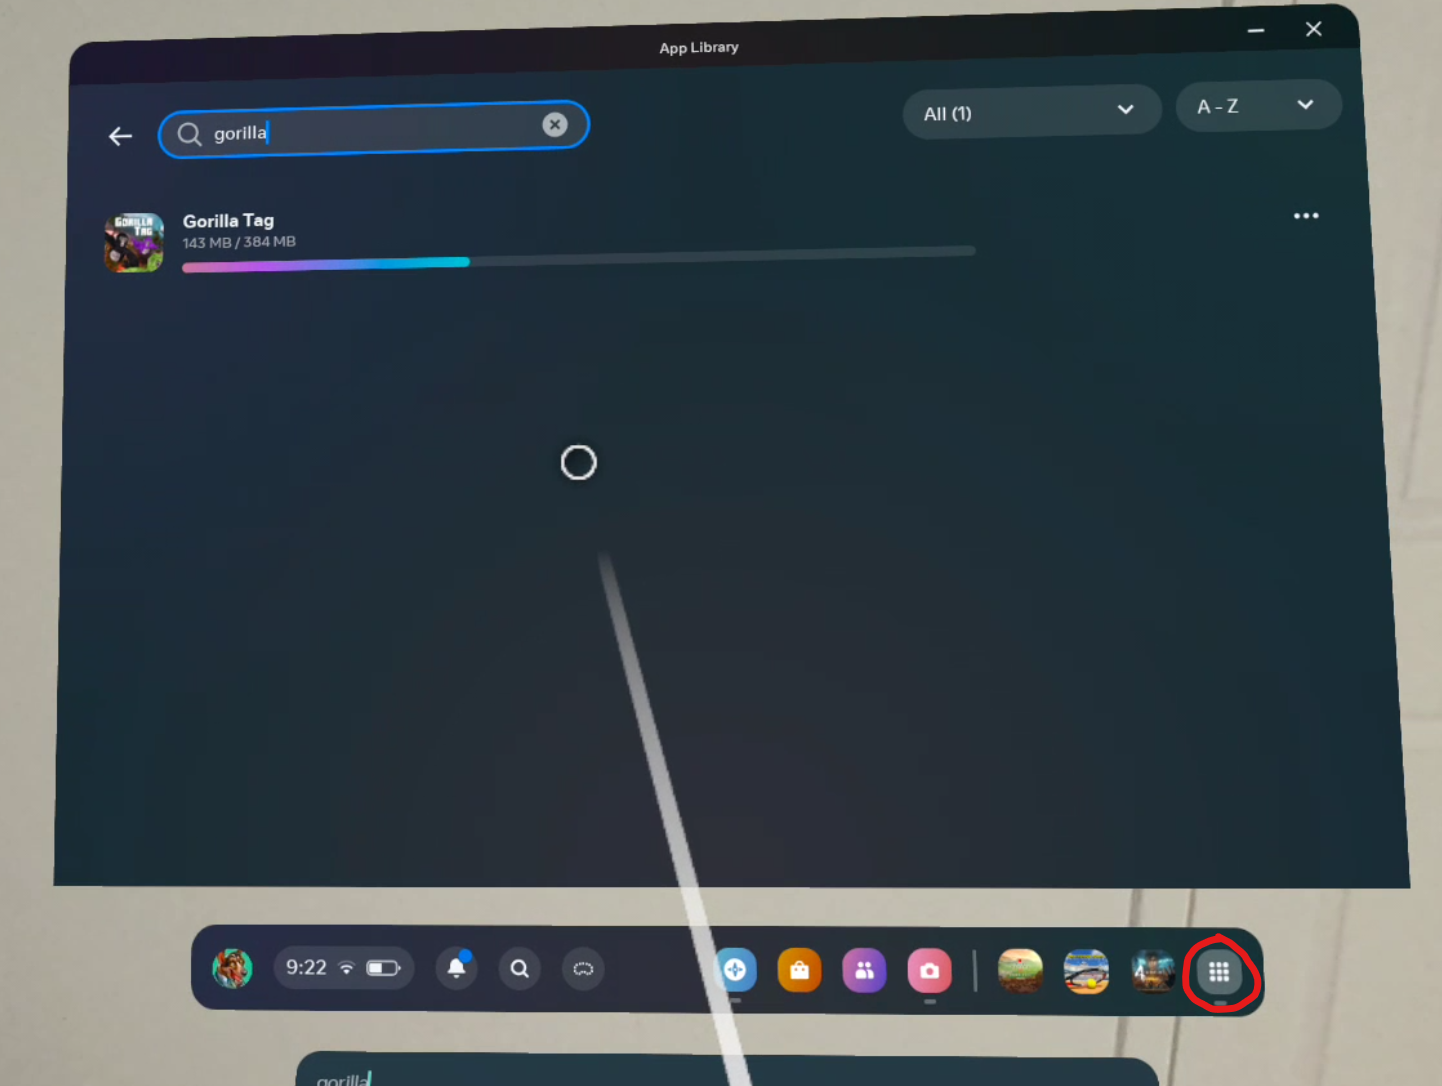
Gorilla Tag installing in the App Library
Once the installation is complete you can run Gorilla Tag just by clicking on it!
Now that you know how to get Gorilla Tag let’s talk about some basic Gorilla Tag controls in our beginner’s guide, and how to complete the Gorilla Tag tutorial.
How To Play Gorilla Tag - The Beginner’s Gorilla Tag Tutorial
So you’re finally in the game! Congratulations on getting Gorilla Tag running, now for the fun part.
Let’s talk about the basic Gorilla Tag controls, how to move around, and how to complete the short tutorial. Oh, and while you do this make sure you’ve got enough space to play the game.
Hitting your hand or breaking a controller on a piece of furniture while you’re playing Gorilla Tag is no fun, so give yourself as much space as possible and make sure any objects, people, or pets are far away from you so you won’t accidentally hit them while you’re in VR.
Back to the Gorilla Tag tutorial. You’ll notice that there aren’t any popups or anything telling you what to do, and you’re in a sort of dark cave.
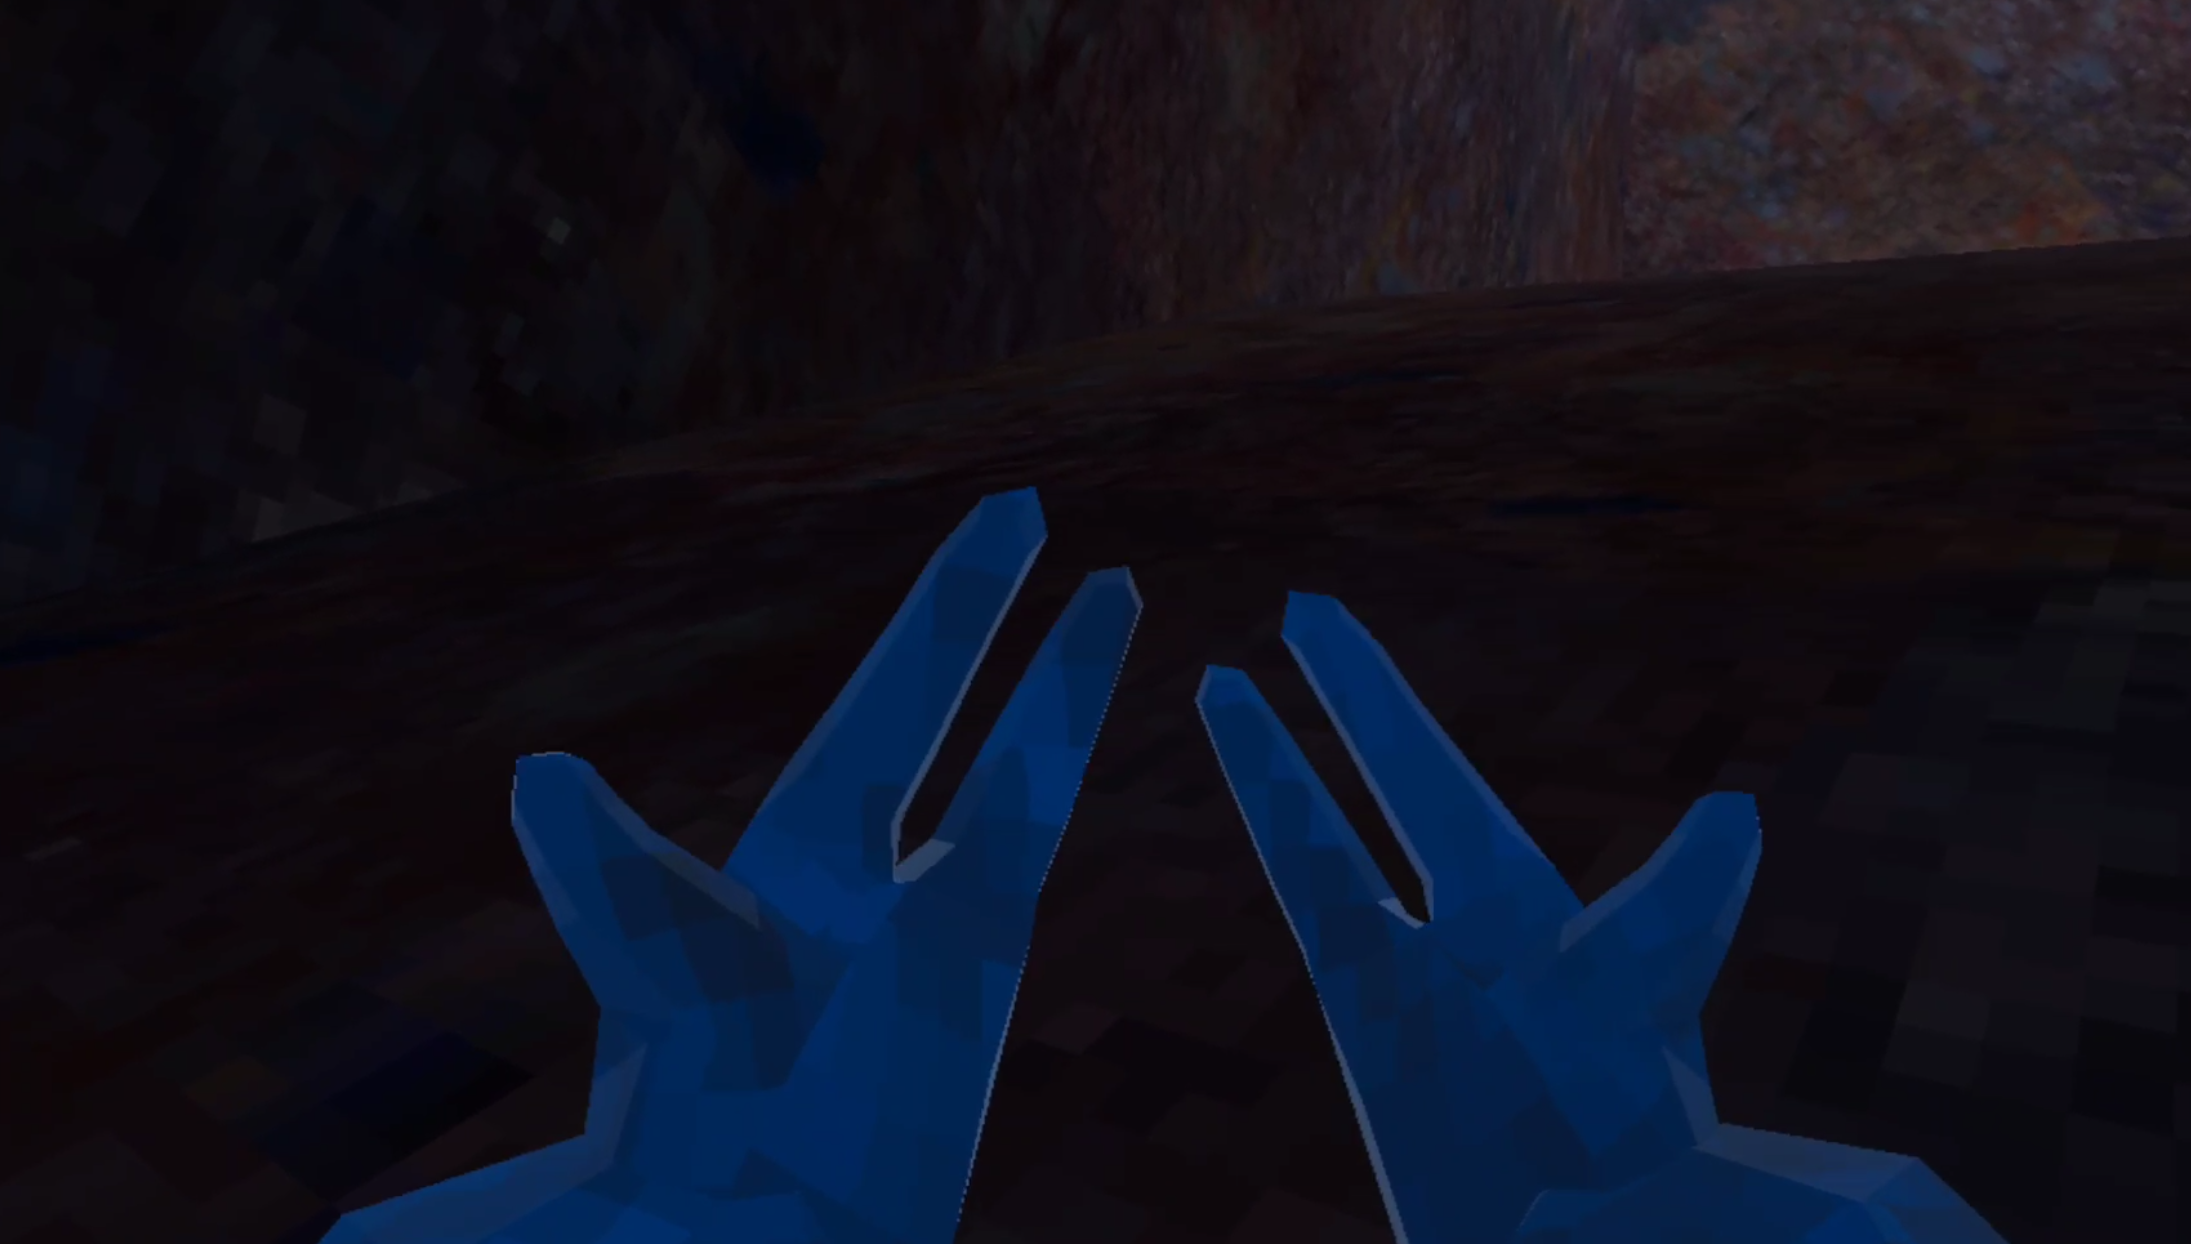
Your monkey hands in Gorilla Tag
You’ll also notice that your hands and body are a random color, don’t worry about that just yet you can change your color to be whatever you want it to be later.
For now get to grips with the controls. The first skill that you will want to master is the ability to move around with your hands.
The joysticks on your controllers won’t do anything, and that’s the secret behind what makes Gorilla Tag so much fun. You don’t use joysticks to slide in the direction you want to move. You use your hands.
At first imagine that your hands are legs. Imagine a gorilla using its huge arms to pull itself forward by planting them in the ground. Just like those gorillas, your gorilla arms in Gorilla Tag are longer than your body.
You can easily touch the ground with them while standing up, and once you feel your hand hit the ground swing your arm backwards so that your body moves fowards.
Take your time and get comfortable with it. Plant one hand on the ground and then the other in front of you while you swing. It’s just like walking but with your arms.
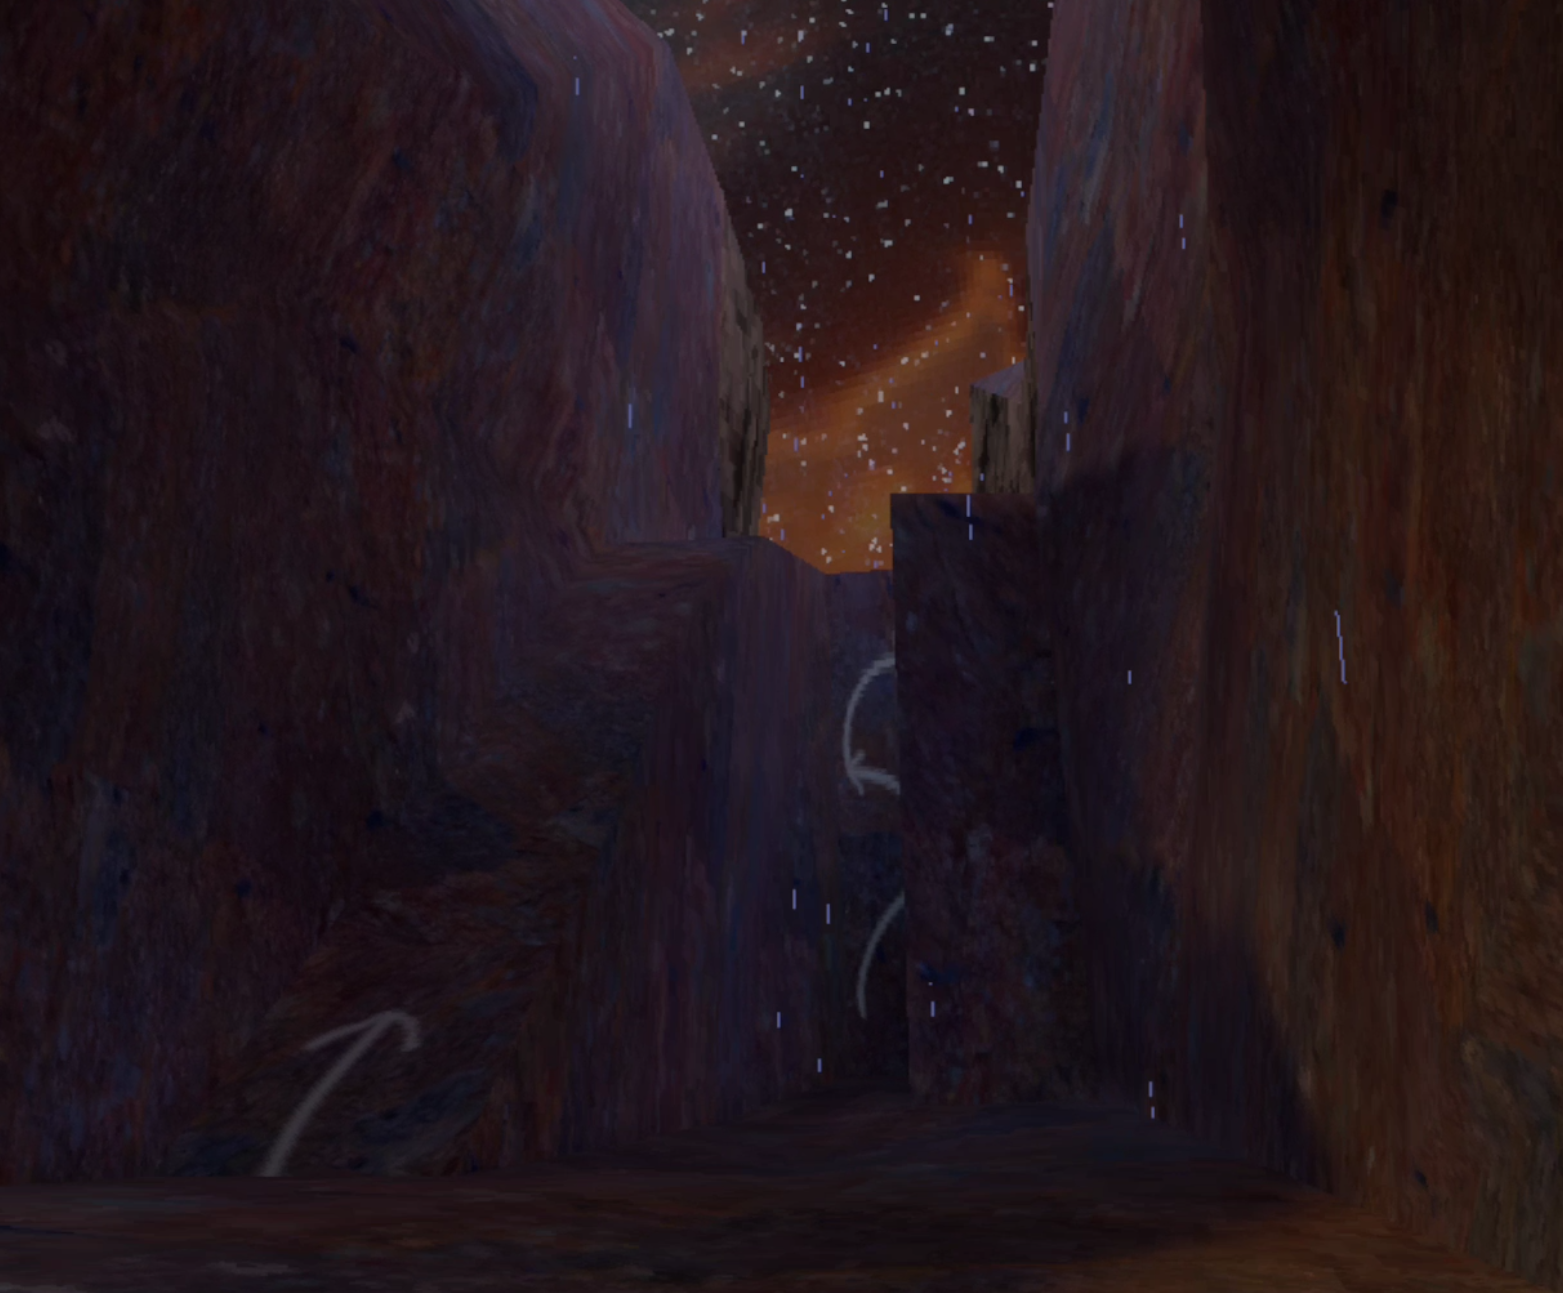
Even basic movement like walking forwards in Gorilla Tag is really different from anything else in real life or Virtual Reality. Don’t worry about getting bored though, your first challenge is right in front of you.

The first obstacle in Gorilla Tag. A bump
You’ll see arrows on the walls pointing down the cave. Follow them to proceed, and soon you’ll see a bump in the floor.
Your basic walking skills aren’t enough to deal with this wall, and unless you’re really tall you won’t be able to lift your hand high enough to reach over the top of it. Even if you could it would be hard to pull yourself up.
So it’s time to learn how to jump off of the ground.
Jumping is a lot like walking, except instead of just going forward you’re going forward and upwards.
This time use both of your arms and slap them both against the floor (the floor in the game, which should be around your waist, not your actual floor) really hard at the same time. You want your hands to hit the floor in the game just behind where your body is to launch yourself up and forward.
You might have already noticed while you were walking around, but if you hit a surface hard enough with one of your arms you will bounce off of it in the opposite direction. This basic knowledge lets you do a ton of cool things in this game, like jump off of the ground.
Jump as much as you like. You might have trouble getting yourself to jump up and forwards at the same time, but doing that is just getting the hang of where your hands end up hitting the floor in the game.
Keep trying, it will probably take you a few tries until you get over the bump.
When you do, congratulations! You’ve complete your first challenge as monke.

The exit to the Gorilla Tag tutorial cave
Time your for second challenge.
Keep following the arrows and you’ll see that the cave opens up.
Go out of the cave entrance and into the open air to discover the second and last obstacle in the Gorilla Tag tutorial.
The final test in the Gorilla Tag tutorial
You have to reach the top of that cliff, and you have two options. You can just go up the ramp if you’re in a hurry and just want to play the game already.
That’s easy enough and by this point you already have the skills to do that on your own, but if you want to challenge yourself and make sure you’re ready to explore Gorilla Tag’s fun maps, then you can try the hard way.
See those arrows in the center that point from one of those walls to the other? Well that’s the challenge. You need to make your way up the straight walls to reach the top of the cliff.
To do that you need to jump up to one wall, and then push yourself off of it to the other. When you’re still in the air you push yourself off of that wall, and back and forth until you reach the top.
This is pretty hard considering that you just learned to push yourself off of the ground to jump, and can take a while. It’s at least worth a try though.
The hard part is making sure you’re going fast enough off of one wall to reach the other. Start by placing yourself next to one of the walls while you’re facing the cliff, and use your jumping skills to push yourself off of the floor towards the opposite wall.
You can do it!
Once you’re in the air and going towards the other wall use your hand closest to that wall to slap it out and down, like you’re swatting a fly that’s on that wall. Just like with jumping you want to push yourself up and also away towards the other wall.
If you do it right you’ll find yourself next to the wall you started next to, except this time you’ll be up in the air. Try to do the same thing and quickly slap that wall so you launch yourself up and back to the other wall.
You’ll only have to do this right three to five times to reach the top. The hard part is slapping the wall just right so that you go up and away from the wall you’re slapping.
That’s a huge part of getting good and learning how to play Gorilla Tag, slapping the ground or walls in just the right way that it moves you just how you want to move.
It might take you a while (it definitely took me a LOT of tries the first time) but you can do it. Once you reach the top, congratulations! You’ve complete the Gorilla Tag tutorial.
We’ve got a lot of useful stuff here about Gorilla Tag at Reality Remake, so if you want to know more check out these articles:
Have fun in Gorilla Tag and enjoy!

The Forest VR Review Played in PCVR On The Oculus Quest 3
More than anything else I was looking to facing the constant threat of the mutant cannibal people that hunt you with more and more aggression and force as time goes on. That was a challenge that would be even more fun to face when fighting them with my actual hands in VR.
Unfortunately it didn’t quite turn out how I imagined. The Forest VR has the bones of a good VR game, but has a lot of little things holding it back from being as great as it should be.
The Forest sounds like it would be a fantastic VR game for a ton of reasons. First of all, because Virtual Reality and survival games are a match made in heaven.
Seriously, survival games are one of the genres that really thrive in the VR gaming space. This is even true among flatscreen games ported to VR, like Subnautica.
So naturally I was really excited to get to know The Forest VR based on what I already knew about the game. It’s got a vast open world with a ton of things to do and constant challenges to overcome. There’s hunting, gathering resources, and building your base to do to constantly keep you busy.
More than anything else I was looking to facing the constant threat of the mutant cannibal people that hunt you with more and more aggression and force as time goes on. That was a challenge that would be even more fun to face when fighting them with my actual hands in VR.
Unfortunately it didn’t quite turn out how I imagined. The Forest VR has the bones of a good VR game, but has a lot of little things holding it back from being as great as it should be.

We’ve got some beef with The Forest VR… but I still kind of love it
I can only imagine how awesome of a VR survival game The Forest VR could be if it had had more time and effort put into it by the developers.
While there’s no Sons Of The Forest VR, it would be really nice if the developers took another crack at a VR mode for one of their games and made a great VR Sons Of The Forest, unfortunately for now all we’ve got is this VR The Forest port.
If you want to try The Forest VR yourself and you have an Oculus Quest 2 or Oculus Quest 3, also keep in mind that The Forest is a PCVR game, meaning that you can’t run it directly on your Quest device. You’ll have to connect your Quest to a computer to try it. So you can play The Forest VR on the Oculus Quest 2 or 3 if you’re wondering.
Anyway, on to the review. This is my experience playing The Forest VR on the Oculus Quest 3, and why you may or may not want to do the same thing too.
The Forest VR Review - The Technical Stuff
The feeling that the developers of this Virtual Reality option for The Forest didn’t get all of the time they would need to finish it is really prevalent.
It’s still called a “Beta” in the main menu, though with the release of Sons Of The Forest and no updates for a very long time, it’s clear that the current state of VR The Forest is as good as it’s going to get as far as the developers were concerned.
Which is a real shame since the whole experience is just so… janky.
See the warping here? Well this is what I saw in my headset, and it happened all of the time.
Let’s start by talking about graphics and performance. As with most VR titles this will vary a lot depending on your personal setup, whether you’re using Airlink or a headset that is cabled directly into your PC, and your PC specs themselves.
Still, I’ve run a lot of PCVR games and few of them run as poorly as The Forest VR. Hopefully this has something to do with the graphics card being used and you don’t have similar issues, but the first hurdles to get over were all related to low frame rates and choppy visuals.
That’s also why the screenshots in this article all look a little bad, though I’ve generally tried to pick moments that look good. Even with a PC that is overall very capable of running PCVR games smoothly it is clear that The Forest VR is poorly optimized.
While I’ve heard that this may be because of the brand of graphics card you’re using. It’s possible that AMD cards run better, but overall it is clear that you’re probably going to have trouble running VR The Forest at anything above 45 FPS even with graphics settings turned down, and it’s still going to look bad.
A view of the beach… still doesn’t look half bad when you don’t move your head
Quick movements, such as those you’ll do during combat, make this problem even worse.
There are a lot of things in The Forest VR that take you out of the experience purely because of the quality of the Virtual Reality port, and a big one is how choppy your frames will get when you’re swinging your axe at an aggressive cannibal.
VR melee combat, or ranged combat, or combat of any kind, gets really hard and awkward when you need to react quickly to something with your actual body, and the reaction that you see in the 3D VR view doesn’t keep up with your hands and head.
That, combined with the visuals that are hampered by performance issues and look grainy and just plain weird makes for an immediate negative impression just when starting the game for the first time.
That’s all we’re going to say about the technical issues of The Forest VR, but there are other things that are also hard to swallow about this Virtual Reality game.
The Forest VR Review - The UI and Bugginess
I can’t tell you how many times I was feeling truly immersed.
I had managed to get over the choppy frames and bad resolution and just play the game without minding it. In our quest here at Reality Remake to try all VR games, I had already put up with worse.
I just started feeling the pressure, had a fight with a mutant, chopped down a tree, delivered some logs to a construction site. Any of the many things you can do in The Forest VR.
For a split second I had finally felt immersed, then I walked into a piece of luggage for a split second so I saw “Movement Blocked.”

I wish this popup never existed
I’m not against popups on your screen in VR games. This review is not going to say that all UI elements in VR games are always bad.
UI popups that appear constantly without any need for them are though. If my movement is blocked then I can tell it is blocked because I didn’t move.
Seriously, this popup will appear every minute or so, and sometimes for no apparent reason. It is so annoying and a constant reminder that you’re in a game. I’m pretty sure it’s broken, just like crouching.
Even if you turn physical crouching on in the settings menu, bending over sightly to hit a locked piece of luggage with your axe will completely mess up your perspective.

A reminder that this is still a Beta years after it’s last update
Sure you can fix this by walking around a little, and then your feet will come back down to the earth, but you need to bend over a lot to wash your hands or interact with something.
It would also be nice just to be able to bend over without thinking “Well now I’m going to teleport into the sky a little bit and have to wait for that to go away.”
There are a ton of things like that in The Forest VR, and I’m not going to list all of them for you here. There are a ton of little pieces of jank that could be solved with just a little more polish put on the experience.
Let the player bend over without their height bugging out. Let them walk into a rock without a popup appearing. There are so many things like this that just scream “abandoned VR port” that you will see all of the time.
Just like with the poor performance and bad frames per second you just have to learn to ignore them to get any joy out of The Forest VR, and that’s asking a lot of a player that’s trying to have fun.

Fighting a mutant in VR The Forest
Oh, and while I never expected much, the The Forest VR controls are occasionally very bad as well.
We’ll talk about the good things here as well, but your selected dominant hand will always have something in it, like your survival axe, and you still use the grab button on that hand to pick things up.
The logic of Virtual Reality controls generally tries to follow some form of real life logic. Like, if you have something in your hand, your hand is dedicated to using that thing.
Say you try to pick something up with your non dominant hand, the hand that will be empty. Nope, instead you pull out your lighter. The natural instinct to use your empty hand to pick up an object constantly creeps into the experience.
I can’t tell you how many times I accidentally took out my lighter by hitting the grab button on my left hand while trying to pick up something off of the ground.
The control scheme in The Forest VR is another constant point of annoyance, and often feels as half baked as other parts of the experience.

Chopping down trees is pretty fun and intuitive though!
Oh, and for my final complaint, I’ll say that jumping out of your body to watch your character do an animation is always jarring in VR. Though it was probably easier from a technical level to do things this way.
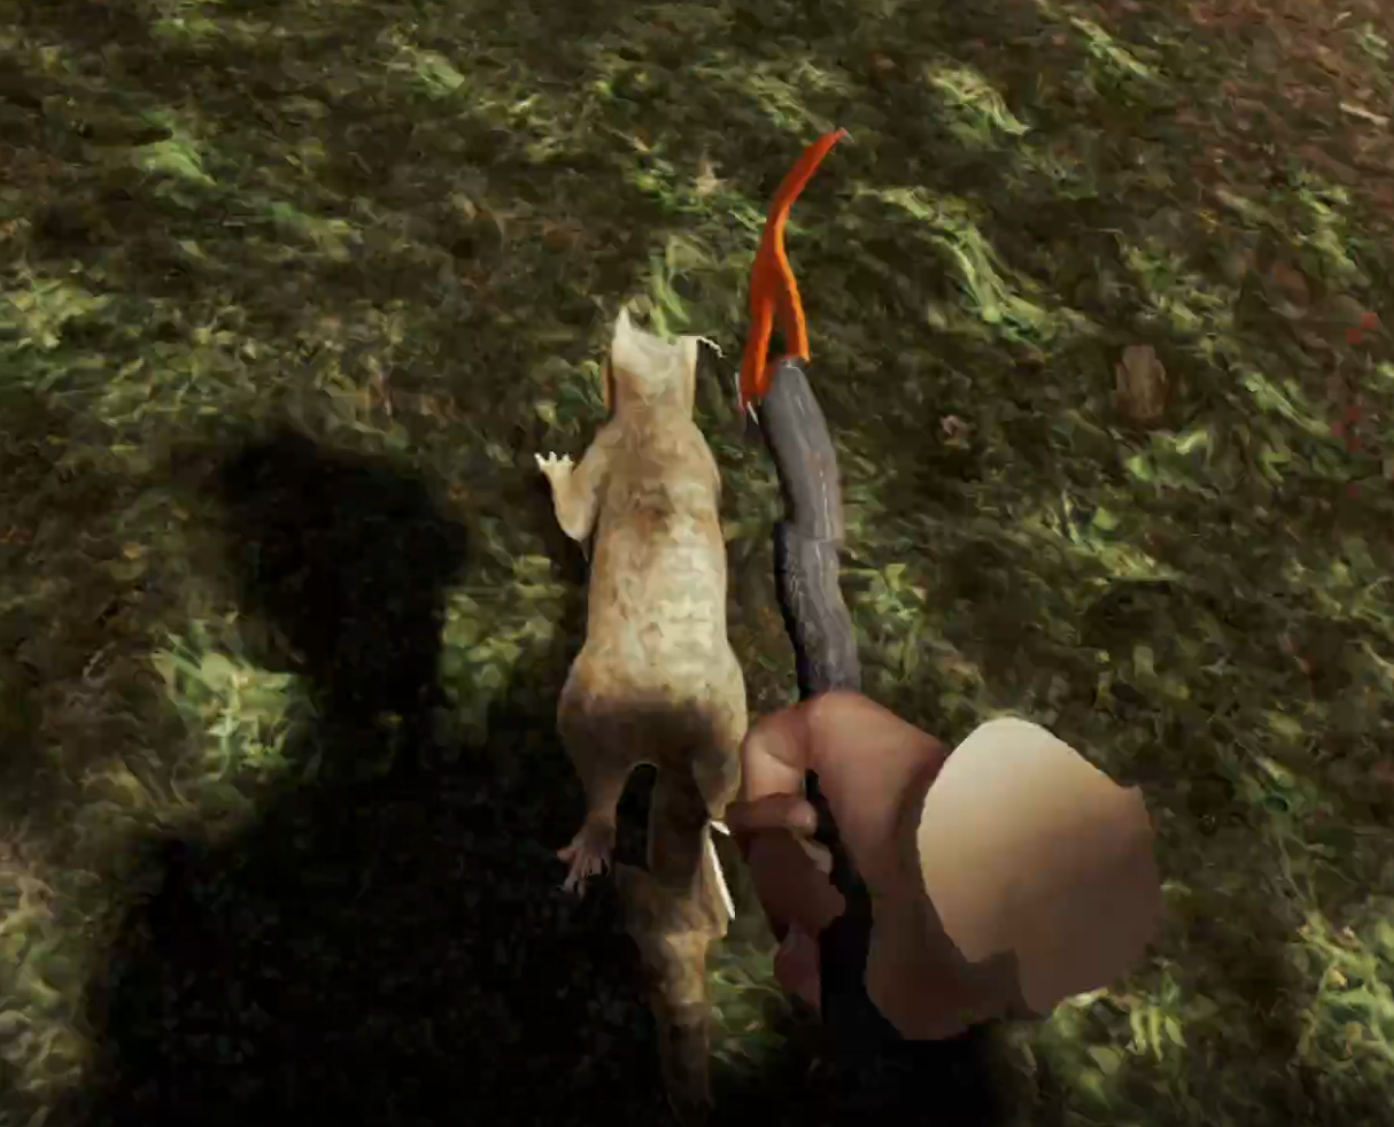
For instance, every time you skin an animal or climb a rope, you stand in place while you watch your character bend over and do the thing.

In The Forest VR you are forced to view your character do certain things from outside your body
Of course your view being forced into a predetermined animation would also be jarring, and so would the animal’s skin just jumping off of their body and into your inventory.
This is why most VR games have you do an action yourself, with your real hands. To be fair that’s hard to implement too, and like with so many other things there probably just never was the time to make it happen.
I feel bad for whoever was working on this VR version of The Forest, it must have been really disappointing to see all this potential go to waste.
That’s not to say that there isn’t anything in The Forest VR to be happy about, what feels finished is really very good, and so let’s talk about that now.
While this has been a very critical review so far, there are definitely good things in The Forest VR.
The Forest VR Review - The Good Things
So we’ve spent quite a while here talking a lot about what’s bad about The Forest VR. I’m doing that mainly so that you don’t get your hopes up and only read half of this article before going charging in and being disappointed.
Let’s finally quit being so negative and talk about what’s good about this survival game’s VR port.
There’s a lot to do and see and find in The Forest, and it is a massive game too. Standing on a hill and looking out at the landscape below you is always breathtaking in Virtual Reality, and The Forest has a lot of natural beauty for you to enjoy.
The sound is also amazing. The wind blowing through the trees, a deer jumping through a bush, a mutant screaming in the distance. All of the sounds can take you from relaxed to fully alert in a second. It’s very well done.
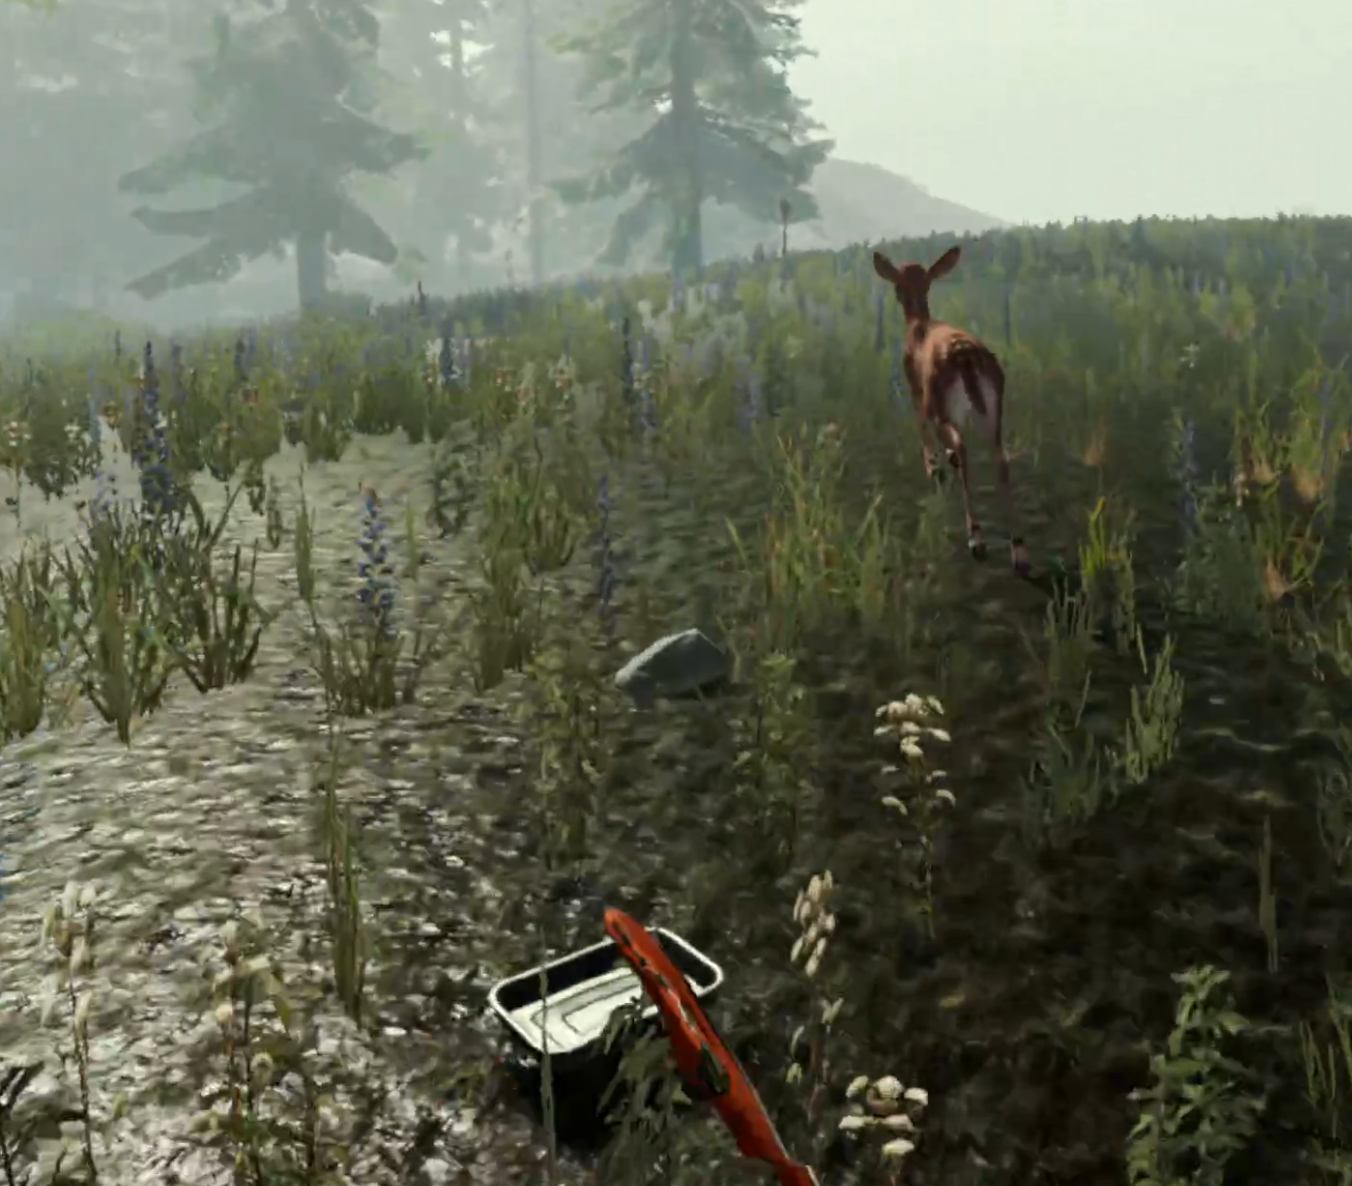
Chasing down a deer with an axe in The Forest VR
More than anything else what shines in this game are the tools and weapons you get your hands on, and the building.
First let’s talk about your tools and weapons. Shortly after starting the game I figured out how to craft a slingshot, which turned out to be as cool as it was ineffective.
It’s ineffective because the stones don’t go very far and do very little damage, but what was cool about it was that the slingshot actually works really well with VR controls.
There’s no cheap “press this button to fire slingshot” instead you pull back the slingshot by holding trigger on your dominant hand, and then actually aim and release it.

The slingshot is ineffective, but a lot of fun
It’s pretty intuitive after you figure it out, and a ton of fun to aim and shoot. It feels like you’re using an actual slingshot and is a ton of fun.
The bow is also pretty easy to make, and is also way more effective against the mutant cannibal enemies. Also it’s a great tool for hunting more illusive game more easily.
It works just like the slingshot, pull back while holding trigger with your dominant hand, aim and release to shoot.

The Bow is more effective and even more fun
A lot of items are meshed very well with the VR motion controls, and when they work they work amazingly well.
You can tell what had a decent amount of development time before development quit on the Virtual Reality support, and what was finished to an acceptable degree functions very well and satisfyingly.
Chopping down trees for sticks, leaves, and logs is also a ton of fun. Chopping around the sides of the tree with your actual hands feels good when you notice a section of trunk fall away with each strike.
Then you look up with your actual head to see the whole thing fall down before your eyes. It’s those sorts of magically immersive moments that make The Forest VR feel worth it.
Delivering more logs to the log cabin
The building is also fun, despite being rudimentary. There’s no manual combining of items by wrapping rope or hammering pieces in like in Green Hell VR, and there isn’t any craft to crafting like in A Township Tale.
Still, putting your construction site in place and adding pieces is fun in VR The Forest, and putting even a simple log cabin together comes with a feeling of accomplishment after chopping down all those trees and hauling all those logs.
Big expansive VR survival games that give you the amount of building and crafting options to play the game your way like The Forest VR does are few and far between. So it’s hard to hate this experience despite the flaws, because building a log fort to fight off hordes of cannibals is something you can’t do in any other Virtual Reality game.
All in all there are a lot of little things holding The Forest VR back, but beneath all of them is a truly great VR survival game. There’s a gem lying beneath all of these performance issues and general jankiness. If you can get past all of those things there are hours of fun to be had. If you can’t get past all of those things then I really can’t blame you.
Hopefully we get more a more complete Sons Of The Forest VR down the road. I know I’d try that game just for VR.
Whether you choose to play The Forest VR or not, there are also other great VR survival games out there, and whatever experience you choose to pursue, enjoy!
Rust VR is Coming To The Oculus Quest 3 and PCVR
That’s right, you can have the full Rust experience of gathering resources, building a base, and raiding your neighbors all in Virtual Reality with a new Rust VR game that is in development by indie VR developer Torched Games.
So we’ve got a VR Escape From Tarkov now, and even a VR Pokemon game, but what about VR Rust? Well luckily you won’t have to wait any longer to have a Rust VR game.
That’s right, you can have the full Rust experience of gathering resources, building a base, and raiding your neighbors all in Virtual Reality with a new Rust VR game that is in development by indie VR developer Torched Games.
This is yet another example of a great flatscreen game making its way to Virtual Reality through the efforts of a small studio. It’s not an official VR Rust title, but wow does it hit the same satisfying gameplay as the original game, but now with immersive VR hand controls.
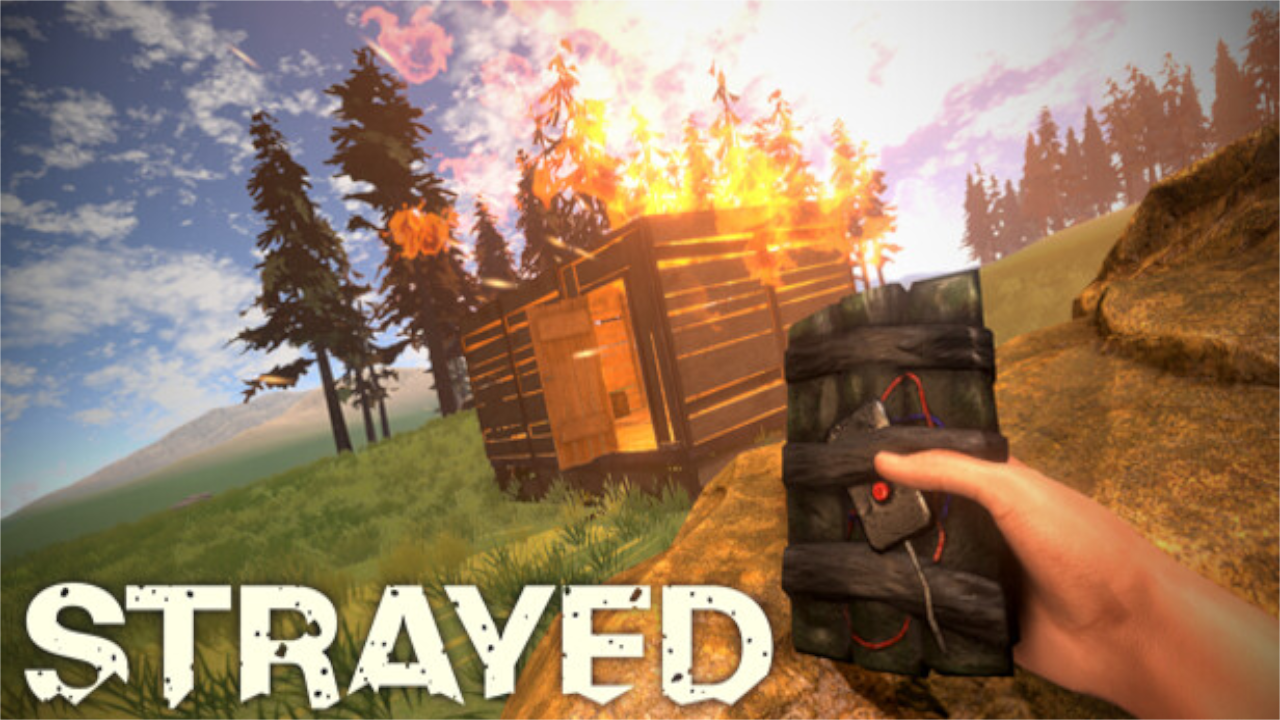
Strayed - The VR Rust Game We’ve Been Waiting For

A version of the Strayed Logo
This new Rust VR game is called Strayed, and it is set to deliver the whole Rust package in Virtual Reality. You can wishlist it on Steam to be notified when it releases, but if you want to play it right now there’s an option to do so that we’ll talk about soon.
Now keep in mind that Strayed is still in active development and hasn’t even entered open Alpha at the time of writing this article, and so we won’t get into a deep review of the game yet.
It would be unfair to judge a project that still has so much development ahead of it well before it is finished, but we can say that it does deliver on the experience of Rust in VR.
Though there are, of course, still rough edges that need to be smoothed out before full release.

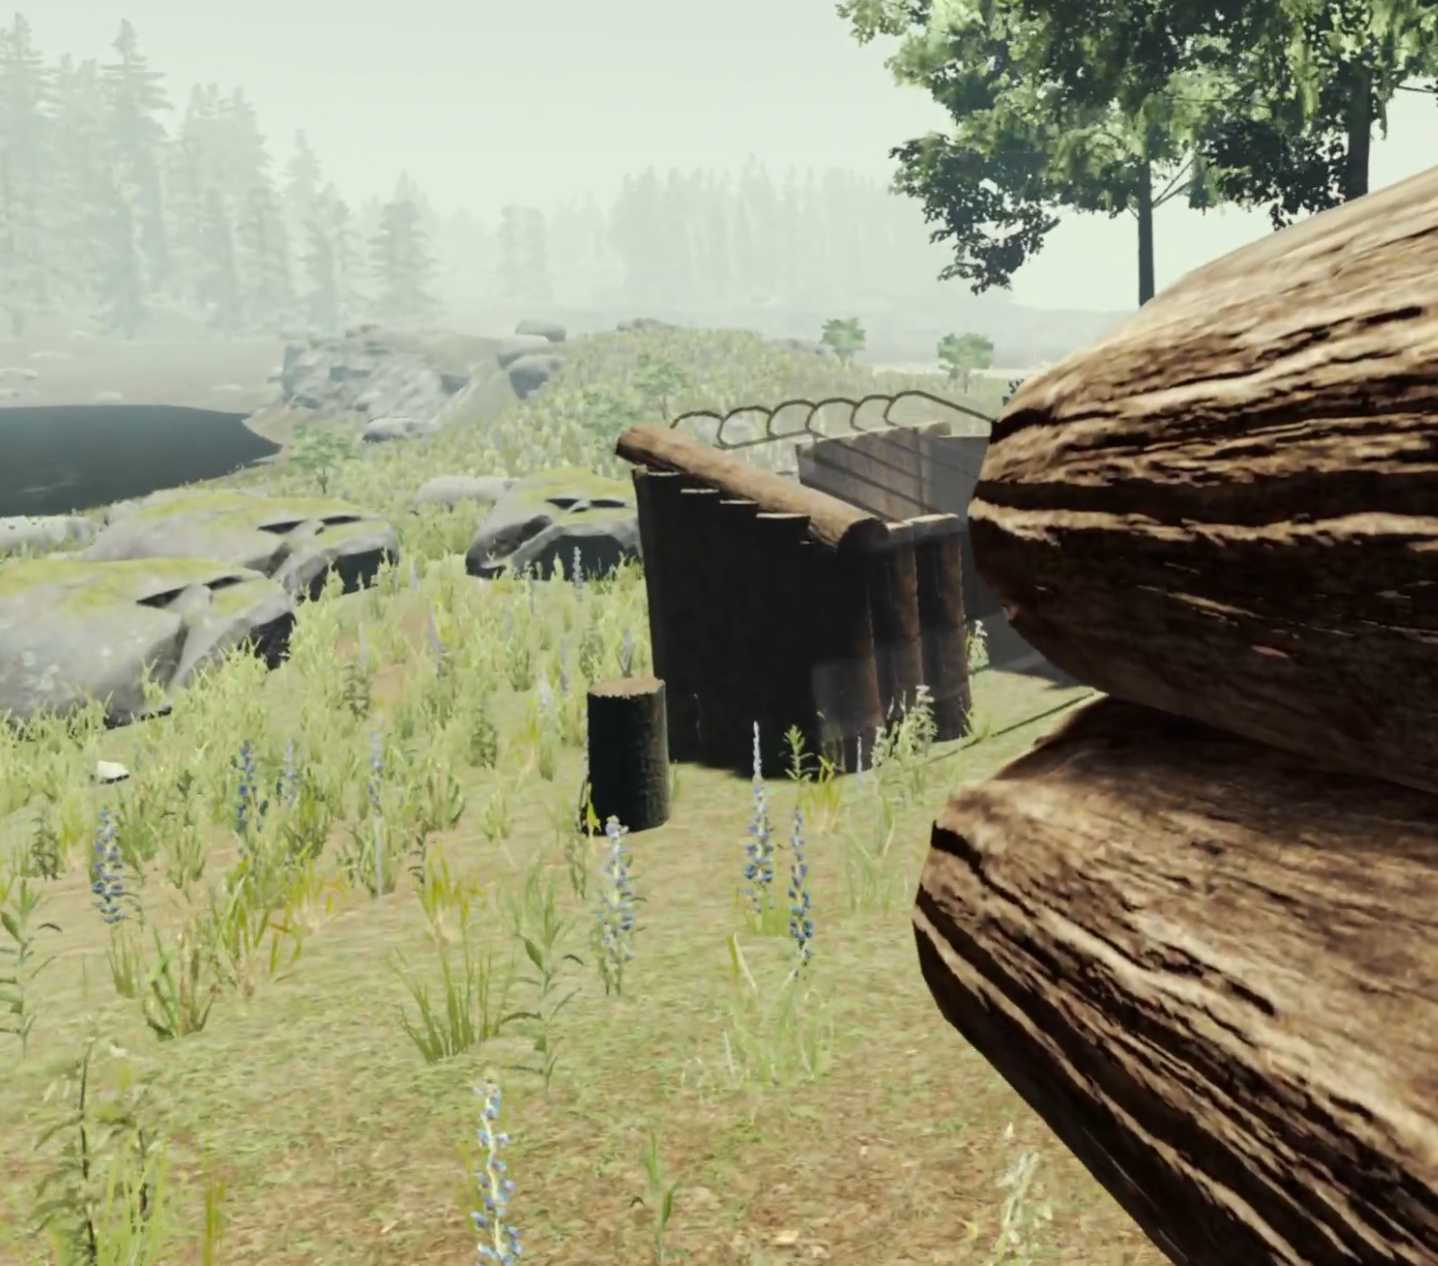
The wide open world of Strayed
You start, just as in Rust, with a Rock and a dream. You use that rock to harvest some resources and get better tools.
Of course you’ll need to keep yourself fed and drink water along the way. All of the survival mechanics present in Rust are already here in Strayed.
There are even animals to hunt for food and skins, and airdrops to chase after. Landmarks are also present with loot spawns that you and other players can fight over.

Two players fighting over a landmark in Strayed
While not being an official Rust title, this VR Rust like game definitely delivers on most of the features already present in Rust, but in VR.
Like building a base.

Base building in Strayed
Whether the game will be an experience truly worth of calling Rust VR in the long term remains to be seen, but it’s shaping up to give a true Rust type of experience.
By now you might be wondering if you can play Strayed, and how.
Well while you used to have to sign up for the game’s Patreon to play, Strayed is now available for PCVR as an Early Access title on Steam. A Quest 3 release is also planned, but not out yet.
You can also support the game and get access to it through its Patreon for a monthly fee if you want to.
If you want to support the development of this VR Rust game then join the Patreon and help the developers out, but if you want a complete and polished Rust VR experience, maybe wait a while for the game to get more time in the oven.
Well there you have it, VR Rust is coming (and if you’re willing to join the Patreon it’s already here). If you want to know more about Strayed and get updates on its development you can also check out the Strayed Discord. The developer Drew Mileham and his team also post updates on his Youtube channel about new improvements and features to the game.
Whether you’re going to join the Patreon and jump right in, or wait for later to play some VR Rust, enjoy!