


Unlock All Vertigo 2 Secret Weapons - How To Get All Vertigo 2 Secret Weapons Guide
If you want to experience every awesome weapon there is to have in Vertigo 2, then you’ll want to collect all of Vertigo 2’s secret weapons. Well this guide will show you where to find them and how to unlock them. Keep in mind that if you haven’t completed Vertigo 2 yet there will be some minor spoilers in this guide. We’ll reveal as little as possible here, but some of the locations you end up visiting in the game will have to be revealed. Here’s how to get all of the Vertigo 2 Secret Weapons.
If you want to experience every awesome weapon there is to have in Vertigo 2, then you’ll want to collect all of Vertigo 2’s secret weapons. Well this guide will show you where to find them and how to unlock them. Keep in mind that if you haven’t completed Vertigo 2 yet there will be some minor spoilers in this guide. We’ll reveal as little as possible here, but some of the locations you end up visiting in the game will have to be revealed. Here’s how to get all of the Vertigo 2 Secret Weapons.
Oh, and when you get these secret weapons you can access them by bringing up your weapon menu in Vertigo 2 as usual, and them pressing the trigger on the controller that you’ve opened the weapon menu with.
Gordle Pun - Vertigo 2 Secret Weapons
The Gordle Pun is the first secret weapon that you can collect in Vertigo 2 during the second chapter of the game, and you can get it really early on. Right at the beginning you’ll be stuck behind a forcefield as a blast door closes, and when the force field disappears an enemy will spawn. Once you’ve dealt with them take the only path available to you, the door on your right.

The door on your right from where you start Chapter 2
Through the door will be a hallway with an enemy in it, and there will be doors on either side of you. Take the second door on the right, and deal with the other enemy that is through that door. You’ll see a pit in the room with you, and across it some writing on the wall saying “Bottomless Pit.”

The bottomless pit
The pit might be bottomless, but you can still teleport into a small hole in the side of it. Peer over the edge of the pit and you’ll see a hole in the wall, teleport into it and go through the cavern it leads to.

The hole you need to teleport into to get to the Gordle Pun Secret Weapon
There will be some enemies on your way, but just keep going forwards and eventually you’ll drop down into a test room with the Gordle Pun looking device on a table.

The Gordle Pun Secret Weapon in Vertigo 2
Pick it up and you’ll be transported to somewhere that looks like a moon. You’ll slowly roll forward, as you’re standing on a rover of some sort, and box shaped enemies will run at you.

The Gordle Pun Secret Weapon Challenge
You’ll need to hit them with the Gordle Pun before they reach you and blow you up. You also can’t use any of your other weapons. This challenge can be pretty hard as they run quickly and the Gordle Pun isn’t very accurate. One tip is to aim down the front of the Gordle Pun and point it slightly up and to the left of what you’re aiming at. Also switching your Gordle Pun to red mode will make shots more accurate, but slower. While blue is better for up close as it shoots more quickly but is less accurate.
When you defeat the challenge you’ll find yourself back in the test chamber with the first Vertigo 2 secret weapon.

Making portals with the Gordle Pun Secret Weapon
Shooting the Gordle Pun at the nearby wall will cause things to come out of the portal that is created. Some of these will be useful healing items or grenades. So stock up while you can before exiting out of the door.
Nostalgia Pistol - Vertigo 2 Secret Weapons
The Nostalgia Pistol is the second secret weapon you’ll come across in Vertigo 2, and it’s a bit further on into the game in Chapter 6. You’ll see the title at the start of Chapter 6 here when exiting a waste pipe.

The beginning of chapter 6 in Vertigo 2
You’ll see a catwalk on your left, teleport on to it and go through the door at the end. Through that door is a healing station and a hallway that will soon fill with enemies. You’ll notice a room with multiple glass windows in this hallway. Once the enemies are dispatched take the first left, and then a right at the closed blast door to go into this room.

The first step to get to the Nostalgia Pistol secret weapon
Inside the room there will be an upgrade station and a small button beside the big machines sitting against the wall. Press the button.

The secret button to get to the secret Nostalgia Pistol weapon
Exit the room and you’ll see the blast door that was closed is now open. There’s a supply closet on the right with some grenades and on the left you’ll see a strange depression in the wall, almost like a doorway was plastered over.

A secret door
Just walk through it and you’ll find yourself in an empty looking bedroom. On the floor there will be a computer and a VR headset, pick up the headset and put it on.

A VR game in a VR game
You’ll be in a new space that contains a small piano and a button above it with a musical note on it. First press the button with the musical note, this will not work if you don’t do that. A melody will play. Complete it by hitting the keys on the piano in the order shown here.

How to solve the piano puzzle to get the Nostalgia Pistol secret weapon in Vertigo 2
Then the piano will disappear and a door will open to a new room. The Nostalgia Pistol is on a pedestal at the end of the room. Walk over and pick it up. Now a bunch of the floating robot ball enemies from the first Vertigo (and Vertigo 2) will appear and attack you. Be careful not to fall off of the narrow bridge you’re standing on and defeat them.

The Nostalgia Pistol Vertigo 2 secret weapon
Once you do just wait for a minute or two and you’ll be teleported out. You can take off the VR headset and the Nostalgia Pistol secret weapon is yours.
AEtherian Quad-Bow - Vertigo 2 Secret Weapons
Soon after the Nostalgia Pistol is the third of Vertigo 2’s secret weapons. The AEtherian Quad-Bow. This is by far the easiest secret weapon to get your hands on, and you’d probably end up finding it even if you never read this guide. Still, it’s possible to miss it. Shortly after the start of Chapter 9 you’ll find yourself in a cave that’s full of the headless centaur creatures that fire arrows.

If you see these guys you’re going the right way
Keep going through the cave, eventually you’ll see some closed doors that you can open by putting your hand on them. Unfortunately doing that means you’ll be locked out of the cave. Instead of going through those take a right and you’ll see a camp inside of the cave.

An empty camp that contains one of the secret weapons
Go into the big hut on the other side of the camp. There’s a chest there, and inside of the chest is the AEtherian Quad Bow!

The chest with the AEtherian Quad-Bow secret weapon in it
Once you pick up the bow the exit to the camp will be blocked off until you defeat all of the headless centaurs that spawn. The AEtherian Quad Bow is a ton of fun and is one of the coolest Vertigo 2 secret weapons.

The Aetherian Quad-Bow secret weapon
Finger Gun - Vertigo 2 Secret Weapons
The Finger Gun secret weapon comes quite a bit after the Quad Bow in Vertigo 2. You’ll be able to get the Finger Gun when you reach Chapter 14. Right at the beginning of the chapter you’ll be in a train station, and across the train station from the control tower you’ll see a dark tunnel.

The tunnel leading to the Finger Gun secret weapon
Go in and go up the escalator inside. It’s dark but don’t worry, your flashlight will come on as always. Once you’re at the top take a right and teleport through the partially open door.

Teleport through the crack in this door
After going down the hall a bit you’ll notice this boarded up hallway on your left.

What happened here? This must be one crazy secret weapon
Blow through the planks with any of your weapons and keep going. You’ll pass a lot of creepy test dummies, and eventually you’ll find yourself in front of this machine.

Getting the Finger Gun Secret Weapon
Put your finger in and you’ve got the finger gun! You can just shoot out of your finger now. To reload put a syringe into the tip of your shooting finger. You’ll generate more syringes, and you can also find some more scattered around the lab. Which is good because now you’ll have to fight your way past the test dummies to escape with your new secret weapon.

Fighting test dummies with the FInger Gun secret weapon
Once you get past all of the dummies this Vertigo 2 secret weapon is yours to keep! Of all the secret weapons in Vertigo 2, this one might be the weirdest.
Kauboi's Revolver - Vertigo 2 Secret Weapons
Of all the Vertigo 2 secret weapons in this guide this one is probably the most spoilery, so if you want to avoid even minor story spoilers skip ahead. Still, while this secret weapon does affect the ending, we’ll spoil very little here. Which is good because Kauboi’s Revolver is the most powerful weapon in all of Vertigo 2, secret or otherwise.
You can get it in Chapter 16 when you find yourself at a big tower in a wasteland. When you go into the tower there’s an elevator with three buttons, hit the lowest button to go to the bottom floor.

The elevator buttons
When you reach the bottom you’ll see a huge statue, and doors on either side of the hall. There is a puzzle behind both doors. Let’s start with the door that will be on your left.

The first puzzle completed
The goal of this puzzle is to get the ray of light to hit each of the balls of light by bouncing the ray with the mirrors. It’s pretty straightforward once you get the hang of it. Once the puzzle is solved the eye in the wall will light up.

Turning a mirror
Quick tip, it’s easier to move the mirrors when holding them with both hands. The hardest part of this puzzle is to just get the mirrors to turn the way you want them to,
Anyway once you’re done go through the other door for the second puzzle. You’ll see a table with some lights hanging over it in the middle of the room. Also, there’s a control panel of some kind on it. When you move the sliders you move the lights.

The controls for the table for the second puzzle
Each slider controls a different aspect of the lights. The goal is to make the lights form the symbol on the wall of the room. Like this.

What you want the lights to look like
Once you’ve solved both of these puzzles the most of powerful of all Vertigo 2 secret weapons is yours! Just head through the pathway of light that comes out of the statue.
Keep in mind that you won’t be able to use Kauboi’s Revolver against enemies for the whole game as you won’t have any ammunition for it… but on New Game Plus playthroughs it is an incredibly powerful secret weapon that you can synthesize ammo for like any other.
Annihilator Prototype - Vertigo 2 Secret Weapons
The Annihilator Prototype is probably the hardest of all secret weapons to acquire in Vertigo 2. You can get it the first time you play through the game, but it’s probably easier to acquire on a second New Game Plus playthrough. the path to getting this secret weapon starts in Chapter 4.
When you wake up go outside into the hallway and take a right. Enter Room 1.

The guest room with the Annihilator Prototype key
You can go into this room, and on the table inside is a key of sorts. Put it into your wrist storage slots. You’ll have to play through a large portion of the rest of the game while holding this key, so you’ll effectively be robbing yourself of an item slot.

The Annihilator Prototype Key
Once you get back to the point in the game where you’re on a beach and… recently left the insides of a large creature (you’ll know it once you’ve been there.) There will be a large rock on that beach with a lockbox on it. Put the key in that box, and you’ve got another awesome Vertigo 2 secret weapon.
Note though that if you try and get the key in New Game Plus you can’t just use Chapter Select and fast forward to the chapter with the box. Your inventory items will not come with you, so you have to play continuously through the game until you reach the box. That’s what makes this the hardest to get of all Vertigo 2 secret weapons.
Well those are all of the Vertigo 2 Secret Weapons! Hope this guide helped you out in getting all of the interesting and unique secret weapons in this interesting and unique game. Enjoy!
Easily Install Beat Saber Mods And Custom Songs On Your Quest 2
Beat Saber is a great game, but like so many great games it’s even better with mods. Beat Saber mods allow you to put even more songs into the game by modding in custom songs too. There’s also custom avatars and custom sabers to try out. So if you want Beat Saber custom songs, or even other mods, then this guide will show you how to install Beat Saber mods on standalone VR devices like your Quest 2, Quest 1, or Quest Pro.
Beat Saber is a great game, but like so many great games it’s even better with mods. Beat Saber mods allow you to put even more songs into the game by modding in custom songs too. There’s also custom avatars and custom sabers to try out. So if you want Beat Saber custom songs, or even other mods, then this guide will show you how to install Beat Saber mods on standalone VR devices like your Quest 2, Quest 1, or Quest Pro.
Note that while this is the easiest method to install Beat Saber mods on your Quest 2, this is still a very involved process that can be difficult to pull off the first time. All of the resources you will need to install Beat Saber mods on a Quest device are here, so if you run into issues make sure you completed the last steps correctly, and if all else fails start again from the beginning.
You will need a PC and Oculus Link cable or similar cable that can connect your Quest to the PC.
Installing BMBF - Beat Saber Mods On the Quest 2 For Custom Songs
The first thing you will need to do to install Beat Saber mods on your Oculus Quest device and install custom songs is to get the BMBF app on your headset. Unfortunately you can’t just download BMBF wirelessly to your headset like you can with most VR games for the Quest 2. You’ll need a PC so that you can install BMBF on to your Quest 2 with SideQuest.
BMBF will be your one stop shop for Beat Saber mods, and does most of the hard work for you. The most difficult part of installing Beat Saber mods for custom songs on your Quest 2 is sideloading BMBF. If you’ve already sideloaded apps on to your Quest 2 before then keep going to the next section to learn how to use BMBF to install Beat Saber mods, otherwise we’ll run through how to add BMBF to your Quest 2 headset here.
The BMBF Logo. Thanks Beat Saber modders!
First you will need a cable that can connect your PC to your headset. So you’ll need to have or go and get an Oculus Link Cable or comparable USB 3 cable. If you don’t have one there are plenty online that are not as expensive as the official Link Cable.
Once you can connect your PC to your headset you will need to download SideQuest on to your PC. Go to this link and download the Advanced Installer. You will probably need the advanced version later, so get it instead of the basic version.

The SideQuest installer download page
Once the installer is downloaded, run it. The installation process is very straightforward, and once you’re done run the SideQuest application. You should see a screen like the one below.

The first page you should see when opening SideQuest for the first time
Press the “OPEN SETUP INSTRUCTIONS” button. Here you’ll be brought through a tutorial from the SideQuest developers explaining how to connect your headset to SideQuest so that you can sideload apps like BMBF to your headset. If for some reason this button isn’t visible then you can check out the setup video here.
Follow the SideQuest setup tutorial all of the way through, and when you’re done setting up SideQuest we can finally get around to installing Beat Saber mods. Search Sidequest for BMBF, open the app page, and click the “SIDELOAD” button on the right. The BMBF app will install to your headset.
Note that whenever sideloading or installing any application with SideQuest that you are trusting the developer of that application with access to your headset.
You’ll see a popup on the bottom of the SideQuest window, and when they disappear you can click on the “Tasks” button on the top right corner of the window that looks like three lines on top of each other with either a checkmark or some numbers in the bottom right corner of the button. You’ll know it when you see it.
Then you should see a new page showing that BMBF was installed succesfully.

The Tasks page showing that BMBF was installed correctly
Using BMBF - Beat Saber Mods On the Quest 2 For Custom Songs
Now that you’ve installed BMBF on your headset, put your Quest headset on. In your app menu where you would normally launch games click the search bar at the top and then click the dropdown next to it and select “Unknown Sources.” This will show all of your sideloaded applications, run BMBF from here to get started on your Beat Saber modding journey on the Quest.

Running BMBF from “Unknown Sources”
First you will get a popup telling you to give file access to BMBF.

BMBF needs file access to install Beat Saber mods
Slide the slider to the right to allow BMBF to do it’s thing.You might have to wait here for a minute or two before you can continue. Eventually the window will change to an “App Info” screen, click the “Open” button there.

Opening BMBF after granting it access
Another new window will appear, and in it you’ll see the “data” folder for your headset, and a large button at the bottom saying “USE THIS FOLDER” press that button and allow BMBF access to those files. Note that all of this access that your giving means you should trust the developer enough to do this. This goes for any mods you install for any game.

BMBF when a version of Beat Saber that is not compatible with mods is installed
Then you will see a screen like the one above, and it may also say that your version if Beat Saber is not supported by Beat Saber mods. If this is the case then continue on to the next section below after taking note of the required version number. If your version is correct, skip over the next section and go to “Installing Beat Saber Mods With BMBF” below it.
Downgrade To An Old Version Of Beat Saber - Beat Saber Mods On the Quest 2 For Custom Songs
If your current version of Beat Saber doesn’t match what is currently supported by mods on BMBF then you’re going to have a hard time installing Beat Saber mods. You can always try to install your Beat Saber mods with the wrong version, but that will mostly likely result in your game crashing every time that you launch it.
So if you need an older version you’ll have to get your hands on an APK for an old version and install it manually via SideQuest. Luckily we’ve got a guide on how to downgrade Beat Saber on a Quest device. Here’s a link to that guide. Follow it to downgrade your Beat Saber version to the version that BMBF said is compatible with mods and then come back here to finish installing Beat Saber mods.
After you’ve completed the downgrade run a Solo song once and immediately fail it, then exit Beat Saber. You’re ready to run BMBF and install mods!
Installing Beat Saber Mods With BMBF - Beat Saber Mods On the Quest 2 For Custom Songs
Alright so your Beat Saber version is correct, whether or not you had to downgrade Beat Saber. Time to finally mod your Beat Saber installation. In your app menu where you would normally launch games click the search bar at the top and then click the dropdown next to it and select “Unknown Sources.” This will show all of your sideloaded applications, run BMBF from here.

BMBF when a compatible version of Beat Saber is installed
The first Introduction screen should show that you have the correct Beat Saber version, if not go to “Downgrade To An Old Version Of Beat Saber” above.
Now hit the “Get Started” button. You’ll get a new “Step 1” screen with a new button “Uninstall Beat Saber” press that. You’ll see a new window pop up with a spinning wheel, give it some time to complete. Once it does you’ll see a popup asking if you want to uninstall Beat Saber, hit “OK”.
The next “Step 2” window will have a new button “Patch Beat Saber” hit that. After another wait through the spinning wheel. Once that’s done you’ll end up on the “Step 3” screen.
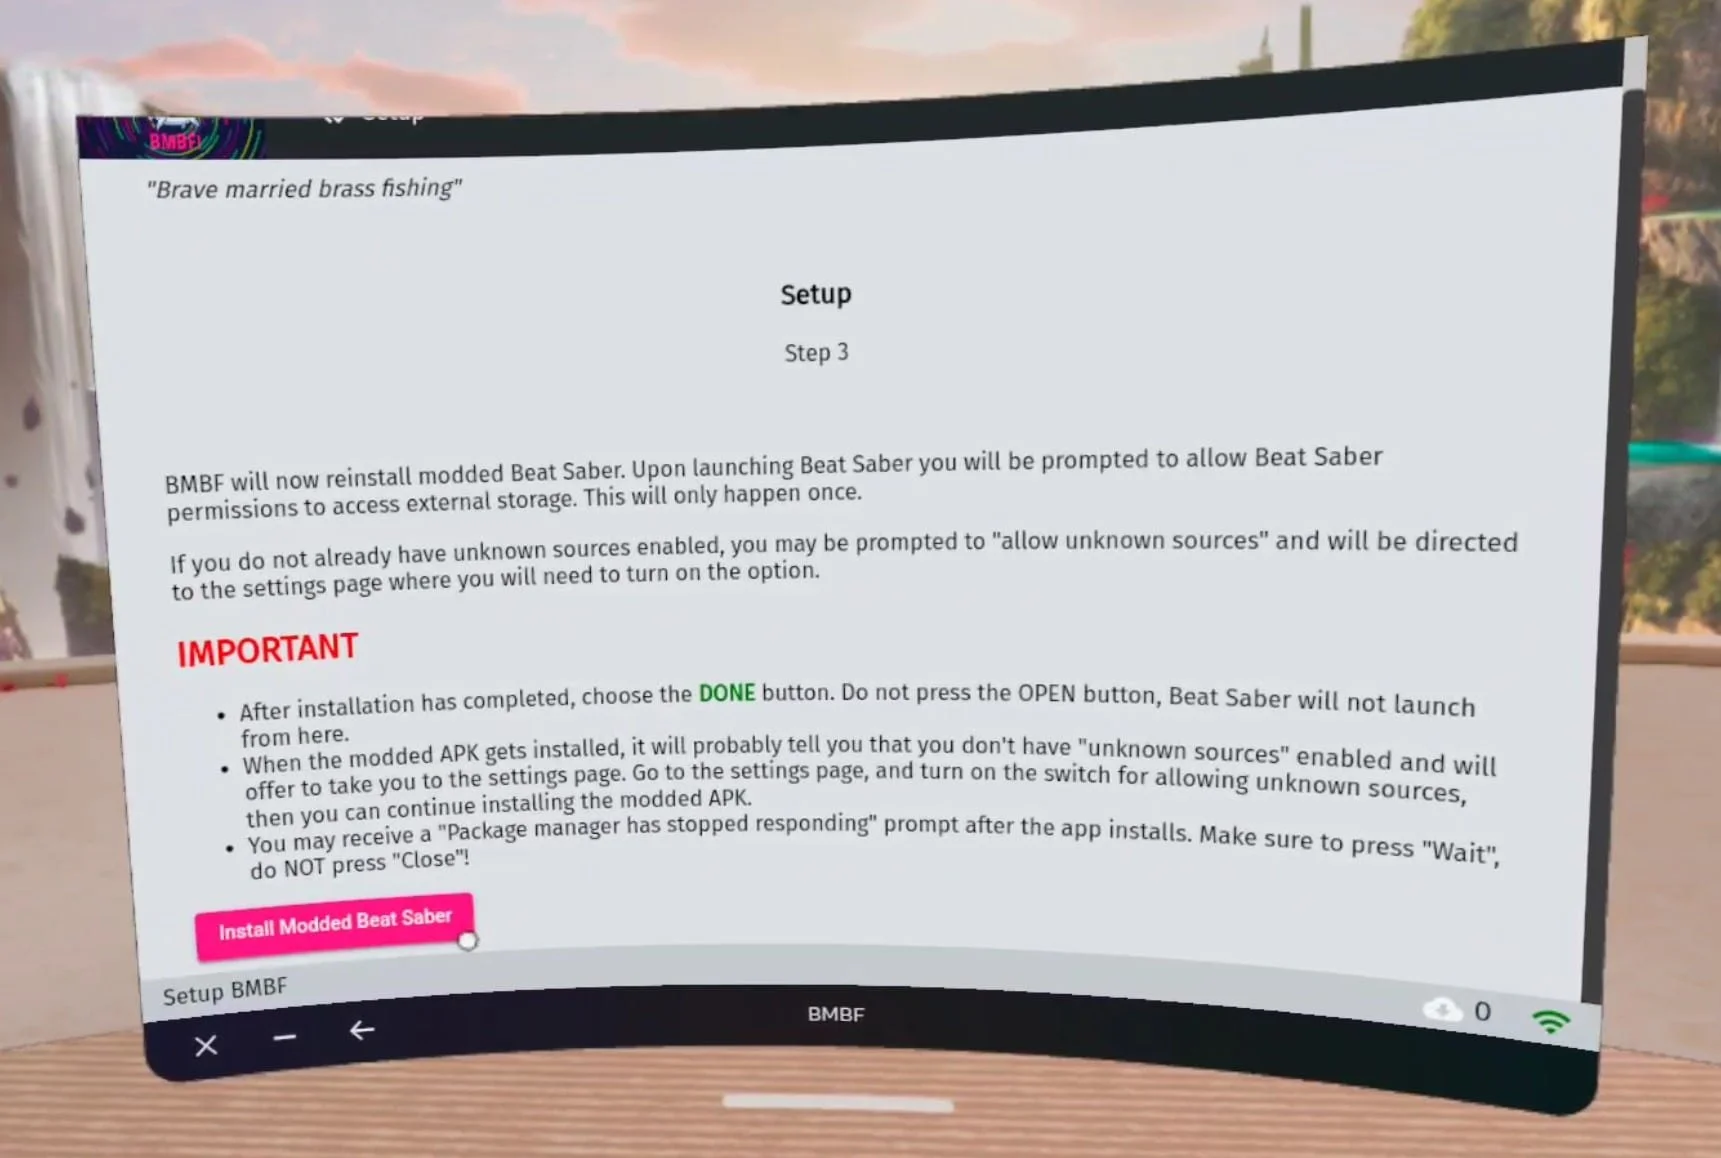
The final BMBF setup page
Note the bullet points under the “Important” section. You may have these problems when installing Beat Saber mods, or you may not. Then hit “Install Modded Beat Saber.” We’ve covered as many things as can go wrong as we know about in this setup guide, but there may be other problems we didn’t run into when installing Beat Saber mods.
You’ll see a popup like this one, click the “SETTINGS” button to open your settings.

BMBF needs the ability to install a modded Beat Saber
Just like before give BMBF the permissions it will need for Beat Saber modding, and then click the “OPEN” button to open the application when prompted. You’ll find yourself back at the “Step 3” screen, so hit the “Install Modded Beat Saber” button again.
Now Beat Saber will install, and you’ll probably get some popups from Oculus saying that your version is wrong and that you’re using an official version of Beat Saber, just close those popups. Do not select “Restore.” You might also get yet another popup asking to give the newly installed Beat Saber permissions. As with BMBF give it the permissions by sliding the slider and waiting a bit, then opening the application and closing it again.

Do not hit “Restore” here. You’re not installing Beat Saber mods to cheat, just to enjoy more songs and options in your games
Now open BMBF again, the application might just show up as a white screen for a while, if it does just wait for it to show you a screen, it might take a couple of minutes. You should finally be in the modding menu, and you may see a popup like this one.

Restore and install core mods if asked
Select this pink “Restore” button if you see it (not the blue one that might pop up from Oculus.) Do the same if you get a popup asking you if you want to install Core Mods. You will need these Core Mods for custom songs, so make sure you install them. Once all of that is done, hit the “Sync to Beat Saber” button in the top right hand corner. Once the sync is complete it will be replaced with a blue “Start Beat Saber” button. Hit that to start your modded Beat Saber!
Using BMBF For Custom Songs - Beat Saber Mods On the Quest 2 For Custom Songs
Now that you’re in your modded Beat Saber game, look to the left and see the new “Mods” menu!

If you see this your Beat Saber mods are installed and you can download custom songs
If you select “More Songs” you can search and download through a ton of new songs.

There are a ton of custom songs to download in modded Beat Saber
Click the “Download” button to download a song, and filter through different songs on the left. Once you’re done go back and hit the “RELOAD PLAYLISTS” button on the lefthand Mod screen. Then play beatsaber like usual, and you’ll see a new playlist full of all of your custom songs!

Playing a custom song with Beat Saber mods
Some songs might not work, though some might work after restarting Beat Saber or restarting your headset.
Using BMBF For Beat Saber Mods - Beat Saber Mods On the Quest 2 For Custom Songs
Relaunching the BMBF application also gives you access to a ton of different Beat Saber mods outside of the core mods you’ve already installed.

The BMBF mods page
You can use the Browser tab to browse through additional mods that you can download and Sync just like the core mods. Also the Tools tab can be useful if you want to go back to an unmodded Beat Saber version, or need to use its Tools to troubleshoot your modded Beat Saber installation.
Well that’s it, that’s how to install Beat Saber mods on a Meta Quest device like the Quest 2, Quest 1, or Quest Pro. It’s certainly not easy, but everything you need to pull it off is in this article here. If you have trouble make sure you didn’t miss any steps, and retry the steps leading up to the one you are on. Good luck and enjoy your new Beat Saber mods.
How To Easily Downgrade Beat Saber On The Quest 2
If you want to downgrade Beat Saber on the Quest 2, then you might be having a tough time with it. Well don’t worry, because downgrading your Beat Saber version on any Meta Quest device isn’t too hard. Whether you want to downgrade Beat Saber so that you can install mods, or just enjoyed an older version for whatever reason, here you’ll find how to downgrade Beat Saber as easily as possible. This guide works for all Oculus Quest devices such as the Quest 1, Quest 2, or Quest Pro.
If you want to downgrade Beat Saber on the Quest 2, then you might be having a tough time with it. Well don’t worry, because downgrading your Beat Saber version on any Meta Quest device isn’t too hard. Whether you want to downgrade Beat Saber so that you can install mods, or just enjoyed an older version for whatever reason, here you’ll find how to downgrade Beat Saber as easily as possible. This guide works for all Oculus Quest devices such as the Quest 1, Quest 2, or Quest Pro.
Oh, and if you’re downgrading Beat Saber so that you can install mods, then check out our Beat Saber modding guide for the most straightforward way to install Beat Saber mods.
Required Tools and SideQuest - Downgrade Beat Saber On the Quest 2
If you need an older version of Beat Saber you’ll have to get your hands on an APK for an old version and install it manually via SideQuest. That’s how you downgrade Beat Saber. Before you start following this guide to downgrade your Beat Saber version though, make sure you have everything that you will need.
If you’ve come here from our Beat Saber mod installation guide then you should already have everything you need and already have set up SideQuest, so feel free to skip to the next section called “Downloading the Beat Saber APK.”
First you will need a cable that can connect your PC to your headset. So you’ll need to have or go and get an Oculus Link Cable or comparable USB 3 cable. If you don’t have one there are plenty online that are not as expensive as the official Link Cable.
Once you can connect your PC to your headset you will need to download SideQuest on your PC. Go to this link and download the Advanced Installer. The advanced SideQuest version is needed to install .apk files, so make sure you download and install that instead of the easy version.

The SideQuest downloads page
Once the installer is downloaded, run it. The installation process is very straightforward, and once you’re done run the SideQuest application. You should see a screen like the one below.

The first page you should see when opening SideQuest
Press the “OPEN SETUP INSTRUCTIONS” button. Here you’ll be brought through a tutorial from the SideQuest developers explaining how to connect your headset to SideQuest so that you can sideload apps and install .apk files on your headset. If for some reason this button isn’t visible then you can check out the setup video here.
After you complete the SideQuest setup tutorial you’re ready to get your downgraded Beat Saber .apk file.
Downloading the Beat Saber APK - Downgrade Beat Saber On the Quest 2
Now go to a browser and log into your meta or facebook account on oculus.com/experiences/quest. In a separate tab go to questmodding.com and click the “How To Downgrade” button at the top.

The “How To Downgrade” page
You must be logged into an oculus account that owns Beat Saber in the other tab for this to work. Scroll down on your questmodding.com page to “Step 3: Download & Install The APK” and press the button to open the download page with all of the downgraded versions of Beat Saber.

Click “Download Beat Saber”
The page that opens will show you every old version of Beat Saber.

All the old Beat Saber versions. You can downgrade Beat Saber to any one you want
Now select the version that you want to download and hit the download button. Hit “Yes” on the popup that appears. If you run into difficulties downloading the file then double check and make sure you’re logged into a Facebook or Meta account that owns Beat Saber on oculus.com/experiences/quest in a separate tab in the same browser window. You cannot download the .apk file if you aren’t.
Installing the Beat Saber APK - Downgrade Beat Saber On the Quest 2
With your downgraded Beat Saber .apk installation file in hand and SideQuest set up on your computer you are finally ready to downgrade Beat Saber on your Quest device. First make sure that Beat Saber is uninstalled on your headset. Your Beat Saber downgrade won’t go well if the game is already installed.
Open SideQuest and connect your headset to your PC with a link cable. Once the icon in the top left hand corner of the screen is green and shows that your device is connected click the “Install APK file from folder on computer” button in the top right hand corner. It looks like this.

A windows explorer window will open, and in it find and open the downgraded Beat Saber .apk file you just downloaded. Once you do you’ll see a popup on the bottom stating that the .apk is being installed. Once the popup goes away click on the boxed “1” in the top right corner, the box should be pink. That will bring you to the tasks menu, and should show that the .apk was installed successfully.
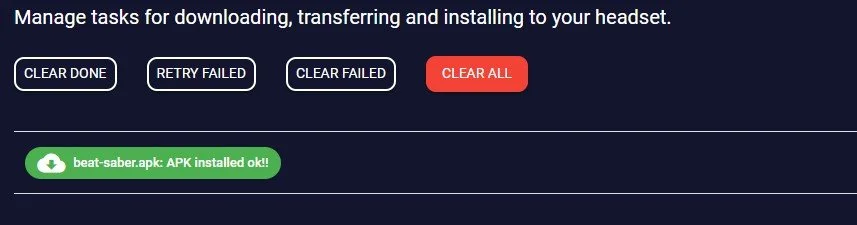
A successful Beat Saber downgrade
The Beat Saber downgrade has been installed! Immediately open Beat Saber in your headset. If you leave it for too long or restart your headset it might update to the latest version automatically. If you ever receive a prompt telling you that your version is out of date just close it, do not update. Once Beat Saber is open look down at your feet, and you should see the version number on the footprints on the ground.

The footprints in Beat Saber that show you your game version number
Congratulations, you’ve downgraded Beat Saber on your Quest 2! Beware that your headset might try to automatically update your Beat Saber downgrade to the latest version. So you might want to disable auto updates on your Quest 2.
Well that’s it, that’s how to downgrade Beat Saber on the Quest 2. Now feel free to enjoy any version of Beat Saber you want to. Oh, and if you want to install mods for Beat Saber then check out our Beat Saber mod installation guide.

How To Get The Grappling Hook In Green Hell VR - Green Hell VR Grappling Hook
Stuck in Green Hell VR because you can’t find the Grappling Hook? Well don’t worry, here you’ll find out where and how to get the grappling hook in Green Hell VR so that you can climb over the cliff that leads to the mysterious Lambda 2 location you found on the burnt map.
Stuck in Green Hell VR because you can’t find the Grappling Hook? Well don’t worry, here you’ll find out where and how to get the grappling hook in Green Hell VR so that you can climb over the cliff that leads to the mysterious Lambda 2 location you found on the burnt map.
Oh and you should know that the screenshots for this guide on where the grappling hook is in Green Hell VR were taken with the Quest version of the game. While there are differences between the Quest and PCVR versions of Green Hell VR, this guide will show you how to get the grappling hook on both.
Recap - Green Hell VR Grappling Hook
Once you’ve completed your first ayahuasca trip inside of the ruined village that you find shortly after starting Green Hell VR, you’ll probably want to go the location called “Lamda 2” on the map that you found. You’ll run into a cliff with some logs hanging over it, and find that you need the grappling hook to climb up and continue. So this is why you need the grappling hook in Green Hell VR, you can’t complete the game without it.

In Green Hell VR you need the grappling hook to continue
So when you hit this point in the game go back to the ruined village and get ready for a long journey. Make sure you aren’t sick and all of your macronutrients are topped up. It’s also a good idea to leave early in the morning so that you can get all the way to the Green Hell VR grappling hook in a single day. Make sure to bring some bandages and a weapon like a stone spear as well.
If you’re having trouble surviving and getting ready for the journey then check out our Green Hell VR tips and tricks article. Oh, and make sure you completed the first ayahuasca trip before setting off to find the grappling hook, otherwise you won’t be able to get to it.

What your journal will look like when you need to find the grappling hook
Where To Go - Green Hell VR Grappling Hook
Luckily once you know the direction to travel in, all you need to do is keep going straight down the path until you find the grappling hook. There are a few side paths that you can get lost on, but if you look back at your map you’ll never get lost.

Where to go to get the Green Hell VR grappling hook
Start by going north out of the ruined village, and then go left after the path forks. You can see the direction you want to go to on the map here. As long as you keep heading towards the top of the map you’ll eventually come across the grappling hook, it will be in a large camp at the very end of this path. You’ll know you’re headed in the right direction when you see the doorway surrounded by paintings and handprints.

If you see this you’re headed in the right direction
That’s all we’ll say here without spoiling anything. If you want to go and get the grappling hook without any spoilers on what happens on the way there, then that’s the direction you need to head in. Otherwise keep reading to learn how to overcome all of the obstacles that you will run into on the way to the grappling hook.
Obstacles - Green Hell VR Grappling Hook
The biggest obstacle on your way to the grappling hook in Green Hell VR will be predators, Pumas most likely. While the animals in your starting location with the ruined village will run away from you, the big cats will run towards you and attack.

A Puma attacking in Green Hell VR
This is where your weapon will save your life, and unless you’re really lucky you’ll probably have to heal up some of the wounds the predator will give you. If they take you out then you’ll have to start the journey all over again. While there’s no guarantee you’ll run into any hostile animals, it’s fairly likely. Stay alert.
Assuming you make it up the path in one piece, eventually Mia will call you and you talk to her over the Walkie Talkie for a while.
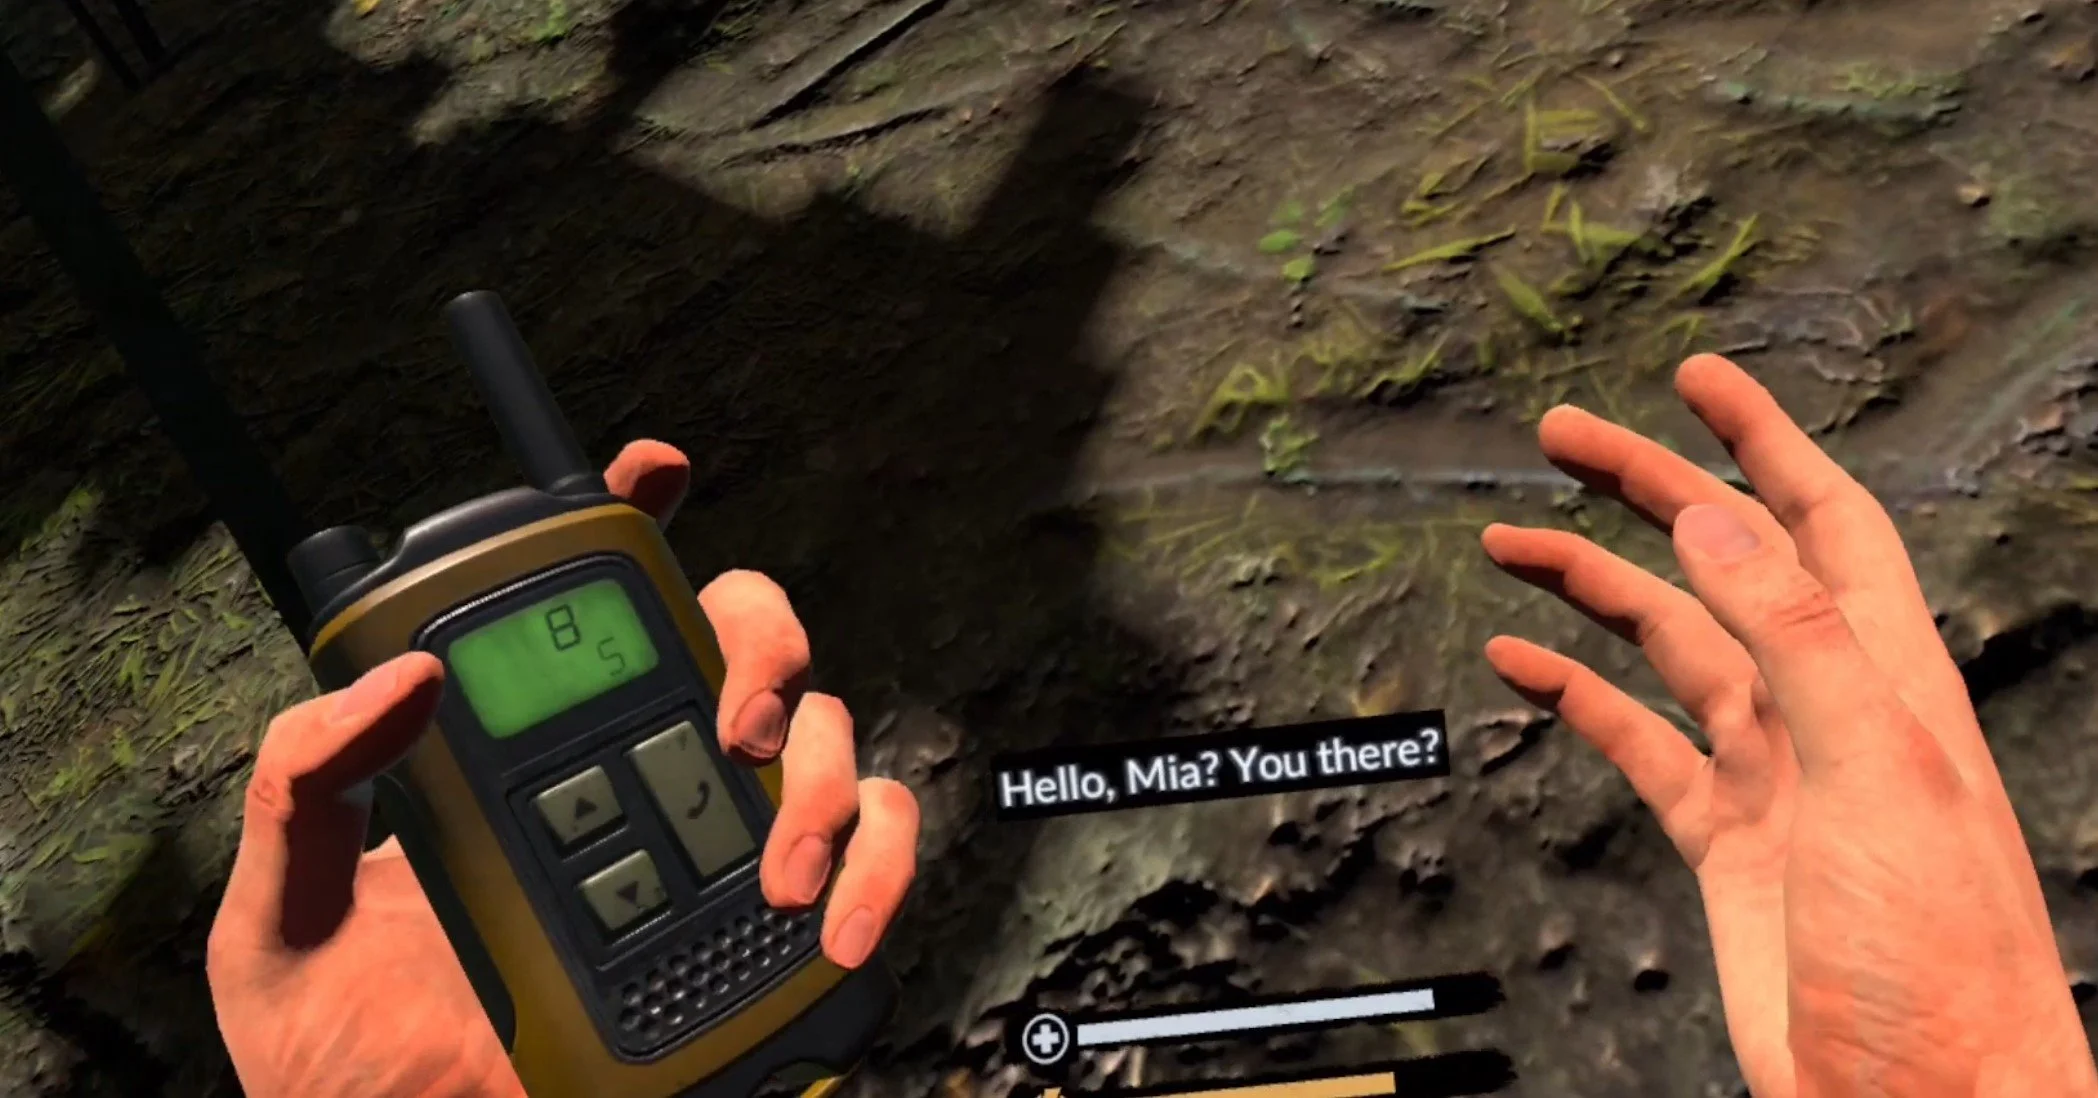
Mia gives you a call in Green Hell VR
She’ll call you a few times as you make your way to the grappling hook, and throughout the rest of the game. Get used to it, or just ignore her, it’s up to you. If it’s your first time playing Green Hell VR it’s a good idea to talk to Mia to try and figure out what is going on. The story of Green Hell VR is very good and worth experiencing.
Shortly after she calls you you will find a road, and after following that road you’ll see a jeep crashed into a river.

The crashed jeep
The jeep has a lot of great things you can find around it. Items from civilization outside of the jungle are rare in Green Hell VR, so take whatever you can. The one thing that you definitely can’t continue without is right next to the jeep, a big red jerrycan of fuel. You have to take it to reach the grappling hook.

The jerrycan of fuel by the jeep
Keep going down the road past the jeep, and as always consult your map if you get turned around. If you don’t have to stop to get food or supplies you can go very fast and make it before the sun goes down. Eventually you’ll find an elevator. Another sign of civilization!

The old elevator in the jungles of Green Hell VR
It’s pretty old, but the only problem with it is that the generator has no fuel, and it’s a long way down. Luckily you got that fuel can from the jeep, so open the cap on the top of the generator and pour some fuel in. Turn it on and head down the elevator.
The Hidden Mining Camp - Green Hell VR Grappling Hook
At the bottom of the elevator is what turns out to be an illegal hidden mine in the jungle. You’ll see a lot of equipment and old stuff lying around.

The hidden mine in Green Hell VR
Keep walking until you see a path leading uphill to some huts. At the top there will be a stone firepit with a hut on either side, go into the hut on the right and sitting on a bench there is the grappling hook!

The Green Hell VR grappling hook!
Take it and it will go into your inventory automatically. Congratulations! You’ve found the grappling hook in Green Hell VR.
Of course you’ll have to make your way back to the abandoned village you started at before you can keep going to Lamda 2. So if it’s late in the day you might want to sleep at the mining camp before heading back. There’s also some more supplies, and a lot of story background to find there as well, so be sure to explore.
Anyway, that’s how to find the grappling hook in Green Hell VR. Enjoy the rest of the game and have fun! Oh, and if you ever need some help surviving in the amazon, be sure to check out this article with tips and tricks for Green Hell VR.

Beat Saber Is A Good Workout - Beat Saber Is Great Arm Exercise
You might be wondering, “Is Beat Saber a good workout?” or, “Is Beat Saber good exercise?” Well we’re here to tell you that while it might not be the best Virtual Reality exercise game, it can definitely be a workout. Whether you’re already an avid Beat Saber player, or are looking to start to use Virtual Reality for exercise. Here you’ll find out what makes a good Beat Saber workout, and how you can benefit from Beat Saber exercise.
You might be wondering, “Is Beat Saber a good workout?” or, “Is Beat Saber good exercise?” Well we’re here to tell you that while it might not be the best Virtual Reality exercise game, it can definitely be a workout. Whether you’re already an avid Beat Saber player, or are looking to start to use Virtual Reality for exercise. Here you’ll find out what makes a good Beat Saber workout, and how you can benefit from Beat Saber exercise.
Beat Saber Exercise - The Basics
Alright, so what makes Beat Saber a good workout? Well you’ll notice while playing the game that Beat Saber involves a lot of arm movements. This is the crux of what makes a Beat Saber workout possible. Swinging your sabers to hit those blocks as they come at you is a movement that burns calories and works your arm muscles.

Chopping two blocks at once in Beat Saber
So Beat Saber exercise is primarily going to affect your arms. The majority of the exercise that you do in Beat Saber is moving your arms to hit blocks with your sabers. So in terms of muscle categories that Beat Saber exercise will affect, your arms are number one.
A lot of Beat Saber players note that, after a long session of playing the game, their arms will feel like noodles, or they’ll feel sore the next day. So if you’re still wondering, “Is Beat Saber a good workout?” There’s your answer. Though some muscles other than your arms can see some action in a Beat Saber workout. There’s also your legs to consider.

A wall moving by while chopping a block in Beat Saber
Beat Saber exercise will also involve these walls of light that come at you while you’re slicing blocks, which you need to dodge out of the way of. Some songs feature these walls more than others, and sometimes you’ll even have to do a squat to duck under these walls.
So a Beat Saber workout can also feature some exercise for your legs as well, but many songs do not feature these walls prominently. So your arms will most likely be the focus of any Beat Saber exercise. Still, if you really like the idea of a Beat Saber leg workout, there is a mod that adds foot blocks to Beat Saber that you need to kick. It’s called FeetSaber, and wow is it a great way to get your legs moving, burn a ton more calories, and also give your abs and back a little attention as well.

Youtuber Cake VR Dance playing FeetSaber
A Beat Saber Workout - Intensity Tips
Just like with any VR exercise game or VR workout, a Beat Saber workout will only be as good as how intense it is. While one of the great things about Virtual Reality gaming is how you can move your physical body to affect the game world, you wouldn’t classify most games as VR workout games.
The key difference is intensity. Beat Saber makes you move a lot, very quickly, in a short period of time. Ramping up that intensity is what makes Beat Saber good exercise. So basically, the more blocks that fly towards you and the faster they do that, then the better a workout you will have. Though as always make sure to take breaks to drink water and catch your breath as needed.

Chopping a block in Beat Saber’s 360 degree difficulty mode
There are some good tricks to achieve the maximum intensity you possibly can for a Beat Saber workout. There is a modifier you can add to any song that will make the whole song faster, which will increase the speed of blocks and walls coming towards you. Also, you can always increase the difficulty so that more blocks and walls come towards you.

The “Super Fast Song” modifier
Some songs even have a 360 degree or 90 degree mode that causes the blocks to come at you from multiple directions, which will involve your legs even more and force you to move your arms in many different ways. These difficulty modes make for even better Beat Saber exercise.

The 360 degree difficulty mode
Though higher difficulties are, of course, harder. That’s the big downside of a Beat Saber workout, you have to be a good Beat Saber player already to make it an intense workout. Unlike other VR exercise games like Thrill Of The Fight, your ability to turn Beat Saber into good exercise is entirely dependent on your skill at the game.
A Beat Saber workout will still make your arms sore and get you sweating even at lower speeds and difficulties, of course, but it will take much longer and you’ll have less of a workout with less intensity. Though if you’re willing to keep trying and failing until you can beat one of the faster levels, a good way to keep the blocks coming and the workout going with no interruptions is to turn on the option to make the level automatically restart every time you fail. It’s at the bottom of the “Player Options” menu, and is named “Auto Restart on Fail.”

The “Auto Restart on Fail” option
With this option on you can jump into a really hard song and swing away, and if you fail, no big deal, you’ll be right back into the game in seconds and you can keep your Beat Saber workout going.
Beat Saber Exercise - Watch Your Wrists
There is one HUGE MISTAKE that you can make during your Beat Saber workout though. Making it will not only rob you of good Beat Saber exercise, but also is potentially damaging to your body and health. That mistake is not using your entire arm to swing your saber. Especially when Beat Saber gets really fast and intense, it can be easy to fall into a trap of just flicking your wrists to swing your saber, instead of swinging your entire arm.
This is potentially very bad for your wrist, and you should avoid doing it at all costs. It’s also not good exercise, because you’ll be robbing your arms of most of their movement, and effectively you’ll just end up standing there rolling your wrists a bunch, which isn’t exercise at all no matter how fast you do it.

A really fast song in Beat Saber
Beat Saber Exercise - Alternatives
As with any health related matters, consult a medical professional, because everyone’s body is different. Avoid injury as best you can and always take a break if you don’t feel right or you feel thirsty. Overall Beat Saber is a good VR game for working out, but it can be a bit limiting.
Sure you can get a bit of a leg workout, but not much, and just swinging your arms to bash blocks is only going to do so much for muscles on your arms. If you’re serious about using Virtual Reality for exercise, then consider some other Virtual Reality exercise games. We’ve got a list of the 5 best at this link. If you really want a rhythm game that does a lot for your legs, like Beat Saber does for your arms, then check out our Pistol Whip exercise guide at this link.
Well hopefully we’ve answered the questions of “Is Beat Saber a good workout?” and, “Is Beat Saber good exercise?” However you decide to workout in VR, whether it’s with Beat Saber or another game, be sure to enjoy yourself. VR is a fantastic way to workout, and it’s only getting better.