

Onward VS Contractors - Multiplayer Shooters on the Oculus Quest 2
There are a few shooters on the Oculus Quest 2, but none as popular as Onward and Contractors, the two giants of Multiplayer Shooting in standalone Virtual Reality. So anyone with a new Quest 2, or that wants to get into VR Shooters might be asking, which one is better? Well that might depend on your own taste. Here you’ll see, category by category, how the two games compare. So here’s a breakdown of Onward Versus Contractors on the Oculus Quest 2.

There are a few multiplayer shooters on the Oculus Quest 2, but none as popular as Onward and Contractors, the two giants of Multiplayer Shooting in standalone Virtual Reality. So anyone with a new Quest 2, or that wants to get into VR Shooters might be asking, which one is better? Well that might depend on your own taste. Here you’ll see, category by category, how the two games compare. So here’s a breakdown of Onward Versus Contractors on the Oculus Quest 2.
Gameplay
Gameplay can mean a lot of things, so let’s get a little more specific. How does the game feel to play? What is the moment to moment action like? Fun can mean a lot of different things to a lot of different people, so what kind of fun are you looking for?
Well if you want fast paced action, then Contractors is probably going to be your go to game. Often called the “Call of Duty of Virtual Reality”, Contractors emphasizes movement, quick reflexes, and constant gunplay. While there are a variety of game modes (more on that later) most of them play out similarly. Spawn, run for a few seconds, see an enemy, fight, see another enemy, fight, die, rinse and repeat.

There is constant action and very little waiting. You will die and be in another gunfight in less than thirty seconds. The action never stops. As for the gunplay, it plays out quickly, but gives you a chance to react. It takes quite a few bullets to take someone down, depending on the weapon, though generally at least five or six, and headshots are instant kills. All weapons are very accurate and most have low recoil. It is easy to fire fully automatic and hit your target almost every time. Health regenerates automatically, which means that tactics like jumping out of cover or sliding past your enemies are completely viable without risking instant death.
So if you want a fast paced rush where you can jump and power slide across the ground while spraying with an AK, Contractors delivers on that. Otherwise if you just don’t like waiting around and don’t have a whole lot of time to get into a game before you have to take your Quest off, Contractors offers some quick action.

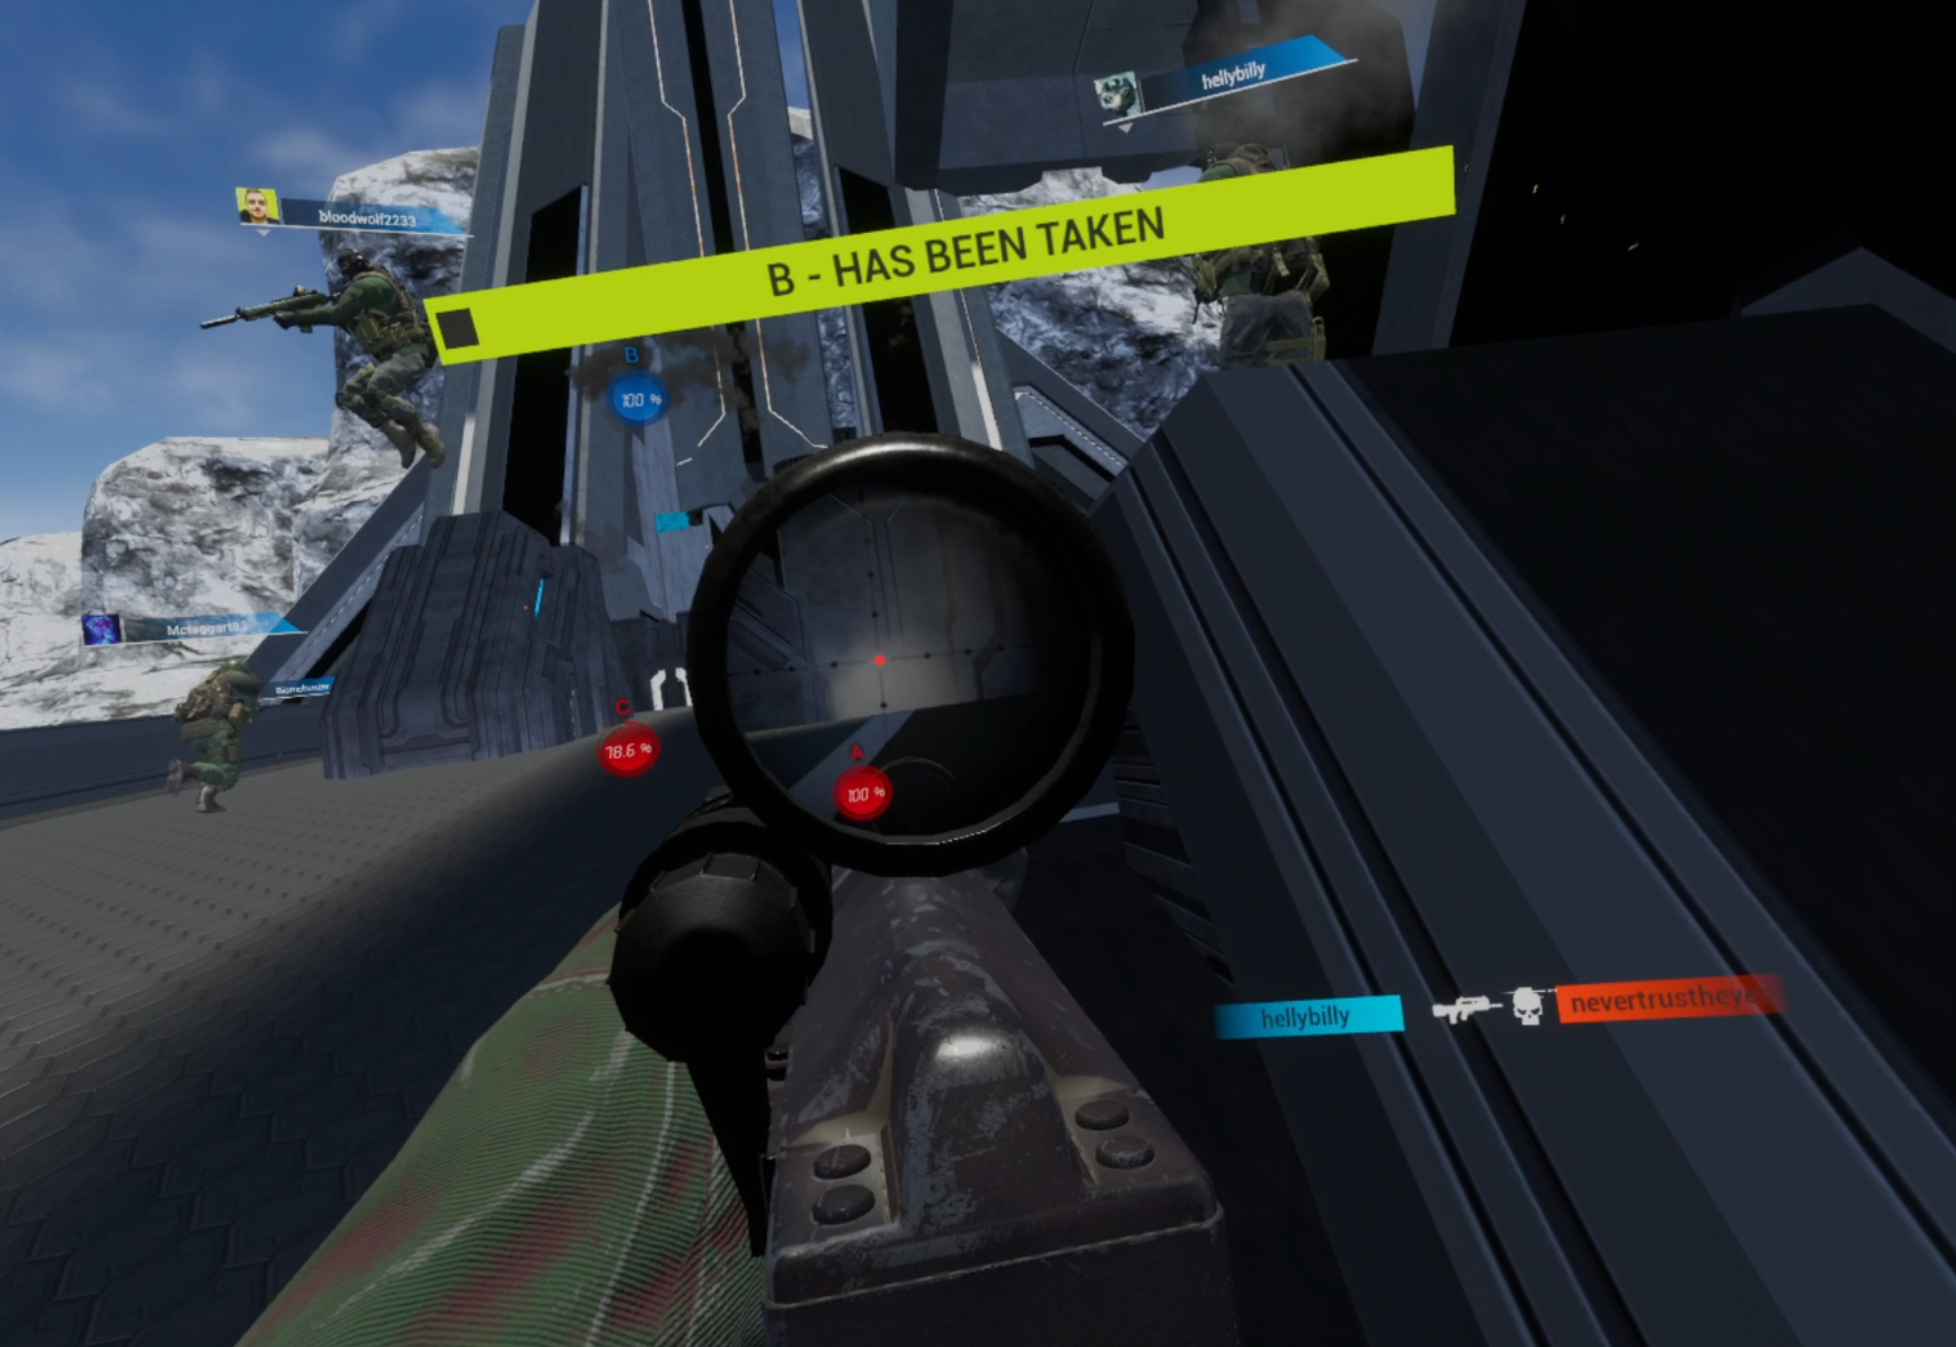
So what about Onward? Well if Contractors sounds too arcadey and fast paced for you, then chances are you will love this alternative. Most Onward games play out like Search and Destroy matches, a team of five against a team of five, one life only per round, no respawns. There is a respawn option, but you will see that less often in public lobbies, and respawns take about ten to fifteen seconds just to get back into the game with them enabled.
All of this means is that your life is more precious in Onward, because once you die you’ll be waiting for a new round to play again, which usually means another couple of minutes before more action at the very least. Couple this with the VERY low Time to Kill (a single bullet can kill easily, no way you can live through three) makes for a very slow paced and cautious game. You might call it “realistic”.

Whatever you call it, Onward offers less action but more tension. Running into the open where an enemy can see you means almost certain death, and while reflexes will definitely matter in some situations, especially in close quarters combat, careful thinking and outsmarting your opponents will give you victory. The fun in Onward isn’t in run jumping into a room spraying bullets, but crouch walking behind a wall, peeking into windows and waiting for an enemy head to appear.
Onward is for those that like mil-sims or just more slowly paced shooters, where quick reflexes and movement aren’t everything. Still, for both games that isn’t all there is, there’s more features to consider.

Game Modes
There’s no use beating around the bush here. Contractors blows Onward out of the water when it comes to Game Modes, and more are being added all of the time. Contractors has been a consistently improved and expanded game through constant updates, while Onward has remained largely the same for the past year or so.
That being said, not all of Contractor’s game modes are very good, but you will probably find something that you enjoy. Base Game Modes include your typical capture the flag style gameplay with sixteen players in a single match (Ground War), Team Deathmatch, escort the VIP, the usual hits and more. With a good variety of maps included in the game, there are also World War 2 and Ninja game modes, where the weapons are all replaced with WW2 variants, or everyone gets a bow, Katana, and smoke bombs. They’re all great fun, though preferences and opinions may vary.

There are quite a few single player missions. While the AI is pretty incompetent, fighting a lot of them can be very fun. There’s some escorting missions, enemy leader assassination missions (the leaders are just super buffed AI enemies), and more. While the Singleplayer is not enough alone to justify buying the game, it’s not a bad way to warm up from time to time, and can be experienced in Co-Op Multiplayer.
What’s more interesting is the Co-Op survival mode, where a team of four players faces off against waves of enemies. The later waves get very intense, and there is decent variety in the enemies that you face, from guys with SMGs to explosive laden attack dogs. It’s a challenge and it’s good fun. There is also a lackluster zombie survival mode, that feels like it needs more effort put into it, though hopefully that will be fixed one day with updates.

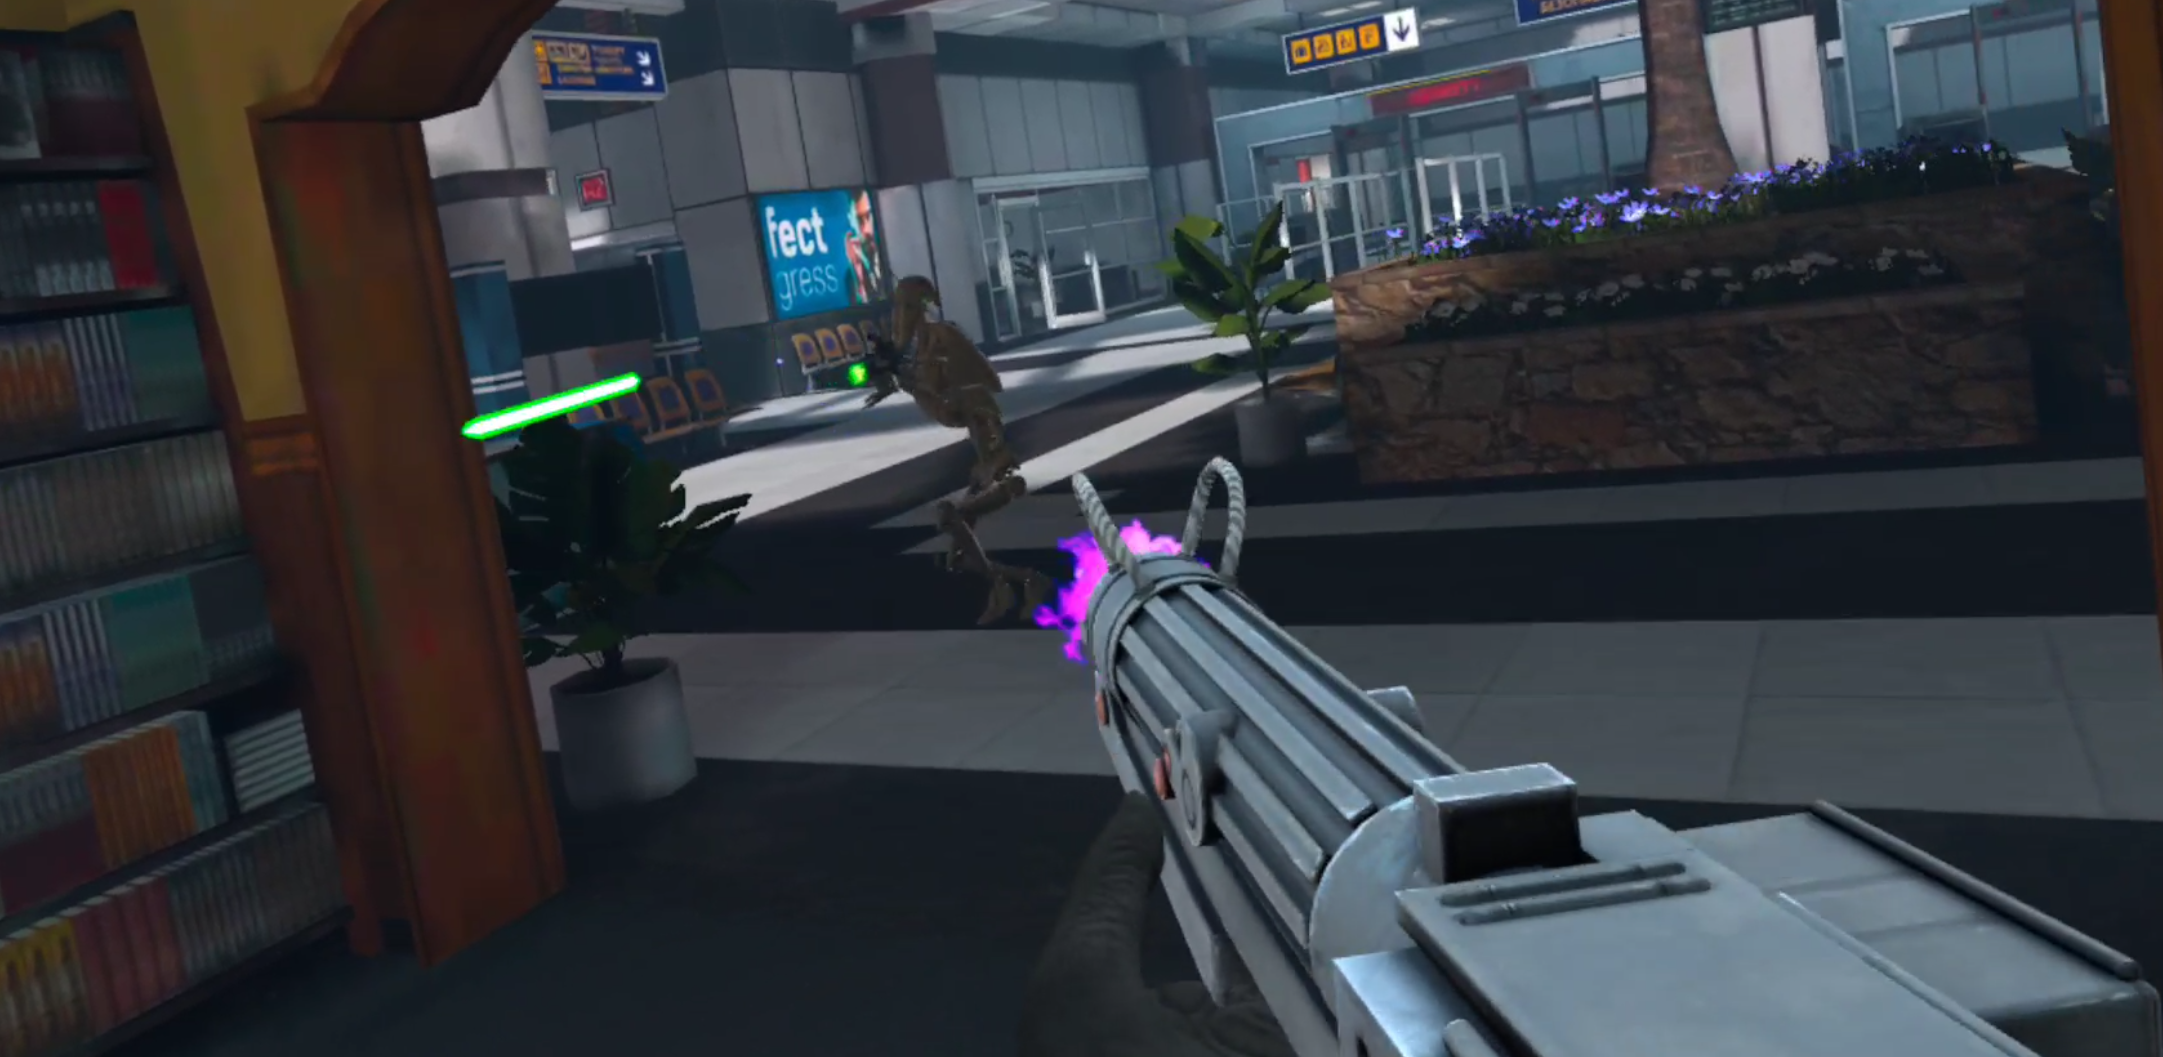
The thing that really makes Contractors stand out is its support of custom game modes and maps. Want to experience classics from the old Call of Duty games in VR? Maps from every classic installment of the series, such as the Modern Warfares and Black Opses, can be found in Contractors to fight over again in Virtual Reality. These maps are the most popular and the most fun. Arenas from other games are present as well, like Halo 3.
Custom game modes like Gun Game are also present in Contractors, so when you get tired of Capturing flags there’s a lot more to do. Really there’s far too many choices to list here, and more are added all of the time.
Custom Loadouts are a more recent addition to the Contractors modding scene, and they really round out custom experiences. Want Halo guns for your Halo map? Now that is possible, and you’ll even be wearing Master Chief’s armor while you use them. Want Star Wars droids fighting clone troopers on Call of Duty’s terminal map? That’s possible now too. These mods are now even capable of affecting the pace of gameplay, with guns that are less accurate, and more shots required for a kill.
Unfortunately Onward does not have modding support outside of some custom maps. Still, the game modes are pretty good. There are two main game modes in Multiplayer, Send the Uplink (type some numbers in front of a dish the other team is defending), and Escort the VIP (make sure one player with only a pistol makes it to one of two points on the map, if that player dies you lose). There’s also Gun Game, which is pretty fun, though it fits better in a faster paced game like Contractors, and a bizarre game mode called Spec Ops.
Spec Ops is kind of a misgnomer, something like “zombie” or “infection” would be a better name. In this mode one team moves really quickly and is armed with knives, while the other team moves normally and has pistols with a single magazine of ammunition. Whichever team is wiped out first loses. Oh, and the map looks foggy so it’s hard to see far. Spec Ops is… well it’s a bit weird and doesn’t really fit into the rest of Onward’s lineup, but is a decent distraction for a few rounds.

While these are good game modes that take familiar archetypes and do interesting things with them, there isn’t nearly as much variety here. On the other hand the built in maps that Onward comes with are fantastic, and come with a variety of spawn points and objective locations to keep them fresh. While the custom maps might show some promise over time, so far what the community has created so far has not surpassed Onward’s original maps.
Onward does have a better Singleplayer experience than Contractors does, with two game modes. Hunt, where you must defeat all AI enemies on the map, or Evac, where you must fight off or evade waves of enemies and escape in a Helicopter. All in all Onward has a better single player, mostly through the virtue of slightly better AI opponents, who aren’t terribly lifelike, but at least take cover sometimes and shoot straight. Still, the Singleplayer is not enough on its own, except as a nice warm up and a decent couple of hours of AI stomping.
Weapons and Loadouts
What is a shooter without a ton of weapons to shoot and customize? Well in this category Onward outshines Contractors.

There are more possibilities for customization in Onward, where in Contractors you get some choices like what weapon to take and whether or not to use a foregrip or silencer. Contractors also has a few optics to choose from depending on the weapon, though the options to choose from are very limited.
Contractors does also offer a choice between light, medium and heavy armors. The thinking being that more armor means slower movement, and less armor means faster movement. Not to mention the grenades and melee weapons there are to choose from. Meanwhile Onward offers more viable variations of loadouts depending on the situation, or player preference.
In Onward there is a greater variety of options to play around with. You can choose between AP and FMJ ammunition, whether to take extra body armor, or extra healing items. Night vision is an option for night maps, and so are lasers and flashlights on your weapon. Bipods are an option in addition to foregrips. There are riot shields and RPGs available, or even an underbarrel grenade launcher on a couple of weapons. You can take a flying drone for scouting, and put C4 on it for the classic exploding drone technique.

The options you have to customize your loadouts in Onward are far beyond what Contractors offers, and the slower pace of gameplay makes optimizing your loadout and playing with all of the options very rewarding. There are four roles to be taken in Onward, Rifleman, Specialist, Support, and Sniper. Some weapons and gear are shared between them, and some are role exclusive. Each role gets two loadout slots for a total of eight loadouts.

Contractors only gives you five loadouts (though there are another 5 for the World War 2 Game Mode) and each can use any weapon. As for those weapons, while there seems to be a wide variety, you will quickly find that some are just not as good as others.
What the current meta is becomes apparent quickly when you see what weapons you get killed by in public lobbies. Some weapons are just much better at killing opponents faster than others, so the worse weapons just never get used once you realize they are terrible. In Contractors you will find that only one or two weapons in each category are actually useful, which means there is less variety than there seems to be.

Not only that, but the sound and feeling of firearms is different between the two games, and once more Onward outshines Contractors. The weapons in Contractors really need better sounds, suppressed or unsuppressed they sound like Airsoft guns.
In Onward each weapon has a respectable report that sounds much closer to an actual gunshot, and bullets will snap as they pass near your head, while in Contractors you only notice you’re being shot when your screen goes red.

While the weapons in Contractors have a variety of spray patterns and recoil, you will generally be firing them at close range and fully automatic to try and spray down your opponent as quickly as possible. Onward has many maps with wide open spaces (such as Downfall) that require careful aiming and encourage sniping. Sniper rifles are rarely very good in Contractors. The recoil of weapons in Onward makes firing full auto at anything other than close ranges more difficult, and overall feels more like firing an actual gun than an airsoft gun.
Conclusion
So there you have it, the breakdown of Onward VS Contractors on the Oculus Quest 2. Each outshines the other in some areas, so whichever sounds better is totally up to you, though you definitely might enjoy both of them.
One final thing to note is that Contractors more consistently receives large updates that adds more modification options, gameplay improvements, and gameplay modes than Onward does. While these updates are not all super stellar and vary in quality and scope, they have been consistently making Contractors a better game and a greater contender.
Onward has not been receiving the same frequency of updates, and for the past year or so has been pretty stagnant in terms of new features and content. Maybe Downpour Interactive is just working on something big using Onward assets, but if they don’t start updating their game soon they threaten being left in the dust by Contractors. Only time will tell.
Whichever you pick, have fun in VR, and enjoy yourself.
You can get Onward on the Oculus Quest store for 24.99$. Contractors can be found there for 19.99$.

How to Permanently Record Oculus Quest 2 Gameplay at 1080p and 4K with the new Update
You might have heard about the new update that allows native recording on the Quest 2 without having to constantly enter ADP commands every time you start the headset. Here’s how you can do that, but before you start you’ll need three things.
You might have heard about the new update that allows native recording on the Quest 2 without having to constantly enter ADP commands every time you start the headset. Here’s how you can do that, but before you start you’ll need three things. A PC to connect your headset to as well as a cable that can connect your headset to that PC. If you need one here is a link to one on amazon.
Finally you’ll need an Oculus Developer account, which anyone can get for free. We won’t go over how to create that account in this guide, just follow the link and the process is straightforward. Also make sure that developer mode is activated on your headset. The reason you need to do all of this is so that you can access the Oculus Developer Hub console (aka ODH). Here you can change your recording settings.
There are also newer methods that have come out to record high resolution videos on the Quest 2. Check them out here as well.
Installing Oculus Developer Hub
First download ODH from the Oculus Developer Hub website and run the installer when it is finished downloading.

Choose a location to install and hit next, the default location will do just fine. A brief loading bar will appear, and when it is done hit finish and run ODH.

Running Oculus Developer Hub
The first time you start ODH you will see this.

Press continue and you will be asked to sign into your Meta account via your default browser. Make sure to use your Oculus Developer Hub account to log in. If you can’t then make sure that your Oculus Developer Hub account and Meta accounts are linked. Then accept the Terms and Conditions and continue.

Changing Recording Settings
Now that you’re logged into the Oculus Developer Hub Console it is time to hook your Oculus Quest 2 up to your PC using an Oculus Link Cable. After you connect the headset to your PC make sure that the headset is turned on, then put it on and press accept on the prompts that will appear, asking you if you trust the computer to access your Oculus Quest 2. Then in the Oculus Developer Hub open the Device Manager tab on the top left part of the window.
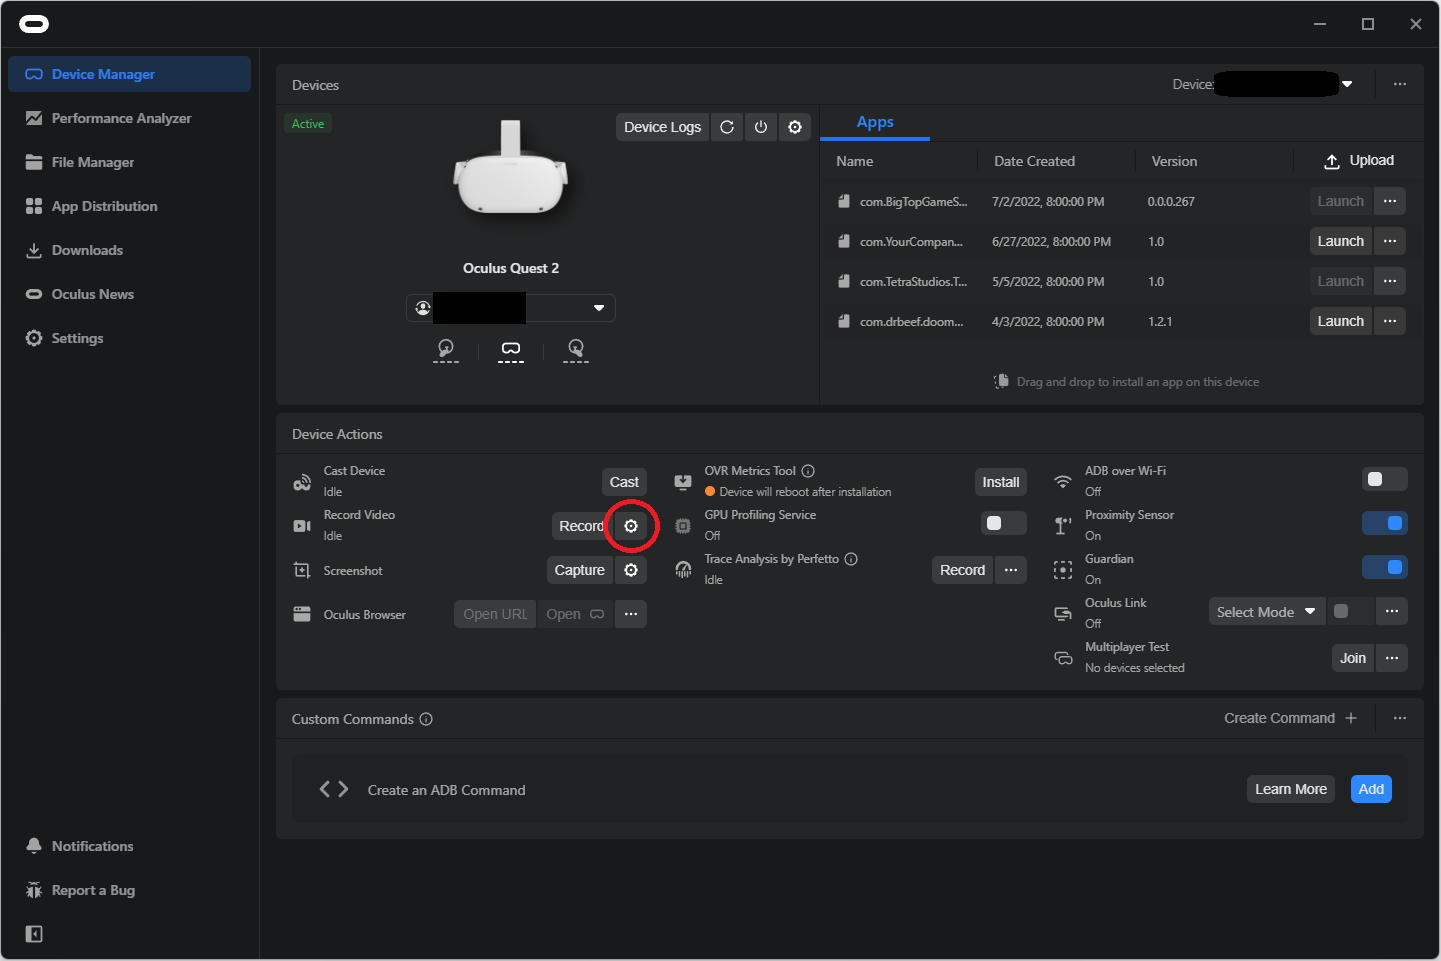
Here you can see a lot of information about your connected Meta Quest 2. what we’re interested in is the Record Video section. You can see it under the Device Actions portion of this menu. Just hit the gear icon to the right of “Record Video”, which is circled in red above. A new menu will open.
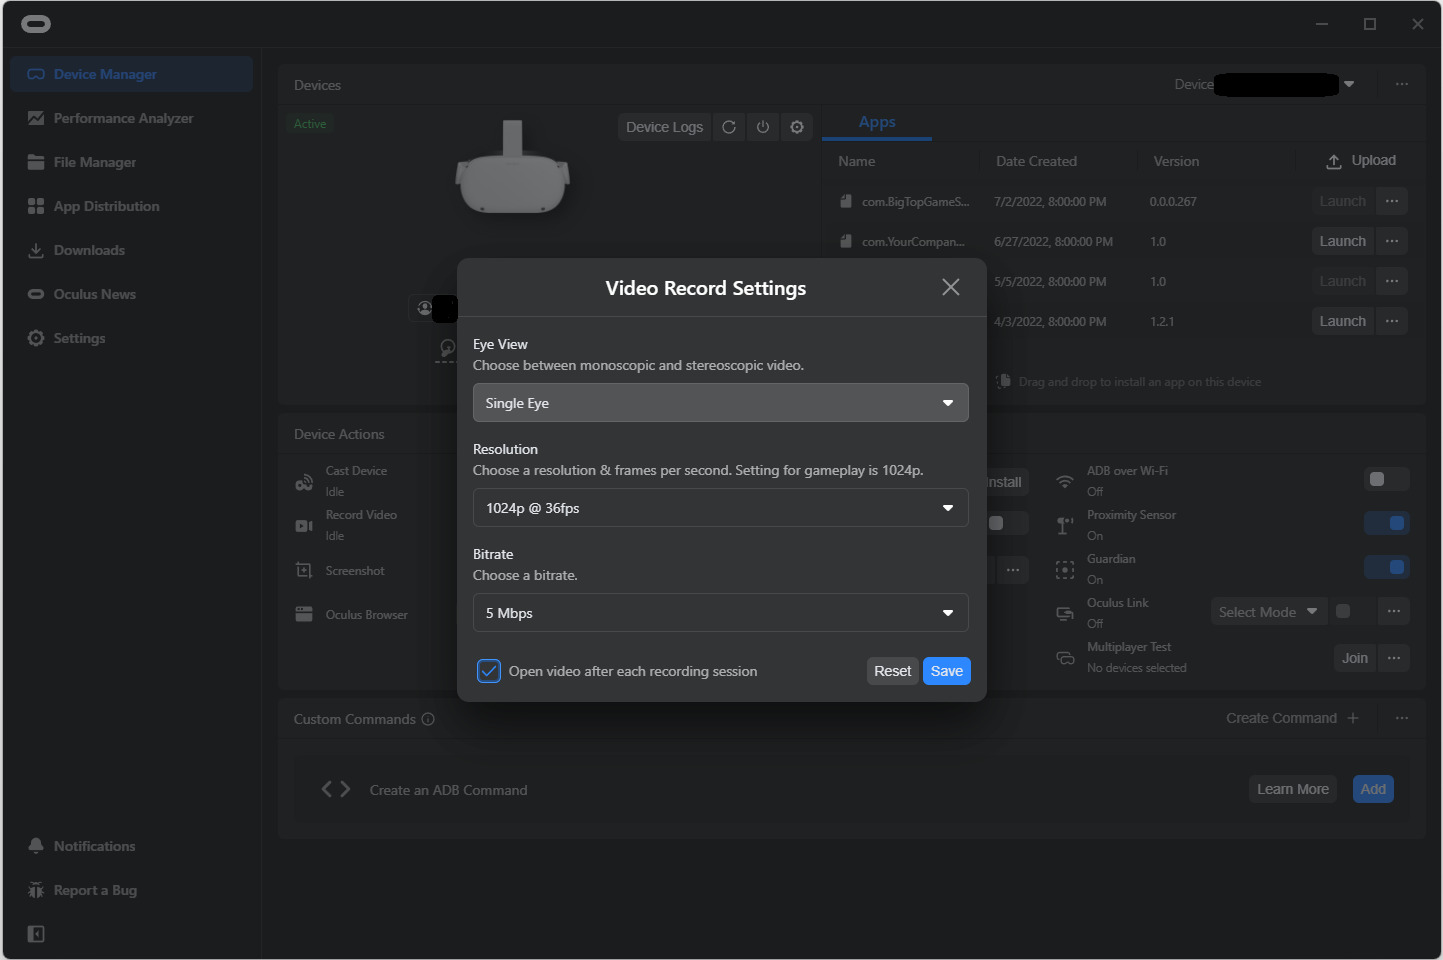
These are the default native recording options on the Oculus Quest 2. Going from top to bottom you can first change the Eye view, though you probably won’t want to. Single Eye will amalgamate the view from both eyes in the recording, creating a single picture. Selecting Both Eyes instead will show the image from each recording side by side (aka Stereoscopic view).

You will probably want to keep this setting at Single Eye. Below that you can change the recording resolution. This will affect the resolution of the video that is recorded, while you can set this to 1080p or 4k or beyond, just be aware that the higher the resolution the bigger the performance hit when you record. The Oculus Quest 2 has a lower default resolution for a reason, so your gameplay experience while recording might not be smooth if you’re recording in 4k.
Below that is the bitrate. Higher bitrates means a higher framerate, to keep it simple. Just as with the recording resolution, a higher bitrate also means a bigger performance hit. Here’s the maximum settings you can have.

Hit save when you’re done, and bam that is your new native recording setting. No ADB commands, and it persists when you shut off your headset. So pop that cable out and get to recording.
Before you go though, there is one more thing, something you will notice pretty quickly. Changing the recording resolution to be anything other than the default will also change your view in the headset. Black bars will appear above and below the picture in each eye, which may impact your VR experience overall. Only the default resolution of 1024p will not affect the view in headset. This is the case even when you aren’t recording.

Into the Radius VR Artifact Hunting Guide and Tutorial
As you might have seen in our Tips and Tricks article, artifacts are a great way to make money in Into the Radius VR. So let's not waste any time and get right into how you can bag some for yourself so you can start buying all the guns you want.
As you might have seen in our Tips and Tricks article, artifacts are a great way to make money in Into the Radius VR. So let's not waste any time and get right into how you can bag some for yourself so you can start buying all the guns you want.
Prefer watching to reading? Then check out the video version of this article on our Youtube channel.
You Might Also Enjoy:
Where are the Artifacts?
Artifacts spawn inside big fields of anomalies. Any anomaly field that you find an artifact in once will always spawn at least one after each tide, so keeping a mental map of where you have found artifacts before will keep you in the money. If you would prefer there are also community made maps detailing where anomaly fields that spawn artifacts are, then go right here.
If you don't want to spoil anything for yourself just keep your detector on your shoulder and wave it around whenever you see a particularly dense pack of anomalies, chances are an artifact is somewhere inside.
Extracting Artifacts: A Tutorial
Alright so now that your detector is ticking, what to do next? While many anomaly fields are very different, there is a series of steps that will give you surefire success no matter where you are in the radius. There are two sorts of anomaly fields, so let’s start with the first and most common.
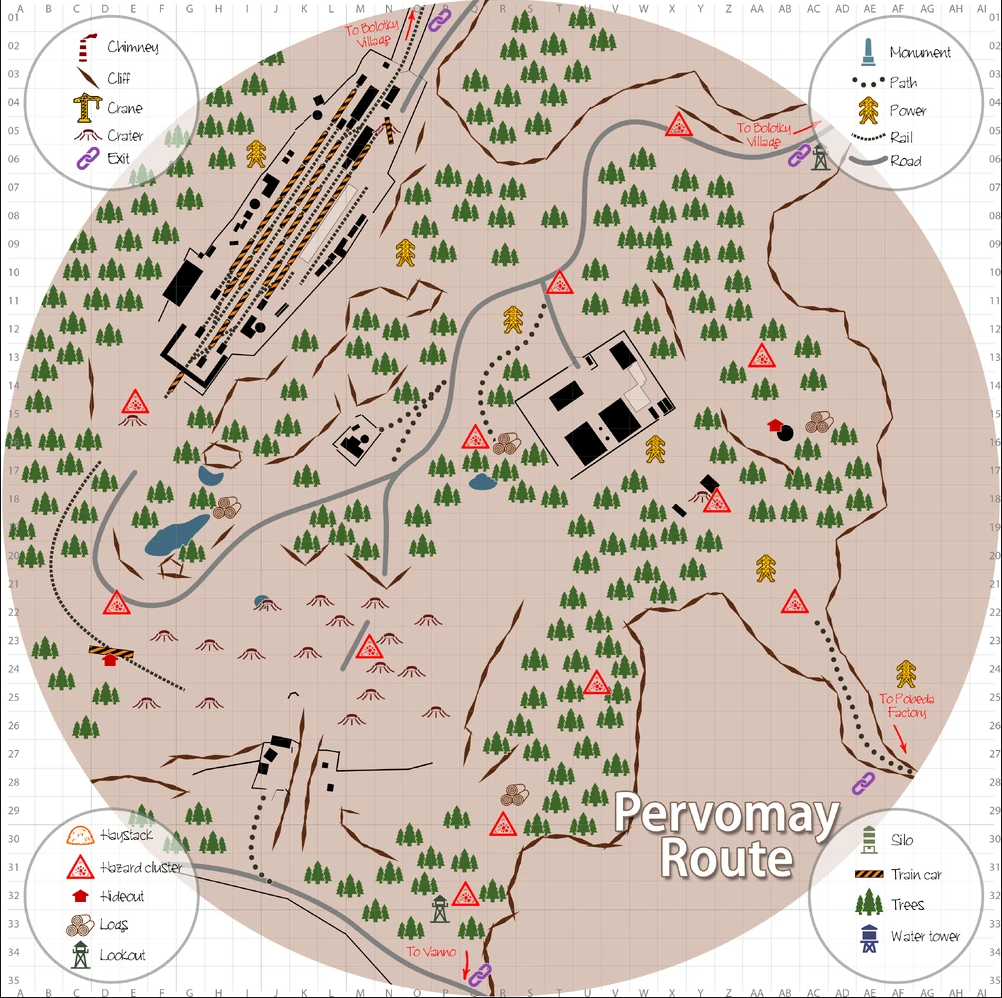
These are dense packs of anomalies found on the ground in a wide open space. In the Pervomany Route you kind find a large field like this just outside the blockhouses which contain the item needed for your first mission. Another example is the hill just past the watchtower beside the road with the entrance to your base. The pile of logs on that hill has a dense pack of anomalies and an artifact spawn inside.

1. First of all you'll want to take a good look around. Enemies might be lurking nearby. You need to decide if they seem to be too far away to bother you or you need to take them down before you go diving for artifacts. Anomalies are deadly to you, but the enemies of Into the Radius aren't injured by them.
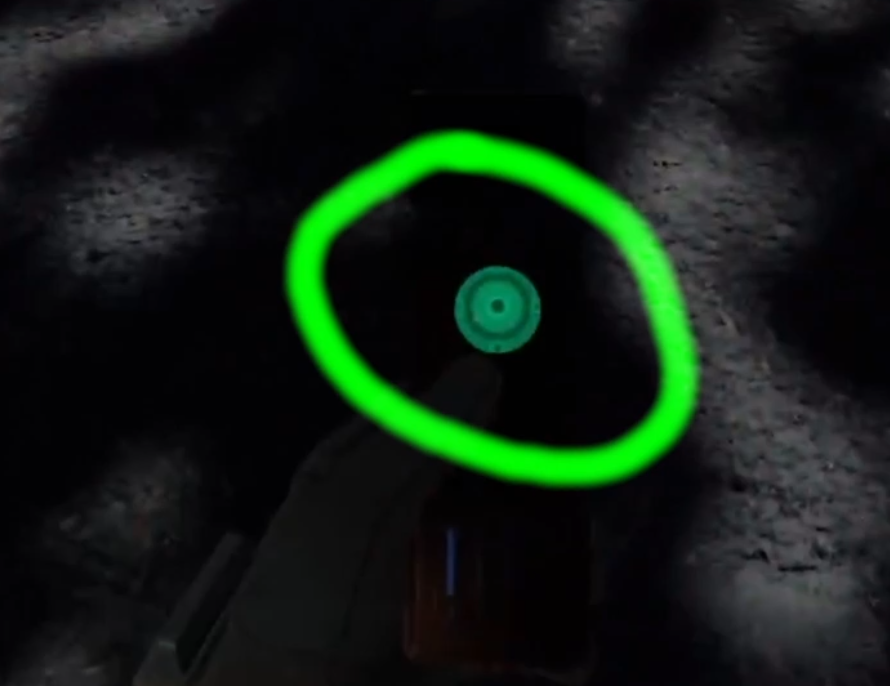
2. Now that you know you won't be bothered, use your detector to find what direction the artifact is in. If the blinking light is green, the detector is pointed towards the artifact it is tracking, if it is blue it isn't. Then put on your gas mask and pull out your probes. If the anomaly field has green tint to it and gas clouds floating around, do not go in without a Gas Mask on, as the gas anomalies will kill you quickly.
3. Throw probes around the edge of the anomaly field. What you're looking for is a gap between anomalies that you can slip into. There is always at least one safe corridor through a field of anomalies that leads to the artifacts inside. Find a corridor and then slip into it. Take your time, and if you don't find it pick around the edges. The corridor can be narrow sometimes, but it'll be there somewhere. If there are reflector anomalies be careful not to get lasered, and if you threw a probe directly ahead into a reflector, strafe out of the way before you get zapped.

4. Calmly, slowly, tightropewalk through the corridor. Use your probes to test the area directly in your path. The faster your detector ticks, the closer you are to the artifact. If the corridor splits, use your detector to determine which direction the artifact is in and go whichever way seems to lead you there.
5. Once the ticks are going super fast, point the detector towards the ground and press trigger to reveal the artifact. The Spotlight the detector emits needs to hit the hidden artifact to reveal it, if you don't get it the first time just cover the area nearby in spotlights until you find it. Be careful not to step into any anomalies!
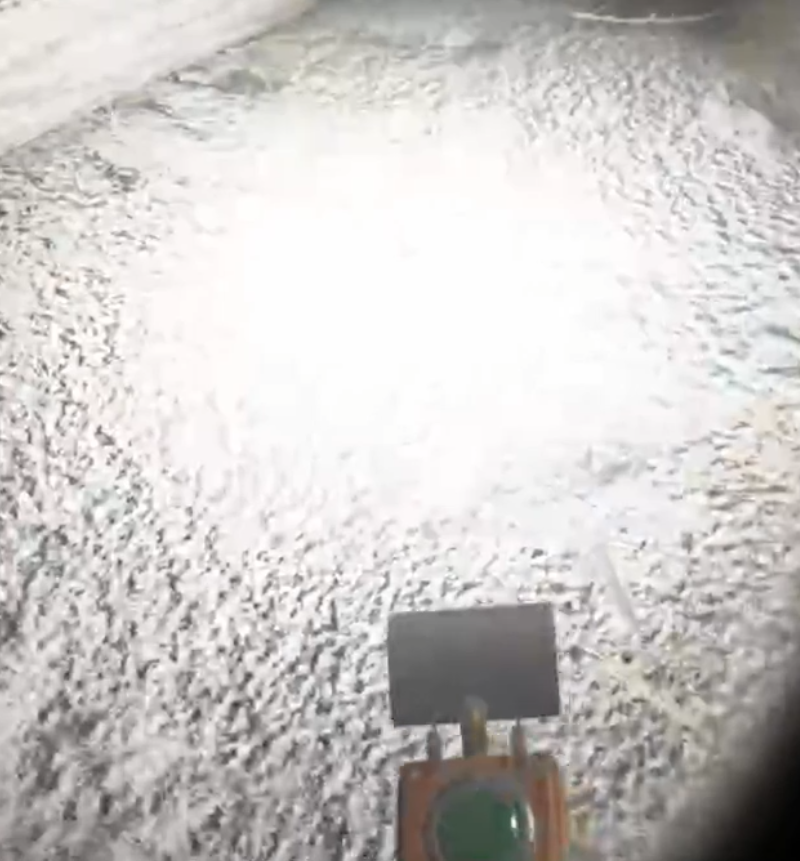
6. Once you've found the artifact use trigger and then the grab button to grab it from a distance. Artifacts can spawn very close to anomalies, so it's always safer to distance grab it.
7. Once you've got the artifact, check your detector to see if there is another. Many fields spawn more than one artifact, so make sure to grab them all before leaving.
8. Once your detector goes quiet, exit the anomaly field slowly and carefully. Retracing your steps and going back out the way you came is always a safe bet, though you might find another corridor out you didn't use before.
9. Profit! Congratulations on your new artifacts. Most just sell for good cash, though some like the Steps and Night Eye artifacts actually have abilities you can use. Whether or not those are useful is up to you, but they're always good money.
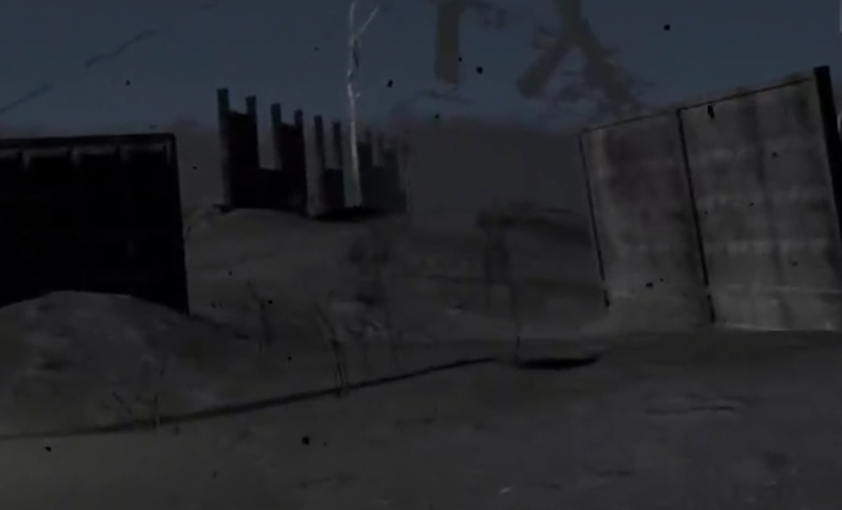
Now for the second type of artifact field. These look very intimidating, but as long as you have a gas mask and good balance you won’t have a hard time. These are more obvious, and always have artifacts. Sometimes they’ll be made of earth, or junk, or both. These fields are characterized by being high up off of the ground, and having narrow walkways with few anomalies on them.
The challenge for these fields is not walking between anomalies, but not falling off to your death. A good example can be found in the first zone as well, near the small compound in the northern part of the map. It is a twisting aerial maze of earthen tendrils leading to a couple of floating log houses. All surrounded by gas.

If you’ve pulled off grabbing artifacts out of a normal anomaly field, then these will be a breeze as long as you have a gas mask.
1. Again first clear out any enemies that might be lurking around. You don’t want them to surprise you when you come back down to ground level.
2. Put on your gas mask and find a ramp upwards. Some ramps are covered with anomalies, but others are easy to just walk up after testing with a probe. Some of these sorts of anomaly fields might only have a single entrance.
3. As long as you don't fall off these are a breeze. There will occasionally be an anomaly in on one of the ramps, so keep testing your path forward with your probe. The artifacts in these anomalies always spawn in around the exact same places. For this example the floating wooden houses spawn an artifact each. Just walk up there, take them, and leave, easy.

Well that's all for this artifact hunting guide. Now you can collect all the artifacts that you pass by and emerge unscathed. Above all else just take your time and you’ll be fine. Have fun having fat stacks of cash.
Into the Radius is a fantastic VR game inspired by the book Roadside Picnic which also inspired the S.T.A.L.K.E.R. series of games. It is 29.99$ on Steam and the Oculus Store, and will soon get a port to the Quest 2, so stay tuned for that.
You Might Also Enjoy:

9 Into the Radius VR Tips and Tricks to Help You Survive the Zone
Into the Radius is a surreal VR Survival Shooter where you take the role of a Stalker tasked by the UNPSC to explore the Pechorsk Zone, complete missions, and return with valuable artifacts. Pechorsk is, however, covered with hostile entities and dangerous anomalies, which means any new Stalker has a pretty short life expectancy. So increase your odds in Into the Radius by using some of these Tips and Tricks.
Into the Radius is a surreal VR Survival Shooter where you take the role of a Stalker tasked by the UNPSC to explore the Pechorsk Zone, complete missions, and return with valuable artifacts. Pechorsk is, however, covered with hostile entities and dangerous anomalies, which means any new Stalker has a pretty short life expectancy. So increase your odds in Into the Radius by using some of these Tips and Tricks.
If you prefer video to reading check out the video version of this article on our youtube channel.
You Might Also Enjoy:
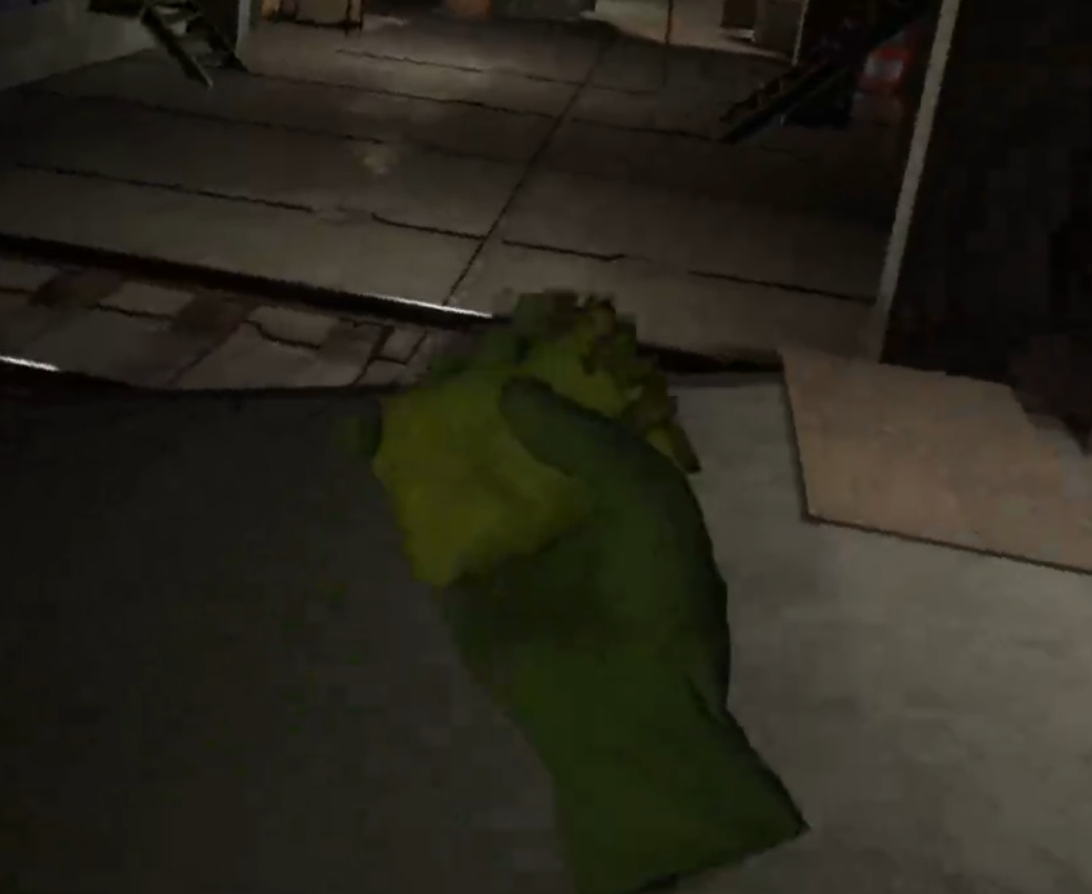
Use Your Whole Body’s Inventory
Into the Radius gives you more than the usual amount of storage slots on your body, so be sure to make use of them. It’s a good idea to keep a knife on one of your arm slots so that you can quickly access it in case you need to stab something, like the Orbs left behind by Fragment enemies. Probes can go in the other arm slot, so that you can quickly whip them out when travelling in anomaly filled areas.
You also get two shoulder slots, and your artifact detector should go in at least one of them so that you can easily hear it click when an artifact is nearby. You can put one of those old soviet style pocket flashlights in the other, and when it is turned on the light will move to match the direction of your body. It you have a headlamp you can always replace the flashlight in that shoulder slot with something more useful, like a grenade or a monocular.

Being able to quickly access the items you need can be the difference between life and death in the Pechorsk Zone, and at the very least is really convenient. The pouch on your hip can also store items you might need during your travels, or can be a nice place to quickly store loot while on the move.
You will also notice the four magazine pouches you have on your chest. You might want to leave one of them empty so that when you reload you have a place to put the empty magazine that you are taking out of your gun, so that you don’t have to drop it on the ground to free up your hand so you can pick up a fresh one.
2. Feed Yourself
When looking at your watch you might notice a blue bar underneath your red health bar. This is your energy bar. It will deplete when you run, and over time it will get shorter and shorter, with the right half of it being replaced by yellow dots.

These dots represent your character’s hunger, and they will accumulate faster when you are carrying a lot of weight and sprinting a lot. So make sure to always bring food on long expeditions, one can’s worth should be enough to keep you sprinting as much as you like. So keep an eye on your energy bar, you don’t want to run out of energy trying to sprint your way to cover in the middle of a gunfight.

3. Virtual Stock Can Help Keep Your Gun Steady
Though opinions vary on this tip, some have said that enabling the Virtual Stock option in the Settings Menu has made their aiming, especially when sniping, more steady. Whether or not you have an actual physical Gun Stock for your controllers, this setting is worth trying out. You may or may not aim more steadily while using it, so give it a try!

4. Maintain Your Equipment
In Into the Radius you need to take care of your equipment if it is going to take care of you. So make a habit of checking periodically if your equipment needs to be maintained. Armor that’s full as holes won’t protect you, and neither will a rifle that is constantly jamming.

Anything you wear, like Gas Masks and Armor, will also lose durability as you take damage, and will completely disappear if it runs out. Those you can only repair by using the repair bay in the trailer at your base. The same goes for knives, which can deteriorate pretty quickly if you use them often enough.
For your firearms it is especially prudent to repair them sooner rather than later, as they can be repaired easily in the vice by using the ramrod and cleaning paper. Wait too long and you will need to use expensive lubricant spray and the brush. Magazines also need to be maintained, though the lubricant and brush is all that will work on them.

Of course you can always use the repair bay if you don’t want to bother with any of that, but it will cost you more.
5. Anomalies Are Not Always Visible
While anomalies will leave traces of their presence, and sometimes outright show where they are, don’t depend on seeing these before you wander right into them. While you’ll still need to keep an eye out for some like the Web or Black Grass anomalies, generally you should always test the ground in front of you with probes while walking through open spaces.

Sometimes you might walk directly into a Distortion or Electric anomaly if you don’t throw a probe in front of you. No matter how vigilant you are with your eyes and ears, it’s always safer to throw a probe.
6. Artifacts Are Good Money
Money will get you all of the equipment, guns, and bullets that you will need to survive deeper and deeper in the Pechorsk Radius. The first way you will discover to make money is by doing contract jobs for the UNPSC. While you can definitely make good money by doing those, you can make even better money hunting for artifacts. The UNPSC will buy them off of you, and they are plentiful and easy to find.
Just look for large fields of anomalies and pull out your detector, artifacts will generally be nearby. Keep in mind that there is always a safe path through a field of anomalies that leads to the artifacts inside. Just take it slow and use your probes to find the safe route to those delicious goodies, and you’ll practically be printing cash.

The more you hunt for artifacts, the better you’ll get at it. Combining artifact hunting with contracts from the terminal is a great way to make more money in less time. Artifacts will also respawn with each Tide, so your income potential is unlimited.
Scientific items like Weather Monitors and Sample Containers are also profitable to get your hands on out in the zone. Try not to waste your time lugging back food items and flares, they don’t sell for much.

7. Always Be Ready To Fight
Not all enemies make a lot of noise before you see them, or they see you. Even approaching each new area methodically, you can sometimes be surprised. They might see you while you are in the middle of something else, like hunting for an artifact with your detector, or doing inventory management. So in general always make sure that at least one weapon you have is loaded and ready to go.
You also don’t have to pull out the entire magazine and empty it to see how many rounds are inside, just hold the weapon in your hand and hold down the B or Y button (depending on which hand it is in). This will not only display the weapon’s durability and statistics, but also the amount of bullets in its magazine.

This also means not getting caught with your safety on or running out of ammunition. No matter what you should always be ready for a fight in Into the Radius, if you aren’t then you better get back to base and get ready for one. Otherwise you might end up fighting with nothing but a knife.

8. Get Important Equipment ASAP
There are a few pieces of equipment that, no matter what weapons you have, you should get as soon as you can. While what guns you use in your loadout is pretty subjective, and there are a lot of choices, you cannot go without these things.
When you unlock Security Level 2 make sure you buy a Gas Mask and a Head Lamp. The Gas Mask is a must have for traversing gas anomalies, and will also give you some general anomalous protection when you have it on. Some anomaly fields will be impossible to traverse without the gas mask. All of the artifacts you’ll be able to get with the Gas Mask will make it pay for itself.

The Head Lamp sits on your head, never needs to be repaired, and give you light instantly by putting your controller on your head and pressing trigger. The light follows where you look, meaning you no longer have to bother juggling pesky Flashlights anymore, and save inventory slots for more important items.
At Security Level 3 it is extremely beneficial to buy body armor, and the helmet. These increase your protection against claws and bullets a lot, and will save you from death more times than you will even realize. Always wear body armor when out in the Zone, and always wear your helmet when you don’t wear your Gas Mask.

9. Don’t Get Caught in the Tide
Time is strange in the Pechorsk Zone, and can move very quickly. So always take a look at your Tidemeter before every raid, and if you have less than half a day or so to pop in and out of the Radius, maybe just sleep through the tide instead.
If you get caught inside Pechorsk during the tide you will be transported to a random place within the zone. Since the Tide also respawns all of Pechorsk’s enemies and shifts all of the anomalies around, you may find yourself very far away from home and with no cleared path back to your home base. So make sure to keep an eye on the Tidemeter, and make sure you get home before it hits zero.

That’s all of the tips we have for now. Good luck out there in the Zone!
Into the Radius is a fantastic VR game inspired by the book Roadside Picnic which also inspired the S.T.A.L.K.E.R. series of games. It is 29.99$ on Steam and the Oculus Store, and will soon get a port to the Quest 2, so stay tuned for that.
You Might Also Enjoy:
All Into the Radius VR Enemies and How to Kill Them
Violence in Into the Radius is an inevitability. Even the stealthiest Stalker will inevitably be cornered by the various enemies that inhabit the Perchorsk Zone. So if you want to know what opponents and entities are in store for you in Into the Radius here is the complete list, and tips on how to beat them.
Violence in Into the Radius is an inevitability. Even the stealthiest Stalker will inevitably be cornered by the various enemies that inhabit the Perchorsk Zone. So if you want to know what opponents and entities are in store for you in Into the Radius here is the complete list, and tips on how to beat them.
You Might Also Enjoy:
Fragments
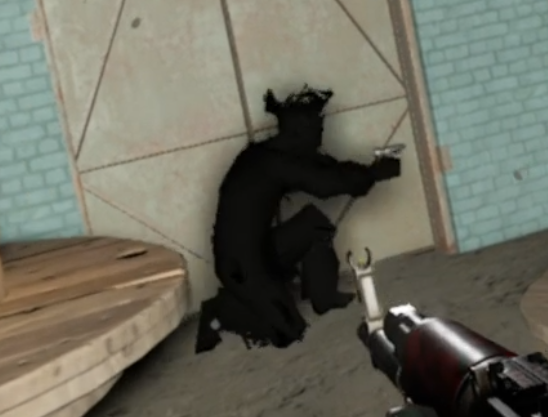
Fragments are the first enemies that you will encounter in Into the Radius, and can be found all over the Perchorsk Zone. Like all enemies in Into the Radius they are made of a shifting black translucent material. They look like tall, gangly people with their arms hung low, almost to the ground.

When a Fragment notices you they walk towards you. Their footsteps sound somewhat like normal footsteps, but a little off, as though they’re always walking through shards of glass. If a Fragment gets close to you it will try to punch you to death with its long arms.

To defeat a Fragment you need to shoot or stab it enough times that it loses its humanoid form, and becomes a little orb surrounded by the swirling black material that was previously its body. Sort of like a miniature copy of the Orb in the middle of the Radius. The Fragment will recollect itself and be fully restored if the orb isn’t destroyed in ten to fifteen seconds.

Since Fragments lumber slowly towards you and rarely show up more than two or three at a time it is easy to pick them off with firearms, even your starting Makarov PM will make short work of this enemy. If you want to save ammo first let the Fragment get close before shooting it. Then grab a combat knife off of your arm slot and stab the orb before the Fragment regenerates.
Fragments are also some of the first enemies that will wear glowing armored plates, starting in the Pobeda Factory area. These plates have a high chance to stop basic ammunition types (FMJ), so AP or P+ ammunition is much more effective against Fragments, and other enemies, with these glowing armor plates.

Phantoms
Phantoms are the hardest to see of all enemies in Into the Radius. They are so pale that even in the middle of the day they can be hard to make out, and at night you’ll never notice one without a light, except for the sound of its footsteps.

Otherwise they look exactly like Fragments, and act in exactly the same way. Though Phantoms can notice you from much further away, as they have better eyesight than their more visible cousins. Otherwise being hard to see is their main defense, as unlike Fragments they do not leave an orb after you shoot them. Instead they just disappear. Just let them get close so you can shoot them easily.
Unlike most other enemies in the Zone, Phantoms are never armored.
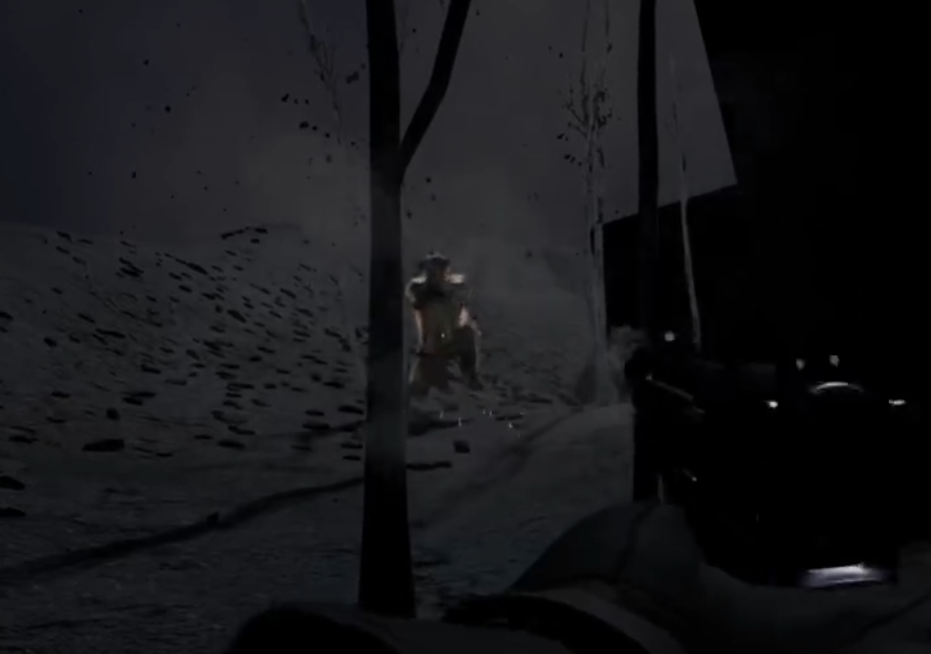
Mimic Policemen
Mimic Policemen are the first ranged enemies that you will encounter in the Perchorsk Radius. They are made of the same black shifting material as all of the other enemies in the Radius. Except they are very humanoid and have a prominent policeman’s cap on their head. Unlike Fragments they have a pretty normal shape. When they are nearby you can hear them say “Where are you?” and their footsteps sound like a boot hitting concrete, very loud and very distinct. They will also occasionally say “Come have Breakfast” or something equally creepy in a little girl’s voice.
Compared to the melee oriented opponents the Mimics are very deadly. Not only will they notice you easily from far away, but they respond quickly to noise. When it notices you the Mimic will crouch down and shoot at you with its PM Makarov pistol. Despite the small size of their weapon they shoot quickly and accurately, dealing a fair amount of damage very quickly even at medium range.
The Mimic Policeman will stick to cover and crouch walk out of it to take shots at you. When it needs to reload it will run to cover again, load its weapon, and crouch walk out to take more shots at you.
Always take cover when fighting a Mimic Policeman. While they are accurate if you are in the open, they will not hit you often if you fire back at them while mostly protected by a hard barrier capable of stopping bullets. Of course, if you’re fighting them with a pistol as well it can be very hard to land a good shot on them more often than they shoot you. So you may have to wait for the mimic to run out of rounds and then dash to a closer piece of cover while the Mimic reloads.

If you are in a very bad spot you can always run away to a piece of hard cover and let the Mimic come closer to you, though this doesn’t always work. If you stick to cover and aim for the head you will generally do alright. If you have trouble against Mimics then make sure to get a firearm that works well at a distance as soon as possible, like the SKS. You will know when you’ve killed one by the high pitched wail that it makes on death.
Seekers
You will first run into Seekers in the Bolotky Village area, the second map in Into the Radius. They look like an average man, but made completely out of darkness with their heads surrounded by dots of pink light. A seeker will charge you the moment it spots you.
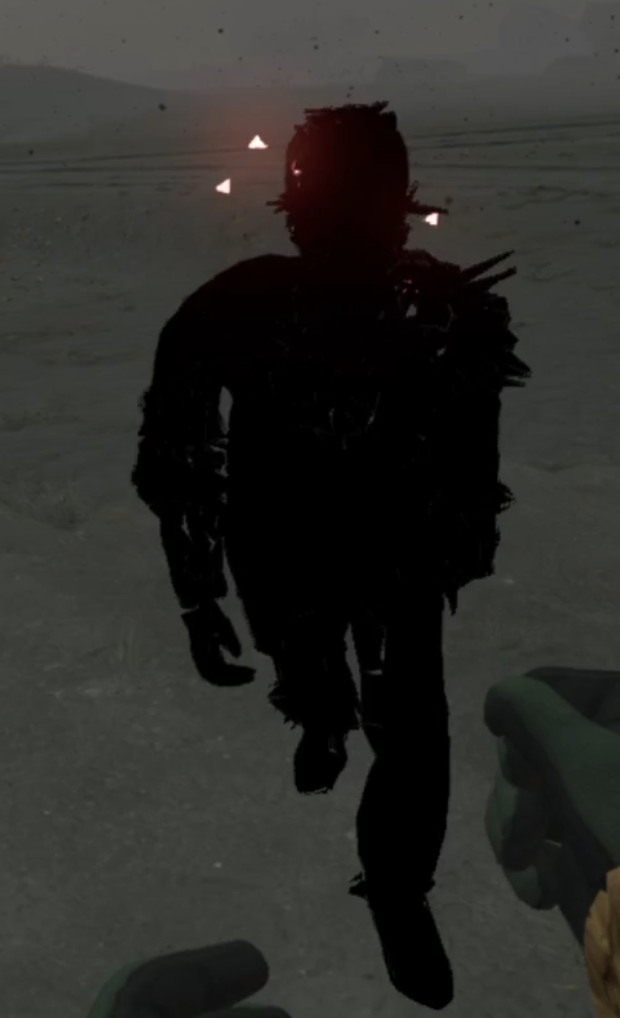
Unlike Fragments, Seekers are very fast and sprint right towards you at about the pace of an adult human. Eerily their footsteps make no noise, so if you do not notice a Seeker after it’s initial wail it can easily sneak up on you. If a Seeker gets right beside you it will not attack you with its arms, but instead release beams of light from its head like those from the reflector anomaly. The beams are damaging and are also very bright and disorienting.

Seekers go down in just a few shots, though like Mimics they can be armored. When they are armored their heads will be exposed, so headshots are key. Seekers often force you to shoot them first while you are also being attacked by ranged Mimic enemies. In this case make sure to take cover and let the Seekers come at you before shooting them. Seekers make a great distraction for Mimics. All in all though Seekers aren’t too hard to take down with whatever firearm as they are spiriting at you full tilt, just make sure your gun isn’t empty!
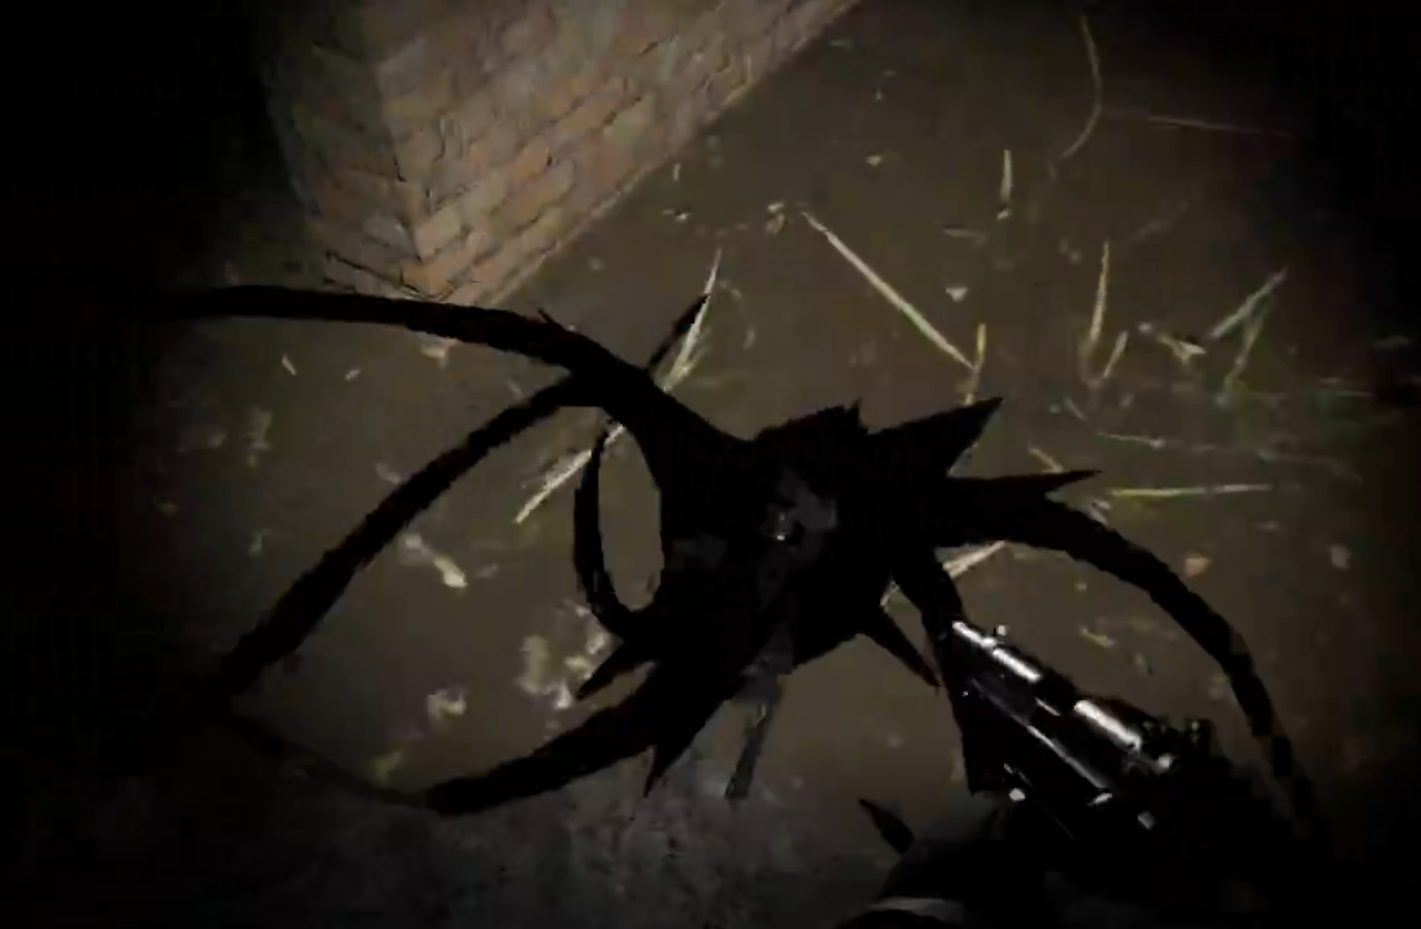
Spawn
Spawn are little balls of black matter with several loose tentacles hanging out of them. They act and sound super strangely, unlike the otherwise human looking enemies found in Into the Radius. You will immediately know if one is nearby by the unique sound that they make, which is a sort of otherworldly chittering that you’ll just have to hear for yourself.

When a spawn sees you it will roll across the ground, tentacles splayed all over the place, until it gets within a few meters of you. Once it does it will momentarily stop completely, before levitating up into the air a couple of meters and then launching itself towards you.
If it hits you it will do a decent amount of damage before flopping back to the ground, and attacking again in a couple of moments. If it misses you it will stick to whatever surface it hit for a couple of seconds, before repositioning and trying again. If the Spawn doesn’t have a line of sight on you, or is too far away to attack, it will roll toward you until it can. The Spawn will do this over and over until you or it is dead.

Spawns move extremely quickly and so are pretty hard to shoot, so at first glance they can be very intimidating enemies. However, if you’re facing a Spawn alone they are actually pretty easy to take down. Just take advantage of how it attacks. The spawn will launch itself at you in a straight line, so if you constantly strafe around the spawn, it will miss you when it launches itself at you. Then shoot or stab it while the Spawn is stuck on the ground.
For such a fast enemy it isn’t very smart, though if coupled with other nearby enemies it can be hard to focus on strafing around the Spawn while dodging bullets or beams. Another way to take out a Spawn is to just hold out your knife and let it skewer itself when it launches itself onto the blade. Again they’re fast, but not super smart.
Just like Phantoms, Spawn are never armored.
Mimic Commados
Mimic Commandos are largely like Mimic Policemen, but with more firepower. Instead of the PM Makarov Pistols they wield automatic weapons and sniper rifles. As you enter the mid and late game areas there will be no enemy more plentiful than Mimic Commandos. They lack the policeman’s cap of their pistol armed counterparts, and instead sport a radio antenna to differentiate themselves. The sniper variant of the Mimic Commando wears a ghillie suit.
Mimic Commandos, also like Mimic Policemen, will occasionally say lines in human voices, like a little boy saying “Is Max coming out to play?” Sometimes these voices are extremely distorted versions of the same lines.

The Mimic Commandos armed with automatic guns will fire at you in bursts. Usually SMGs or lower end assault rifles like the AKM. Some are armed with shotguns, if you’re lucky. While not exceptionally accurate they will still zero in on you pretty quickly and do a ton of damage if you’re not in cover, especially up close. The snipers are the most accurate of all and do incredible damage, owing to their large caliber weapons.
Mimic Commandos sound and act mostly like Mimic Policemen, just with bigger guns. Though they do seem to be able to see a little further and hear a little better. The Mimic Snipers tend to stick to their positions, and be located in fortified locations like watchtowers and blockhouses.

By the time you run into Mimic Commandos you will need to have a long ranged rifle or assault weapon like the AK-74 or M4A1 to compete with them. While one or two Mimic Commandos can be found in the Bolotsky Village, by the time you go to the Pobeda Factory you will need to fight a lot of them.
Mimic Soldiers
Similar to Mimic Commandos, Mimic Soldiers of many types can be found in the Kolkhoz Zarya. They are essentially identical to Mimic Commandos, but have a different look and better weapons.
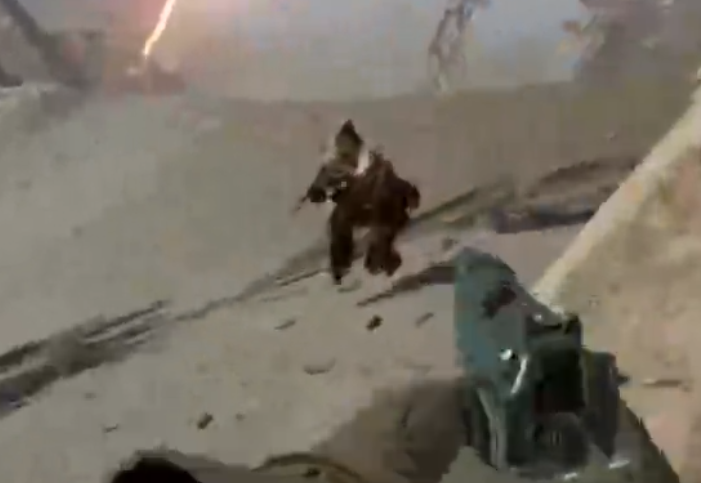
Mimic Hunters are hooded figures, commonly armed with rifles such as the Tiger Sniper Rifle, or a variety of Automatic weapons. Some are even suppressed such as the VSS. Mimic gunners look similar but carry an assault rifle. Meanwhile Mimic SWAT Team members carry SMGs and heavy armor. Mimic Scouts are more lightly armored looking, and carry AKS-74us.

Kolkhoz Zarya is where these many types of Mimic Soldiers begin to appear in both armored and unarmored forms. They are all differentiated by the types of weapons they carry, and have slightly different looks to them. Their behaviors are generally all the same, when they detect you they will stop and fire, and then advance slowly by crouch walking if you are out of sight.

There are also Mimic Snipers as in Pobeda Factory, with the same behavior of sitting in place in set positions, sniper nests if you will. In general the presence of Mimic Soldiers, and so many of them, in Kolkhoz Zarya and Pechorsk Castle means that firefights are much more common and much deadlier.
Sliders
Sliders can be found in Kolkhoz Zarya, and compared to other enemies in Into the Radius they are extremely frightening to fight. They look like people made of darkness with super long necks and halos around their heads, but bright white eyes like pinpricks of light.

Instead of running at you like other enemies, the Slider will teleport directly in front of you. Each time a Slider teleports it makes a distinct whooshing noise. They don’t just appear, but rather seem to stretch very quickly across space, so that they can get close to you and cut you with their clawed hands. Luckily Sliders will pause after sliding towards you, and give you about half a second before trying to claw at you.
Sliders are the most terrifying and otherworldly enemy in Into the Radius. So at first they can seem formidable, but just like Spawn they are easy to deal with as long as you take them one at a time and calmly. Just let it slide close to you and back up, just like Spawn don’t stop moving when one is after you. When it pauses after teleporting, just put a few rounds into its head, and keep backing away from it. Failing to do so, or getting cornered, will end in a quick death. Only a couple of hits from a Slider will kill you even fully armored and fully healthy.
The BTR
Here we are, saving the best for last. The BTR is the most distinct enemy in Into the Radius. It’s a giant armored car, or APC, whatever you want to call it, made of shifting black matter. Its engine is very loud, so you can hear it coming from a long way away. Wherever it is it will swing its searchlight around looking for you as it drives.
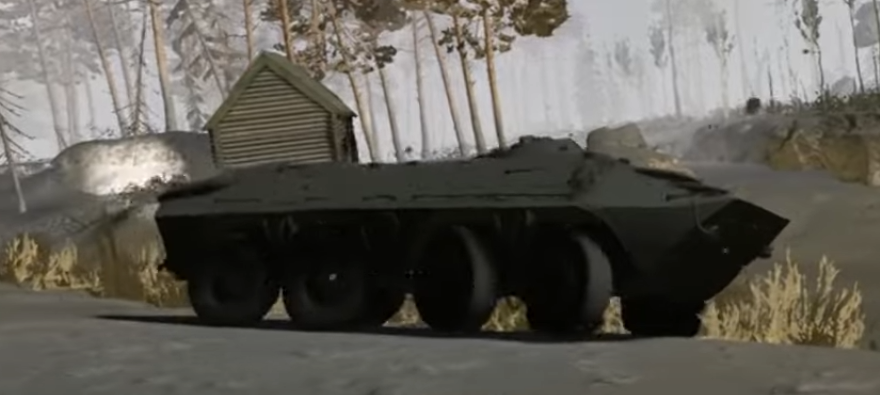
The BTR can’t hear, but if you step into its searchlight it will make you regret it. The BTR will immediately halt and open fire with its autocannon. If this happens your only option is to escape, because the BTR will outgun you every time. Not only will its cannon take you down quickly if you’re in the open, but you have basically no way to destroy it. Realistically no amount of firepower you can bring in will be able to destroy the BTR.
Your only option here is to find cover and then run away as soon as you can, if you can. You do not want to be caught out in the open when the BTR finds you. Just don’t get near it, because you won’t be able to kill it.
Well there’s all of the enemies in Into the Radius. Into the Radius is a fantastic VR game inspired by the book Roadside Picnic which also inspired the S.T.A.L.K.E.R. series of games. It is 29.99$ on Steam and the Oculus Store, and will soon get a port to the Quest 2, so stay tuned for that.
You Might Also Enjoy: