

5 Great Resident Evil 4 VR Tips and Tricks
Resident Evil 4 VR is the latest big budget, big hype release on the Oculus Quest 2. Sorry SteamVR only users, but for now it’s only on the Quest. Whether you’re an old fan excited to see this genre-defining game on a new medium, or a newcomer looking to shoot some zombies and save some daughters, here’s some tips to help you on your way.
Resident Evil 4 VR is the latest big budget, big hype release on the Oculus Quest 2. Sorry SteamVR only users, but for now it’s only on the Quest. Whether you’re an old fan excited to see this genre-defining game on a new medium, or a newcomer looking to shoot some zombies and save some daughters, here’s the greatest Resident Evil 4 VR tips and tricks to help you out.
The Resident Evil 4 VR Logo
Immersive Mode is More Versatile - Resident Evil 4 VR Tips and Tricks
When starting out in Resident Evil 4 VR you’re given the option between “Immersive Mode” and “Quick Select.” Whichever you end up preferring, know that you’re missing out if you don’t choose Immersive Mode. Out of all of these Resident Evil 4 VR tips and tricks, this is the most game changing. In quick select you can only use one hand to select weapons. In immersive mode you can use both hands at once. This can be extremely useful in a number of situations.
Holding your handgun in one hand and your knife in the other, keeping your unloaded shotgun in one hand while quickly pulling out your pistol with the other. There are a number of situations where Immersive Mode gives you more versatility in what you do with your hands.

A weapon in each hand in Resident Evil 4 VR
Stay on the Lookout For Loot - Resident Evil 4 VR Tips and Tricks
You’re going to need supplies to survive in Resident Evil 4 VR. More than you could possibly find just lying around in the open. Bullets, healing items, grenades, and money to buy new equipment and upgrades. More of each of these things can be found by breaking crates and barrels found in the world with your knife.
So this Resident Evil 4 VR tip is that good loot is often where you might expect to find it the least. Such as coins in crows nests or gems stuck in the ceiling. Another trick is to shoot the crows themselves wherever they congregate, as they always drop some treasure.

Any tip that gets you treasure is a good one in Resident Evil 4 VR
Knives Beat Bear Traps - Resident Evil 4 VR Tips and Tricks
From early on in the game a number of traps and devices will be left in your path. Bear Traps in particular can be disarmed in an unintuitive way by hitting them with your knife. Shooting also works, but who needs to waste a bullet? This wouldn’t be a great Resident Evil 4 VR tip if it involved wasting ammunition.

Knife > Bear Trap
Good Herbs Make For Good Health - Resident Evil 4 VR Tips and Tricks
As in any of the older Resident Evil games, there are herbs used to restore health. Keeping with tradition Resident Evil 4 has three herbs, green, red, and yellow. These can be used to restore your health, but also to increase your maximum health. Mixing green herbs with green herbs generally restores more health, but is less efficient than combining a green herb with a red herb. A green and red herb together will restore health completely.
An important Resident Evil 4 VR tip is to use these herbs as efficiently as possible. An addition of a yellow herb to any green herb will increase maximum health no matter how many green or red herbs are also mixed in. The next time you need healing make sure to use a yellow herb mixture to give you a little more survivability next time. Also mix red herbs and green herbs as much as possible.

Always mix your herbs in Resident Evil 4 VR
Invest in Your Inventory - Resident Evil 4 VR Tips and Tricks
There is a lot of stuff to be bought from the enigmatic trader that seems to always appear where he is most needed. The most important of these things are the upgraded Attache Cases. The attache case is basically your inventory container, and buying a larger one will grant more slots for carrying items.
Sooner or later your inventory will be full. You will not want it to be full, who knows if that next herb or grenade you pick up can be the difference between life and death later on? Resident Evil 4 VR requires a decent amount of frugality with resources. Sometimes there will be plenty of ammunition, and sometimes not. For the dry times you’ll want inventory space, and also to carry as many weapons as possible, so that you can use as many types of ammunition as possible.
Upgrade your inventory whenever you can, and when that isn’t enough combine herbs to save on slots. If all else fails, maybe sell some of your less useful items to the trader.
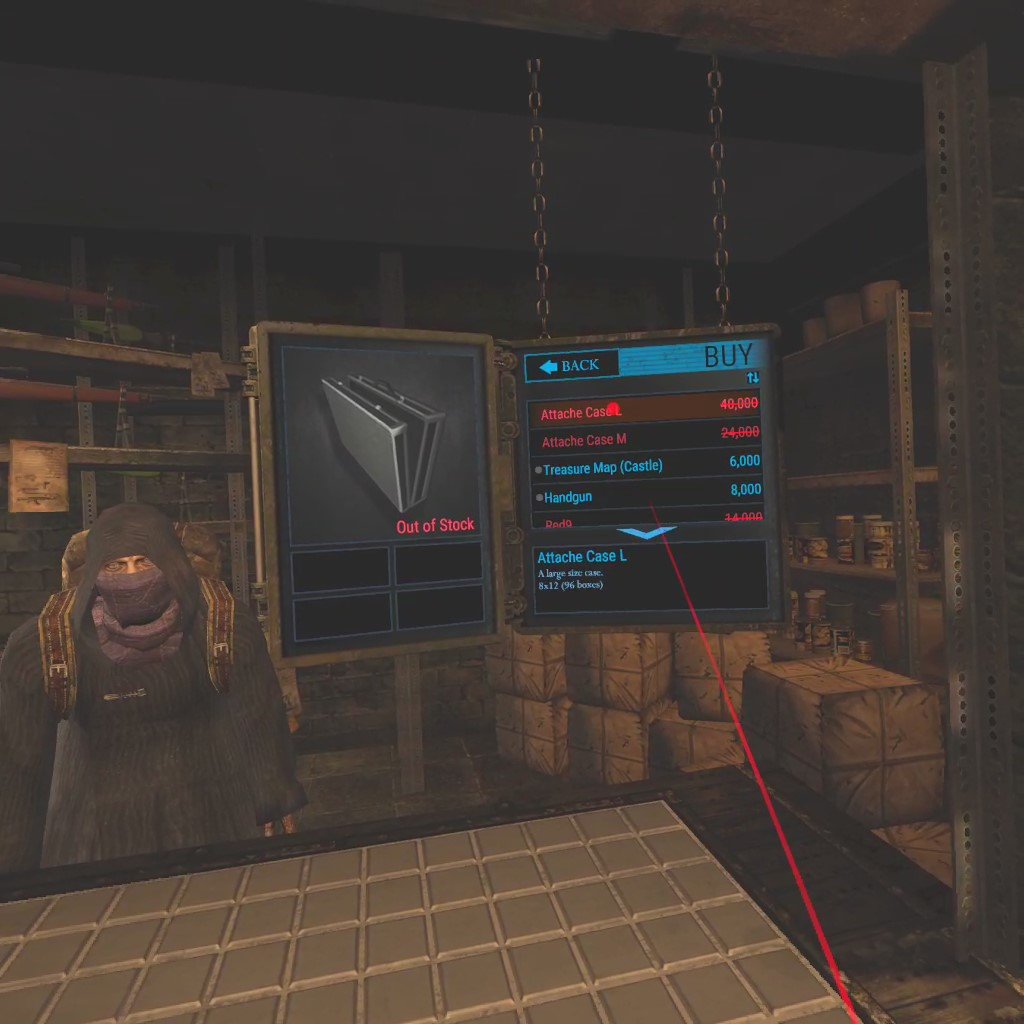
Always get the attache case ASAP in Resident Evil 4 VR
Those are all the Resident Evil 4 VR tips and tricks we’ve got for you. Resident Evil 4 VR by Armature Games is available on the Oculus Store for 39.99$. Good luck fighting Los Ganados.

The Walking Dead: Saints And Sinners Aftershocks Review
The Walking Dead: Saints & Sinners has a pretty solid run time, especially for a VR title. Even after finding The Reserve and completing the main story there was fun to be had traipsing around New Orleans, destroying ever larger amounts of the undead and Tower and Reclaimed patrols and death squads. That fun did peter out without the shiny jewel of The Reserve to be a constant goal and compelling mystery. The Trial provided some brief relief, but it did not satisfy, it did not feel like playing the original game at all. For those left wanting more by then there is finally relief with Skydance Interactive’s release of the Aftershocks DLC.

The Walking Dead: Saints & Sinners has a pretty solid run time, especially for a VR title. Even after finding The Reserve and completing the main story there was fun to be had traipsing around New Orleans, destroying ever larger amounts of the undead and Tower and Reclaimed patrols and death squads. That fun did peter out without the shiny jewel of The Reserve to be a constant goal and compelling mystery. The Trial provided some brief relief, but it did not satisfy, it did not feel like playing the original game at all. For those left wanting more by then there is finally relief with Skydance Interactive’s release of the Aftershocks DLC.
Those who have not stepped into The Tourist’s shoes for a while may wonder though, is this DLC worth reinstalling the game? Can more of the same be expected, or something a little different? Stick around to find out. (Light Spoilers, mostly content related)
Shootouts Traps and Loot Oh My!
The first thing that is very apparent when playing Aftershocks is the increase in human enemies. By the time the main game is finished it is assured that the player has a sizeable arsenal and a lot of, if not all of, the workbench upgrades. So the enemies are commensurate to the player’s ability. Where The Trial was a test of zombie fighting skill, Aftershocks is a test of gunfighting capability. There are many human enemies in Aftershocks, and not just a light sprinkling as before. Tower troopers and Reclaimed soldiers come in packs, almost entirely armed with heavy weapons such as shotguns and assault rifles, and wearing heavy armor. Gone are the days of fighting a few goons wearing blue shirts and wielding .30 revolvers. The Tower and The Reclaimed aren’t playing around anymore. So whenever one of those Military Cases is up for grabs be sure to bring some firepower.

For anyone who hated fighting other humans in the main game, this DLC might not be for you, though there are always stealth options. On the other hand anyone who found that the main game quickly skimped out on opportunities to have gunfights with your fellow man, then Aftershocks delivers. Especially as, even if not taken from The Reserve in the original ending, the ability to make assault rifles and ammunition for them is quickly unlocked.
Traps are also more formidable then before. No longer are there only simple barbed tripwires that only do a little damage if they touch the player’s body. The Reclaimed have become more devious than ever before, and have wired up propane canisters to blow. They don’t have tin cans hanging from them either. You need to spot the thin wire, or say goodbye to your legs.

Can you spot the tripwire?
Despite the dangers, the crates are SO worth the trouble. Each is packed to the brim with the highest tier loot. No joke. Boxes of loot of all colors, ammunition, the highest tier food items, the best medicines, even fully assembled high durability weapons. Items that previously could only be crafted. All this and more are the prizes at stake. What seemed like a high quality haul before now looks like so much random garbage. Prepare to be spoiled.
What About the Story Though?
The story starts off pretty tame. There is no talk of the leaders of the factions, or any new direction in their ideologies now that The Reserve is gone. As far as they are concerned it is still there, just spread about in many small pieces to fight over. The Tower does not collapse if you killed Georgia in the main game, and neither do The Reclaimed if JB kicked the bucket. No choices made before Aftershocks affect the DLC missions. The missions are simply… go get the crates. If you’re hungry for loot this may be enough, but any additional motivation is not found within the story.
Other than the standard “Get the cache before anyone else does” setup of the missions, it takes quite a few runs before any additional plot develops. The cache missions all vary slightly, and a couple of minor characters that come and go are introduced. Nobody of the caliber of May or Casey. All in all the story is very light, and all built up to a central mystery which is… not satisfying.

While fighting The Tower and The Reclaimed across the same old maps definitely feels like living in the world of The Walking Dead’s New Orleans, something is missing. There is no more discovery as there was playing the base game the first time. Everything is simply there as window dressing for the end game combat challenges. The Tower does not change. The Reclaimed do not change. New Orleans does not change, and neither does The Tourist through the player. There are no interesting choices to make as in the first game. There are simply gunfights and massive loot. Sure there is a mystery, but the final reveal of it at the end will have you wishing there was never a mystery at all, the ending is that bad. It seemed as though it was shoed in so that Aftershocks could have a clear way to say it is over. Just to make sure, the developers added a popup which basically says “Thanks for playing, it’s over.”
More to Come
Skydance has indicated that there will be more additions to The Walking Dead: Saints & Sinners, so maybe the lackluster ending is building to something greater. As it stands if you want more interesting gameplay challenges in this game, then this DLC is definitely for you. If you wish to be satisfied by an interesting story with ideas to think about and moral choices to make, you won’t find it here. Hopefully Skydance’s next addition will be better in that department. Though, who can complain too much with so many things to shoot?
The Walking Dead: Saints & Sinners is available on Steam for 39.99$. It is also available on the Oculus Store for 39.99$.
The Walking Dead: Saints and Sinners Factions - The Tower
The waterlogged and zombie infested world of The Walking Dead: Saints & Sinners is filled with living people. People fighting and struggling to survive even after a year of trying to live in a world where everything is upside down, even the cycle of life and death. In the city of New Orleans most of these people are part of one of two societies. That of the Tower, or that of the Reclaimed. Those lost souls that are left to fend for themselves and are considered doomed to become another member of the hordes of the dead which roam the city streets are called “Exiles”.
Let’s start with the group that most would likely consider to be the most heinous of them all. The Tower.
A Tower Made of Sand
The Tower began as a large group of survivors with the standard zombie apocalypse dream. Find a defensible place with enough room to house a lot of people and supplies, and make it safe. So they chose a large skyscraper in the business district and got to work. Many of them died while cleaning their new home of the undead. Now those who perished during the founding of The Tower are martyrs in a mythically poignant founding story. They are the dead half of the Romulus and Remus which founded their society. A society that the Romulus of the story, a Haitian woman called Mama, so quickly turned into an authoritarian society.
Even with a secure home things were not easy. People desperate for any kind of security flocked to the new safe haven. The Tower inevitably had a strain on resources, and so sent patrols all over New Orleans to gather what was needed. The strain became greater and greater as the population grew. Though Mama was powerful she had a great burden to a great many people, and so quotas on supplies had to begin. Those quotas, if not met, would likely result in harsh punishments from a leader who felt a great obligation to feed her people. So, inevitably, corners were cut to meet those quotas. A group of hunters put human meat on the menu to make ends meet and numbers add up to the correct amount.
They were caught when the human meat caused an outbreak of disease that killed many, and so the hand of control had to tighten. It tightened into a society of secret policepersons. After the cannibals were sentenced to death, paranoia began to reign. People caught going against Mama’s will were either exiled, a fate many considered akin to death, or simply killed by forcing them to walk off of the heights of the skyscraper itself. That is how The Tourist meets The Tower. As a desperate regime that becomes more brutal by the day, and mostly to its own members, but also as the most powerful and omnipresent force in New Orleans. Other than the dead themselves, of course.
The Tower is the ultimate representation of the order that is created in trying times of interregnum. Brutal because it has to be, and when times get tough even more brutal. All in a vain attempt to hold on to order in a world thrown into chaos. Mama might have been a good leader, but she stepped down when things became too difficult, and her right hand woman Georgia took over. It was likely Georgia who encouraged such harsh measures in order to keep control. While not stated explicitly, Georgia’s will seems to have overtaken Mama’s own, and the strain was too much for the old woman, so she secluded herself. While it seemed that Mama was the one imposing harsh laws, in reality it was likely Georgia’s bloodlust and desire for absolute control that caused those orders to be given.
It is by Georgia’s hand that The Tower becomes the Stalinist society of snitches that it does. Closed off to outsiders and quick to use force against any threat internal or external. Georgia encourages even harsher measures as the game’s story goes on. Those thought to be weak are thrown out, not worth resources which are becoming more scarce. No more exiles, just execute those who dissent. Do not simply ignore Exiles. Kill all of them in an area before they become a threat, or join The Reclaimed.
The Tourist vs. The Tower
The Tower’s patrols are well armed, organized, and numerous. So they are naturally a suitable enemy for The Tourist. Throughout the game The Tourist is forced into conflict with The Tower in order to gain access to The Reserve, via the auspices of May, who will be discussed more later. Even if the player, as The Tourist, feels no disgust or hatred to The Tower by learning of their atrocities, or is convinced of the necessity of their harsh stance by reading their propaganda posters, they are forced to infiltrate Tower strongholds. Unless they sympathize with the tower so much that they kill May, who sends them against The Tower in exchange for good opportunities to steal supplies and weapons. In the Aftershocks DLC it is even harder to avoid fighting The Tower, as they are the main opponent guarding multiple Reserve caches. It seems that conflict with The Tower is inevitable for The Tourist.
It may not be impossible to never fight The Tower without killing May, but if it is it would be damn hard, and require sneaking around their guards in order to steal the objective. It is much simpler to fight them, and at the end of the day feel some comfort in knowing that the people who were killed likely would have stabbed their own family members just to stay safe. Those are the people that remain in The Tower. Those ruthless enough to do anything for survival, or those physically strong enough to be accepted, but weak enough to not want to strike out alone no matter what they are told to do.
Conclusion
Georgia’s brutality is easy to hate when taken at face value. It is easy to judge such actions on moral grounds when playing a game in comfort, for relaxation. It is easy to not think of the pervasive fear that must accompany a world gone to hell, and the desire of regular people who simply want security so badly that they will trust someone who is clearly a ruthless despot in order to get it. It is unfortunate that Georgia’s ideology is simply not suited to longevity. Such a system inevitably collapses sooner rather than later, because fear of being executed overcomes fear of the undead chaos that lurks outside those walls. One day those walls may seem more of a cage to be escaped from than a bulwark of safety. It was that fear that lead to the creation of The Reclaimed.
See our article on The Reclaimed for more on the factions of New Orleans in The Walking Dead: Saints & Sinners. They are The Tower’s worst enemy, and also a product of its own beliefs.
The Walking Dead: Saints & Sinners is available on Steam for 39.99$. It is also available on the Oculus Store for 39.99$. This is one of the best Virtual Reality experiences out there right now, with extremely polished survival gameplay and a compelling story. Not to mention an unmatched melee combat system, focusing on piercing the skull of course, because zombies. If you like zombie games then this is one you should not miss. Even if you aren’t a huge zombie culture fan, this is a game that is well worth its price tag for even a single playthrough. There’s even an Arena Survival Mode, and more free updates.
The Walking Dead: Saints and Sinners Loot Tier List and Crafting Guide
The Walking Dead: Saints and Sinners by Skydance Interactive is the premiere Zombie Survival experience for VR both on the Oculus Quest and PCVR. Based in the Walking Dead universe, as the name implies, you take the role of “The Tourist”. Basically a Louisiana badass wandering the flooded, zombie infested ruins of New Orleans looking for the rumored “Reserve”, an underground military bunker containing enough weapons and supplies to equip a regiment and care for a horde of refugees. As always in the apocalypse, weapons and supplies are king. The only problem is, everyone else also wants to get to the Reserve, so finding it won’t be quick or easy. You’ll need weapons, upgrades, food, and medicine just to get there. The best way to acquire all of these things is by collecting junk, and then crafting it into something useful. Here’s the best way to do just that, and blaze your trail through zombies and bandits to The Reserve.
The Walking Dead: Saints and Sinners by Skydance Interactive is the premiere Zombie Survival experience for VR both on the Oculus Quest and PCVR. Based in the Walking Dead universe, as the name implies, you take the role of “The Tourist”. Basically a Louisiana badass wandering the flooded, zombie infested ruins of New Orleans looking for the rumored “Reserve”, an underground military bunker containing enough weapons and supplies to equip a regiment and care for a horde of refugees. As always in the apocalypse, weapons and supplies are king. The only problem is, everyone else also wants to get to the Reserve, so finding it won’t be quick or easy. You’ll need weapons, upgrades, food, and medicine just to get there. The best way to acquire all of these things is by collecting junk, and then crafting it into something useful. Here’s the best way to do just that, and blaze your trail through zombies and bandits to The Reserve.
Without The Loot The Point is Moot
Before getting to what you should upgrade and buy, let’s start with what you should be taking back to your base when out in the zombie infested city of New Orleans. Not all pieces of loot are created equal, and you only have so much space in your backpack. Knowing what to take and what to leave can be the difference between a shiny new pump action shotgun, and facing off against five zombies with nothing but a kitchen knife and the will to survive.
S Tier
Box Of Loot
Always, always, always pick these up. No matter what color they are or what you need. The metal boxes of loot hold an insane amount of crafting material for a single inventory slot. They are the absolute best pieces of loot in The Walking Dead: Saints and Sinners and so should never be left behind. Don’t think about it, just take it. It’s also important to note that any unarmed NPC will drop one of these boxes when killed. That doesn’t mean you should do it… but it is an apocalypse. Sometimes even enemy patrols will have one or two on them, and those you won’t have to feel so bad about.

Medicine/Sterile Bandage
What’s not to love about free items? While not as effective as some other medical items you can craft with the upgraded Survival Workbench, bottles of medicine and sterile bandages are effectively free items that you won’t have to spend resources on and therefore are definitely worth the inventory slot when out on a run. Don’t scrap them, but keep any spares in your storage box. You never know when you might need them. Be careful not to take any dirty bandages though, they are hardly worth it.
A Tier
Destroyed Firearm
Ruined Pistols, shotguns, and rifles are extremely good pickups. Not only do they provide frames which are required to craft a working version of the same firearm, but they also give Workable Metal, Nuts and Bolts, and even Wood Scrap in good quantity. In the early days they are very common, especially ruined revolvers. Armed NPCs will drop either a whole or destroyed version of their weapon when killed.

Working Firearm
Working firearms provide both firearm frames as well as a good amount of resources, as their destroyed counterparts do. Make sure to unload them before scrapping. Sometimes armed NPCs will still drop their weapons in working condition. You can use them if you like, but keeping them for scrapping is better, as the firearms you craft yourself last for much longer.
Candelabra/Candle Stick
While it may not seem like much at first, the Candelabra is a fantastic loot item. Not only does it provide Workable Metal, which is especially useful in the early game, but it also contains sharp objects, which are needed for most melee weapons and constantly in demand. The shaft is also a nice bonus. While shafts may not seem very important, they are more scarce than they seem. The Candelabras and Candle Sticks are great all in one items and shouldn’t be left behind.
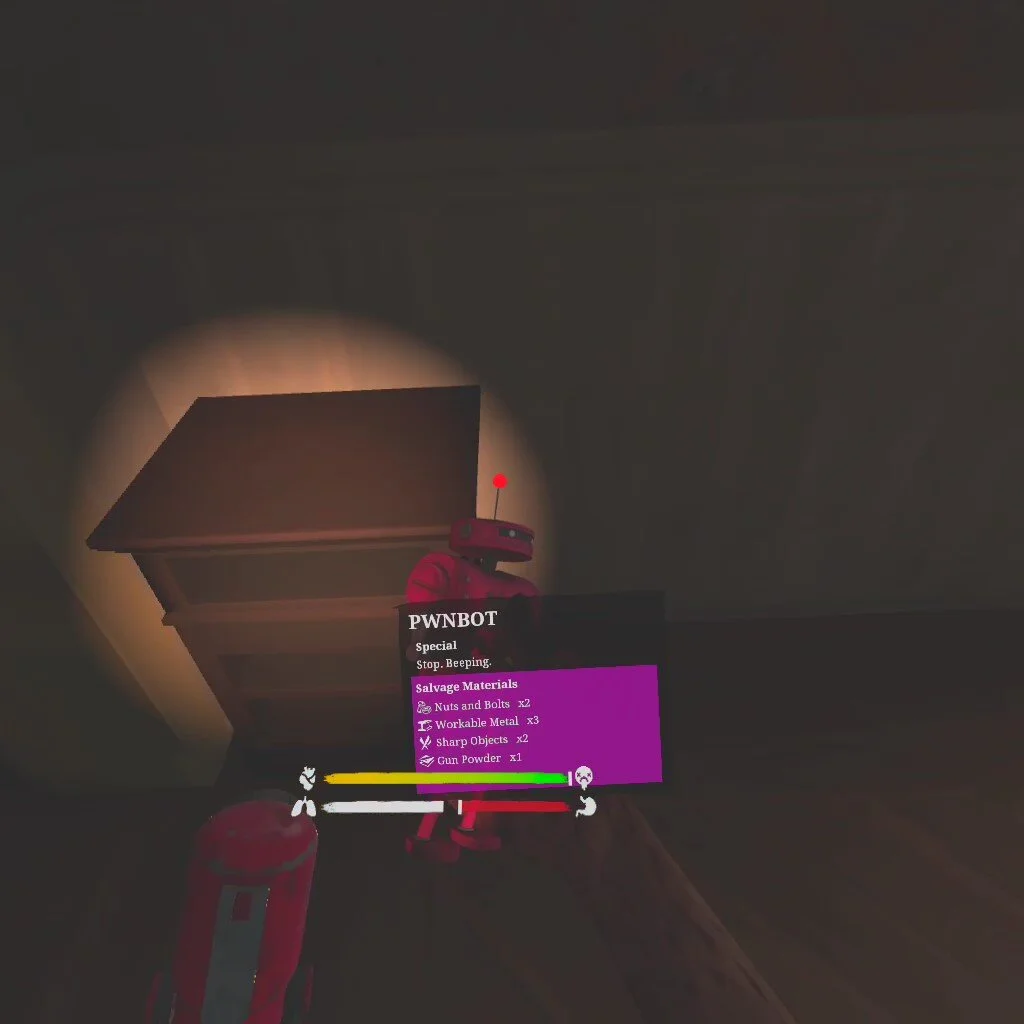
Toy Robot/PWNBOT
Toy Robots contain Nuts and Bolts, Workable Metal, and more. For a single junk item they certainly have a lot inside of them. Definitely worth taking.
Dragon Bar/Poseidon Tuna/Twinkle Toe/Cereal
These are the three best non-craftable food items in the game, and each provide the best resources for food crafting. The Dragon Bar is generally the best, while Poseidon Tuna, notable from other cans by it’s blue label, is the best source of Protein. Twinkle Toes and Cereal are the best source of sugar.
Chemical Vial/Effigy
Both the Effigy and the Chemical vial are excellent sources of gunpowder, which as you might guess is needed for crafting all firearms ammunition. The chemical vials can be found in the science lab in Rampart (the school) abundantly. Be careful to check each one though, not all contain gunpowder.
Keyboard/Headset
Keyboards and headsets are both great sources of many good resources in small quantities. Regardless they are very good pickups.
B Tier
Firewood
Firewood should definitely be coveted in the first few days, as they provide an astounding six wood in addition to a single shaft. After upgrading the crafting stations wood is still a very common resource found in other items, and is not needed in great quantities. So later on Firewood should be ignored, but when you are still upgrading your stations it is invaluable. Take enough of these early on and you will never run out of Fiber either.

Clock
Clocks contain not only Wood Scrap, but also Nuts and Bolts and Bindings. While none of these resources are especially rare, this is a good variety in a single item in good quantity. Not a bad pickup.
Large Can of Food/Dog Food/Can of Beans
Any of the larger cans of food contain a variety of foodstuffs such as Fiber, Water, and Protein. Not to mention a small amount of Workable Metal. All in all they are decent pieces of loot, but not as dense in singular rare foodstuffs as A Tier food items. Fiber and Water are common, while Protein and Sugar are not.
Skull/Box of Matches
Both of these are more common sources of gunpowder, though they do not contain much. As an added bonus they do both include some Wood Scrap. If you need some more ammunition in the short term, definitely pick these items up. Otherwise there are likely better alternatives lying around.
Two Handed Weapon
Before getting the backpack upgrade you will only have the capacity to hold two two handed weapons, three after the upgrade. These are items such as Hatchets, Fire Axes, and Crowbars. They are good pickups which don’t grant exceptionally rare resources, but are better than leaving with any of those two handed slots unoccupied. If a two handed firearm such as a rifle is available instead, favor those over two handed melee weapons.
C Tier
Book
Books aren’t for reading when the dead roam the earth, at least not these. Instead they are a good source of Bindings and Adhesives.
Pots and Pans
Pots and pans are essentially infinite durability melee weapons, which take multiple bonks on the head in order to bring down an opponent. Otherwise they are a subpar source of metal and other various pieces.

Dog Bowl
A decent combination of Nuts and Bolts as well as Workable Metal. Not the best item and just barely above D Tier. However, they are worth a backpack slot if you need both of those things.
Kitchen Knife/Screwdriver
Occasionally you can find Kitchen Knives and Screwdrivers out in the wild, which operate as decent weapons with low durability. As scrapable objects they are alright, containing some Sharp Objects, Workable Metal, and a Shaft. A decent pickup, but not the highest priority.
Broken Plank
These are wooden boards with a single nail in them, obtained by smashing a wooden barricade with a single or two handed weapon. These give some Wooden Scrap and a pittance of Workable Metal. While they do not give great resources, if no two handed weapons are available to fill your two handed slots these are better than nothing.
D Tier
Box of Razors/Empty Bottle
Boxes of Razors provide only Sharp Objects and are effectively garbage items that should always be left behind unless there is no time to grab something else. Empty Bottles are a better alternative. Not only are they more abundant, and also contain one Workable Metal as a bonus, they can be broken and used as weapons in a pinch. You will never want for Sharp Objects since empty bottles are so common, even forty plus days into a game.
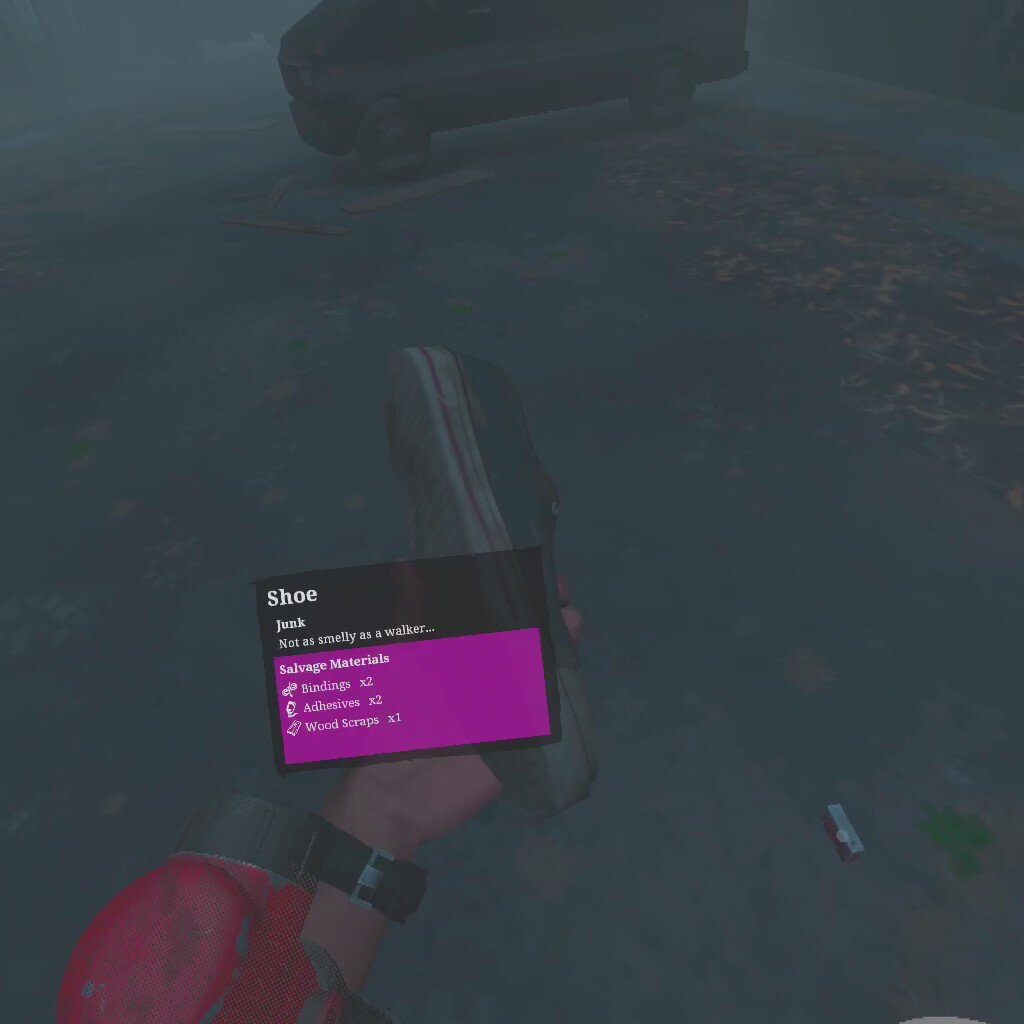
Shoe
Old shoes are a decent source of Bindings and Adhesives, but grant them in inferior quantities to other items. You will likely find better sources of both in any given run, until the much later days.
Egg Timer
A great source of Nuts and Bolts and nothing else. Not often worth picking up due to many other items containing a lot of Nuts and Bolts as well as other resources.
Worn Photo
Contains some Wood Scrap and a bit of Nuts and Bolts, maybe some fond memories for somebody other than you. If you’re starved for wood this may be worth it, but probably not.
Soda/Beer
A source of Sugar, Workable Metal, and Water in small quantities. Only worth taking when starved for Sugar and unable to find anything better.
Lighter
Somehow contains a fair quantity of antiseptic. Not to mention a shaft. For this it may be worth it should you really need to craft some medical supplies. They are also extremely common in kitchens if you’re starved for shafts.

F Tier
Other Junk
Telephones, Radios, Pillows, medical tape, pillows, cigarettes, etc. There are a lot of junk items in The Walking Dead: Saints and Sinners and a lot of them are not worth taking. Some give only two to three resources apiece, and those not even particularly rare resources. It’s safe to assume that if an item is not in one of the tiers above, it’s never worth taking. Unless we’ve missed something! If we have then leave a comment.
Glue
A special mention here since glue seems like it should be a good item, containing a fair bit of adhesive, but adhesive is extremely common in other items which grant other resources as well. Don’t fall into the trap, leave the glue.
Progression and Upgrades
Now that you know what junk items are good for what materials, you’ll also want to know what you should spend them on. There are three workbenches, Survival, Firearms, and Gear. At first most of the good items and upgrades are locked and require a lot of resources to unlock them. Even with an abundant haul it is important to prioritize.
Most important of all is the Backpack Upgrade, which is the first upgrade on the second level of the gear workbench. This one is a no brainer as it grants an additional page of backpack slots as well as a two handed weapon storage slot. This allows you to carry 36 items in your backpack as well as two two handed weapons. Not to count your two hip slots and back slot.

That’s a lot of loot! Keep an eye on what resources you need next and rush to complete this upgrade. You will need a lot of Wood Scraps, Workable Metal, and Nuts and Bolts. Also ten Adhesives and ten Bindings. Here’s the complete list to get that far.
Level 1: 12 Nuts and Bolts and 24 Workable Metal
Level 2: 12 Nuts and Bolts and 24 Wood Scraps
Level 3: 24 Wood Scraps and 30 Workable Metal
Level 4: 24 Workable Metal and 24 Nuts and Bolts
Level 5: 30 Wood Scraps, 10 Adhesives and 10 Bindings
This can take as little as a couple of days if you optimize your looting. Not to mention you will gain several other very useful upgrades along the way.
Once the backpack upgrade maximizes your looting potential, what is next is up to your preference. Should you have a lot of gunpowder and firearms frames and desire to quickly blast away enemy bandits and zombies alike, going to the firearms workbench might be the next best idea. If you really want a Katana, which is arguably the best melee weapon in The Walking Dead: Saints and Sinners, then continuing to upgrade the Gear Workbench is for you.
For the most conservative player the Survival Workbench is the best pick. Not only does it grant an upgrade to health, but also the best medicines in the game. At least upgrading it as far as the health upgrade is a choice that will increase your survivability considerably. You can’t bring back loot if you’re dead.
Whichever way you choose to go, prioritizing the backpack upgrade and looting properly will get you to fully upgraded Workbenches in a few days. Not to mention an abundance of resources afterwards in order to craft whatever goodies you could want. Happy looting, stay safe out there in the apocalypse.
The Walking Dead: Saints & Sinners is available on Steam for 39.99$. It is also available on the Oculus Store for 39.99$. This is one of the best Virtual Reality experiences out there right now, with extremely polished survival gameplay and a compelling story. Not to mention an unmatched melee combat system, focusing on piercing the skull of course, because zombies.
If you like zombie games then this is one you should not miss. Even if you aren’t a huge zombie culture fan, this is a game that is well worth its price tag for even a single playthrough. There’s even an Arena Survival Mode, and a free end game DLC.
Having trouble sweating through your headset’s face cover? Try out new ones from VR Cover that repel sweat and are easy to swap in.

Thrill Of The Fight: Opponent Breakdown
Here we break down every opponent available to go toe to toe with in Thrill Of the Fight by Sealost Interactive. With the exception of the special opponents like the ghost and zombie. We’ll save those for another time. Each opponent in Thrill Of the Fight has different characteristics and methods of fighting. Don’t be fooled by the intensity of the game, it isn’t just a question of physical fitness, some strategy is involved. Some hit hard, some less so. Some are easy to knock out, others more so. Whether you’re struggling to defeat one of them, or just starting out and wondering what is in store, there’ll be something here for you. Let’s get into it.
For a video version of this article check it out here on our youtube channel.
Here we break down every opponent available to go toe to toe with in Thrill Of the Fight by Sealost Interactive on the Oculus Quest 2 (and PCVR). With the exception of the special opponents like the ghost and zombie. We’ll save those for another time. Each opponent in Thrill Of the Fight has different characteristics and methods of fighting. If you’re interested in the Halloween fighters in the “Extra” menu then be sure to check out our article about them.
Don’t be fooled by the intensity of the game, it isn’t a question of physical fitness alone, some strategy is also involved. Some hit hard, some less so. Some are easy to knock out, others more so. Whether you’re struggling to defeat one of them, or just starting out and wondering what is in store, there’ll be something here for you. If you’d like a more beginner focused guide check out our article on the basics, like how to hit hard and win fights. Now let’s get into it.
Choose Your Character
Sparring Partner

Sparring Partner is a nameless, overweight older guy with a bunch of pads on and a funky shirt tucked into some funky shorts. The fight against him lasts only a single round. All in all he’s really easy. He can take a few good punches, but swings the most slowly and weakly of all opponents. He makes for a good single round warm up and not much else.
“Melky" - Alexei Petrov

After a warm up with the sparring partner the first true opponent is Melky. He’s a skinny, yet still shredded, guy with a short haircut and almost complete lack of emotion. He won’t feel much like a true opponent though. He’s really just a slightly better version of the sparring partner. He’s a little harder to take down, punches a little more quickly, and punches a little harder. His strategy is pretty straightforward. Block for a little while and then throw a few punches, almost like he’s on a timer.
“Ugly Joe” - Joe Nasato

Ugly Joe looks like Rocky Balboa if he kept boxing, but never made it off the streets of Philadelphia. He’s got a lazy eye and a face that took a million punches and could probably take a little more. A classic old school boxer still in the ring. His match goes on for three rounds, and here those rounds might be necessary. Ugly Joe is much harder to take down than previous opponents, requiring a lot of powerful hits on weak points in order to bring him down. If you’re not much in practice, you may have a very hard time with him. His blocking is pretty good, and his punches are fast and fairly hard. While he does not throw insane combos like later fighters, a couple of solid hits from Ugly Joe can knock a you down pretty quickly.
Despite this, Ugly Joe has his weaknesses. He’s not particularly fast on his feet, and sidestepping him in order to get a punch on his liver or the side of his head can be very effective. His strategy is very defensive, taking hits and waiting for you to tire yourself out before counter attacking when he has an opening. He is the first real challenge of the game, so watch out.
Want to see how to knockout Ugly Joe? Well check out the video of it here with commentary.
“The Raging Reverend” - Gene Priest

The Raging Reverend, just “The Reverend” from here on, is a short angry looking guy with a head that could generate enough power for a small village if you put solar panels on it. He is the polar opposite of Ugly Joe. Depending on your strengths and weaknesses he can be easier or harder than Joe. That’s because he is fast on his feet and fights offensively. He will take swings at you before even defending himself. Where Joe is a test of careful, slow offense, The Reverend is a test of patient defense and quick attacks. Unlike Joe, The Reverend goes down very easily with a hit or two to the jaw. However, he has a counter for this, and that is this very annoying defensive block that he uses.

He holds his elbow up over one side of his head, and his other hand over the other side of his head. Normally in this situation a jab to the face is called for, but that elbow easily gets in the way, making a solid hit on the face or chin very difficult. Doing this does leave his side open, so a couple of blows to his ribcage will cause him to drop his guard and leave his head open for a killing blow. All in all The Reverend will fold to a quick and precise offense launched before he has a chance to throw any combos. When The Reverend has taken hits he is very slow to counter attack before he recovers. Having an offense that is more overwhelming than his own will lead to victory.
“Luis The Lightning” - Luis Felix

The Lightning has all of the attributes of The Reverend, but more. He’s shorter and angrier. He’s fast, and hits quickly and hard. Though he has an even glassier jaw than The Reverend. He goes down very easily. The only problem is actually landing a solid hit on him. The Lightning is the first opponent who will actively dodge punches, and he does so pretty well. Especially after recently taking a hit, he will move his head out of the way of subsequent punches. This makes landing subsequent hits to get a knock down very difficult. Still, after wearing him down a bit it’s easy to bring him down with a single, glorious hook. The same strategy for the Reverend works here as well. Hit him hard and fast. Though he will actually counter attack fairly quickly, so watch out.
“The Spider” - Charong Kitsuwan

The Spider is tall and second only to Ugly Joe in ugliness. He looks like somebody told him you personally insulted his tiny hands right before the match, and now he has a personal vendetta against you. Though despite his intimidating appearance and height he is extremely easy to take down. He has has a jaw as glassy as The Lightning’s, and he doesn’t dodge. The trick is to land solid hooks on his broad chin, but it’s a bit more difficult due to that chin being so high up. Attacking fast is really the only easy way to win. While The Spider’s defense is terrible, his offence is almost unrivaled. His hands are small but they hit incredibly hard and fast. A single hit can quickly knock you down. Attack him fast and precisely. He’s practically a stationary target, though he will counter attack if the pressure lets up. His fight can last for four rounds, but good luck getting that far without him knocking you out.
“The Artist” - Hojo Mizushima

The Artist is an extremely focused looking guy with a receding hairline and a sweet moustache. Of all the fighters he is the most interesting to have a long, artful duel with through each of the four rounds of his fight. His style of fighting is extremely defensive. The Artist relies on being fast on his feet and quick to dodge punches. Rather than attack you outright he will wait for an almost absurd length of time for you to attack him, and then very rapidly counter attack. Even when wounded his counter attacks are fast and often very strong. Should his counter succeed The Artist will not hesitate to press his advantage and commence with a fierce flurry of blows.
Fighting the Artist should be done carefully. The previously best strategy of all out offense will not work nearly as well against him. Rather whittling him down is the best way to go. Carefully maneuver into the engagement and bait him into counter attacking. Block or dodge the attack, and counter the counter while his face is unguarded. Even then pressing the advantage can be dangerous unless The Artist is on the verge of keeling over. Attacking him can be very tiring, as he is extremely good at dodging, more so than any other opponent.
An alternative strategy for a very aggressively inclined player is to do the same, but go all out on the attack when The Artist’s defenses are down. This will require either very quick blocking of his counter attacks or simply absorbing the blows and resetting the attack. This strategy requires a lot of skill at seeing The Artist’s dodges coming, and adjusting aim in order to still land a blow. Therefore it is only recommended for more advanced players.
“The Duke” - Duke Bell

The Duke is a thick dude built like a pile of bricks and just enough corn rows to not be bald. He wears a very stylish purple outfit, though maybe he would look better in red. Where The Artist is a master of evasive defense, The Duke is a master of static defense. He blocks quickly, and his big hands block a wide area. More so he is just extremely tough. Knocking out The Duke is very difficult, even with many successive, devastating hits he does not go down easily. He does not strike extremely quickly, but he does hit very hard, and can knock you down easily. That being said he takes his time with counter attacks, though he will counter attack. If left alone he will go on the offense, though again he generally takes a few slower but heavy blows rather than quick attacks or a flurry of punches.
The best strategy against The Duke is slow pressure. Keep attacking him, but not so quickly that the exhaustion becomes too much before The Duke falls down. Punch him in the face so that he changes his guard and then hit him with a hook before backing off and coming in for another run. Otherwise hit him with a hook and then follow up with a solid face hit or an uppercut. Changing the location of attacks quickly will work just as well against The Duke as any other fighter, but those hits need to be on weak points and be very strong to be worth the energy. Score enough hits and a couple of very well placed blows will knock him down in later rounds.
“Matty” - Mateo Vega

Matty is the most stylish of all fighters with a red and blue glove combo and the most tight fitting shorts of all. He’s fast and can dodge, though not as well as The Artist, and he can take a few hits, though not as well as The Duke. If he has an appropriate opening his attacks can be very fast and strong, and he will push you. His style is fairly aggressive, though he will certainly give some room to breathe. He throws combos more than any previous fighter, and failing to defend from one of them can lead to a quick knock down. All in all he is quick and combines the traits of all previous fighters, though he does none of them the best.
Due to his balanced nature a variety of tactics can work against Matty. Whatever you are most proficient at will likely be the best option here. All out offense works against him, though his dodges can make this a very tiring strategy. Careful defense is another good strategy, though a single uppercut from Matty can put you on the floor. A mixture of the two is likely the best, since he is not overly hard to knock down like The Duke. Wait for Matty to attack and then counter attack fiercely with a few strong hits to weak points. Let him dodge and then strike again when he stands straight, or back off and prepare for another attack. Letting Matty strike first can also work as this will leave him exposed for a hook to the jaw.
“Moneymaker” - Edward Price

Here he is, Moneymaker. The big boss with the tacky golden gloves, deceptively skinny arms, and what looks like a glass jaw but certainly isn’t. Don’t be mistaken, Moneymaker is as tough as they come in Thrill Of The Fight. He hits the hardest and is the most difficult to knock down. His speed and dodging ability rivals even that of The Artist. He’s the last fighter and he’s the hardest. Most of all he has no weaknesses. If you’re going to fight Moneymaker prepare for one hell of a workout and a challenge. You’ll likely need to go for most if not all of the five rounds of the fight.
Since Moneymaker has no weaknesses, just like Matty, no particular strategy is strong against him. He will dodge, he blocks quickly, and he hits the hardest of all. Most of all he is extremely aggressive. Rarely will he simply stand by and block, unless he has taken a lot of damage and needs to recover. Instead he will constantly pressure you, attacking both with single hits and combo attacks. Those combos are lethal, and come from a variety of angles, forcing an extremely dynamic defense in order to stop them. Generally you’re better off just side stepping out of the way.
Just as with Matty whatever strategy you feel you are best at is likely to be the way to go. All out offense is possible, but will require extreme endurance and the ability to quickly dodge counter attacks to work. That is likely the least viable strategy. Just like with Matty a more careful approach is the best, though with Moneymaker the slightest slip up can end up with you out for the count. Defend carefully and counter attack quickly.
Once you defeat Moneymaker, congratulations! He’s the hardest fighter in the game. If you’re a real enthusiast try them all again on the next highest difficulty, or play with the settings. Setting the force multipliers to 1x each can make for a much more stable feeling fight. Additionally turning on drift protection can keep your hooks from drifting behind your opponent’s head. These both offer a little more realism and a little more challenge. That is, if the most intense workout in Virtual Reality isn’t intense enough for you.
Having trouble sweating through your headset’s face cover? Try out new ones from VR Cover that repel sweat and are easy to swap in.
If you’re interested in Thrill Of The Fight but haven’t purchased it yet, it can be found on Steam for 9.99$ or on the Oculus store for either the Meta Quest 2 or PCVR for 9.99$. Happy Boxing!