


Cossacks 3 Review
Cossacks 3 is a 2016 real-time strategy remake of the classic Cossacks: European Wars, developed by GSC Game World. It revisits 17th and 18th-century warfare in Europe with updated 3D visuals, new lighting, and support for mods. In this Cossacks 3 Review, we’ll break down its strengths, shortcomings, and whether it delivers the grandeur fans expect.
Cossacks 3 is a 2016 real-time strategy remake of the classic Cossacks: European Wars, developed by GSC Game World. It revisits 17th and 18th-century warfare in Europe with updated 3D visuals, new lighting, and support for mods. In this Cossacks 3 Review, we’ll break down its strengths, shortcomings, and whether it delivers the grandeur fans expect.
Cossacks 3 is a classic RTS focused on 17th and 18th century warfare.
Nostalgia Meets Modernity: Graphics & Atmosphere
From the moment you start a game in Cossacks 3, the revamped 3D engine is evident. Cities, buildings, and unit models receive fresh textures and dynamic lighting, which elevate the sense of scale compared to the original. The animations are smooth, and armies numbering into the thousands march and clash fluidly. Yet, while the visuals breathe new life into familiar terrain, they retain a distinctly old-school RTS vibe—deliberate, functional, and not overly cinematic.
The atmosphere is further enhanced by an immersive soundtrack composed to reflect the historical theme. The music captures the era's grandeur, punctuating dramatic moments with stirring scores that lodge in your memory long after campaigns end.
Overall, in this Cossacks 3 Review, the graphics and atmosphere are a fine balancing act: they honor nostalgia yet feel polished for modern audiences.
Economy & Resource Management
Backed by the resource system taken from the original, Cossacks 3 challenges you to tame six resources—gold, wood, food, stone, coal, and iron—through meticulous planning. Gold, coal, and iron come from mines; food is produced at mills or farms; and wood and stone are gathered conventionally. The catch? Over-harvesting slows your economy, and resource scarcity cripples your war machine—coal and iron are vital for firearms, and lack of food causes famine and troop death.
This approach rewards efficiency: you must balance harvesting, production, and maintenance. It's deeply satisfying when your supply chains hum, but punishing when they falter.
In mid-game, micromanagement becomes intense, especially when juggling large populations. Still, it is important to say in this Cossacks 3 Review that the complex economy remains one of the game’s most compelling features, though daunting for newcomers.
Army Composition & Tactical Depth
The battles get even larger than this in Cossacks 3.
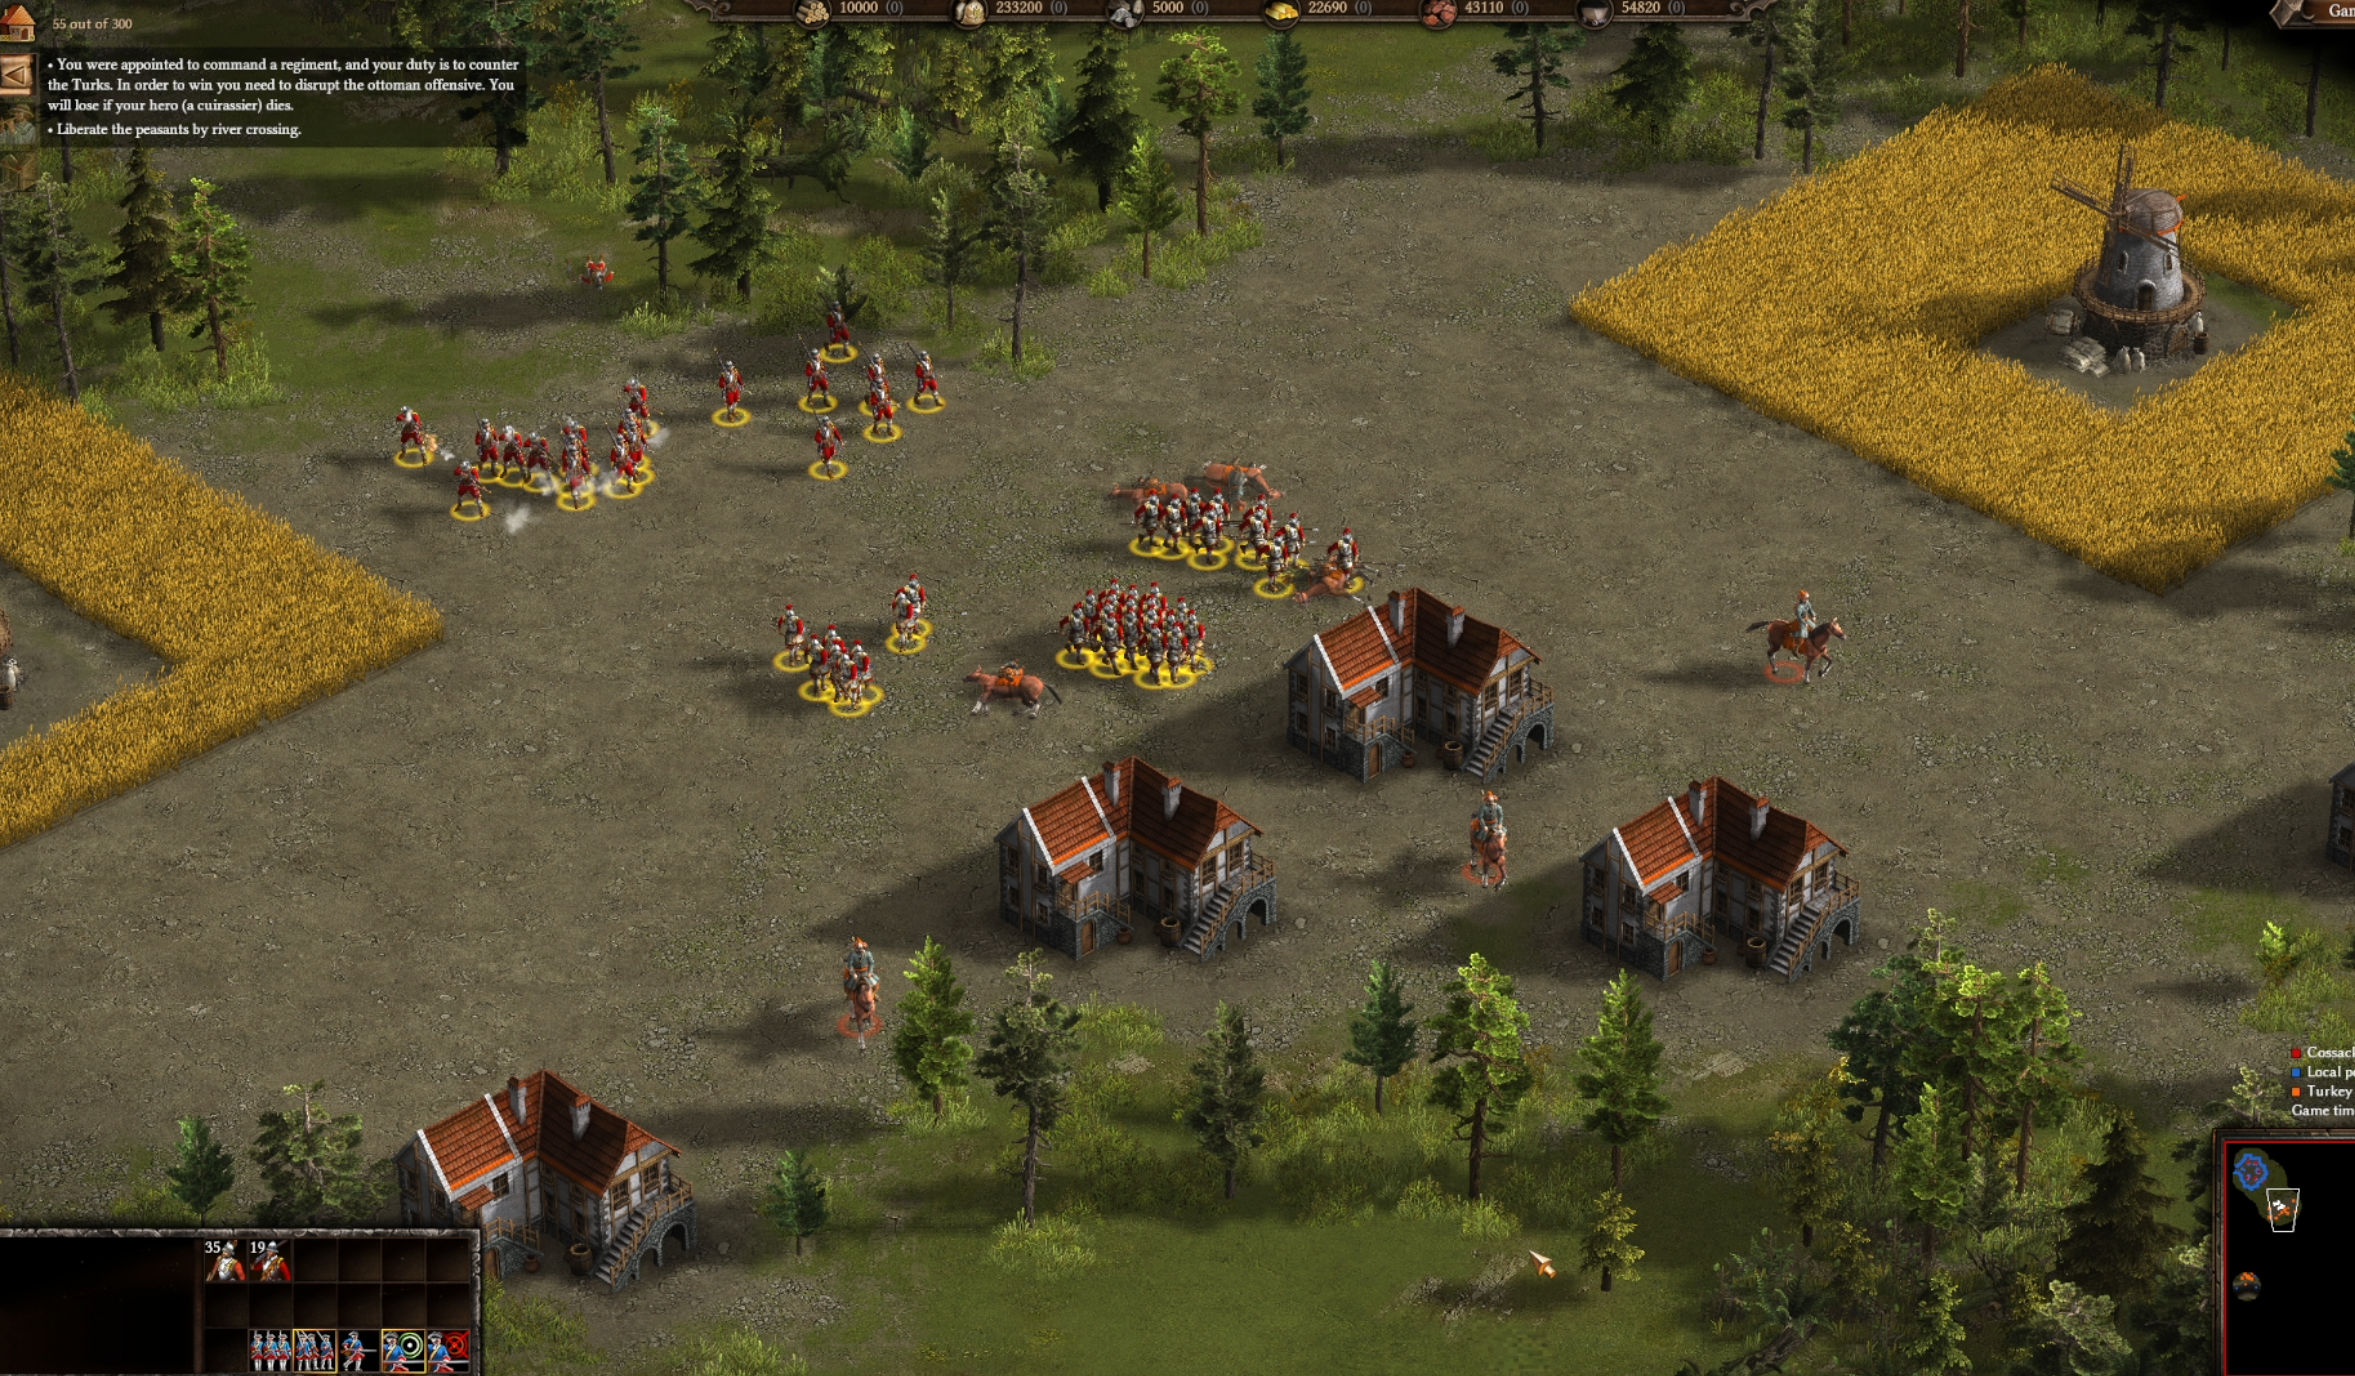
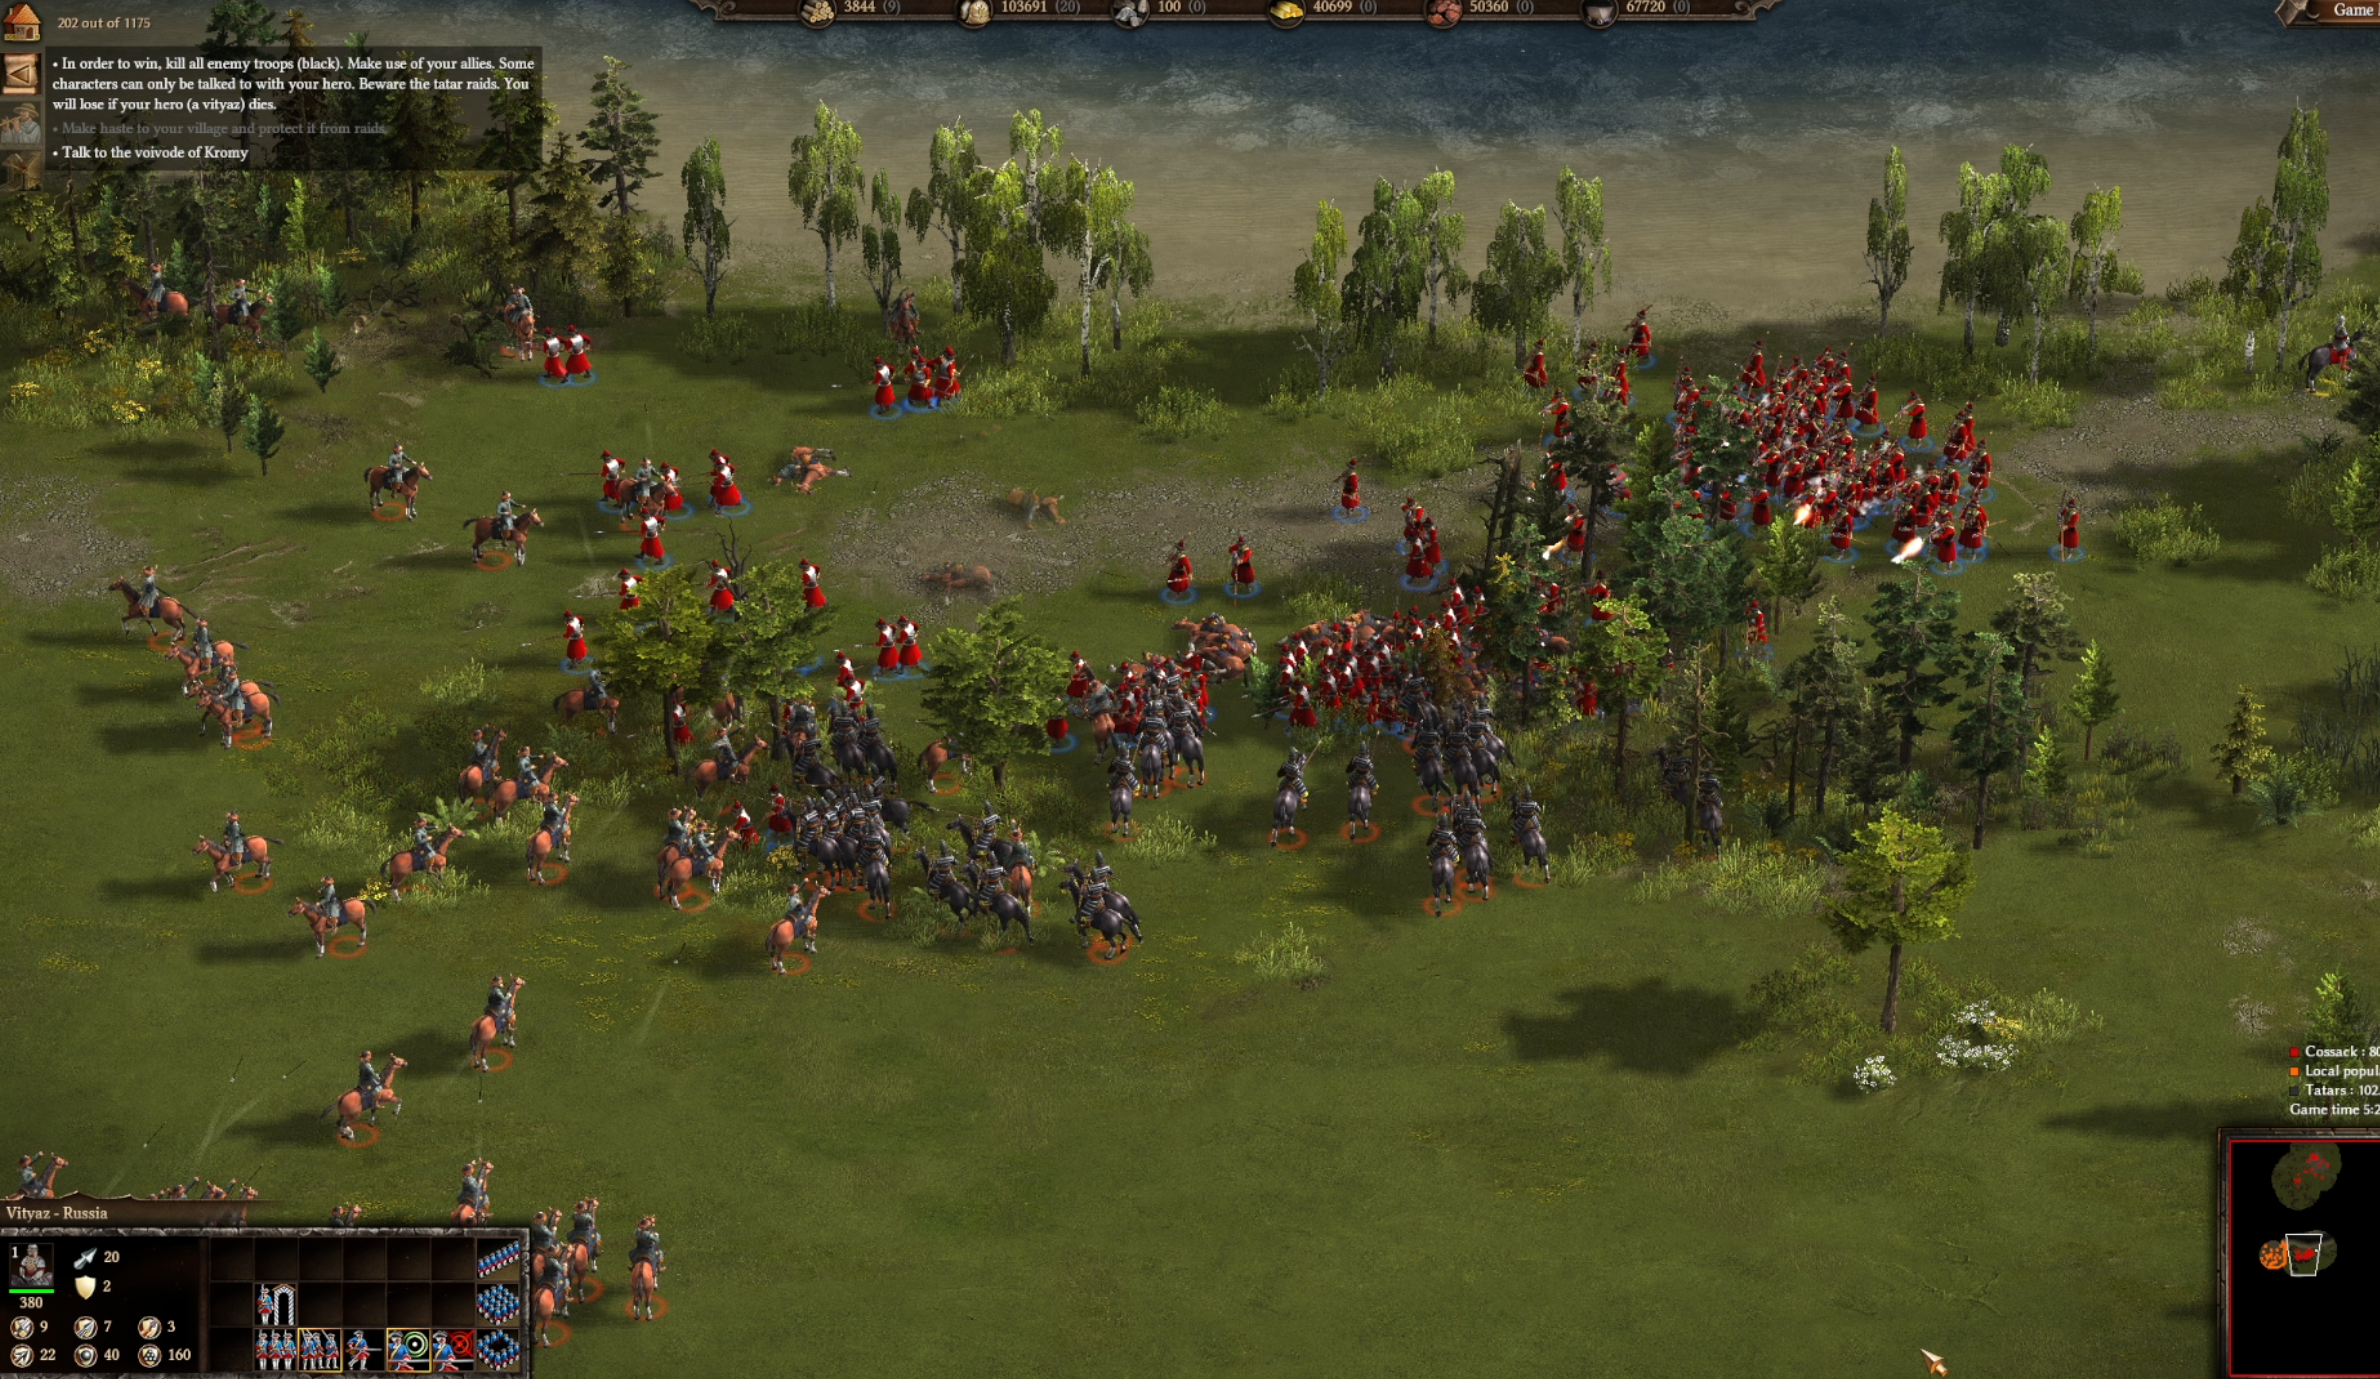
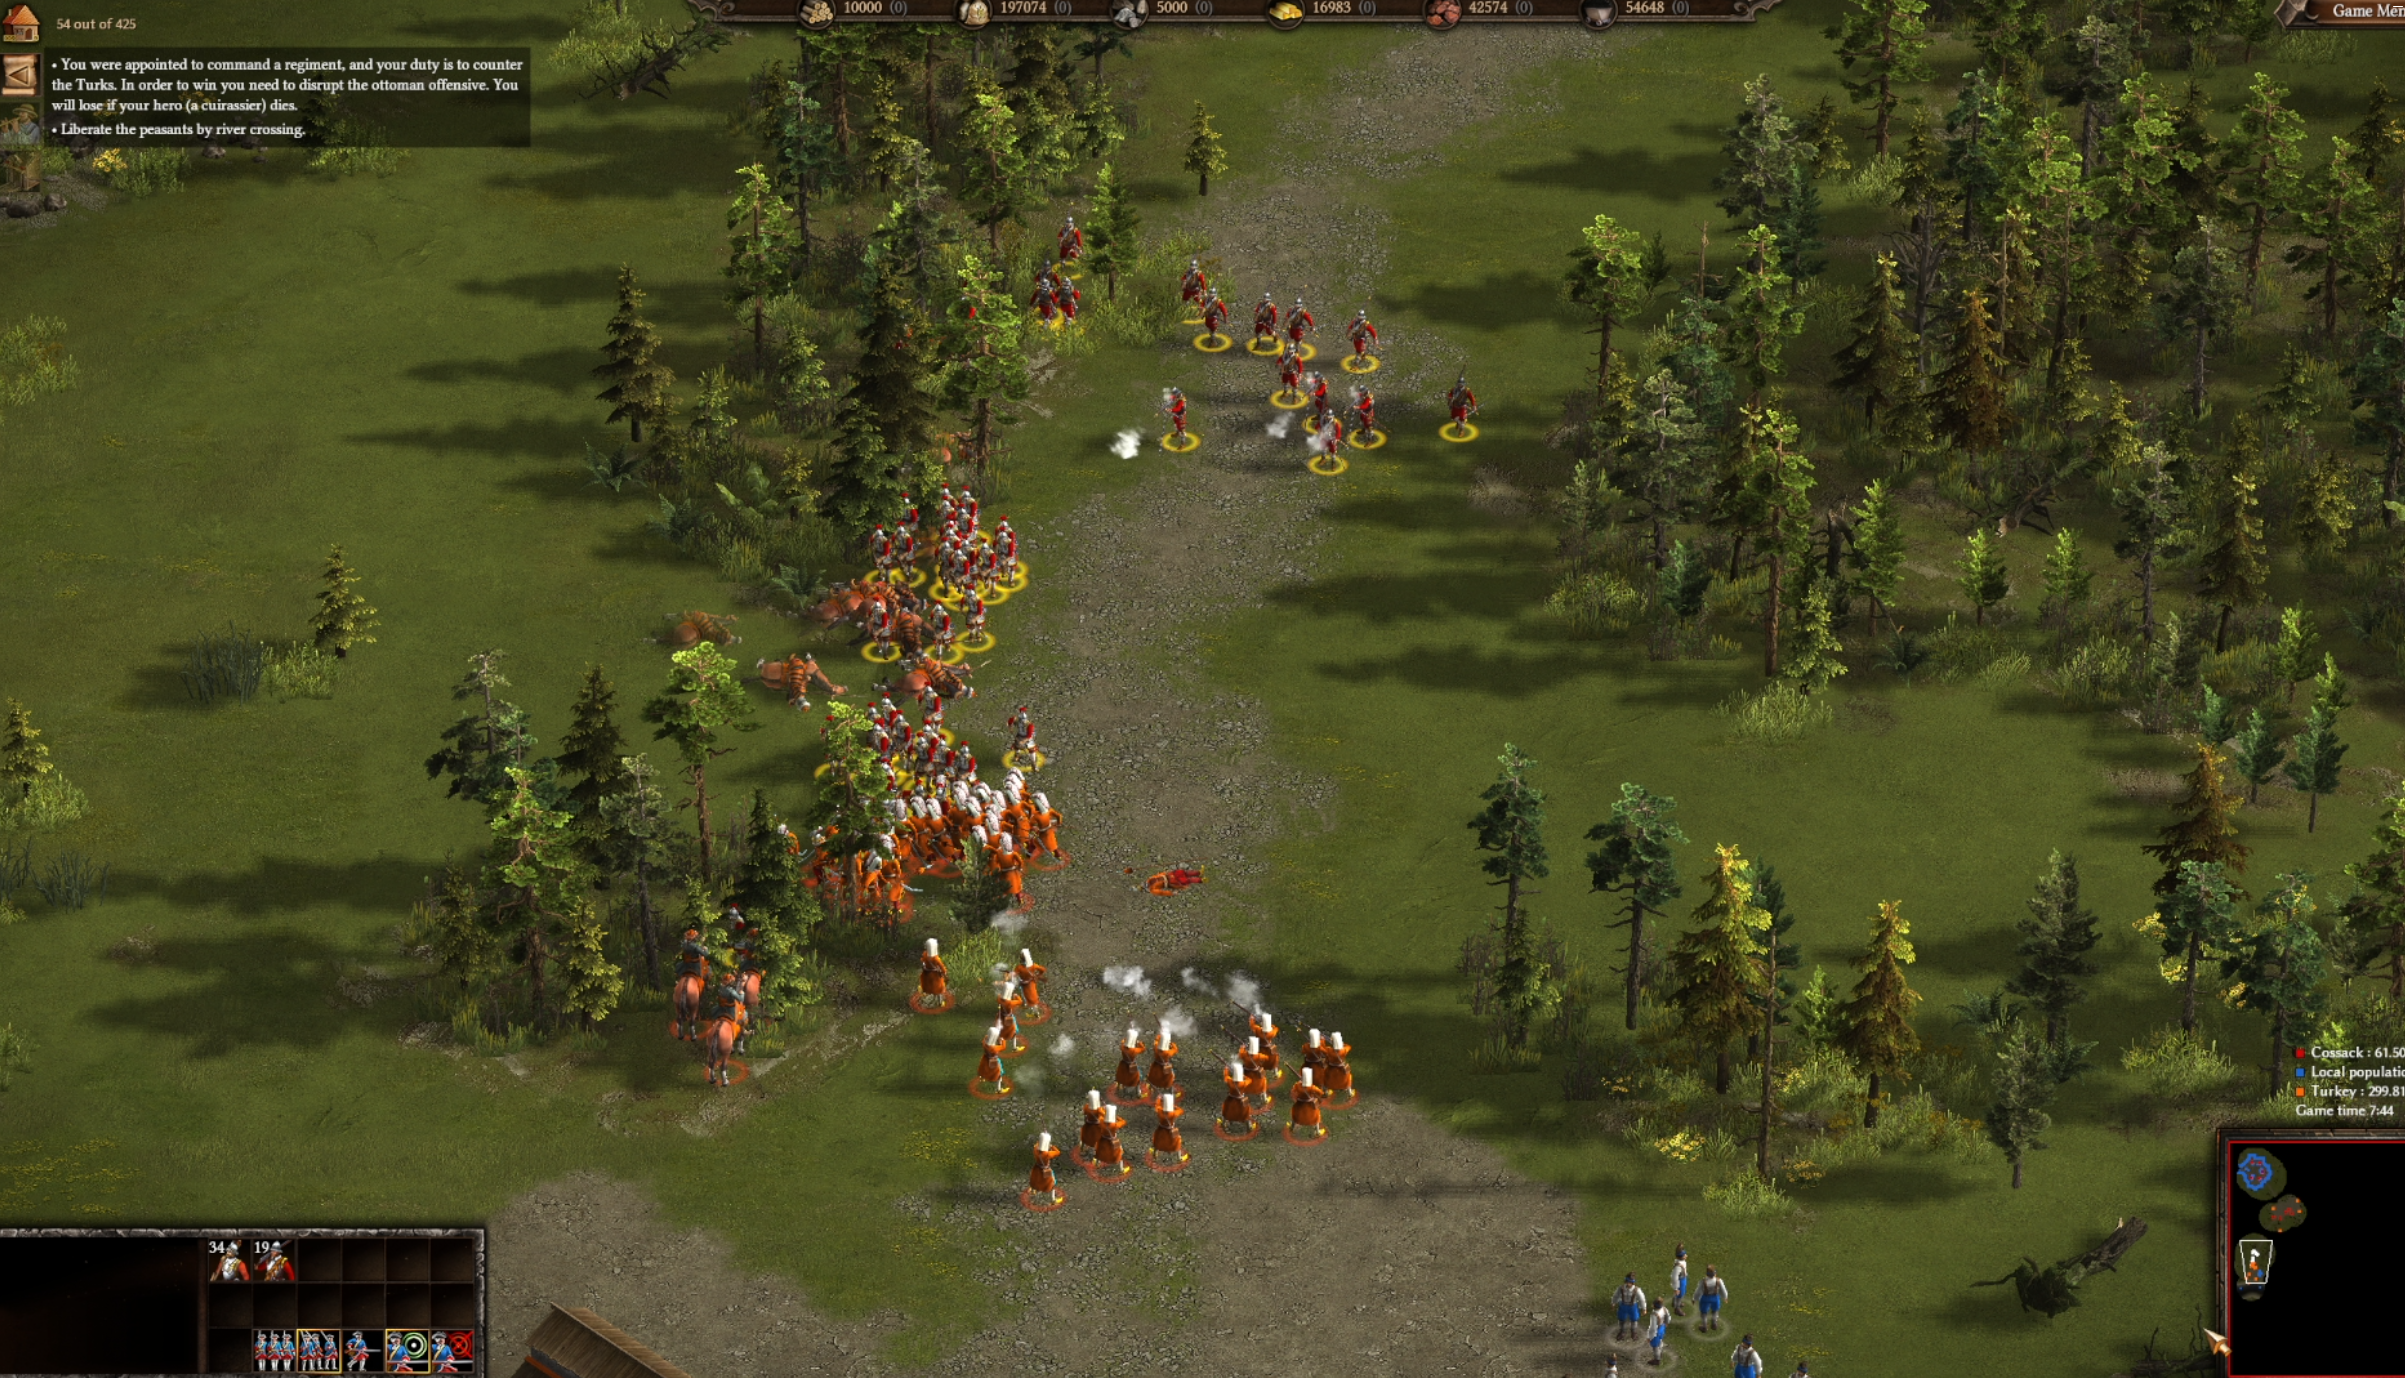
Cossacks 3 lets players create formations with regimented units—36, 72, or 108 infantry grouped with officers and drummers; cavalry form in increments of 40 per unit type. This regiment system rewards strategic choices: infantry on wide lines, cavalry in column charges, or tight squares against mounted threats. Even better it is used automatically when you select units, so there’s no need to spend precious time microing units into formation.
Combat mechanics blend ranged, melee, and artillery engagements. Positioning and line-of-sight matter—cavalry flanks, formations hold ground, and artillery decimates enemy concentrations. According to GameWatcher, this leads to massive battles with up to 32,000 units, delivering grand-scale RTS action.
However, this Cossacks 3 Review must note combat's downside: formations often dissolve into chaos under AI control. That tactical elegance crumbles into a “human meat grinder” at scale. The result is that masterfully arranged troops can fall apart mid-battle.
AI Performance & Controls
Our Cossacks 3 Review finds the AI to be perhaps the weakest link. Both enemy and ally units lack the finesse to maintain formations under pressure. When maneuvering large armies, units commonly veer off their formation or target far away enemies.
Controls too feel dated. Interface elements, while reminiscent of classic RTS, lack intuitive improvements, making unit selection or commanding large regiments sometimes clunky While diehard RTS fans may accept this for nostalgic fidelity, modern players might find the combat experience less polished than desired.
Campaign & Historical Immersion
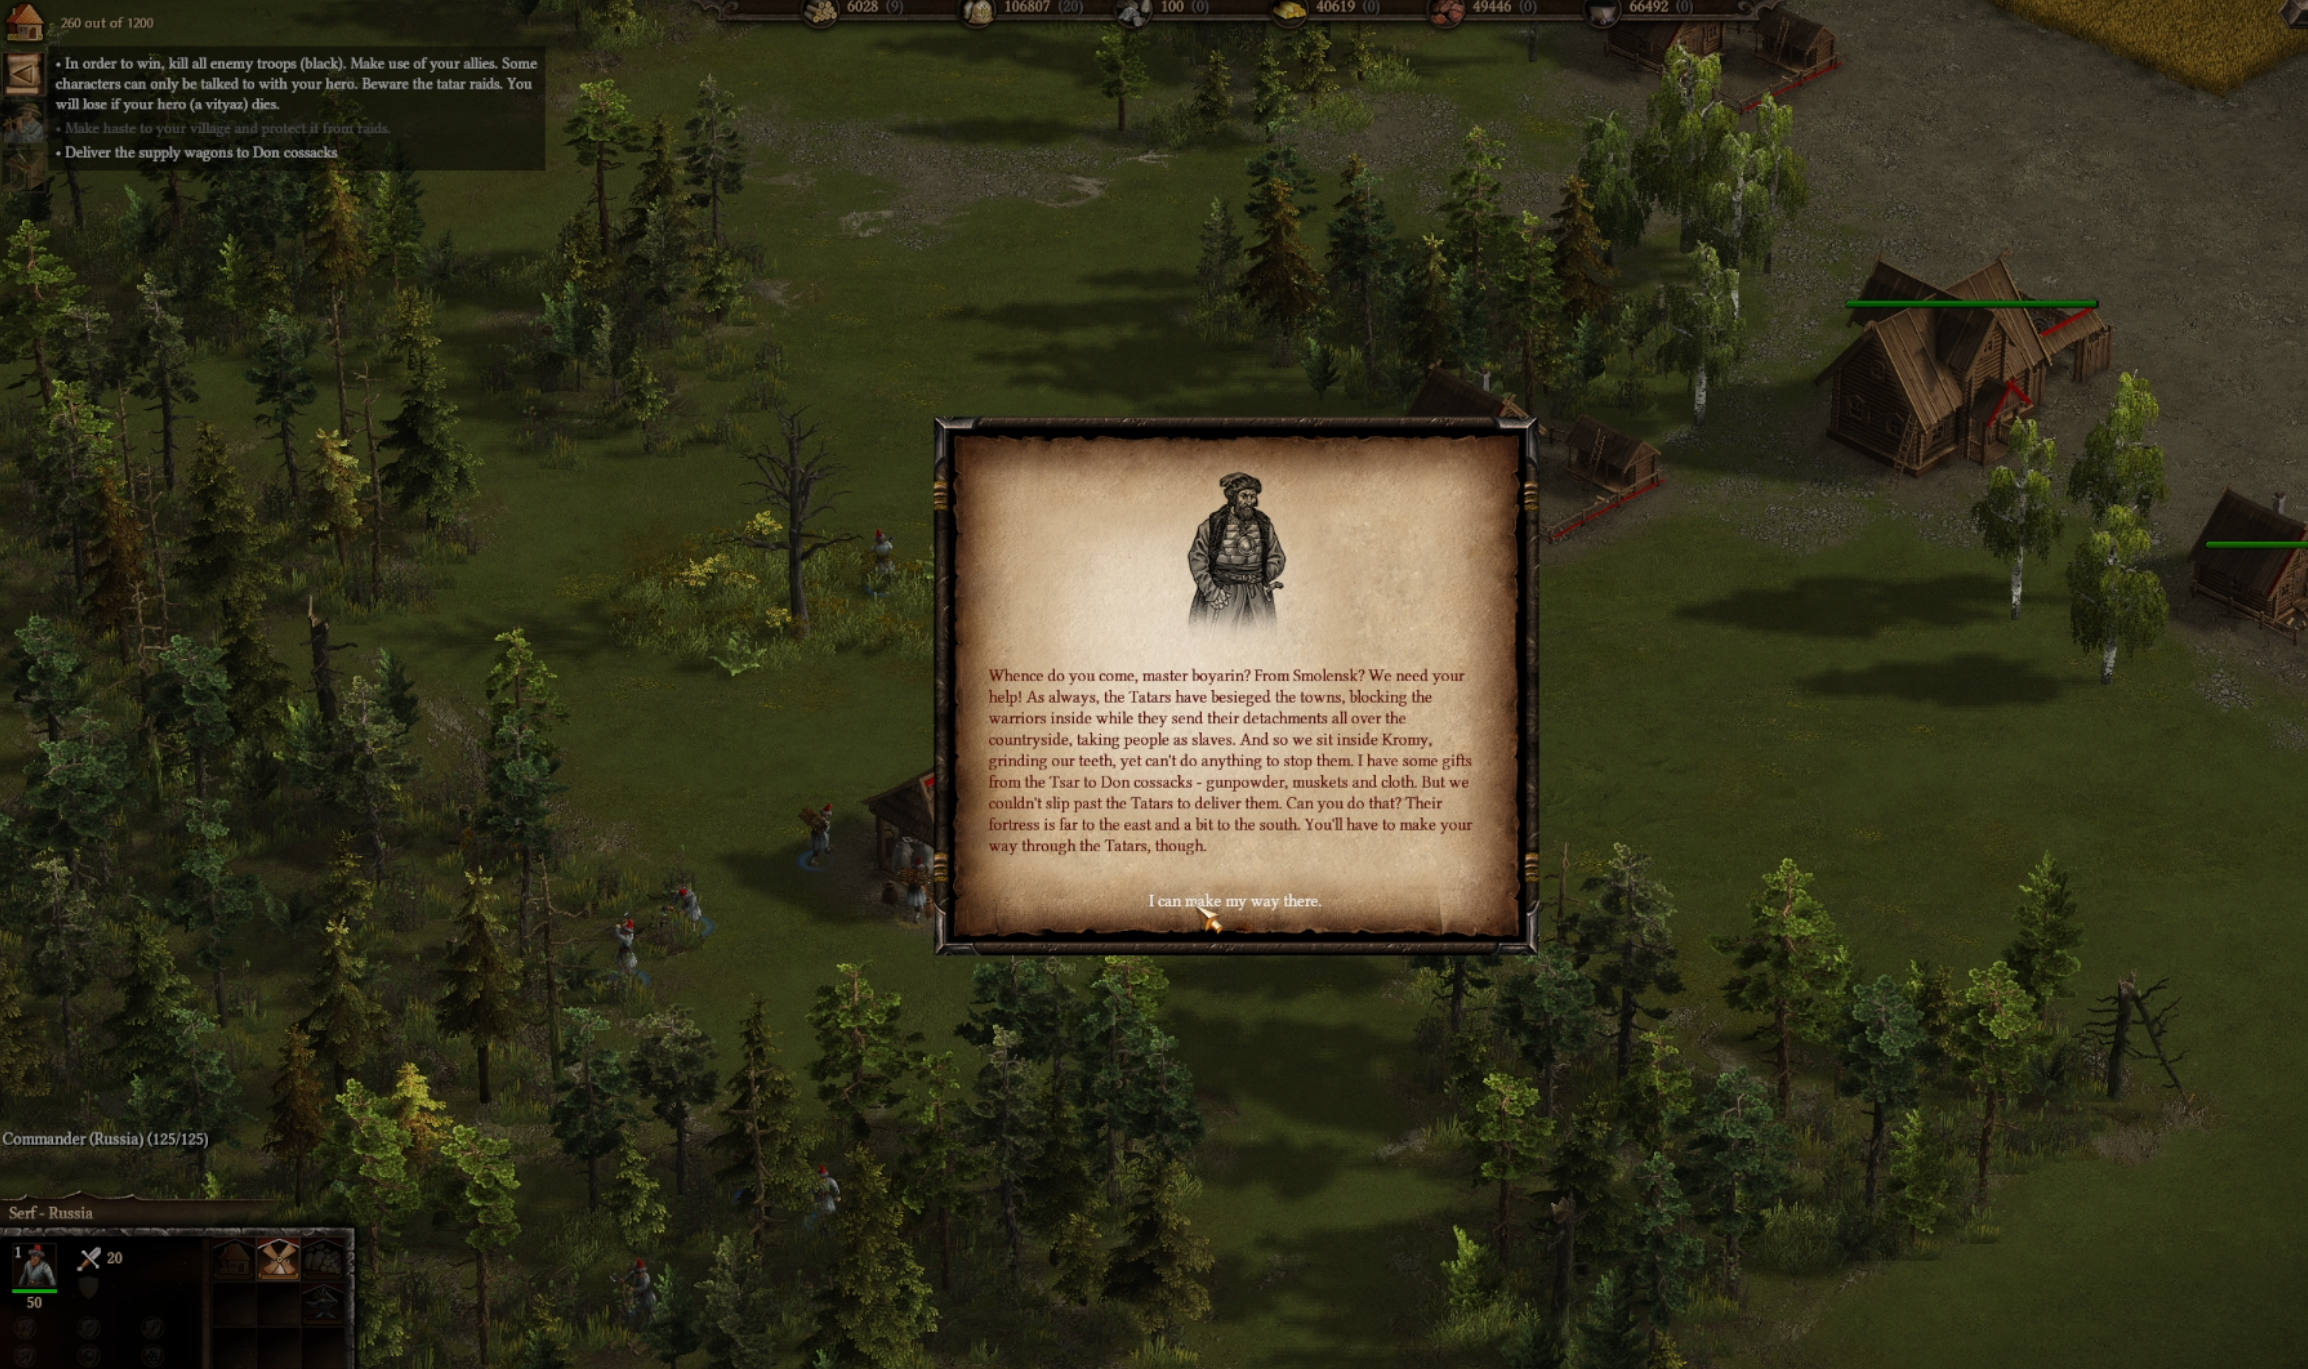
Each Campaign mission in Cossacks 3 has a historical story to go along with the gameplay.
The main campaign spans several European theaters: Austria, England, Ukraine, Russia, and France, while DLCs add Poland, Prussia, Sweden, Scotland, Turkey, Spain, the Netherlands, Switzerland, Portugal, Piedmont, Hungary, Bavaria, Saxony, and others. Missions cover famous battles from the age of Pike and Shot like Khotyn and Edgehill, with historically flavored objectives and narratives.
Storytelling is straightforward, but well-paced. Each scenario introduces fresh strategic goals—sieges, defenses, naval engagements—and unfolds in appropriately themed maps, seasonal weather, or terrain. DLCs add unique nation-specific mechanics—Scotland’s “Personal Assistant” AI or winter maps for Prussia/Sweden partying with snow.
Fans of historical RTS will find the depth and variety engaging. However, some critics say pacing and nation-specific impacts feel shallow. Most nations feel the same with only one or two units being slightly different.
Modding & Multiplayer Longevity
True to GSC’s strategy, Cossacks 3 is highly moddable. A built-in editor lets players add maps, units, nations, and new scripted campaigns. The community has produced variety in maps and balance patches, improving the experience over time.
Multiplayer supports up to 8 players, optional alliances, and massive battles
Pros and Cons
Pros
Granular, large-scale resource & economy management
Massive battles with thousands of units and rich tactical depth
Extensive historical content including campaigns and nation variety via DLC
Full mod support & friendly built-in editor
Multiplayer is expansive, laid for up to 8 players
Cons
AI and unit control feel dated—formations break easily
Tactical complexity becomes unwieldy at larger scales
Limited narrative variety—missions feel similar over repeat plays
Community is niche compared to high-profile RTS titles
Final Verdict
Cossacks 3 shines brightest when delivering massive historical campaigns with complex resource systems and regimented battles. For fans of deep strategy and old-school RTS mechanics, its library of nations, modular economy, and grand battles quench nostalgia. Robust mod tools and multiplayer maps extend longevity.
However, AI and control limitations hamper large-scale tactical purity. Where precision is expected, chaos sets in—eroding the satisfying formation dynamics. While some players embrace this as classic charm, others see it as missed opportunity.
If you're drawn to deep historical RTS and can look past some mechanical roughness, Cossacks 3 offers a rich, if imperfect, strategic playground.
Conclusion
In this Cossacks 3 Review, the verdict is clear: it recaptures the grandeur and complexity of 17th–18th century warfare, offering thousands of units, resource-heavy gameplay, and historical flair. But AI breakdowns and formation issues temper the scale’s strategic power. It’s a passionate throwback with room to grow.
Still, those willing to engage deeply, explore mods, and embrace occasional chaos will find Cossacks 3 a compelling strategy experience steeped in historical authenticity.

Best Guns and How to Use Them in Ready Or Not
Discover the top-rated weapons in Ready Or Not for different tactical scenarios. Learn how to optimize your rifle, SMG, shotgun, or sidearm for better accuracy, stopping power, and mission success.
In Ready Or Not, your gear defines your survival and success. This intense tactical FPS demands precision, planning, and the right firepower. Whether you’re breaching doors or clearing rooms, the gun you carry plays a pivotal role. This article reveals the best guns in Ready Or Not, tailored for players who want to dominate missions with confidence.
You may also be interested in:
💥Weapon Categories in Ready Or Not
Weapons are categorized into five major groups:
Assault Rifles – Balanced for most missions, offering solid range and power.
SMGs – Perfect for tight CQB situations, with fast fire rates and easy handling.
Shotguns – Devastating at close range, great for breaching and suppression.
Pistols – Reliable backup options with high mobility.
Non‑Lethal – Tools for arrest-oriented or stealth missions.
Choosing the right category based on your mission environment is crucial.
🔝 Best Assault Rifles

Ready Or Not Assault Rifles
SA‑58 (SCAR‑H / 7.62 mm)
The SA‑58 remains the go-to rifle for raw power and one-shot incapacitations—especially with armor-piercing (AP) rounds. In the community, it’s become known as the shooter that lets you “show who’s boss.” However, its significant recoil and low 20-round magazine mean it rewards careful shot placement over spray-and-pray aggressiveness.
GA416
Ranked as one of the most balanced rifles in the game, the GA416 hits the sweet spot between handling, recoil, and enough stopping power to drop threats efficiently. It performs well in both indoor and open-air engagements.
F90
With minimal recoil, high rate of fire, and a generous magazine, the F90 is one of the best beginner-friendly rifles. It is easy to control and forgiving during aggressive pushes.
G36C
Praised for its laser-tight recoil profile, the G36C is ideal for CQB or missions requiring precision. Players often call it “literally no recoil”; it’s one of the cleanest-shooting 5.56 rifles in the game.
MCX / ARN‑180
These weapons strike a strong balance between damage and stability. The MCX and ARN‑180 offer excellent customization and controllability, making them favorites among experienced teams that require adaptability without excessive kick.
Other Notables
SLR-47: High damage and decent mag size, but higher recoil makes it A-tier for skilled users. It’s short and powerful, though less forgiving than the military-carbines.
SR-16 / MK18 / MK16: Versatile rifles with approachable recoil and effective medium-range performance, particularly with proper grip, optics, and muzzle combos. Some players report recent updates dampened their output.
🔧 Attachment Tips Based on Community Best Practices
Here are attachment combos favored by players for recoil control and accuracy:
Vertical or TH Grip + SFMB Brake: Recommended for G36C, F90, GA416, MCX to reduce recoil and tighten spread.
Canted Laser with Reflex Sight: Boosts target tracking in close encounters—for SMGs and rifles.
Suppressor + Flashlight/Reflex: Ideal stealth combo for urban indoor missions.
Slug rounds + Breaching Barrel (M1014/B1301): Great for precision breaching.
Grip and muzzle brake setups for quieter, tighter handling AR builds.
🚪 Best SMGs & Shotguns for CQB
MP7 / MP5
Solid options for close-range engagements where mobility matters. The MP5A3 especially offers excellent control and quick target transitions in narrow hallways. Great for aggressive entry.
P90
Renowned for its 50-round capacity, impressive fire rate, and manageable recoil. Best used with AP ammo against heavily armored targets or for sustained suppression. It’s often selected for fast room clearing and crowd control.
M1014 (Semi‑Automatic Shotgun)
Often described as the most powerful shotgun in the game, the M1014 excels in high-intensity breach-and-clear scenarios. Buckshot works great for spread, while slugs provide precision and stopping power at slightly longer range.
B1301 “Entryman” Shotgun
A premium choice for entry teams—its design minimizes muzzle climb, allowing faster follow-up shots. Reliable in high-stress hostage rescue scenarios.
🔫 Pistols & Secondary Weapons

Ready Or Not Pistols
USP45
A longtime favorite among players, USP45 delivers reliable stopping power with a 12-round magazine and consistent recoil control. It handles well even under stress and works excellently with hollow-point or AP rounds. A solid choice when your primary rifle is out of commission.
M11 Compact
Praised for its flat trajectory, minimal recoil, and fast fire rate, the M11 Compact is ideal for aggressive play. Reddit players often cite its ability to land follow-up shots quickly, making it a dependable go-to backup pistol.
FN Five‑Seven (5.7 × 28 mm)
The only pistol capable of piercing Level IIIA body armor using AP rounds, it offers unmatched ammo capacity (20 rounds). That makes the Five‑Seven a smart choice for heavily armored opponents and shield work. It has fantastic armor piercing capabilities for a pistol.
.357 Magnum (Revolver)
This one-shots unarmored targets but comes with steep drawbacks: high recoil, low capacity, and a slow reload that expels all unfired rounds. It’s more of a niche pick for dramatic flair.
P92X / G19 / TLE 1911
G19 and P92X: Balanced in performance and recoil, often seen as comparable to the M11 and USP for general use.
TLE 1911 / M45A1: Higher recoil and lower ammo capacity make it less practical in sustained engagements. Still, the compensator on the M45 can improve its follow-up shot control.
🤝 Non-Lethal Options & When to Use Them
Beanbag Shotgun
The gold standard for less-lethal suppression. A single hip or chest shot can incapacitate a suspect reliably—even those wearing face protection. Excellent for soft objectives or arrest scenarios. Ideal in close-range confrontations, especially indoors.
Community consensus:
“Beanbag is far more shots-per-suspect efficient than pepperballs… one center-mass hit generally stops the target.”
“Reloading slower but deadly efficient if you’re accurate.”
Pepperball Launchers (R7 or TPL / SMG variant)
These deliver irritant-filled projectiles over a medium range. They allow fast magazine-style reloads and provide ranged compliance options. However, suspects may sometimes resist or relocate before incapacitation.
Community perspective:
“Pepperball rifle is easier to handle and better on ammo economy, but less reliable when suspects wear masks.”
“It’s smoother to handle than the beanbag shotgun, especially under stress.”
“However, the beanbag incapacitated more consistently in close encounters—even through armor.”
Taser & CS Gas
Taser: Instant incapacitation when it hits—best for singular suspects caught alone.
CS Gas (tear gas): Effective in area denial and suppressing multiple targets without direct hits. Useful when stun or arrest is the goal.
🔧 Recommended Attachments for Each Weapon Class
Optimize your weapon for peak performance:
Assault Rifles:
SA-58: AP rounds + suppressor + holo sight.
F90: Muzzle brake + vertical grip + red dot.
SMGs:
MP7: Flashlight + suppressor + reflex sight.
P90: Laser + recoil grip + scope.
Shotguns:
M1014: Slug rounds + breaching barrel + side rail light.
Pistols:
USP45: Suppressor + flashlight.
G19: Night sights + hollow-point ammo.
Attachments help you customize for specific missions, balancing stealth and stopping power.
🎯 Tactical Loadouts for Mission Types
Match your loadout to the mission:
Close Quarters / Breach Missions:
Primary: M1014 or MP7
Secondary: Beanbag Shotgun
Extras: Flashbangs, CS Gas
Mid/Long-Range Engagements:
Primary: SA-58 or F90
Secondary: G19
Extras: AP Ammo, Suppressor
Balanced Runs:
Primary: MCX or G36C
Secondary: USP45
Extras: Breaching Charges, Pepper Spray
⚠️ Common Mistakes & What to Avoid
Avoid high recoil weapons like MK16/SR‑16 without proper attachments—they demand expert control.
Skip complex loadouts like SLR-47 unless you're comfortable managing recoil and spread.
Over-customization can hinder visibility—keep optics clean and minimal.
🏁 Conclusion
The right weapon in Ready Or Not isn’t just about power—it’s about purpose. Know your environment, pick a role, and choose the gun that complements your squad’s goal. Whether it’s the all-around F90, the powerful SA‑58, or the trusty MP7, mastering your loadout means mastering the mission.
You may also be interested in:

Survive the Wild with The Long Dark: Complete Weapons & Ammo Guide
Master survival in The Long Dark with this expert guide to weapons, where to find them, how to craft ammo, skill leveling tips, and combat strategies.
In The Long Dark, mastering ranged weapons can mean the difference between thriving and perishing in the frozen wilderness. This guide breaks down every ranged option—from the high‑impact Hunting Rifle to the silent and renewable Survival Bow, the compact Revolver, all the way to the emergency Distress Pistol—showing you how to use them most effectively, and how to maximize your Firearms and Archery skills.
You may also be interested in:
Weapon Types & Their Characteristics
Hunting Rifle
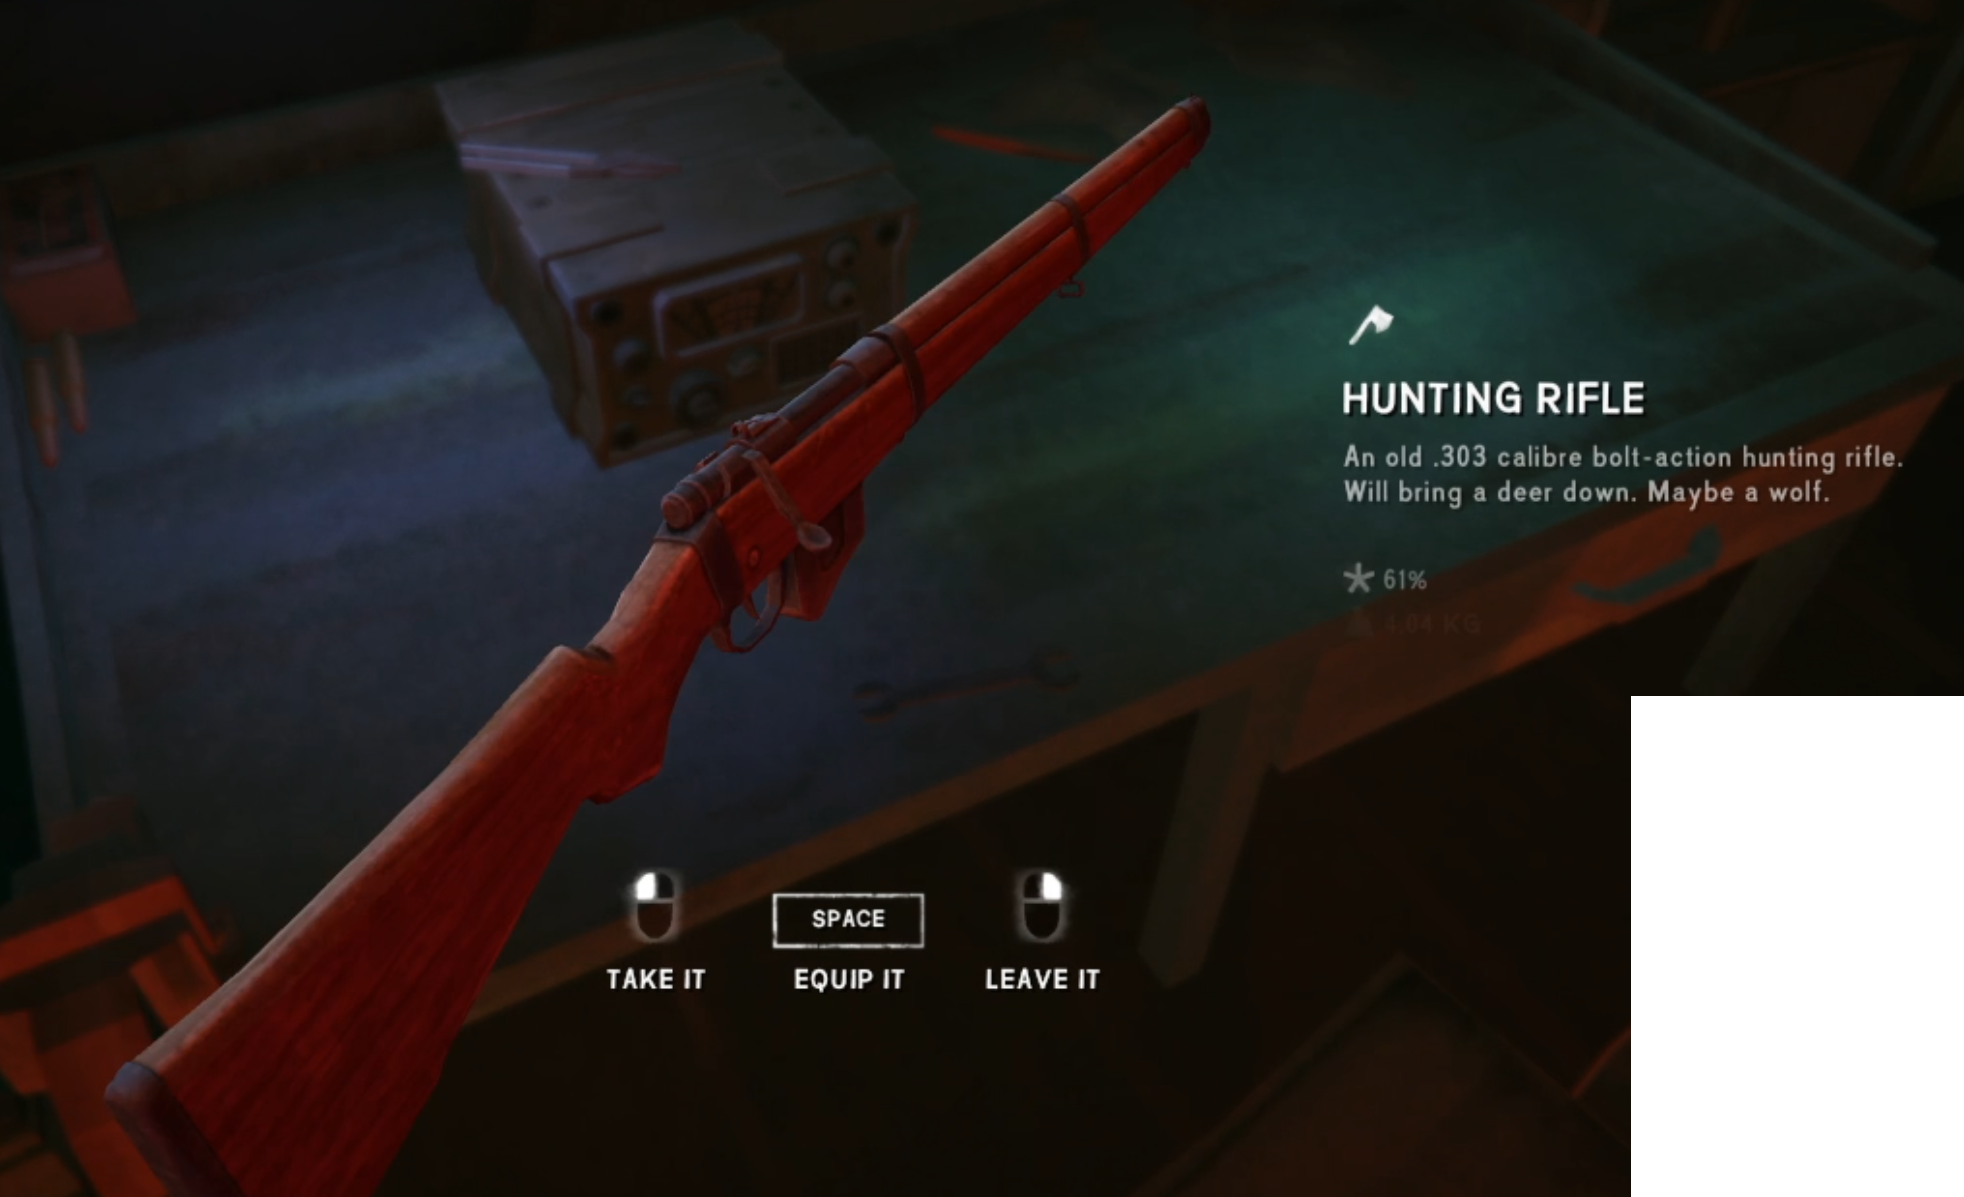
The Long Dark Hunting Rifle
A .303 caliber bolt‑action rifle with a 10‑round internal magazine and built‑in iron sights. Powerful and precise, it delivers one shot kills on deer and wolves with headshots. Torso hits on wolves may require two shots; bears usually take 2–3 headshots or up to five torso hits to down. Rifle rounds are rare, and the firearm itself weighs about 4 kg (~8.8 lbs). Condition degrades with every shot (1.33% per shot at base skill), though you can clean it using a Firearm Cleaning Kit to restore condition and reduce jamming risk.
Revolver

The Long Dark Revolver
A double‑action handgun with a six‑round cylinder, weighing ~1.5 kg (~3.3 lbs). It’s faster to fire and reload compared to the rifle and often deters wolves even without a killing hit. Damage is considerably lower—deer and wolves may bleed out over several hours post-hit, and moose or cougars often ignore revolver shots. If multiple rounds are fired quickly at a charging moose, it might scare off the animal. It’s most useful in close‑range and defensive scenarios.
Survival Bow

The Long Dark Survival Bow
A self‑crafted maple longbow weighing ~0.5 kg (~1.1 lbs). Shoots Simple, Fire-Hardened, or Manufactured arrows. Silent and renewable, it’s ideal for stealth and small‑game hunting. Arrows cause heavy bleeding and can often be retrieved—though condition degrades with each shot. Bow condition drops 2–3% per use and cannot be repaired. Bleed‑out times shorten with higher Archery skill. Moose and cougars don’t bleed, making bows less effective against them.
Distress Pistol (Flare Gun)

The Long Dark Distress Pistol
A single-shot break-action pistol firing Flare Shells that create bright, burning projectiles lasting ~20 in‑game minutes. It’s the only weapon that guarantees deterrence of charging bears and moose—if it connects. Hits may kill instantly via critical hit or cause a bleeding wound (except moose and cougars, which don’t bleed). Accuracy is challenging due to heavy arc trajectory. The pistol is light (~0.4 kg) but rare and not repairable; the shells are non-craftable and non-retrievable.
Ammunition & Crafting
Hunting Rifle & Revolver Ammo: Crafted at the fixed Ammunition Workbench (e.g. at Bleak Inlet). Rifle ammunition is especially rare—use with care. Revolver ammunition is more common.
Arrows for Bow:
Simple Arrows: Takes down most animals with bleeding wounds.
Fire Hardened: Brittle, only effective vs rabbits and ptarmigan, break on larger targets.
Manufactured: Highest damage and durability—trader‑only.
Arrows may be recovered after firing—damage accrues based on hit surface.
Flare Shells for Distress Pistol: Cannot be crafted or reused once fired.
Skill Leveling Strategies
Rifle & Revolver Firearms Skill: Gain XP by hitting wildlife—headshots yield more. Improved weapon stability and reduced degradation come with higher skill.
Archery Skill: Earned from both crafting and firing arrows. Hitting targets increases skill, and higher levels improve draw speed, stability, condition retention, and reduce bleed‑out durations.
Weapon Comparison Table
| Weapon | Pros | Cons | Best Use Case |
|---|---|---|---|
| Hunting Rifle | Instant headshots, straight-line bullets, effective up to ~50 paces | Heavy (~4 kg), rare ammo, condition degrades per shot, jamming possible | Deer, wolves, bears (with headshots), large game |
| Revolver | Light (~1.5 kg), quick fire, deters charging wolves | Low stopping power, slow bleed-out, ineffective vs moose/cougar | Emergency defense, close-range wolf deterrence |
| Survival Bow | Silent, renewable ammo, retrievable arrows, great for small game | Low range, slow draw, arc trajectory, less effective vs large animals | Rabbits, ptarmigan, stealth wolf hunts |
| Distress Pistol | Guaranteed deterrent if hit, kills or wounds large predators | Very rare, only single-shot, severe arc makes hits difficult, ammo non-craftable | Emergency deterrent—especially vs bears/moose with flare hit |
Combat & Hunting Tips
Using the Rifle: Target head or neck for instant kills. Torso shots induce bleed—45 minutes for deer, 120 for bear, etc. Weapons degrade quickly—keep cleaning kits on hand.
Using the Revolver: Effective as high-stress backup. Even a non-lethal hit on a charging wolf often causes retreat. Avoid attempting moose/cougar kills—use rifle or let bleed out over long periods.
Using the Bow: Stealth is your ally. Aim carefully for bleeding hits at close range. Track wounded animals before they escape. Arrow retrieval is key to conserving materials.
Using the Flare Gun: Fire at a charging bear or moose to scare them away. If you hit them, animals either die quickly via bleed or flee immediately. Cougar is immune to deterrence. This weapon is best used in emergencies.
Conclusion
Best overall choice: The Hunting Rifle delivers power and precision but demands resource discipline.
Stealth & sustainability champion: The Survival Bow, with renewable ammo and silent effectiveness, is ideal for resource constrained and careful players.
Emergency backup: The Revolver offers quick response in close encounters.
Last-resort deterrent: The Distress Pistol, when used directly, can turn a dangerous bear or moose charge into an escape.
Mastering ammo crafting, weapon upkeep, and skill progression dramatically increases your survival chances in The Long Dark.
You may also be interested in:

The Long Dark Best Clothing: Ultimate Guide for Survival Gamers
Discover the best clothing in The Long Dark to boost warmth, protection, and survival. From Expedition Parkas to Rabbitskin Mitts, here’s what to wear when every degree counts.
In The Long Dark, survival isn’t just about what you do—it’s about what you wear. One wrong layer and you could freeze before the next sunrise. With the game’s chilling realism and dynamic weather, your clothing loadout is critical. This guide will break down the best clothing items in the game, ranked by warmth, protection, and efficiency, so you can explore the Canadian wilderness without losing toes.

The clothing slots available in The Long Dark.
How Clothing Works in The Long Dark
Clothing in The Long Dark isn’t cosmetic—it’s a lifeline. Every item contributes to core stats that impact your survival:
Warmth Bonus: How much heat the item provides.
Windproof Bonus: Shields you from freezing gusts.
Waterproofness: Keeps you dry during storms.
Protection: Reduces injury from animal attacks and falls.
Weight: Heavier clothes slow you down and use more stamina.
Evaluating Clothing: Warmth-to-Weight Efficiency
Veteran survivors know it's not just about bulk—it’s about efficiency. The best gear offers maximum warmth and protection per kilogram. That’s where warmth-to-weight ratio comes in.
Here’s how to think like a pro:
Divide the warmth bonus by the item's weight.
Compare that across your loadout to find optimal gear.
For example:
Expedition Parka: Super warm, but heavy.
Fisherman’s Sweater: Excellent inner layer with great warmth-to-weight.
This ratio helps keep your carry weight under control, especially important on Interloper difficulty or long treks.
Best Clothing by Slot
Ready to build your ultimate survival outfit? Here are the top clothing items by slot:
🧢 Head: Balaclava or Rabbitskin Hat
Balaclava: Offers strong warmth and windproofing with minimal weight.
Technical Balaclava: A more resistant, but less warm version of a standard balaclava.
👕 Inner Torso: Fisherman’s Sweater or Cowichan Sweater
Fisherman’s Sweater: Ideal warmth-to-weight for inner wear.
Cowichan Sweater: Very warm but heavier; better for stationary players.
🧥 Outer Torso: Expedition Parka
Expedition Parka: Arguably the best outerwear. High warmth and wind protection, but heavy. Ideal for cold zones like Timberwolf Mountain or Desolation Point.
👖 Inner Legs: Wool Long Johns
Wool Long Johns: Staple item. Lightweight, dependable warmth for the base layer.
🩳 Outer Legs: Snow Pants or Combat Pants
Snow Pants: Amazing windproof and warmth stats.
Combat Pants: Better weight-to-warmth trade-off; more versatile.
Conclusion
Choosing the best clothing in The Long Dark can mean the difference between a successful expedition and freezing mid-step. Focus on layering strategically, prioritize warmth-to-weight efficiency, and adapt your gear to your playstyle. With this guide, you're dressed to survive—even when the wolves are howling and the wind won't let up.

Best Loadout for Ready Or Not: Gear Up Like a Pro
Getting the right loadout in Ready Or Not can be the difference between a flawless S‑Rank run and costly failure. I’ve broken down the optimal gear choices to help you dominate tactical scenarios—whether you’re clearing rooms, securing hostages, or going stealthy. Let’s dive in.
Getting the right loadout in Ready Or Not can be the difference between a flawless S‑Rank run and costly failure. I’ve broken down the optimal gear choices to help you dominate tactical scenarios—whether you’re clearing rooms, securing hostages, or going stealthy. Let’s dive in.
You may also be interested in:
The best loadout in Ready Or Not, especially when just starting the game.
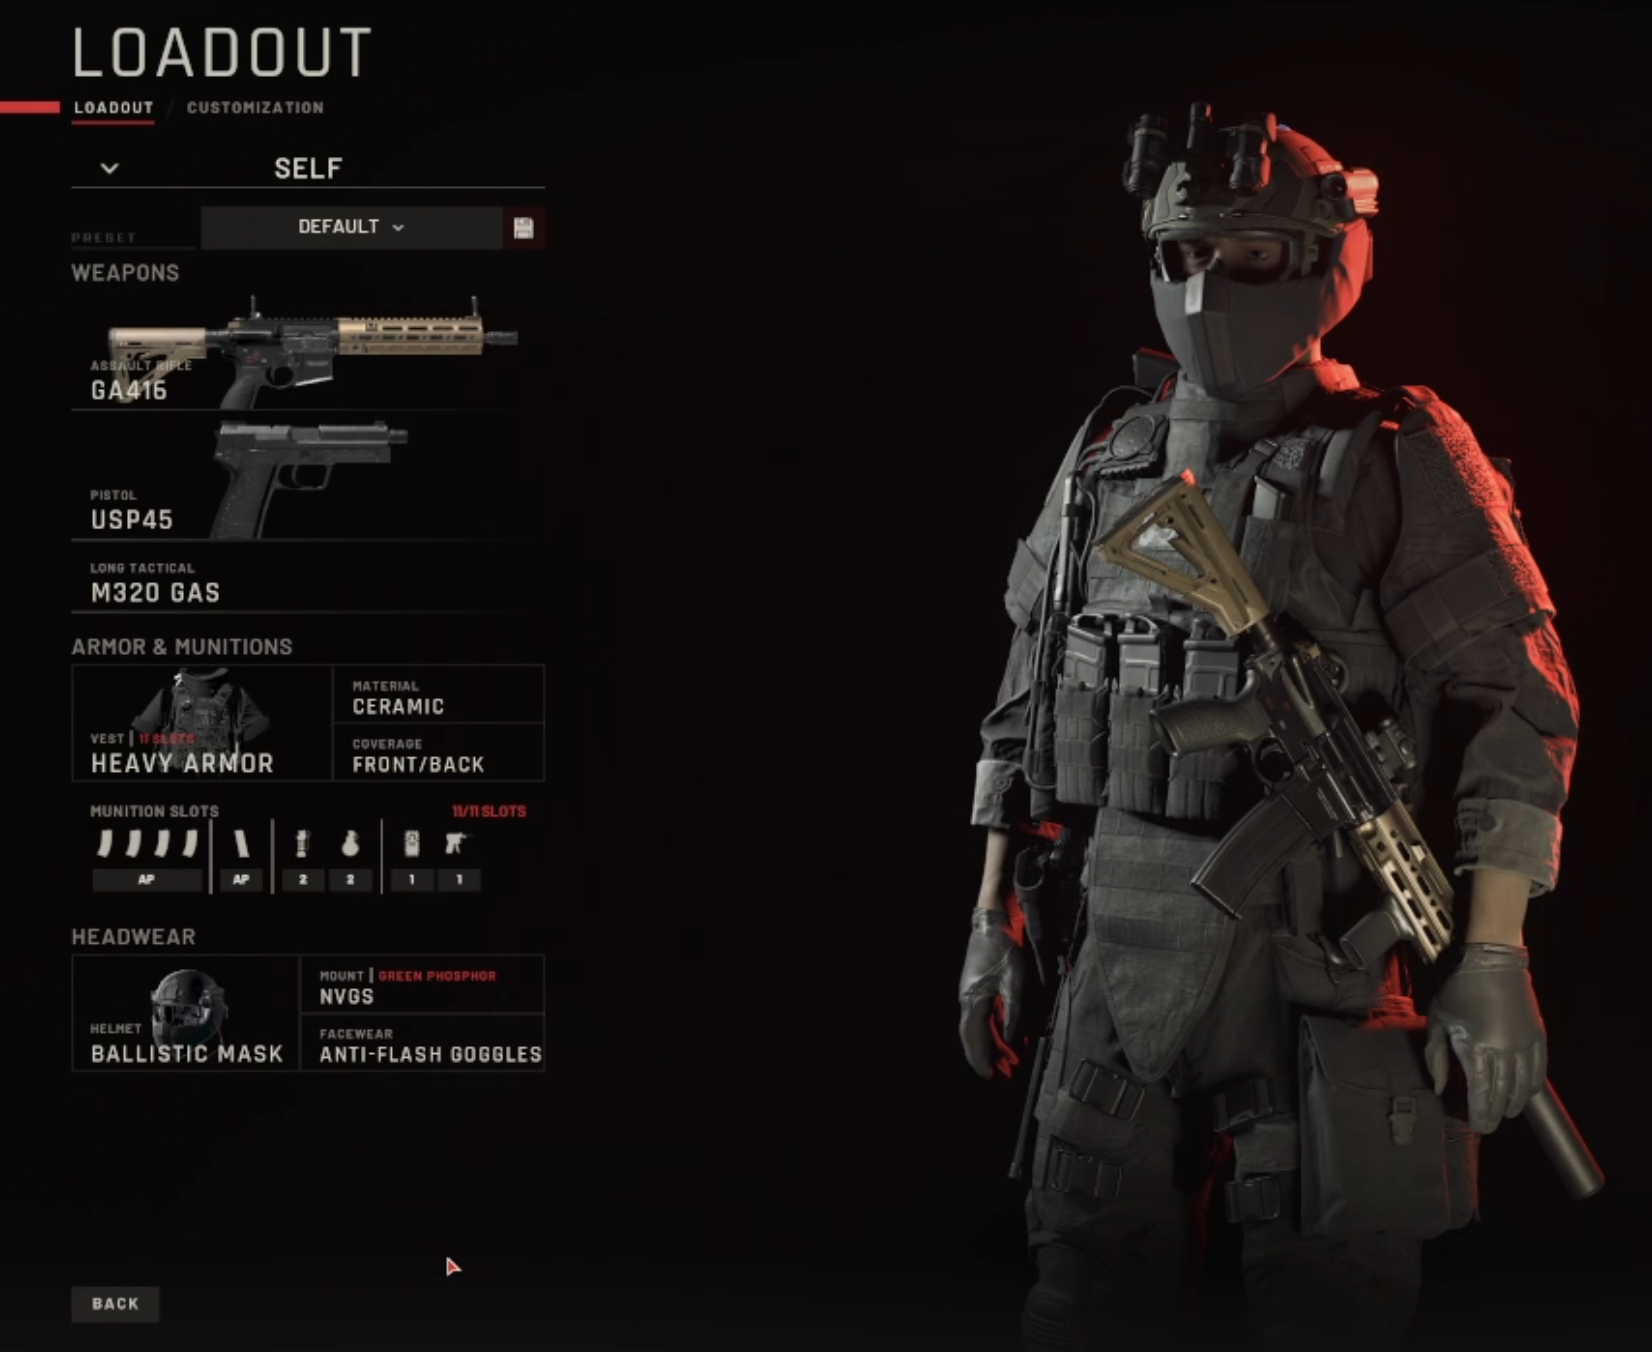
1. 🎯 Primary Weapon: Assault Rifle (MK18 or GA416)
Why choose it? Both rifles offer excellent handling, moderate recoil, and versatility across close to mid‑range combat—ideal for most maps. The MK18 is particularly praised for its agility and customizable options.
Recommended attachments:
Optic: MICROT2 – balances recoil control with quick aim.
Muzzle: SOCOM suppressor – reduces vertical recoil and conceals muzzle flash.
Underbarrel: Combat grip (or vertical grip for rifles like GA416) – helps aim stability.
Overbarrel: M600V flashlight – essential for dark rooms.
Ammo choice: AP rounds are your best bet—they ensure rounds punch through ballistic shields and plated enemies.
2. 🔫 Secondary Weapon: USP45
The USP45 is highly accurate, stable, and reliable in stressful moments.
Attachments:
Obsidian suppressor for stealth.
Laser pointer for quick target acquisition.
Ammo choice: AP rounds are your best bet—they ensure rounds punch through ballistic shields and plated enemies.
3. 🛡 Armor & Protection
Body armor: Heavy ceramic plates (front & back). This setup provides the best balance of survivability and mobility.
Armor carrier type: Ceramic is great “mid-tier”; light kevlar offers speed and can be swapped to stab vest for extra gear slots when needed.
Headwear: Make sure to wear a ballistic mask and Anti-Flash Goggles with your helmet unless you are taking a gas launcher or grenade, then wear a gas mask.
4. ⚙️ Tactical Equipment
Mirrorgun: Must-have tool for safe room entry and scouting.
M320 CS gas launcher: Perfect for subduing multiple suspects and maximizing non-lethal arrests. Remember it equip gas masks for yourself and your team mates!
Grenades + tools: Take flashbangs and C2 for controlled entries, plus a lockpick gun as backup. Wedges can also block doors in preparation for forced entry. When playing singleplayer you can have your AI teammates carry a lot of this gear. In multiplayer make sure someone has breaching charges. Everyone should have at least 2 Stinger or Flashbang grenades. Gas is just as likely to hurt as help you if you do not wear a gas mask, but can be a viable strategy as well.
5. 🎯 S‑Rank Non‑Lethal Loadout Option
Want more non-lethal arrests for S‑Ranks? Here’s a specialized build:
Primary: VPL‑25 gas rifle (CS rounds) or beanbag shotgun.
Secondary: Taser (or USPS .45 AP if lethal backup is needed).
Equip gas masks for both you and your AI team.
This setup achieves more arrests without casualties—perfect for score-focused runs.
6. ⚙️ Tuning Attachments & Gear
Use holosights or red-dot optics (EXPS3).
Add IR lasers for night operations when night vision is optimal.
7. ⚡ Reddit Quick Tips
From the Ready Or Not subreddit:
“Assault Rifles are good to start with … shotguns, when used right are the best.”
“Standard on any gun … laser, holosight and the grip that improves accuracy.”
Wrap-Up
This core loadout—**MK18/GA416 + USP45 with ceramic heavy armor, suppressors, and tactical gear—**offers deadly flexibility and reliable performance across missions. Want to go non-lethal? Swap in CS gas or bean bag shotguns and tasers for safer arrests.
Experiment with attachments and gear depending on the map and mission objectives. Mastering these loadouts will elevate your gameplay—now gear up and go earn those S‑Ranks!