


Survive the Wild with The Long Dark: Complete Weapons & Ammo Guide
Master survival in The Long Dark with this expert guide to weapons, where to find them, how to craft ammo, skill leveling tips, and combat strategies.
In The Long Dark, mastering ranged weapons can mean the difference between thriving and perishing in the frozen wilderness. This guide breaks down every ranged option—from the high‑impact Hunting Rifle to the silent and renewable Survival Bow, the compact Revolver, all the way to the emergency Distress Pistol—showing you how to use them most effectively, and how to maximize your Firearms and Archery skills.
You may also be interested in:
Weapon Types & Their Characteristics
Hunting Rifle
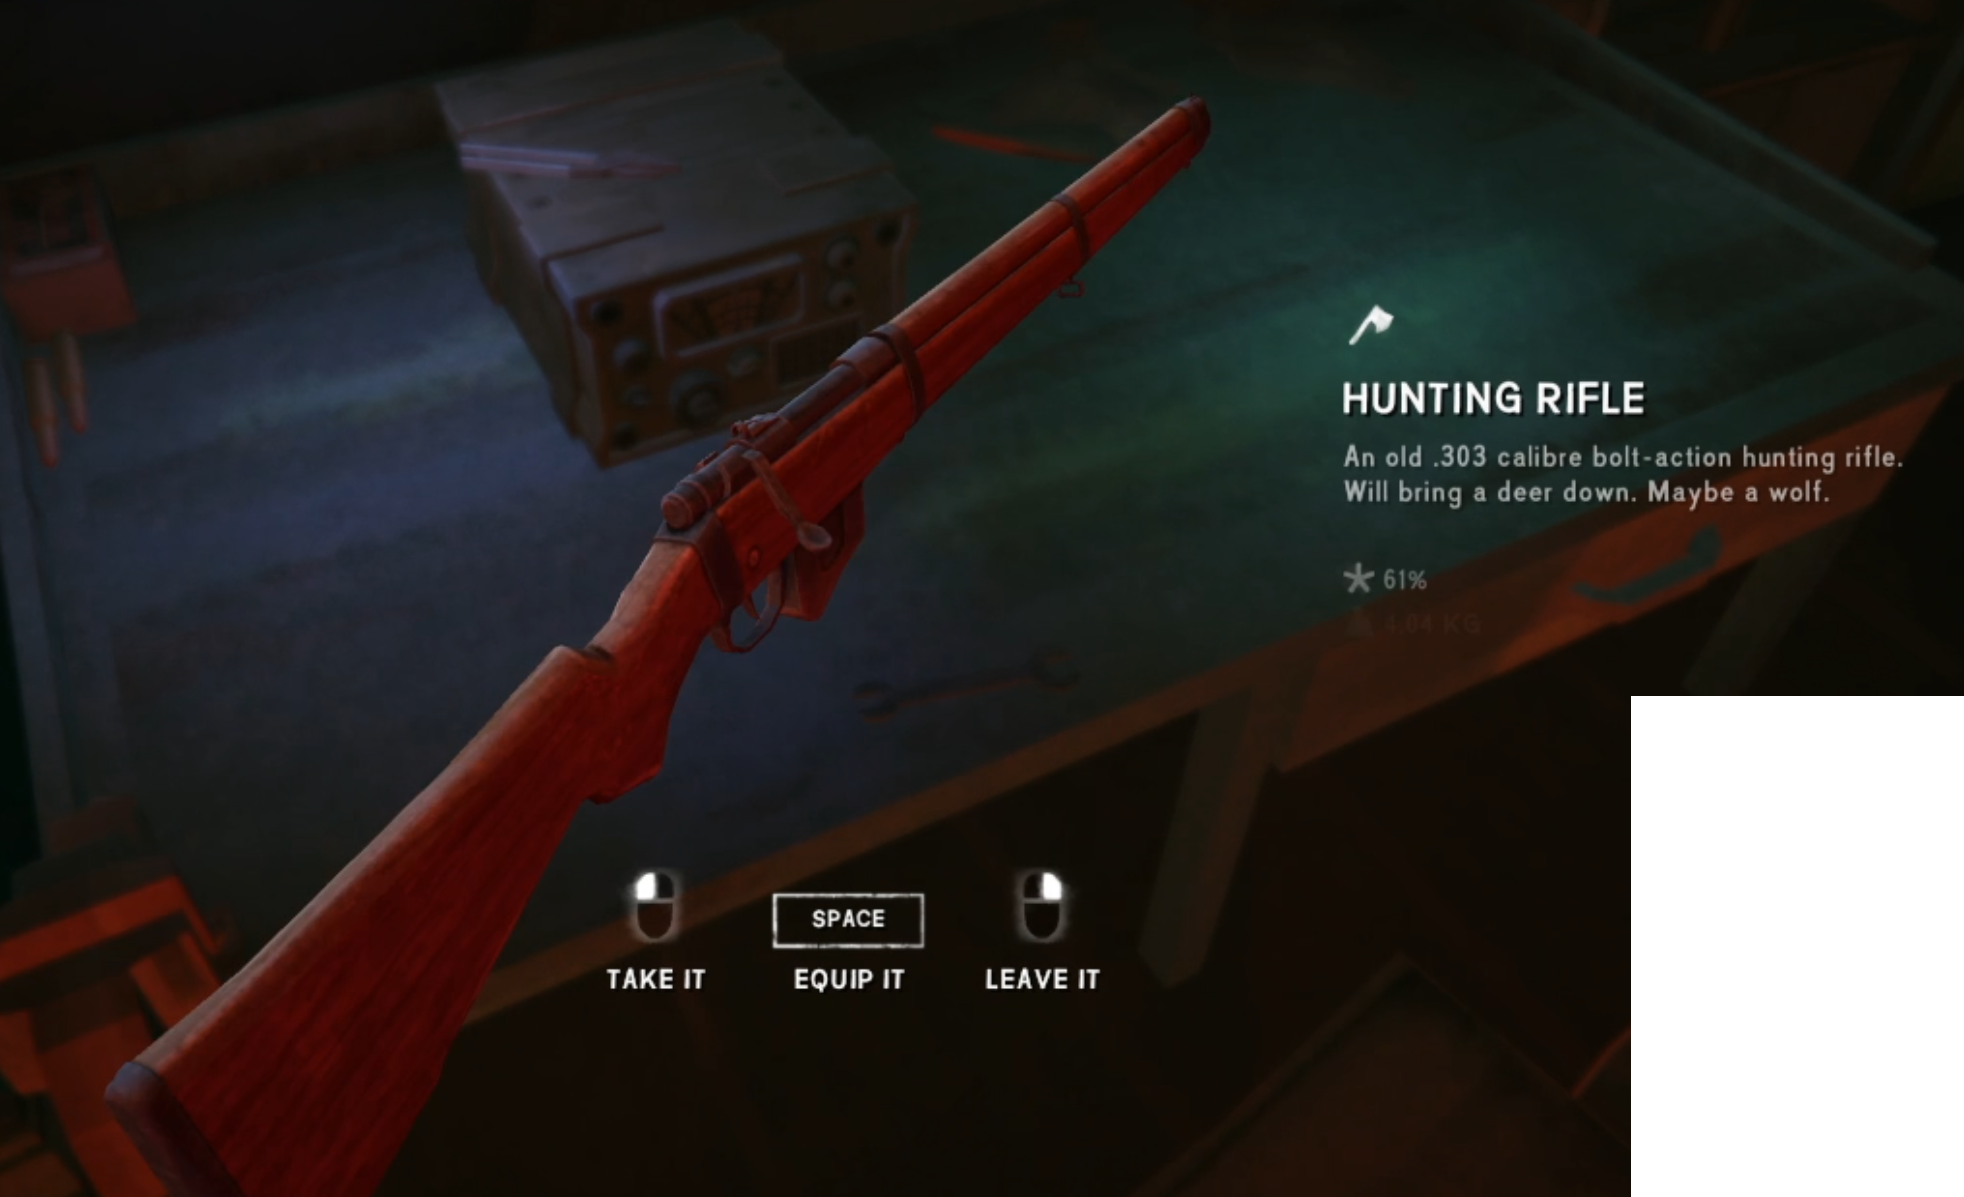
The Long Dark Hunting Rifle
A .303 caliber bolt‑action rifle with a 10‑round internal magazine and built‑in iron sights. Powerful and precise, it delivers one shot kills on deer and wolves with headshots. Torso hits on wolves may require two shots; bears usually take 2–3 headshots or up to five torso hits to down. Rifle rounds are rare, and the firearm itself weighs about 4 kg (~8.8 lbs). Condition degrades with every shot (1.33% per shot at base skill), though you can clean it using a Firearm Cleaning Kit to restore condition and reduce jamming risk.
Revolver

The Long Dark Revolver
A double‑action handgun with a six‑round cylinder, weighing ~1.5 kg (~3.3 lbs). It’s faster to fire and reload compared to the rifle and often deters wolves even without a killing hit. Damage is considerably lower—deer and wolves may bleed out over several hours post-hit, and moose or cougars often ignore revolver shots. If multiple rounds are fired quickly at a charging moose, it might scare off the animal. It’s most useful in close‑range and defensive scenarios.
Survival Bow

The Long Dark Survival Bow
A self‑crafted maple longbow weighing ~0.5 kg (~1.1 lbs). Shoots Simple, Fire-Hardened, or Manufactured arrows. Silent and renewable, it’s ideal for stealth and small‑game hunting. Arrows cause heavy bleeding and can often be retrieved—though condition degrades with each shot. Bow condition drops 2–3% per use and cannot be repaired. Bleed‑out times shorten with higher Archery skill. Moose and cougars don’t bleed, making bows less effective against them.
Distress Pistol (Flare Gun)

The Long Dark Distress Pistol
A single-shot break-action pistol firing Flare Shells that create bright, burning projectiles lasting ~20 in‑game minutes. It’s the only weapon that guarantees deterrence of charging bears and moose—if it connects. Hits may kill instantly via critical hit or cause a bleeding wound (except moose and cougars, which don’t bleed). Accuracy is challenging due to heavy arc trajectory. The pistol is light (~0.4 kg) but rare and not repairable; the shells are non-craftable and non-retrievable.
Ammunition & Crafting
Hunting Rifle & Revolver Ammo: Crafted at the fixed Ammunition Workbench (e.g. at Bleak Inlet). Rifle ammunition is especially rare—use with care. Revolver ammunition is more common.
Arrows for Bow:
Simple Arrows: Takes down most animals with bleeding wounds.
Fire Hardened: Brittle, only effective vs rabbits and ptarmigan, break on larger targets.
Manufactured: Highest damage and durability—trader‑only.
Arrows may be recovered after firing—damage accrues based on hit surface.
Flare Shells for Distress Pistol: Cannot be crafted or reused once fired.
Skill Leveling Strategies
Rifle & Revolver Firearms Skill: Gain XP by hitting wildlife—headshots yield more. Improved weapon stability and reduced degradation come with higher skill.
Archery Skill: Earned from both crafting and firing arrows. Hitting targets increases skill, and higher levels improve draw speed, stability, condition retention, and reduce bleed‑out durations.
Weapon Comparison Table
| Weapon | Pros | Cons | Best Use Case |
|---|---|---|---|
| Hunting Rifle | Instant headshots, straight-line bullets, effective up to ~50 paces | Heavy (~4 kg), rare ammo, condition degrades per shot, jamming possible | Deer, wolves, bears (with headshots), large game |
| Revolver | Light (~1.5 kg), quick fire, deters charging wolves | Low stopping power, slow bleed-out, ineffective vs moose/cougar | Emergency defense, close-range wolf deterrence |
| Survival Bow | Silent, renewable ammo, retrievable arrows, great for small game | Low range, slow draw, arc trajectory, less effective vs large animals | Rabbits, ptarmigan, stealth wolf hunts |
| Distress Pistol | Guaranteed deterrent if hit, kills or wounds large predators | Very rare, only single-shot, severe arc makes hits difficult, ammo non-craftable | Emergency deterrent—especially vs bears/moose with flare hit |
Combat & Hunting Tips
Using the Rifle: Target head or neck for instant kills. Torso shots induce bleed—45 minutes for deer, 120 for bear, etc. Weapons degrade quickly—keep cleaning kits on hand.
Using the Revolver: Effective as high-stress backup. Even a non-lethal hit on a charging wolf often causes retreat. Avoid attempting moose/cougar kills—use rifle or let bleed out over long periods.
Using the Bow: Stealth is your ally. Aim carefully for bleeding hits at close range. Track wounded animals before they escape. Arrow retrieval is key to conserving materials.
Using the Flare Gun: Fire at a charging bear or moose to scare them away. If you hit them, animals either die quickly via bleed or flee immediately. Cougar is immune to deterrence. This weapon is best used in emergencies.
Conclusion
Best overall choice: The Hunting Rifle delivers power and precision but demands resource discipline.
Stealth & sustainability champion: The Survival Bow, with renewable ammo and silent effectiveness, is ideal for resource constrained and careful players.
Emergency backup: The Revolver offers quick response in close encounters.
Last-resort deterrent: The Distress Pistol, when used directly, can turn a dangerous bear or moose charge into an escape.
Mastering ammo crafting, weapon upkeep, and skill progression dramatically increases your survival chances in The Long Dark.
You may also be interested in:

The Long Dark Best Clothing: Ultimate Guide for Survival Gamers
Discover the best clothing in The Long Dark to boost warmth, protection, and survival. From Expedition Parkas to Rabbitskin Mitts, here’s what to wear when every degree counts.
In The Long Dark, survival isn’t just about what you do—it’s about what you wear. One wrong layer and you could freeze before the next sunrise. With the game’s chilling realism and dynamic weather, your clothing loadout is critical. This guide will break down the best clothing items in the game, ranked by warmth, protection, and efficiency, so you can explore the Canadian wilderness without losing toes.

The clothing slots available in The Long Dark.
How Clothing Works in The Long Dark
Clothing in The Long Dark isn’t cosmetic—it’s a lifeline. Every item contributes to core stats that impact your survival:
Warmth Bonus: How much heat the item provides.
Windproof Bonus: Shields you from freezing gusts.
Waterproofness: Keeps you dry during storms.
Protection: Reduces injury from animal attacks and falls.
Weight: Heavier clothes slow you down and use more stamina.
Evaluating Clothing: Warmth-to-Weight Efficiency
Veteran survivors know it's not just about bulk—it’s about efficiency. The best gear offers maximum warmth and protection per kilogram. That’s where warmth-to-weight ratio comes in.
Here’s how to think like a pro:
Divide the warmth bonus by the item's weight.
Compare that across your loadout to find optimal gear.
For example:
Expedition Parka: Super warm, but heavy.
Fisherman’s Sweater: Excellent inner layer with great warmth-to-weight.
This ratio helps keep your carry weight under control, especially important on Interloper difficulty or long treks.
Best Clothing by Slot
Ready to build your ultimate survival outfit? Here are the top clothing items by slot:
🧢 Head: Balaclava or Rabbitskin Hat
Balaclava: Offers strong warmth and windproofing with minimal weight.
Technical Balaclava: A more resistant, but less warm version of a standard balaclava.
👕 Inner Torso: Fisherman’s Sweater or Cowichan Sweater
Fisherman’s Sweater: Ideal warmth-to-weight for inner wear.
Cowichan Sweater: Very warm but heavier; better for stationary players.
🧥 Outer Torso: Expedition Parka
Expedition Parka: Arguably the best outerwear. High warmth and wind protection, but heavy. Ideal for cold zones like Timberwolf Mountain or Desolation Point.
👖 Inner Legs: Wool Long Johns
Wool Long Johns: Staple item. Lightweight, dependable warmth for the base layer.
🩳 Outer Legs: Snow Pants or Combat Pants
Snow Pants: Amazing windproof and warmth stats.
Combat Pants: Better weight-to-warmth trade-off; more versatile.
Conclusion
Choosing the best clothing in The Long Dark can mean the difference between a successful expedition and freezing mid-step. Focus on layering strategically, prioritize warmth-to-weight efficiency, and adapt your gear to your playstyle. With this guide, you're dressed to survive—even when the wolves are howling and the wind won't let up.

Best Loadout for Ready Or Not: Gear Up Like a Pro
Getting the right loadout in Ready Or Not can be the difference between a flawless S‑Rank run and costly failure. I’ve broken down the optimal gear choices to help you dominate tactical scenarios—whether you’re clearing rooms, securing hostages, or going stealthy. Let’s dive in.
Getting the right loadout in Ready Or Not can be the difference between a flawless S‑Rank run and costly failure. I’ve broken down the optimal gear choices to help you dominate tactical scenarios—whether you’re clearing rooms, securing hostages, or going stealthy. Let’s dive in.
You may also be interested in:
The best loadout in Ready Or Not, especially when just starting the game.
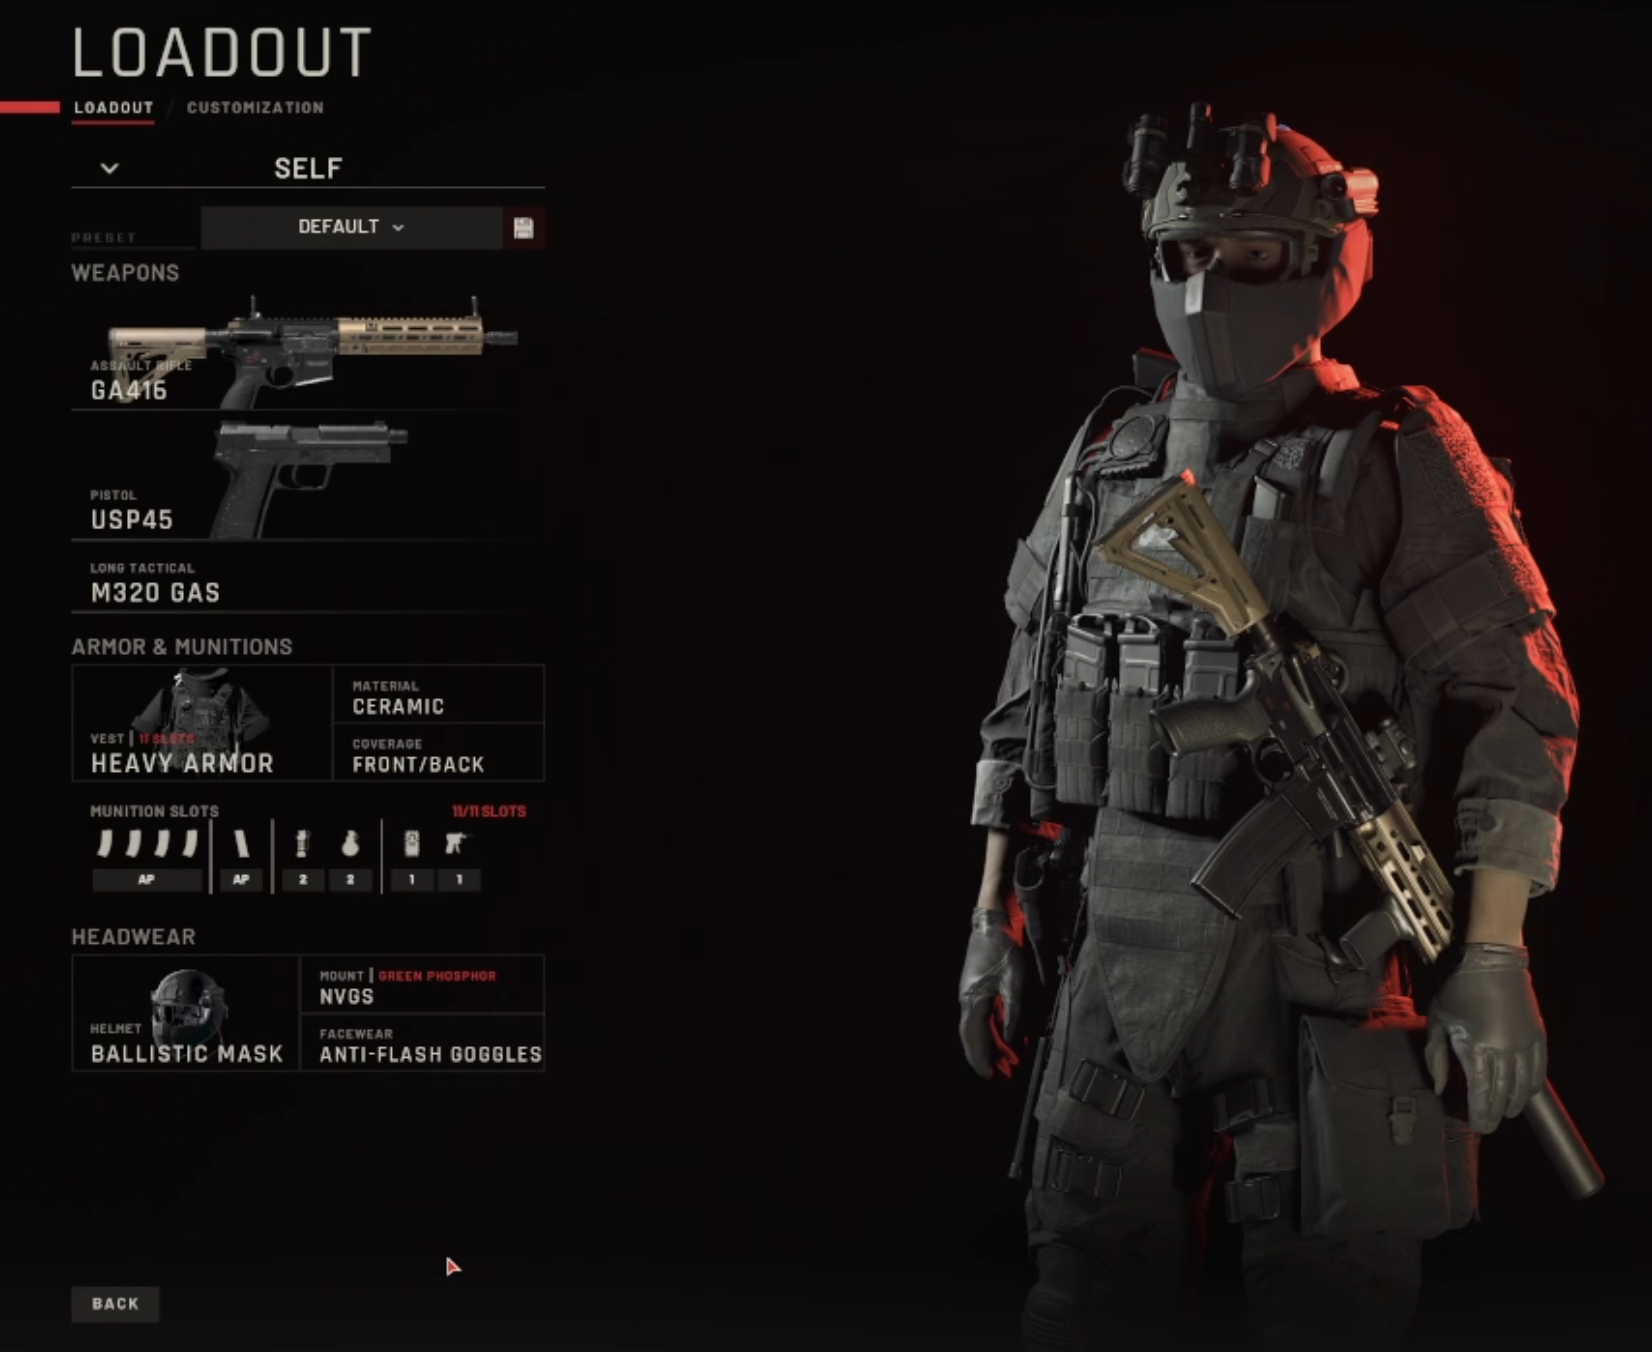
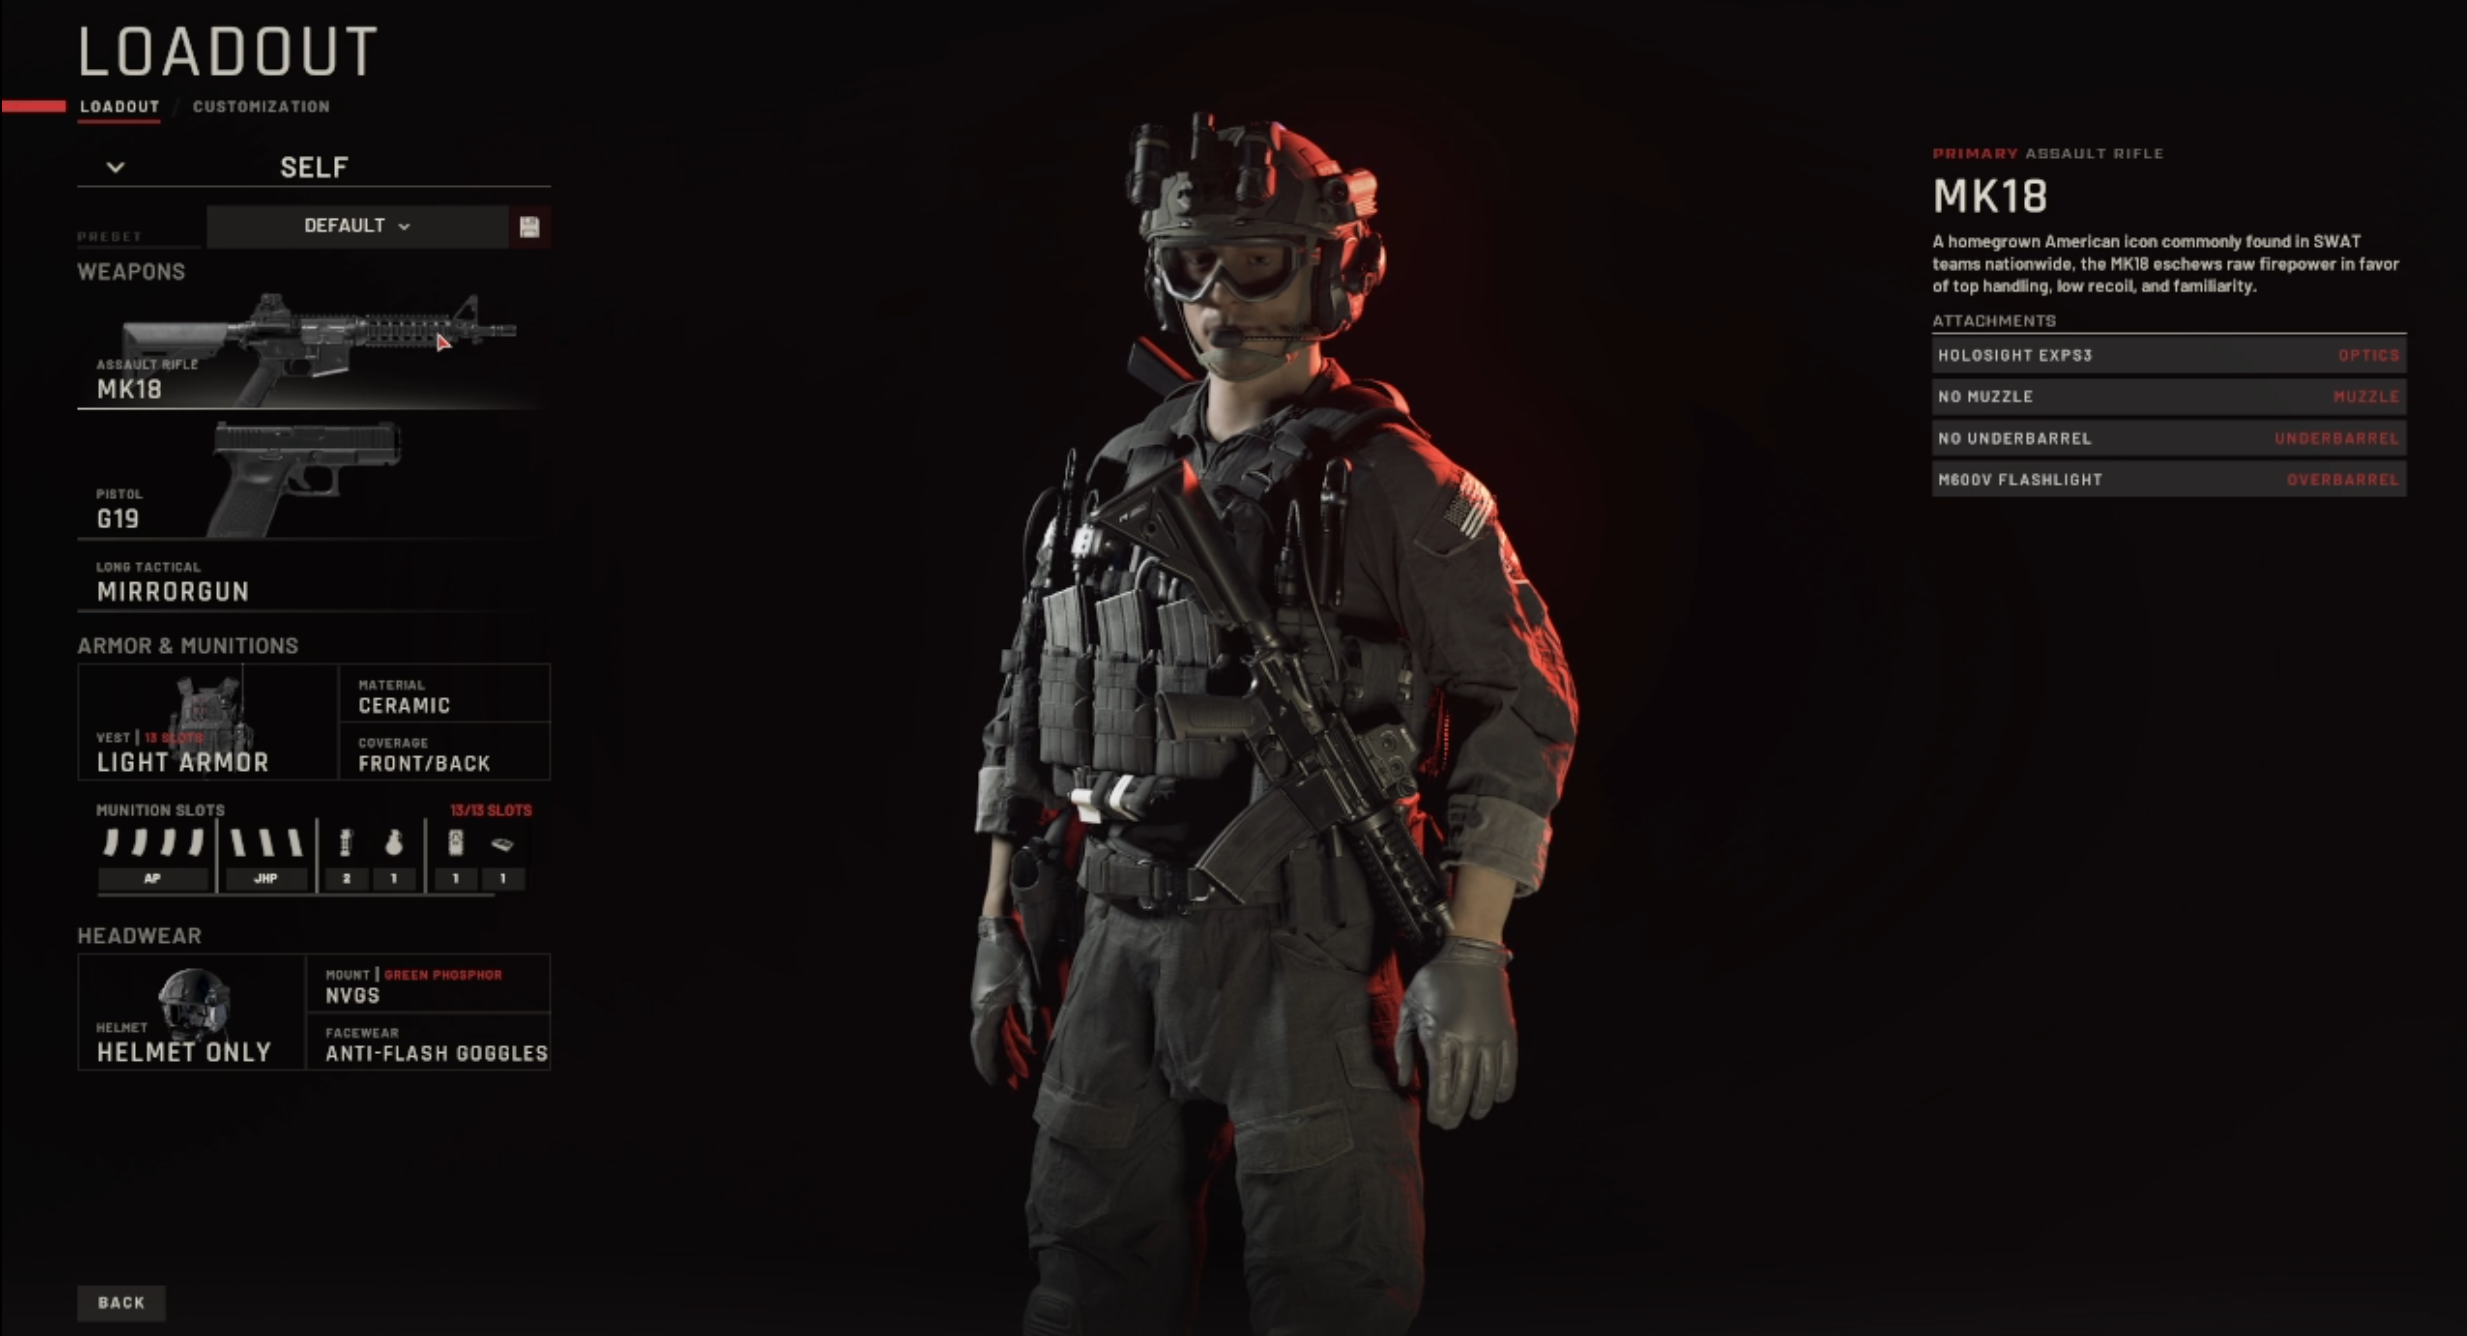
1. 🎯 Primary Weapon: Assault Rifle (MK18 or GA416)
Why choose it? Both rifles offer excellent handling, moderate recoil, and versatility across close to mid‑range combat—ideal for most maps. The MK18 is particularly praised for its agility and customizable options.
Recommended attachments:
Optic: MICROT2 – balances recoil control with quick aim.
Muzzle: SOCOM suppressor – reduces vertical recoil and conceals muzzle flash.
Underbarrel: Combat grip (or vertical grip for rifles like GA416) – helps aim stability.
Overbarrel: M600V flashlight – essential for dark rooms.
Ammo choice: AP rounds are your best bet—they ensure rounds punch through ballistic shields and plated enemies.
2. 🔫 Secondary Weapon: USP45
The USP45 is highly accurate, stable, and reliable in stressful moments.
Attachments:
Obsidian suppressor for stealth.
Laser pointer for quick target acquisition.
Ammo choice: AP rounds are your best bet—they ensure rounds punch through ballistic shields and plated enemies.
3. 🛡 Armor & Protection
Body armor: Heavy ceramic plates (front & back). This setup provides the best balance of survivability and mobility.
Armor carrier type: Ceramic is great “mid-tier”; light kevlar offers speed and can be swapped to stab vest for extra gear slots when needed.
Headwear: Make sure to wear a ballistic mask and Anti-Flash Goggles with your helmet unless you are taking a gas launcher or grenade, then wear a gas mask.
4. ⚙️ Tactical Equipment
Mirrorgun: Must-have tool for safe room entry and scouting.
M320 CS gas launcher: Perfect for subduing multiple suspects and maximizing non-lethal arrests. Remember it equip gas masks for yourself and your team mates!
Grenades + tools: Take flashbangs and C2 for controlled entries, plus a lockpick gun as backup. Wedges can also block doors in preparation for forced entry. When playing singleplayer you can have your AI teammates carry a lot of this gear. In multiplayer make sure someone has breaching charges. Everyone should have at least 2 Stinger or Flashbang grenades. Gas is just as likely to hurt as help you if you do not wear a gas mask, but can be a viable strategy as well.
5. 🎯 S‑Rank Non‑Lethal Loadout Option
Want more non-lethal arrests for S‑Ranks? Here’s a specialized build:
Primary: VPL‑25 gas rifle (CS rounds) or beanbag shotgun.
Secondary: Taser (or USPS .45 AP if lethal backup is needed).
Equip gas masks for both you and your AI team.
This setup achieves more arrests without casualties—perfect for score-focused runs.
6. ⚙️ Tuning Attachments & Gear
Use holosights or red-dot optics (EXPS3).
Add IR lasers for night operations when night vision is optimal.
7. ⚡ Reddit Quick Tips
From the Ready Or Not subreddit:
“Assault Rifles are good to start with … shotguns, when used right are the best.”
“Standard on any gun … laser, holosight and the grip that improves accuracy.”
Wrap-Up
This core loadout—**MK18/GA416 + USP45 with ceramic heavy armor, suppressors, and tactical gear—**offers deadly flexibility and reliable performance across missions. Want to go non-lethal? Swap in CS gas or bean bag shotguns and tasers for safer arrests.
Experiment with attachments and gear depending on the map and mission objectives. Mastering these loadouts will elevate your gameplay—now gear up and go earn those S‑Ranks!

Explosive & Honest Ready Or Not Review: A Tactical Masterpiece or Overrated Hype?
Ready Or Not Review – Dive into a comprehensive 2025 breakdown of this tactical FPS gem. Discover its realism, mechanics, and whether it’s worth the price today.
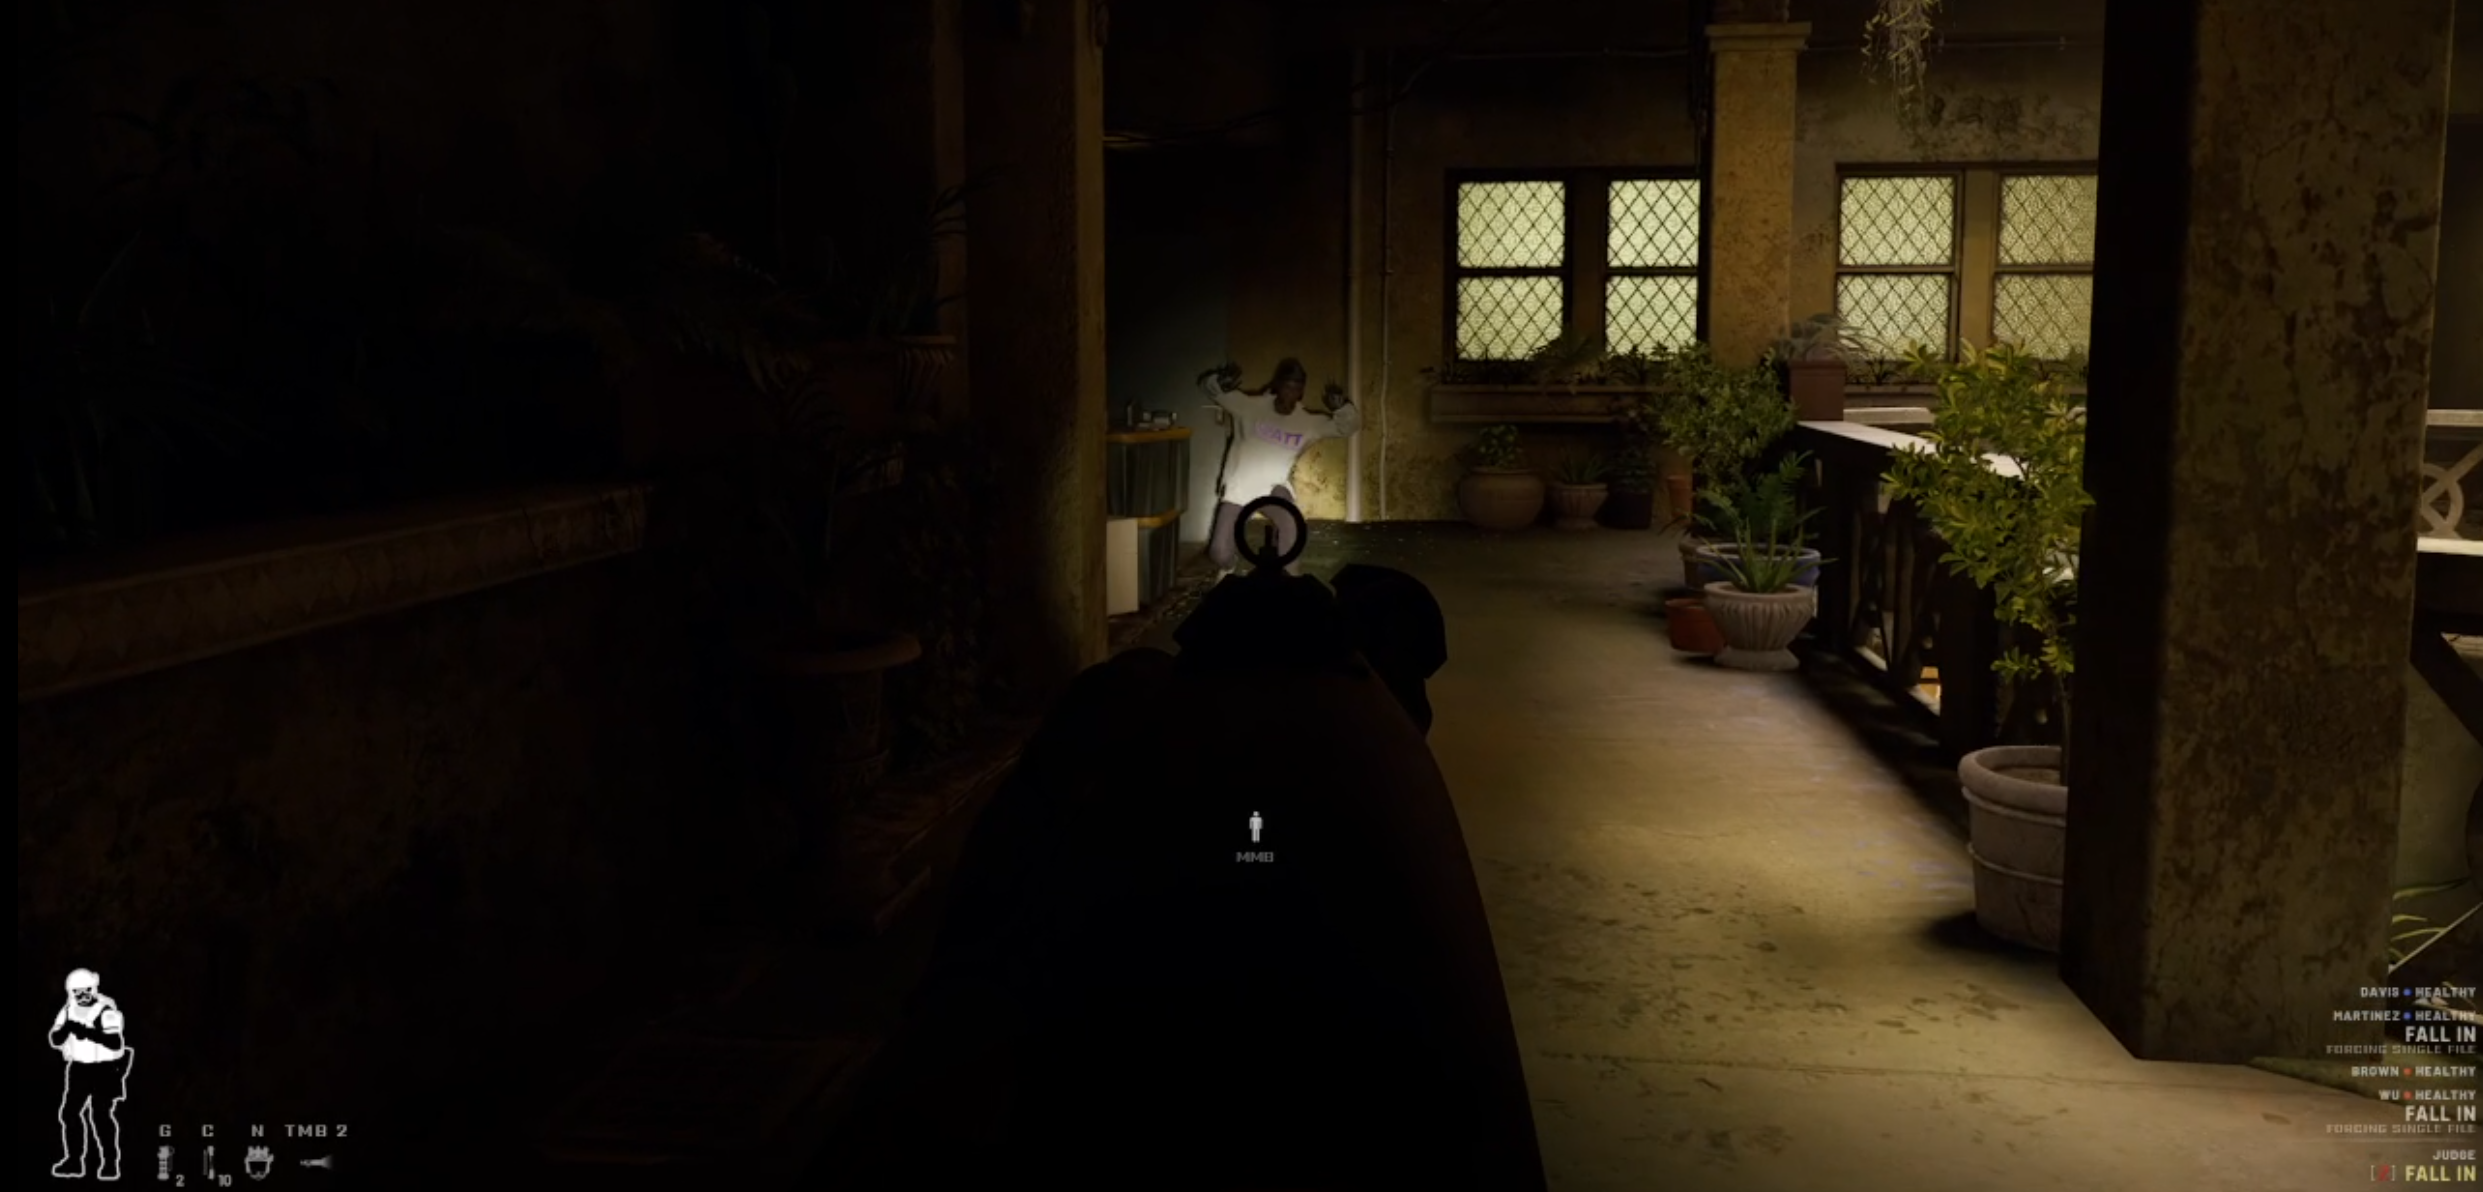
Ready Or Not, developed by VOID Interactive, is a hardcore tactical shooter that demands more than just reflexes—it requires critical thinking, team coordination, and nerves of steel. Built as a spiritual successor to SWAT 4, this game captures the gritty essence of Close Quarters Battle (CQB) operations and offers a grounded, slow-paced approach compared to mainstream shooters.
As it reaches a mature state in 2025, Ready Or Not continues to evolve through consistent updates, cementing its place in the genre of realistic law enforcement simulators.
You may also be interested in:

Ready Or Not is extremely intense
Game Setting and Storyline
Rather than focusing on a fixed narrative, Ready Or Not structures its experience around a series of intense standalone missions. Each mission throws players into scenarios like hostage rescues, active shooter responses, or drug busts within environments ranging from suburban homes to urban offices and public buildings.
The game’s indirect storytelling—through cluttered rooms, environmental damage, and suspect behavior—effectively draws players into the reality of law enforcement without over-relying on dialogue or exposition. If you want to dig deep enough there is an expansive story in the game, or you can just ignore all of that.
Gameplay Mechanics
The gameplay prioritizes realism and deliberate pacing over chaotic firefights. Players are penalized for unnecessary force and rewarded for capturing suspects alive. Each mission encourages:
Stacking up on doors
Carefully assessing threats
Deploying tactical equipment like flashbangs and gas
Restraining civilians and suspects
Carefully adhering to rules of engagement and using lethal force only when necessary
The game’s use-of-force system tracks actions based on suspect behavior, the officer’s perception, and the tactical environment. Wrongful engagement—especially when a suspect is surrendering or compliant—results in penalties, adding a heavy layer of accountability.
Weapons and Loadouts
Players have access to a wide arsenal of weapons and tactical gear, each customizable to suit specific mission needs. Rifles like the G416 dominate for their balance of accuracy and stopping power. Sidearms, shotguns, and less-lethal options such as tasers, beanbag shotguns, and pepper ball launchers allow for diverse approaches.
Loadout decisions impact mission outcomes. High-caliber weapons may incapacitate enemies quickly, but using less-lethal tools improves mission ratings by safely subduing threats. There are tons of choices to fit your preferences in both the lethal and less than lethal categories.
AI Behavior and Team Dynamics
The AI has undergone considerable refinement since early access. Suspects can fake surrenders, ambush teams from hidden positions, or attempt to retrieve discarded weapons. Civilians behave unpredictably, occasionally running into danger zones.
SWAT AI teammates now respond more reliably to commands. Players can order them to hold positions, stack on doors, breach with grenades, or mirror-check for traps. Although not flawless, AI functionality supports solo play more effectively than in earlier versions.
Graphics and Visual Aesthetics
Ready Or Not offers you a huge variety of loadout choices
Graphically, Ready Or Not impresses with a grounded, gritty style. Lighting effects, like dynamic shadows and realistic reflections, heighten tension during night missions. Environments are intricately detailed—cracked walls, cluttered halls, and blood-stained floors all contribute to the immersive tone.
From suburban neighborhoods to crime-infested nightclubs, every map is designed with precision and forethought. They vary wildly in looks and this also affects gameplay with different lighting levels and building layouts to account for.
Sound Design and Audio Effects
The game’s audio design is immersive and functional. Distinct gunshot sounds, ambient background noises, and realistic radio chatter enhance the situational awareness needed for tactical success.
Voice lines are clear and add urgency, while directional audio helps players identify the location of threats, contributing to a heightened sense of presence during operations.
Realism and Tactical Depth
Ready Or Not pushes players to make decisions grounded in police tactics:
Use of force must be justified
Suspects must pose an imminent threat to engage lethally… or not
Doors must be checked for traps before breaching
Non-lethal equipment often yields better scores
Tools like the mirror gun provide essential recon, while breaching options range from silent lockpicks to explosive C2 charges. The depth of these mechanics ensures that each mission feels like a tactical puzzle.
Multiplayer and Co-op Modes
Multiplayer shines as a core component of Ready Or Not. Co-op play supports up to five players, encouraging tight communication and synchronized tactics. From executing double breaches to managing suspect compliance, the cooperative experience is immersive and rewarding.
Although PVP is not yet available, team-based play delivers high replay value and camaraderie among players.
Modding Support and Community Engagement
The modding community has flourished. From reskinned weapons and character models to entirely new missions and maps, player-generated content breathes new life into the game.
Void Interactive remains responsive to community feedback, frequently updating the game and incorporating suggestions, reinforcing long-term support.
Performance and Optimization
Ready Or Not runs well on modern hardware. Visual improvements and optimization patches have resolved many early access issues. While occasional UI bugs and AI quirks remain, they rarely interfere with gameplay.
New players should note that mission pacing is intentional—there’s no sprint function, reinforcing the game’s deliberate tactical rhythm.
Replayability and Content Longevity
With varied mission types, unpredictable AI behavior, and dynamic objectives, Ready Or Not offers impressive replayability. Additional difficulty settings, randomized suspect spawns, and the scoring system encourage multiple playthroughs.
Modding also significantly expands the game’s lifespan by allowing players to engage with fresh content beyond the base offering.
Comparison to Similar Tactical Shooters
SWAT 4: While SWAT 4 set the foundation, Ready Or Not improves upon it with modern graphics, deeper AI systems, and more complex rules of engagement.
Ground Branch: Ground Branch leans toward military tactics, whereas Ready Or Not focuses on law enforcement, offering a distinct and unique challenge.
Pros and Cons of Ready Or Not
Pros
Deep tactical gameplay
Realistic AI and decision systems
Extensive modding support
Immersive audio-visual design
Cons
Steep learning curve for beginners
Some AI and UI quirks persist
No traditional campaign mode
Limited content without multiplayer
Critics’ and Players’ Verdicts
By 2025, critics acknowledge Ready Or Not as a standout in its niche. Players appreciate its authentic mechanics and atmospheric detail. While not for everyone, it has earned a dedicated following of tactical shooter enthusiasts.
Is Ready Or Not Worth Buying in 2025?
Ready Or Not isn’t for casual shooter fans—it’s for those who crave methodical, high-stakes experiences. If you enjoy calculated decision-making, realistic mission design, and team-based strategy, this game will offer countless hours of intensity and satisfaction.
With a vibrant modding scene and committed developers, it’s a worthwhile investment for anyone interested in tactical law enforcement simulation.
More About Ready Or Not
Does Ready Or Not have a story campaign?
No traditional campaign, but mission-based structure provides narrative depth through environments.
Is the game solo-friendly?
Yes, but the experience is enhanced with co-op play.
Can you play non-lethally?
Absolutely. The game encourages non-lethal playthroughs for better mission ratings.
Are there any console versions?
A console version has been announced, with expected release ongoing.
Does the game support mods?
Yes, with a thriving modding community and developer support.
Is it better than SWAT 4?
It builds on SWAT 4’s foundation with modern enhancements and greater tactical complexity.
Conclusion
Ready Or Not sets a high standard for realism in tactical shooters. It offers a blend of high-tension missions, strategic depth, and immersive audio-visual elements that reward patient and intelligent play.
Whether you’re a SWAT sim veteran or a newcomer seeking a fresh challenge, Ready Or Not delivers an unforgettable tactical experience in 2025.

The Best STALKER 2 Mods to Transform Heart of Chornobyl Gameplay
This list rounds up the most essential, high-quality mods currently available on Nexus Mods that not only enhance the experience but also stay true to the game's post-apocalyptic tone. Each section includes a direct link to the mod page, a breakdown of its best features, and tips on what to expect when you install.
From massive overhauls like Modular Hard Mode and Shay’s Living Zone, to laser-focused improvements like Ace’s Real Flashlight, these are the mods that can make your next STALKER 2: Heart Of Chornobyl run feel fresh, brutal, and unforgettable.
Modular Hard Mode
⚠️ Installation note: The installation guide is in the Posts section—be sure to follow it carefully to get the full experience!
This mod is a massive gameplay overhaul that revamps nearly every core system in STALKER 2: Heart of Chornobyl. It introduces multi-layered balancing to make combat, progression, and resource management significantly more engaging. Expect over 100 brand-new items, including weapons, armor, consumables, and upgrades—all meticulously integrated through community mod support. The economy has been restructured, creating a more immersive, challenging, and rewarding in-game world. Nexus Mods.
You’ll find:
A rebalanced loot and gear economy that discourages easy early-game gear and encourages riskier decisions for better rewards.
Fresh gear paths—including new armor sets, tactical upgrades, and gear customization options—for a deeper personalization experience.
Hundreds of new consumables that can shift the tide of survival, from stamina buffs to medical boosters, each with a place in your stash.
This mod connects seamlessly with the community’s ecosystem of mods, ensuring compatibility and expanding your gameplay options. It’s a holistic, feature-rich experience crafted for players who want more depth and challenge from every encounter.
Desolation – Global Hardcore Overhaul
Desolation is a total realism overhaul for STALKER 2 that transforms the Zone into a punishing survival sandbox. It introduces over 200 new items, an overhauled medical system, realistic loot distribution, and a shared progression curve between the player and NPCs. Nexus Mods.
Combat is more immersive—NPCs follow the same rules as players, grenade usage varies by experience, and no one has unfair advantages. Traders and the economy are redesigned for regional realism, with artifact-based bartering and faction-aware inventories.
Expect deep radiation mechanics, realistic healing, field repairs, and revamped mutant looting. Everything ties back to the mod’s core goal: to make the Zone feel alive, unpredictable, and brutally fair.
⚠️ Save backups are essential. This mod is in beta and incompatible with many inventory-related mods.
Project Itemization
Project Itemization breathes new life into exploration by addressing STALKER 2’s often unrewarding loot system. The mod adds roughly 50+ new lootable items, scattered intelligently through stashes, destructible containers, and NPC drops—so every corner of the Zone feels like it holds potential.
It offers an optional consumables overhaul, transforming instant-effect items into slower-acting buffs—some may cause sleepiness or intoxication if used recklessly, making inventory choices more meaningful. Although meshes and sound effects are still in development, this mod lays a solid foundation for richer, more realistic itemization. Nexus Mods.
LNA – Linxz’s NPC Attachments
This mod brings much-needed realism and challenge by outfitting NPCs with the same attachments available to players. Now, enemies across the Zone can wield scopes, grips, muzzles, and even night vision goggles—adding both aesthetic variety and tactical depth to encounters. Importantly, LNA is built to complement OXA – Oxide’s eXpanded Armory, ensuring enemy loadouts stay fresh with the latest gear. Nexus Mods.
Expect:
NPCs dynamically upgrading their firearms as your own arsenal expands
More unpredictable combat scenarios—enemies adapt their gear over time
Seamless compatibility with other weapon-focused mods
Though the mod is archived, most issues have already been addressed in newer releases—so it remains a solid addition to any modded profile.
OXA – Oxide’s eXpanded Armory
OXA overhauls weapon customization to its core, vastly expanding your gear options. With night vision goggles, universal scope support, grips, muzzles, laser sights, and more, it transforms weapon building into a deeply engaging system. Nexus Mods.
Key features:
Attach any scope to any rifle or SMG—no more locked-in setups
Equip NVGs, laser modules, adjustable grips, and tactical muzzles
OXA Prototype bridges into even more modular components and introduces a weapon repair system, ensuring long-term strategic maintenance
Pre-configured installer packages include a quick start guide—be sure you have UE4SS or Simple ModLoader installed before diving in.
Shay’s Living Zone – Modular A-Life Overhaul
This in-depth simulation mod completely reworks the Zone’s artificial life (A-Life), giving you full control over world behavior. With over 100 add‑ons, you can tailor creature spawning, NPC routines, bartering, hub interactions, mutant activity, body loot drops, and more. Choose standalone versions (v2 for all‑in‑one simplicity or v1 for add‑on flexibility) to fit your playstyle Nexus Mods.
Key features include:
Customizable NPC & mutant spawns, letting you adjust difficulty or immersion by unlocking creature types and balancing distributions.
Enhanced hub and trader systems—NPCs engage in trade, chat, and mission progression more naturally than vanilla.
Optimized performance, with no meaningful FPS drops despite deep world simulation Nexus Mods.
With regular updates like the v1.1.4 patch adding body loot chances and mutant intelligence tweaks, it’s an evolving ecosystem. Whether you want a vibrant living world or a desolate struggle, this mod offers a fully customizable experience.
Instant Long‑Range Aggression Fix
Fixing broken NPC sensing, this mod adjusts hearing and vision detection ranges for more realistic engagements. NPC vision drops to around 65–70 m (vs. 95 m vanilla), and peripheral vision is carefully tuned. Threat timers and radio communication are overhauled to eliminate endless aggro chains Nexus Mods.
Highlights:
More believable enemy behavior: stalked in cover? NPCs won’t detect you instantly from far away.
Balanced threat system ensures players aren’t relentlessly hunted across the map by patrolling squads.
Mutants included, with updated threat scoring for creatures, too.
This lightweight tweak subtly transforms stalking gameplay without heavy overhauls—ideal with A-Life mods like Shay’s Living Zone.
Dynamic Weather Overhaul
Transform your environmental immersion with a fully reimagined weather system. This mod delivers dramatically moody nights, balanced daylight, and unpredictable atmospheric events like bursts of intense fog, wind, or sunlight Nexus Mods.
What you gain:
Air of unpredictability: clear skies can quickly shift into ominous gloom, changing your risk assessment.
Visual depth: richer color palettes and dynamic lighting create more cinematic and immersive scenes.
Vanilla compatible—requires only the base game.
Pair this with reshade tools for HDR effects, and the Zone becomes a living, breathing ecosystem of weather-driven tension.
Real Longer Days
Tired of blindingly fast day-night cycles? This simple yet powerful mod lets you choose cycle lengths: 1, 2, 4, 6, 8, 12, or 24 real-time hours Nexus Mods.
Why it matters:
More atmosphere: stretch nights for tense stealth ops or longer days for meandering exploration.
Flexible pacing: tailor the game rhythm to your style—binge gamers can speed up days; speedrunners can slow it down.
Lightweight and easy to configure via game files.
An ideal enhancement for players who crave temporal control over their Zone experience.
NPC Combat Overhaul
This combat mod empowers NPCs with tactical intelligence, overhauling human enemy actions with behaviors like advancing, flanking, suppressing, evading, and coordinated covering fire Nexus Mods.
Improvements include:
Conditional behaviors: NPCs adapt based on distance, damage taken, and success/fail chance.
Realistic suppression: use fire pressure to pin them down, or they might fall back or flank.
De-aggro logic: if you break line of sight behind cover, NPCs may stop chasing, boosting stealth utility.
Actively maintained (v1.4 as of June 25, 2025), this mod makes combat feel tactically alive, not scripted.
Ace’s Real Flashlight
Upgrade your flashlight from joke-level to survival essential. This mod revamps illumination, delivering a realistic beam with greater distance and soft falloff, without washing out the atmosphere Nexus Mods.
The great change in this mod is that your flashlight beam is far brighter and longer than vanilla, yet still moody. Perfect for dark underground zones or night-time explorations.