


Genotype VR Review - The First Virtual Reality Immersive Sim
While it isn't the first VR game released by developer Bolverk Games, it certainly is their most expansive. The question though, is is Genotype VR a good example of the Immersive Sim genre? Does it really succeed in being a good immersive sim game? Let's talk about it and find out more about Genotype VR in this review.
Genotype VR has everything you would expect in an immersive sim game.
Massive facility to explore that is overrun with hostile creatures? Check.
Everyone is perished or worse except for one person who talks to you over the radio? Check.
For some reason, everyone who lived there used to record journals and audio logs and just leave them randomly scattered around? Check.
There are locked doors with keys you have to find, management of your limited resources, many different weapons to find... or rather grow, a little mystery as to why everything has gone so wrong, and tons of different obstacles and enemies to overcome as you scavenge and fight through this dangerous secret Antarctic Facility.
Except all of this is in Virtual Reality, and nowhere else. Built from the ground up for VR, Genotype is a pioneer of a game that is tackling an expansive and expensive genre for the first time natively to Virtual Reality headsets. It's an ambitious project to tackle for such a small studio.
While it isn't the first VR game released by developer Bolverk Games, it certainly is their most expansive. The question though, is is Genotype VR a good example of the Immersive Sim genre? Does it really succeed in being a good immersive sim game? Let's talk about it and find out more about Genotype VR in this review.
You might also be interested in:
UNDERDOGS VR Review On The Oculus Quest 3 - A Fantastic VR Mech Fighting Game
Propagation: Paradise Hotel Review - A Very Scary Zombie VR Game
Genotype VR Review - The Combat
Let's start with the most prevalent element in any immersive sim game, the element that all other pieces of the game revolve around, and that's the combat.
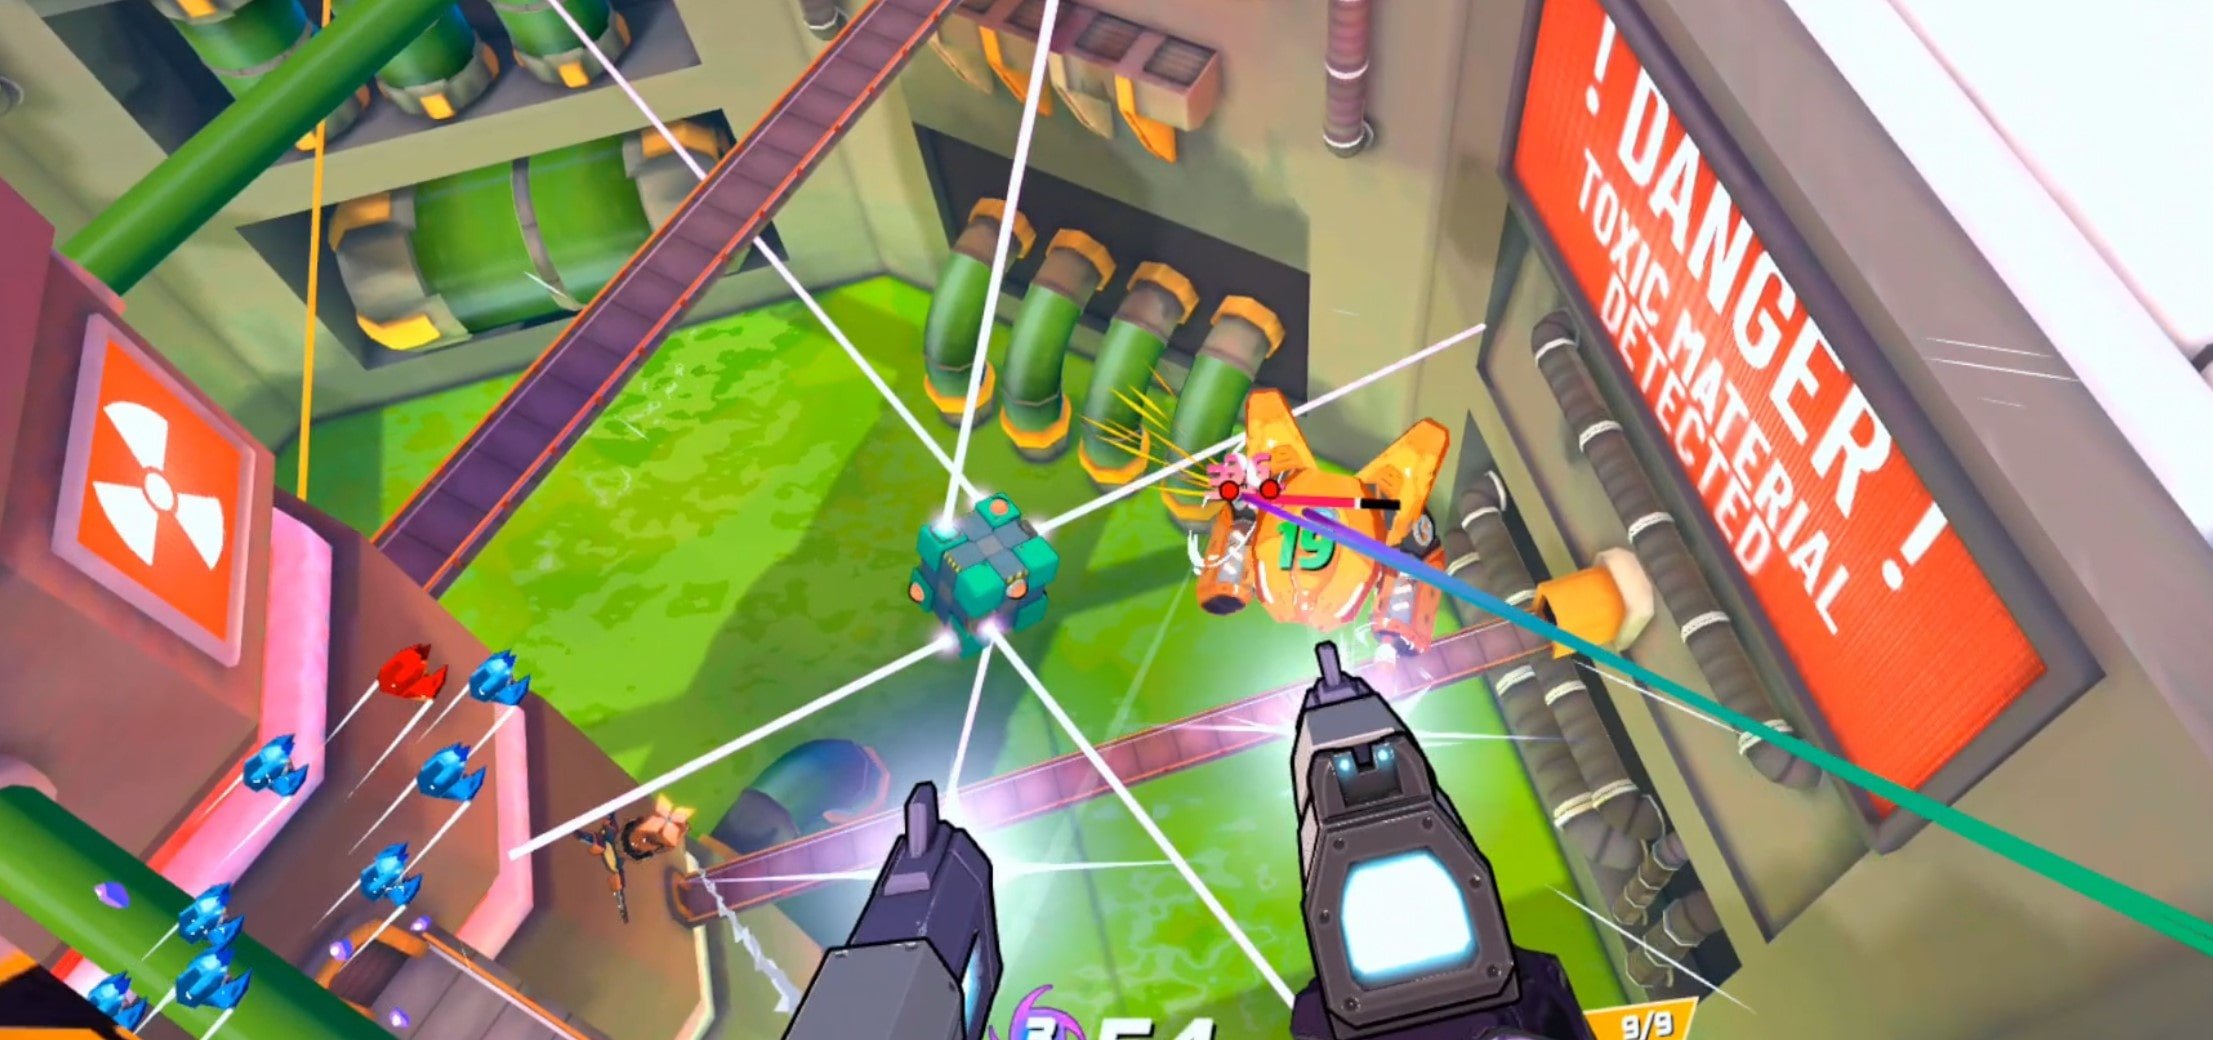
In Genotype VR you'll be fighting the aliens that have taken over the Antarctic research base that you find yourself in, and you'll be fighting a lot of them.
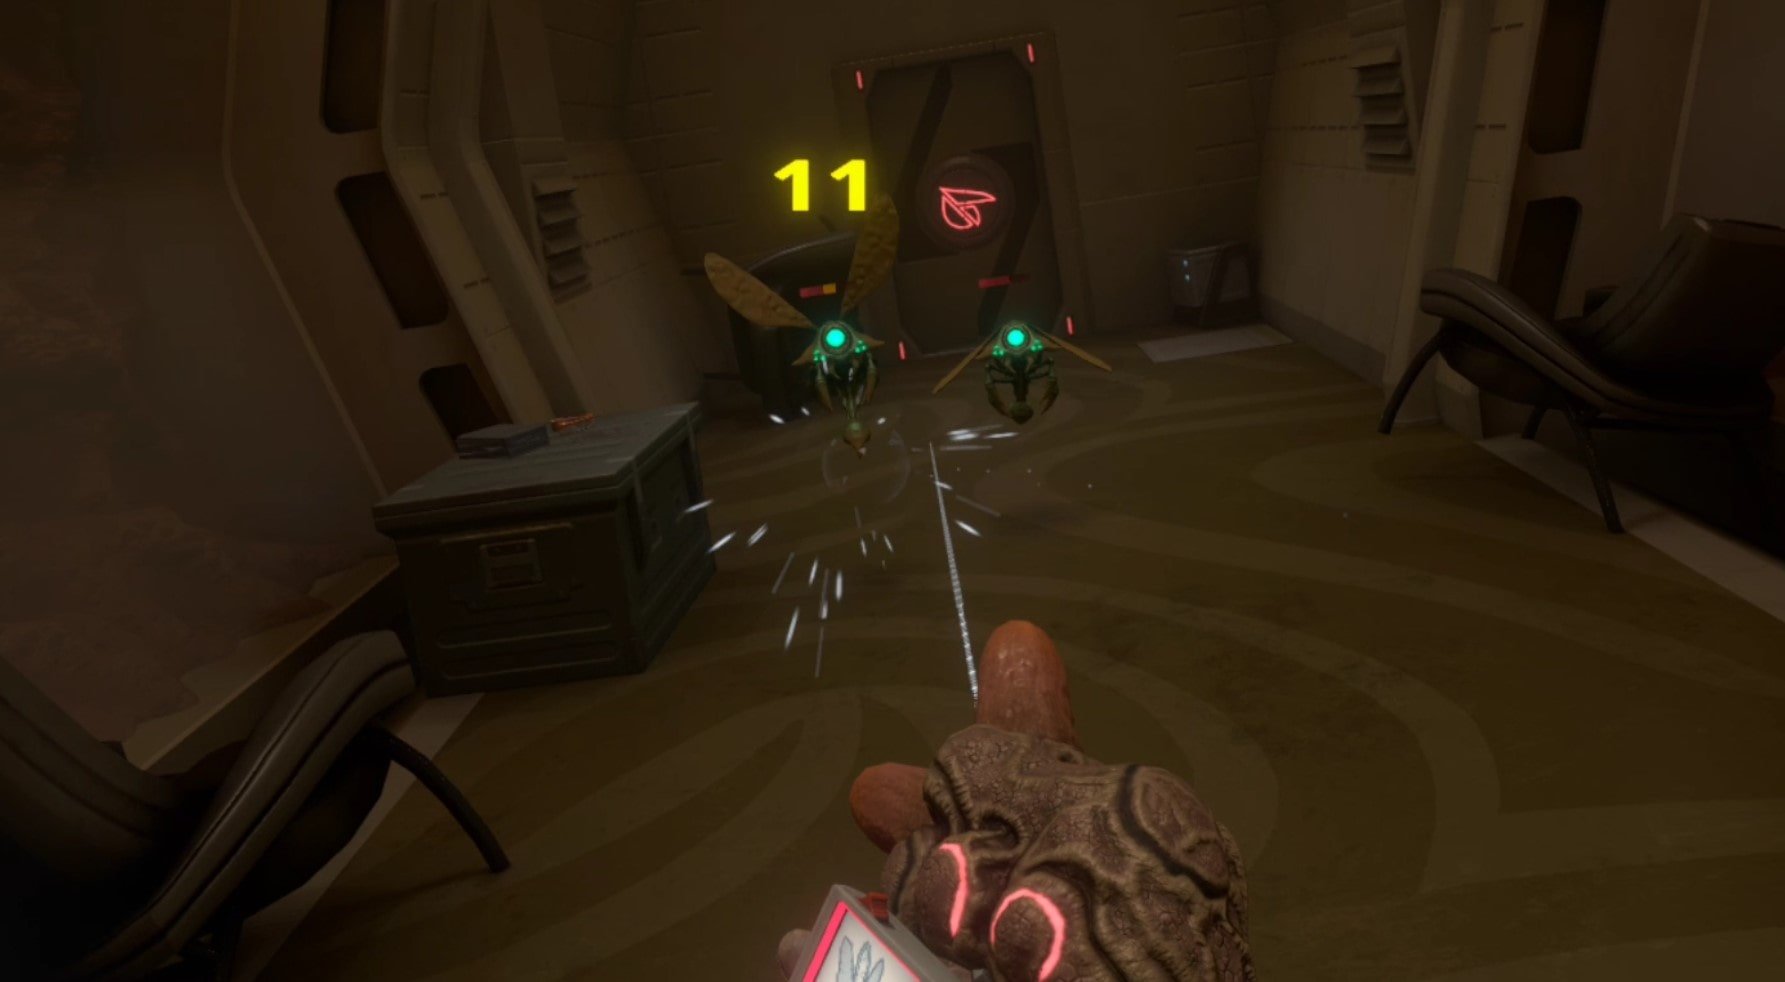
Fighting enemies in Genotype VR early on in the game
There will be loads of them the first time you enter an area, and even cleared out rooms can sometimes spawn more for you to take on. When aliens spawn in a room the doors will lock until you've dealt with them. There is even an in universe explanation for this. Something about an aggressive pheromone locking system that automatically closes the doors, which is a nice touch.
So you can't just run around and kite enemies through rooms forever. You'll need to stand and fight them in one location. This is a good thing because Genotype VR's combat system is very dependent on movement.
The ability to move around freely is your greatest offensive and defensive tool. This is because there are no hit scan enemies, and cover is rarely a factor. Enemies will either try to close into melee range to hit you with their claws, or more commonly shoot slow moving projectiles at you. So your ability to strafe out of the way is really important. Every fight is way easier when you have space to move around.
The game generally gives you this space, though in a few cases closes you in for a really quick and intense fight. The map design leans into how the combat works by giving you the maneuvering room that you need, but this also leads to combat that depends on you constantly strafing around enemy attacks or moving away to keep your distance.
The factor that decides whether or not you win or lose is mostly your ability to play keep away and avoid getting cornered.

You get all sorts of options in Genotype VR, like this flamethrower
Whether or not you like this movement heavy combat in your VR game is up to you, but combat in Genotype is generally enjoyable and doesn't get old. However, the constant slow strafing around projectiles does feel a little overly artificial. This is especially true during the boss encounters in this game, which are just the usual aliens but scaled up and with some smaller enemies added in.
The bosses have huge health pools and felt very bullet spongey, which is fine, they are bosses after all, but needing to constantly strafe around them while attacking made the issues with the strafe heavy combat in this game very apparent where normally the shorter length of a fight disguises it somewhat.
The game throws in new enemy types and more dangerous variants of those enemies at a pretty consistent pace. While the combat seemed a little easy at first, it does get significantly harder as you progress further into the base, though at the same time, your arsenal of tools becomes larger and more dangerous.
Your first and most obvious tools are your weapons. You start with the Spitter, a slow firing but heavy hitting weapon that does some area of effect damage. Then you soon acquire more, like the Grubber, which is a short range tentacle that can punch or grab on to enemies.

The Grubber is your weapon with infinite ammo and biomass removal tool in Genotype VR
You can deal good damage with this thing by grabbing an enemy and then ripping your hand away, which is a novel weapon for VR that has you using a different hand movement in combat than just pointing and shooting, very creative stuff.
You’ve also undoubtedly noticed that all of these weapons also aren't weapons in the traditional sense, and are rather creatures that grow out of your hand. This is a great way to explain how you can walk around with a huge arsenal, and also some cool flavor to the game overall.
A rip cord on your shooting hand lets you select which creature to grow for you to use, and not all of them are just for combat, but we'll get into exploration and utility a little later.

In Genotype VR you select a new weapon by pulling a ripcord on your main hand glove
These weapons are varied and more or less useful in different situations and enemy types. You might end up using weapons that do splash damage against swarms of smaller enemies, or a weapon that rapidly deals damage to a single enemy against big boss monsters.
There is no one weapon that is definitively more powerful than the rest, and that is a good thing. You'll naturally be inclined to use different weapons to suit different combat situations.
Now for your other combat tools, your items.
You'll find a lot of different items while scavenging the base, most importantly healing syringes, but there are more interesting ones, like rockets you can shoot out of your off hand, or syringes that make you invisible or extremely fast.
It can be difficult to use these items during combat because you'll have to constantly be moving while accessing your inventory to avoid getting hit, but they're so powerful that it's a reasonable added challenge.

All sorts of consumables are spread around the facility in Genotype VR
The one downside to items is that if you're at all stingy and hang on to them your inventory will quickly fill up.
Still, this could be intentional, because running out of inventory space directly incentivizes you to actually use these items instead of just hanging on to them forever. A little more inventory space would have been nice though.
Genotype VR Review - Exploration
So the combat is good, but what about the parts of an immersive sim that really make them an immersive sim? The world, the exploration, the atmosphere.
Well, you'll be happy to hear that there's a lot of world to explore. Each wing of the strange complex that you find yourself in is pretty big with lots of nooks and crannies to explore.

This is the usual scenery in Genotype VR. Lots of future industrial hallways
Exploration is well rewarded with more resources and tokens for upgrades, and it always feels exciting and worth it to uncover a new hallway or room. There are even a few puzzles to solve or key codes to discover and use to get tons of extra loot. The biggest downside of the exploration is that for huge chunks of the game there is very little variety.
Being outside in the antarctic winds is amazing, and the storms surrounding the facility look truly impenetrable and impressive. Unfortunately, you'll be spending most of your time indoors, and the practically identical look of the hallways, offices, maintenance rooms, and laboratories that you'll find yourself in gets old.

The outside area looks fantastic in Genotype VR, but you’ll hardly ever be there
Some areas do have this beautiful and fascinating alien growth covering them to add some variety, but you'll definitely be looking at the same sorts of industrial, sterile walls and floors a lot. Though the various tools you'll use to assist your exploring are still very cool, like the Brain Link, a creature that spawns an egg that hatches a tiny alien that you... become?
It somehow absorbs your entire body and then hatches back into a fully grown human again once you press another button. This might not make a ton of sense, but it is unique and useful for fitting into tight ventilation shafts or bridging gaps by launching the egg over them.
Even deep into the game Genotype throws some new challenges and tools your way that are completely unexpected, but welcome new challenges. Like one section that suddenly introduces a swimming mechanic. It’s these sudden new changes in exploration, puzzling, and navigation that keep Genotype fresh all the way through to the end.

Crawling through a tunnel using the Brain Link in Genotype VR
So exploration takes a little thinking as well, but hardly ever feels obtuse. Even if you do get lost there are ingame objectives and a map to help you out, but no onscreen markers.
There's also dialog between your character and the mysterious man on the other side of the radio, which will add context and character to your next goal. While their conversations are tense and mysterious at first, they quickly develop a rapport and it's fun to listen in on their conversations.
There are some light jokes, and their contributions to the story unfolding in front of your eyes and hands are pleasant and charismatic. Your mysterious helper explains the strange place you find yourself in and gives much needed context to what is going on and what you’re doing.
Genotype VR doesn't hold your hand, even with these helping nudges, but if you keep looking around and uncovering new areas you will inevitably find what you need to complete your objective.

A beautiful hallway infested by alien fauna in Genotype VR
Genotype VR - Upgrades And Personalization
What is your objective anyway? Luckily your friend over the radio has a solution to the aliens roaming the facility, and the plague that you carry within you. Did I mention you are also infected with an alien plague? Well, you are. To cure it and get rid of the creatures you will have to collect 9 DNA samples from across the facility to engineer a solution to destroy them all. So you go to each wing and collect the samples.
There's more after that of course, but I won't spoil what happens next for you here. The story of Genotype VR isn’t groundbreaking stuff, but it’s very serviceable and gives enough color to the setting through dialog and the journals scattered around the levels.
Back to the samples. They also function as upgrade points for your weapons. You can also upgrade yourself with Tokens found around the facility three times, which unlocks some more general buffs and a maximum health increase. This is where the Immersive Sim nature of Genotype VR shines again, and why that's such a focus of this review.

Upgrading a weapon at an upgrade terminal in Genotype VR
What's an immersive sim without the ability to choose how you want to approach each situation? Well Genotype VR doesn't give you an insane amount of customizeability, but enough to make you feel like you're choosing upgrades that fit your playstyle. Each weapon has a few to choose from, and even just choosing which weapons to upgrade is a choice within itself.
Since I was so attached to the Grubber I decided to upgrade it first with a health leeching ability that also increased its damage. Oh, and the swarmer too with a faster fire rate.
While there are situations in which each weapon you can grow from your hand is useful, there are also many chances to pick favorites. You also get some more general upgrade choices each time you collect enough of the Tokens spread around the base. Like a passive ability that makes each alien you destroy explode into a ball of lightning to hit its allies.
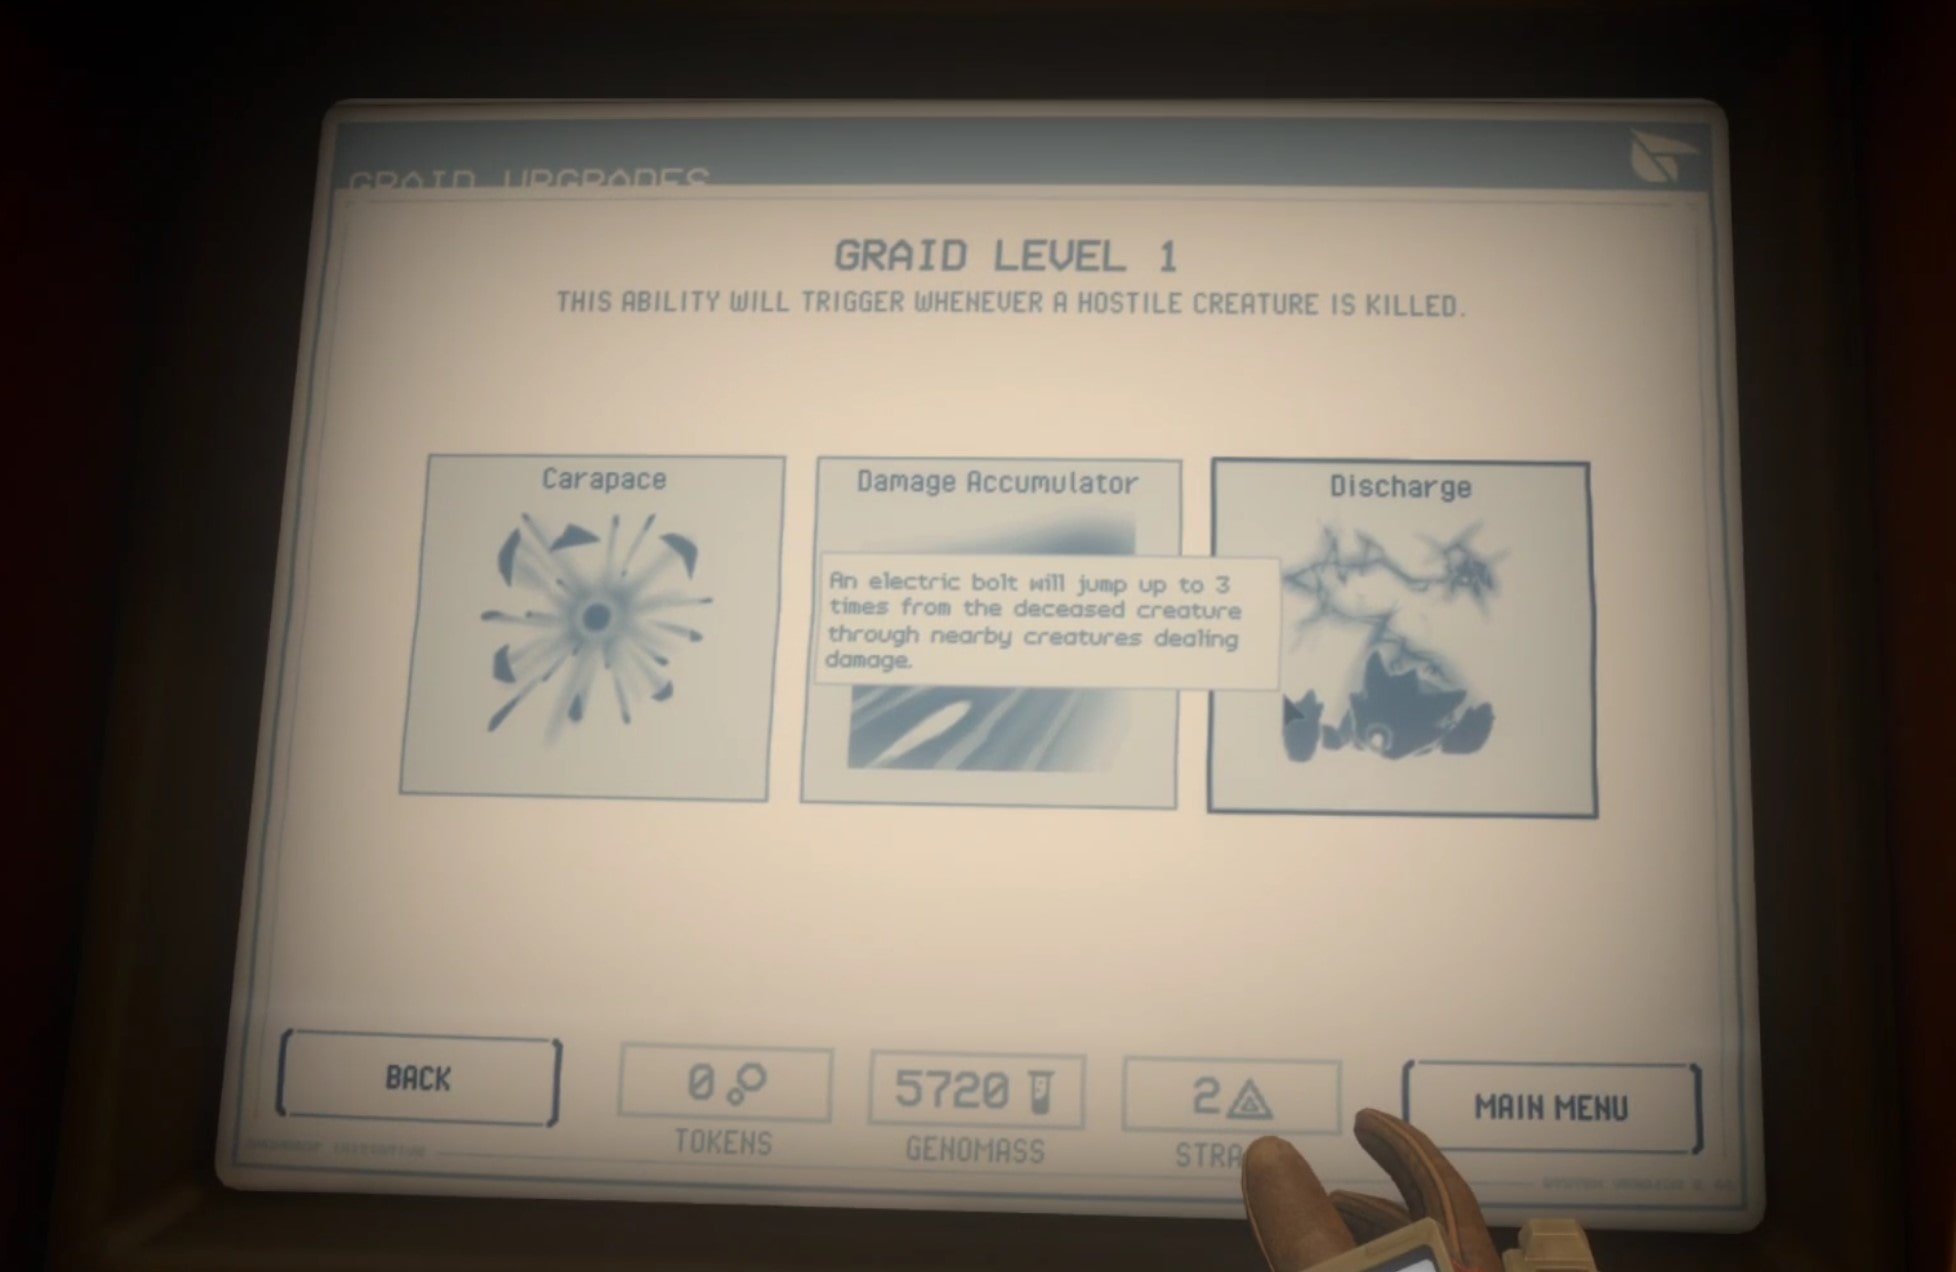
Choosing an upgrade in Genotype VR
If you're ever unhappy with your decisions or want to try a new playstyle you can redo all of your upgrade choices at any time. The freedom to mix and match your choices at will is good to have, and changing up which weapons you will favor and how you use them is a real mark of an Immersive Sim VR game.
Crafting and resource management are also typical hallmarks of the Immersive SIm genre. There's a crafting resource you can collect by defeating enemies or finding capsules of the stuff lying around.
I found that I had an absolute ton of it pretty early on in the game and never ran anywhere close to empty, so strict resource management wasn't much of an issue. Though the Grubber has infinite ammo in case you run out completely, it would be pretty difficult to run out of resources, and this one resource can print basically anything you need at an upgrade station.
Healing items, buff items, rockets you can shoot from your off hand, and ammo of course. While Genotype VR doesn't utilize resource scarcity to ratchet up the tension, the abundance of resources also gives you a lot of latitude and options to pick your playstyle by choosing which items to create and carry in your inventory.

The inventory in Genotype VR
Overall Genotype VR has turned out to be a fantastic VR game. I enjoyed it all the way through to the end. If you love immersive sims then you should definitely give this game a try.
In fact, if you're dying for a new and novel singleplayer VR game then Genotype VR is a good choice for any VR gamer who has liked what they've heard in this Genotype VR review. It's a game that makes you want to just explore one more room to see what is next until the next thing you know, your headset is out of battery.
So Genotype VR is a fun game that I’d recommend, but is it truly the first VR Immersive Sim?
I’d say so, your vast choices of items to use and upgrades to take can change how you approach enemy encounters. Though you’ll have to do a lot of strafing regardless of what you pick. Your options mostly come down to weapon selection, and different weapons do play differently. Genotype VR reminded me a lot of the remake of the original System Shock in its pacing and exploration.
This feeling was more deeply ingrained by other elements like the audio logs, text logs, and lock boxes that lead back to the start of the genre.
Genre definitions are more up to the community than individual reviewers such as myself, so whether or not Genotype VR counts as the first VR immersive sim is up to you, but if you ask me I’d say it does.
You might also be interested in:

Mario Kart VR Is Amazing On the Meta Quest - Here’s How To Play It
If you want to play Mario Kart in Virtual Reality then you don’t have to go all the way to an arcade in Japan to do that.
In this article, we’ll be going through how to set up Mario Kart VR on the Meta Quest, some settings to get it looking good, and how it plays. Spoiler alert. It’s pretty awesome.
If you want to play Mario Kart in Virtual Reality then you don’t have to go all the way to an arcade in Japan to do that.
Now with a Meta Quest 3 or 2 and the Citra VR emulator, you can now enjoy a fully 3D and immersive Mario Kart VR experience at home on your Quest headset. The experience of playing this classic racing game in VR is amazing, especially considering that there really aren’t a whole lot of racing games available in VR, and those don’t play half as well as Mario Kart does.
While Mario Kart wasn’t made for VR it is definitely enjoyable when playing it in Virtual Reality. You can even zoom in your view to the first person so that all of the action is as immersive and in your face as possible. Once you try Mario Kart in VR you won’t ever want to go back to playing it on the flat screen. This isn’t just a great VR Mario Kart experience, but also just a great VR racing game in general if you’re hungry for a new one.
In this article, we’ll be going through how to set up Mario Kart VR, some settings to get it looking good, and how it plays. Spoiler alert. It’s pretty awesome.
How To Play Mario Kart In VR
Playing Mario Kart in VR does involve a bit of setup, I’ll warn you right now.
You’re going to need a few things since while you can play the 3DS version of Mario Kart 7 entirely with just your headset once you get it set up, you will need a PC and a cable to connect your Oculus Quest to your PC in order to start.
Other than the computer and the cable, also keep in mind that you have to get your hands on a .cci, .3ds, or .rom file of the Mario Kart 7 game. So to get started here are the things that you will need.
A PC.
A cable capable of connecting your computer to your Meta Quest: If you don’t have a cable already there’s always the official Oculus LInk Cables. However, there are also cheaper third party cables available from amazon.
A game file of Mario Kart 7 on your PC. This will only work if the file is one of these filetypes: .rom, .cci, .3ds (.cia files do not work)
Enough storage space on your Quest. (Even 1 GB is enough)
With all of these things, you can start by setting up SideQuest on your Meta Quest 2 or 3. SideQuest is vital because you’ll use it to install the actual application, CitraVR, that you have to use to get Mario Kart for VR running. If you don’t know how it’s not difficult to, but it will take a little time and effort.
Once you have SideQuest installed on your Quest device, go ahead and use SideQuest to install CitraVR. You’ll have to use your computer and cable during this setup as well. Not only do you need to install the Citra VR application, but you’ll also want to use your link cable to move over your Mario Kart 7 3DS game file while you’re at it. Setting up CitraVR is also very straightforward if you know how to do it.
Once you’re done setting up Citra VR make sure that your Mario Kart 7 game file is in your Citra games folder. If it is it should appear in the CitraVR games menu.
Keep in mind that the first time you run VR Mario Kart it will stutter and lag. This is due to caching shaders and other data in the background and should fade completely in thirty minutes or less.

Mario Kart VR can be run from the Games menu in Citra VR.
Making Mario Kart VR Look Great
Once you’re through with the setup you can play VR Mario Kart already, but it won’t look as good or be as immersive as it could be.
By default, the 3DS upper and lower windows will show up in your headset in a Mixed Reality mode, kind of like a gigantic version of a handheld 3DS. You can play the game entirely this way if you like. The controls are all mapped to your Quest controllers (more on that in the section below) and after the stutters wear off it should play just fine.

Mario Kart VR will run in this large screen Mixed Reality mode unless we change some settings.
Still, you may be able to get it looking better than the old low resolution 3DS graphics can. They were intended to be seen on a much smaller screen after all. So if you want a bigger version of Mario Kart for the 3DS in VR, then here you have it. If you want a truly more immersive Mario Kart VR experience, then keep reading.
The first thing we’ll do is replace those floating 3DS screens with a more in your face and first person view of the game. This is done by clicking the gear icon in the top left of the CitraVR menu and then clicking on the “VR” menu.
Then scroll to the bottom and enable the slider for Immersive Mode. This will wrap the 3DS screen directly around your face when you’re playing a 3DS game in VR, and will add a lot of additional immersion to Mario Kart by putting you into the seat of your kart.

Enabling Immersive Mode will wrap the 3DS screen around your face.
While you’re here you can also improve how well 3DS games will run by setting your CPU level as high as it will go. This is recommended at least the first few times you try Mario Kart for VR.
We can also improve how the game will look while we’re in the settings. Do this by going to the “Graphics” section in the settings menu.
There are an absolute ton of settings here, but those that make the most difference have to be “Internal Resolution” and “Depth.” Set the depth slider as high as it will go, and set Internal Resolution as high as you dare.
Keep in mind that a higher resolution means more demand on your headset. If you’re using a Meta Quest 3 or Meta Quest Pro you should be fine increasing it quite a bit, but a Quest 2 might struggle a little more. If the game doesn’t run well then come back and lower this setting.

Setting the Depth and Resolution higher will make Mario Kart in VR look much better.
Once you’re in the game here are the controls:
A - Drive
B -Reverse
Right grip - Hop
X - Item
Y - Drive
Thumbsticks - Toggle first or third person by pushing forward or backwards when your opposite thumb is resting on the thumb rest next to the buttons
Triggers - Select things in menus
How Does Mario Kart 7 Play In VR?
Once you’re back in the Mario Kart VR and have a race started, rest one of your thumbs on the thumb rest of its controller.
The “thumb rest” is the empty space right next to the two buttons on the controller, away from the joystick. Once one thumb is rested there press forward with the joystick on your other controller using your opposite thumb.
This will bring your view forward and put you right inside of your kart like you are the Mario Kart character you’re playing as. Completely first person, completely immersive. Now that’s Virtual Reality.
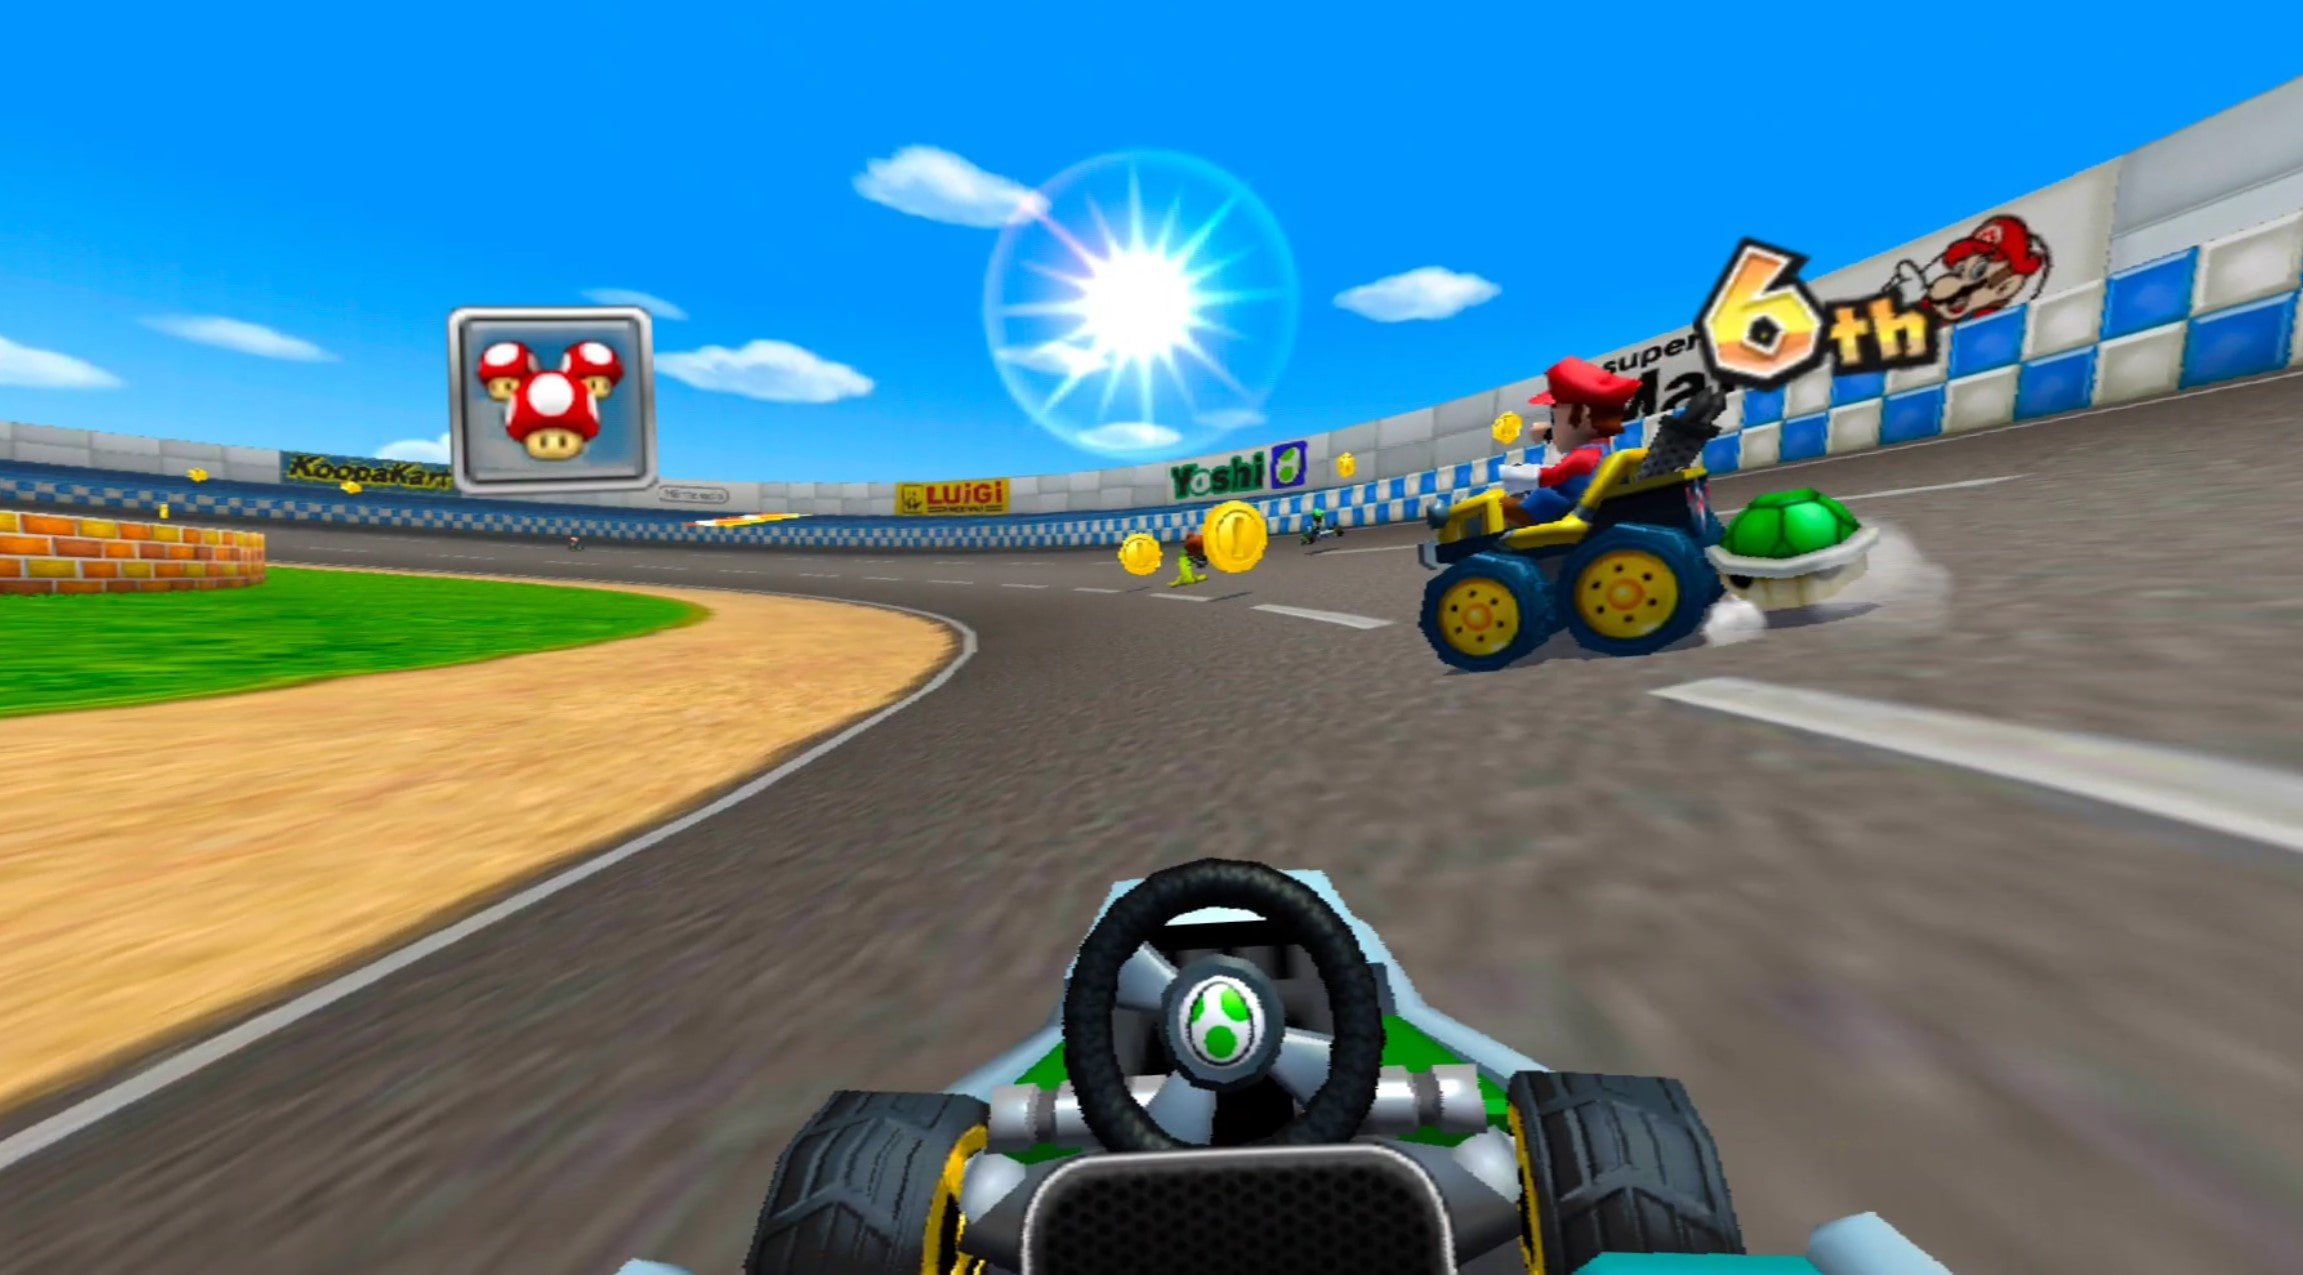
Make sure to set the view to first person as it’s much better for Virtual Reality.
Playing in the third person as you would normally on a flat screen is great and all, but Mario Kart in VR is a completely different experience when you experience it in first person.
You can really feel every turn as you take it, and running over a banana is a lot more startling when you see it right up in your face just before you hit it.
The game still plays like Mario Kart, there’s no denying that, and Mario Kart 7 is already a fantastic game on its own, but there is a quality added by playing it in Virtual Reality that brings it to the next level. You get the benefit of a giant virtual screen already, but using CitraVR’s immersive mode and wrapping that screen around your face makes you feel like you’re in the seat of your Kart.

This picture doesn’t do VR Mario Kart justice.
That’s really how Mario Kart in VR feels and plays, a lot like Mario Kart with different controllers, but also elevated and more intense.
It’s enjoyable, and a really fun experience even if you’re just looking for a good VR racing game in general. The only downside is that you can’t turn around and look behind you as you can in so many other VR games, but this is still a long way in terms of VR immersion. Enjoy!

Easily Install CitraVR To Play VR 3DS Games on Meta Quest
If you’ve ever wanted to play VR 3DS games on your Meta Quest 3 or 2 then you might have heard of the app CitraVR. It’s a version of the popular emulation application Citra built specifically to run on Oculus Quest devices.
Once you have CitraVR installed on your Quest then you can play Nintendo 3DS games on your Quest headset without having to keep it connected to a PC. All for free!
Citra VR even has special settings that make 3DS games even more immersive in VR by wrapping the view of the game around your Virtual Reality 3D perspective. Essentially putting you inside of your favorite 3DS games using the magic of Virtual Reality.
So in this article, we’ll get into how to set up and install CitraVR so that you can play 3DS games on your Oculus Quest 2 or 3 device. Here’s how.
How To Install CitraVR On Your Meta Quest Device - Prerequisites
Before we get into the installation process here are a few things that you will need before you get started. There’s no point wasting your time attempting to install CitraVR before you meet these prerequisites:
A PC.
A cable that can connect your PC to your Quest, aka a “Link cable”: If you don’t have one there are official Oculus LInk Cables. Though if you don’t want to spend as much money there are third party cables available from amazon.
Emulation game files for the games you want to play in VR on your PC. CitraVR will only work with these filetypes: .rom, .cci, .3ds (.cia files did not work with this method). Some games may not work well and unfortunately, there is no reliable compatability list to check before you try.
Enough storage space on your Oculus Quest device to fit all of the game files you will be moving to it.
SideQuest, the popular sideloading application for the Quest. Installing it is very straightforward, but will not be covered in this article. Luckily there is a complete guide already.
If you have all of these things then you have everything that you need to install CitraVR on your Oculus Quest 3 or 2. Here’s how to download and install CitraVR.
How To Install Citra VR On Your Oculus Quest Device - Add Your 3DS Game Files
You’ve got all of the prerequisites and are ready to install CitraVR, so let’s get started.
First, you’ll need to connect your headset to your PC with your link cable. Once one end of the cable is connected to your computer then put the other into the charging port on the side of your headset.
Make sure you have your headset on, or put it on quickly, after you connect the cable. There may be some popups asking you to allow USB debugging, but most importantly a little prompt that asks you whether you want to allow access to files on the newly connected device.
This prompt will appear just above your home menu bar, so make sure that you are looking at your home menu and click it in time.

Unfortunately the popup text did not show up in recording, but it will appear here.
If you miss this popup then you’ll have to disconnect the cable from your headset and reconnect it again so that it will appear once more.
When you click it successfully a new file explorer window will appear on your PC. It contains all of the files in your Quest. Open in up and you’ll see every folder inside of your Meta Quest.
Create a new folder on your PC. Name it whatever you like. In the example, it’s named “ROMs.” Move all of your 3DS game files into the ROMs folder.

Add a folder to here, like the “ROMs” folder you see here.
This is the folder where Citra VR will both be set up and access your game files. Once all of your 3DS games are moved over to your Quest disconnect the cable. You won’t need it or your PC for the rest of this guide.
How To Install CitraVR On Your Oculus Quest Device - Installing Citra VR
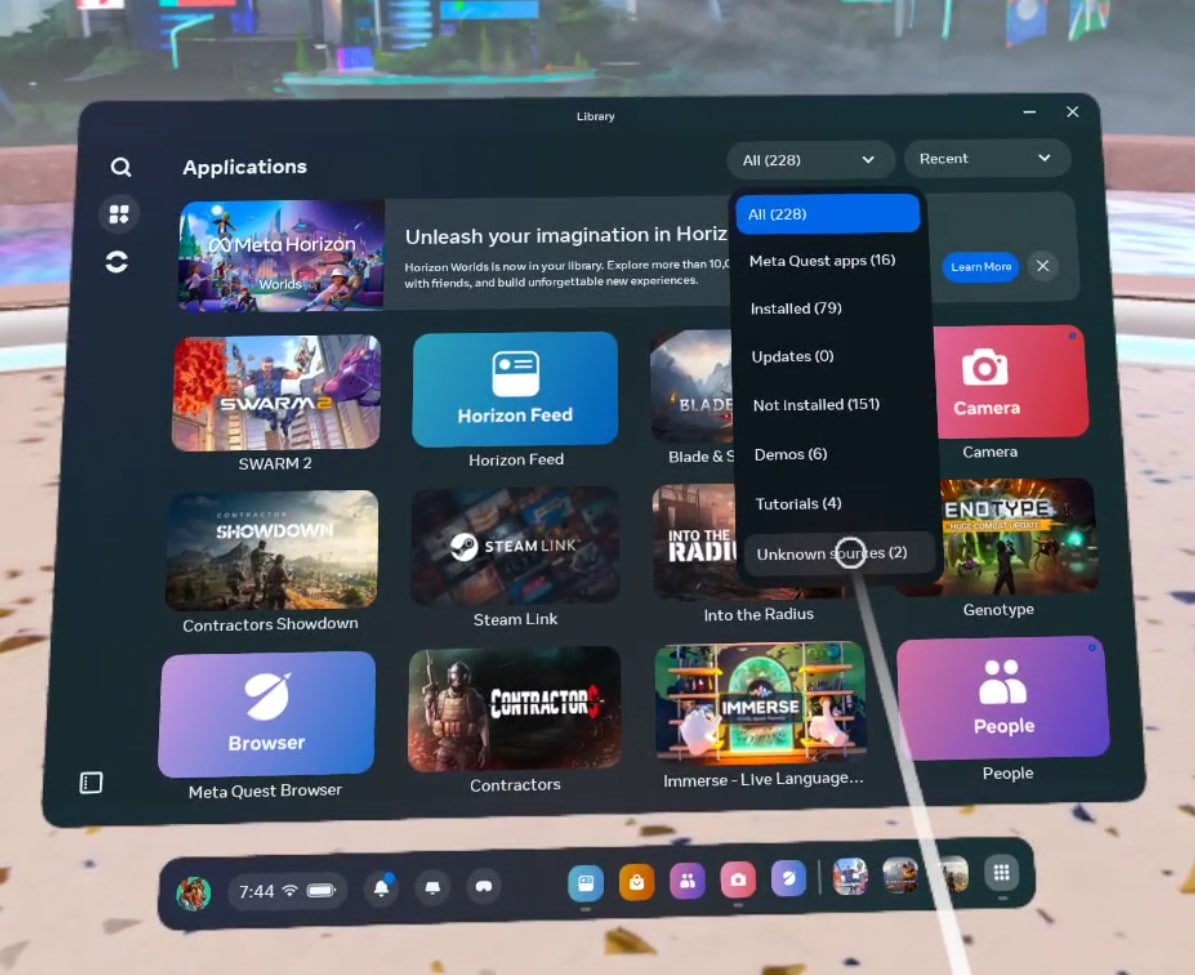
Put your Oculus Quest on and go to the “Unknown Sources” section of your app library.
To do this open your app library like you normally would to play a game on your Quest and then click on the “Applications” button in the top left to open your applications page. Once this menu is open click the dropdown button in the top right that is set to “All” by default. A dropdown menu will appear, click on it and then click on “Unknown Sources”.

SideQuest will download and install CitraVR for you, easy peasy.
From thee “Unknown Sources” menu launch SideQuest. As mentioned in the prerequisites you’ll need SideQuest installed to follow this guide.
Once SideQuest loads go to the search bar and search for “citra” or “citravr” and the CitraVR application will pop right up. Click on it to open the CitraVR SideQuest page and press the download button.
Just as with downloading any other SideQuest app you’ll soon see a popup in the bottom right of the SideQuest window stating that CitraVR has been installed successfully. Exit SideQuest once Citra VR is installed.
How To Install CitraVR On Your Meta Quest Device - Setting Up CitraVR
Go back to the “Unknown Sources” page in your app library and launch new the CitraVR app.
Click the dropdown in the top right to go to the Unknown Sources menu.
When you first launch CitraVR you’ll get a menu asking you to set up the application. When you see this hit the big green “Get Started” button.
Then it will prompt you to grant Citra VR permission to use your microphone and camera. Give CitraVR every permission that it asks for and once each step is completed hit the “Next” button in the bottom right corner of the app.
After granting permissions, you’ll get a new prompt asking you to select your User folder. Luckily you already have a folder ready to go, the one you created in the first step of this guide.
Just hit the big green “Select” button and in the following menu select the folder you created earlier. After selecting the folder hit the blue “Use This Folder” button at the bottom of the page, hit “Allow” when asked to confirm, and hit “OK” on the final popup.

Use the folder you created earlier as the User and Game folders.
Next, you will be prompted to select your Games folder, which is done in exactly the same way as selecting your User folder. We’ll also be using the exact same folder, so just repeat what you just did for the User folder.
Once that’s done you have successfully installed, configured, and run CitraVR! Congratulations.
Using Citra VR
Once you’re presented with the Citra VR main menu you’ll get a few popups telling you that games may experience stutters and that all games may not work well. Keep this in mind. Not all VR 3DS games will work as well as you might hope, but many do.

CitraVR will run with some stutters at first, but they get better.
Once you’re done with these popups you’ll be presented with your games folder, which should have all of the games that you previously moved over to your CitraVR folder.
If some or all of your 3DS games do NOT appear:
Check the file types of the game files. These are the compatible filetypes: .rom, .cci, .3ds (.cia files did not work with this method)
Go to the Settings menu by pressing the gear icon in the top left and check that your Game folder directory is set correctly to the folder containing your game files
Restart CitraVR
Restart your Quest headset
Keep in mind that not all 3DS games will work well, or at all, with Citra VR. This is third party software and so they can’t guarantee full compatibility with all 3DS Nintendo games.
Once you launch a 3DS game in VR successfully it will appear in front of you as two large mixed reality screens, one for the top screen and one for the bottom. You can interact with the bottom 3DS screen by clicking it with one of your controller pointers, and the top screen by using your touch controller’s buttons and joysticks.
In the settings menu, you’ll also find an “Immersive Mode” which will wrap the upper screen around your view when you play a game. It might not look fantastic on all 3DS games but it is definitely worth a try to get the most out of Virtual Reality 3DS gaming. There are also a ton of options to increase the graphical fidelity of your Virtual Reality 3DS games, but these may cause performance issues.
Well, hopefully, this guide helped you to get started in the wonderful world of 3DS VR games with the CitraVR emulator. Enjoy!

Swarm 2 VR Review - A Virtual Reality Grappling Action Shooter
Swarm 2 is a fast paced action shooter where most of your movement is done by grappling hook. It’s a little frustrating at first to get the hang of, but when the stars align and you have the skill to swing yourself around like Spiderman and you’re flying through the air effortlessly while blasting robots out of the sky you feel like a god. This VR action game is intense and insanely fun if you want to master the movement system.
If you want to know why this is, and more about the game, then join me in this Swarm 2 VR Review.
I’ve never played the first Swarm, though that game is extremely highly rated on the Meta Quest store, so it’s likely pretty good. If you’re looking for a review of Swarm 2 that takes the first game into account, well I’m sorry but this isn’t that Review.
I’ll be looking at Swarm 2 by itself and on its own merits here. Oh, and I did receive a review copy of this game from the developers, though I always do my best to avoid letting that sway my opinions in reviews. Still, big thanks to the folks over at Greensky Games for sending a key my way.
So how would I summarize Swarm 2? If you’ve only got one minute to know something about it from this review then this is all I’d say to you.
Swarm 2 is a fast paced action shooter where most of your movement is done by grappling hook. It’s a little frustrating at first to get the hang of, but when the stars align and you have the skill to swing yourself around like Spiderman and you’re flying through the air effortlessly while blasting robots out of the sky you feel like a god. This VR action game is intense and insanely fun if you want to master the movement system.
If you want to know why this is, and more about the game, then join me in this Swarm 2 VR Review.
You may also be interested in:
UNDERDOGS VR Review On The Oculus Quest 3 - A Fantastic VR Mech Fighting Game
Vampire: The Masquerade - Justice Review After One Playthrough
Swarm 2 VR Review - The Movement
The movement in Swarm 2 is the most unique and important part of the game, so let’s talk about that first.
You can move in a few different ways. You have the ability to launch yourself across the map towards enemies, or very slowly towards a piece of terrain. You can also use your left joystick to dash in midair and change the direction you’re headed.
Mostly you use the grappling hooks attached to your guns on either hand. The grappling and the physics surrounding it are not only the main features of Swarm 2 but also where it really shines.
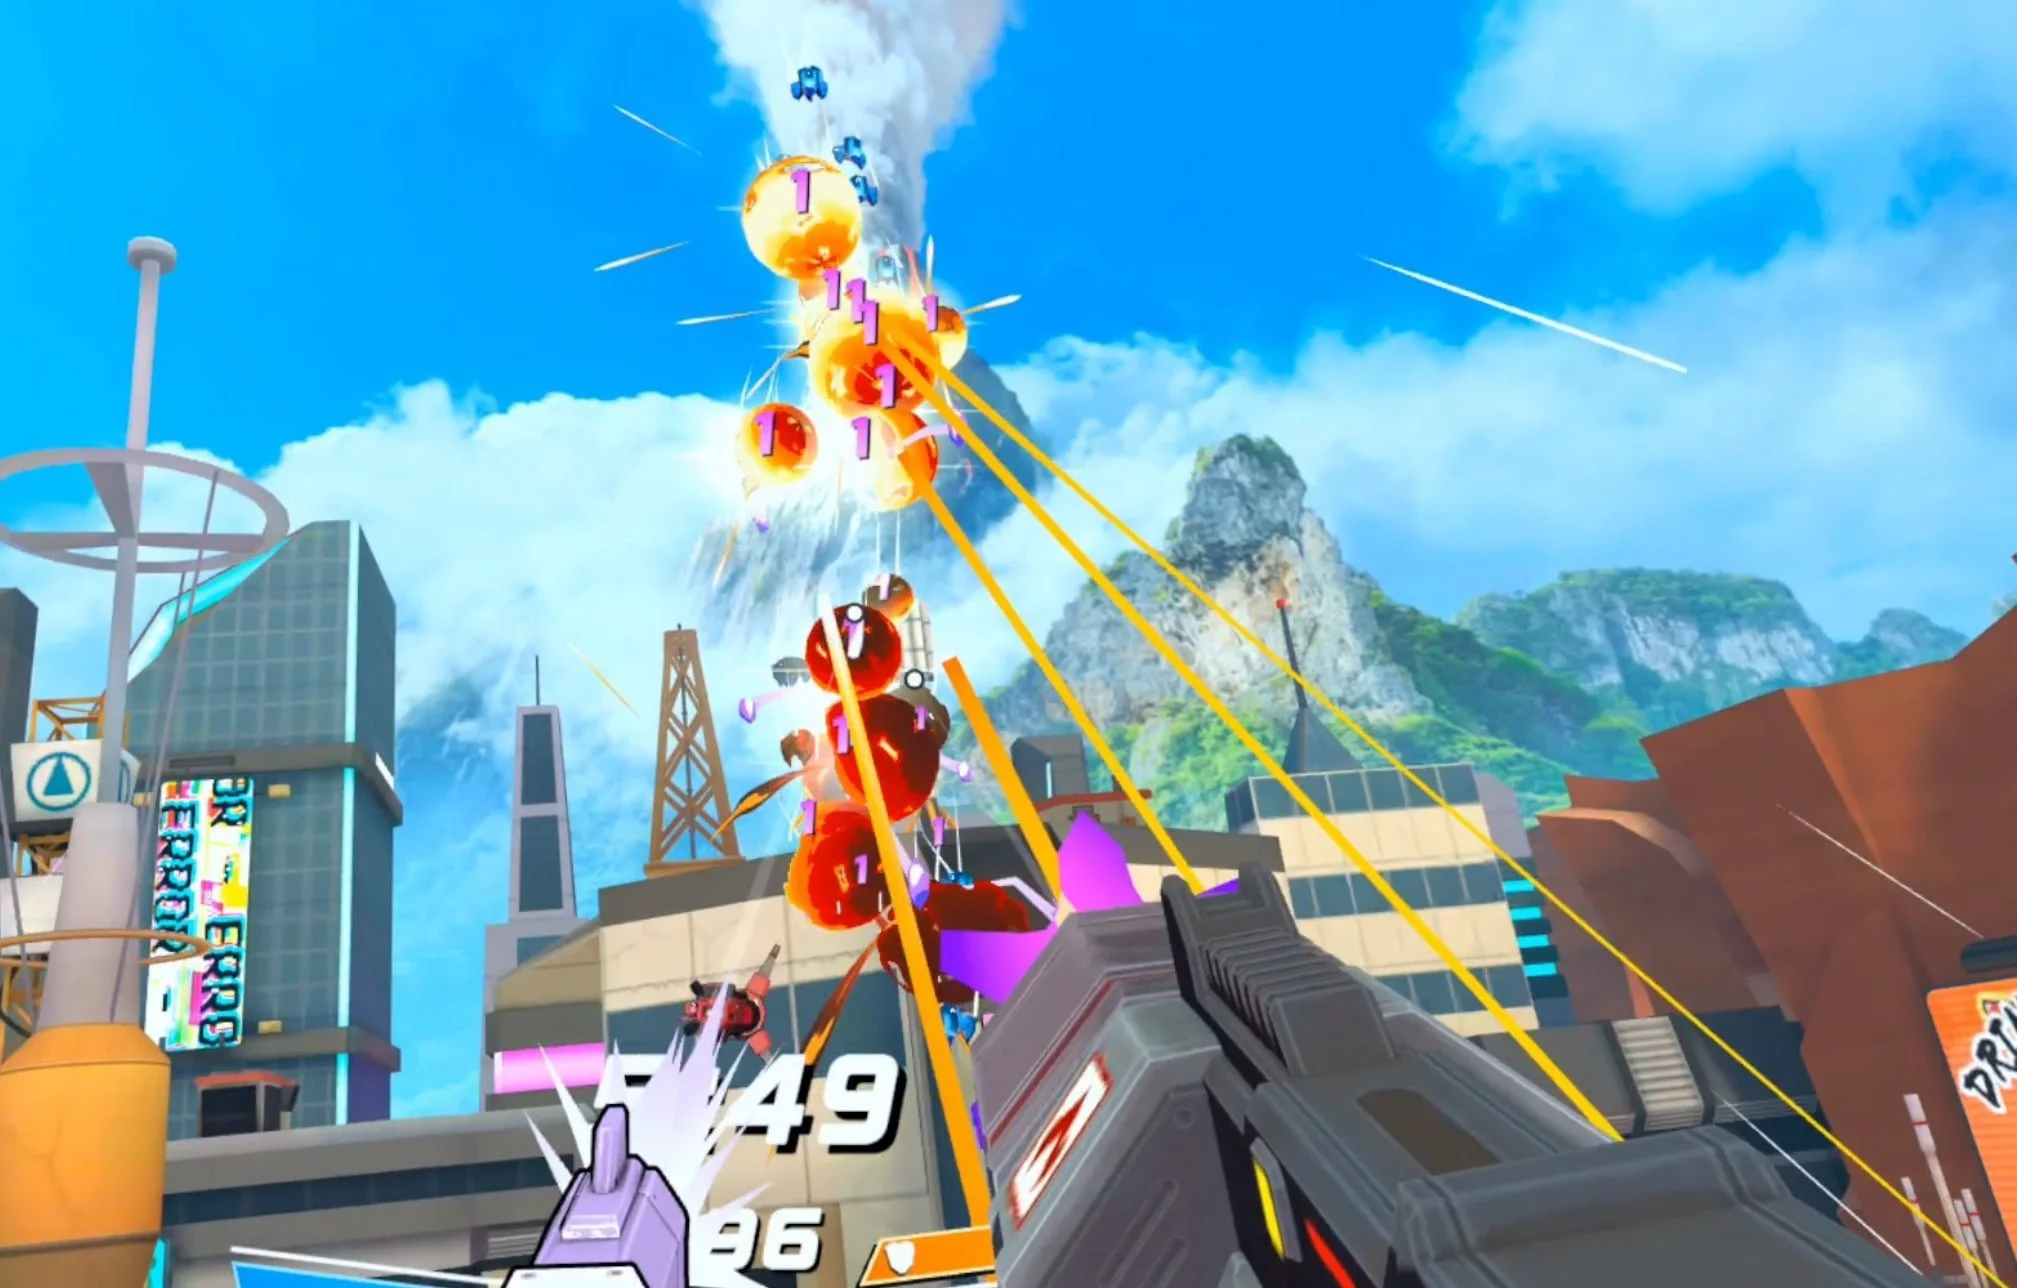
Blasting robots at high speeds is what Swarm 2 is all about.
Grappling to an object will make you swing around it, and the closer the grapple the tighter the swing. You can also generate some force by pulling your grappling hand away from the line attaching it to the object to create some tension. This will make you swing faster.
It’s a pretty straightforward system on paper, and paired with the dash abilities, is comprehensible even when just beginning the game. Though as I mentioned at the beginning of this review it’s in mastering this movement system that the game feels really satisfying.
When you’re playing Swarm 2 just right it is an amazing experience. Going fast and catapulting yourself to where you’re trying to go is hard and so it feels good when you pull it off. You can build up insane speed really quickly and zoom across the map almost effortlessly… until you run into a wall and lose all of your momentum. Then the ten missiles chasing you blow up in your face.

Destroying a robot in Swarm 2.
That’s the downside of Swarm 2, it can feel kind of frustrating. While getting a handle on the controls isn’t hard, learning the tricks of how to swing yourself around to where you want to go is.
I’m not saying that the movement should be easier. The fact that it takes skill to know how to swing yourself accurately and with speed is the core of what makes Swarm 2 fun. What I’m saying is that swinging along happily while blasting with your guns to be interrupted by slamming into a wall and suddenly panicking desperately for a way to keep moving is a little frustrating when you’re first getting a handle on the game.
Should you ever play Swarm 2 I recommend that you abuse the dash abilities a lot to give you some height and get you closer to terrain that you can swing around easily with your grapple. Grappling an enemy and swinging around them while shooting them is another easy and very effective tactic.
There are also a ton of maps in this game, and each gives you interesting geometry to swing around. The map variety is only going to get better according to the developers, but even with the review copy, there were many to play.
Each map has different movement challenges, obstacles, and opportunities to use the objects on the map to swing around. One or two felt a little limiting, and some are very prone to devolving into your character bouncing off of walls and ceilings, but overall they’re very good.
Swarm 2’s movement is very fun but very skill based. Even after playing the game for quite a while, I’d occasionally get frustrated with it, but in the end, every mistake I made was ultimately my fault. When all of the pieces clicked and I was swinging around like a futuristic gun toting Spiderman the experience was absolutely amazing. If you want a Virtual Reality movement shooter to really sink your teeth into there is a lot to master in Swarm 2.

Using a special weapon to one shot an enemy in Swarm 2.
Swarm 2 VR Review - The Shooting
Of course, all of that movement serves purposes in the game, and though there is a free roam mode where you can just experiment risk free with swinging and dashing, most of the game combines that with fighting a variety of robots.
You can shoot constantly as long as you’re holding down the trigger. Each bullet does low damage, but they shoot very quickly and there’s no ammunition counter or overheating meter on your weapons, at least the basic pistols you usually have. There are special weapons that are extremely powerful with limited ammunition, but we’ll get into that more when we talk about progression.
You use your pistols to blast robots out of the sky, and the robots are almost constantly spawning as you clear the level, though there’s an upper limit to how many will be around at a time until you get rid of some of them. So you’re not on a timer to clear them out as quickly as possible, but in the later levels, a lot will be present at the same time.

A ton of enemies around at once in Swarm 2.
Of course, you’ll want to blast robots away as quickly as possible, because they’ll be constantly attacking you if they can.
Their attacks vary between ramming you or shooting missiles and lasers. Some shoot with lasers which are beams that predict your path before firing, and some with bolts of energy that also try to predict your path. Missiles follow you slowly and explode in an area of effect. The only way to stop a missile is to trick it into hitting a wall or shooting it.
You have health and shields that can be regenerated with pickups, but you want to avoid getting hit as much as possible. The best way to do that is to move erratically, quickly, or both.
You also want to avoid moving too close to enemies, though you can melee them for big damage by flying into them. This is sometimes more dangerous than effective though.
So the enemies you fight in Swarm 2 all directly incentivize you as a player to master the movement system. By constantly moving you’re under less threat, and so the enemy design and the design of the movement work together in tandem to make you want to move fast and move constantly.

Larger enemy robots have glowing weak points on them in Swarm 2.
There are also enemies that have glowing weak spots on them. Break all of the weak spots and the enemy becomes vulnerable to your damage and will go down quickly, but until you break them they will take much reduced damage.
So you’re further incentivized to shoot at the more advanced enemies from several different angles to break the weak spots before destroying them. This gives you a reason to move in a certain direction instead of just wherever is convenient.
If you want to destroy that big robot that keeps firing salvos of missiles at you you’re going to need to use your movement skills to zoom over to the other side of it and break the last weak spot before really letting it have it.
Once more the enemy design and the movement mechanics work together in Swarm 2, forcing you to try to figure out how to move in a certain way in order to deal maximum damage. All while keeping your eye on enemies, shooting at them, and avoiding being hit.
Enemies also drop shield batteries and shards when destroyed. If you’re low on health they’ll drop health capsules as well. So if you’re taking hits you also have to figure out how to get over to those drops before they disappear so that you can take more hits and survive in the future. Those shards are important as well, and I’ll talk about them soon in this review.
Swarm 2 isn’t content to just make you move quickly and often, it also wants you to move to specific places at specific times. In that way, the design of this VR game is simple, but elegant in how it keeps you from just swinging around the map in the same path that is optimal for speed and distance.
The one complaint that I have is that enemies will often spawn right behind you, so suddenly you’ll get hit from an area that you thought was safe but is suddenly littered with opponents. A louder sound cue when enemies are spawning near you would be nice to give you a chance to react before you take hits.

The first boss in the Swarm 2 roguelike game mode.
Now for the ultimate enemies, the bosses. The first time you make it far enough to fight a boss it’s pretty epic. The boss has weak points on the front and back of it that regenerate, oh and it’s a giant robot too, which looks pretty sweet.
You have to break enough weak points before they regenerate so that the boss becomes vulnerable. Some enemies will spawn and you have some time to deal a ton of damage to the boss before it recovers. Rinse and repeat until either you or the boss are destroyed.
The disappointing thing about the three bosses is that they’re all variants of the same giant robot. While they do have some significant differences in the enemies they spawn and their attacks, it would have been nice to see a little more creativity in the boss design. Each being a similar giant robot felt a little uninspired.
That’s not to say they’re entirely boring, however. My favorite has to be the second boss, which can light you on fire. You’ll constantly take damage before flinging yourself into a nearby waterfall to put the fire out. So maybe I’m being nitpicky in terms of creativity as that’s a very cool idea.

The second boss in the Swarm 2 roguelike gamemode.
Swarm 2 VR Review - The Progression
That covers the game mechanics, but what about everything that surrounds that? Let’s talk about the different game modes of Swarm 2.
The main game mode, and the one you’ll likely be tackling first, is a roguelike game mode. Virtual Reality gaming might have too many roguelikes, but to be honest, the gameplay of Swarm 2 might not have lent itself to be great as a more linear experience with preset and predesigned challenges. Though if there were a series of hand crafted Swarm 2 levels I’d be very happy to play them. Hopefully future updates to the story will add something like this.
The roguelike section has the usual drawbacks of roguelikes, mostly that playing the early levels feels like a waste of time when you’ve already become good at the game and just want to get to the challenging parts later on. Swarm 2 does make each run pretty fast though, so you won’t have to wait for too long. If you make it all the way to the end you can beat the game in under thirty minutes.
Even beating the game doesn’t feel quite like completing the game, because there are multiple difficulty modes and even a leaderboard if you want to try and go for the highest score in the world. There are also other game modes than the roguelike one, which we’ll get to soon in this Swarm 2 review.
Swarm 2 works adequately well as a roguelike, and the progression system leans into that. After each level in a run, you get a choice between upgrades to pick. I wouldn’t say that the choices I picked influenced how I played too much though. Regardless of your perks, avoiding being hit and destroying robots as quickly as possible are always the best ideas.

Blasting incoming missiles out of the sky in Swarm 2.
Some perks are obviously better than others. Having slightly more shield capacity is clearly not as good as a chance to just ignore damage coming your way. Shooting faster is always better than doing more damage per shot because so many other perks trigger each time you do damage, and your guns are so accurate and fast firing that how much damage you deal is more dependent on how long you stay on target than the accuracy of each shot.
It’s still satisfying to create good perk combinations during a run and then see them in action though, and there are still some general choices on whether or not you focus more on defense or perks that deal damage versus perks that debuff your opponents. It’s not a brainless system, but some perks are just clearly inferior to others.
Another form of progression happens whenever you complete a run. Each time there is a chance for you to unlock more perks to appear during your later attempts, and also special weapons that may spawn.
Special weapons are very powerful and a ton of fun. Each has limited ammunition before being replaced by your basic pistol again. Getting a special weapon makes you feel extremely powerful for a short period of time. They also make you pick your shots a little more carefully and tactically so that you make the most out of their ammunition, which is a nice change of pace from constantly blasting with your infinite ammo pistols.
The special weapons are a good addition to the game, though I do wish they would spawn a little more often to add some more variety to your offensive capabilities. Most of your attacks will still be done with your pistols, which are an exercise in holding down the trigger.
Using the Minigun special weapon to mow down robots in Swarm 2.
Oh, and remember those shards I mentioned earlier? Collecting them lets you unlock upgrades over time, some of which are very powerful. Mostly they just give you some more options and make you more survivable.
So you do get some progression through each attempt, and more options become available as you go through the game. The progression is pretty solid, and while each run won’t feel different you will get a better handle on these systems over time. The real progression of Swarm 2 is the skills that you learn along the way. Mastering the movement helps more and is far more satisfying than incremental upgrades to health or shields.
In addition to the roguelike main mode and free roam there’s also an arcade challenge mode. In Arcade mode, the focus is more on destroying enemies as quickly as possible for points than staying alive. That’s because in Arcade mode you’re on a timer, and the overall goal is to get the highest score possible.
It’s a great way to practice certain maps or try to get your name on the leaderboard for that map in particular.

My top leaderboard position will not last long.
There are some more modes on the way that I didn’t get a chance to try with my prerelease review copy, namely something called “Challenge Mode.” More maps are slated to be added to the game as well.
There’s also an in-game story planned to be added, so hopefully your character will say something other than the one or two cheesy lines he constantly spouts every once in a while.
Anyhow that’s all for this Swarm 2 review. In summary, the movement system of grappling and dashing is what makes this a great game, and how the game forces you to use these systems to move quickly and decisively in certain directions on the map while utilizing that map’s geometry to pull it off. The progression and perk system isn’t extremely clever or in-depth, and so mastering the movement is really where the fun of this game comes at you with full force.
Swarm 2 is available on the Meta Quest and Pico platforms. Enjoy!
You may also be interested in:

Easily Install SideQuest To Sideload Games On the Meta Quest For Free
So you want to install SideQuest VR on your Oculus Quest 2 or 3 so that you can Sideload a huge number of games to play directly on your Meta Quest 2 or 3 headset.
SideQuest truly is a remarkable application that lets you play even more Virtual Reality games on your Meta Quest device for free.
In this article, I’ll show you how to install SideQuest on your Oculus Quest 3 or 2 step by step with screenshots and everything.
So you want to install SideQuest VR on your Oculus Quest 2 or 3 so that you can Sideload a huge number of games to play directly on your Meta Quest 2 or 3 headset.
This is an extremely good idea. Not only does Side Quest give you access to a huge amount of modded content and applications, but a lot of them are completely free, and so is SideQuest! You won’t have to pay a single penny to install and use it.
SideQuest truly is a remarkable application that lets you play even more Virtual Reality games on your Meta Quest device for free.
In this article, I’ll show you how to install SideQuest on your Oculus Quest 3 or 2 step by step with screenshots and everything. Once you’re done installing SideQuest VR you will be able to install new games and apps on your Quest directly on your headset without having to connect it to a PC again.
So here is how to easily install and use Side Quest to Sideload games on the Meta Quest for free.
How To Install SideQuest On The Oculus Quest - Prerequisites
So before we get going with the installation process there are a few things you’ll need to install SideQuest VR:
A PC that is connected to the same WiFi network as your Oculus Quest 3 or 2 headset.
A link cable to connect your PC to your headset: You can get the official Oculus Link Cable on the Meta website here. If you’re looking for a cheaper option there are third party cables available from Amazon like this one here.
With these two things, you have everything that you need to install SideQuest VR on your Oculus Quest headset. Here’s how to download and install Side Quest.
How To Install SideQuest On The Meta Quest - Download SideQuest
To start you’re going to have to get on your PC, go to the SideQuest installation page, and download the Easy Installer.
Once you hit the download button the file will download to your Downloads folder.

The SideQuest VR downloads page. Download the Easy Installer on the left.
Once the SideQuest installer file is finished downloading, run it.
How To Install SideQuest On The Oculus Quest - Install SideQuest

The first screen you will see when installing SideQuest. You need to connect your Oculus Quest headset to your PC to start the installation process.
The SideQuest installer makes the whole process very easy by explaining exactly what to do step by step. All you have to do to get started is click that big “OPEN SETUP INSTRUCTIONS” button in the center.
Once you do that three steps will appear in the installer. These will detail how to create a Quest developer organization, enable development mode on your Quest device, and finally, it will tell you to connect your Quest headset to your PC.
Unfortunately, there’s no way to Sideload games or applications to your headset without going through this first. This is the most annoying part of installing SideQuest, but there is no way that you can skip it.

The setup page of the SideQuest installer.
Just follow the instructions in the Side Quest VR installation window. The instructions are very good and will tell you everything that you need to know to complete these three steps. Once you create your organization click on the next step and enable development mode in the Oculus app.
I also recommend that you restart your headset after enabling development mode, or it might not function as intended.
After you’ve set up your Meta Organization and enabled developer mode you should also create a SideQuest account while you’re at it. After you complete the installation you’ll need an account to link your headset to in order to use the SideQuest application.
Now that you’ve done the first two steps in the SideQuest installer you will need to connect your Meta Quest 2 or 3 headset to your computer using that Link Cable mentioned in the prerequisites.
Just connect the larger rectangular shaped USB end to a USB port on your PC and then connect the smaller end to the charging port of your Oculus Quest device. Be careful to make sure that the cable doesn’t come out while you’re installing SideQuest.
Once your headset is connected you will get a prompt in your headset asking you to give your PC permission to access files on the device and allow USB debugging. Click the blue allow button when you see this prompt. When your Quest is linked to your PC the installer should pick it up and the red circles with text next to them stating that you haven’t connected a headset should turn green. All of the circles on the right side of the Side Quest installer window should be green.
If the circles aren’t green then double check the steps you took previously and disconnect your Quest from your PC before restarting the Quest device and reconnecting it to your computer.
Once all of the circles are green hit the “Home” button on the left side of the installer and then click the big “INSTALL SIDEQUEST IN YOUR HEADSET” button in the center. After a brief wait, you should see some confetti in the installer window.

Once you see the confetti then you’ve successfully installed Side Quest on your Meta Quest 3 or 2.
Congratulations! You’ve installed SideQuest VR directly onto your Quest headset. You can now disconnect the Link Cable from your Quest and put your headset on. However, you will need your PC for one final step.
In your headset open your game library and click the search bar at the top. A dropdown should appear in the top right of the App Library window click on the one that says “All” and then click on “Unknown Sources” in the dropdown menu.

How to open the Unknown Sources app page on a Meta Quest headset.
The Unknown Sources page contains all third party applications installed on to your headset. This includes SideQuest and also games and applications that you will later sideload using Side Quest, so make sure you remember how to get to the Unknown Sources page.
Once you’re there you will see a new button for the SideQuest app. Click on it to open it.
Once you’ve started SideQuest in your headset you will see a six digit code telling you to go to sdq.st/link and enter the code. Remember the code before taking your headset off. Then go back to your PC and go to the website so that you can enter your six digit code. Hopefully, you made that SideQuest account earlier because you’ll have to log into one now on your PC.
If you haven’t made a SideQuest account already then you can make one on their website. It’s free. If you’re having trouble linking your headset, for instance, if the sdq.st/link page isn’t working, then connect your headset to your PC again with the link cable as you did before. Then try the website again.
Once your account and Oculus Quest are linked then put your headset back on and the SideQuest app will start shortly. You will get a lot of popups and prompts asking you to give SideQuest permissions. Hit the “Allow” button on all of them.

Make sure to allow permissions for SideQuest or it won’t work.
You also might get a popup at the bottom, like in the screenshot above, to Update SideQuest. You might as well do it now, so click on the “UPDATE SIDEQUEST” button. Once you do another popup will appear saying that “your phone currently isn’t allowed to install unknown apps from this source.”
If you see that then hit the “Settings” button in that popup. Another screen will appear that looks like the one in the screenshot below. In this window enable the slider for “Allow this source.”

If you see this settings page then enable the slider so that SideQuest VR can update.
If nothing is telling you to update SideQuest then don’t worry about it. However, if you do update and the Side Quest window closes just relaunch it. That’s just a part of the update.
How To Use SideQuest VR On The Meta Quest
Since you installed the SideQuest VR application directly onto your headset then you won’t have to worry about using that Link Cable anymore.
Now that all of the installation and permissions setting is finished you can just scroll through the SideQuest library to find new games to sideload. Most are completely free!
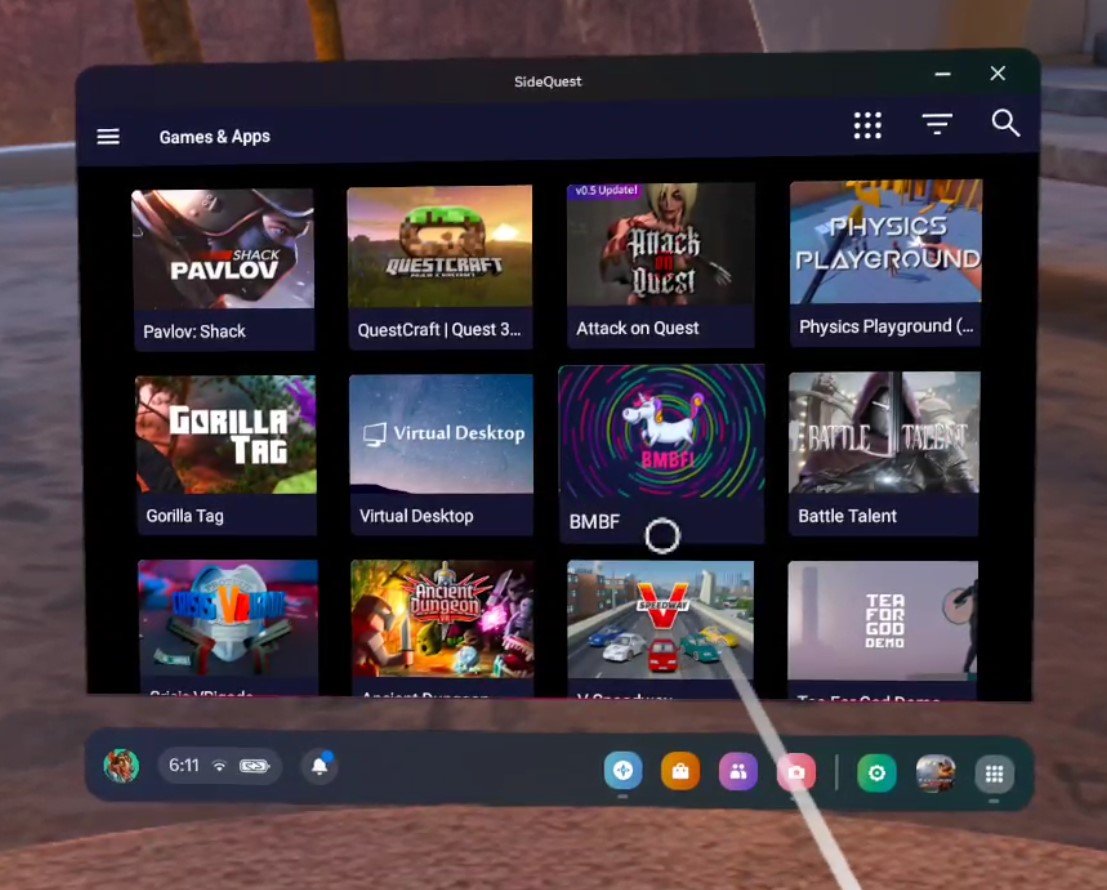
There are a ton of new (and free) games for you to install with SideQuest.
I hope you enjoy using SideQuest. It really opens up a whole new world of VR games for you to play and enjoy outside of what Meta has allowed to be on their store.
Keep in mind that this means that a lot of the games you will see on SideQuest might be very experimental or early on in their development, and so will be low quality.
That being said, there are still a ton of high quality games on SideQuest VR for you to sideload to your Oculus Quest 2 or 3. A lot of really great VR games got their start on SideQuest before making it to the official Meta Quest store. Enjoy!