


The 3 Best VR Tennis Games On The Oculus Quest 3
VR Tennis games are great because you can just pop on your headset and enjoy a game of tennis whenever you want. It’s cheaper too, a decent racquet can cost you upwards of 100 dollars these days, but now with a VR headset and a few extra bucks you can enjoy a huge tennis court and a wide variety of opponents wherever and whenever you like.
Imagine having a tennis court in your living room. Well, you don’t need to imagine because with the magic of Virtual Reality that is already possible.
Tennis is a great sport, and I’ve played it quite a bit in the real world, but it can be kind of a hassle to get a game together and go out to the court.
VR Tennis games are great because you can just pop on your headset and enjoy a game of tennis whenever you want. It’s cheaper too, a decent racquet can cost you upwards of 100 dollars these days, but now with a VR headset and a few extra bucks you can enjoy a huge tennis court and a wide variety of opponents wherever and whenever you like.
Tennis in VR makes the game not only way more accessible, but faster. You don’t need to run after stray balls anymore, because the balls are digital and infinite.
With Virtual Reality tennis games you can have all the fun you want in this sport, and never even need to walk out of your front door. Though weirdly enough it doesn’t seem like many developers have taken advantage of how awesome a great VR tennis game could be.
Currently there are three decent VR tennis games on the Oculus Quest 3 (and Oculus Quest 2 of course) that are at least worth talking about.
I’ll tell you right now that there is a clear winner out of these three games, though these three are the best on offer at the moment. If you just want to see which game is the best then scroll down to our section on First Person Tennis. That’s the winner here.
Oh, and a quick disclaimer before we get into these games. You’re going to want a bit of space to play them. I already accidentally punched the ceiling with my controller at least once, and almost ran into the furniture a few times.
So if you want to enjoy VR tennis as much as possible with these games make sure you’ve got the biggest playspace you can get. Having enough space to swing the racquet around is important, even if there is no physical racket.
Anyhow without further ado these are the 3 Best VR Tennis Games on the Oculus Quest 3.
You May Also Be Interested In:
Tennis Esports - VR Tennis Games On the Oculus Quest 3
Let’s start with the VR tennis game that I’d recommend you try the least, Tennis Esports.
Right off of the bat it seems like it’s got a lot going for it. Professional looking interface, upbeat music, and a good tutorial. All of your comfort and height options are set right at the start.
I had a lot of hope when first trying Tennis Esports, and had even already seen an article about a professional tennis player practicing with a tennis VR game (but not this one). A game with such a great name and marketing material looked like a great place to start.
Well whatever game they were using certainly isn’t this one.

Hitting the ball in Tennis Esports feels more like punting a baseball
You’ll notice the problem right in the tutorial, because the biggest problem of all in this game is the hitting.
You look around the court, see the net swaying in the breeze, and think “wow this looks pretty good” and then all of that hope falls away the first time your racquet makes contact with a ball.
It feels like you’re hitting the tennis ball with a baseball bat instead of a tennis racquet. It feels unnatural, and you’re hardly incentivized to follow through on your swings like when actually hitting a tennis ball.
The only way I found to get a ball to land somewhere in the opponent’s side of the court is to sort of tap it and stop the racquet just as it makes contact with the ball.
Everything else either sent the ball smashing into the ground or straight into the net, or worse somewhere off on the sidelines.

The bot hitting the ball in Tennis Esports
Tennis Esports has the worst racquet physics out of any VR tennis game on the market. I tried messing with the settings and hitting the ball in different ways, but no matter what I did it never felt right and I never got a satisfying or effective hit.
If that’s not enough to steer you away from this game then there’s a slew of other problems to warn you about too.
As in all of these Tennis VR games you move into range of the next ball coming towards your side of the court by teleporting or gliding over to where it will impact.
Tennis Esports decided that if a ball doesn’t land near enough to you that you just won’t teleport over to it, and you’ll never have a chance to make a shot back.
This feels pretty cheap, and takes the fate of the game out of your hands. Sure, you should have a disadvantage if your opponent made a good return, that’s part of the strategy and fun of tennis… but to give you no chance at all feels boring and ridiculous.
At least seeing yourself get closer to the ball would give some illusion of a chance, and let you reason that it was just too far away and too fast. Standing still and doing nothing doesn’t look good.

Returning the ball never felt so wonky
The AI opponents are either extremely easy or extremely hard. They’re either mostly incapable of returning balls that land right in front of them, or return most of your hits at 500 miles an hour.
Also they look kind of stupid, and their animations often glitch out and look unnatural, especially when a ball passes by them and their swing in the air a whole second later. They look weird.
There’s also a ton of other minor issues and bugs, like the reason for a point loss not displaying correctly on the scoreboard. Those would be criticisms of a game that actually functioned well, but for Tennis Esports are nitpicks because the other problems are so glaring.
Oh, and just so you know this game does have Multiplayer, and actually had a few people online one of the times I checked.
Unfortuantley the multiplayer suffers from all of the problems the Singleplayer has. My opponent was also contorted and strange looking the entire time.
It didn’t lag though, which was nice.

The multiplayer opponents always looked weirdly distorted and I don’t know why
At this point you might be wondering why I’ve included this game on a list of the “Best” VR Tennis games if it’s so bad.
Mostly this is here just to warn you to stay away from this game because it seems so good before you get your hands on it, but in a couple of matches you’ll feel cheated out of your money and time.
So steer away from Tennis Esports, either of the other games here are far more worth your hours and dollars.
Tennis League VR - VR Tennis Games On the Oculus Quest 3
Now for a somewhat better, but still somewhat difficult to enjoy tennis game on the Meta Quest 3, Tennis League VR.
I really want to like this game. I’ve tried to like this game. At first glance it seems like it should be the best in so many ways.
Right at the main menu it’s got a great look and feel to it, customizable avatars, a leaderboard, a trophy room. It seems like it’s got so many of the trappings of a professionally made and polished game that it should be very fun.
Unfortunately Tennis League VR falls short of being a great VR Tennis Game.

Hitting backhands is hard in Tennis League VR
Just like with Tennis Esports, the racquet physics is not quite there.
Even after playing around with the settings I could never dial in how to hit the ball properly and consistently. Trust me, I tried a lot, and it just never felt quite like hitting a tennis ball, but it definitely felt better than Tennis Esports.
I ended up lobbing the ball up really high a lot after kind of tapping it.
Still shots would seem to almost randomly veer off in odd directions at incredible speed, or suddenly barely go anywhere despite my slapping of the ball with a full force backstroke.
I thought that maybe this happened due to the incoming speed of the ball or where it contacted the racquet, but after testing things out with the ball machine training mode I could never figure out what was causing the random reactions of the ball.

Another shot that went straight into the net
Still this didn’t totally ruin the experience of the game, though it definitely made me feel that I could only ever get so good at it without being able to consistently land the ball where I wanted it to go.
There are other problems though, like how hard it is to see across the court at your opponent. Unlike the other games on this list it felt like I was straining my eyes the entire time just trying to see what the other player was doing.
The game also occasionally lagged, even when I wasn’t recording, for no apparent reason. Frames would drop and the ball would stutter in the air, which isn’t pleasant in any VR experience, let alone when you’re trying to smack a ball with a tennis racquet.
Also this game really wants you to hit buttons on your controller. You have to hit a button before you serve or before your opponent serves, and you have to hit a button to stand in the way of the incoming ball so you can whack it.
It’s a strange system and keeps you from holding the controller like you would a tennis racquet, because you always have to keep your thumbs on the buttons. It’s a little awkward.
Oh, and sometimes I would be teleported right into the path of the ball instead of beside it, so I could either step to the left and run into a desk or try to awkwardly hit it as it came towards my chest.

Trying to not double fault
Still, I did have a fairly good time with Tennis League VR. The opponents ramped up in difficulty fairly well and I really felt like I was making progress despite the feeling of randomness.
Despite all of that I did get a little better at the game over time, and felt good enough to try the Multiplayer.
Unfortunately no matter how many times I checked I couldn’t find another player online.

I could never find a multiplayer match in Tennis League VR
I would quickly forget about all of the good times I had in Tennis League VR and also figure out why hardly anybody was playing the multiplayer for it or Tennis Esports when I discovered the best VR Tennis game of them all, First Person Tennis.
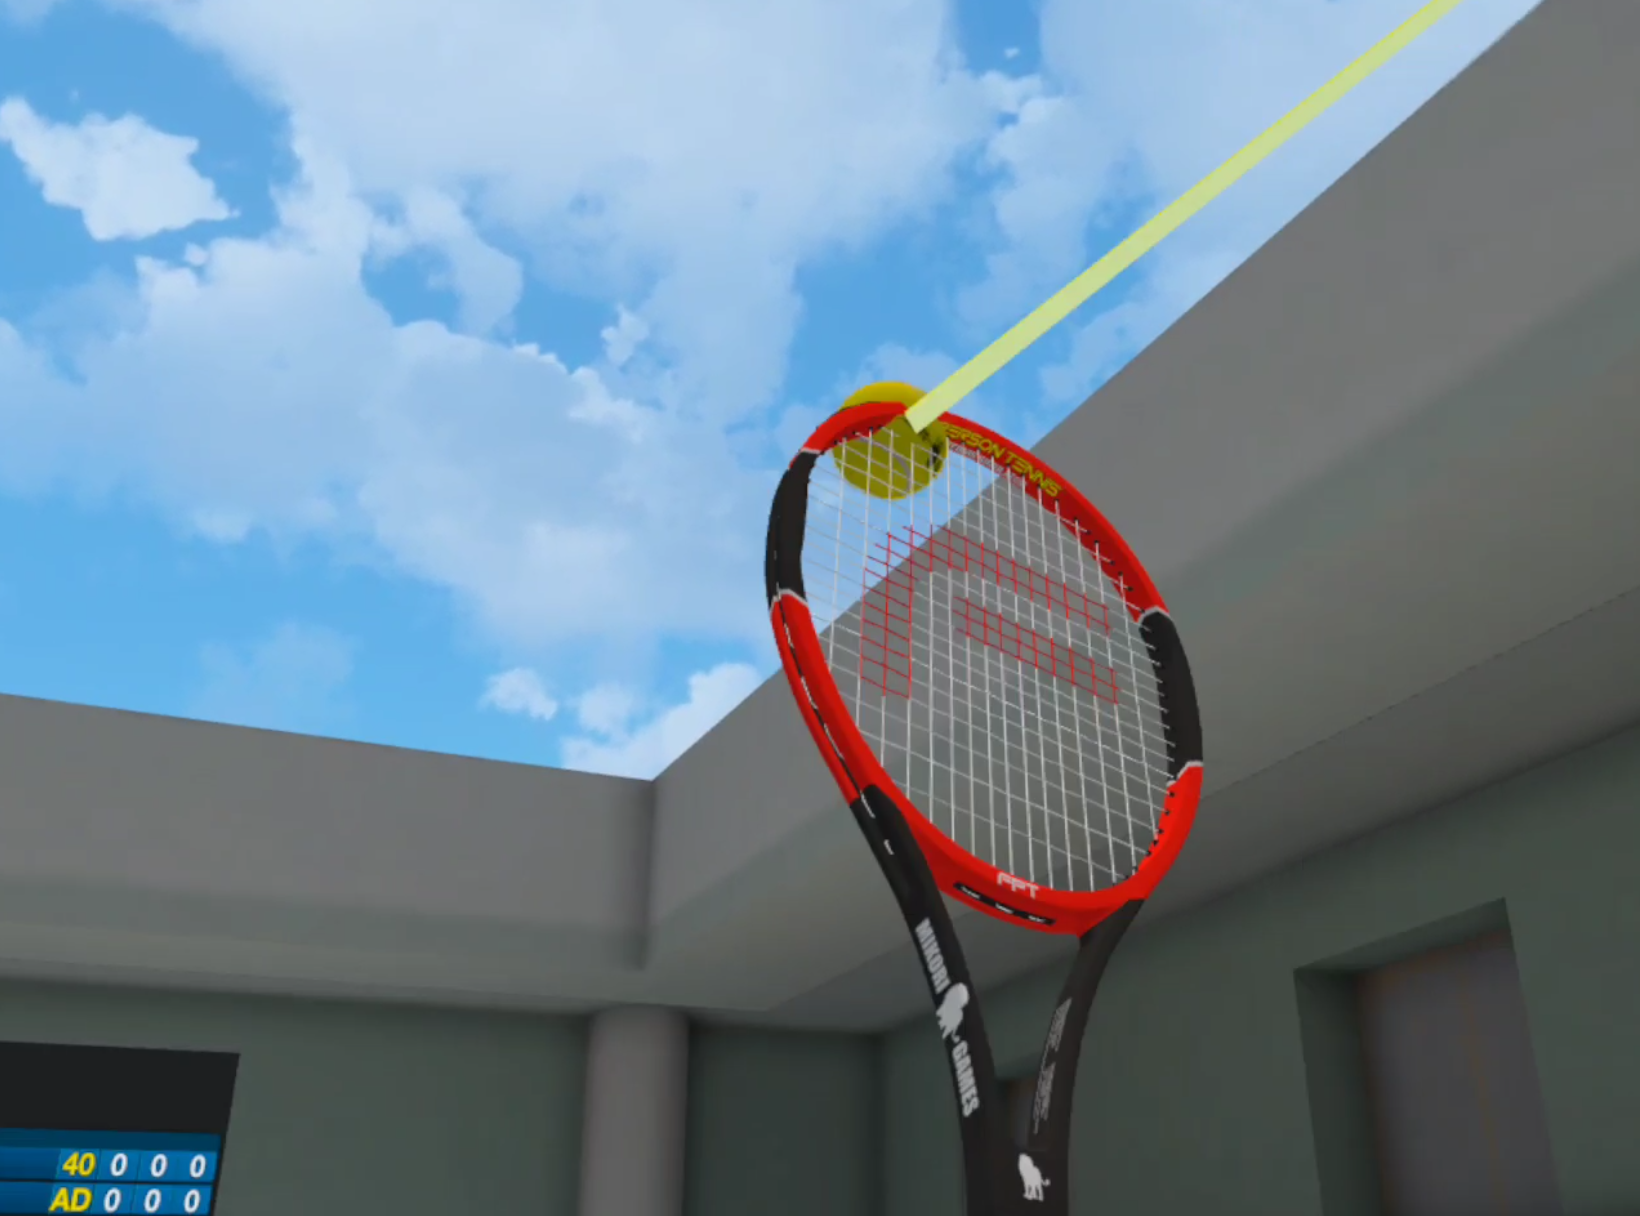
First Person Tennis - VR Tennis Games On the Oculus Quest 3
Now for our final VR tennis game on the Oculus Quest 3, and if you couldn’t guess already the one that I’d recommend you try before any other on this list.
I’ve personally spent the most time with First Person Tennis because it’s the best virtual way to play tennis I have ever tried, and because it is a ton of fun.

Returning a ball in First Person Tennis
Let’s start with how hitting the ball feels. For once a game really nails it.
The feeling of hitting the ball is consistent, and after a few matches you start to recognize why the ball went the way that it did after a hit. The physics are consistent and make sense.
First Person Tennis feels close to hitting an actual tennis ball with an actual racquet, though the option for some haptic feedback through the controller for each hit, like a brief vibration, would be pretty cool.

How the bot looks after losing a round
At first I thought that my hits were maybe a little too easy and consistent, and the ball always seemed to land in the middle of the opponent’s court.
That’s because of Arcade mode. It’s far easier to get good hits in in Arcade mode, but it really cuts into the difficulty.
If you really want a realistic VR tennis experience then I recommend you change it to Simulation immediately. Sure it’s a little harder and if you’re used to Arcade you’ll have to adjust, but it’s much more rewarding to master and lets you make far trickier shots.
Oh, and let’s also talk about the movement. Finally there are multiple movement options, and none of them involve hitting a button or randomly having no chance to catch a ball.
Serving in First Person Tennis
You can teleport to where the ball is coming next, or always move using your thumbstick, or automatically slide over to the ball and have the option to interrupt automatic movement by using your thumbstick.
Moving with the thumbstick can be really tricky to get right, and I never had the patience to really get the hang of it. Stopping yourself not too close and not too far away from the ball was not easy, and I would often accidentally hit the sprint button and lurch past the ball.
That’s really a skill issue though, and to mitigate that skill issue I just went with the automatic movement mode.
Though at first I felt a little cheated, because sometimes it would just decide to bring me up to volley range right up to the net.
I didn’t really want to do that often because jumping or diving far enough to catch most rallies would involve hitting the ceiling or wall, even with a fairly sizeable playspace.
Luckily when I discovered that you can still use the thumbstick to move in automatic movement mode I found that I had the comfort of easily sliding up to the ball and focusing on my strike, and still have all of the tactical options of deciding where I wanted to be to prepare for the next incoming ball

Hitting the ball in a practice match
Though First Person Tennis does fall a little short in the AI department. Unlike in Tennis League VR the AI start hard and stay hard.
They’ll hardly ever just miss a ball or make an unenforced error. Though occasionally they’ll just sort of stand next to a ball landing beside them, which may be a bug or maybe the bot not thinking that your ball was going to land in.
Generally the best way to defeat them, even when starting out or doing a practice match, is to hit the ball really fast on the opposite side of the court from where they are, or hit it behind them when they are close to the net.
Not to say those are the only ways to score, but it is awfully hard to get the good feeling of a win when you’re just starting out, especially when using Simulation physics.
There was also a difficulty setting in the Options menu, though I noticed all of this while playing on Beginner. Switching to Advanced didn’t seem to change much though.
It would be good to have a better range of difficulty options. Though I guess setting the physics to Arcade is the closest thing to that, though it will hamper you in the long run.
So it would be nice to have a bit more of a difficulty curve to the games AI, but overall that’s really a nitpick, and if you don’t want to play against the AI there’s always Multiplayer.

First Person Tennis has a pretty active multiplayer scene, mostly in Europe
While I never could find a match in Tennis League VR I can guess that the reason for that is because it’s an inferior experience to First Person Tennis’s multiplayer.
I was able to find a match whenever I got on. Though the most populated server seemed to be Europe.
Others were not so active, but it was always easy to find a game on the European server.

A real opponent returning the ball in multiplayer
It was a lot like playing First Person Tennis in Singleplayer. Easy to use, quick to start and quick to keep moving.
Though there was a strange constant lag. The ball would seem to bounce past my opponent, and then suddenly they would hit it and it would come towards me.
It was uncanny and a little unpleasant, not to mention kind of a disadvantage as it cut seconds off of my ability to react, but I did get used to it.
Still, this wasn’t ideal. There were a few times that I would miss the ball due to this constant lag on each return from my opponent.
Hopefully if you try First Person Tennis’s multiplayer you don’t have the same problem, mine might have been largely due to playing on European servers an ocean away from my location.

The bot returning a ball out of bounds
If it wasn’t already obvious I have to say that if you try any of these 3 tennis VR games on the Oculus Quest 3 or 2 it should be First Person Tennis.
There really is nothing like it, and it blew the other two contenders out of the water in almost every way.
There’s even a Mixed Reality Mode!

The mixed reality mode is pretty sweet too
Before we end this article, a quick shoutout to Court Time Tennis, which does have some VR tennis gameplay that you can try for free!
Unfortunately it didn’t make it as one of the 3 main games on this list because it’s really lacking in features and still needs some tweaks. Hitting the ball feels a lot like launching it out of a cannon, but one day it could be a truly great VR tennis game.
Anyhow, those are the 3 Best VR Tennis Games on the Oculus Quest 3, though they’re all the top 3 out of what there is to have, there’s really one that’s a truly great Virtual Reality tennis experience. Enjoy!
You May Also Be Interested In:

Subnautica VR Review and Setup Guide
Today we’re going to be looking at a fantastic survival game, Subnautica, and found out how well it plays in Virtual Reality without mods and with the Submversed VR mod.
Here we’re going to take a look at Subnautica VR both with and without mods. Without spoiling too much I have to say that the unmodded version of VR Subnautica only plays well when you’re using a traditional controller rather than moving your actual hands with VR touch controllers.
Today we’re going to be looking at a fantastic survival game, Subnautica, and found out how well it plays in Virtual Reality without mods and with the Submversed VR mod.
Subnautica is an underwater themed survival game that is a well known and liked experience as a traditional flatscreen game.
In it you’re the sole survivor of a crashed spacecraft. You have to find out how to not only survive on an alien planet completely covered in water, but also uncover the mysteries of it as you head deeper and deeper below the depths.
Here we’re going to take a look at Subnautica VR both with and without mods. Without spoiling too much I have to say that the unmodded version of VR Subnautica only plays well when you’re using a traditional controller rather than moving your actual hands with VR touch controllers.
If you really want a fully immersive VR experience with touch controls I’d recommend using the SubmersedVR mod to improve the game.
Though it’s an independent mod and has some issues, Subnautica VR becomes a true VR game with the addition of true touch controls and some VR interactions.
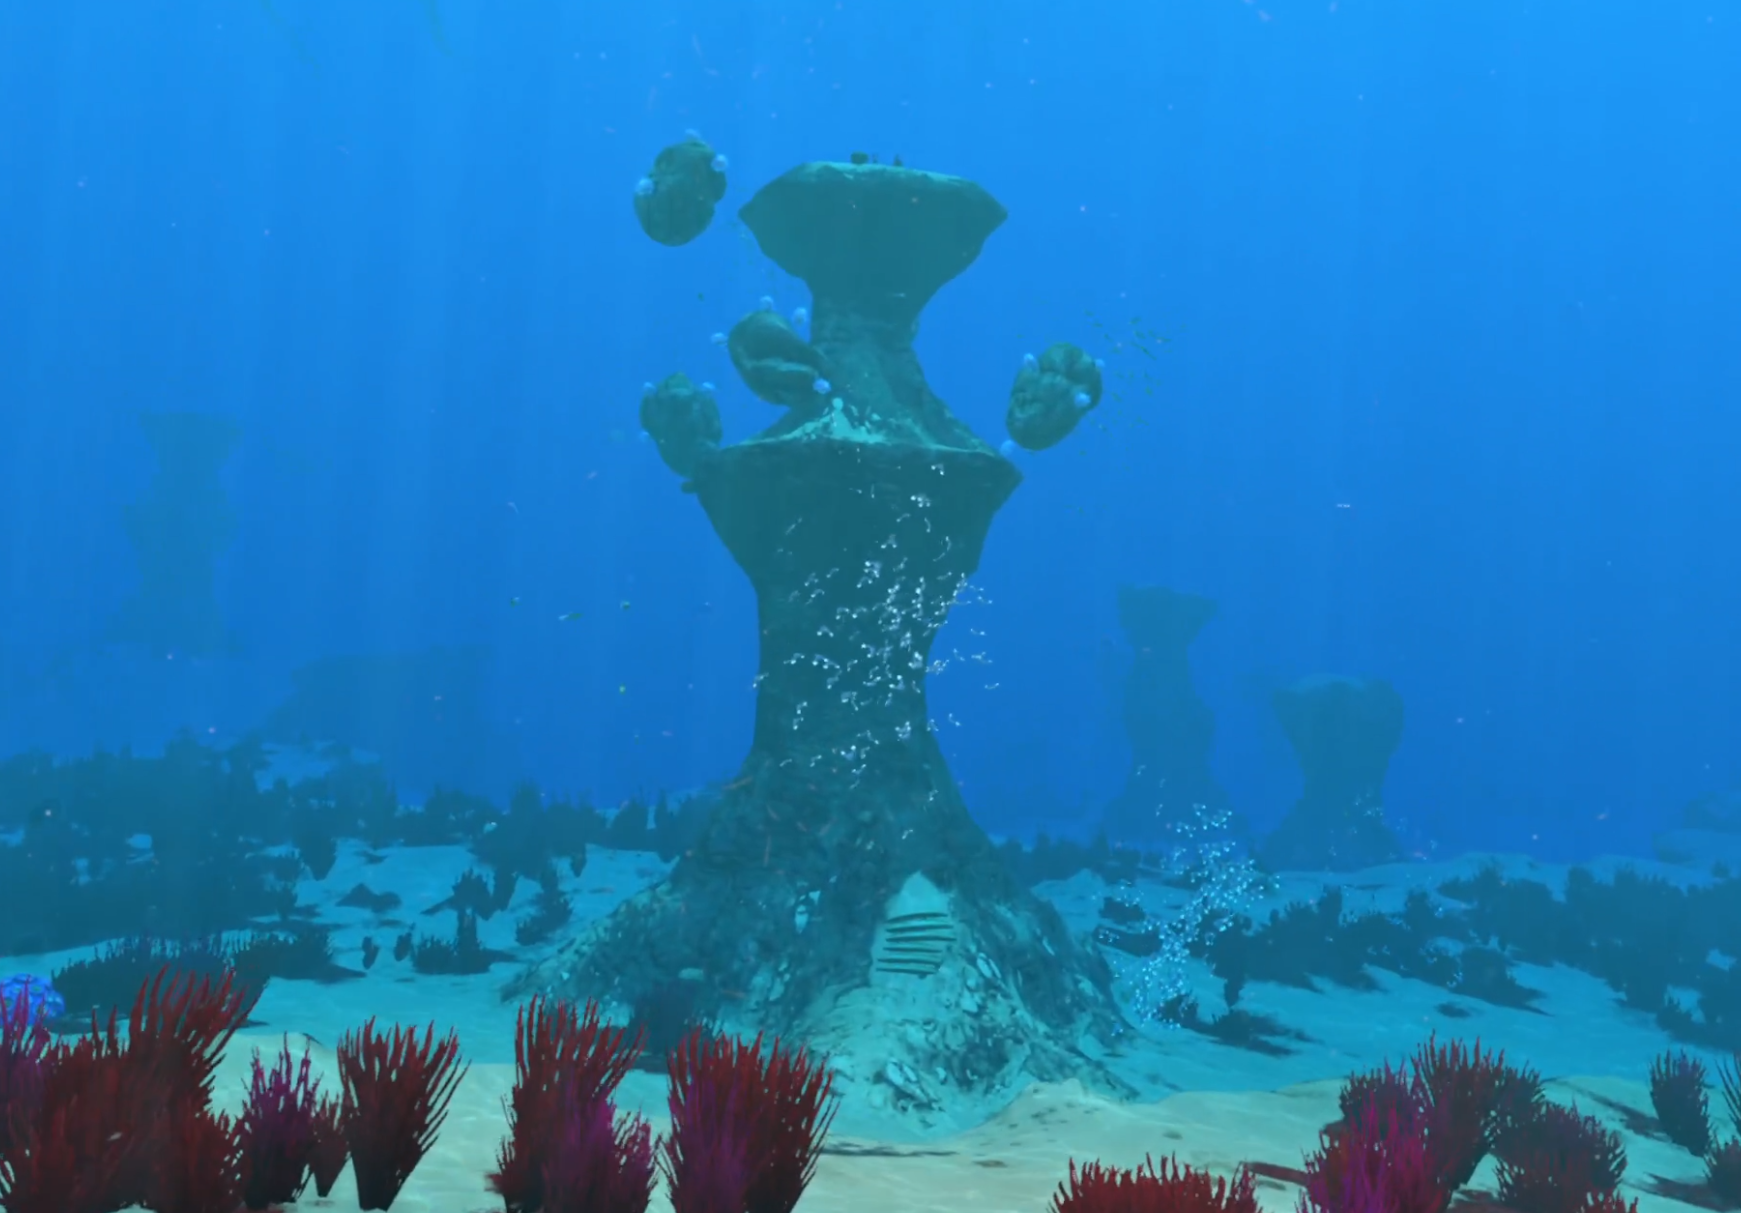
Subnautica VR is very pretty
First we’ll talk about how Subnautica VR plays unmodded, and then go into how VR Subnautica plays with the inclusion of a Virtual Reality mod.
If you’re already set on playing Subnautica in VR with the SubmersedVR mod then check out our setup guide by scrolling below the review portions of this article. If you’re still on the fence then check out our review and see if it sounds like fun to you.
Oh, and one more thing. If you want to play Subnautica VR on an Oculus Quest 2 or Oculus Quest 3 then keep in mind that Subnautica is a PCVR game, so you can’t run it in standalone on your Quest headset. You’ll have to connect your Quest to a computer to try it. You can enjoy Subnautica in VR on the Oculus Quest 2 or 3 if you have a PC to connect to and run the game.
Subnautica VR Review Without Mods
First let’s take a look at how Subnautica VR plays right out of the box.
You don’t have to have mods to play Subnautica in VR. Though as you’ll see I would really suggest you play this game with mods for the best Virtual Reality experience.
The developers added VR support that works simply by launching the game using SteamVR while you have a headset connected to your PC.
Just select “Launch Subnautica in SteamVR mode” when you start the game.

Select this to run VR Subnautica
Running VR Subnautica without mods is incredibly easy, and the VR port is pretty good performance wise.
Where other VR ports like that for The Forest VR feel incomplete and tend to have a lot of performance issues, Subnautica VR runs with a great framerate and few performance glitches or slowdowns.
The main menu can be navigated with touch controllers immediately without changing any settings by using the thumbsticks and A button.

The Subnautica VR main menu
Though there are many downsides to running Subnautica VR without mods that immediately become obvious after starting a new game.
After making it through the intro cutscene you’ll immediately notice that the fire that usually burns inside your escape pod is not there, even though the warnings flashing on the wall and the fire extinguisher is on the floor as usual.
Your ingame cursor will follow whatever you are looking at instead of your hands, which isn’t terrible by any means, though the tutorial prompts on how to move and use items also all display controls for a controller or gamepad, like an xbox controller.
Luckily they will go away if you leave the escape pod by looking at the ladder and hitting A, though you’ll also see that the animation for climbing out of your escape pod is cut out, and you’ll just teleport to the top.

These tutorial prompts will not go away until you leave the Escape Pod
Opening your PDA will have it display very close to your face, and there’s no way to select items on your quick selection bar once you’ve put them there.
Though there are some good signs, like a physical body in game that stays with your head if you physically move around your playspace.
Having your head part ways with your physical body if you move around a little is extremely annoying in other VR ports of flatscreen games like No Man’s Sky VR or even the MotherVR mod for Alien: Isolation. Luckily Subnautica VR doesn’t have that problem unmodded or modded.
The difficulties with unmodded Subnautica VR are very apparent with the controls though.
There simply aren’t as many buttons on touch controllers as there are on a controller. Normally you would use the sideways buttons on the D-Pad to change which quick slot item you are using, but that .
You can play around with the controller settings and get a little more mileage out of touch controllers, but there’s really no point since you won’t be using them to move your hands in game anyway.

The PDA gets very close to your face
There is awkwardness in other areas as well, mostly with items being way too close to your face when you use them, like the PDA.
While the VR Subnautica port runs well right out of the box and works in theory, it’s really intended for you to use a controller to play Subnautica, and enhance your experience with a VR view through your headset.
I couldn’t even figure out how to open the main menu to save or quit the game.
While this is serviceable when using an Xbox controller, and made even better with the VR Enhancements mod, there simply aren’t enough buttons on touch controllers to fully experience Subnautica in VR without a gamepad or xbox controller.

VR Subnautica without mods isn’t bad if you bring a controller
So to get the most modern VR experience out of Subnautica, we’re going to have to install the SubmersedVR mod, which will add touch controls to make a true Virtual Reality experience out of this survival game.
Of course if you’d prefer to play Subnautica VR with a traditional controller while viewing the world in Virtual Reality, then check out the VR Enhancements mod and enjoy.
However for this review we’re going to be a little more particular and focus on the most immersive VR mod for Subnautica that includes motion controls and other immersive enhancements, SubmersedVR.
VR Subnautica Review with the SubmersedVR Mod
Now for the real meat of this Subnautica VR Review, how it plays with the immersive Virtual Reality mod SubmersedVR.
Right out of the gate I can tell you that if you want to play VR Subnautica with touch controllers then this mod is the way to play it. With it you can use your hands to point at objects to use them, and do other things like hold your tools and PDA.
No more looking at stuff in order to use it, now you point to it with your dominant hand and press the A button to use an item. Even the main menu works with touch controllers.

With the SubmersedVR Subnautica VR mod you get actual hands now
Of course there’s still some of the original VR mode’s slight issues. The tutorial prompts are fixed and function as you would expect for touch controller input, but little things like the fire in your escape pod being missing are still present.
Still, SubmersedVR really does bring a lot of new VR interactivity to VR Subnautica. For instance, opening your PDA.
Instead of a static animation that just brings the PDA up to your face, it is now tied to your non dominant hand, and you use your other hand to interact with it.
Kind of like you are actually holding a tablet in your actual hand! You can press the buttons to use items or navigate menus with your pointer hand.

The new and improved PDA that you hold with your real hand
Even more importantly a lot of basic Subnautica actions are accessible with touch controllers.
Like the quick items menu. Now you can press the joystick on your dominant hand and move your hand over an item to use it anywhere. It’s fast, it’s easy, and it’s interactable with hand controls.
The same goes for the pause menu. You can now open it through your PDA.
Though it is a shame that the physical body we had in the unmodded version didn’t seem to make the cut. At best you can see your feet if you’ve got flippers on.
At least there continues to be no issues with your VR view becoming decoupled from your VR body.
Even if you physically walk around your VR “head” won’t stray away from your body. Your body in the game will move to keep up, which is a problem even a lot of otherwise very good VR mods for flatscreen games still have, like the MotherVR mod for Alien: Isolation VR.
I’d call that a win for any flatscreen to VR port.

Also watching the Aurora blow up in VR is amazing
Though you can’t expect full VR interactivity with this Subnautica VR mod.
Your ingame hands are mostly limited to just pointing at things or holding objects to point at things.
For instance, breaking a limestone outcrop still involves just pointing your hand at the outcrop and pressing A until you mine it into a resource.

Breaking a limestone outcrop in Subnautica VR
Taking a sample of something with your survival knife comes down to just holding the knife, pointing it at something, and pressing trigger to collect a sample.
Also sometimes, especially with the scanner, it’s not always obvious where the pointer coming from your hand is pointing, which gave me a few awkward moments where I pointed my scanner at something and pressed the trigger to scan, but nothing happened.
It turned out that the scanner was pointing further downwards than it seemed, and I had to awkwardly tilt my hand up to scan something in front of it, but it didn’t take too much getting used to.

The scanner can be a little awkward, but it’s not too hard to get used to
There are certainly technical limitations with modding Subnautica VR with more immersive VR interactions. More immersive interactions like, for instance, allowing you to swing your knife holding hand into a piece of flora to collect a sample.
These limitations don’t make the SubmersedVR Subnautica mod a bad experience by any means. You should just know that you’re going to be doing a lot of pointing and button hitting.
Other things don’t translate completely too. For instance your seaglide. You only hold it with your dominant hand, and can’t hold it with your other.
It also doesn’t really work how you might expect it to. Moving while you have your seaglide equipped is just faster.
Only the lights on the front are affected at all by where your hand is actually pointing it. You can swim forward while your seaglide is pointed straight up, which doesn’t make much sense.
Again, there are probably technical limitations here. I habitually held it in front of myself anyway. It was just easier.

Seagliding around the ocean floor
Still, overall modded VR Subnautica is fantastic. A lot of comfort and gameplay options are included with the mod that can make playing it more immersive.
They’re all accessible from the options menu and if you do try this mod I highly suggest you take a look, some of them are great.
For instance, if you don’t want your view constantly obstructed by your oxygen, health, hunger, and thirst bars there is an option to put them on your wrist instead of the bottom left corner of your view.
You can even turn on animations for things like climbing ladders, though those can be pretty uncomfortable as they artificially snap your view around and shake your screen as the animation plays out.
They’re all great options to have though, and Subnautica VR with the SubmersedVR mod is an extremely enchanting experience.

The Submersed VR options menu
Swimming deeper and deeper beneath the water and watching the glowing flora and fauna of Subnautica’s world float around you in Virtual Reality is truly amazing.
As we’ve said the controls aren’t the most tactile, though they are very serviceable, what makes Subnautica VR truly amazing is exploring its world with the immersive feeling of Virtual Reality.
The controls and interface being updated to allow for the use of touch controls just makes it easier to sink into that world and be able to play the game without awkwardly carrying a controller in both hands while standing up.
All of those fantastic Subnautica moments of discovery and dread, like the first time you enter the Kelp Forest, or the first time you see one of the underwater behemoths, or when you see the Aurora explode.
All of these moments look and sound and feel so great because they feel like you’re actually there.
It also helps that even with mods the game looks and runs really well in PCVR. No big performance issues like some other VR games.

Collecting Creepvine by pointing my hand at it and hitting trigger
Subnautica is a game that never really grabbed me until I played it in Virtual Reality.
It looked good on a flat screen and was fun and even relaxing to play and wander around, but being in it in Virtual Reality really sold me on its gameplay and made playing it feel more adventerous.
Finding new resources, making new items, and uncovering the secrets of the world piece by piece turned from an interesting distraction into a real adventure with the inclusion of VR.
So if you have the ability and desire to explore the depths of an alien planet I highly recommend you try out Subnautica VR and play it with the SubmersedVR mod.
Sure it’s got some limits, but they’re things you can easily become used to, and doing that is worth it to see things like this.

Seagliding around the Kelp Forest. This picture doesn’t do the feeling of having been there justice.
So if you have Subnautica installed and are interested in trying it with the SubmersedVR mod, here’s how.
How To Mod Subnautica VR with SubmersedVR
SubmersedVR is the best way to get a fully immersive VR experience out of VR Subnautica. Though if you’re trying to play Subnautica VR on the Oculus Quest 2 or 3, or any standalone VR headset you’ll need to connect your Quest to a PC to play this. Subnautica VR is PCVR only.
Unlike other Subnautica VR mods like the VREnhancements mod, SubmersedVR focuses on using touch controllers instead of relying on a traditional console controller like an Xbox controller connected to your PC.
So here’s how to install the SubmersedVR mod to mod your Subnautica game to be as immersive as possible in Virtual Reality. The biggest downside to this mod is that it currently only works on the Steam version of Subnautica.
We’ll be using the nexusmods.com mod manager called Vortex for this. It’s the easiest way to install the SubmersedVR Subnautica VR mod.
Oh, and if you already have some Subnautica mods installed like VREnhancements or the previous Motion Controls Mod, uninstall them before continuing. To make sure nothing goes wrong with mod compatibility issues you might want to uninstall and reinstall Subnautica. Starting from a fresh installation is the surest way to make sure nothing goes wrong.
So first go to the Vortex Mod Manager download page and click on “Download the latest version now.”

You’ll be brought to the “Files” tab of the Vortex Mod Manager page.
Scroll down and click “Manual Download” under “Main Files”.
If you don’t have a nexusmods.com account then it’s time to make one. Don’t worry, an account is free. Either log into an existing account you have or make an account and log in to download Vortex.
Once you’re at the download page hit “SLOW DOWNLOAD” and the installer .exe should be downloaded to your Downloads folder in a moment.
When it’s done downloading, run the installer. You can indicate a custom installation path if you want, but the default should work just fine.

Launch Vortex after it is done installing.
In the Vortex window you should see a notification bell in the top right corner.
Click on it to reveal your notifications. If you see one that asks you to restart Vortex then click on the Restart button.

Alright so now that you’ve got Vortex installed it’s time to link your Subnautica installation to it.
Click on the “Games” tab on the left side of Vortex and in the “Search for a game…” search bar type in “Subnautica.”
You should then see it appear, click on it and then on the “Manage” button that appears in the center. There’ll be a little popup box asking you to Download some files for it. Keep going and accept everything. Vortex will restart.
After Vortex restarts you will get this prompt.

Click the “Continue” button and a file explorer window should pop up.
In that window you need to find your Subnautica installation directory. The default path is C:\Program Files (x86)\Steam\steamapps\common\Subnautica. If you’ve installed Steam in a different folder then follow the filepath from the “Steam” folder onwards.
Once your game has been successfully found by Vortex another prompt will appear.

Click the checkbox and then hit the “Get BepInEx” box. Without BepInEx you won’t be able to install any mods for Subnautica, including the SubmersedVR Subnautica VR mod.
You’ll be taken to the page for Tobey’s BepInEx Pack for Subnautica. Hit the “Vortex” button near the top.

This should bring you to a downloads page.
Download the latest version of the BepInEx pack for Subnautica by hitting the “SLOW DOWNLOAD” button.
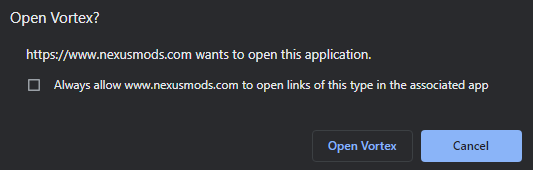
A popup should appear shortly in your browser. Hit “Open Vortex” on it.
The package will download and install automatically, though if you haven’t logged into Vortex with your nexusmods.com account then you’ll be asked to log in to link your account to Vortex.
After it’s done you should see some notifications pop up in the top right corner underneath the notification bell.
If not click on the bell and you should see a prompt asking you to Elevate the deployment. Click the “Elevate” button.

Now BepInEx should be installed for Subnautica.
To make sure that it is installed correctly start Subnautica (not in VR just yet). Shortly before the game starts you should see a little console pop up and some text scroll across it.
The console can be very fast and easy to miss.
It’s a little black box with white text. If you see that appear before the game starts, even for a moment, then you’re good to keep going.
So now head over to the SubmersedVR Github page and click the “Releases” button on the right hand side.

In the releases page under “Assets” click the first .zip file name that appears.
Make sure you’re doing this on the latest release, you can see the release numbers at the top of each release section.
The .zip file will download to your downloads folder, unzip it and open it. You should see some other folders inside.

These folders will have the same name as some others in your Subnautica installation directory.
So head back there. The default installation path is C:\Program Files (x86)\Steam\steamapps\common\Subnautica. If you’ve installed Steam in a different folder then follow the filepath from the “Steam” folder onwards.
Drag these two folders into whatever folder in the Subnautica installation directory has folders with the same name.
They should copy over with no problems and put all of their files into your Subnautica installation.
At long last you have finally added the SubmersedVR mod to Subnautica! Congratulations, though there is one more thing.
If you’re using an Oculus Rift or Quest headset then make sure that you run Subnautica from SteamVR, and not in Oculus VR mode. One way to make sure of this is by running SteamVR and then running Subnautica from SteamVR.
You can also add the -vrmode openvr option to Subnautica’s Launch Options in steam by right clicking on Subnautica in your library, selecting “Properties…” and adding -vrmode openvr to the launch options text box.

Now you can run Subnautica VR in Virtual Reality and enjoy all that this game has to offer with immersive motion controls! Enjoy!

Massive Ghosts Of Tabor Update Adds New Map and More
If you’re a Ghosts Of Tabor fan or are interested in how this Tarkov inspired VR game is shaping up, then you’ll be very excited to hear the latest news about the HUGE update that just hit Ghosts Of Tabor.
The new map is a very worthy addition, for a new total of three in this VR extraction shooter.
That’s not the only thing to get excited about though, there are a ton of UI changes that make shopping a much sleeker experience than before, new guns, a new DLC, insurance, and even a new weight and bleeding system!
If you’re a Ghosts Of Tabor fan or are interested in how this Tarkov inspired VR game is shaping up, then you’ll be very excited to hear the latest news about the HUGE update that just hit Ghosts Of Tabor with patch 0.5.7.3813.18711.
The new map is a very worthy addition, for a new total of three in this VR extraction shooter.
That’s not the only thing to get excited about though, there are a ton of UI changes that make shopping a much sleeker experience than before, new guns, a new DLC, insurance, and even a new weight and bleeding system!
Oh, and a lot of bug fixes and optimizations too. Ghosts Of Tabor has had a lot of bugs, but the devs have been squashing them so quickly. It’s great to see such massive changes coming so quickly from such a recently released VR game.
That’s the overview, now let’s go through each piece of this update before circling back and talking about how great the new map is.
Updated Mechanics
Now the size of your backpack won’t be the only thing keeping you from taking everything you want out of a raid.
With the new weight system the more you carry and the more those things weigh, then the faster your character loses running energy and the more slowly you are able to move.
You can see how much weight you are carrying on your watch.

You can see how much you’re carrying on your watch
Also sometimes when you’re hit in combat your character will bleed.
To cure a bleed you will need to wrap a bandage around your arm. This marks the first addition of the improved healing systems that Combat Waffle has been planning to add to Ghosts Of Tabor.
So far the system has been simple with a health bar and syringes that heal you over a short period of time. Over time Ghosts Of Tabor Updates will make this system more and more diverse and require more and more different types of healing items.
Bleeds and bandages are just the beginning.

Throwing a grenade. It’s way more fun now in Ghosts Of Tabor
Even more impressive is the new throwing system, which adds a ton of weight to throwable objects like grenades and knives.
Previously they would just sort of fly out of your hands and were difficult to control, but now it’s a lot of fun to toss a grenade. It feels like throwing a real object!

You can now insure items when buying them
Another important extraction shooter feature has also made its way into Ghosts Of Tabor with this update, insurance.
Now when you buy items from a vendor you can select a checkbox to insure them.
If you lose insured items in raid and nobody extracts with your items they will appear back in your Trade Room after some time has passed.
Speaking of shopping all of the shopping UIs have been given a facelift, just like the Raid selection and group UIs were a few updates ago.
Purchasing gear is not only easier now, but it looks much better. You can just select what items you want to purchase directly from the kiosk screen instead of having to scan them and then increase the quantity.
Overall this makes buying a new kit a much smoother experience, and you won’t have to rely on the scan gun so much. Though you can still use it if you want to scan your items off of the rack.

The new shop UI looks pretty great
Also speaking of items you won’t have to worry about running out of them, or money, anymore.
With the rations system you will get some items for free every six hours, every day, and every week. So even if you’re flat broke you will still be able to collect some gear to go into raid with.
The inclusion of entering a raid as a FENIX member (or scav if you rather) with a random kit would be more interesting, but for now the ration system is a good way of mitigating the fear of running out of money and gear in newer players.
As for more tangible enhancements in raid, you might also notice that crates, boxes, and other lootable objects now all have sounds when you open them.
This not only makes the experience of looting an area more immersive and tangible, but also means that when listening in on other players you’ll have a better idea of what they’re doing.

Ambushing a Scav on the new Ghosts Of Tabor map
There’s also a new melee combat system that adds more physicality to melee weapons. While it might not be likely in a modern combat game dominated by firearms, melee weapons don’t simply pass through enemies anymore.
They’ll impact other players and other objects with physics, sort of like The Walking Dead: Saints and Sinners. So if you want to knife fight somebody in Ghosts Of Tabor now is the time.
The patch notes have also mentioned being able to grab guns from other players’ hands, and good luck if you can pull that off, because we haven’t so far.
Not to say that this new feature is bugged or anything, just that sneaking up on someone and grabbing their weapon out of their hands is easier said than done.
New Weapons and John Wick DLC
Possibly the most impactful new piece of equipment in this Ghosts Of Tabor update is the Ammo Pouch.
Before now shotguns haven’t been very viable outside of the magazine fed Saiga, because potentially needing to take out your backpack, set it down on a surface, and then take shells out of it to load individually into your shotgun was way too cumbersome to do in combat.
Now you won’t have that problem anymore for shotguns because you can put your spare shells into the ammo pouch, set the pouch on your hip, and retrieve shells from it at any time.
This also goes for other types of ammunition, meaning that all sorts of weapons that are not magazine fed are now much easier to use, like bolt action rifles.

Getting some Mosin ammo out of an ammo pouch
That’s why it is also great that this update has also included two new bolt action rifles, the Mosin Nagant and M190A3.
Even if you’re at trader level 1 you can buy both of these rifles from the Spectre store.
Whichever you go with you can reload the rifle by taking individual bullets from your ammo pouch, making these weapons great options when you’re starting out.

The new rifles in Ghosts Of Tabor
Speaking of new weapons if you don’t mind spending a little money you can cough up 4 dollars for the John Wick DLC that includes a ton more new options.
It includes many iconic firearms from the movie John Wick 3, such as a custom Benelli shotgun, John’s iconic pistols, and even his wakizashi.

The new Taran Tactical John Wick 3 DLC is currently available for 4 dollars
Purchasing the DLC sends the weapons to your Trade Room (though it may be a little delayed).
You can also buy more from the Merchant of Death Kiosk. Even without purchasing the DLC you can loot them off of other players.
There’s also a new piece of armor, the Ronin Mask, which protects your face from gunfire and also tinges your vision with a purple tint that is supposed to make it easier to see in the dark.
New Tutorial Map
There’s also a brand new tutorial map with not only a shooting range and all of the tutorial stations that you’re used to, but also a kill house.
If you want to practice clearing rooms in Ghosts Of Tabor there are a lot of new options to practice in the new tutorial map.
It’s another valuable addition to the game, and a great way to warm up before getting into some raids.

Clearing the killhouse with the Benelli
The New Map Matka Miest
Now for the true prize of this update, the newest map called Matka Miest.
Matka Miest used to be the largest city on Tabor before the current conflict began, you can expect a pretty densely packed urban environment.

A street fight with an MP40 on the new map
If you’ve gotten tired of the Island of Tabor and Missile Silo maps then the new Ghosts Of Tabor map is a refreshing change of pace.
Its sometimes narrow and sometimes large streets offer more cover and shorter engagement distances than the wide open areas of the Island of Tabor, and still offer more tactical options and room to maneuver in than the Missile Silo.
Currently this map is a six man raid, and gives a good medium between the two extremes of map design that we’ve seen so far.

Looking around a corner for other players in Matka Miest
If you’ve been hankering for some urban combat in Ghosts Of Tabor then this map delivers with a wide variety of environments, and a ton of new loot spots to find.
It’s fairly densely packed, and especially with everyone eager to try the map often ends in very interesting gunfights.
This is a great addition to the game. Ghosts Of Tabor was desperately in need of new maps, and Matka Miest is a worthy addition to the roster.
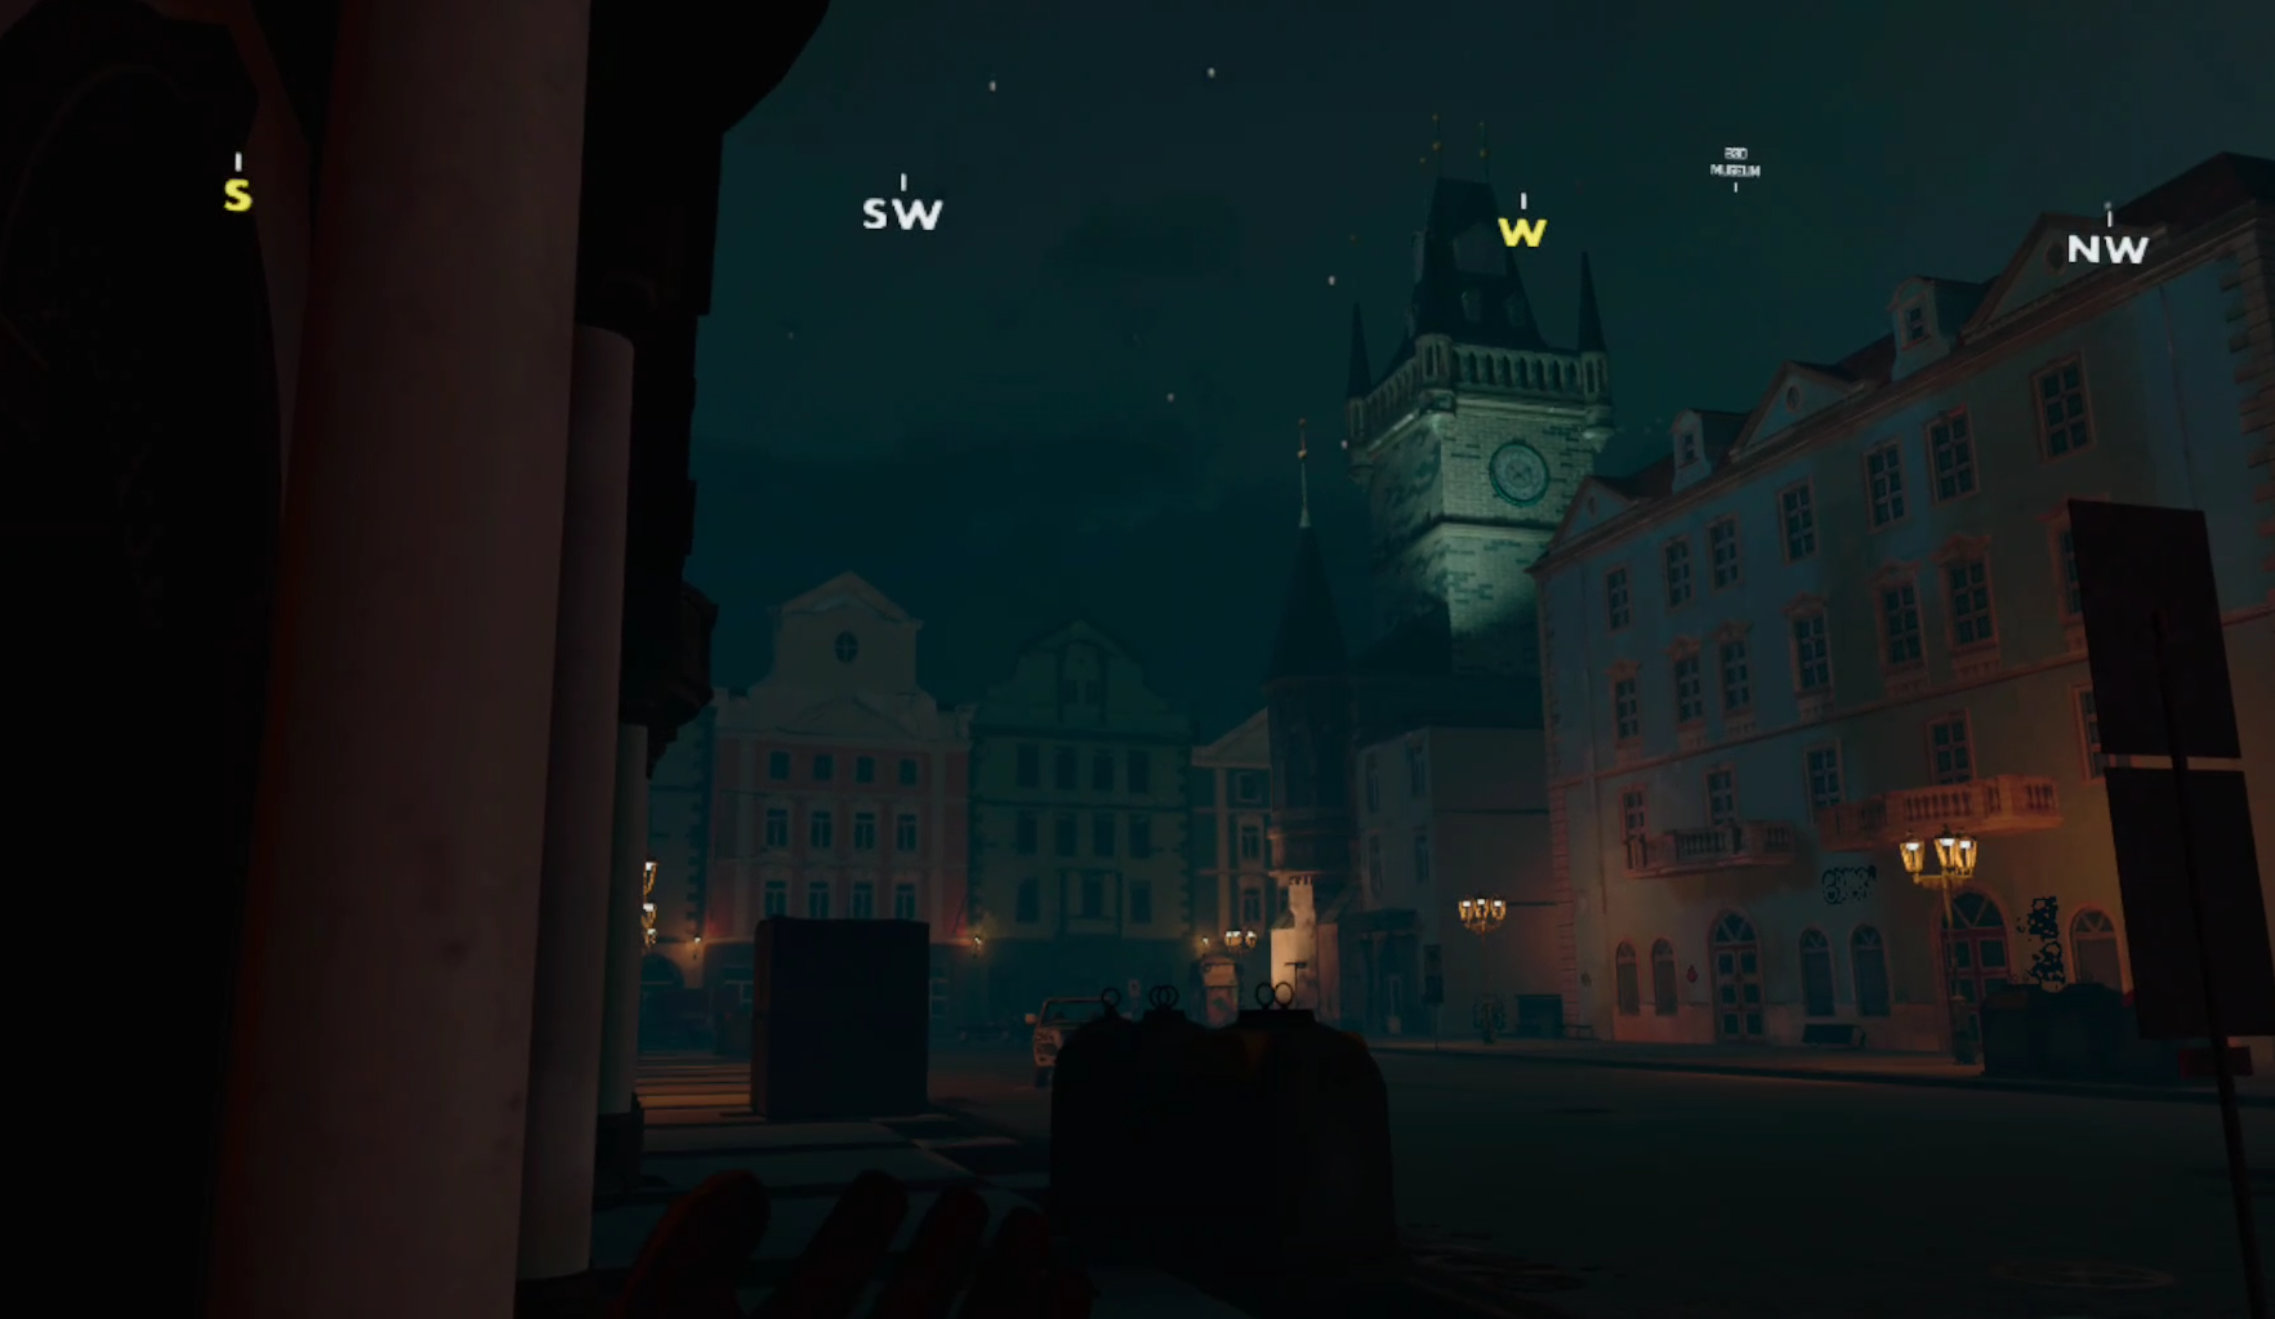
Check out how great that Cathedral looks
Though the map can only be played at night currently, even if you have day time selected in the raid terminal. A day version is likely to be added soon.
The map might feel a little too tight at the moment, but currently we only have half of it to explore. The other half is planned to be released in the future, and hopefully with some more additions to the half already available.
The one thing that feels lacking are the amount of indoor environments, most of the houses and other buildings don’t have accessible interiors, and so a lot of the map devolves into linear streetfighting without the option of ducking into a building to get away or reposition.
Still, this new map is awesome.
Well that’s all about this awesome Ghosts Of Tabor update. If you’ve been waiting to get back into the game now is a great time to try out all of these new features and weapons and most of all the new map. Enjoy!
Easily Solve The Resident Evil 4 VR Church Puzzle
If you want to solve the church puzzle in Resident Evil 4 VR you’ve come to the right place.
This Resident Evil 4 VR guide will show you how to easily solve the church puzzle in this fantastic VR game.
You’ll run into this puzzle shortly after the first time you come to the church, though unfortunately then it will be locked from the outside, and needs a strange circular key to get in.
If you want to solve the church puzzle in Resident Evil 4 VR then you’ve come to the right place.
This Resident Evil 4 VR guide will show you how to easily solve the church puzzle in this fantastic VR game.
You’ll run into this puzzle shortly after the first time you come to the church, though unfortunately then it will be locked from the outside, and needs a strange circular key to get in.
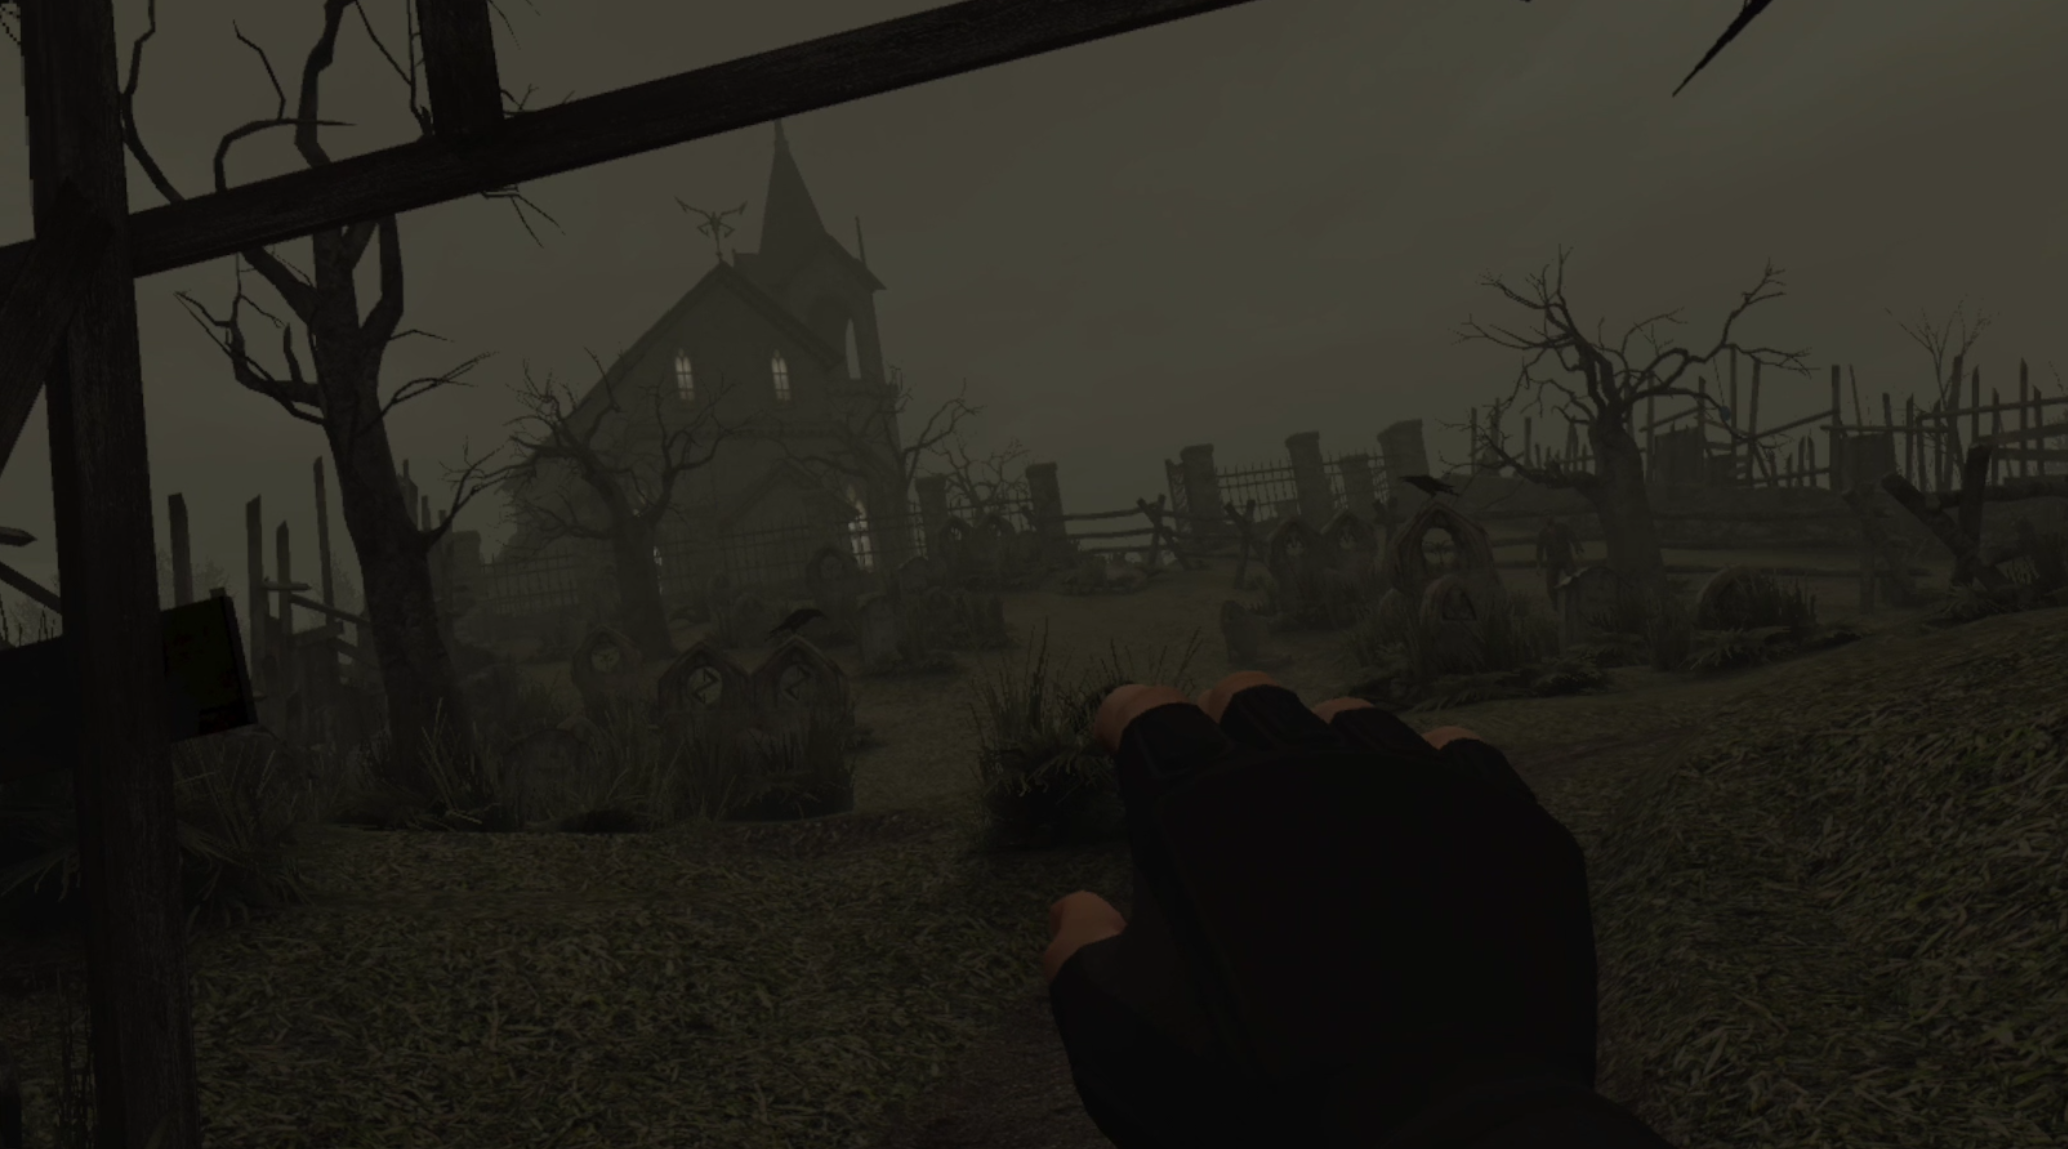
The Church containing the puzzle in Resident Evil 4 VR
To get this key you’ll have to go around the church and make your way to the lake. After defeating the giant fish monster on the lake you can make your way down the river and past the local mill.
To make your way to the other side of the river you can just shoot the boxes that are hanging from chains over the rushing water, and then jump over the boxes to get to the other side.
After pulling the lever to drop the sluice gate and stop the water you can make your way underneath the waterfall and take a boat to the Merchant’s cave hideout.
Finally after you exit you’ll have to fight the Giant boss, and after defeating him finally come back to the church. Along the way you’ll have gotten the emblem to unlock the door.
Some wolves will stand between you and the church now, but once you’re past them you can use the strange emblem to open the door.

Entering the church after unlocking it
Once you’re inside though, you may be wondering how to progress, and so that is where our guide begins.
This is how to solve the church puzzle in Resident Evil 4 VR.
You May Also Be Interested In:
How To Solve The Resident Evil 4 VR Church Puzzle
When you enter the church there won’t be any enemies.
The place looks pretty cool though. You may notice the multicolored symbol above the altar and the three unlit spotlights on the ceiling above you.
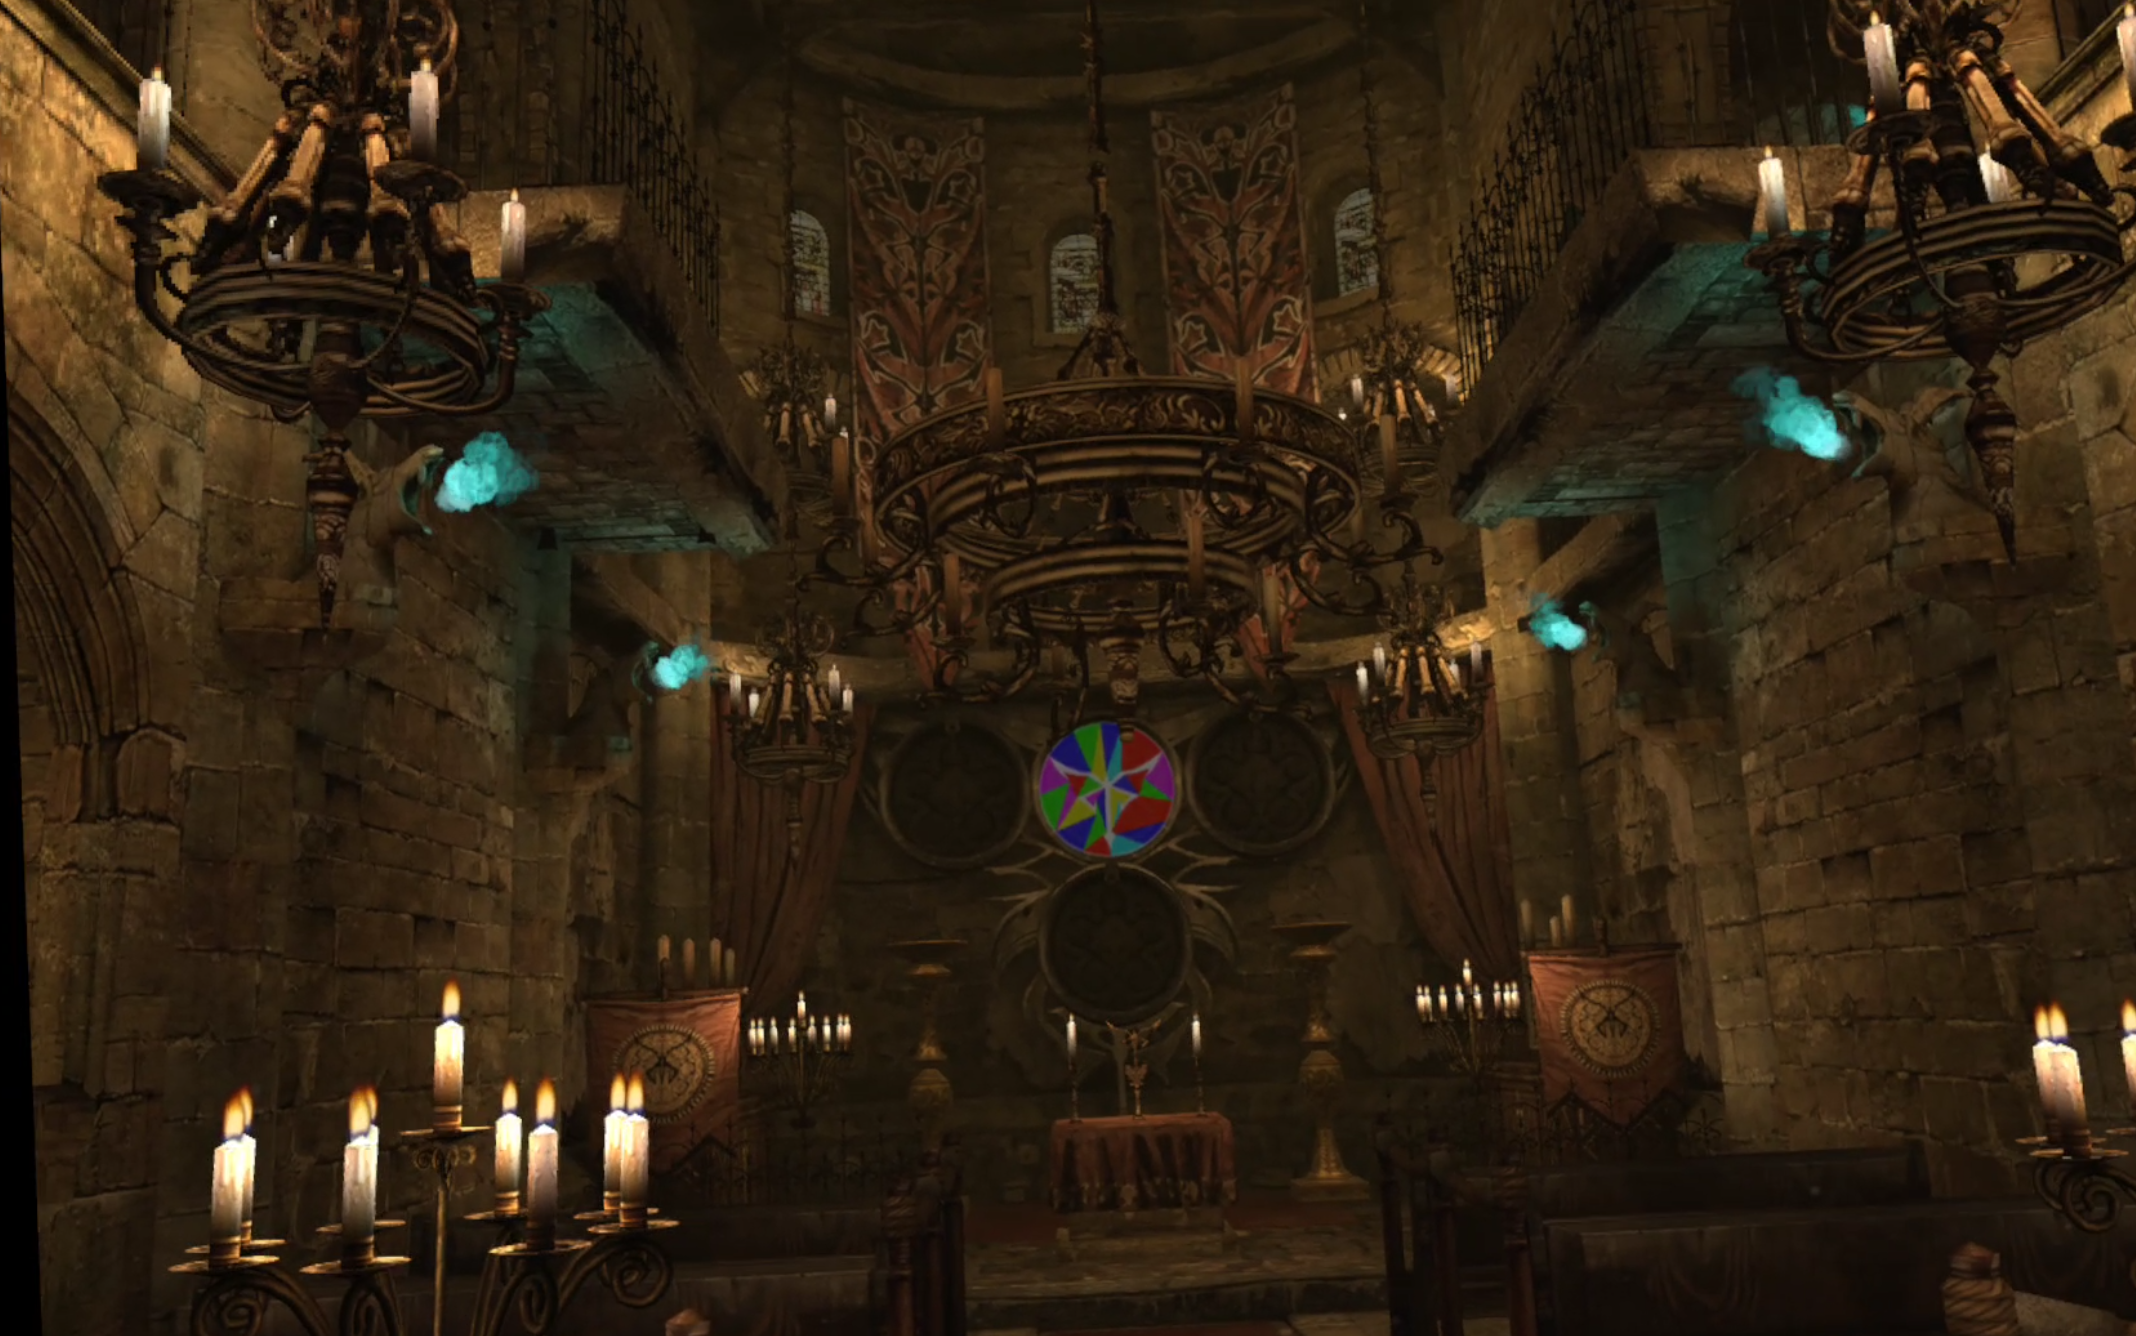
What you’ll see when entering the church
You can walk up to the Altar and inspect it, and collect a few items hidden around.
If you take a right immediately after entering there is also a barrel that you can break at the end of a short hallway.
You might as well grab what you can. Your survival in Resident Evil 4 VR is heavily dependent on your items.

A free barrel on the right side of the church
Once you’re satisfied with the ground floor where you really need to go to solve the puzzle is up.
So go to the little hallway on the left of the main entrance, opposite the side with the barrel.
You’ll see a ladder leading up to the upper balcony, take it.

The ladder on the left side of the church
Once you’re on the upper floor you’ll notice a multicolored control panel on the other side.
You’ll also notice a door that you can’t get to because of the metal gates on either side of it.
To solve the church puzzle you will need to get to the other side of the balcony and use that control panel to open those gates so that you can go through the door.

Step up this chandelier and hit A to jump across
To get to the other side stand close to the ledge until the “Jump” icon appears.
You might think that pressing A to jump would make you jump down to the ground floor.
Nope, in this case it actually makes you jump on the chandelier in the center, and from there you can jump across to the other side.
Once you make it to the other side of the balcony go around and head to the multicolored control panel.

The control panel that you will complete the puzzle with
There are a couple of barrels next to it that you might as well break for items.
Whenever you are ready to start the puzzle hit the A button to Operate the console.
You’ll notice the three multicolored spotlights power up and display some weird patterns next to the big colorful symbol in the center.
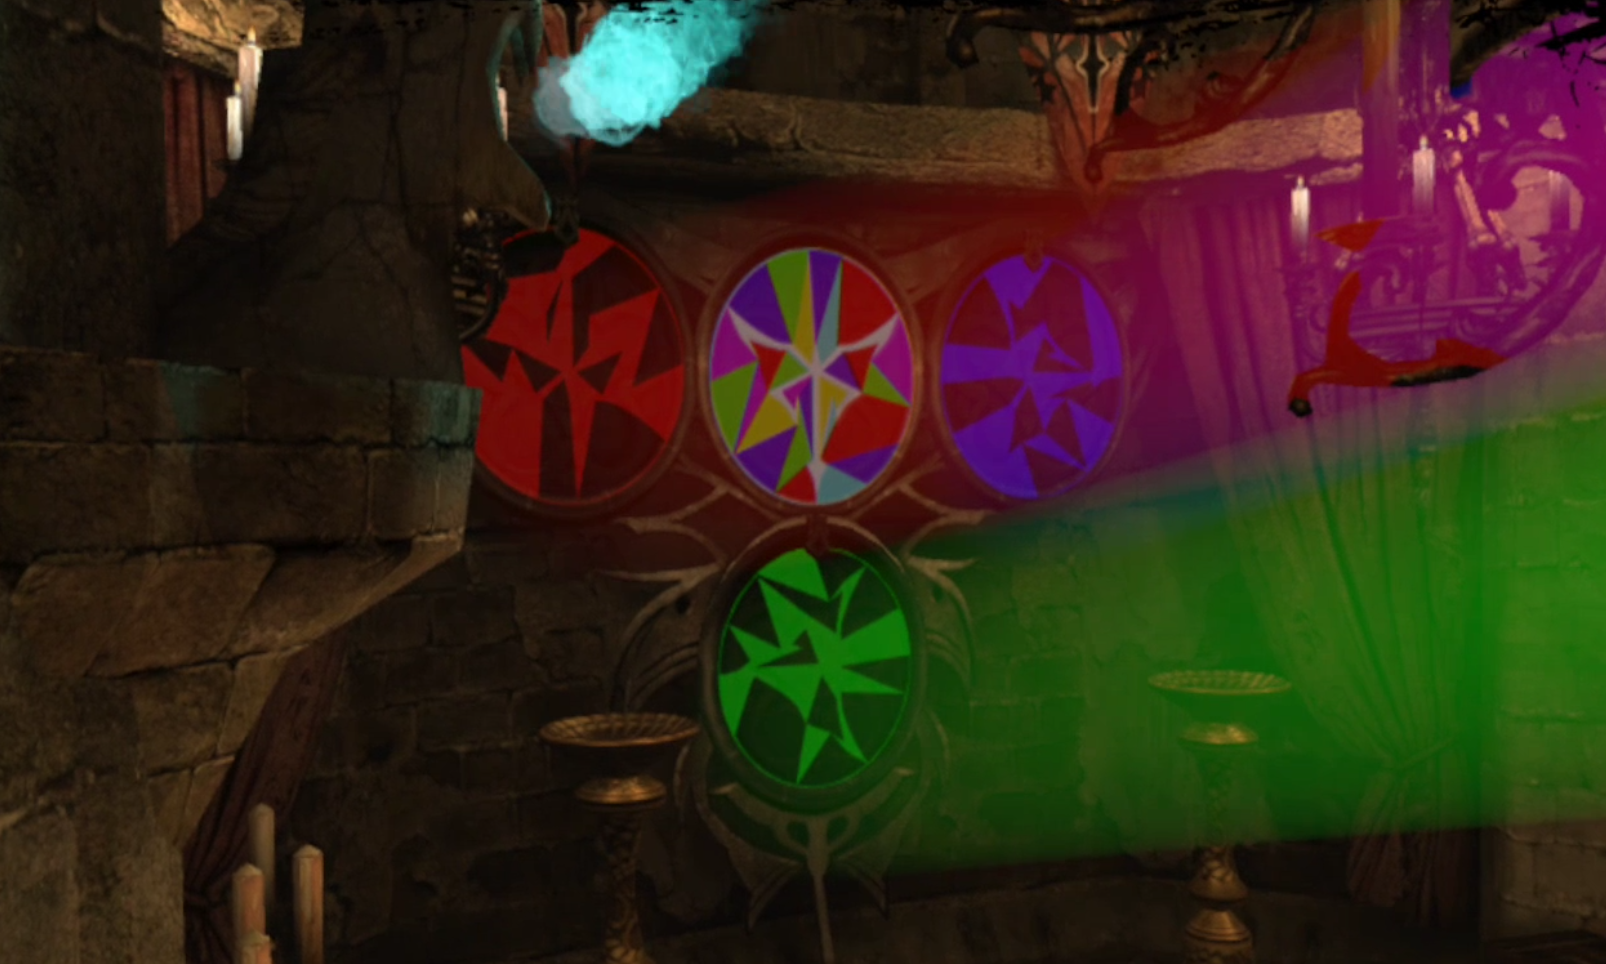
The three spotlights need to match the symbol in the center when combined
To solve the puzzle you hit the button of the same color as one of the spotlights, which will make that spotlight rotate.
You will notice the pattern on the wall change.
Then when you are ready you hit the rectangular button below the three colored buttons on the console to combine the three spotlight and see what result you get.
The goal is to match the colors of the spotlights to the pattern in the center.
If all three colors are in the same spot when combined, then they will make the color white. So you want all three colors to cover the area that the white symbol in the center covers.
If there is only one color in part of the circle then only that color will appear, and if two colors are mixed then they will make whatever color they make combined.
For instance, an area covered only by blue and green make teal, like in the bottom right of the symbol.
Unless you’re really frustrated and just want to keep progressing in Resident Evil 4 VR then I’d recommend you solve the puzzle. It’s actually pretty fun once you understand it.
If you would like to just complete the puzzle and not figure it out yourself, then here is the solution. Just turn the three spotlights until they match this screenshot.
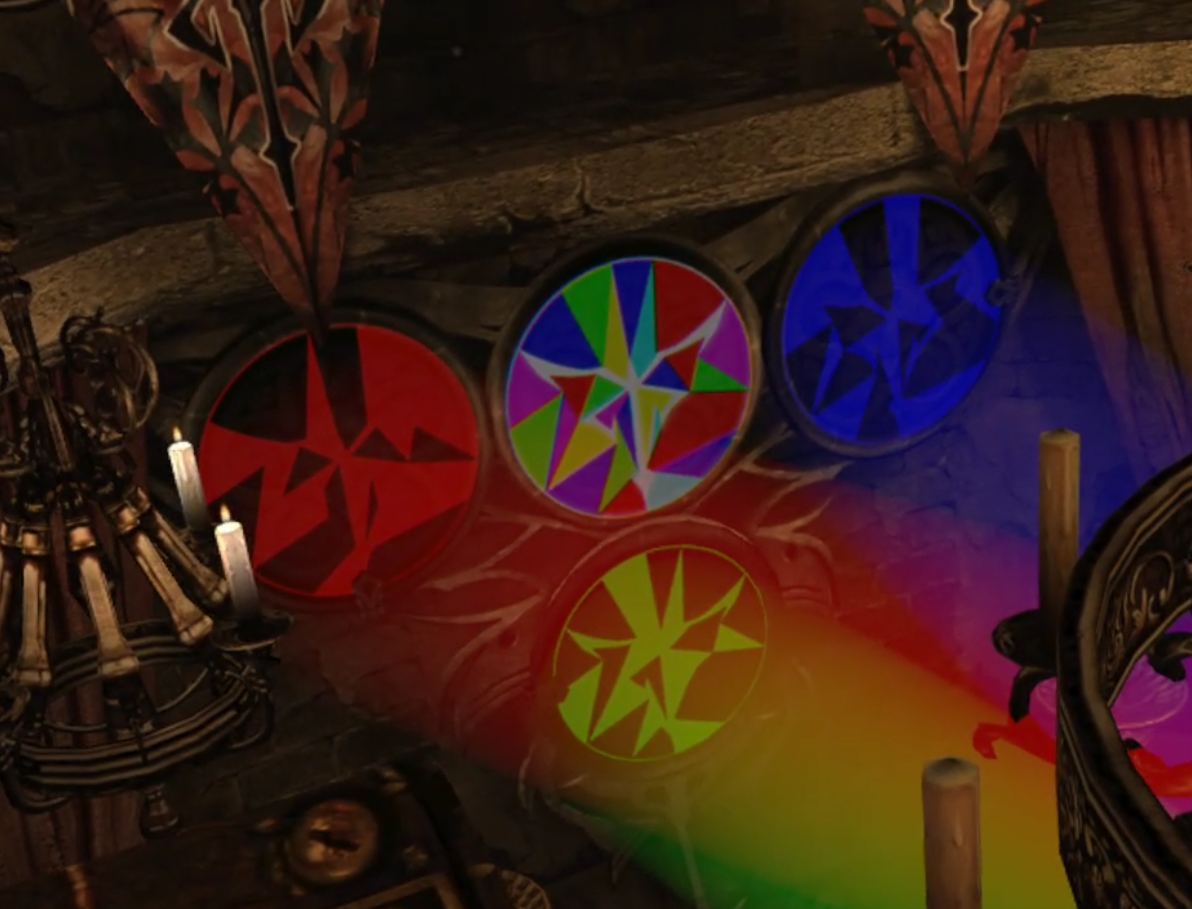
The solution to the Resident Evil 4 VR church puzzle
Once all of the circles look like that you hit the rectangular button again and you’ve completed the Resident Evil 4 VR church puzzle!
Now the gates will open and you can walk through the door to continue onwards and enjoy the next part of the game. Good luck!
You May Also Be Interested In:

5 Helpful Swordsman VR Tips and Tricks
Part of what makes this game so great is how hard it is. Swordsman VR aims to be a true sword fighting simulator, which is what makes it one of the best VR sword fighting games out there.
Of course this difficulty means you might have trouble winning fights at first, or just keep wailing on your enemy and wonder why they never seem to fall down.
Well don’t worry because in this Swordsman VR guide we’ve got 5 helpful Swordsman VR tips and tricks that are sure to help you whether you’re playing on the Oculus Quest 2 or 3, or on PCVR.
Swordsman VR is a fantastic game from Sinn Studio that is only getting better as the developers keep updating it.
Part of what makes this game so great is how hard it is. Swordsman VR aims to be a true sword fighting simulator, which is what makes it one of the best VR sword fighting games out there.
Of course this difficulty means you might have trouble winning fights at first, or just keep wailing on your enemy and wonder why they never seem to fall down.
Well don’t worry because in this Swordsman VR guide we’ve got 5 helpful Swordsman VR tips and tricks that are sure to help you whether you’re playing on the Oculus Quest 2 or 3, or on PCVR.
So without further ado sharpen your blade and get ready to get better at Swordsman VR.
Go For Weak Spots
If there is one Swordsman VR tip that will benefit your more than any other, it’s to learn to go for weak spots on your opponents (assuming you have turned armor physics on when starting the game, which you really should for a more fun experience).
Seriously, you will hardly do any damage if you just bang your blade against an opponent’s heavily armored parts over and over.
The way to do maximum damage in Swordsman VR is to look for weak spots. Each of the various types of opponents in this VR game have different weak spots, but once you find them they are consistent. So once you find them you’ll know exactly where to strike

Stabbing an enemy in the weak spot in their armor by their armpit
Basically you want to look for areas where their body isn’t covered by armor. If you strike a part of your enemy and hear a fleshy sound, see your blade sink in, and see blood, then you’re hitting them in the right place.
The upper torso, stomach and arms will often be defended by thick armor. Though that is not always the case as you’ll see in the tip after this one.
There’s always some sort of opening leading to the face, but those are very hard to hit and can be quite small on some enemies. Though hitting an opponent’s head does incredibly high damage.
So if you think you can finesse a hit to the face then go for it (especially if you parried successfully and activated slow motion).
Some opponents won’t wear helmets. So if you see a completely unprotected head always go for it for a quick victory.

An opponent with no helmet. An easy victory
Some enemy types have more armor and others have less, but all of them will have weak spots on their legs. Going for the legs is a very tried and true strategy in Swordsman VR.
While you’ll learn what enemies have armor in what spots over time through trial and error, start with the legs.
Even the bosses all have some unarmored part on their legs.
2. Certain Enemy Types Are Easier Than Others
When starting a new game in Swordsman VR you might be tempted to start from the left of the opponent list and do them in order.

The arena selection screen. You don’t have to go from left to right
The typical thought is that the beginner stuff is at the beginning of the list, right? Well no, that’s not the case in Swordsman VR.
The first entry on the list of opponent types to fight against in Swordsman VR are Knights. Knights are all extremely well armored and so very difficult to take down for a beginner.
Instead let’s take a lesson from our previous tip and start with opponent types that actually wear less armor and so are way easier to take down.
This way even with your starter gear and lack of stats you can get some victories under your belt and accumulate some wealth and levels that will make taking on the more difficult opponents easier.

Vikings have no protection on their chests
I recommend that you start by fighting the Vikings or the Samurai.
Vikings are the least armored opponents in the game and you can even stab them right through the chest or side. Their only truly armored areas are their stomachs and heads.
Though the Vikings do do incredible damage to a low level player with no armor and can take you down in a hit or two if you’re not careful, so another alternative is starting by fighting the Samurai.
While the Samurai are more armored than their Viking counterparts their legs and most of their arms are basically free game, and some will even spawn without helmets for easy head chopping wins.
You can also just vary between the two if you get bored with one enemy type, but if you want to play optimally focus on getting a lot of victories so you’ll have gold and experience to spend to become more powerful.

Even helmeted samurais have unprotected faces
3. Upgrade Your Gear And Spend Your Money Wisely
There are three ways to become more powerful in Swordsman VR, by getting better weapons, better armor, and better stats.
Weapons and armor are bought with money, and stats are gained with experience. Both of which are earned from winning in the arena.
When you’re just starting out keep in mind that you can always pick up the weapons of fallen enemies, which can be much stronger than those you start with. You can view the stats of all weapons in the buy menu, and they apply to the weapons of your enemies as well.
Though you’ll probably notice in that buy menu that there are a few upgrades you can get for extremely cheap early on. The Viking Sword is extremely cheap and so is the Katana.
Both are big upgrades over your two starting options, the Cutlass and Half Sword.

The Katana is a great upgrade to your starting weapons
You also would benefit from buying the cheapest quiver of arrows even if you don’t plan on bringing in a bow. This still lets you pick up the bows of fallen enemies and use them.
Otherwise you won’t have any arrows on you, though enemies do drop a few if they came in with a bow, just like all other enemy equipment they will disappear when they’re on the ground for long enough.
Also keep in mind that you have a limited number of arrows, so if you were thinking of going straight for a bow and arrows to play keep away with your opponents, then think again because you can’t just plink them from a distance forever.
Though if you miss you can still pick up arrows off of the ground for a limited amount of time.
A more expensive upgrade is armor, but investing just a few thousand into armor can make you significantly stronger early on in the game.
My recommendation is to go for the Viking Armor and Helmet as soon as possible. It not only is a great upgrade in defense, but also makes you do a TON more damage.
The Viking Armor gives both defense and damage
Oh, and if you have a problem with getting hit and losing a lot then try going with a shield and weapon combo. A shield is a great way to not get hit and a very easy defensive measure.
You can even hit an enemy with your shield to throw them off balance. It’s more effective than kicking.
4. Upgrade Your Stats and Spend Experience Wisely
So we’ve already mentioned that you get experience alongside gold.
Well just like gold you have some options of how to spend it, and if you want to get powerful and start challenging bosses you’re going to want to think about how you spend it.

Even knights have unprotected legs
There are a lot of stats to choose from and a lot of different playstyles you can try with different combinations of stats.
You could maximize your chances for slow motion so that you can use slow motion to go for quick face stabs on your enemies.
You can maximize speed and run around using up your arrows and doing hit and run attacks.
The simplest long term plan is just to increase your damage and health by investing into Vitality and Strength. A lot of weapons also have a minimum Strength requirement to use.
Luckily you can always respec later when you’re rich and powerful, and so you can spend your experience like you want without having to worry about needing to start all over again to try a different combination.

The Greed stat gives you more gold
So to get rich and powerful as quickly as possible you can try to accelerate your growth by investing early into the Greed and Intelligence stats.
These will increase how much money and experience you get for winning. Since the early levels are very cheap it’s worth getting a few before your first respec so that you get better rewards when you need them the most.
Of course once Greed and Intelligence levels start becoming expensive you might want to spend your experience elsewhere so that you have the stats to keep up with your opponents and be stronger in a fight.
5. Be Patient
Your biggest advantage against your enemies in Swordsman VR, except maybe for the fact that you are a human and can outsmart the AI opponents, is that you regenerate health.
When you take damage you’ll notice your screen going dark and the edges and your vision greying.
Whenever you see this immediately back off from the fight and just focus on defense for a while.

Hiding behind a big shield is a very effective defensive tactic
Your enemies will generally be very slow to catch up and keep attacking (unless you’re up against a ranged enemy, so hopefully you’ve got a shield or something to hide behind, though you can always just constantly strafe around at a distance so they miss).
You’ll regenerate your health and your vision will return to normal. Your enemies, with the exception of one boss that can heal himself, do not.
This advice holds the best up against bosses. They have incredible amounts of health, and fighting them is a marathon.
Even with good weapons and high damage stats you’ll need to hit them a LOT for them to go down. Push your luck once when you’re wounded and you’ll have to start all over.
A bow is also a great way to attack from a safe distance
So if you get hit be patient and wait until you’re back to full strength to continue the attack.
Well those are all of our Swordsman VR tips and tricks. I hope you’ve gotten something useful out of this guide and wish you the best of luck in the arena. Enjoy!
You Might Also Be Interested In: