


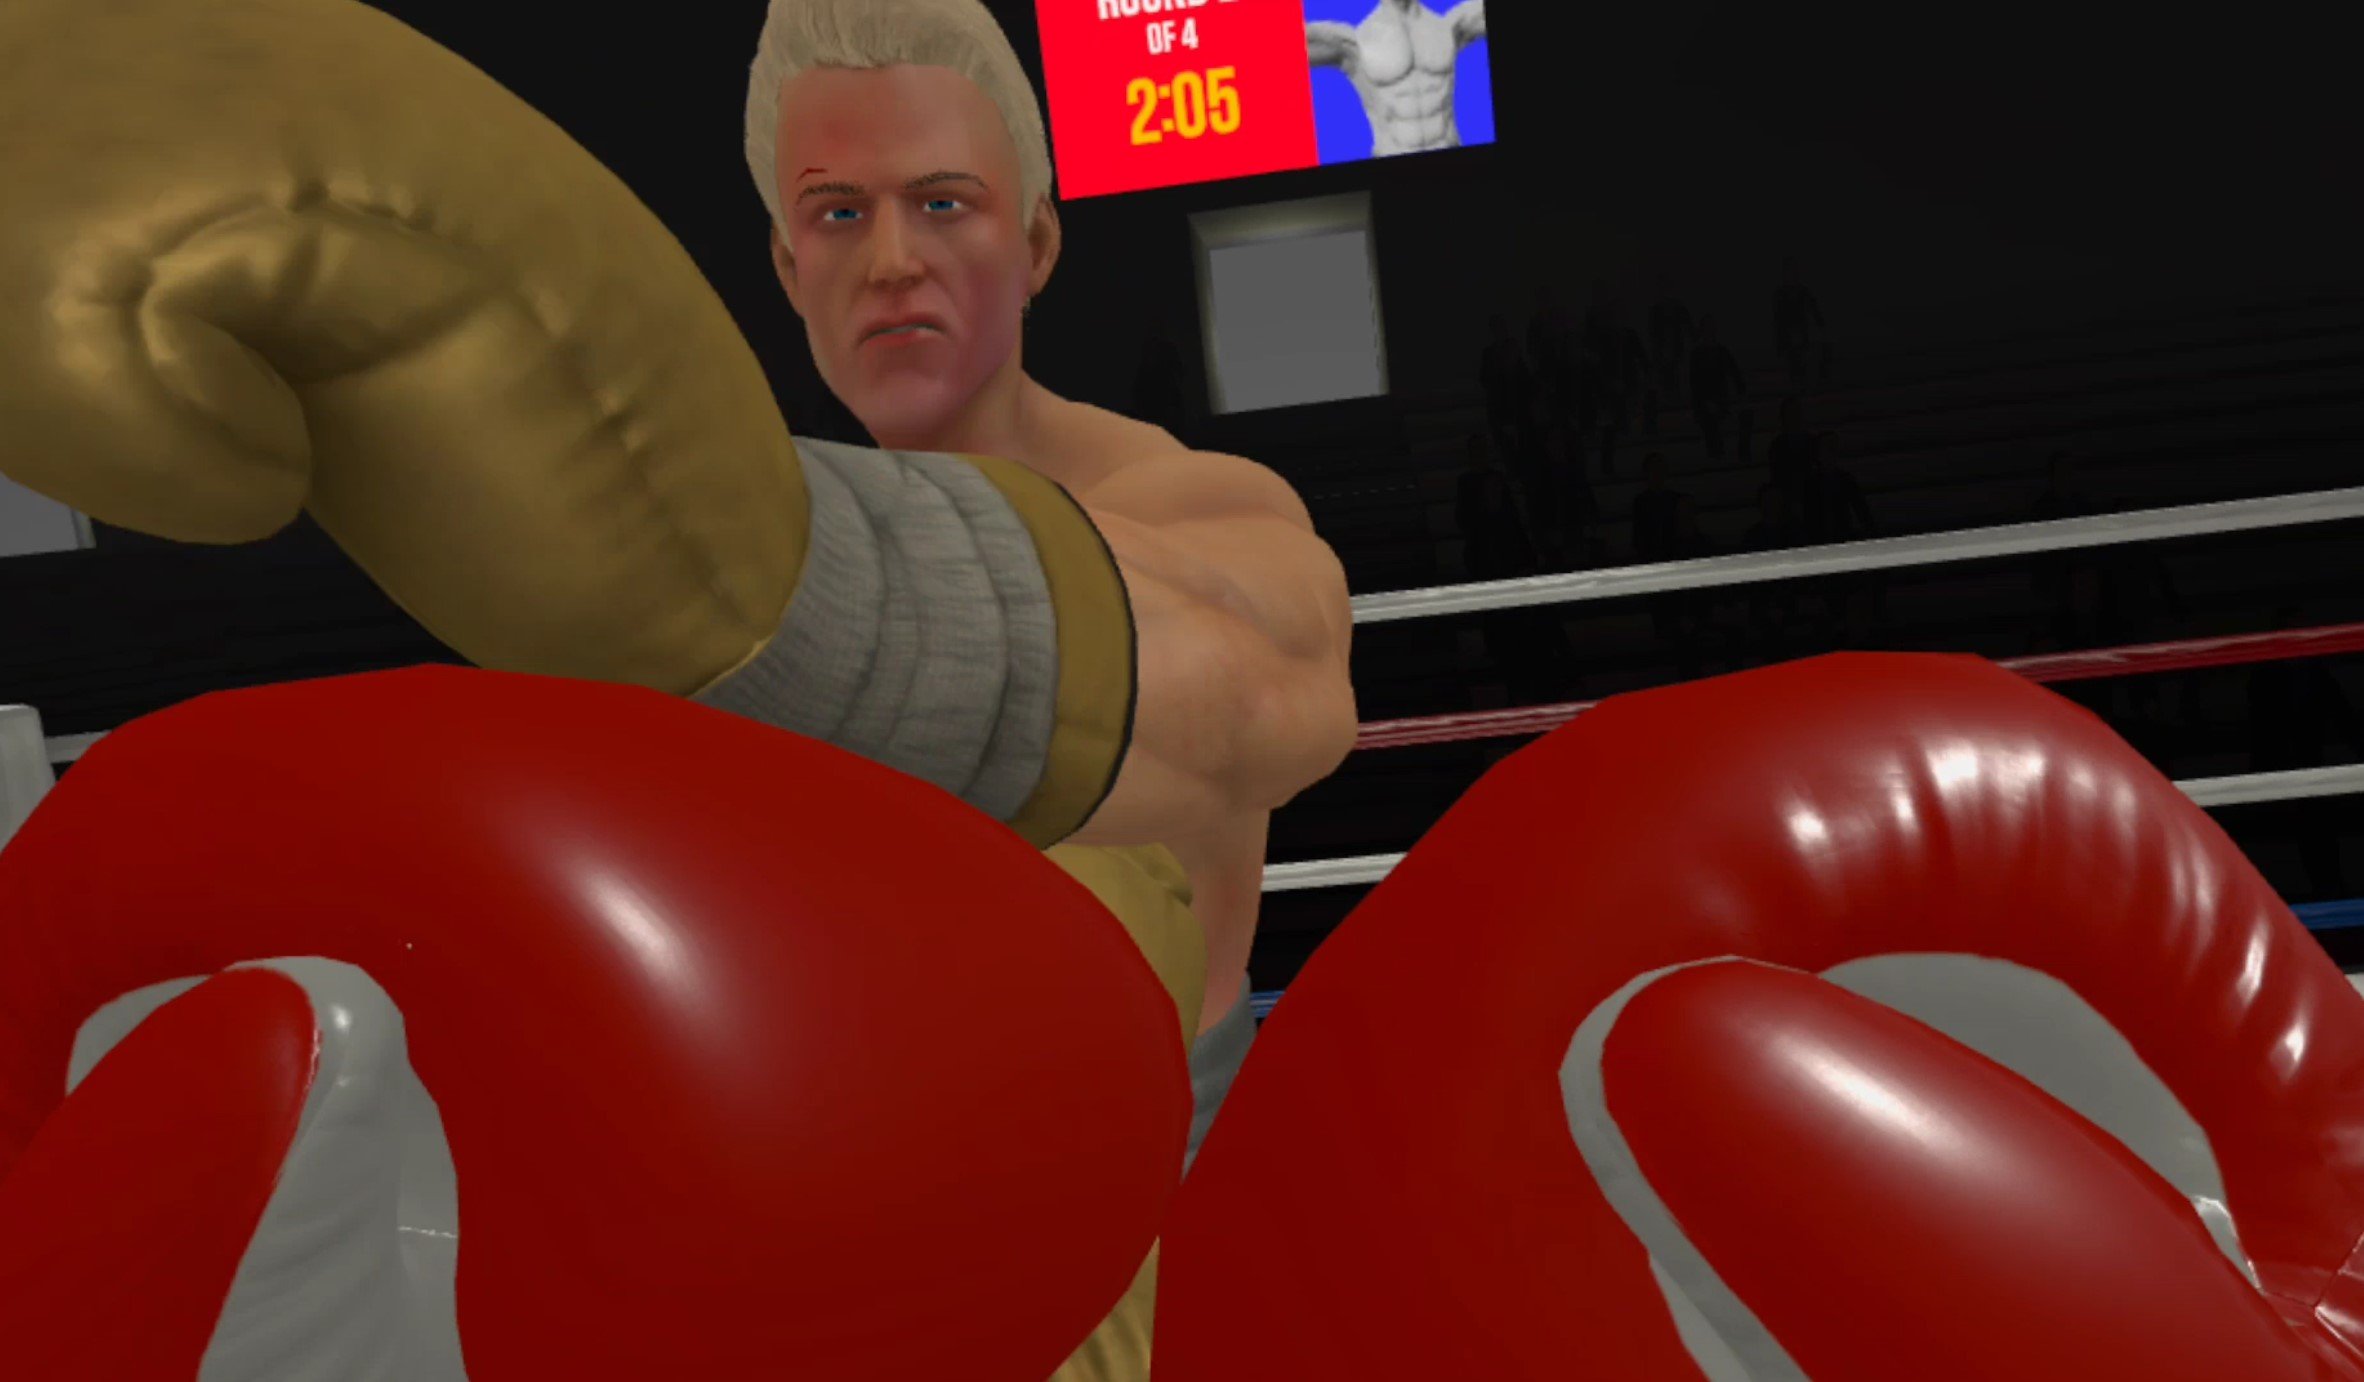
5 Essential Thrill Of The Fight Tips and Tricks To Become A Powerful Boxer
Thrill Of The Fight is a really intense game. It’s more of a simulation of boxing than some of its more arcade style counterparts, so learning how to fight well in Thrill Of The Fight is a lot like learning how to box well. Still, while there is some intersection of good boxing skills and good Thrill Of The Fight skills, there are some particulars to the game that good skill at boxing won’t get you.
Here we’ll cover 5 of the most essential Thrill Of The Fight tips and tricks to get you more knockouts and help you become a powerful boxer that can beat any of the opponents in this VR game on any difficulty level. You’ll even get a great workout while you’re at it, because Thrill Of The Fight is one of the greatest VR games for exercise out there.
1. Go For Weak Points - Thrill Of The Fight Tips and Tricks
If you just can’t seem to ever knock down your opponent in Thrill Of The Fight, then this tip will show you exactly why. You’ll notice that when you hit them a little splash of color accompanies every strike.

Landing a very effective hit on a weak point
You’ll often see that these little color splashes are grey, or maybe even yellow. If you get a really good hit then they’ll be orange or even red for maximum damage. Though if you’re really wailing on your opponent and landing hard hits, you might still just be doing grey or yellow damage.
Well hitting faster and harder always helps, but the main way to make sure your punches do as much damage as possible to your enemies are weak points. There is one in the center of the chest, one on their right side, one under the chin, two on either sides of the chin, and two on either sides of the head.
Hitting these weak points increases your damage by a lot, and if you really want to do enough to knock down your opponent you need to hit them. The best way to find out where exactly these weak points are, and practice hitting them, is the practice dummy.

The Practice Dummy in Thrill Of The Fight
Seriously, you have to use it at least once to get a feel for where to hit an opponent. Sure, the dummy doesn’t move, but a minute of practice swinging at it before you start fighting real fighters will increase your odds of hitting weak points a lot and is completely worth it.
If you want to knock your opponent down then a flurry of low damage blows isn’t the way to do it, focus on doing a lot of damage with a single punch.
2. Keep Your Hands Up - Thrill Of The Fight Tips and Tricks
The second thing you’ll need after a good offense that can actually knock out your opponent is a good defense so they don’t knock you down.

Blocking a punch in Thrill Of The Fight. Keep your hands up!
Luckily your hands are very effective at defending in Thrill Of The Fight. Hits bounce right off of them with ease, and so the best way to put up an effective defense is to just keep your hands up. If either of your hands isn’t punching then it should be covering your head.
Sure you can get hit in the body as well, but nothing will put you out of commission faster in a fight than a punch to the side of your skull, so keep those hands up.
Good footwork is also important, though it might not be as useful for you if your play space is very small. Even if you’re boxing in a space so small that you can’t move your feet, you can still benefit from moving your upper body and head around.
Dodging a punch in Thrill Of The Fight
Ducking and dodging out of the way of incoming blows is also a very effective defensive tactic, and you can also land a couple of hits on your opponent while you’re moving out of the way on their blow.
3. Damage Is Debilitating - Thrill Of The Fight Tips and Tricks
You’ll notice that your screen will go grey when you take a particularly nasty hit in Thrill Of The Fight. While luckily physical pain isn’t transferrable across a VR headset, this grey screen does show you how much you are hurt in the game.

After taking a bad hit your vision will go grey
Once your vision goes grey you should immediately break off any attack you’re doing and go on the defensive. One solid hit while your vision looks like this and you’ll probably end up on the floor of the arena.
You also deal less damage while you’re injured, so continuing to attack will probably be ineffective until you take a few seconds to recover and your vision returns to normal. All of your punches deal far less damage while you are hurt.
Though the same is true for the enemy fighter.

Ugly Joe after taking a really hard hit
After you land a particularly devastating blow you might notice that your opponent’s head starts wobbling. You also might notice that they attack you far less when they’re in this state, and will generally just block and take a few seconds to recover before trying to attack.
While they might still punch back depending on which fighter you’re fighting and which difficulty level you’re fighting them on, it’s a good idea to press an attack when you’ve already hit your enemy hard.

A fighter getting up after being knocked down. A few effective hits in succession can knock them down
Your damage will stack up on them, and the best way to knock down an enemy fighter is not to depend on a single hit, but to focus on several hard hits to weak points until they go down. You won’t have a lot of time to land another hit though, so go in and take your chance quickly before they recover and start attacking you back.
4. Low Damage Punches Are Still Important - Thrill Of The Fight Tips and Tricks
So a few high damage hits in a short period of time is the way to get a knockout on your opponent, but what about all of the places on their body that aren’t weak points? Well they’re not useless places to attack.

Hitting an enemy in the side can make them drop their guard
Sure getting a knockout with purely body shots is extremely difficult, though landing a hit in your opponents sides can still do some decent damage. What’s great about attacking low damage areas like the face or body is that your opponent will move their hands to block those areas after you hit them.
So if you land a devastating right hook on your enemy they will move their hands to protect the sides of their head, but you’ll need to land more high damage hits to knock them out. Their chin is open, but uppercuts are hard and maybe you’re not good at them.

A punch to the face can make your opponent change their guard
So just punch them in the face or body a couple of times. Soon they will move their guard and give you another opening to attack the weak points on their chin or the sides of their head.
Rotating your attacks will frustrate the enemy’s defense and give you a chance to hit weakpoints quickly in a short amount of time.
5. Pace Yourself And Take Breaks - Thrill Of The Fight Tips and Tricks
Of course even if you haven’t taken any damage in game your punches will still be ineffective if your actual body is physically exhausted.
Thrill Of The Fight is a really intense game, and it can make you tired very quickly if you’re not used to it. That’s why it’s important to take the previous tips to heart when planning your attacks. A few devastating and well aimed punches are less tiring than a bunch of weak and ineffective punches.

Swinging and doing hardly any damage will just tire you out
If you’re starting to get winded during a fight then go defensive. If you want to win your odds of hitting, blocking, and dodging effectively go way down when you’re tired. So unless you’ve only got a little time left and really need to get a knockout quickly to win you can give yourself a breather and just focus on not getting hit for a while.
It’s also important to drink plenty of water because Thrill Of The Fight is a workout no matter how you play it and will make you sweat. Feel free to cool down a bit between matches and walk around in circles for a bit and maybe do some basic stretches to stay limber.
Thrill Of The Fight is a fantastic game, but it will be no fun if you’re struggling to breathe. Wipe the sweat off of your face and out of your eyes and give yourself a breather before jumping back in.
Anyway those are all of the Thrill Of The Fight tips and tricks we’ve got for you today. Hopefully you can take them and use them to become an even better boxer in the ring. Best of luck and enjoy!
Oh, and if you want some more tips on Thrill Of The Fight then check out our knockout guide. We’ve also got some tips for each opponent in the game, and you might find something you’d like to read in any of the other articles on this fantastic boxing simulator.

The Easiest Way To Install Skyrim VR Mods
So you want to play modded Skyrim VR, awesome! Unfortunately downloading and installing enough Skyrim VR Mods to create a completely new Skyrim VR experience is a pretty hard task. You’ve got to worry about what mods you want, which ones work, which ones don’t, dependencies, and a ton of other problems that can cause bugs, make your game crash, or make it just not start at all.
Luckily there’s a way, the easiest way, to install a ton of Skyrim VR mods at once that are built to change the game to enhance functionality, graphics, and gameplay. They’ll also all work together, and you don’t have to browse nexusmods.com for hours and hours figuring out what you do and don’t need.
So here’s the easiest way to install Skyrim VR mods using a fantastic tool called Wabbajack.
Wabbajack - Easily Install Skyrim VR Mods
Wabbajack is a community made tool that is used for both Skyrim VR Mods and flatscreen Skyrim Special Edition Mods. Here, of course, we’re going to be downloading and installing Skyrim VR Mods with Wabbajack.
Some warning though, the actual downloading process will still take a while and require some input on your part. While Wabbajack is the easiest way to download and install Skyrim VR mods quickly, there’s still going to be some legwork on your part.
Not only can we download mods through a predefined list of mods that are made to provide a complete modded experience and work together, but Wabbajack also manages the downloads and files so we don’t have to do a ton of boring dragging and dropping ourselves. So let’s get started.
First go to wabbajack.org and download Wabbajack.

Downloading Wabbajack from wabbajack.org
A Wabbajack application file will download to your browser’s usual downloads folder. Don’t run it quite yet though. We want to run Wabbajack in its own folder, not your Downloads folder. Wabbajack will make some extra files, and so won’t run in certain places.
The easiest way to run Wabbajack is just to create a new folder directly on your C:/ drive or any other drive you might have on your PC and name it something like “Wabbajack.” Once you’ve created this C:/Wabbajack folder, move your newly downloaded Wabbajack application into it and run it.

The Wabbajack Start Screen
Using Modlists - Easily Install Skyrim VR Mods
Now that you’re running Wabbajack, hit the “Browse Modlists” button on the main page, and filter for Skyrim VR Modlists at the top. You’ll see there are a few options for you to pick from here. These are your options for predefined modlists that you can use through Wabbajack.
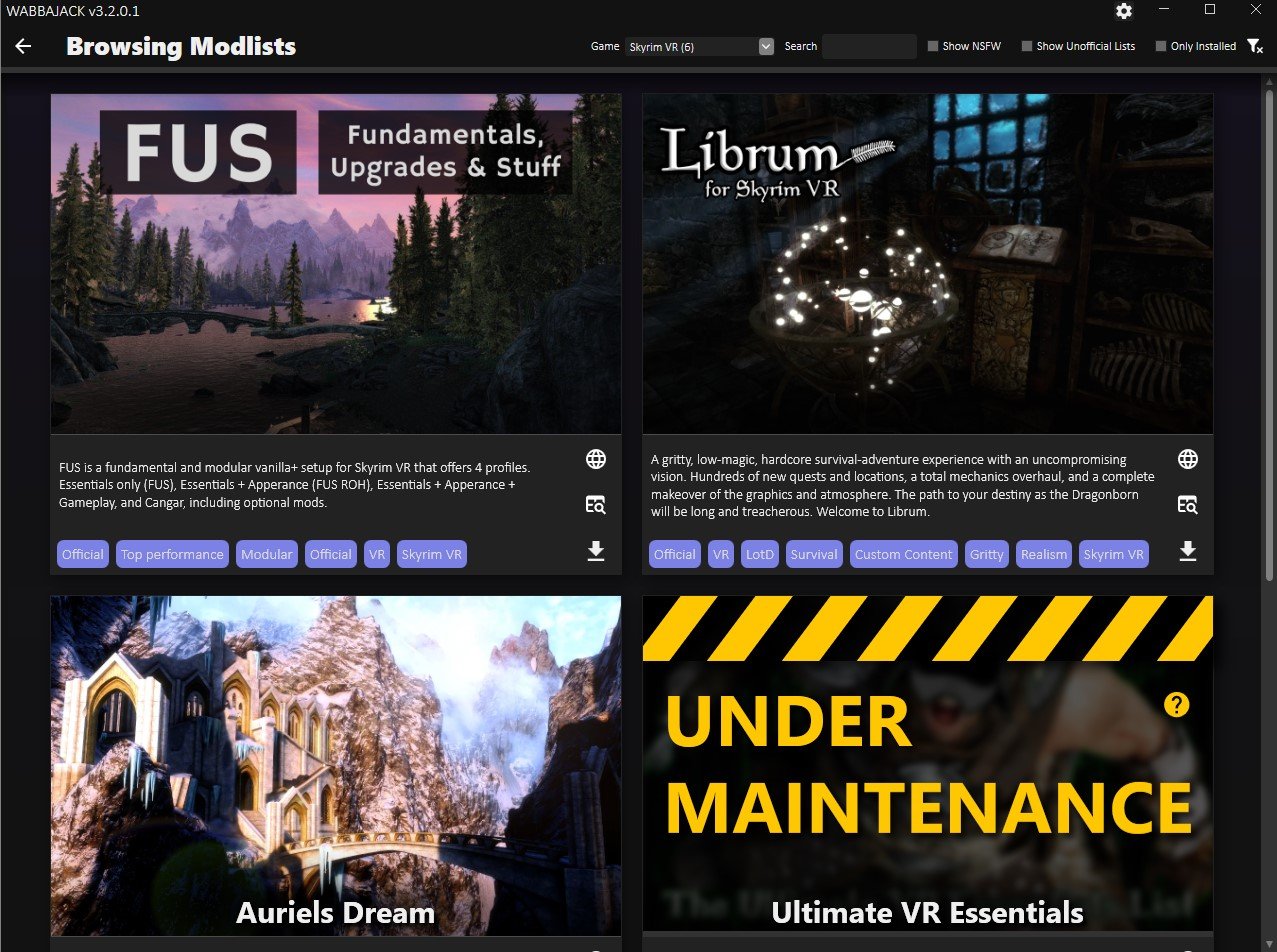
Browsing Skyrim VR Modlists in Wabbajack
There are some great options here, and if you want an improved but still recognizeable modded Skyrim VR experience that doesn’t stray too far from the base game, then you’ll want to go with FUS, which is short for “Fundamentals, Upgrades, and Stuff.”
While the rest of this article is applicable when installing all modlists through Wabbajack, the specifics will revolve around installing FUS. If you want Skyrim VR but better, then FUS will give you that with a ton of improvements. It’s also modular, so you can decide what Skyrim VR mods you want to keep in the modlist.
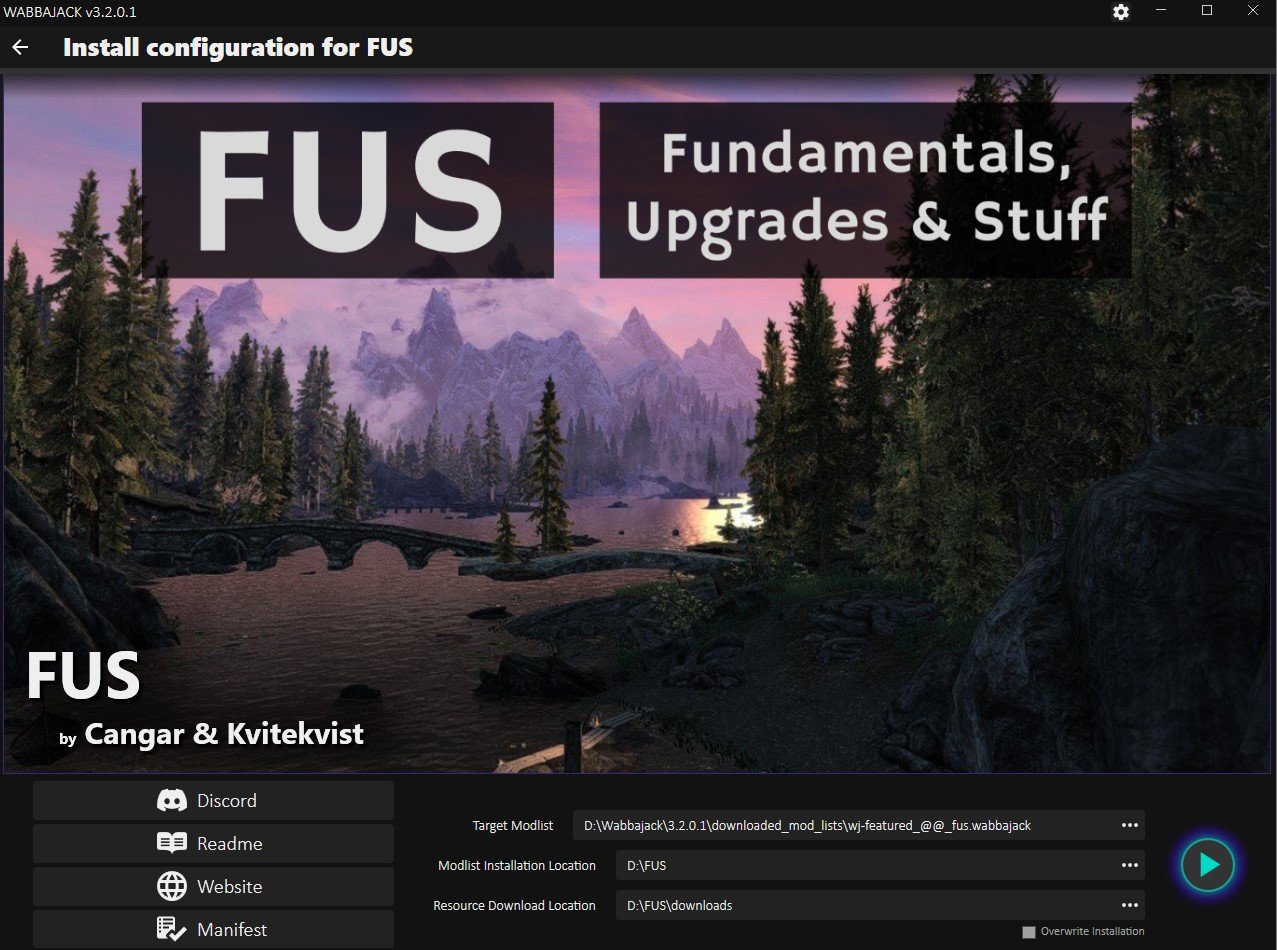
Anyway, since we’re installing FUS, hit the little arrow button in the bottom right of the FUS modlist icon. After a wait it will turn into a play button, hit that. You should see a screen like the one below.

Ready to download the FUS mods
The only difference between this screen and yours will be that the “Modlist Installation Location” and “Resource Download Location” sections will be empty. You’ll want to create another folder in the same location you made your Wabbajack folder earlier, and then add that folder location to both of these paths, except the “Resource Download Location” should have \downloads at the end.
As you can see in this example, the name of the folder here is FUS. So you might think it will be time to hit the play button, not yet though. You might have noticed that a github page appeared right when you got to this screen. Well it will have a long list of instructions and other stuff. It seems complicated, and sure it is, but we’ll distill some of it down for you here to a few simple steps to do before you start.
If you run into issues at any point and can’t figure out why, then check out the “Troubleshooting” section at the bottom of this article.
FUS Preinstallation Steps - Easily Install Skyrim VR Mods
Alright so you’ve got Wabbajack ready to start downloading mods, but haven’t hit that final play button quite yet, time to get your PC ready for FUS. First you’re going to need to install some extra software to support some of the mods in FUS.
You’ll need to make sure you have some Microsoft Visual C++ Redistributable Packages installed. Here is a direct link to them, download the x64 version. Once the installer downloads, run it, though you might get this error.

If you see this you’ve already got the right Microsoft Visual C++ packages installed
If you do, no big deal, you’ve already got the right things installed, and can move on. Otherwise the installer is straightforward so just follow along it.
Next you’ll need to install some old versions of the .NET 5.0 Runtime. Go to this webpage from microsoft and download and install both the console and desktop app versions. This means you’ll end up running two installers, one for each.

Where to download the .NET 5.0 Runtime installers
With that out of the way you’ll want to uninstall Skyrim VR and then reinstall it. You want as clean a version as possible. If you’ve already got some Skyrim VR mods installed, then you’ll want to follow these steps to make sure your installed version is as clean as possible. We’ll want nothing to interfere with the FUS mods.

Advanced steps to clean your Skyrim VR installation
If you run into problems later on you might want to double check this github page for any other things that might interfere. Additionally make sure your language in Skyrim VR is set to English, and if you ever changed your Render Resolution in Steam VR, change it back to 100%.
Now you’re ready to download and install FUS! Oh, and if you run into issues at any point and can’t figure out why, then check out the “Troubleshooting” section at the bottom of this article.
Downloading And Installing the Skyrim VR Mods - Easily Install Skyrim VR Mods
Now you should go back to Wabbajack and hit the play button in the bottom right corner to start downloading your shiny new Skyrim VR mods.
The FUS download screen, time to hit that play button
Once you do the modlist installer will run, and very quickly it will hit a point where you have to start downloading mods. A browser window will appear and ask you to log into a nexusmods.com account. If you don’t have one already then make one, they’re free.
Once you log in the page will automatically redirect to the download page for the first mod in the list. It will look like this.

Downloading a Skyrim VR mod from nexusmods.com
Here’s the boring and lengthy part we mentioned earlier. If you don’t have a premium nexusmods.com account then you’ll have to manually click the “Slow Download” button for each mod that comes up. A premium account will automatically download the mods.
This will take a while, there are over 300 mods to download for FUS, but Wabbajack makes it as fast as possible. Once a mod is ready to be downloaded the page will appear automatically, all you have to do is hit the download button for each one.
You see normally you’d have to go to the Skyrim VR mod page, go to the files page for that Skyrim VR mod page, then download it through this screen, and then move the downloaded Skyrim VR mods folder to the right location.
With Wabbajack all you have to do is hit the “Slow Download” button, wait a bit, and then when another appears click the “Slow Download” button again. Some of these mods also take a while to download, and if that happens another download page won’t appear until there’s a space in the queue for a new download. So you’ll be waiting for a while.

Downloading the FUS Skyrim VR mods with Wabbajack
So kick back, relax, maybe watch a youtube video or five, and hit that download button when it shows up. You can see the Skyrim VR mods that are downloading in the bottom right section of the Wabbajack screen.
Oh, and if a mod seems to never finish downloading and the bar doesn’t move for a long time, you might need to restart Wabbajack and reopen the FUS modlist installer. Just follow the steps we’ve done to get to this point in Wabbajack and it will pick up right where it left off. Do the same if Wabbajack crashes.
Once all of the mods are downloaded the installer will automatically unpack and install them, this will also take a while. Still, all of this is way easier than downloading and installing all of these mods yourself.
If you run into issues at any point and can’t figure out why, then check out the “Troubleshooting” section at the bottom of this article.
Playing Modded Skyrim VR - Easily Install Skyrim VR Mods
So the Wabbajack installer is complete. All your Skyrim VR mods are ready to go. So you might be wondering how to actually run them. Well for FUS you don’t just run Skyrim VR from Steam like you normally would. No, instead you need to go to the FUS folder that you made previously before downloading all of the mods (in this example it was D:/FUS, yours is likely C:/FUS if you don’t remember.)
From this folder scroll around until you find ModOrganizer.exe, and run it.

The ModOrganizer.exe file in the FUS folder
This handy application lets you view, manage, and select which FUS mods you want to use. You’ll see a little dropdown bar with several profiles near the top. There are four, each with a differing amount of mods applied to Skyrim VR.
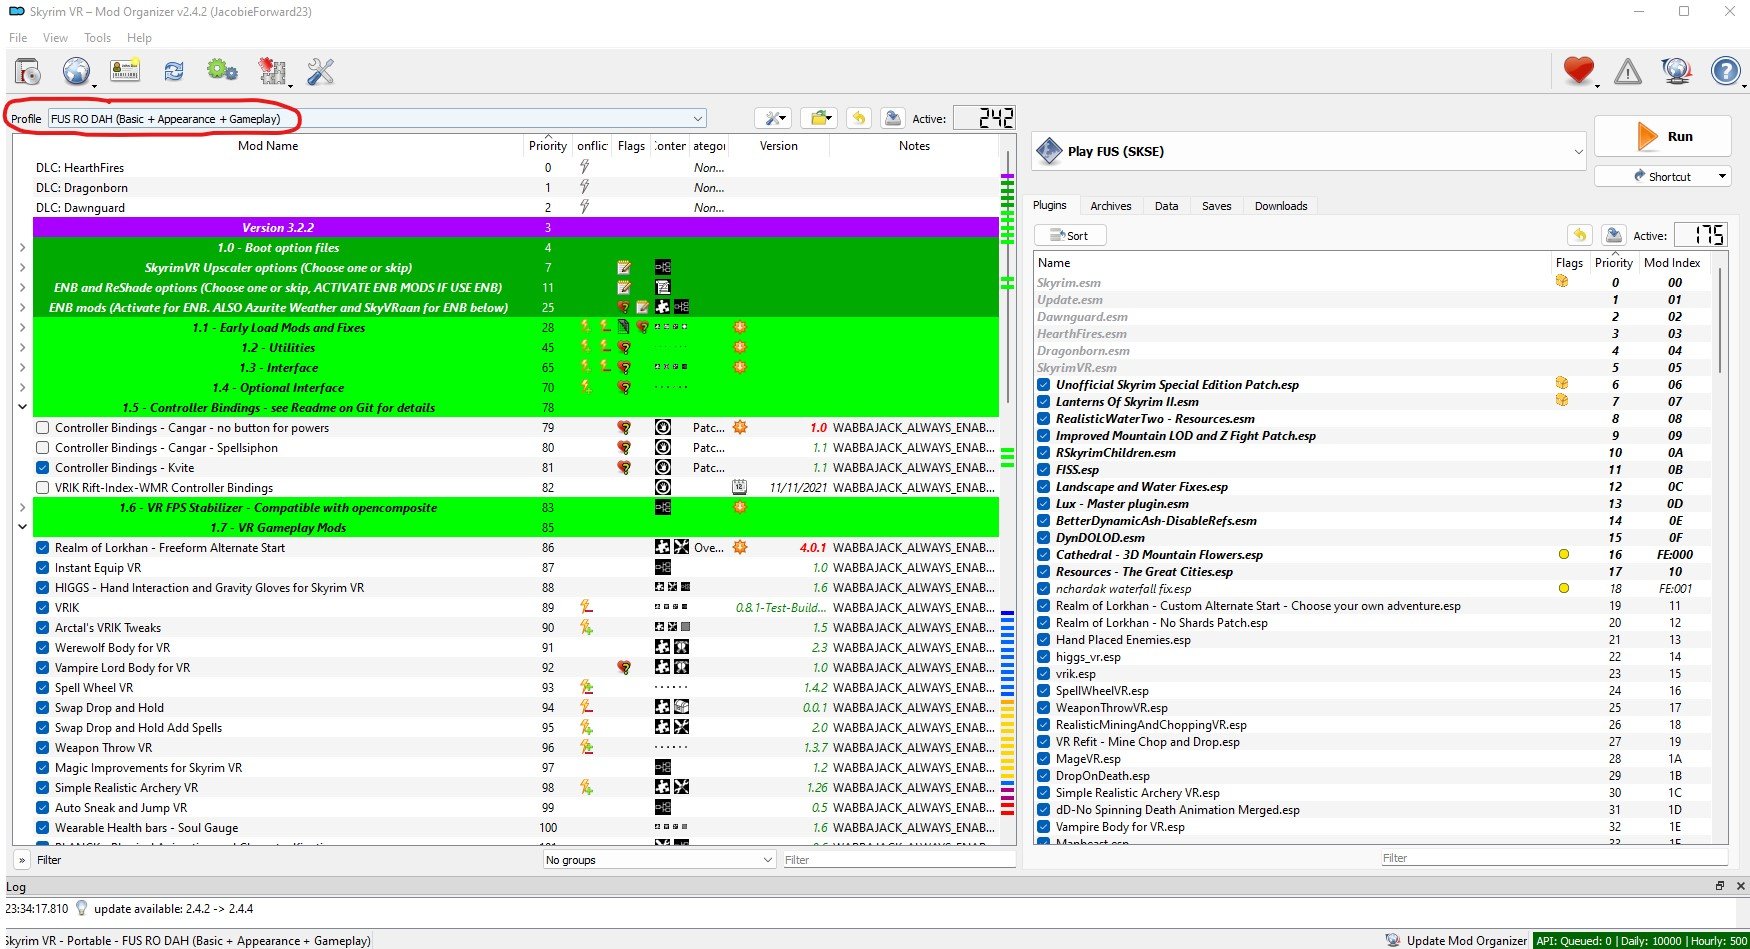
ModOrganizer.exe for your Skyrim VR mods with the profiles section circles
Here we recommend the “FUS RO DAH (Basic + Appearance + Gameplay) mod selection, which not only improves the normal Skyrim VR experience, but also adds some important gameplay improvements as well. There are other profiles that change the game to lesser extent, but after going through all that waiting to download these mods you might as well use them.
Later on you can scroll through the list of mods and activate or deactivate whichever you like, but first you should run your freshly modded Skyrim VR without changing anything to make sure it runs without crashing and to allow important mods to load ingame.
To run your modded Skyrim VR you hit the run button in the top right corner of ModOrganizer.exe, but before you do that make sure your headset is on and connected to your PC, and that your controllers are also on and working. Then run Steam VR so that you’re in Steam VR home in your headset, then click the run button.

You’ll find yourself in FUS’s new starting location and ready to make a character. Congratulations! You’ve successfully downloaded and installed a whole modlist of Skyrim VR mods.
If your game crashes or doesn’t start then retrace your steps to this point and make sure you didn’t miss anything. If all else fails or you get an error you didn’t expect, check out these troubleshooting tips.
Troubleshooting - Easily Install Skyrim VR Mods
Unfortunately even with Wabbajack the process of downloading and installing Skyrim VR mods can be difficult, and some problems might show up on your PC that might not on others.
So here are a list of places you can look if you’ve had problems at any point in this article. Before you look here check back and make sure you didn’t accidentally skip any steps. You may also want to more thoroughly clean your Skyrim VR installation before reattempting to install the modlist through Wabbajack.
Hopefully your journey in installing Skyrim VR mods is as painless as possible. Once you reach the end, enjoy!

Fighting a giant in modded Skyrim VR

The Best VR Tank Game Out There - Steel Crew Review
There are a lot of different sorts of games that are present or even prevalent on the flatscreen that still haven’t made it to VR. That has been largely true for VR tank games, except for some really poor attempts there hasn’t been a noteable VR tank game to talk about so far.
Well that has changed. Now there is a truly great VR tank game that isn’t perfect, but has a ton of potential. Steel Crew. Here we’re going to talk about this new VR tank game that is currently in early access, and some of what it does well and still needs work on.
What Sort Of VR Tank Game Steel Crew Is
If you’ve been looking for a VR tank game where you can drive, gun, or command a World War 2 tank completely in Virtual Reality, well then Steel Crew is what you’ve been waiting for. So we’re going to start this Steel Crew review with what it is and what it does best as a Virtual Reality tank game. That’s what you’d hope it would be, piloting a tank.

Blowing Up A T-34 in Steel Crew
Each tank has three positions, the driver, gunner, and commander. Being the driver sounds easy, right? Just drive the tank around. You might be expecting it to be simple, but it’s really not, because Steel Crew doesn’t just settle for having you sit around and press a “Drive” button to go forward or a “Reverse” button to go back. Oh no, you’re driving a manual transmission tank from World War 2.

The Control Panel Of A Sherman Firefly in Steel Crew
You don’t get a wheel to steer with, you get what tanks in World War 2 had in this VR tank game, two sticks. One for the right track and one for the left.
To control the power you don’t just hit the gas, you’ve got to change the gear that you’re in to go. So you can’t just put it in fourth gear and start going. Nope, you’ve got to start in first, then go up to second, and so on to get the motor running and the tracks moving.

The Driving Compartment Of A T-34
Driving, like everything as you’ll discover in this Steel Crew review, is hard, even though it sounds straightforward. To go fast you’ve got to switch the gears quickly with expert timing. To turn quickly you’ve got to switch back to a lower gear and slam one lever back while moving the other forward.
It’s even hard to see out of the little porthole you get to look out of while driving. You can open up the hatch though, but that leaves you vulnerable to getting hit. So you either have to drive while barely being able to see, or risk your health for a better view.

The Driver’s Port on a Sherman Firefly in Steel Crew
This all blends in really well with the Virtual Reality view and controls. You have to physically change the gear shift to move in a different gear, and it can be easy to mess up and go to the wrong gear if you’re not good at it. You also need to see where you’re going with your actual eyes through the tiny port. It’s a very immersive tanker experience.
What about the other positions in the tank? Well the gunner sounds simple as well, but it’s really hard. If you’re expecting a War Thunder level of looking and shooting simplicity then you won’t get it in Steel Crew. This is a more hardcore VR tank game. To move the gun you’re going to actually have to physically turn wheels with your hands.

Driving a Sherman Firefly with the Hatch Open in this VR Tank Game
One wheel turns the gun one way and another turns it the other way. Just like with driving it’s hard to see. You’ve got a tiny porthole in the front of the tank that gives you a general sense of what you’re pointed at, and a very small gunner sight that you have to crane your head to look through.
It’s got some icons to give you an idea of where you’re aiming, but as with real World War 2 tanks you’re going to need to factor in how far away your target is to get a shot that will land accurately. Even hitting a stationary target can take a few shots to get right.

Destroying a Sherman with a T-34
Still, it’s a ton of fun. If you really want to feel like you’re the gunner in a real tank then no VR tank game does it better than Steel Crew.
Finally there’s the Commander position. As the commander you look around and give directions more than do anything. You’ve got a map, and you’ve got the best view in the whole tank through your cupola.

The Commander’s Map In Steel Crew
Just like the driver you can even look out of the top hatch to get an unobstructed view, but it’s really dangerous to leave the thick skin of your tank. Still, even inside you can see in all directions, and so you have to give directions by talking to your driver and gunner.
Being the commander makes you the eyes and brain of the tank, and it’s a hard job.
The Combat In Steel Crew Is Intense
The whistling of shells passing close by your tank, the explosions of hits and the crashes of your tank taking a round, it is all incredibly immersive in VR. Steel Crew captures the feeling of tank combat using Virtual Reality in a way no flatscreen game could.

A Big Battle Forming in Steel Crew
No matter what position you’re in there’s pressure to move as quickly as possible, or aim and shoot as quickly as possible, or make the right call in a tough situation. When it all comes together it’s a VR tank game experience like no other.
There’s even some damage modeling at play. Hit a tank where it’s armor is sloped and your shell might bounce right off. So being in the right position and firing accurately is key.
Steel Crew Still Needs Work
Though Steel Crew is a fantastic VR tank game that does everything it can to translate an immersive tank driving, gunning, and commanding experience to you through immersive VR views and controls, it is most certainly an early access game.
There are only two tanks to drive, the T-34 for the Soviet team, and the Sherman Firefly for the British team. It’s great that both tanks are very different in their layouts and controls, and are modelled just like the insides of actual tanks, but two is a very small selection.
Also there are only three maps to choose from, and those aren’t even finished. There are a lot of placeholder assets with no textures.

Shifting The Gears Of A Tank
More than anything else the early access nature of this game can be felt by how few people know about it. There’s practically never an open public game, and so finding a match is very hard. You can play with bots, and for bots they’re pretty good, but finding a crew to play with is very hard.
Playing with only bots leaves you filling all the roles of the tank yourself, and it’s a shame because playing with other people and working together is where Steel Crew really shines.

On Top Of A T-34 In Steel Crew
Still, Steel Crew is playable via VR and flatscreen as well. So if you have any friends who are into a realistic World War 2 tanking experience but not into Virtual Reality, they can join you as well.
Steel Crew might need work, but everything about it screams of a huge amount of potential. This could be the number one VR tank game in a couple of years, but for now we’ll just have to see if it can fulfil the promises that it makes with its immersive controls and tank cockpits.
That’s all for this Steel Crew review. If you’re really dying for a realistic and immersive WW2 VR tank game then give it a look. Steel Crew is currently available for PCVR via Steam.
All Breachers VR Weapons And Guns
Breachers VR is a game with a ton of guns. So you’re probably wondering what all of the Breachers VR weapons are, and which of them are the best.
Well there’s no easy answer to the question of “What Breachers VR guns are the best?” Some are better at certain times than others, and all require you to have a good aim, though some more so than others.
Either way we’ll go through all of the Breachers VR guns here so that you can know all about them, and which Breachers VR weapons to buy depending on the situation you’re in. Here’s all Breachers VR weapons and guns.
Table Of Contents:
Pistols - Breachers VR Weapons And Guns
In Breachers you will always have a pistol of some kind, since you spawn with a Jesper every round. While pistols aren’t generally as accurate or powerful as larger weapons, they can often save you if you run out of ammunition for your main weapon.
Developing skills with at least one of the Breachers VR pistols is also a good idea for the first round of every game. Since everybody starts the game with little money in the first round you’ll be forced to use a pistol during that round. This is called the “pistol round” and a player who is very good with pistols can often get a great head start.
Jesper

The Jesper Pistol Breachers VR weapon
The Jesper is the free pistol that you start every round with in Breachers VR. Of all Breachers VR guns this is the one you will inevitably become very familiar with. Even if you don’t have a single dollar to your name, you can always rely on the Jesper.

The stats for the Jesper Breachers VR gun
That doesn’t mean that the Jesper is a terrible weapon though. While its stats may be the lowest of all you can still easily get the upper hand on an opponent by ambushing them, or with a well placed shot.
If you would rather spend your pistol round cash on gadgets to help your team out, or need a reliable handgun to fall back on, then the Jesper will always be a great Breachers VR weapon of choice.
Spectral

The Spectral Pistol Breachers VR weapon
The Spectral is a great Breachers VR pistol. If you want an upgrade to the Jesper, then this is a cheap option that might give you an advantage during the pistol round.

The stats for the Spectral Breachers VR gun
As you can see the Spectral is essentially the same as its free counterpart, but it does more damage. It also has a larger magazine size, and is quieter. So if you want a little extra edge to clutch the pistol round, but want a little money spare for gadgets, then the Spectral is a great choice.
Cyclone

The Cyclone Pistol Breachers VR weapon
If you want your sidearm to be less of a sidearm and more of a small submachine gun, then the Cyclone is a great choice. It is the only pistol that fires fully automatically. With the cyclone you can just hold down the trigger and let it go brrrr.

The stats for the Cyclone Breachers VR gun
Of course the Cyclone does less damage per shot than the Spectral due to this, though it’s still more powerful than the Jesper. Overall this makes the Cyclone the best sidearm for quick up close engagements where you have little time to aim.
Taurus

The Taurus Pistol Breachers VR weapon
Basically the opposite of the Cyclone, the Taurus is a powerful revolver that is essentially a small sniper rifle you can hold on your hip. Of all the Breachers VR pistols, the Taurus is fantastic if you love the feeling of a finely placed headshot.
That’s because the Taurus is the only Breachers VR weapon that is both a pistol and can down an enemy player with a single shot to the head. Being really proficient with the Taurus and taking down enemy team members with single headshots is a wonderful feeling.

The stats for the Taurus Breachers VR gun
Of course the Taurus has its drawbacks. If you miss your single powerful shots then you’ll be in trouble because of the Taurus’s low fire rate and low magazine capacity of only 6 shots.
Submachine Guns - Breachers VR Weapons And Guns
Submachine guns fill the same niche in Breachers VR as they do in any similar team based shooter like Pavlov or Counter Strike: Global Offensive.
Submachine Guns (or SMGs) fit in your two handed weapon slot, are cheaper than rifles, have a high rate of fire, but low accuracy and damage per shot when compared to their more expensive and larger cousins.
However, for a game like Breachers, this makes SMGs very viable in general as most of the fighting is done in pretty close quarters. You’ll still have to handle high recoil across the board, but out of all the Breachers VR guns SMGs perform every well in this VR shooter.
Omen

The Omen SMG Breachers VR weapon
The Omen is the cheapest of Breachers VR SMGs. This makes it great for budget minded people who still want more firepower than any of the pistols can provide.
The Omen has the same recoil issues as all SMGs, but also comes with a very small magazine, though that can be upgraded. It does very little damage per shot, just as much as the Jesper.

The stats for the Omen Breachers VR gun
Still, the Omen can be very effective and makes for a good budget weapon after the pistol round is over. At close range it can be pretty easy to sink two or three headshots in a row and quickly take down an enemy at close range.
Due to these factors and its cheaper price, the Omen is generally the most favored Breachers VR Submachine Gun among players.
Viper

The Viper SMG Breachers VR weapon
The Viper is slightly more expensive than the Omen, but is a fantastic little weapon for quickly bursting down enemies. Since its so small it’s very easy to wield in VR.
Though the Viper has the slowest fire rate of all SMGs, this can also make it easier to control when firing it fully automatic.

The stats for the Viper Breachers VR gun
However the Viper suffers from truly terrible iron sights by default, and so if you plan to use one make sure you buy a red dot or holosight for it.
The Viper sits in an odd place because of its price and comparatively similar performance to the Omen. While many prefer the Omen, you should try the Viper and see if it feels a little better.
RCP
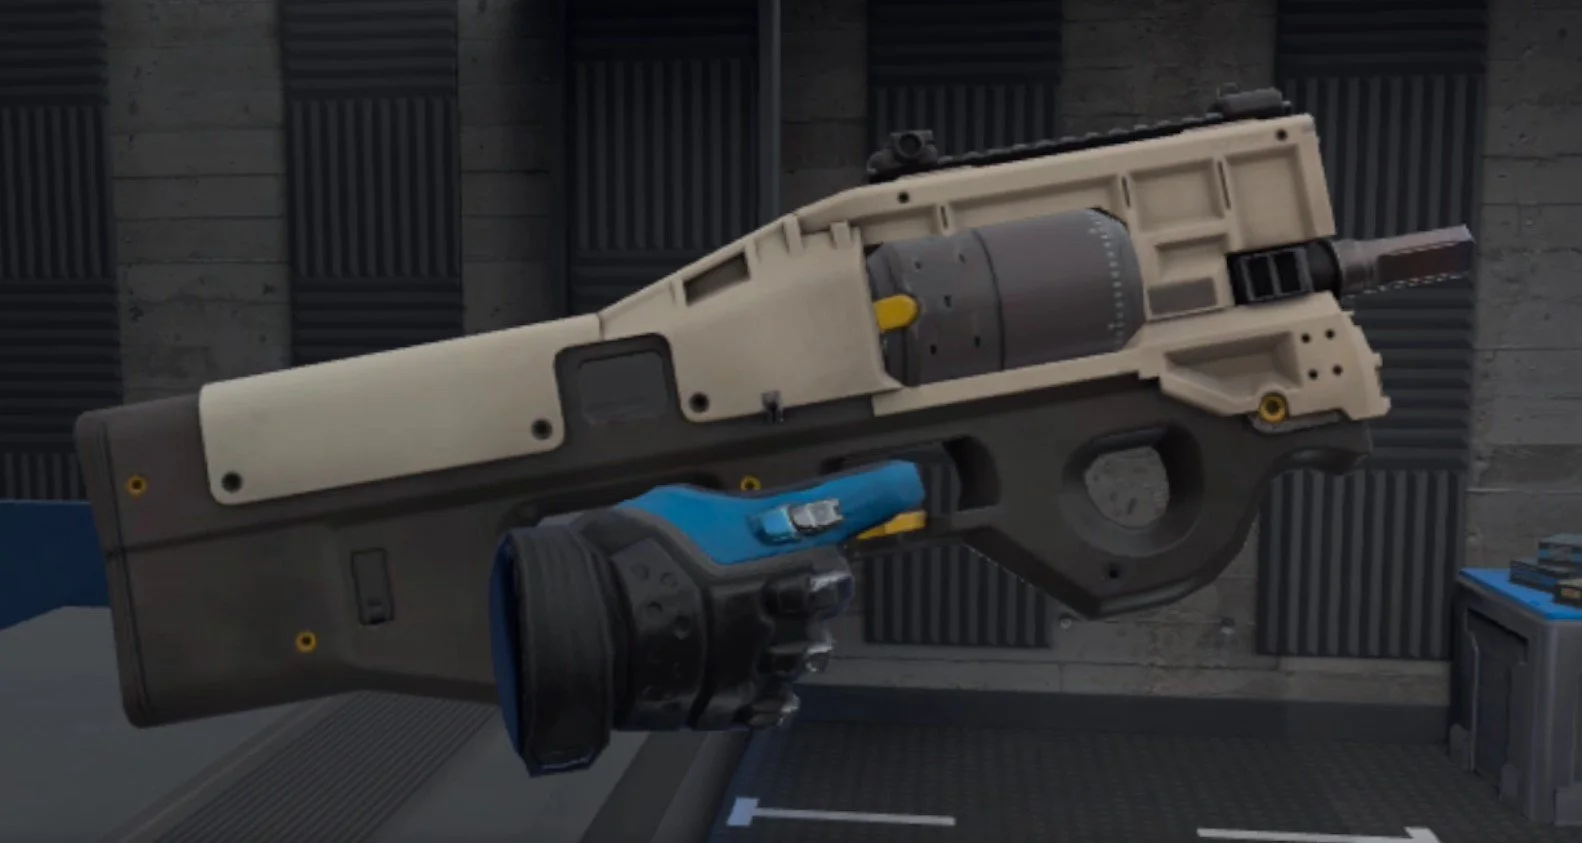
The RCP SMG Breachers VR weapon
The RCP is the most expensive Breachers VR SMG, and it has a lot going for it. A good fire rate, and the best damage among SMGs. Combine this with a huge magazine and the RCP looks like a great choice.

The stats for the RCP Breachers VR gun
Despite the Stats looking good, however, the RCP is not incredibly popular. It’s just cheaper than a proper rifle, and still suffers from all of the accuracy and recoil issues of Breachers SMGs. It’s also a little unwieldly to use due to its odd design.
Rifles - Breachers VR Weapons And Guns
Rifles are the most expensive, but also the most powerful type of Breachers VR guns. They combine great damage per shot and high accuracy.
Because of this rifles are the most favored type of Breachers VR weapons, and so players generally use them if they can afford them. If you’re low on cash and want one, always keep in mind that you can take a fallen player’s rifle off of the ground.
Cadillo

The Cadillo Rifle Breachers VR weapon
The Cadillo is the closest thing Breachers VR has to a sniper rifle. It has the greatest damage per shot of any weapon in the game, and if you can land headshots with this thing you feel like an assassin.
Though this is a cheaper Breachers VR rifle, you’ll want to get a sight for it whenever you do get it, because it relies so much on being accurate.

The stats for the Cadillo Breachers VR gun
The one drawback to the Cadillo is its low rate of fire. This makes it much less effective in close in fast firing situations.
Auril

The Auril Rifle Breachers VR weapon
The Auril is cheap, but has a strange design and can be difficult to wield. Though you can get used to that. Still, it does less damage than the slightly faster firing Vezin, but is a bit cheaper.

The stats for the Auril Breachers VR gun
If you want a budget rifle that is effective in all situations, the Auril isn’t a bad choice. You should try it to see if you would prefer it over other options when you’re low on cash, but still want a rifle’s level of damage and accuracy. Though the Auril isn’t the most damage dealing or accurate of the bunch.
Vezin

The Vezin Rifle Breachers VR weapon
The Vezin is one of the two priciest Breachers VR weapons next to its buddy the Marui, but it is definitely worth it.
The Vezin does great damage and has a good fire rate. Its wide range of upgrades really add up the price, but can make it an even more versatile and effective weapon.

The stats for the Vezin Breachers VR gun
The Vezin isn’t the best at long ranges, and it isn’t the fastest firing of Breachers VR guns. Though at the same time it doesn’t lack in any of these categories and feels really easy to use.
For the best all around general purpose firepower, you can’t do better than the Vezin, but it will cost you.
Marui

The Marui Rifle Breachers VR weapon
The Marui is a pricey Breachers VR weapon, just like the Vezin, but at the same time doesn’t see as wide use as the Vezin does.
The Marui sits in a strange niche. It has a fantastic damage falloff, but lacks the damage and accuracy of the Cadillo. The Marui has a good rate of fire, but not as great as the Vezin. So it’s not a great option up close or at range, but isn’t a fantastic all rounder weapon in either category.

The stats for the Marui Breachers VR gun
The Marui also feels awkward to use, though you might feel differently after giving it a try. For the large price tag the one way the Marui excels is because of its fantastic Wall Penetration.
If you need a weapon to light up a section of wall with rapid fire and good damage, then the Marui might be the niche choice for that.
Shotguns - Breachers VR Weapons And Guns
Shotguns are a very underutilized category of Breachers VR guns. This is because of all of the Breachers VR weapons out there, shotguns are the most likely to do little to no damage due to distance.
Even in a game that is designed around short range combat, shotguns in Breachers have ridiculously short damage falloff ranges. They also cost quite a bit, as much as some rifles, and so don’t see a ton of use except as a fun meme weapon.
Still, a well placed shotgun round can easily one shot an enemy, but opportunities to do this are harder to come across than they are with other Breachers VR guns. Still, shotguns can be good if you have truly bad aim and just want to land some shots due to firing a cone of pellets rather than a single round.
Canutt

The Canutt Shotgun Breachers VR weapon
The Canutt is the semi automatic shotgun option in Breachers VR. Its firerate is the slowest in the game. While the Canutt does good damage and has a great spread to it, when using this weapon you’ll notice a pattern.
Often with the Canutt you’ll fire it at an enemy and fail to one shot them, then that enemy will be able to quickly shoot you before you can even fire again.

The stats for the Canutt Breachers VR gun
This makes the Canutt kind of frustrating to use, and makes it practically a death sentence to rely on unless you’re firing it from cover, which usually means you’ll be too far away from your target to be effective anyway.
Though if you can get really close to an enemy and one shot them in the head from close range with the Canutt, that’s fun for a bit, but not more effective with this Breachers VR weapon than it would be with any other.
Urakan

The Urakan Shotgun Breachers VR weapon
The Urakan is the automatic shotgun option in Breachers VR, though as you can see below it still has a very slow fire rate.
While it is faster than the Canutt it suffers from the same problems as its slower firing cousin, though you’ll at least generally be able to get off multiple shots with the Urakan before being destroyed by return fire. The thing is, the Urakan does truly horrible damage, even within its extremely short damage falloff range.

The stats for the Urakan Breachers VR gun
This Breachers VR shotgun sees even less use than the Canutt because its damage is so low and its range is so limiting. You’d be better off using a Jesper.
Well there you have it, all Breachers VR weapon and Breachers VR guns that you can use. Pick your favorite and do battle, enjoy! If you want some more useful information about Breachers VR then check out our tips and tricks article.

Unlock All Vertigo 2 Secret Weapons - How To Get All Vertigo 2 Secret Weapons Guide
If you want to experience every awesome weapon there is to have in Vertigo 2, then you’ll want to collect all of Vertigo 2’s secret weapons. Well this guide will show you where to find them and how to unlock them. Keep in mind that if you haven’t completed Vertigo 2 yet there will be some minor spoilers in this guide. We’ll reveal as little as possible here, but some of the locations you end up visiting in the game will have to be revealed. Here’s how to get all of the Vertigo 2 Secret Weapons.
If you want to experience every awesome weapon there is to have in Vertigo 2, then you’ll want to collect all of Vertigo 2’s secret weapons. Well this guide will show you where to find them and how to unlock them. Keep in mind that if you haven’t completed Vertigo 2 yet there will be some minor spoilers in this guide. We’ll reveal as little as possible here, but some of the locations you end up visiting in the game will have to be revealed. Here’s how to get all of the Vertigo 2 Secret Weapons.
Oh, and when you get these secret weapons you can access them by bringing up your weapon menu in Vertigo 2 as usual, and them pressing the trigger on the controller that you’ve opened the weapon menu with.
Gordle Pun - Vertigo 2 Secret Weapons
The Gordle Pun is the first secret weapon that you can collect in Vertigo 2 during the second chapter of the game, and you can get it really early on. Right at the beginning you’ll be stuck behind a forcefield as a blast door closes, and when the force field disappears an enemy will spawn. Once you’ve dealt with them take the only path available to you, the door on your right.

The door on your right from where you start Chapter 2
Through the door will be a hallway with an enemy in it, and there will be doors on either side of you. Take the second door on the right, and deal with the other enemy that is through that door. You’ll see a pit in the room with you, and across it some writing on the wall saying “Bottomless Pit.”

The bottomless pit
The pit might be bottomless, but you can still teleport into a small hole in the side of it. Peer over the edge of the pit and you’ll see a hole in the wall, teleport into it and go through the cavern it leads to.

The hole you need to teleport into to get to the Gordle Pun Secret Weapon
There will be some enemies on your way, but just keep going forwards and eventually you’ll drop down into a test room with the Gordle Pun looking device on a table.

The Gordle Pun Secret Weapon in Vertigo 2
Pick it up and you’ll be transported to somewhere that looks like a moon. You’ll slowly roll forward, as you’re standing on a rover of some sort, and box shaped enemies will run at you.

The Gordle Pun Secret Weapon Challenge
You’ll need to hit them with the Gordle Pun before they reach you and blow you up. You also can’t use any of your other weapons. This challenge can be pretty hard as they run quickly and the Gordle Pun isn’t very accurate. One tip is to aim down the front of the Gordle Pun and point it slightly up and to the left of what you’re aiming at. Also switching your Gordle Pun to red mode will make shots more accurate, but slower. While blue is better for up close as it shoots more quickly but is less accurate.
When you defeat the challenge you’ll find yourself back in the test chamber with the first Vertigo 2 secret weapon.

Making portals with the Gordle Pun Secret Weapon
Shooting the Gordle Pun at the nearby wall will cause things to come out of the portal that is created. Some of these will be useful healing items or grenades. So stock up while you can before exiting out of the door.
Nostalgia Pistol - Vertigo 2 Secret Weapons
The Nostalgia Pistol is the second secret weapon you’ll come across in Vertigo 2, and it’s a bit further on into the game in Chapter 6. You’ll see the title at the start of Chapter 6 here when exiting a waste pipe.

The beginning of chapter 6 in Vertigo 2
You’ll see a catwalk on your left, teleport on to it and go through the door at the end. Through that door is a healing station and a hallway that will soon fill with enemies. You’ll notice a room with multiple glass windows in this hallway. Once the enemies are dispatched take the first left, and then a right at the closed blast door to go into this room.

The first step to get to the Nostalgia Pistol secret weapon
Inside the room there will be an upgrade station and a small button beside the big machines sitting against the wall. Press the button.

The secret button to get to the secret Nostalgia Pistol weapon
Exit the room and you’ll see the blast door that was closed is now open. There’s a supply closet on the right with some grenades and on the left you’ll see a strange depression in the wall, almost like a doorway was plastered over.

A secret door
Just walk through it and you’ll find yourself in an empty looking bedroom. On the floor there will be a computer and a VR headset, pick up the headset and put it on.

A VR game in a VR game
You’ll be in a new space that contains a small piano and a button above it with a musical note on it. First press the button with the musical note, this will not work if you don’t do that. A melody will play. Complete it by hitting the keys on the piano in the order shown here.

How to solve the piano puzzle to get the Nostalgia Pistol secret weapon in Vertigo 2
Then the piano will disappear and a door will open to a new room. The Nostalgia Pistol is on a pedestal at the end of the room. Walk over and pick it up. Now a bunch of the floating robot ball enemies from the first Vertigo (and Vertigo 2) will appear and attack you. Be careful not to fall off of the narrow bridge you’re standing on and defeat them.

The Nostalgia Pistol Vertigo 2 secret weapon
Once you do just wait for a minute or two and you’ll be teleported out. You can take off the VR headset and the Nostalgia Pistol secret weapon is yours.
AEtherian Quad-Bow - Vertigo 2 Secret Weapons
Soon after the Nostalgia Pistol is the third of Vertigo 2’s secret weapons. The AEtherian Quad-Bow. This is by far the easiest secret weapon to get your hands on, and you’d probably end up finding it even if you never read this guide. Still, it’s possible to miss it. Shortly after the start of Chapter 9 you’ll find yourself in a cave that’s full of the headless centaur creatures that fire arrows.

If you see these guys you’re going the right way
Keep going through the cave, eventually you’ll see some closed doors that you can open by putting your hand on them. Unfortunately doing that means you’ll be locked out of the cave. Instead of going through those take a right and you’ll see a camp inside of the cave.

An empty camp that contains one of the secret weapons
Go into the big hut on the other side of the camp. There’s a chest there, and inside of the chest is the AEtherian Quad Bow!

The chest with the AEtherian Quad-Bow secret weapon in it
Once you pick up the bow the exit to the camp will be blocked off until you defeat all of the headless centaurs that spawn. The AEtherian Quad Bow is a ton of fun and is one of the coolest Vertigo 2 secret weapons.

The Aetherian Quad-Bow secret weapon
Finger Gun - Vertigo 2 Secret Weapons
The Finger Gun secret weapon comes quite a bit after the Quad Bow in Vertigo 2. You’ll be able to get the Finger Gun when you reach Chapter 14. Right at the beginning of the chapter you’ll be in a train station, and across the train station from the control tower you’ll see a dark tunnel.

The tunnel leading to the Finger Gun secret weapon
Go in and go up the escalator inside. It’s dark but don’t worry, your flashlight will come on as always. Once you’re at the top take a right and teleport through the partially open door.

Teleport through the crack in this door
After going down the hall a bit you’ll notice this boarded up hallway on your left.

What happened here? This must be one crazy secret weapon
Blow through the planks with any of your weapons and keep going. You’ll pass a lot of creepy test dummies, and eventually you’ll find yourself in front of this machine.

Getting the Finger Gun Secret Weapon
Put your finger in and you’ve got the finger gun! You can just shoot out of your finger now. To reload put a syringe into the tip of your shooting finger. You’ll generate more syringes, and you can also find some more scattered around the lab. Which is good because now you’ll have to fight your way past the test dummies to escape with your new secret weapon.

Fighting test dummies with the FInger Gun secret weapon
Once you get past all of the dummies this Vertigo 2 secret weapon is yours to keep! Of all the secret weapons in Vertigo 2, this one might be the weirdest.
Kauboi's Revolver - Vertigo 2 Secret Weapons
Of all the Vertigo 2 secret weapons in this guide this one is probably the most spoilery, so if you want to avoid even minor story spoilers skip ahead. Still, while this secret weapon does affect the ending, we’ll spoil very little here. Which is good because Kauboi’s Revolver is the most powerful weapon in all of Vertigo 2, secret or otherwise.
You can get it in Chapter 16 when you find yourself at a big tower in a wasteland. When you go into the tower there’s an elevator with three buttons, hit the lowest button to go to the bottom floor.

The elevator buttons
When you reach the bottom you’ll see a huge statue, and doors on either side of the hall. There is a puzzle behind both doors. Let’s start with the door that will be on your left.

The first puzzle completed
The goal of this puzzle is to get the ray of light to hit each of the balls of light by bouncing the ray with the mirrors. It’s pretty straightforward once you get the hang of it. Once the puzzle is solved the eye in the wall will light up.

Turning a mirror
Quick tip, it’s easier to move the mirrors when holding them with both hands. The hardest part of this puzzle is to just get the mirrors to turn the way you want them to,
Anyway once you’re done go through the other door for the second puzzle. You’ll see a table with some lights hanging over it in the middle of the room. Also, there’s a control panel of some kind on it. When you move the sliders you move the lights.

The controls for the table for the second puzzle
Each slider controls a different aspect of the lights. The goal is to make the lights form the symbol on the wall of the room. Like this.

What you want the lights to look like
Once you’ve solved both of these puzzles the most of powerful of all Vertigo 2 secret weapons is yours! Just head through the pathway of light that comes out of the statue.
Keep in mind that you won’t be able to use Kauboi’s Revolver against enemies for the whole game as you won’t have any ammunition for it… but on New Game Plus playthroughs it is an incredibly powerful secret weapon that you can synthesize ammo for like any other.
Annihilator Prototype - Vertigo 2 Secret Weapons
The Annihilator Prototype is probably the hardest of all secret weapons to acquire in Vertigo 2. You can get it the first time you play through the game, but it’s probably easier to acquire on a second New Game Plus playthrough. the path to getting this secret weapon starts in Chapter 4.
When you wake up go outside into the hallway and take a right. Enter Room 1.

The guest room with the Annihilator Prototype key
You can go into this room, and on the table inside is a key of sorts. Put it into your wrist storage slots. You’ll have to play through a large portion of the rest of the game while holding this key, so you’ll effectively be robbing yourself of an item slot.

The Annihilator Prototype Key
Once you get back to the point in the game where you’re on a beach and… recently left the insides of a large creature (you’ll know it once you’ve been there.) There will be a large rock on that beach with a lockbox on it. Put the key in that box, and you’ve got another awesome Vertigo 2 secret weapon.
Note though that if you try and get the key in New Game Plus you can’t just use Chapter Select and fast forward to the chapter with the box. Your inventory items will not come with you, so you have to play continuously through the game until you reach the box. That’s what makes this the hardest to get of all Vertigo 2 secret weapons.
Well those are all of the Vertigo 2 Secret Weapons! Hope this guide helped you out in getting all of the interesting and unique secret weapons in this interesting and unique game. Enjoy!