


The Scavenger Mod Makes Into the Radius a Whole New Game
Chances are if you've already played Into the Radius you've picked some favorites. Bet you're used to running an M9 on your hip, maybe an OC-33, or even a Desert Eagle just for style. Maybe you want to try out some different long arms, but you'd never use a double barrelled shotgun once you hit security three. You know what you like and you know what works for you. Well what if, just what if, you had to throw all of that out the window? What if instead of being able to just get whatever you want, you have to take whatever you can get?

Chances are if you've already played Into the Radius you've picked some favorites. Bet you're used to running an M9 on your hip, maybe an OC-33, or even a Desert Eagle just for style. Maybe you want to try out some different long arms, but you'd never use a double barrelled shotgun once you hit security three. You know what you like and you know what works for you. Well what if, just what if, you had to throw all of that out the window? What if instead of being able to just get whatever you want, you have to take whatever you can get?
So Many Guns
Imagine all the weapons you never tried because you didn't have the money for them or because another one just looked better. Now imagine having to use that weapon because it's literally the only one you still have ammo for. That's the experience of this mod, the experience of desperation, of the scavenger life. Get ready to throw out half of what you knew about surviving in the Zone, because the Scavenger mod is the best way to replay Into the Radius VR.
In this Mod the shop is disabled so you can't buy anything with your cash. So as you complete the main missions and explore the Pechorsk Zone you'll have to rely completely on what you find. Forget hunting for artifacts, it's all about hunting for those sweet sweet silver crates now. Money isn't totally useless though, you can still buy repairs and upgrades at REALLY inflated prices.

So Much Loot To Find
But wait! This isn't just some masochistic mod meant to make the game super hard. I mean just start a Realistic Ironman playthrough if you want that. Nope, scavenger mod gives you what you need to survive. You just have to find it. Compared to the stuff you can scavenge in unmoded Into the Radius, you find some crazy things in the Scavenger Mod. Gas Masks, Ammo Cases, sick guns with mods already on them, way more than vanilla Into the Radius. The thing is, the loot is random, so you might get a really nice pistol... but no magazines to load it with. Still, you'll find guns in crates that you never would without the mod, and you can build as varied an arsenal as you could with the store. You just have to go out and find it. As always, the harder the map you're on, the better the loot.

Use What You Can to Survive
So now the name of the game is adaptability. You won't get your favorite thing immediately. You may or may not even find armor or cleaning supplies for a while. The flip side is the thrill of the find. The scavenger experience. You'll know what I mean when you practically jump up and down with joy because you found a cleaning rod. Having to adapt to what weapons and ammo you find is a great way to freshen up the Into the Radius experience. You might find yourself relying on weapons you would never use if you had access to the shop. While the TT-33 pistol isn’t a big upgrade from the Makarov, you might find yourself using it because you’ve got nothing better, or nothing else you have ammo for.
This goes for all sorts of equipment. Without easy access to a headlamp, the humble flashlight becomes much more important. Of course the guaranteed weapons in stashes from vanilla are still around, but repair fees are pretty big now and they might not be in the best of shape when you get them.

So if you're a Radius hoarder, you'll love the Scavenger mod for a replay of Into the Radius. Give it a shot, you won't regret it. Tried the Scavenger mod already? Then leave a comment with what you thought about it.
All Anomalies in Into the Radius VR and How to Survive Them
The many enemies of Into the Radius VR are not the only danger you face in the Pechrosk Zone. Anomalies are the other primary danger Into the Radius VR, and come in a wide variety of different types. All can be avoided if you are careful and know how to deal with them. Play your cards right, and you might even snatch an artifact from a field of them, though doing so successfully involves not dying first. So take a look through our list of anomalies in Into the Radius, and how to survive them.
The many enemies of Into the Radius VR are not the only danger you face in the Pechrosk Zone. Anomalies are the other primary danger Into the Radius VR, and come in a wide variety of different types. All can be avoided if you are careful and know how to deal with them. Play your cards right, and you might even snatch an artifact from a field of them, though doing so successfully involves not dying first. So take a look through our list of anomalies in Into the Radius, and how to survive them.
You Might Also Enjoy:
Distortion Anomaly/Gravity Anomaly

The Distortion Anomaly is likely the first you will encounter in Into the Radius VR, and overall it is the easiest to avoid. Plus you won’t take too much damage if you wander into one.
The Distortion Anomaly is made up of a few overlapping blue cubes of various sizes, and makes a sort of warbling noise when activated. They are activated by you or an object touching or coming near the blue cubes. The trick with the Distortion Anomaly is that they are not usually visible. Sometimes they will randomly activate on their own and show themselves and create a sound, and often they can still be seen when invisible as a little bit of white haze coming straight out of the ground, though that haze is still very hard to spot.
This sounds very dangerous since the anomaly is invisible, but they’re actually really easy to see by just throwing a probe into them. The moment a probe makes contact with the invisible cube it will become visible and make its warbling noise. Just make sure you keep throwing probes in front of you as you travel and look for artifacts. and if they hit a distortion anomaly you’ll know exactly where not to walk.
If you stand in a Distortion Anomaly you will take damage constantly. Not a lot if it’s just for a moment, but it will kill you quickly enough if you don’t walk back out of it.
Reflector Anomaly

You will encounter the Reflector Anomaly early on in Pervomay Route just like Distortion Anomalies. Like Distortion Anomalies they are easy to detect and don’t do an insane amount of damage. Unlike Distortion Anomalies you do not want to hit these with your probes.
The Reflector Anomaly is a giant white sphere that is visible to varying degrees. Sometimes they will be tiny and hard to spot, but they will expand every few seconds to its full size. It also makes a whooshing noise each time it does this, making it easy to hear as well. They are activated by you or an object touching it.
What makes Reflector Anomalies dangerous is that if a Probe hits it that will cause a laser to shoot out of the anomaly outwards of the spot that the probe touched it. So if you threw a probe straight into it, better make sure you sidestep out of the way, or get hit full in the face. A dead on hit can take out a decent chunk of your health. If you touch the Reflector Anomaly then you will be launched away from it while taking a very small amount of damage. The danger then is that you might end up launched into another anomaly.
Reflector Anomalies are easily seen, but you don’t want to hit them with your probes. This means that you not only have to throw your probes to spot invisible anomalies, but you also have to use your eyes to find where the reflectors are before you throw, and throw carefully.
Black Grass Anomaly
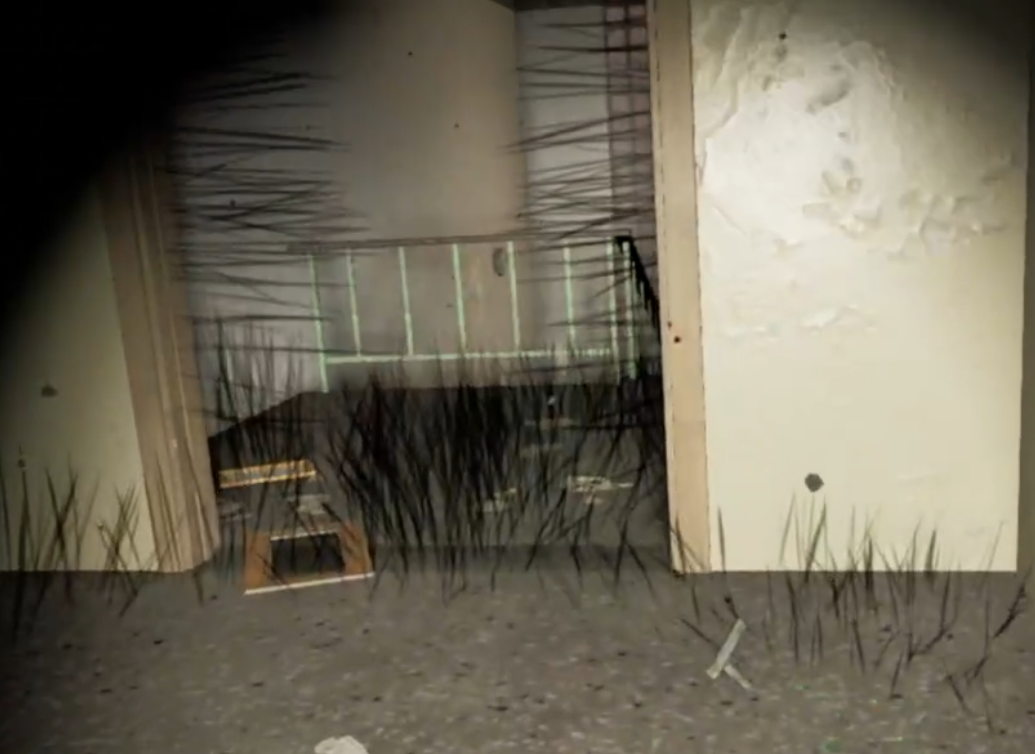
You won’t see the Black Grass anomaly too often, but you should watch out if you do. It doesn’t do a ton of damage, but you can easily lose a decent chunk of your health if you wander into it.
The Black Grass anomaly is basically what it says in the name, patches of sharp looking black grass that sprout out of the walls and floor. They are always found inside of buildings, never outside. Since the inside of buildings are usually dark, you won’t spot the Black Grass anomaly unless you have a light on to see where you are going and are paying attention.
Luckily the remedy for Black Grass is the same as how you spot it. Just shine a light on it for a couple of seconds and it will shrink back into the ground. Though if you take that light off of the anomaly it will sprout back up in a few moments. So unless you have a way of leaving a light pointing at it (i.e. placing a flashlight on the ground) then you’ll want to run past it very quickly.
If you touch the Black Grass Anomaly it will do constant damage to you. Make sure you always have a light on when you’re indoors or you might just wander into one without realizing it.
Haze Anomaly/Gas Anomaly

The Haze anomaly is easy to spot and easy to mitigate. As long as you have a Gas Mask with you and spot them early you won’t have a thing to worry about.
The Haze anomaly is a cloud of green gas that is especially unusual because it also lets off a bright green glow. It can be found in large quantities in certain anomaly clusters, and also floating around in open areas.
Once you’ve spotted a Gas Anomaly don’t step into it unless you’ve got a gas mask on. Without a gas mask you will have trouble breathing and start choking, causing damage. Standing in one without protection can quickly kill you. So make sure you’ve got a gas mask on you at all times as soon as you can. The gas mask also gives general anomalous protection, so it is useful in any anomalous area, not just those that contain the Gas Anomaly.
All in all the Haze Anomaly forces you to carry a gas mask with you at all times, and forces you to wear it when a Haze cloud is floating around. Otherwise it is harmless.
Bolt Anomaly/Shock Anomaly/Electric Anomaly

Widely considered the most dangerous anomaly, the Bolt Anomaly definitely does the most damage the most quickly out of all anomalies in Into the Radius VR.
This Electric Anomaly is most easily heard. You can always tell when one is nearby by the snapping sound they make. Unfortunately that is the only thing that can be considered “easy” about the Bolt Anomaly. They are practically invisible, sometimes you may see a small electric dot on the ground when they make their snapping noise every few seconds.
Even when activated it can be very hard to see. When you or an object wanders into its radius the Bolt Anomaly will activate and send a bolt of electricity at it. This means that just like with Distortion Anomalies, probes can easily spot where Bolt Anomalies are. Unlike Distortion Anomalies, it can be very difficult to figure out just how far the bolt can reach, or if you can safely walk past it.
This makes fields of Electric Anomalies very dangerous, even if you spot them with probes first. Give them as wide a berth as you can, and when walking past them make sure your planned path with not active them by throwing probes where you intend to go.
Though when a Bolt Anomaly is activated it will remain dormant for a few seconds, making it a tempting and risky proposition to try and run through it before it recovers. Try to avoid doing this at all costs, even if you manage to time it perfectly some Electric Anomalies have a wider radius than others.
Most of all this is the most dangerous anomaly because of the damage it does. The Bolt Anomaly will almost kill you in one hit, and certainly will in two. A gas mask won’t help you here. Even any items you are carrying when hit will drop from your hand and take durability damage. Take your time with Bolt Anomalies as much as possible, getting hit by one is very bad.
Web Anomaly

The Web Anomaly is very easy to wander into by accident, and does a good deal of damage. Walk and do not run whenever you spot one.
The Web Anomaly is totally silent and is very hard to see. They take the form of black wisps that float in the air and move in place very slightly. Throwing probes at them won’t do anything. Throwing probes at them won’t cause any sort of reaction. The only way to avoid the Web Anomaly is to keep your eyes open and spot them before you touch them.
Web anomalies can be found among objects, like strung up between two trees or clinging on to a truck as in the picture above. They are especially hard to see at night and almost impossible to spot if you don’t shine a light on them.
Touching a web anomaly will cause a sizzling noise and a rapid damage over time effect that takes a serious portion of your health. If you are not at 100% health then use a healing item as soon as possible. The damage effect will end in about 5 to 10 seconds.
Stomper Anomaly

The Stomper Anomaly is generally easy to avoid, but wow does it hurt you if you don’t.
The Stomper anomaly is very visible and very loud. You will definitely hear it before you see it too, as it makes a consistent booming noise. Each time that sound is made a giant cloud of dust will erupt out of the ground. The Stomper Anomaly isn’t activated or triggered in any way. Instead it just appears and seems to follow a set pattern.
You may spot it far away or up close by hearing the stomping noise and seeing the clouds of dust. The stomps are semi random and go in a straight line, sometimes making a slight turn in one direction or another. Eventually the stomps just stop.
If you are standing near where the next stomping cloud appears you get crushed. Imagine an invisible giant walking around. The best way to avoid getting stepped on is to keep your distance and keep an eye on the Stomper. You will definitely hear it coming, so just stay away.
Scythe Anomaly

The Scythe Anomaly doesn’t try to kill you directly in Into the Radius VR, though it is very hard to avoid. Still, be careful when you’re near one.
The Scythe Anomaly takes the form of a small field of glowing particles surrounded by a black ring. When you get close the Scythe Anomaly makes a very loud noise which builds and builds until getting very loud and stopping. While the noise builds the ring surrounding the center of the anomaly grows bigger and bigger. When the noise reaches its peak so does the ring, which retracts as the sound ends.
As with the Stomper and Bolt Anomalies you will hear the Scythe before you see it. It activates when you come close enough, and enough is actually not that close. It will detect you from very far away and make its noise. You can run back where you came to avoid but, but generally you’re going to have to just grin and bear it.
While the noise itself isn’t painful or damaging, it will alert all nearby enemies to your presence. You should expect all enemies in a large radius to be alerted and looking for you. So the Scythe makes stealth basically impossible in a wide area. There’s really no way to avoid activating it without avoiding a large area around it.
Rift Anomaly

The Rift Anomaly, like the Scythe Anomaly, doesn’t try to kill you directly. Actually it’s one of the more harmless varieties of Anomaly.
The Rift Anomaly takes the form of what looks like a broken apart Mimic that creates a constant electric buzzing sound. The Rift doesn’t move or do much of anything. It is usually found around high concentrations of enemies, especially Mimics. If left alone for long enough it will respawn Mimics that have died nearby in a flash of lighting, though this takes quite a while.
The Rift is also the only Anomaly that can actually be destroyed. Shooting or knifing it will cause it to disappear and drop a Shard, which is a blue bar looking artifact that can be sold for a bit of cash.
There are also “Special Rifts” which have a mission associated with them. They look like four normal Rift Anomalies smashed together into one, and when destroyed drop a Broken Shard mission item.
Rifts are usually just an easy way to get some extra cash, but be sure to destroy them when you find them or you might find a bunch of enemies respawning after you clear an area.
You Might Also Enjoy:
5 Most Powerful Weapons in Into the Radius
There are all sorts of guns in Into the Radius VR, but which ones are worth your hard earned cash? There’s some debate and personal preference as to what weapons people use, but some clearly stand in a class above all others. Which are the most effective against the many enemies you will find in the Pechorsk Zone? Time to find out. Here are some of the most powerful weapons that you can find and buy in Into the Radius VR.
There are all sorts of guns in Into the Radius VR, but which ones are worth your hard earned cash? There’s some debate and personal preference as to what weapons people use, but some clearly stand in a class above all others. Which are the most effective against the many enemies you will find in the Pechorsk Zone? Time to find out. Here are some of the most powerful weapons that you can find and buy in Into the Radius VR.
1. M9
The M9 is commonly regarded as the most powerful pistol in Into the Radius VR. For good reason, as far as a sidearm is concerned the M9 is extremely accurate, to the point that it even puts some Submachine guns to shame, and fires the fairly common 9x19mm cartridge.

It does great damage, especially when using P+ ammunition, and carries a healthy amount of bullets in each magazine. The M9 is perfectly viable throughout the game, and you can acquire it very early, so if you don’t want to spend too much money on a reliable and accurate sidearm, go with the M9 before anything else, and save your cash for other investments.
While they are less cash efficient and far less capable at range, the OC-33 is also good if you want your sidearm to have full auto capability. The same can be said for the Glock 18.

2. PP-91 ‘Kedr’
As far as submachineguns go in Into the Radius VR, you might be surprised to learn that the PP-91 ‘Kedr’ is much more powerful and versatile than it looks.

It sure is cheap, and since it uses 9x18mm ammunition the ammunition is plentiful throughout the game as well. You can even get a Kedr for free in Bolotky Village by searching the water in the destroyed boat next to the red valve sticking out of the swamp. It is just slightly south of the anomaly field with the white flowers surrounded by rocks and trees, and west of the construction site.

Cheap doesn’t make a powerful weapon though, so what is so great about the Kedr? Well it’s pretty accurate, despite it’s short barrel and small bullet. You can hit shots with it even at medium range, especially with the help of a holographic sight attached to the gun. What really makes it strong though is its fire rate. A Kedr gets a lot of bullets out very quickly, and puts them right on target. While you’ll use a lot of 9x18mm rounds with this weapon, it will melt enemies very quickly.
3. Mosin-Nagant
The Mosin Nagant is perhaps the most legendary and widely used bolt action rifle in history.

In Into the Radius VR it is a fantastic sniper rifle. Despite its low rate of fire due to its Bolt action, this rifle delivers devastating 7.62x54R rounds accurately at very long ranges. The bolt can be a little finicky, but once you get used to it chambering a new round becomes very quick and easy.

Especially with AP rounds loaded the Mosin will stop basically anything with one or two well placed shots. Of course this weapon is not great for short range engagements, though it’s cousin the Tiger rifle does better there since it is semi automatic and has a larger magazine. Though the Tiger is more expensive and not as great for sniping, it is more versatile.
4. VSS ‘Vintorez’
Another legendary Russian weapon, the VSS ‘Vintorez’ is perfect for those who want something stealthy that packs a punch. While it is allegedly a marksman rifle, best to use this gun at short to medium ranges. It is pretty accurate, but it’s no sniper rifle.

That being said the VSS has a lot of other things going for it in Into the Radius VR. It does great damage with its 9x39mm rounds, and makes practically no noise thanks to its integrated suppressor. Unlike other suppressors you won’t have to clean it separately, since it is a part of the weapon.

While the magazine doesn’t hold a lot of rounds, those that it does are very effective and very silent, making the VSS a great all around weapon for stealthy players.
5. FN17 Rifle
The FN17 Rifle, also known as the ‘SCAR’ was a potential candidate to become the United States’ military new battle rifle, but was rejected. Luckily it fits right in in the Pechorsk Zone as the most powerful assault rifle available to you. The only downsides are it’s high price, and the fact that it degrades more quickly than other weapons.

Once you have the funds to afford this beast though, you will never go back to another rifle in this game. There is nothing but upsides. The FN17 does enormous damage per shot with its 7.62x51mm rounds, which are also expensive like the weapon itself. The FN17 is also very accurate, capable of sniping about as effectively as the Tiger rifle, just swapping in a longer range scope on the top rail will turn it into a very effective long range tool.

The SCAR absolutely destroys enemies at any point in the game, though its magazines are limited to 20 rounds, you’ll rarely need all of them if you put your shots on target. Even armored foes can’t stand up to it at any range. There is no weapon in the game more versatile and powerful than the FN17.
Requisition VR Singleplayer First Look and Review
First of all, a little disclaimer. The folks over at Arcadia gave me an early access key to Requisition VR before its Steam release on October 20th. Since there doesn’t seem to be anyone on the Multiplayer yet, I decided to get my feet wet and review the Singleplayer Campaign.
While Requisition VR bills itself as a Cooperatively focused experience, there is a Single player option with a light story, which at this time consists of two missions, though I’m sure more will be added. Still, I got a pretty thorough impression of the game as it stands right now.
For a video version of this review check it out on our Youtube channel.
Unique Crafting and Zombie Destruction
So what kind of experience is this game that we’re reviewing? Requisition VR has a very important and fundamental thing going for it, and that is a very interesting premise that utilizes and innovates with Virtual Reality.

Requisition VR is a Coop zombie survival game that not only gives you guns and melee weapons, but also the ability to combine them in countless ways and create some insane and deadly zombie crushing instruments. It also gives you the ability to create and set a very wide variety of traps that can be triggered with pressure plates, trip wires, buttons, a ton of things.
As for story it’s your standard zombie stuff, a fog appeared one day and people started turning into zombies and civilization rapidly splintered. You and your compatriots are from a small colony of survivors seeking a solution as the fog spreads ever further. While not the most original story, this is a zombie game, and so it doesn’t need one.

The Bugs
Now that we know what Requisition VR is about, let’s get the elephant out of the room first. This is a modern VR game, and like all modern games and VR games especially, it has bugs, and will release with bugs. Also like all modern games and especially VR games, those bugs will probably be fixed over time, so I won’t talk about them too much, but right now Requisition VR feels really janky and looks kind of ridiculous at times.

Zombies will climb over air, attack air. Hit registry is… weird. Stabbing especially feels odd, with the thing you’re stabbing with being awkward to pull out of the zombie, and therefore twisting your arms at weird angles. Overall the bugs as they stand right now are pretty immersion breaking, and I mention them only because some of them seem so ingrained in the basics of your arms interacting with the enemies and environment that they may take a very long time to fix, if they are fixed at all.

This is basically a long winded way of saying that Requisition VR does not feel smooth to play, and it is easy to lose your sense of immersion in the game. Most of these bugs can and likely will be fixed, but some, like when hitting zombies feels odd and sometimes jerks your arms out of place, may take a very long time to get right. Overall I doubt Requisition VR’s interactions will ever feel as smooth as something like The Walking Dead: Saints and Sinners.
Mission 1: The Hut

Okay so the game is a little janky, but what is the gameplay like? Well if you’re looking for a desperate defensive mission against waves of zombies that will make you prepare as thoroughly as possible and use every ounce of cleverness you have, the first mission does not deliver that. If you love to smash some zombies and maybe bait them into an explosive trap or two, then that’s what you’ll get.

When you start you’re given a few objectives, mainly looking for a battery in a nearby house so you can open a shed. So you go into the house and get the battery, killing a few wandering zombies along the way, and even a great big fat one. All throughout the house are drawers and cabinets that you can loot. The loot inside them seems to be totally randomized. I’ve found toast and detergent in a drawer one round and then an assault rifle and beer cans on the next round.
A Digression: Finding Weapons
This can be a little annoying, because you need to get pretty lucky to get a gun and also a decent amount of ammunition for that gun. The only guaranteed spawns of items are those sitting outside of cabinets, and in both of these missions they are rarely items that go together, such as a gun and its ammunition. More importantly, they are hardly ever items that combine into unique weapons.

Unique weapons are made by certain items that are combined into an especially powerful weapons, they’re preprogrammed. So a metal baseball bat and a worklight creates an electrified spiked bat, or a leaf blower and a blowtorch create a flamethrower. These weapons are super powerful and super fun to use.

To get them, though, you’ll need to get really lucky and hope that the items to create them spawn in these random containers. Otherwise you might end up with three metal bats and no lights to make them really effective, just like you might end up with one of every firearm, but only one magazine of ammunition for a couple of them.
This is frustrating in Singleplayer, but I imagine Co-op would make this worse, with one person having managed to scrounge a gun, and another having found the ammo, but each one holding onto it and making both pieces useless. Or, one person finding a blowtorch and one finding a leafblower, but never combining the two together into a fantastic weapon.

So unless you get lucky and both know what junk you need to create a great weapon and also manage to find that junk, you’ll probably end up just duct taping random sharp or heavy items together to create insane weapons, which is really good fun too. Or you might just never bother with that and hack all your enemies apart with an axe. Still, there’s definitely some charm to be had in weed wacking a zombie to death, there are a lot of interesting weapons in Requisition VR.

Back to Mission 1: The Hut
Anyway back to the first mission. Hopefully you both played and payed really good attention to the tutorial, because otherwise you’ll be really lost here. I didn’t pay enough attention, so I had to go replay the tutorial a second time, turns out the tutorial room with the crafting tables was the most important, go figure. What you’re going to want to know is that every item has certain materials that it is made out of.
Some of these materials are needed for creating “trap boxes,” which allow you to set up traps, and explosives to be activated by those traps.

Also if you want to create barricades you’ll need to know that you can’t just use a wrench you found to break up furniture into scrap wood for boarding up windows. You also can’t use a literal hammer that you found. You need to use the permanent hammer that you can take out of the left side of your chest, otherwise furniture won’t break into wooden scraps that you can use for barricading, and you can’t hammer in nails. Only the special hammer in your chest will do either.

The first mission forces you to create two traps, and barricade three windows. Now, maybe there are more zombies in Multiplayer, but as far as the Singleplayer goes, I found these preparations to be not only unnecessary but unhelpful.
First of all the barricades. You can only barricade windows, so you’d think the best course of action would be to barricade the first floor of the big house to buy you some time to thin out the zombies before maybe retreating upstairs or outside if you get overwhelmed. Well it isn’t, because the doors won’t close. What is the point of barricading windows if the doors don’t close at all? I’m not sure if this is intended design or a bug, but you can’t even grab the door handles.

You need to open the doors to get into and out of the place, so the zombies will just march through the open doorway. If you’re leaving multiple open entryways to the house, what is the point of the barricading mechanic? I never once saw a zombie try to get in through the windows, they just walked through the empty doorway.
Not that I spent much time defending the house. The zombies are slower than you, so confining yourself to the small rooms of the house is actually a bad tactic, because you can get cornered there. What ended up being far more effective was just running around outside and smacking zombies as they got close.
As for the traps, they were effective for what they were, but they only really killed one or two zombies apiece and weren’t really worth the time it took to set them up. Despite the janky melee combat I was only really in danger once or twice. Running away and chugging a beer or bottle of wine was an easy to way to survive in those situations. The enemies couldn’t keep up, and I topped off my health pretty quickly.

After three waves the mission was over. All in all I got an impression not of a desperate defense while surrounded by walls and traps, relying on my cleverness and preparation to survive, but rather an action packed romp around a field, slapping zombies as they came at me without any regard for traps or defenses.
Not to say that it was an unenjoyable experience. The guns in particular were actually much more satisfying than VR guns usually are. Just that if you’re looking for a more defensive and planning oriented experience, you won’t find it here despite the game mechanics that seem to point to a game that is more oriented that way.
If the best and most fun way to fight zombies is to run around an open space and whack them, why patiently sit behind traps and barricades? It seems that there is a gap between the implementation and what was desired by the designers. As it stands gameplay was much more fun without bothering with barricades and traps, at least as far as the Singleplayer is concerned.
Mission 2: The Gas Station
Mission 2, unlike the first, did not start with the game forcing you to do useless things like set traps and build barricades. Instead it changed the pace of things a little, and asks you to gather some items for your bus to repair it. More fuel, some oil, new tires, new battery, the works basically.
So instead of a purely defensively focused mission, you’re encouraged to look around and loot while fighting the wandering zombies, cool. There’s also some great weapons to be found like the sledge hammer, which is great even without the part needed to make it more powerful. There are a few times though, such as when you fill the new tire with air, or charge the battery and install it in the bus, that the noise summons a big wave of zombies, so there’s still plenty of action.

Mostly this level is a scavenger hunt, but it is a great change of pace from the first level, and looking for the required parts was genuinely fun. This means that when more missions are added they will probably have similarly interesting variation between them. Maybe they will even get hard enough that setting a bunch of traps will actually be necessary for victory.
Conclusion
Requisition VR is not a very impressive game as it stands right now, at least as a Singleplayer experience. Like most games that feature a multiplayer option, Requisition VR is probably much better with some friends. It is meant to be a Cooperative experience after all. Still, I don’t believe that will fix the gap between the intention of the game designers with mechanics such as barricades and traps, and the end result of those barricades and traps being either useless, or more time than they are worth.

If you are are a real VR or zombie enthusiast then you will definitely enjoy taping random objects together to make crazy weapons to bash zombies with. Though that alone does not make up for Requisition VR’s downsides. As a Singleplayer experience, you can do better elsewhere, though as far as fighting zombies cooperatively in VR there aren’t many options, and if that is what you are looking for then Requisition VR might be worth a closer look. Regardless, as long as the folks at Arcadia keep fixing and refining this game, they could have a real unique gem on their hands.
Every Weapon Recipe You Can Craft in The Walking Dead: Saints and Sinners
Want to know more about the craftable weapons in The Walking Dead: saints & Sinners? Well here is your ultimate source for every craftable weapon in the game with some information and pros and cons for each, whether they’re guns, bows, melee weapons, or explosives. Most of these recipes can be acquired by upgrading your workbenches, while some can only be made by finding secret recipes out in the wilds of New Orleans.
Want to know more about the craftable weapons in The Walking Dead: saints & Sinners? Well here is your ultimate source for every craftable weapon in the game with some information and pros and cons for each, whether they’re guns, bows, melee weapons, or explosives. Most of these recipes can be acquired by upgrading your workbenches, while some can only be made by finding secret recipes out in the wilds of New Orleans.
Note that this list does not include the Tourist Edition weapons, as they are simply reskins of already existing weapons, though they might be added in the future. This article is also confined to weapons craftable in the first game, newer weapons added in The Walking Dead: Saints and Sinners - Chapter 2: Retribution are coming soon.
Categories:
Melee Weapons
Shiv

The Shiv is the very first weapon that you can craft from the Gear Workbench in The Walking Dead: Saints and Sinners. It is a very basic knife that falls apart quickly and is not very sharp, so it will have some trouble getting through a walker’s skull. While it may not see much use outside of your first few scavenging runs, it is very cheap to make a lot of them to use as throwing knives, if that’s your sort of thing.

Bayou Slugger

The Bayou Slugger is the first two handed melee weapon that you can craft from the Gear Workbench in The Walking Dead: Saints and Sinners. While it is much better at getting through a walker’s skull than the Shiv, it will use quite a bit of stamina every swing, so be careful using this against a large crowd of walkers. Still, this is a pretty easy melee weapon for beginners to use. It is far easier to land hits with this than with the Fire Axes, Hatchets, or Crowbars that you might have scavenged.

Night Shift

The Night Shift is an improved version of the Shiv. It is more durable and stabs through a walker’s skull more easily. Extraction from the skull is also faster and easier than with the Shiv. While it is not the most durable single handed melee weapon it is the fastest one handed knife and can be awfully satisfying to use in a crowd of walkers. It is also arguably the easiest melee weapon to throw.

Sheet Metal Cleaver

The Sheet Metal Cleaver is a very durable one handed melee weapon that can easily chop a big hole in a walker’s skull. While it may lack the finesse of a smaller blade there is a lot of power in its simplicity and ease of use. Though for the more theatrically inclined you can also use this cleaver to cut through a walker’s neck and decapitate it. Not to mention, decapitating a walker uses less stamina than chopping into its skull.

Grass Clipper
The Grass Clipper is basically a Katana, and it’s awesome. In terms of a two handed melee weapon it is the opposite of the Bayou Slugger. The Grass Clipper is light and does not use much stamina to either chop through a walker’s head or decapitate it, and it is very durable. Rapidly slicing your way through a crowd of walkers in a breeze with the Grass Clipper. Oh, and it’s a Katana during a zombie apocalypse, really what’s not to love?

4th And Pain

4th and Pain is a hidden recipe that is an upgraded version of the Sheet Metal Cleaver. It is a little more durable and cuts a little smoother. Overall a direct upgrade and arguably the best one handed melee weapon. At the very least it will last the longest out of all of them, and cuts the smoothest as well.

Samedi’s Hand

Samedi’s Hand is a hidden recipe and the only claw or fist based weapon in the game. It essentially amounts to a pair of brass knuckles with a couple of sharp blades coming out of it. Samedi’s Hand can be pretty unwieldly until you’re used to it, but offers similar stabbing action to the Shiv or Night Shift, while being a little more inflexible to use. Though it is very durable, and looks really cool.

Esteemed Mortal

The Esteemed Moral is a hidden recipe, and is definitely the largest and most menacing melee weapon in all of The Walking Dead: Saints and Sinner’s flooded New Orleans. The buzz saw blades at the head of this thing easily chop through and piece of a walker that you want it to, and this blade will last you quite a while. Though like the Bayou Slugger it is heavy and a little unwieldly, and will take more stamina to swing than a lighter alternative, like the Grass Clipper, would.

Bows
Laminated Bow

The Laminated Bow is your basic bow in The Walking Dead: Saints and Sinners, and is made at the Survival Workbench. Bows are the only quiet ranged weapons in the game, so taking anything out at a distance will require one, or really great skill at throwing melee weapons.

The bow is intuitive to use, if a little hard to aim until you get good at it. Also there are three arrow types, your typical pointed sticks, noise making “lure” arrows which are some firecrackers tied to a pointed stick, and a hidden recipe for explosive arrows, which is a small bomb tied to a pointed stick.

Compound Bow

The Compound Bow is a hidden recipe that is basically an upgraded version of the Laminated Bow with more durability and greater shot power. Overall it is a direct upgrade, and there is no downside over the Laminated Bow except possibly for the look of the weapon making aiming it a little different.

Explosives
Nail Bomb
The Nail Bomb is made at the Gear Workbench like all other explosives, and packs quite a punch. They’re easy to use, just throw it far away, and if it hits the ground hard enough it will explode.
Just be careful not to drop it at your feet, because you will easily kill yourself that way.
Sticky Proximity Mine
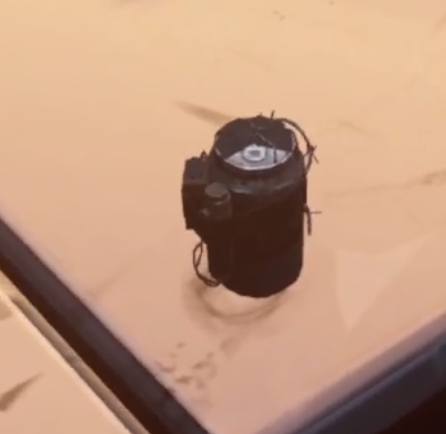
The Sticky Proximity Mine is a hidden recipe in The Walking Dead: Saints and Sinners. To use it just throw it at a surface, the ground, a wall, a doorframe, wherever enemies will be. When it contacts a surface the mine will stop moving and stick to it. After a second or two it will arm. Then when an enemy comes close it will beep for a few moments and explode. Overall it is a very easy and effective trap. Just throwing it into a crowd of enemies and then running away is also pretty effective.

Timed Noise Maker Bomb

The Timed Noise Maker Bomb is a hidden recipe and a very effective tool for getting walkers off of your back, or taking out a crowd of walkers. Just dial the egg timer on the back to however many seconds you want it to wait before it explodes, and throw it.
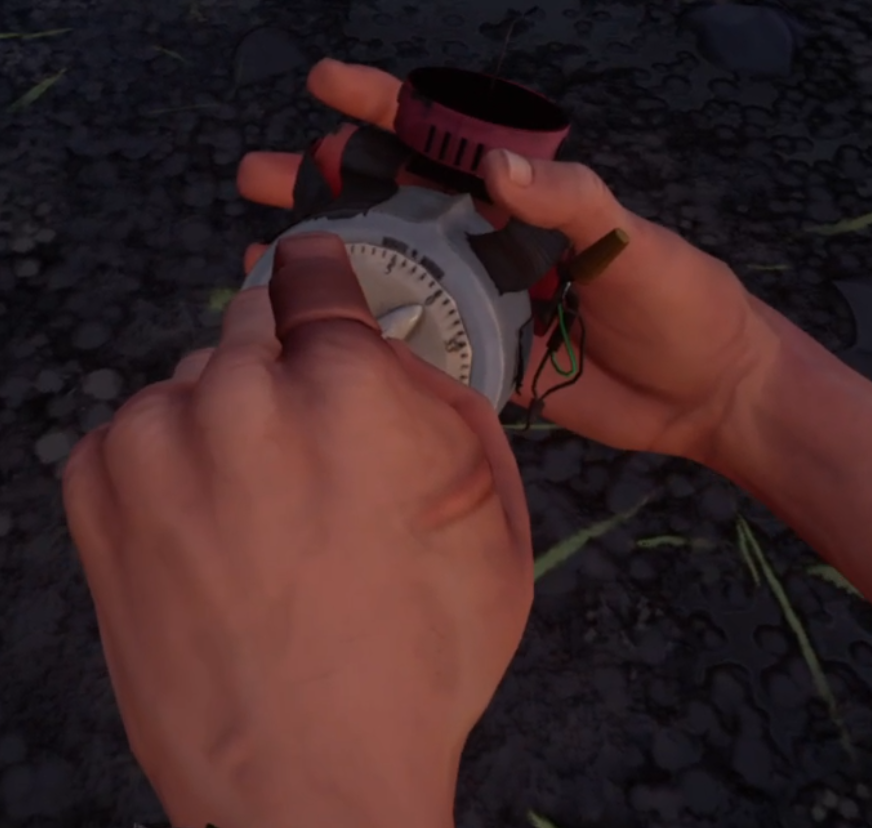
The bomb will then make a ton of noise, attracting all nearby walkers, until the time is up. When it is the bomb explodes. This is a great way to clear an area of walkers, or two get walkers chasing you off of your back. Though the explosion of the bomb might just attract more.

Pistols
.30 Revolver

The .30 Caliber Revolver is the first gun that you can craft at the Guns Workbench, and is the weakest gun in the game. Still, a .30 Caliber bullet can punch through a walker’s skull as good as anything else, though for such a weak round this gun as a lot of recoil, and the revolver shoots very slowly, with a noticeable delay between shots.

All of the guns in The Walking Dead: Saints and Sinners have a lot of recoil. While you can fight human opponents with this weapon, you would be at a disadvantage to do so. The .30 Revolver is reloaded by opening the chamber with the A/X button (on Oculus/Meta Devices) and bringing bullets from your bullet pouch to it one at a time, then closing the chamber with the A/X button or by closing it with your hand or using the force of moving your wrist quickly to slap it shut. At least this lengthy reloading process means it will never jam.

.45 Revolver

The .45 Revolver and its ammo are hidden recipes which are are basically better versions of the .30 Revolver and ammo. While it has more recoil, the .45 Revolver does significantly more damage than the .30 Revolver does. Though it still has a low rate of fire and must be reloaded in the same way as the .30 Revolver does, and also does not jam.

Overall the .45 Revolver is a direct upgrade over the .30 Revolver, but its ammo is not nearly as common to find, so you’ll have to craft it.

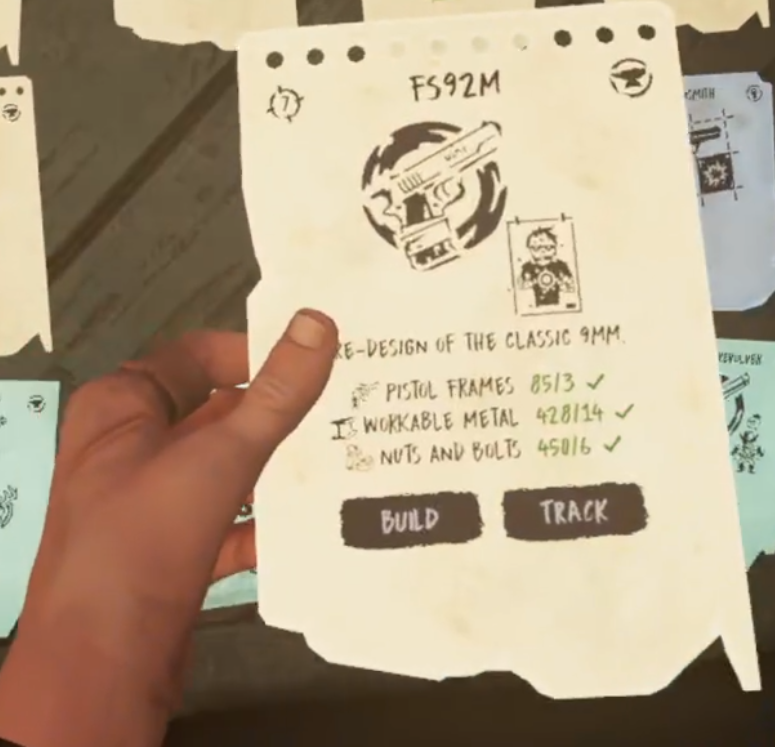
FS92M 9MM Pistol

The FS92M 9mm Pistol is the most powerful pistol in the game. While it does less damage per round than the .45 Revolver, it holds almost three times as many rounds as the .45 (16 in the clip and 1 in the chamber) and has a much faster rate of fire. This, coupled with possibly the lowest recoil of all firearms, makes the FS92M extremely deadly.

Since the FS92M is reloaded via magazine instead of via individual rounds, reloading is faster as well. Just get rid of the old magazine by pressing the A/X button (on Oculus/Meta Devices) and then replace it with a new one. If there is no round in the chamber you’ll have to pull the slide back.

Be careful when this pistol gets to about half durability though, jams will become very common, to the point where this gun becomes hard to use when about 1/4 durability is left. To unjam you’ll have to pull the slide back. This severely slows down how quickly you fire and so takes away the FS92M’s biggest upside. Generally you’ll burn through more ammunition using this firearm, but it quickly outpaces the competition with sheer volume of fire.
Shotguns and Rifles
Double Barrel Shotgun

The Double Barrel Shotgun is the first two handed firearm that you can craft at the Guns Workbench of The Walking Dead: Saints and Sinners. While it may not seem like much, it is very powerful at close ranges and easy to use. It has a huge spread of pellets, and so is best fired at close ranges. Still, it can easily take a walker’s head off if you just aim high. Though even at medium range the huge spread of the pellets can make it hardly effective at all.

After firing it twice, just reload it by pressing the A/X buttons (on Meta/Oculus devices) and taking two new shells from your ammo pouch and placing them into the empty chambers. Press the A/X button or flip the chambers closed yourself, and you’re ready to fire again. This means that the Double Barrel can be very slow to fire with this cumbersome reloading process. Though at least it will never jam.

Bolt Action Rifle

The Bolt Action Rifle is the opposite of the Double Barrel as it fires only a single bullet, and is very accurate and precise. Each bullet is extremely powerful too, capable of killing humans with a single body shot. Wherever you line up the sights, that is where the bullet will land, and whatever that bullet hits won’t forget it.

The big downside of this firearm is its reloading process. As the name implies you need to pull back the bolt after every shot, you don’t get two tries like the double barrel. Pulling the bolt back is a little clunky, and never feels really smooth or intuitive. This is a problem a lot of VR games have with bolt action weapons.
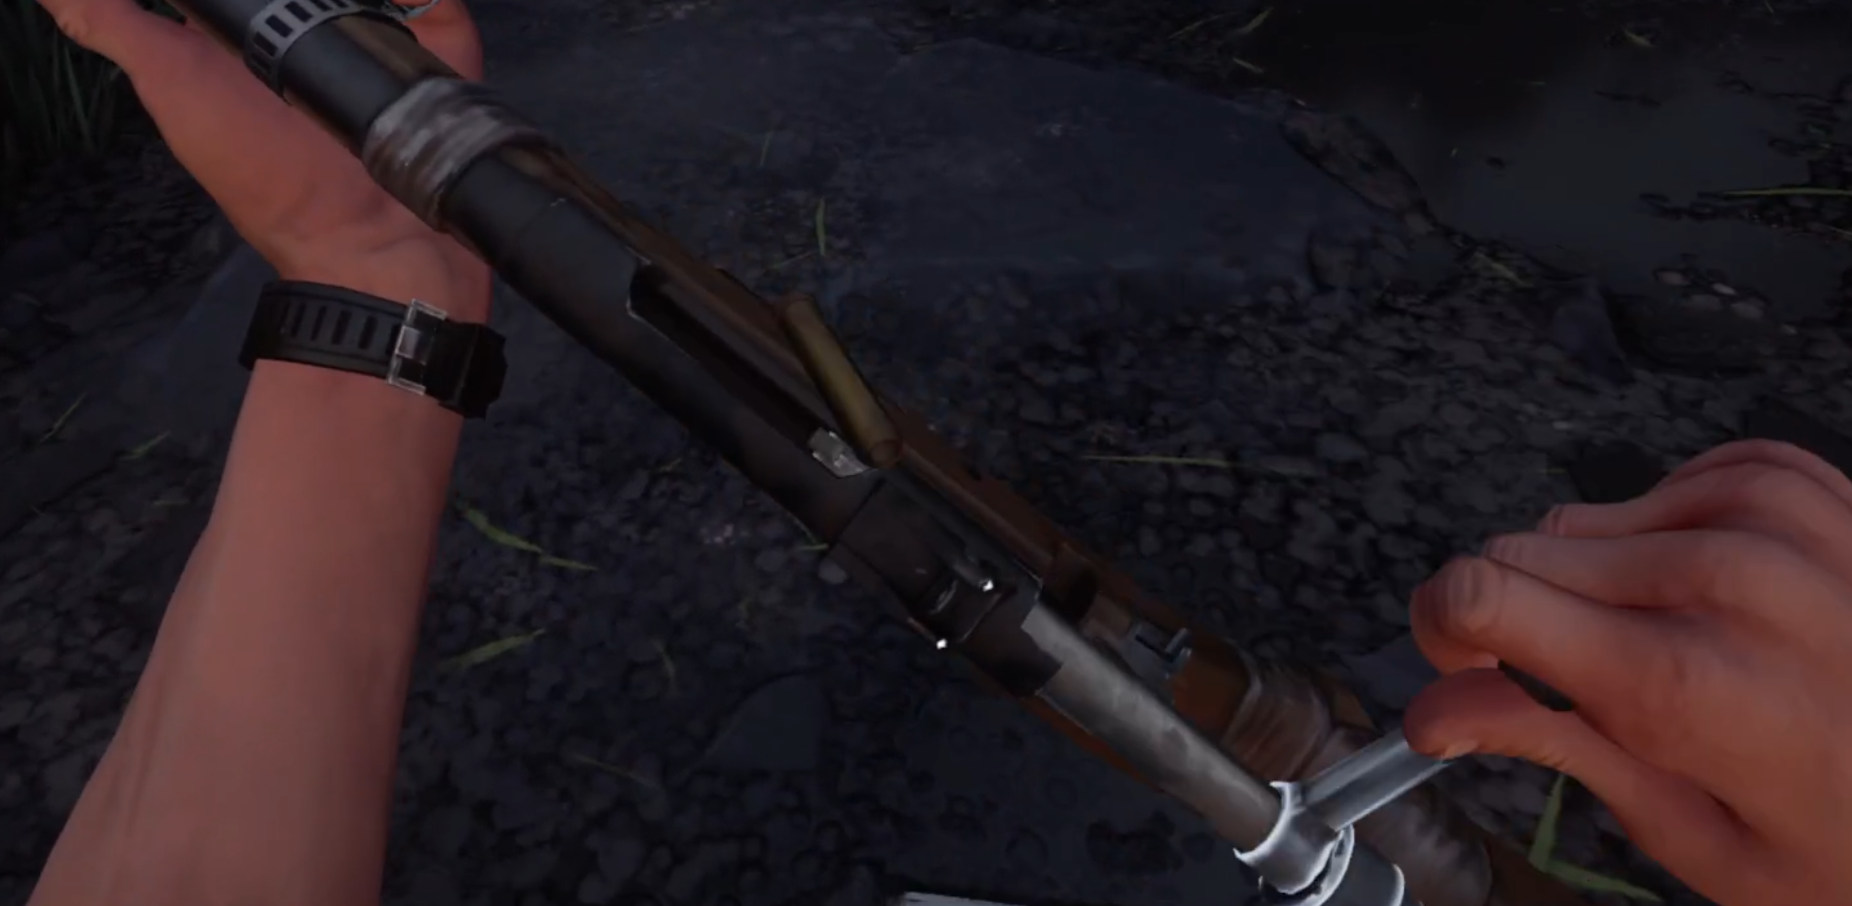
While you can quickly fire again after cycling another round, the precision of the weapon also makes it easy to miss shots in a high stress situation and quickly run through the five bullets in the magazine. To refresh the gun with bullets the magazine also needs to be replaced by pressing the A/X button (on Meta/Oculus devices) to drop the old one before replacing it with a new one.
This is what keeps the Hunting Rifle from being a great gun, how hard it is to cycle and reload. Especially because it is terrible at taking out walkers, since any bullet will do against a skull, all of that power goes to waste.

Nova 1014

The Nova 1014 is the last firearm that you get access to by upgrading the Guns Workbench, and wow is it worth it. This is arguably the most powerful firearm in the game due to its high rate of fire (when you get the hang of it), ease of aiming, and high damage per shot. Since the Nova 1014 is a shotgun its bullets have a spread to them, though a much less significant spread than the double barrel. This means that you won’t need to aim with exact precision, and the cone of pellets does a ton of damage, often killing human enemies in a single shot, and easily taking out a walker’s brain.

You won’t need to worry even if they survive though, the pump action of the gun to chamber another round is very quick and smooth, meaning you can get another shell out of the barrel in just a moment. Reloading individual shells into the chamber does take a while, but with a capacity of 8 shells (the same shells as the Double Barrel uses) you will hardly ever run out of ammo in combat. The one downside is that the Nova can jam, but to clear a jam you just need to work the pump an extra couple of times. Luckily jams generally only happen at very low durability with this gun.

If you want the classic zombie apocalypse shotgun experience, then the Nova 1014 Pump Action Shotgun has got it for you.

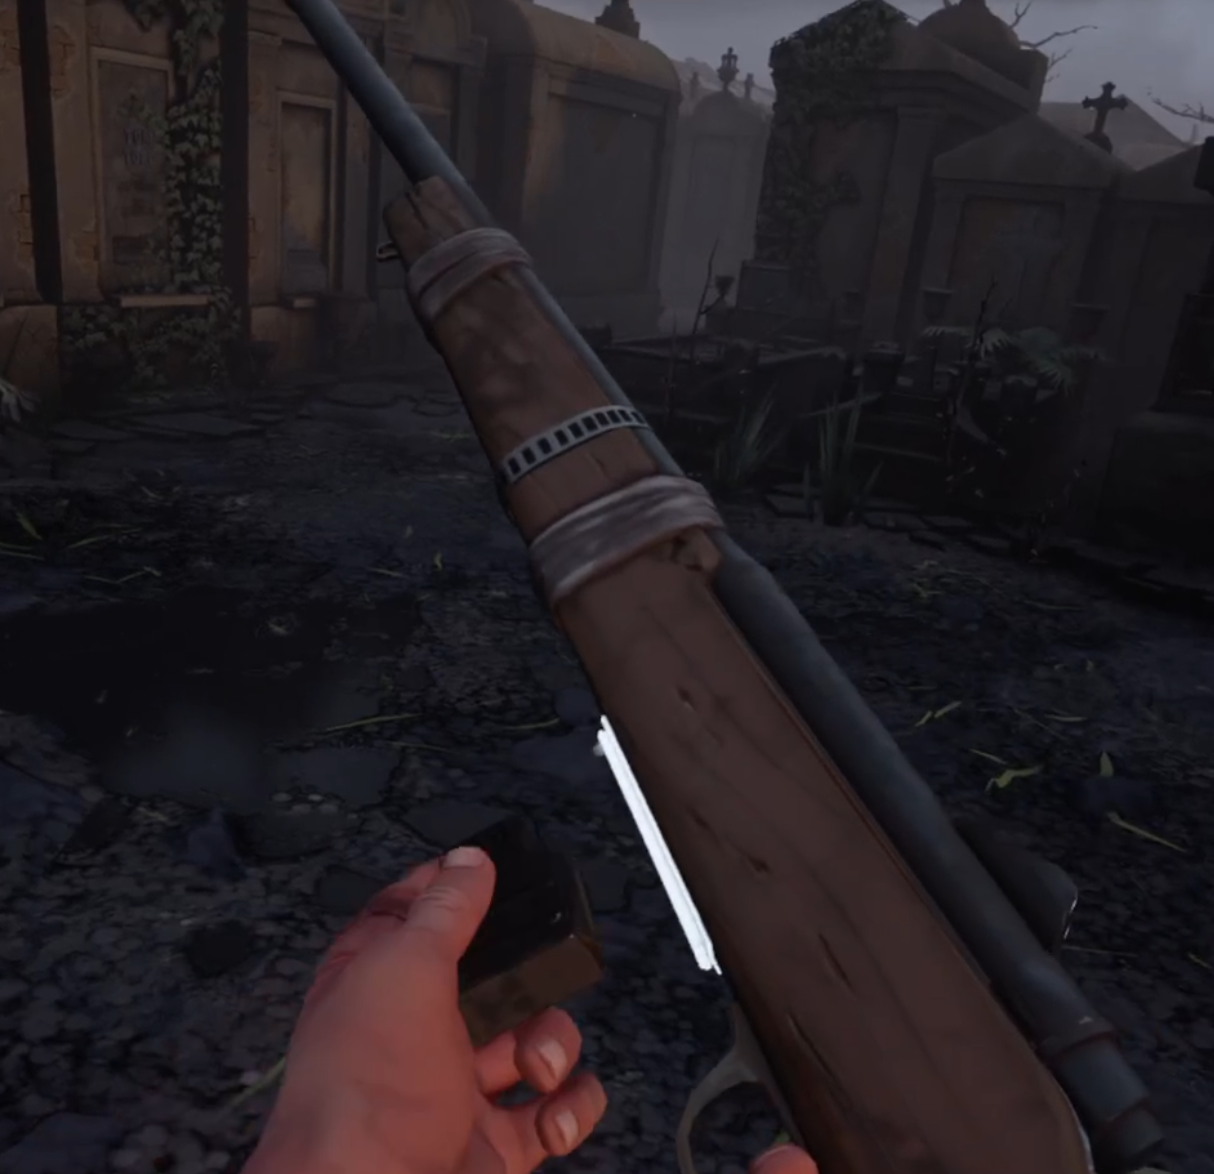
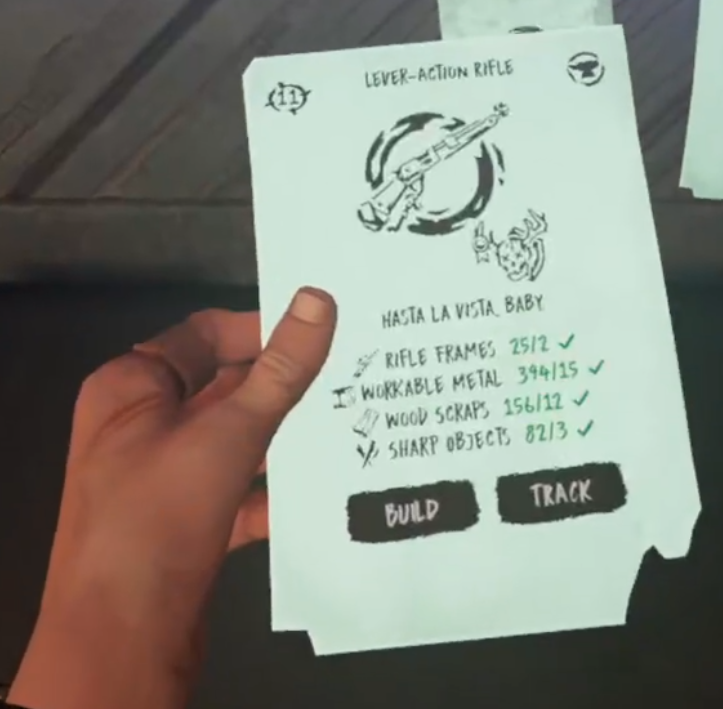
Lever Action Rifle

The Lever Action Rifle is a hidden recipe that is a fantastic upgrade to the Bolt Action Rifle. It uses the same ammo type as the Bolt Action and has all of the same strengths. Similar damage per shot and fantastic accuracy. The Lever Action has the upside of also helping one of the Bolt Action’s greatest strengths, its terrible bolt cycling and reloading times.
The Lever Action, as the name would make you think, rechambers new rounds by pulling the lever on its bottom, instead of cycling a bolt. While it can be a little annoying and unwieldly at times, it is far better and faster than the Bolt Action’s bolt, and so lets you fire many more of its powerful rounds far faster.

This makes the Lever Action a clearly superior upgrade. The one downside is each bullet needs to be reloaded individually into the side of the rifle. Though with a huge ammo capacity of 12 rounds this is hardly ever a problem.
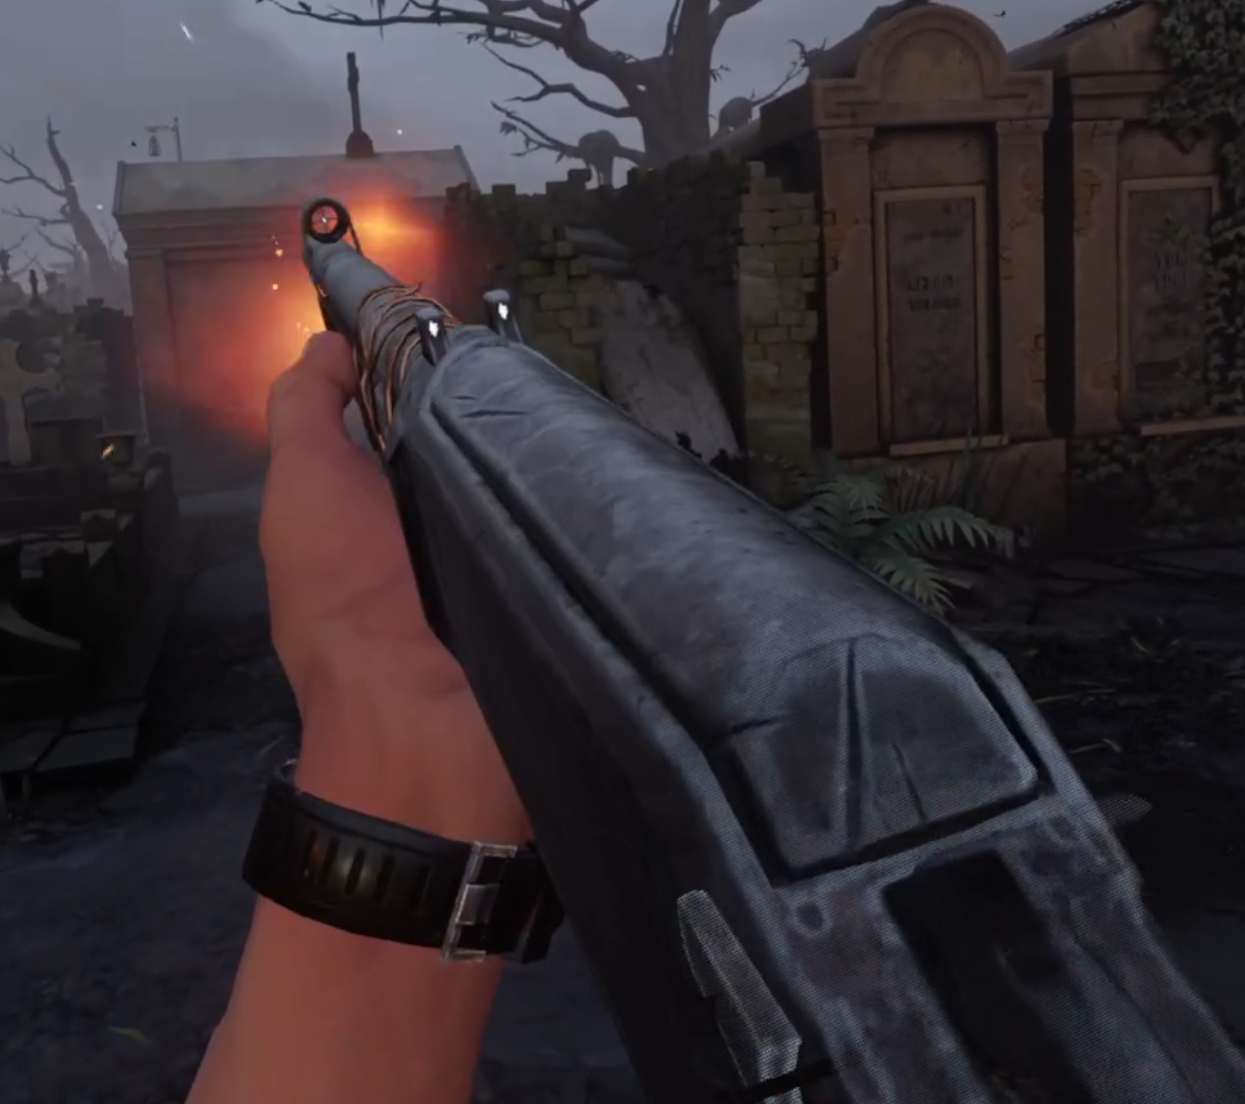
AR-416 5.56MM Rifle

The AR-416 Rifle is a hidden recipe assault rifle that is the only automatic weapon in the game. Though if you’d prefer something slower there are burst and semi automatic fire modes as well, that can be selected by putting one hand over the selector switch on the side of the rifle and pressing trigger. This and the huge magazine capacity of 30 rounds (with 1 in the chamber as well) makes the AR-416 the gun capable of sustaining the greatest volume of fire in the game.

That being said it’s not perfect. Each bullet does decent damage, though like the FS92M 9mm its strength is in the amount of bullets being fired. So when your stream of rounds touches a human opponent they’ll melt away. Though the recoil, like all guns in The Walking Dead: Saints and Sinners, is awfully high. This makes landing headshots on walkers a little difficult, and no matter what you’re shooting at you will likely use a lot of ammo.

Loading is done by pressing the A/X button (on Oculus/Meta Devices) to release the old magazine, and then placing a new magazine in the catch. If the chamber is empty you’ll need to pull back the tab at the rear of the firearm (just above the buttstock and above the grip, it will glow) to load a round into the chamber. The AR-416 is also prone to jamming when it is at low durability, and pulling that tab back will also clear a jam.

All in all if you’re a good shot there is no better weapon than the AR-416, though compensating for its recoil can be frustrating. As far as naked damage output goes though, there is nothing better in The Walking Dead: Saints and Sinners.