


5 Epic VTOL VR Campaigns for the F/A-26B That You’ll Love
Did you know that VTOL VR has an absolute ton of free community made singleplayer content?
Well here are just a few of the many free enjoyable singleplayer campaigns for the F/A-26B.
Did you know that VTOL VR has an absolute ton of free community made singleplayer content? Here are just a few of the many free enjoyable singleplayer campaigns for the F/A-26B.
You might also be interested in:
New Planes for FREE In VTOL VR By Easily Installing VTOL VR Mods
Flying VTOL VR Planes Is Some Of The Greatest Fun In Virtual Reality Gaming
Sky Wars

Flying over a city in the Sky Wars VTOL VR singleplayer campaign.
Let's start off with the highly rated Sky Wars. If you couldn't tell from the logo, this campaign by Fyrcat is very loosely based on the Star Wars movies, though everyone will still be using the usual VTOL VR aircraft instead of X-Wings and TIE fighters.
There's a story here, also loosely inspired by Star Wars, except instead of fighting an evil empire the enemy are the Oil Cartels. Though that's not really very important, really this is all just a vehicle for some vaguely Star Wars themed missions and opportunities for the campaign author to use a few sound bytes from the movies.
Not to spoil too much, but there is a sort of Death Star Trench scene, and you even get to be Red 5! Of course even if the Star Wars references don't sound all that appealing, this is a pretty great campaign for the F/A-26 that can be difficult without being unapproachably hard.

Strafing a ground target with guns in Sky Wars.
Though I did run into some bugs and failed triggers once or twice. Such as during an escort mission. The transport to be escorted ended up just flying in circles when a batch of enemy planes were supposed to spawn. Also, the author does have a habit of spawning enemy planes extremely close to you.
This is probably to force you to have intense close ranged dog fights instead of the usual AIM-120 missile duels. While this worked sometimes, most of the time it just ended up feeling cheap and unfair to suddenly be barraged with multiple close ranged missiles from a place that had been completely threat free moments ago.

The trench scene in the Sky Wars VTOL VR campaign.
Regardless, Sky Wars is a great campaign that is full of memorable and unique missions. I highly recommend it, and if you're a Star Wars fan then you'll get some fun references and chuckles out of it too.
Operation Tollgate

Striking ground targets as other explosions go off in the Operation Tollgate VTOL VR campaign for the F/A-26B.
Next let's talk about a campaign that is pretty new and, highly underrated, Operation Tollgate for the F/A-26 by Liao and Zulu.
I'm shocked there aren't more subscriptions and positive ratings for this campaign, because it is an absolutely fantastically varied and creative campaign for the F/A-26. The maps are an even mix of water and land, which gives a lot of opportunities to face enemy naval and land based units, just as the missions themselves are a fantastic mix of anti air and anti ground.
You might be fairly used to the standard for VTOL VR missions, well Operation Tollgate has some missions where things get really switched up in creative ways.
Like one mission where you must hit some enemy ground targets while evading the Combat Air Patrol above, or another mission where you can't rearm, and can only refuel at a tanker, so you better use your ammunition efficiently.
Flying up to a tanker in Operation Tollgate.
The briefings are thorough, and even have a nice section that recommends a loadout to you in case you're unsure. You also start with relatively primitive munitions compared to the AIM-120Cs, AGM-65s, and AIRS-Ts that you might be used to.
Instead you'll have to make do with AIM-7s and Sidewinders for a while, but when you complete enough missions and you get access to better munitions it really feels like you earned them, and like you need them.
The missions in Operation Tollgate have a very smooth difficulty curve, getting harder as you get better tools to tackle them with, and some missions even have unexpected curveballs and priority targets thrown your way when you might expect it to already be complete.

Defending an airfield from a night attack.
If you want missions that feel unique and have a fair mix of air and ground combat then try out Operation Tollgate. It really deserves more attention than it has gotten.
Artemis Campaign

The Artemis Campaign has the most detailed map I've ever seen in a VTOL VR singleplayer campaign.
Our third singleplayer campaign is the Artemis Campaign by Judge Dredd. The first thing that struck me about this campaign was the map. It is the most well made and detailed map I've seen for any VTOL VR campiagn, and it was actually not made by Judge Dredd, but a different person called ddDeath_666.
This map, called Greek Islands, has numerous cities, settlements, and airfields spread out on several islands. The terrain itself is wonderfully blended so that it looks natural, and the settlements have suburbs, downtown areas, and even remote buildings all connected by roads.
The campaign itself focuses mostly on a single large island, and there are some really great missions here, alongside a few lackluster ones where not much happens and you'll find yourself flying over the water for long periods of time. Still, the missions that are good in this campaign are impressive.

A low level airstrike on an airfield.
Though the odd thing about the Artemis Campaign is that it gets easier as you progress through the missions, rather than harder, the first three missions are actually the best and most impressive of the bunch. The later missions are still good, don't get me wrong, but don't have the same level of challenge and spectacle as the first ones.
Oh, and I do like the thought of only giving the player limited saves in this campaign, this is a great way to add some interesting challenge to missions by making the player wonder when they should use their limited pool of saves. It was a nice change of pace to get out of the habit of saving every five minutes just in case.
Liberation of Kuwait F/A-26

Monitoring a friendly target in the Liberation of Kuwait VTOL VR singleplayer campaign.
Our next campaign is the Liberation of Kuwait F/A-26 campaign by Judge Dredd, not to be confused with a similarly named campaign for the AH-94 (which is also excellent). These missions are very loosely based on the air war and following ground invasion of the nation of Kuwait, which was then occupied by the Iraqi military, during Operation Desert Storm.
The first mission starts off slowly with the some aerial reconnaissance using your TGP, and the rest is a tight series of four bombing and close air support missions.
That's almost entirely the focus of this campaign, close air support and strikes using smart munitions. You'll be spending a lot of time watching prospective targets or friendly forces with your TGP before getting the order on whether or not to engage. Despite not being a very difficult campaign it's a ton of fun and very tightly designed.

The map in the Liberation of Kuwait mod could use a little more detail, but it is serviceable.
The map is a little barren and not the best approximation of Kuwait out there, but the missions do a great job of integrating friendly forces into your objectives.
When you support friendly forces you'll also see those friendlies fighting on the ground, and so the missions really sell that you are giving vital support to real troops below. The missions are well made, immersive, and not overly intense. Mostly you only have to make sure to stay out of MANPAD and AAA range.
If you want a little leisurely precision bombing in missions polished enough to feel like they could be DLC, then give the Liberation of Kuwait campaign a try. Though, expect to spend a lot of time looking at the ground with your TGP.
Surveying an allied attack on a destroyed bunker complex.
Oh, and this campaign does have some fun little touches, like this guy who you are told to stop for to arm your weapons each time you fly a combat mission. Very cool. This is a very well polished and scripted campaign that does a good job of making you feel like part of an operation involving other units.
Defenders Of Kyiv

Defending an allied airfield with a low level airstrike in the Defenders Of Kyiv VTOL VR singleplayer campaign.
The last singleplayer campaign here is based on the still active Russo-Ukrainian war. Defenders of Kyiv by Innocence Of Children focuses on a small group of fighter pilots just before and during the Russian invasion of Ukraine on the northern Kyiv front.
The Russian military attempted to pull off a high risk and high speed operation to quickly capture Kyiv and force the Ukrainian government to flee or capitulate. In this campaign you are part of the Ukrainian military forces that prevented this from happening.
The thing that makes the Defenders of Kyiv campaign stand out from all other custom singleplayer campaigns in VTOL VR, even more so than its setting, are the wingmen that you fly with. Both are actually characters, with dialog and personalities. In fact there's a lot of dialog in these missions.
Your two wingmen, Joker and Queen, go from corny to dramatic very quickly when the invasion starts. Their banter fills out the quiet moments and gives each mission a greater sense of context and drama.

Your wingmen are actual characters in this campaign.
While English is clearly not the author's first language and there are a lot of minor errors in the script, the intent of the writing is a solid story, and the character drama hits as hard as the missions do. In terms of story and drama the Defenders of Kyiv campaign has to be the best one out there.
This campaign also severely limits what equipment you will have access to, especially earlier on. While you'll never get all of the fancy ultra modern missiles and ground attack munitions that you'll have access to in normal play, limiting you to less sophisticated weapons makes the campaign more difficult throughout, and changes the usual flow of air to air fights. It also changes how you engage ground targets, and unfortunately not in the best way.

Using old weapons means you'll be resorting to guns more than ever in the Defenders Of Kyiv VTOL VR campaign.
While being forced to rely on dumb bombs and missiles more than usual is interesting, it's more annoying than anything when you receive objectives to destroy fifty targets... and then even more after that.
While ostensibly you'll have your wingmen and other allied units helping you, they'll inevitably end up being shot down or run out of ammo before chewing through so many enemy ground targets. This leaves you using all your muntiions up over and over and needing to fly back to base a bunch of times to actually complete the objective. This gets kind of tedious, and I wish you didn't get such a massive amount of ground targets to take out at once.
Still, the briefings have great detail, and the battles on the ground are absolutely massive and impressive. This campaign felt really unique and fresh in a lot of ways. I highly recommend it.
If you've got a campaign for any aircraft that you think deserves playing then feel free to let me know in the comments. Have fun flying out there in VTOL VR.
You might also be interested in:

VTOL VR - How To Use AH-94 Countermeasures
Here’s how to use the countermeasures (flares and chaff) in the AH-94 helicopter in VTOL VR.
Here’s how to use the countermeasures (flares and chaff) in the AH-94 helicopter in VTOL VR.
Grab the combat collective stick. You’ll notice that there are two sticks on the collective lever to the left of your seat, one on top of the other. The combat collective is the one on top.

The combat collective in the AH-94 is used to release flares and chaff countermeasures.
Now hold down the trigger on the controller of the hand that is grabbing the combat collective and press the Y/B button (the higher of the two buttons on the controller) to release your countermeasures.
That’s how to use countermeasures in the AH-94. Remember that you can also turn off flares or chaff by clicking the green flare or chaff buttons on the dashboard to the left of the collective lever. Also remember that you can configure chaff and flare release modes by pressing the CMS button on an MFD.

How To Use HOTAS In VTOL VR
Despite being a VR flight simulator that lets you use all of the controls of its many planes with just hand controls, VTOL VR does come with some built in HOTAS (Hands On Throttle And Stick) support.
There are also some mods out there that also add additional VTOL VR HOTAS support, though they are mods that may or may not function as intended.
So does VTOL VR support HOTAS? Yes, but just for the rudder and left and right wheel breaks.
Despite being a VR flight simulator that lets you use all of the controls of its many planes with just hand controls, VTOL VR does come with some built in HOTAS (Hands On Throttle And Stick) support.
There are also some mods out there that also add additional VTOL VR HOTAS support, though they are mods that may or may not function as intended.
So does VTOL VR support HOTAS? Yes, but just for the rudder and left and right wheel breaks. This very limited support is due to the game being much more straightforward to play using its fantastic VR hand controls to interact with the cockpit. That’s the entire point of the game, and what differentiates it from other flight simulators like DCS.
So here’s how to use VTOL VR HOTAS controls both with built in support, and also with a mod.
VTOL VR HOTAS - Setting Up Rudder Pedals
Setting up rudder and break pedals in VTOL VR is very straightforward and easy, since it’s a feature built into the game. You shouldn’t have any compatibility problems with it.
Once you start VTOL VR hit the Start button in the carrier start menu and then click on the “SETTINGS” button in the main menu that follows.

The Settings button on the VTOL VR main menu.
Once you’re in the settings menu that follows click on the “CONTROLS” button on the top, and you’ll see a menu with a variety of controls options.
The one we are interested in to set up HOTAS rudder controls for VTOL VR is the “Hardware Control Rudder” button. Click on it to turn it on.

Turning the HOTAS Hardware Control Rudder on in VTOL VR.
It’s not that simple though. There’s still a little more setup to do. See that “BINDINGS” button in the bottom left of the screen? Click on that now.
You’ll get an entirely new menu that lets you bind the inputs for the Rudder and both Wheel Breaks to a HOTAS controller, preferably rudder pedals.
Make sure your HOTAS pedals are connected and recognized by your PC. You can then select a controller by pressing one of the arrows next to the desired action to bind in the “CONTROLLER” column.

These built in VTOL VR HOTAS features work extremely well.
You can use any sort of HOTAS hardware controller for these actions in VTOL VR, you’ll see in this example that the controller is actually a joystick.
With your desired controller selected click the blue “BIND” button to the right. The screen will say “MOVE THE RUDDER AXIS” so do so by hitting one of your pedals.
Once VTOL detects the input then you can test it by looking at the “AXIS TEST” box. One or the other side will fill up with a yellow bar the more you press on the corresponding right or left axis.

A HOTAS rudder successfully set up in VTOL.
That’s that. Click the “APPLY” button in the bottom right and hop into any of VTOL VR’s many planes to test out your HOTAS rudder controls.
You Probably Shouldn’t Use VTOL VR HOTAS Mods
Of course you might be thinking that just adding physical rudder pedals isn’t enough. You want the feel of a real throttle and joystick while you’re playing VTOL VR.
This is a sentiment especially common among players migrating to this fantastic VR game from other games like DCS World that require HOTAS controls to be playable.
While it can be possible to use mods to use your physical HOTAS controls in VTOL VR, it comes highly recommended both here on Reality Remake, and by many members of the VTOL community that you try using the VR controls first.
Adding physical rudder pedals is great because they use your untracked feet that don’t interfere with the rest of the Virtual Reality cockpit. Adding physical controls that use your actual hands sounds great in theory but falls apart in practice when playing VTOL VR.

You’ll want to make sure a table isn’t in your way when you want to reach these controls in the game.
You’ll need somewhere to put your physical joystick and throttle and well… physical objects will interfere with your ability to reach for the virtual MFDs and other buttons inside of the game. You’ll also have to put down your VR touch controllers to use your HOTAS controls with your hands.
So that means the only viable way to use VTOL VR HOTAS is to use only HOTAS controls and not use VR hand controls at all. If this is what you want to do then hopefully the HOTAS mod shown here will help.
Still, all of the few available HOTAS mods are unreliable and may or may not function depending on the hardware that you have. So please try the game without HOTAS or with just physical rudder pedals before you go down this path. VTOL VR is truly wonderful if you play it as intended.
A VTOL VR HOTAS Mod To Try
If you are truly committed to using HOTAS in VTOL VR then here is a very recently updated VTOL VR HOTAS mod to try. It’s called BYO Controller.
To use it you’ll first have to install the VTOL VR Mod Loader and install the mod via the VTOL VR Mods website. There is already a comprehensive guide on how to install VTOL VR Mods, but here is a short version as well.
Download the Mod Loader from the VTOL VR Modding Website.
Start the Mod Loader .exe and point it to your VTOL VR Installation automatically with the detect button, or manually with the browse button. The path by default should be C:\Program Files\Steam\steamapps\common\VTOL VR\
Then go to the browser page for the mod you want to install on the website. Click the “One Click Install” button and click OK on the popup to allow the VTOL VR modding website to install the mod on your local mod loader.
Run VTOL VR from the mod loader.
Those are the basics, and the mod you’ll want to install for VTOL VR HOTAS is the BYO Joystick Mod.
Once you install this mod and start the game click on the “MODS” button in the main menu, select the BYO Joystick mod in the menu and click “LOAD” at the bottom.

Loading the BYO Joystick mod in the VTOL VR mod menu.
Now lift the headset up and look at your PC monitor, the HOTAS configuration menu should be up on your screen.
Here you can see a column for each detected HOTAS device. Here you can see a connected Joystick and Throttle. As in any other HOTAS game click on the empty space for each flight action to bind a key, and hit the “DETECT” button. Then move the controller on the desired access (or press the desired button) to bind the key.

Setting up HOTAS controls in VTOL VR using the mod.
You’ll notice that there are A LOT of keys to bind, which normally are all easily accessible using VR hand controls in your cockpit.
BYO Joystick lets you save a different configuration for each type of plane and seat in the game, and you can copy configurations from one to another.
Beware that this and other HOTAS mods are very finicky and break often with updates to the game. There’s no guarantee your hardware will be supported, and that this mod will continue to work in the future.
Use at your own risk. You may need to run the game, set up the mod, and then restart to get it to work. It may not work for no apparent reason, or due to an update, or due to the hardware you are using.
Anyhow that’s how to use VTOL VR HOTAS, hopefully you won’t have to. Either way, enjoy the game!

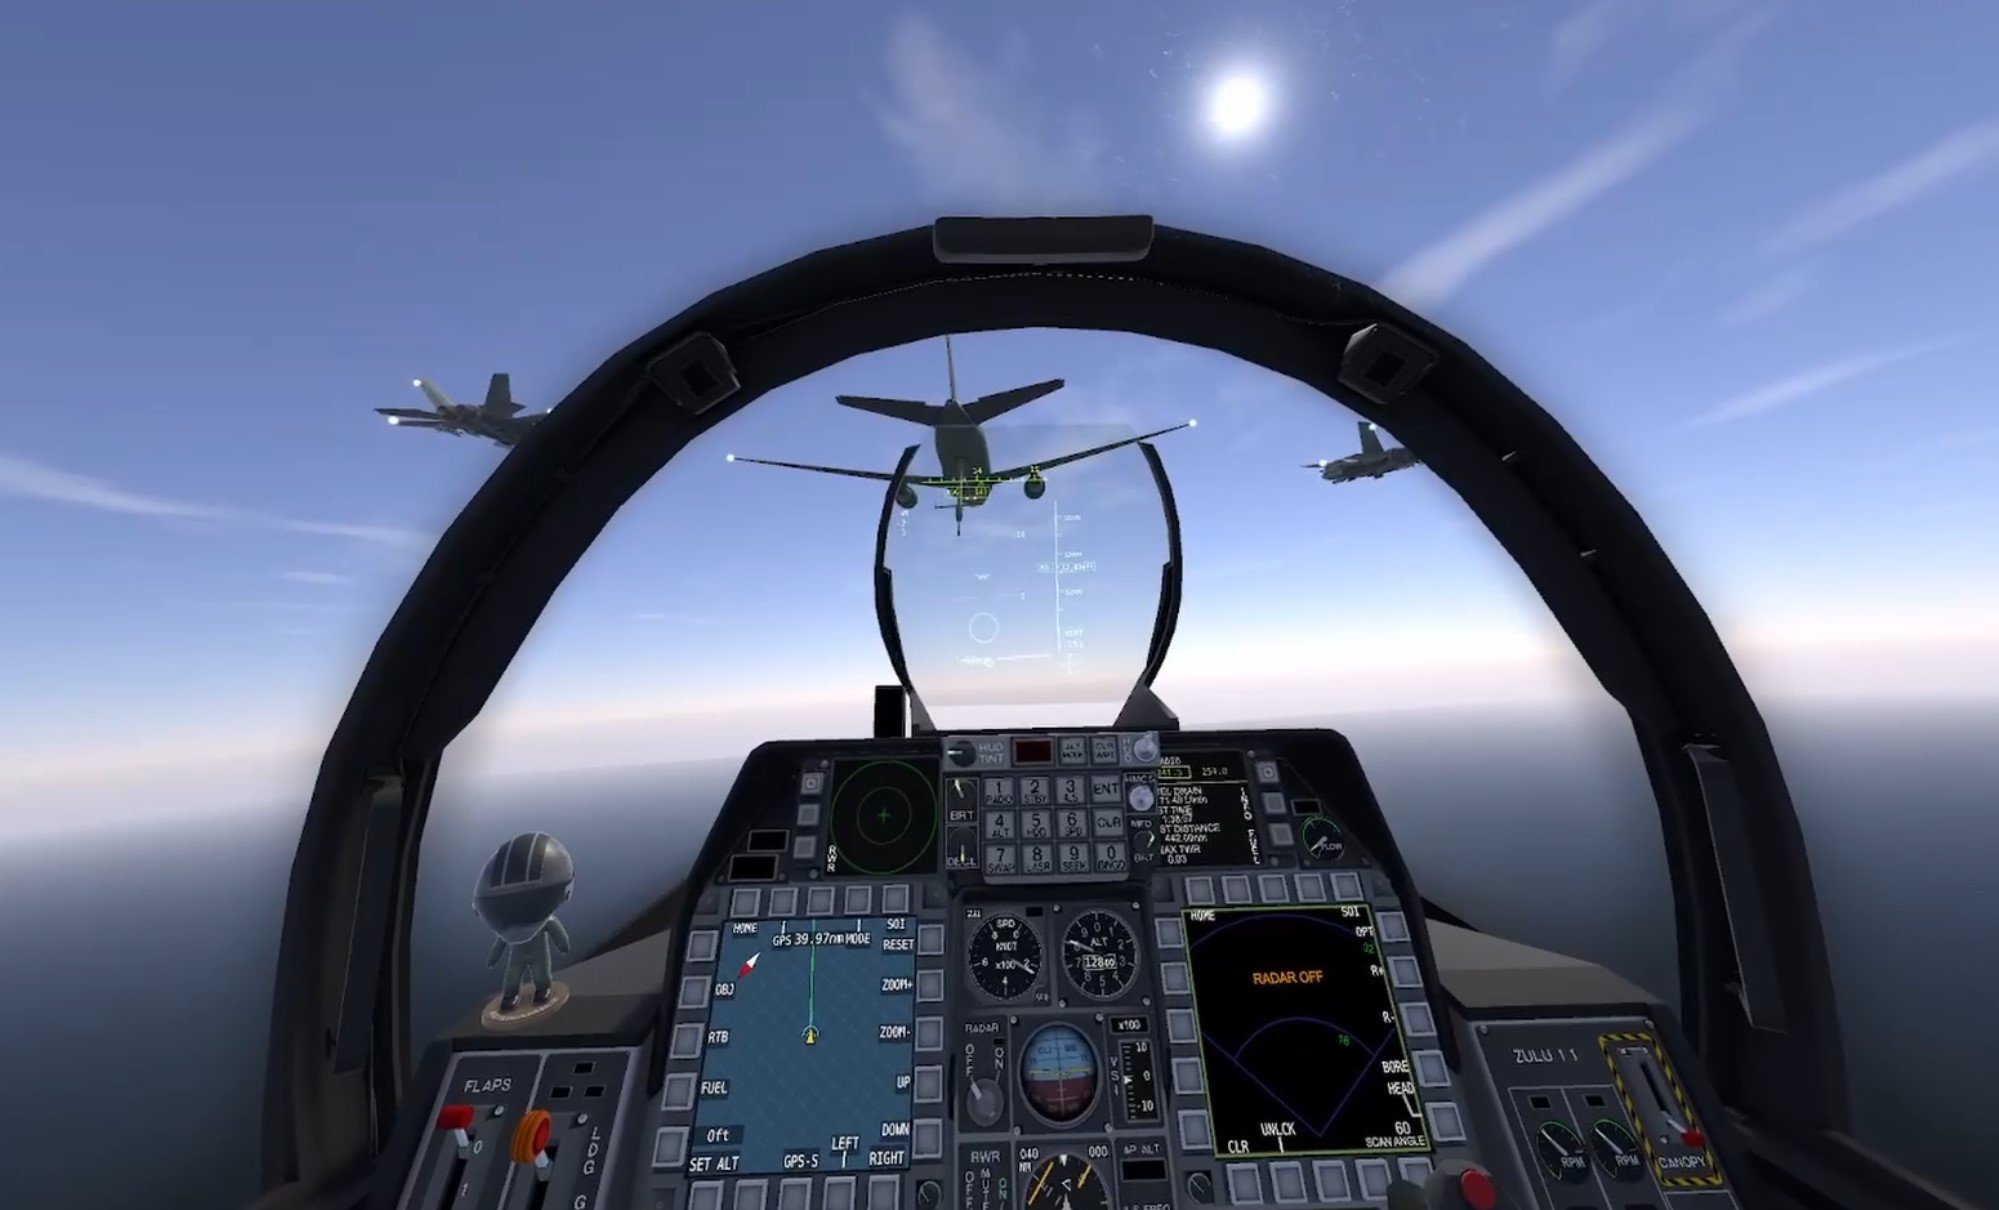
Flying VTOL VR Planes Is Some Of The Greatest Fun In Virtual Reality Gaming
VTOL VR is my personal favorite flight simulator of all time, and it’s completely playable entirely within Virtual Reality. There is no modern flight simulator that this as easy to pick up and as easy to play as VTOL VR.
Flying any of the numerous VTOL VR planes whether it be the dual engine F/A-26 high powered fighter jet or the sleek and stealthy F-45 is easy because the game itself displays all of the various interfaces, switches, and buttons of your chosen VTOL VR aircraft and you can use them with your VR hands.
VTOL VR is my personal favorite flight simulator of all time, and it’s completely playable entirely within Virtual Reality. There is no modern flight simulator that this as easy to pick up and as easy to play as VTOL VR.
Other flight simulators like DCS or IL-2 Sturmovik might be capable of running in Virtual Reality, but they rely on you buying and then setting up a bunch of hardware like physical joysticks, throttles, and even display screens. Imagine setting up and tearing down all of that hardware every time you want to fly!
Well the greatest part of VTOL VR is how it uses Virtual Reality to avoid all of this. Everything you need to fly the plane is completely accessible and usable in your virtual cockpit in this fantastic VR flight simulator.
Flying any of the numerous VTOL VR planes whether it be the dual engine F/A-26 high powered fighter jet or the sleek and stealthy F-45 is easy because the game itself displays all of the various interfaces, switches, and buttons of your chosen VTOL VR aircraft and you can use them with your VR hands.

The cockpit of the F/A-26 in VTOL VR. The most straightforwardly powerful of all VTOL VR planes.
That’s the magic of Virtual Reality that VTOL VR utilizes so well. You can just be sitting in a chair in a room, but by slipping on a VR headset and starting a VR game you can be transported to the inside of a fully interactable fighter cockpit. VTOL VR’s aircraft are absolutely incredible, and this is really a must play game for any VR or flight simulator enthusiast.
What is most impressive about VTOL VR’s planes is how good they feel to fly. It doesn’t take a whole lot of time to get used to the joystick or other controls inside the virtual cockpit, and the controls and reactivity of each aircraft are so smooth and genuine feeling even when compared to other flight simulators that you can experience on the flatscreen or in Virtual Reality. This is all despite those controls being entirely virtual.
Most impressive of all is just how much content there is in this game. While some aircraft require the purchase of additional DLC along with the base game in order to try, there are three available with the base game, and those three alone are extremely different, from a VTOL (Vertical Takeoff and Landing) ground attack aircraft to the F/A-26 fighter jet to the F-45 stealth fighter, each is wildly different and gives you a lot of interesting decisions to make while flying them in the game.
Each aircraft can also accommodate a basically endless variety of loadouts, and there are a ton of different munitions to try when using any of them. From GPS guided bombs to radar guided missiles to ancient short range infrared missiles to dumb bombs to guns guns guns, there are a huge variety of different munitions to use as well. Customizing your loadout to fit the mission you are about to undertake is an integral part of the experience.

Closeup of an F/A-26 firing a missile in VTOL VR.
Learning each of these aircraft and playing them in Singleplayer or Multiplayer is an absolute blast for any fan of flying. There are a decent amount of missions in the base game, and Multiplayer servers that are always full of opponents. There are casual servers and dynamic conquest missions to just jump in and play, or hardcore milsim groups that are always looking for members.
Best of all are the many Steam Workshop missions and campaigns, which are made by the many enjoyers of this VR game via the built-in VTOL VR mission editor. There is a practically endless amount of content to enjoy in this game from the official to the user generated. It’s all easy to install and use as well. All you have to do is click a button in the game and the mission is downloaded to your computer.
What is most amazing about VTOL VR is that it is made completely by a single person, and updates come out very regularly, at least twice a year for the most major changes. It’s strange to think that the world of VR flight simulators would be so much more dull and difficult without the efforts of the single developer behind VTOL VR who is known as Baha or Bahamut.
Well, my hat is off to him, and we all owe him a big debt of gratitude for bringing the modern flight simulator into the virtual world and continually improving upon it. VTOL VR’s planes are an absolute blast to fly and fight in and will be for a long time to come.

VTOL VR Gets New Plane: The EF-24G Mischief and Electronic Warfare Update
A couple of weeks after its announcement VTOL VR solo developer Baha has released the new VTOL VR plane known as the EF-24G Mischief to the public.
The EF-24G Mischief is intended as an Electronic Warfare fighter in VTOL VR, using jamming pods and sensors to hide from or confuse enemy missiles and radar systems.
Of course this new plane isn’t going to be the only one capable of utilizing jamming technology, with jamming equipment now available for other planes in this fantastic VR flight simulator.
A couple of weeks after its announcement VTOL VR solo developer Baha has released the new VTOL VR plane known as the EF-24G Mischief to the public.
This new plane is purchasable as DLC on Steam for the price of twelve dollars, and is based on the real world F-14 tomcat. This plane also happened to be released on the exact same day of the year as the first flight of the Tomcat in 1970.
The EF-24G Mischief is intended as an Electronic Warfare fighter in VTOL VR, using jamming pods and sensors to hide from or confuse enemy missiles and radar systems.
Of course this new plane isn’t going to be the only one capable of utilizing jamming technology, with jamming equipment now available for other planes in this fantastic VR flight simulator.
There’s even some other new equipment available like the AIM-54 missile, but for now let’s talk some specifics on exactly what you can do with the EF-24 and more about the electronic warfare update, which massively changes VTOL VR.
The F-14 Tomcat In VTOL VR
The EF-24 is a very fun new addition to VTOL VR that makes great use of the new Electronic Warfare system.
On it, and various other aircraft like the F/A-26, you can mount AN/ALQ-245 Jammer pods, which allow you to spoof and jam signals for the enemy team.
We’ll talk more about this and the new Electronic Warfare system here shortly, but suffice to say it’s a massive change to VTOL VR that will completely revamp how the game is played, especially in Multiplayer, and the EF-24G is tailor made for it.
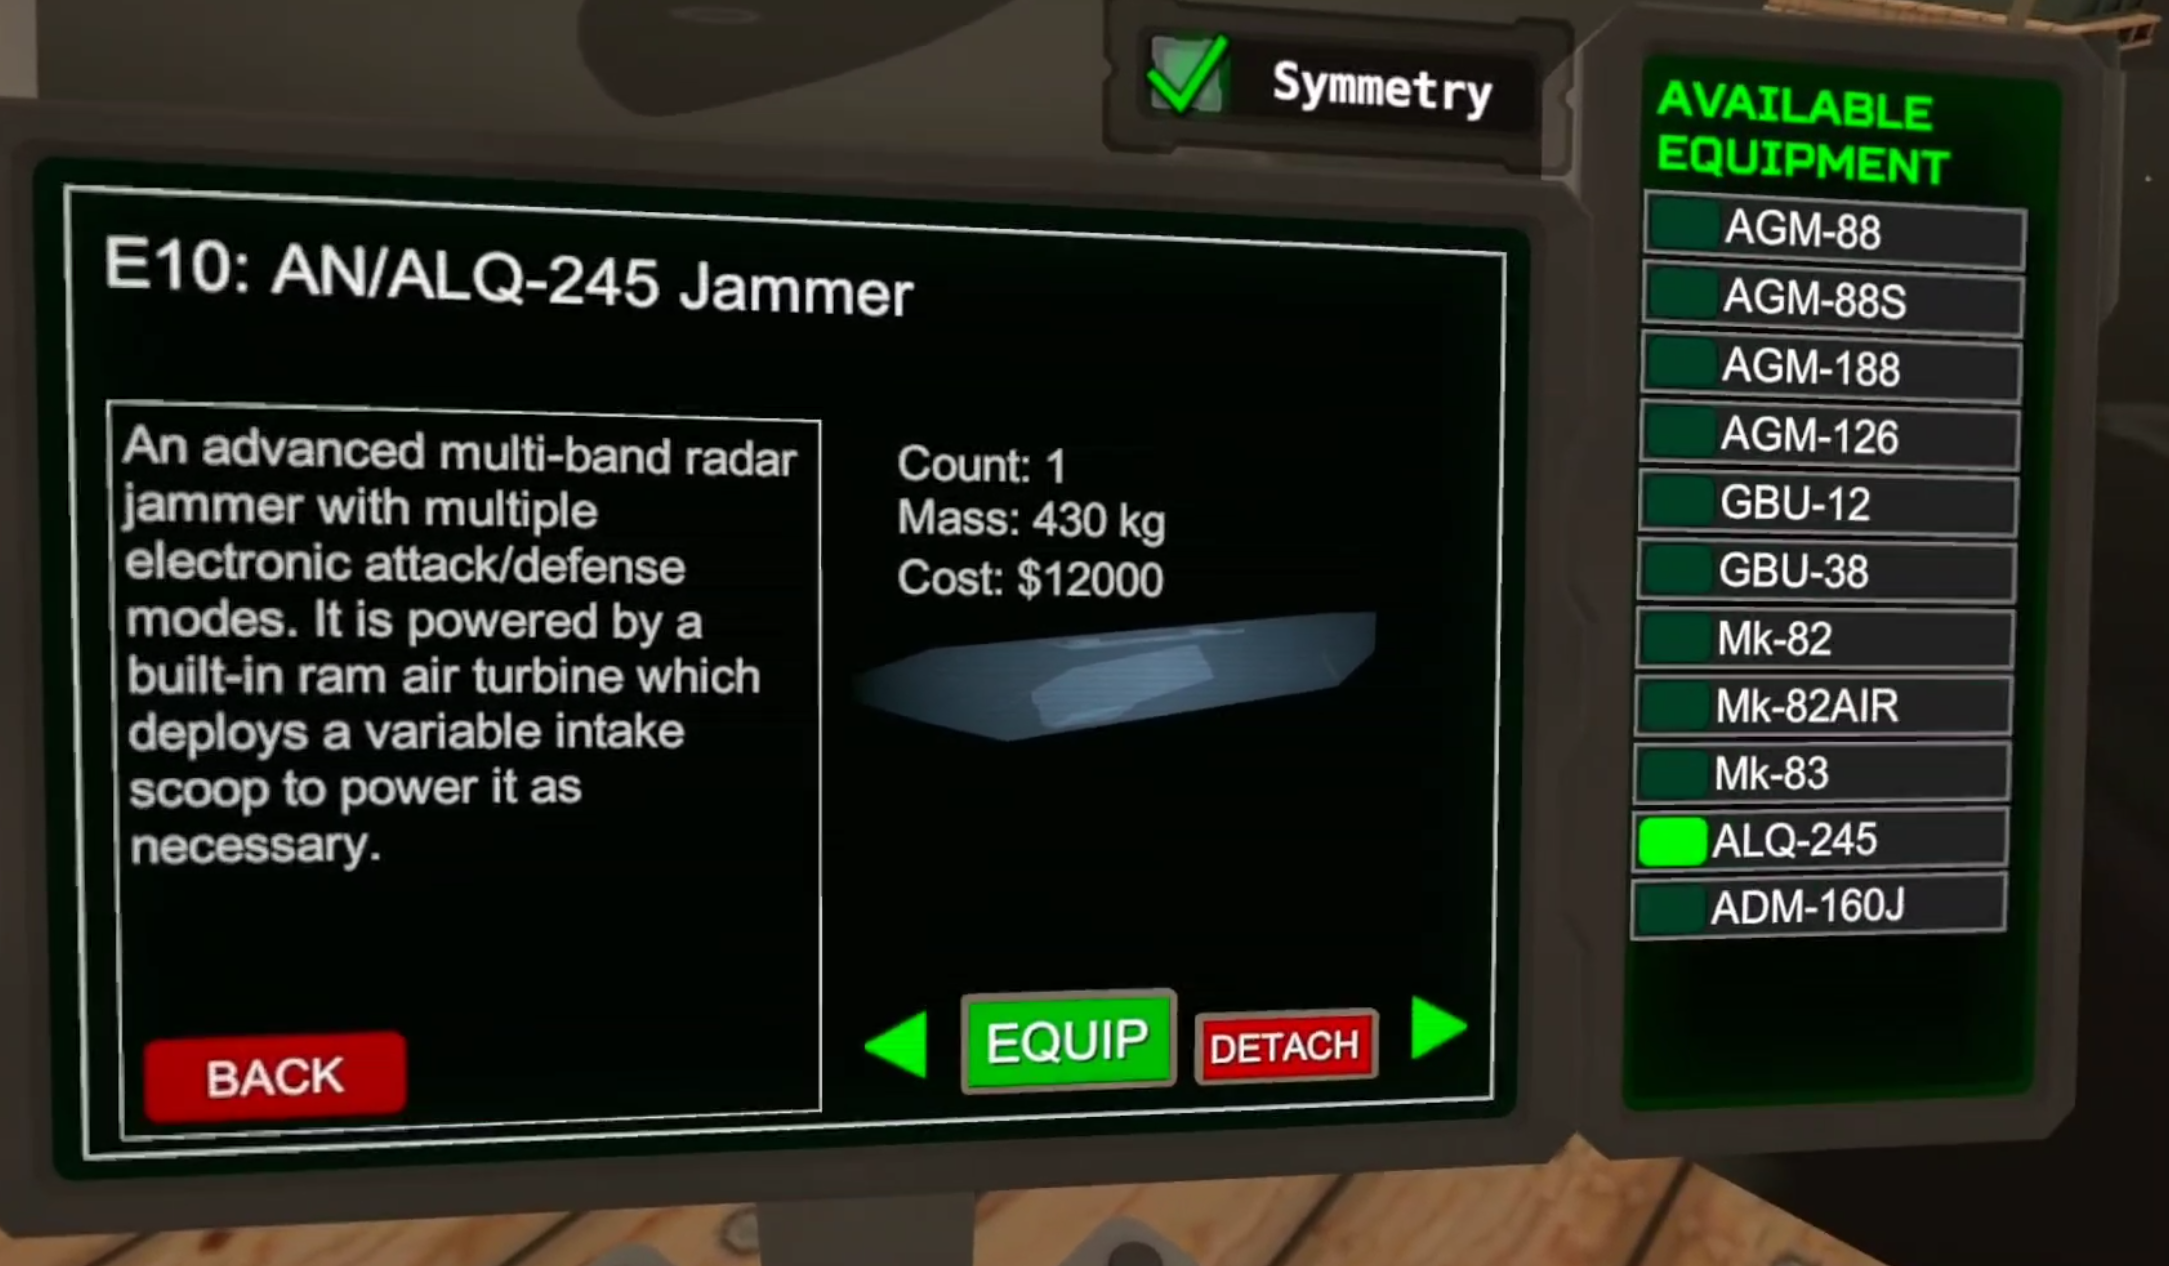
The AN/ALQ-245 Jammer Pod
The EF-24G Mischief itself bears many similarities to the F-45 (based on the real like F-35) in that the cockpit is extremely high tech when compared to older aircraft like the AV-42 or F/A-26. Though in many other respects this new plane is unlike any other.
Especially when using Electronic Warfare, there’s a lot of buttons to press on your various configurable touchscreens, and a lot of things to do to fly and fight as effectively as possible.
That’s why it’s great that the EF-24G is also a two seater plane. You can have a copilot in the back to handle the Electronic Warfare pods or weapons.
While it’s completely possible to fly this new plane by yourself, it’s much harder to manage everything on your own.

Being the passenger can be just as fun as being the pilot
Still, you can always by yourself a little time by zooming away, which the EF-24G is very capable of doing just like it’s real life inspiration the F-14 Tomcat.
It’s now capable of the highest speeds in the game, at least when you sweep the wings back, because just like the F-14 the EF-24 can sweep its wings forward or back for maneuverability or straight up speed.
This, coupled with the new missiles available to it, make the EF-24G a fantastic plane for countering enemy air defenses, and generally confusing them.
There are a ton of features, old and new, that you can use with this plane. So many that we won’t discuss them all here, though the size of the EF-24Gs manual speaks for itself.
If you’ve just gotten ahold of the EF-24G there’s also a whole new Singleplayer campaign for the plane which focuses on its strengths in countering enemy ground based air defenses. It’s a ton of fun and a great way to get to know your way around the new aircraft.

The new campaign is hard at first, but fantastic
Electronic Warfare in VTOL VR
Though by far the biggest change to VTOL VR is not only the addition of the EF-24G, but the addition of Electronic Warfare in general in this fantastic modern VR flight simulator.
You used to always be able to trust your radar and radar warning system to show you exactly where enemies were and what type of craft they were flying. That’s no longer the case.

That’s a lot of incoming missiles, shame they’re aiming at imaginary planes
The new jammer pods, which can be mounted on many of the aircraft already present in the game as well as the EF-24G Mischief, mean that no electronic system is guaranteed to work as you’d expect it to anymore.
These jamming pods are capable of doing a number of different sorts of electronic warfare and different frequencies. Guidance systems can be flooded with noise to become unreliable, DRFM can be used to make one aircraft seem like a whole wing of them, and even basic functionality like navigation and communications equipment can be interfered with.
It’s truly a massive change for VTOL VR, and opens up many more options in how you can approach each combat encounter, or how you can be tricked into approaching them in the wrong way.
What’s even more incredible is the further addition of the ADM-160J decoy missile.

The ADM-160J Decoy/Jammer Missile
This is a missile that, like the name says, functions as a decoy and is capable of making itself look like an entire aircraft.
Not only that, but it can help you triangulate targets for your own missiles, and has jamming technology of its own to misdirect enemy air defenses. Suddenly what might seem like another EF-24 approaching you could just be a decoy missile.
There’s no limit to how these new technologies present in the game can be used for any number of operations, and makes the depth of the air combat simulation of VTOL VR far better.
That’s not even mentioning all of the new assets available not only in the new campaign like huge Early Warning Radars, Enemy Radar Jamming Trucks, and Missile Silos, but also in the VTOL VR mission editor for mission creators to use.
So if you’ve always wanted to feel like Maverick from Top Gun yourself and rule the air in an F-14 Tomcat, or want to see the new ways the game can be played, now is a fantastic time to get back into VTOL VR or try it for the first time. Though all of this new technology does make an already complicated game even more complicated. Once you understand it though, it’s truly a masterpiece.