

Easily Install Beat Saber Mods And Custom Songs On Your Quest 2
Beat Saber is a great game, but like so many great games it’s even better with mods. Beat Saber mods allow you to put even more songs into the game by modding in custom songs too. There’s also custom avatars and custom sabers to try out. So if you want Beat Saber custom songs, or even other mods, then this guide will show you how to install Beat Saber mods on standalone VR devices like your Quest 2, Quest 1, or Quest Pro.
Beat Saber is a great game, but like so many great games it’s even better with mods. Beat Saber mods allow you to put even more songs into the game by modding in custom songs too. There’s also custom avatars and custom sabers to try out. So if you want Beat Saber custom songs, or even other mods, then this guide will show you how to install Beat Saber mods on standalone VR devices like your Quest 2, Quest 1, or Quest Pro.
Note that while this is the easiest method to install Beat Saber mods on your Quest 2, this is still a very involved process that can be difficult to pull off the first time. All of the resources you will need to install Beat Saber mods on a Quest device are here, so if you run into issues make sure you completed the last steps correctly, and if all else fails start again from the beginning.
You will need a PC and Oculus Link cable or similar cable that can connect your Quest to the PC.
Installing BMBF - Beat Saber Mods On the Quest 2 For Custom Songs
The first thing you will need to do to install Beat Saber mods on your Oculus Quest device and install custom songs is to get the BMBF app on your headset. Unfortunately you can’t just download BMBF wirelessly to your headset like you can with most VR games for the Quest 2. You’ll need a PC so that you can install BMBF on to your Quest 2 with SideQuest.
BMBF will be your one stop shop for Beat Saber mods, and does most of the hard work for you. The most difficult part of installing Beat Saber mods for custom songs on your Quest 2 is sideloading BMBF. If you’ve already sideloaded apps on to your Quest 2 before then keep going to the next section to learn how to use BMBF to install Beat Saber mods, otherwise we’ll run through how to add BMBF to your Quest 2 headset here.

The BMBF Logo. Thanks Beat Saber modders!
First you will need a cable that can connect your PC to your headset. So you’ll need to have or go and get an Oculus Link Cable or comparable USB 3 cable. If you don’t have one there are plenty online that are not as expensive as the official Link Cable.
Once you can connect your PC to your headset you will need to download SideQuest on to your PC. Go to this link and download the Advanced Installer. You will probably need the advanced version later, so get it instead of the basic version.

The SideQuest installer download page
Once the installer is downloaded, run it. The installation process is very straightforward, and once you’re done run the SideQuest application. You should see a screen like the one below.

The first page you should see when opening SideQuest for the first time
Press the “OPEN SETUP INSTRUCTIONS” button. Here you’ll be brought through a tutorial from the SideQuest developers explaining how to connect your headset to SideQuest so that you can sideload apps like BMBF to your headset. If for some reason this button isn’t visible then you can check out the setup video here.
Follow the SideQuest setup tutorial all of the way through, and when you’re done setting up SideQuest we can finally get around to installing Beat Saber mods. Search Sidequest for BMBF, open the app page, and click the “SIDELOAD” button on the right. The BMBF app will install to your headset.
Note that whenever sideloading or installing any application with SideQuest that you are trusting the developer of that application with access to your headset.
You’ll see a popup on the bottom of the SideQuest window, and when they disappear you can click on the “Tasks” button on the top right corner of the window that looks like three lines on top of each other with either a checkmark or some numbers in the bottom right corner of the button. You’ll know it when you see it.
Then you should see a new page showing that BMBF was installed succesfully.

The Tasks page showing that BMBF was installed correctly
Using BMBF - Beat Saber Mods On the Quest 2 For Custom Songs
Now that you’ve installed BMBF on your headset, put your Quest headset on. In your app menu where you would normally launch games click the search bar at the top and then click the dropdown next to it and select “Unknown Sources.” This will show all of your sideloaded applications, run BMBF from here to get started on your Beat Saber modding journey on the Quest.

Running BMBF from “Unknown Sources”
First you will get a popup telling you to give file access to BMBF.

BMBF needs file access to install Beat Saber mods
Slide the slider to the right to allow BMBF to do it’s thing.You might have to wait here for a minute or two before you can continue. Eventually the window will change to an “App Info” screen, click the “Open” button there.

Opening BMBF after granting it access
Another new window will appear, and in it you’ll see the “data” folder for your headset, and a large button at the bottom saying “USE THIS FOLDER” press that button and allow BMBF access to those files. Note that all of this access that your giving means you should trust the developer enough to do this. This goes for any mods you install for any game.

BMBF when a version of Beat Saber that is not compatible with mods is installed
Then you will see a screen like the one above, and it may also say that your version if Beat Saber is not supported by Beat Saber mods. If this is the case then continue on to the next section below after taking note of the required version number. If your version is correct, skip over the next section and go to “Installing Beat Saber Mods With BMBF” below it.
Downgrade To An Old Version Of Beat Saber - Beat Saber Mods On the Quest 2 For Custom Songs
If your current version of Beat Saber doesn’t match what is currently supported by mods on BMBF then you’re going to have a hard time installing Beat Saber mods. You can always try to install your Beat Saber mods with the wrong version, but that will mostly likely result in your game crashing every time that you launch it.
So if you need an older version you’ll have to get your hands on an APK for an old version and install it manually via SideQuest. Luckily we’ve got a guide on how to downgrade Beat Saber on a Quest device. Here’s a link to that guide. Follow it to downgrade your Beat Saber version to the version that BMBF said is compatible with mods and then come back here to finish installing Beat Saber mods.
After you’ve completed the downgrade run a Solo song once and immediately fail it, then exit Beat Saber. You’re ready to run BMBF and install mods!
Installing Beat Saber Mods With BMBF - Beat Saber Mods On the Quest 2 For Custom Songs
Alright so your Beat Saber version is correct, whether or not you had to downgrade Beat Saber. Time to finally mod your Beat Saber installation. In your app menu where you would normally launch games click the search bar at the top and then click the dropdown next to it and select “Unknown Sources.” This will show all of your sideloaded applications, run BMBF from here.

BMBF when a compatible version of Beat Saber is installed
The first Introduction screen should show that you have the correct Beat Saber version, if not go to “Downgrade To An Old Version Of Beat Saber” above.
Now hit the “Get Started” button. You’ll get a new “Step 1” screen with a new button “Uninstall Beat Saber” press that. You’ll see a new window pop up with a spinning wheel, give it some time to complete. Once it does you’ll see a popup asking if you want to uninstall Beat Saber, hit “OK”.
The next “Step 2” window will have a new button “Patch Beat Saber” hit that. After another wait through the spinning wheel. Once that’s done you’ll end up on the “Step 3” screen.
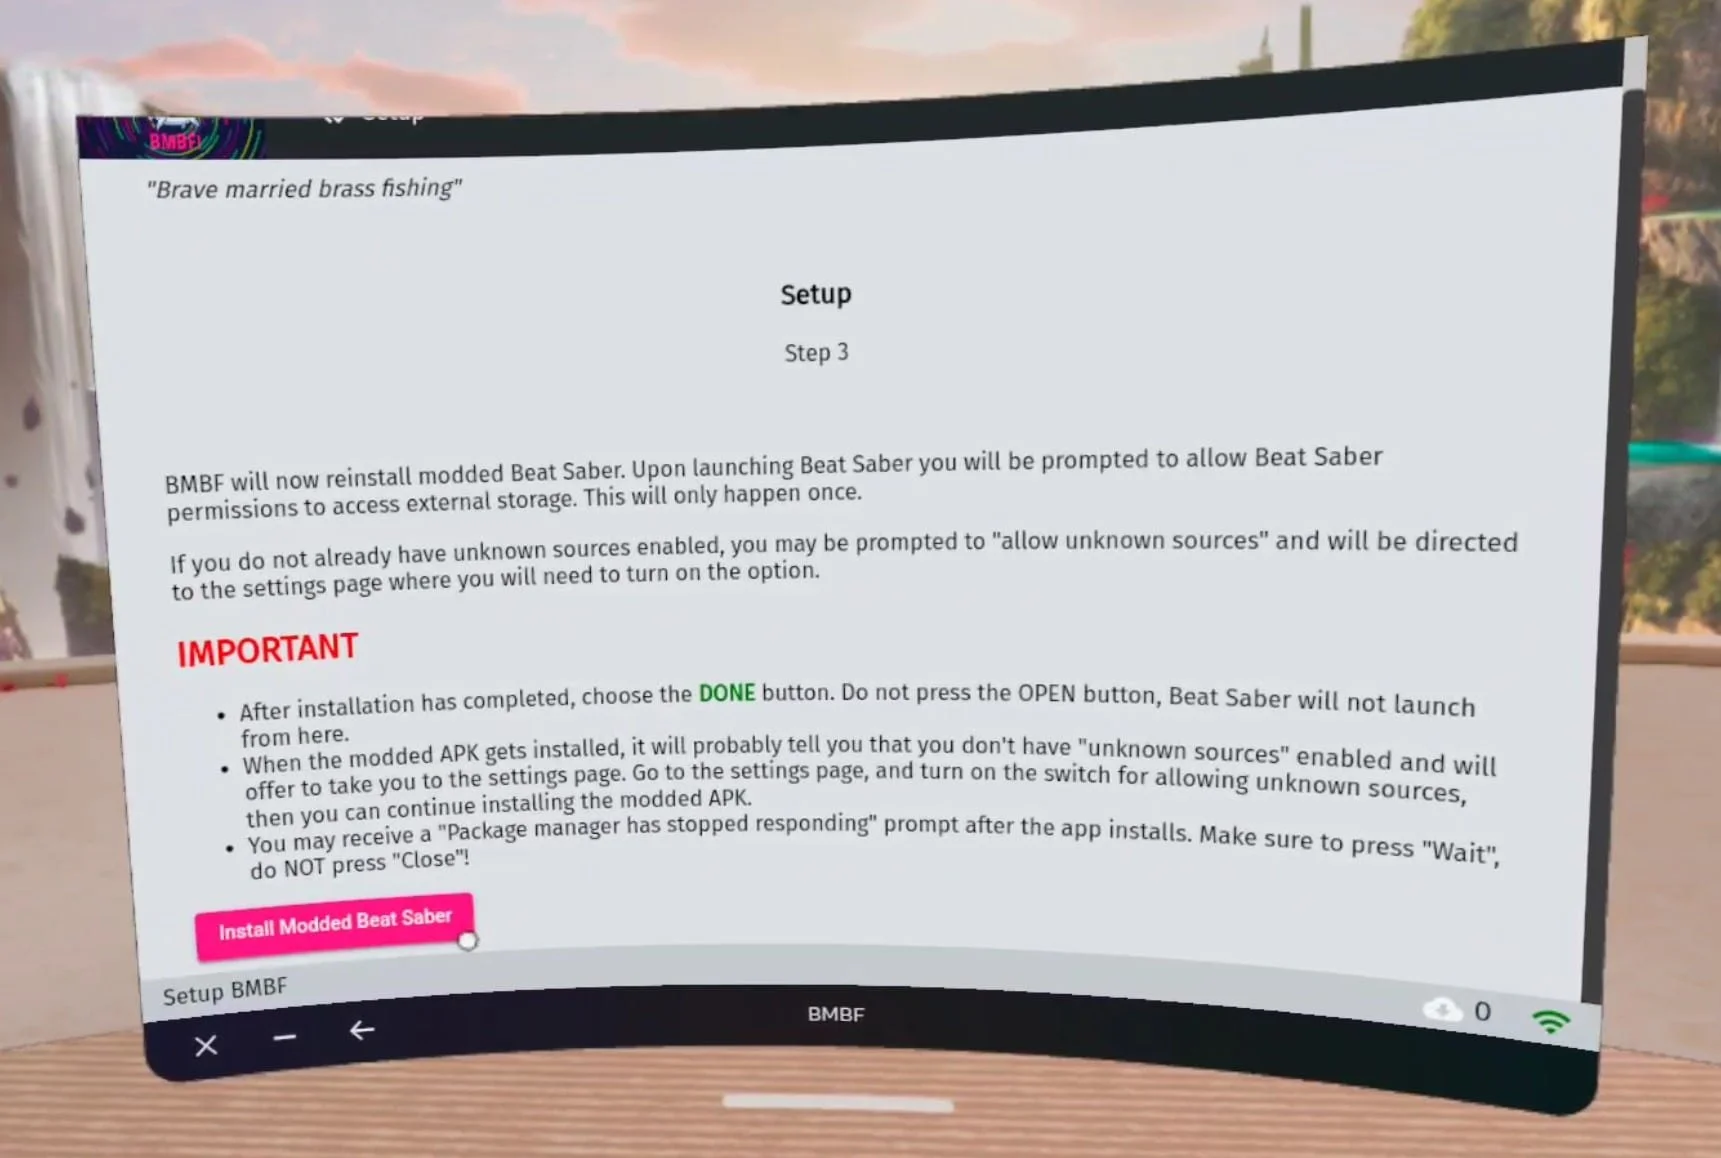
The final BMBF setup page
Note the bullet points under the “Important” section. You may have these problems when installing Beat Saber mods, or you may not. Then hit “Install Modded Beat Saber.” We’ve covered as many things as can go wrong as we know about in this setup guide, but there may be other problems we didn’t run into when installing Beat Saber mods.
You’ll see a popup like this one, click the “SETTINGS” button to open your settings.

BMBF needs the ability to install a modded Beat Saber
Just like before give BMBF the permissions it will need for Beat Saber modding, and then click the “OPEN” button to open the application when prompted. You’ll find yourself back at the “Step 3” screen, so hit the “Install Modded Beat Saber” button again.
Now Beat Saber will install, and you’ll probably get some popups from Oculus saying that your version is wrong and that you’re using an official version of Beat Saber, just close those popups. Do not select “Restore.” You might also get yet another popup asking to give the newly installed Beat Saber permissions. As with BMBF give it the permissions by sliding the slider and waiting a bit, then opening the application and closing it again.

Do not hit “Restore” here. You’re not installing Beat Saber mods to cheat, just to enjoy more songs and options in your games
Now open BMBF again, the application might just show up as a white screen for a while, if it does just wait for it to show you a screen, it might take a couple of minutes. You should finally be in the modding menu, and you may see a popup like this one.

Restore and install core mods if asked
Select this pink “Restore” button if you see it (not the blue one that might pop up from Oculus.) Do the same if you get a popup asking you if you want to install Core Mods. You will need these Core Mods for custom songs, so make sure you install them. Once all of that is done, hit the “Sync to Beat Saber” button in the top right hand corner. Once the sync is complete it will be replaced with a blue “Start Beat Saber” button. Hit that to start your modded Beat Saber!
Using BMBF For Custom Songs - Beat Saber Mods On the Quest 2 For Custom Songs
Now that you’re in your modded Beat Saber game, look to the left and see the new “Mods” menu!

If you see this your Beat Saber mods are installed and you can download custom songs
If you select “More Songs” you can search and download through a ton of new songs.

There are a ton of custom songs to download in modded Beat Saber
Click the “Download” button to download a song, and filter through different songs on the left. Once you’re done go back and hit the “RELOAD PLAYLISTS” button on the lefthand Mod screen. Then play beatsaber like usual, and you’ll see a new playlist full of all of your custom songs!

Playing a custom song with Beat Saber mods
Some songs might not work, though some might work after restarting Beat Saber or restarting your headset.
Using BMBF For Beat Saber Mods - Beat Saber Mods On the Quest 2 For Custom Songs
Relaunching the BMBF application also gives you access to a ton of different Beat Saber mods outside of the core mods you’ve already installed.

The BMBF mods page
You can use the Browser tab to browse through additional mods that you can download and Sync just like the core mods. Also the Tools tab can be useful if you want to go back to an unmodded Beat Saber version, or need to use its Tools to troubleshoot your modded Beat Saber installation.
Well that’s it, that’s how to install Beat Saber mods on a Meta Quest device like the Quest 2, Quest 1, or Quest Pro. It’s certainly not easy, but everything you need to pull it off is in this article here. If you have trouble make sure you didn’t miss any steps, and retry the steps leading up to the one you are on. Good luck and enjoy your new Beat Saber mods.

New Planes for FREE In VTOL VR By Easily Installing VTOL VR Mods
Welcome to this step by step guide on how to install VTOL VR Mods! VTOL VR is an extremely fun VR combat flight simulator game, and it’s even better with mods. So keep reading to find out how to install VTOL VR mods as easily as possible to make your game even better. In this example we will be installing a brand new modded plane! The Mirage 2000CX. Keep reading to find out how to get a free new plane in VTOL VR!
Welcome to this step by step guide on how to install VTOL VR Mods! VTOL VR is an extremely fun VR combat flight simulator game, and it’s even better with mods. So keep reading to find out how to install VTOL VR mods as easily as possible to make your game even better. In this example we will be installing a brand new modded plane! The Mirage 2000CX. Keep reading to find out how to get a free new plane in VTOL VR!
Mod Loader for Installing VTOL VR Mods
The first step in installing PCVR VTOL VR mods is downloading and installing the VTOL VR Mod Loader. This is a useful program that you can use on your PC to install and manage VTOL VR mods. Go to the vtolvr-mods.com homepage and download the latest version of the VTOL VR Mod Loader by clicking the “Download Mod Loader” button.

After the VTOL VR Mod Loader is downloaded, run it as an administrator. You can choose not to, but not all features may be available if you do not. You may see a popup like this one.

If you do and want to keep following this guide, then press Yes. Do note that the VTOL VR Mod Loader is third party software and not supported or created directly by the VTOL VR developers.
Anyway, once the Mod Loader is run with the correct permissions you will see the “First Time” Setup menu.

Press the “Auto Detect” button on the right side of the screen. If, for some reason, the VTOL VR Path field does not fill after you press this button, then press “Browse” and navigate to your computer’s VTOL VR folder. If your VTOL VR installation is through Steam then this folder should be located at:
C:\Program Files\Steam\steamapps\common\VTOL VR\
If you installed Steam somewhere other than the default location, then go to your “Steam” folder wherever you installed it before following the rest of the filepath above.
Once the VTOL VR Path field is filled correctly, press the “Install” button.

You may see a popup like the one above, asking you to update files. If you see this press Yes. Afterwards you may have to wait shortly for the updates to download and install. You can see the progress of this at the bottom of the VTOL VR Mod Loader application. When everything is set up the Mod Loader should look like this.

Downloading VTOL VR Mods
From the main menu of the VTOL VR Mod Loader you can press the “Open https://vtolvr-mods.com” button to go to the website where you can download mods, or just go to vtolvr-mods.com. Once you’re there press the “Mods” or “Skins” icons in the top left corner of the page, depending on what you want to download and install. Here we will be downloading the Mirage 2000CX aircraft to use in our modded VTOL VR game. So let’s go to “Mods.”

On the left hand side of the “Mods” page you can filter for the type of mod you are looking for, or do a string search if you have a type of mod in mind. Luckily for the Mirage 2000CX mod, it’s right here on the first page. When you find the mod you want, click on the name or picture of the mod to open its page.
Once you’re on the Mod page make sure to read the description for any potentially required mods to run it, how the mod works, and any potential bugs that the mod may cause.
When you’re ready to download the mod, just click the “Download” button in the top right. The mod will download to your Downloads folder, or wherever you have configured your PC to send downloaded files.

Installing VTOL VR Mods
Head back over to the VTOL VR Mod Loader, and on the bottom left side of the application hit the “Open Folder” button.

This will open the “VTOLVR_ModLoader” folder within your VTOL VR installation folder that you selected when setting up the VTOL VR Mod Loader. Enter the “mods” folder within this new File Explorer window. Take the mod file you downloaded, unzip it, and move the unzipped folder into this “mods” folder.
Back in the VTOL VR Mod Loader, select the “Mods” button in the top left corner of the screen. Your freshly added mod should be visible in the Mod Loader. Selecting the “Auto Update” checkbox can also help to keep mods up to date, but if you notice a difference in the “Current Version” and “Website Version” numbers you may need to manually update the mod by deleting it from the “mods” folder and repeating this by redownloading it from the vtolvr-mods.com website.

Running VTOL VR With Mods
Now that your VTOL VR mods are installed it’s time to try them out! Press the “Play” button in the bottom right hand corner of the Mod Loader. You should always launch your modded VTOL VR game using this button. Otherwise your mods may not work and problems may occur even when using unmodded content. If you want to play VTOL VR unmodded again, you can just press the red “Disable” button in the top right corner of the VTOL VR Mod Loader.

Once the game is launched and you’ve hit the “Start Game” button in the initial menu. When you’re in the pilot selection menu, don’t select your pilot just yet, instead go to the “Mods” menu here.

Once you’re in the Mods menu in VTOL VR select the mod you just installed and press the “Load” button at the bottom. There will be a brief delay, and then the button will say “Loaded!"
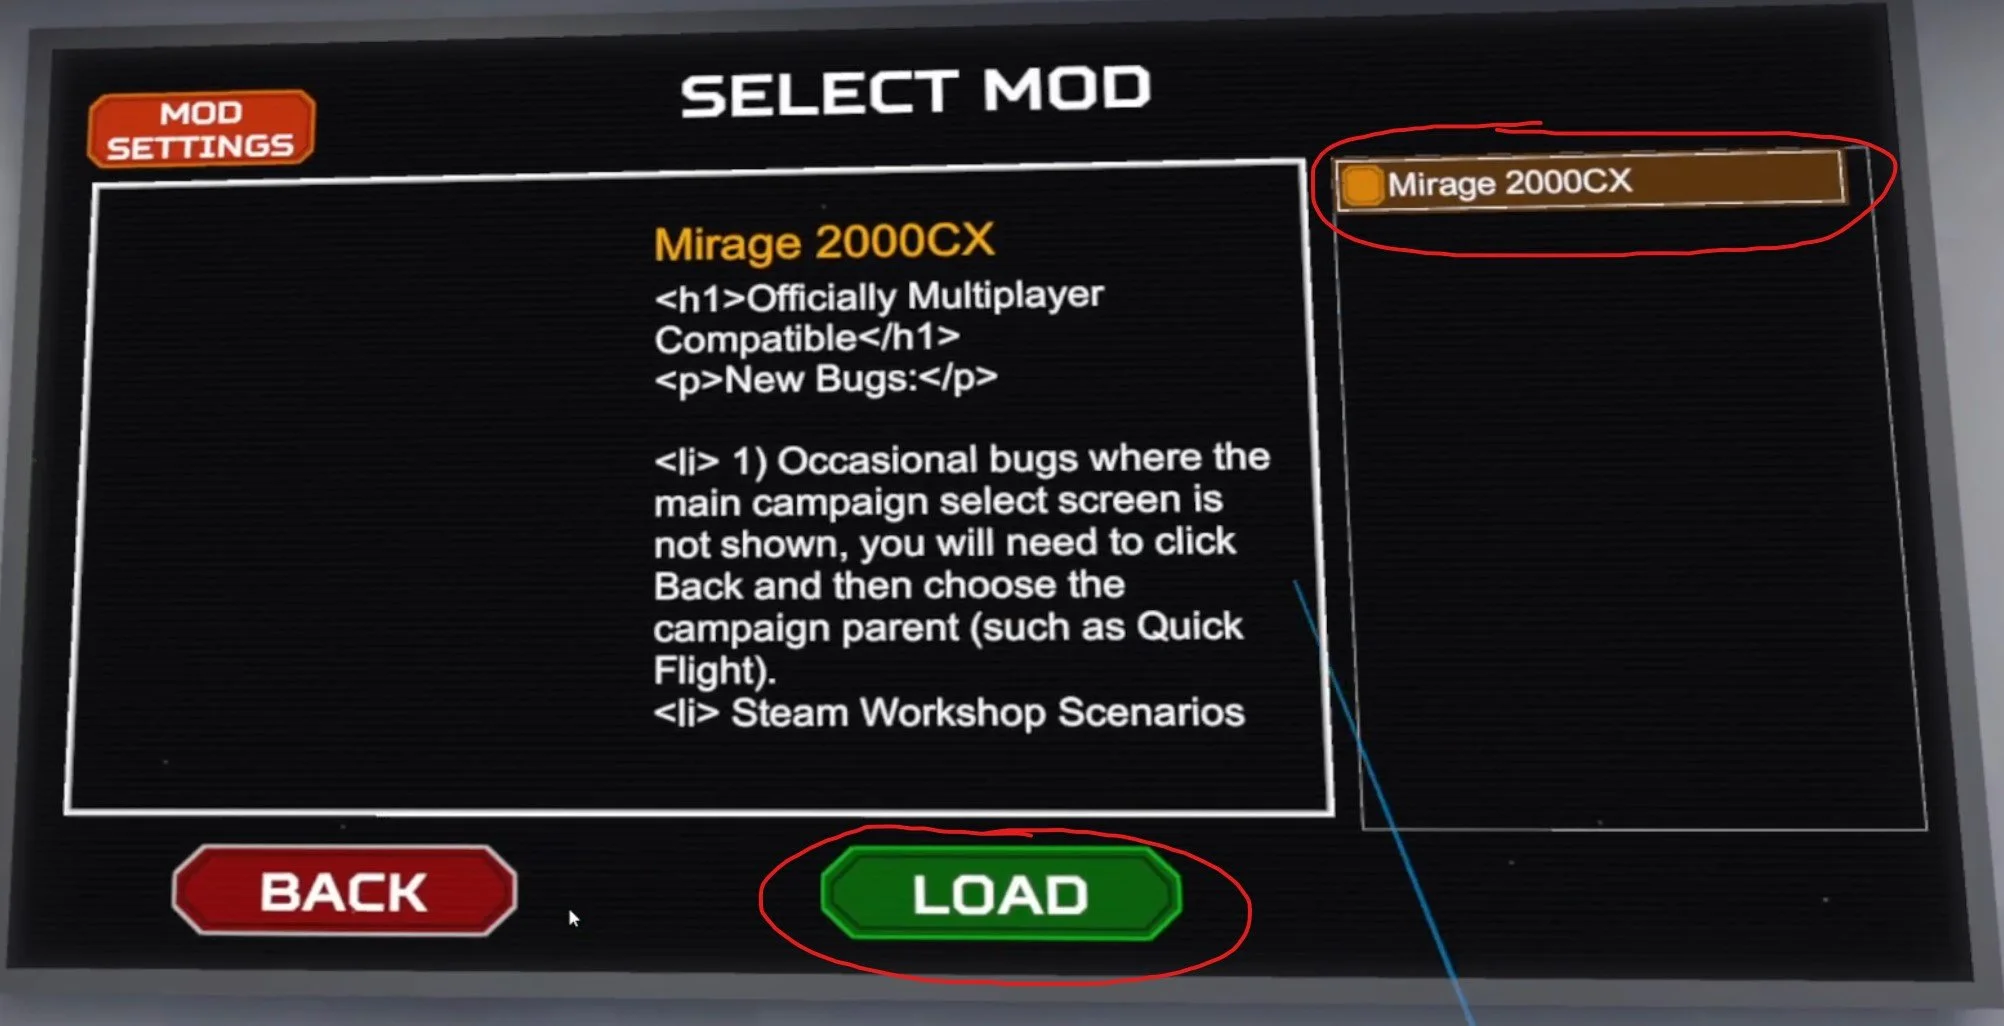
Once the mod is loaded go back and select your pilot as usual. Since this example added a new modded plane to VTOL VR, the Mirage 2000CX is now available to be selected as an aircraft. Other mods may be visible elsewhere, for instance skins should be available when customizing the aircraft that the skin is meant for.

Keep in mind that the mod might not show up immediately after pressing the “Load” button in the mod menu. If you don’t see the mod ingame at first try starting a Quick Flight as another aircraft, or exit and restart the game from the Mod Loader.

Congratulations, you now know how to easily install VTOL VR mods! More mods are coming out all of the time to make VTOL VR even more fun. Thanks to all of the VTOL VR modders out there for their contributions to making this game even better. Enjoy!
Easily Get and Install Into the Radius Mods
Welcome to this step by step guide on how to download and install Into the Radius Mods! Into the Radius is an extremely fun VR game. Even after you’ve played it through a bunch of times, or haven’t even finished it and want a different experience, mods can make this VR Survival Game even better. So keep reading to find out how to install Into the Radius mods as easily as possible.
Welcome to this step by step guide on how to download and install Into the Radius Mods! Into the Radius is an extremely fun VR game. Even after you’ve played it through a bunch of times, or haven’t even finished it and want a different experience, mods can make this VR Survival Game even better. So keep reading to find out how to install Into the Radius mods as easily as possible.
Into the Radius Mods on the Oculus Quest 2
You might be here to find out how to install Into the Radius mods on the Oculus Quest 2, or if you can install mods on the Quest 2. Well I’m afraid to tell you that currently Into the Radius mods are not supported on the Meta Quest 2. Hopefully at some point in the future they will be, but for now there’s no way to install Into the Radius mods on your Quest 2. To play modded Into the Radius you’ll need to play it via PCVR via Steam or the Oculus App on your PC.
If you have a Quest 2 and want to play Into the Radius on PCVR then you could set up and use Oculus Airlink. The thing about Airlink is that it can drop a ton of frames and be very choppy and look horrible if your internet setup to your PC isn’t very good. If you want to use Oculus Airlink, then make sure your PC is connected to your Router or Modem with an ethernet cable.
If you can’t or don’t want to use Airlink then you’ll need to be able to connect your headset to your PC directly. This is possible with an Oculus Quest 2 using an Oculus Link Cable or comparable USB 3 cable. If you don’t have one there are plenty online that are not as expensive as the official Link Cable, but are possibly not as good.
How to Get Into the Radius Mods
To mod Into the Radius on PCVR let’s start with getting the mods that you’ll want to install. In this example we will be downloading the Scavenger Mod. This mod is a great new way to play the game. Make sure you start a new save file after installing this mod, and always be wary of cross compatibility issues when you have multiple mods installed.
To get the scavenger mod get on your PC and go to nexusmods.com and search by game for “Into the Radius” or follow this link to take you straight to the Into the Radius mod page.
Once you’re here feel free to browse the mods listed on the front page and search through some categories. There’s a bunch of great cosmetic mods that replace objects in the game with different models. There are even other gameplay mods like the STALKER mod that you can install. To find the Scavenger mod search for “Scavenger Mod” in the search bar at the top of the screen, or go to any mod page that you want. When you’re there click on the “Files” tab.

Oh, and make sure that you’re logged into a Nexus Mods account, otherwise you won’t be able to download anything. Don’t worry, you can easily sign up for a free Nexus Mods account. Also you’ll notice that some mods, like the Scavenger Mod, can be installed using Nexus Mod’s Vortex mod manager.
Since not all mods are supported by Vortex, here we’ll be going over how to install these mods manually. Don’t worry, it’s not very hard and takes about just as long as using Vortex anyway.
Now click the “Manual Download” button underneath the latest mod file and you’ll be taken to a downloads page. Select the “Slow Download” button if you’re using a free Nexus Mods account and the file will download to your Downloads folder (or whatever folder you’ve designated files to download to, but Downloads is the default).

Congratulations on your shiny new mod! Time to install it.
How To Install Into the Radius Mods
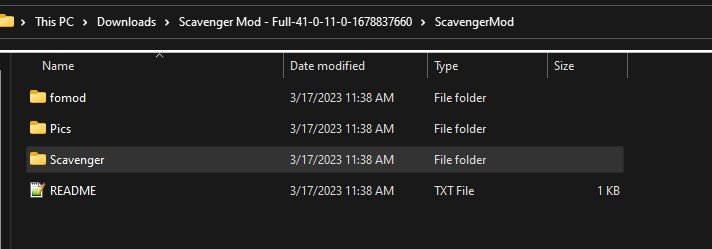
Head to your PC’s Downloads folder. You can find it in the “Quick Access” panel of the file explorer, or go to C:\Users\<Your PC Username>\Downloads. If the downloaded mod file is a .zip file right click on it and select “Extract All” to get the unzipped contents.
Whichever mod you’ve downloaded should come with one or multiple .pak files. Those .pak files contain the actual mod information and all you need to do is move them to the right folder to install the mod. The Scavenger mod comes with a lot of .pak files in the ScavengerMod/Scavenger/ folder. For this example we’ll be installing the .pak file in the “Abundant” folder for as much loot as possible, and also disabling the shop with the .pak in “Optionnal_files”.
Now that we know what .pak files we want to move, let’s open another File Explorer window to where we want to move them. If you run Into the Radius VR through Steam, then go to where you installed Steam and then \steamapps\common\IntoTheRadius\IntoTheRadius\Content\Paks. The default Steam installation path is: C:\Program FIles\Steam\steamapps\common\IntoTheRadius\IntoTheRadius\Content\Paks.
Oculus App users can find the Into the Radius folder in C:\Program Files\Oculus\Software\Software by default. Then go to \IntoTheRadius\Content\Paks.
This “Paks” folder is where you need to move all of the installed .pak files. Just drag the .paks for the mods you want to install into the “Paks” folder and that’s it! You’ve installed Into the Radius mods. When you start the game next they’ll be installed and ready to go.

Well that’s how you install mods in Into the Radius VR. Make sure to be careful that the mods you install don’t overlap and conflict. Be sure to read the README if one comes with a mod you want to install, or at least read the mod’s page to check if the mod developer shows any conflicts. Most should be obvious, for instance don’t install two mods that reskin the same weapon. It’s also best to start a new game after installing mods, as the mods might mess with a differently modded or vanilla game. Especially overhaul mods like the Scavenger or STALKER mods.,
Oh, and make sure to leave pakchunk0-WindowsNoEditor.pak in the “Paks” folder. This .pak is needed to run Into the Radius properly and is part of a vanilla installation of the game. Moving or deleting it will probably break your game.
Have fun out there in a whole new Zone!
Easily Install Blade and Sorcery: Nomad Mods WITHOUT A PC | How to Install Blade & Sorcery Mods Directly On Quest 2
Want to install mods for Blade and Sorcery: Nomad but don’t have a PC, or don’t want to go through all of the hassle to plug your headset into your computer every time you want to install new mods for Blade & Sorcery: Nomad? Well good thing you don’t have to, because you can download and install Blade and Sorcery Mods directly on to your Quest 2 without needing a PC at all! Here’s a guide on how.
Want to install mods for Blade and Sorcery: Nomad but don’t have a PC, or don’t want to go through all of the hassle to plug your headset into your computer every time you want to install new mods for Blade & Sorcery: Nomad? Well good thing you don’t have to, because you can download and install Blade and Sorcery Mods directly on to your Quest 2 without needing a PC at all! Here’s a guide on how.
The Blade and Sorcery U12 Mod Menu
With the release of U12, Blade & Sorcery: Nomad and Blade & Sorcery for PCVR both have an integrated mod manager that can be used on either platform to install mods directly from mod.io. If you still want to install a mod manually then go to the “How To Download Blade and Sorcery Mods Manually” section below and read on from there. For the most straightforward method, you’re in the right place.
First off you’ll need to have a mod.io account. So go to mod.io on your phone, or directly through your Quest 2 if you like, and sign up for an account with an email address. No password is needed, just make sure you can access the email so that you can provide the security code that mod.io will send to that email. Once you’ve made an account and entered the code, start up Blade and Sorcery: Nomad on your headset.
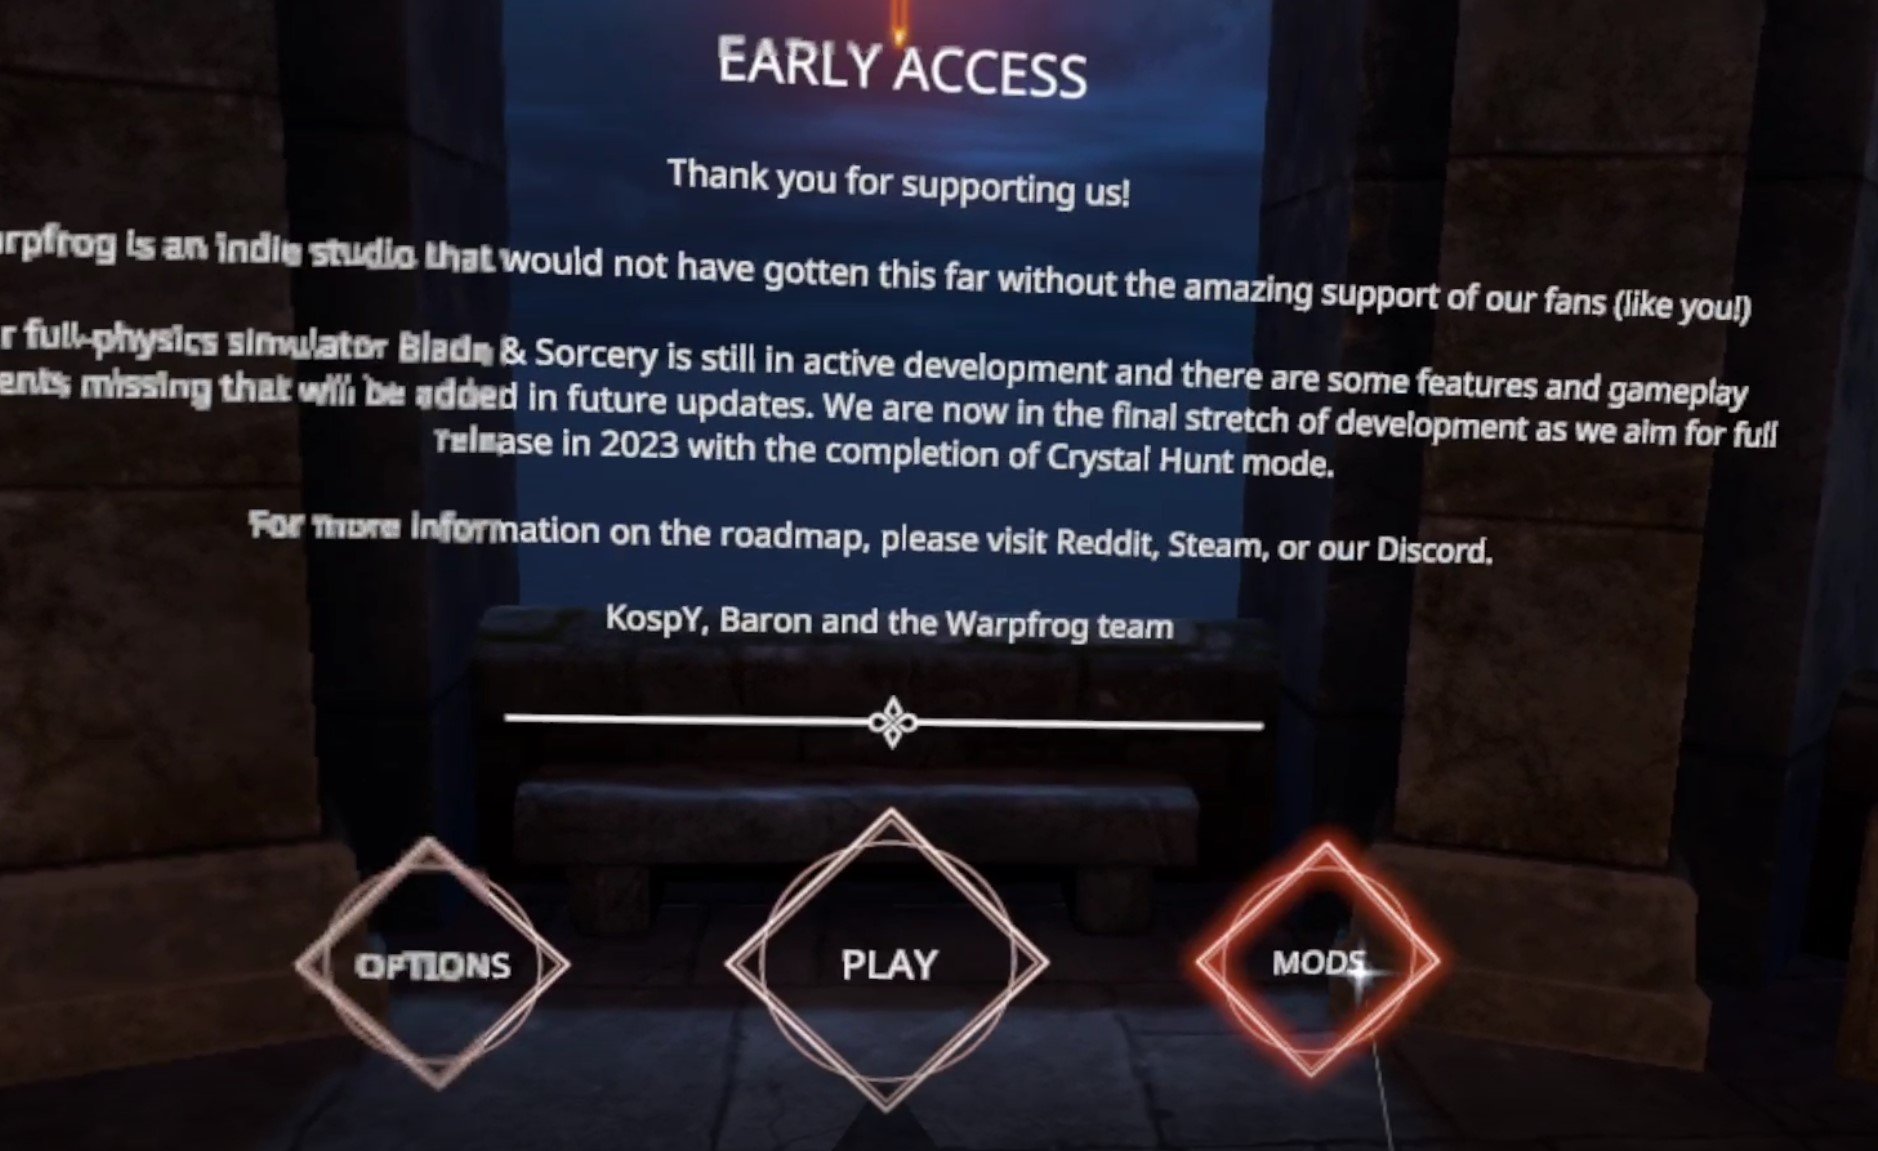
Next to the usual “Play” button on the first screen after the Warp Frog logo, you’ll see a new “Mods” button on the right, hit that, before being presented with a prompt to enter your mod.io email address. This will link your mod.io account to the Blade and Sorcery: Nomad game on your headset to manage mods. Enter the email you used to create your account. You may get an email with another activation code to enter into the game, and once all of that is done you’re presented with the new U12 Blade and Sorcery Mod Manager.

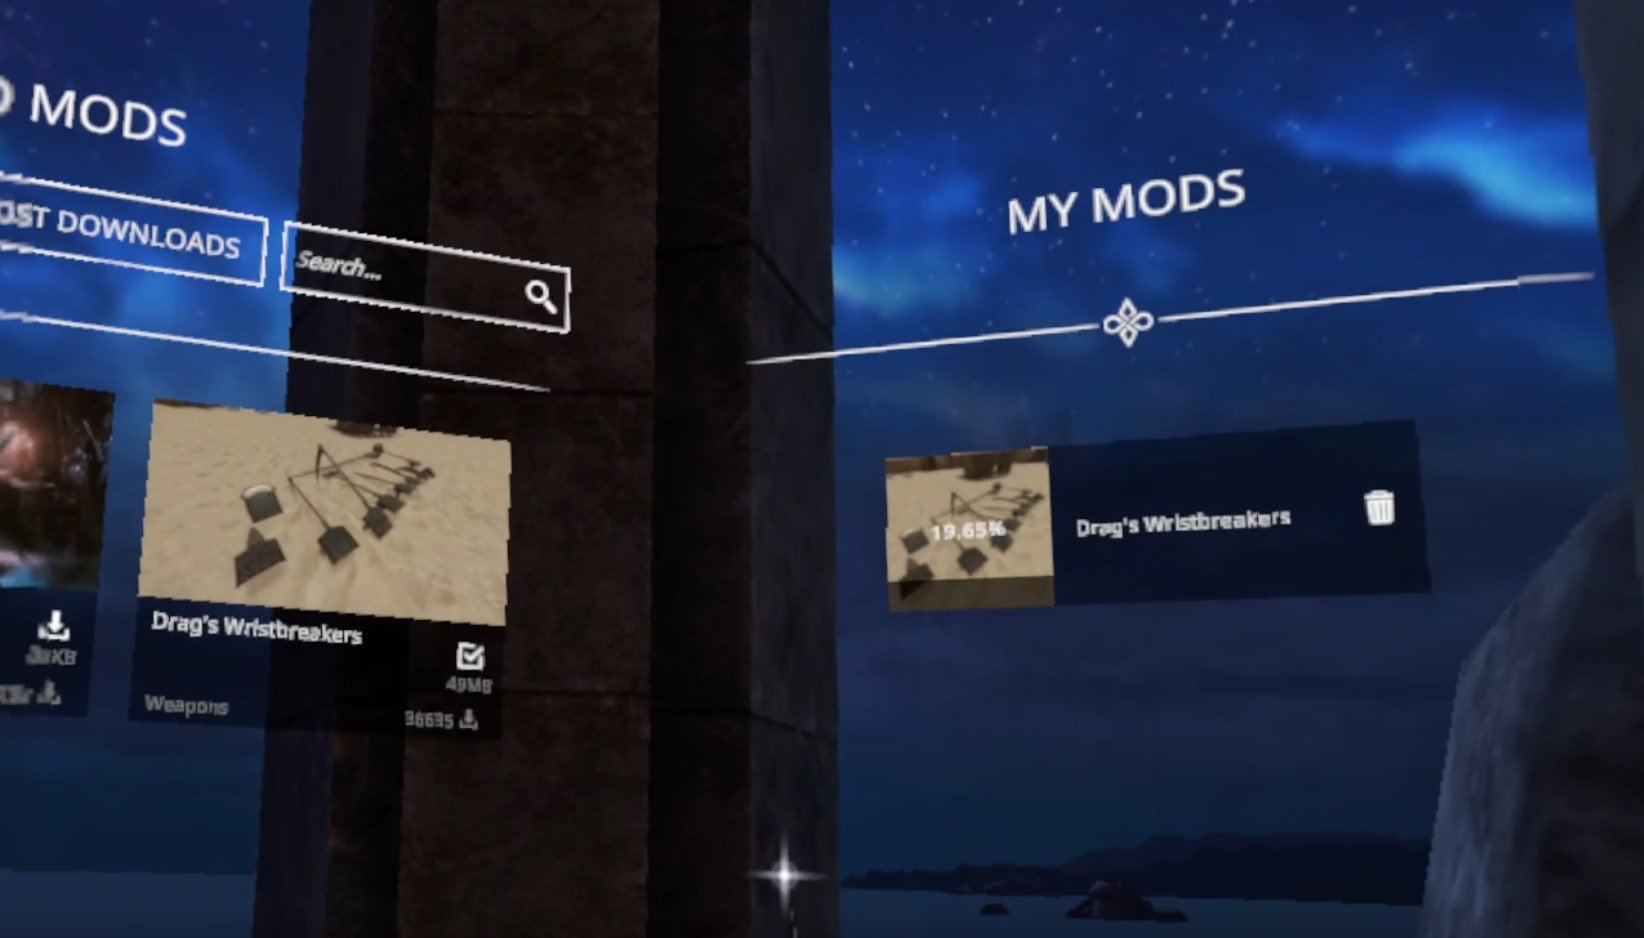
Here in the Mod Manager you can view and download mods as you like. There is a panel on the right to show already installed mods, even those you might have installed manually. You can search for a specific mod in the search bar at the top, or filter with the filter options on the left. Note that any nexusmods.com mods aren’t present here, only those on mod.io.

For this example we’ll be installing Drag’s Wristbreakers, a collection of weapons. Download and installation is easy, just hit the little arrow icon to the right of the name of the mod, and you’ll see the download and installation progress in the “My Mods” panel on the right.
Once you’ve installed all the mods you like, just click the “Back” button on the bottom of the center of the Mod Manager to go back to the first screen, and then hit “Play” like always, and select your character. Once you’re back in the game, you can see what mods are installed through the In Game Menu, which you can open by pressing the menu button on your left controller, and clicking on the “Mods” button.

Though you should know that even if the mod shows up in the menus it may not appear ingame. If this happens to you try restarting Blade and Sorcery: Nomad and if the mods still are not appearing, restart your entire headset.
For our example, Drag’s Wristbreakers appears as a “Grippables” menu in the weapon spawner book. Make sure to check mod descriptions for where they should appear, some might appear in already existing menus like the “Swords” category.

Now we can spawn any of our new modded weapons as we like! Enjoy downloading and installing all the Blade & Sorcery: Nomad mods you like super easily!

How To Download Blade and Sorcery Mods Manually
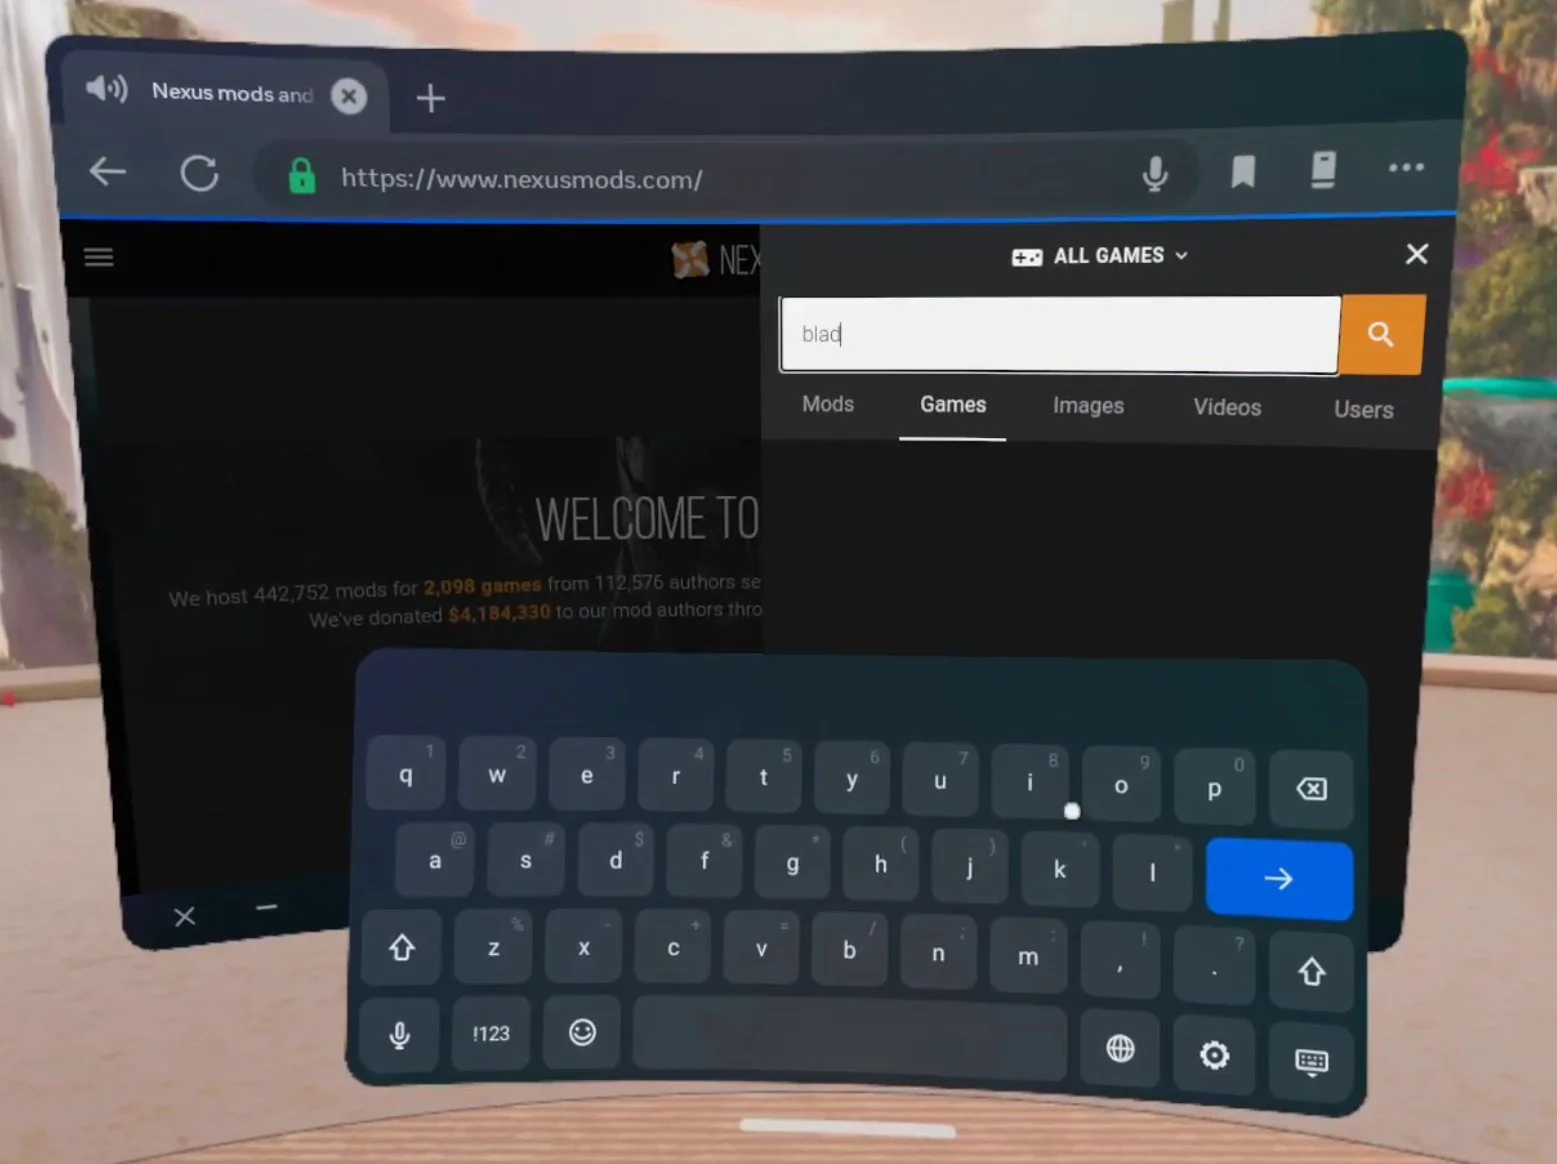
If you want to install Blade & Sorcery: Nomad mods the old fashioned way without using the built in Mod Manager, then here’s how. Let’s start with the fun part, finding all of the Blade & Sorcery mods that you can download! In your Quest 2 go to the “Meta Quest Browser” app (the one you can use to browse the internet on your headset) and go to the website nexusmods.com.

Hit the little search spyglass in the top right and then select “Games” to search by game. Then type in “Blade & Sorcery” to search for Blade & Sorcery: Nomad. Make sure to use “&” instead of “and” as searching “Blade and Sorcery” will give you no results.
After you search for Blade & Sorcery, make sure you select Blade & Sorcery: Nomad and not regular Blade & Sorcery, because mods downloaded for PCVR Blade and Sorcery will not work on your Quest 2. Once you’re on the Blade and Sorcery: Nomad page it will look something like this.

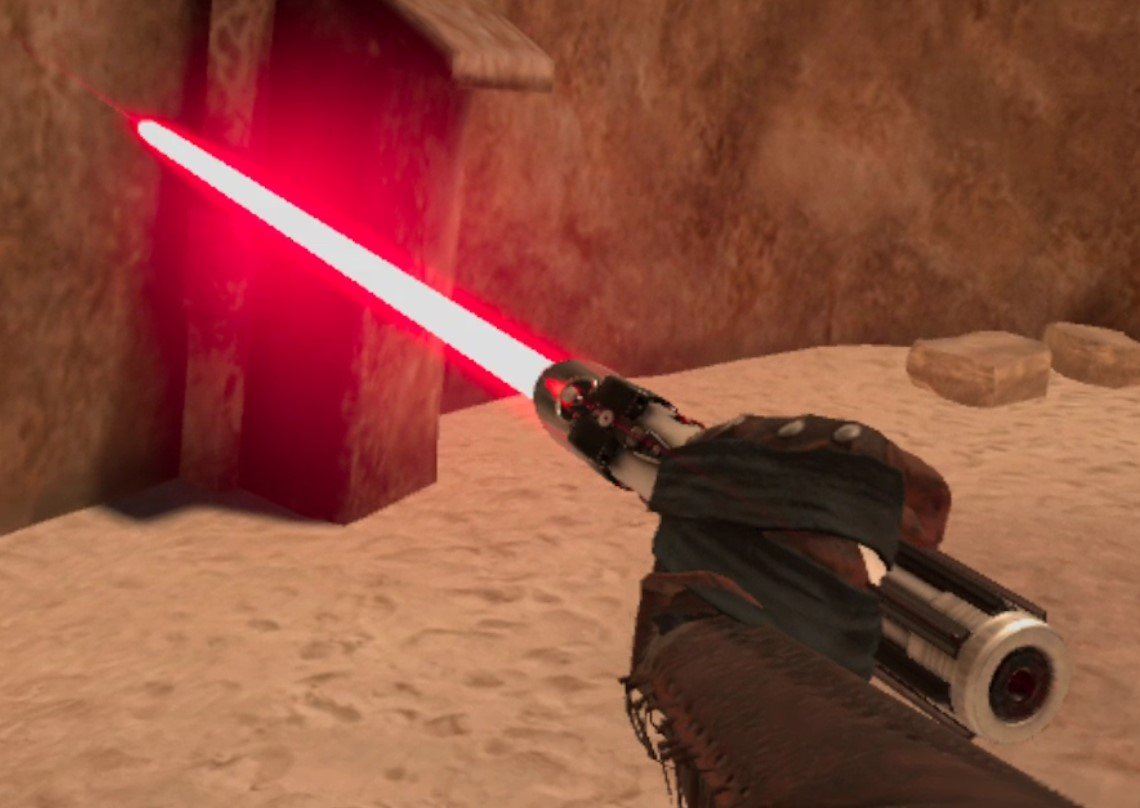
The most popular and trending mods are displayed here at the front page, but you can also use the search spyglass in the top right corner again to search for whatever you want. In this example we’ll be installing a lightsaber mod, and found one by searching for “lightsaber”. Selecting a mod here displays the mod page.
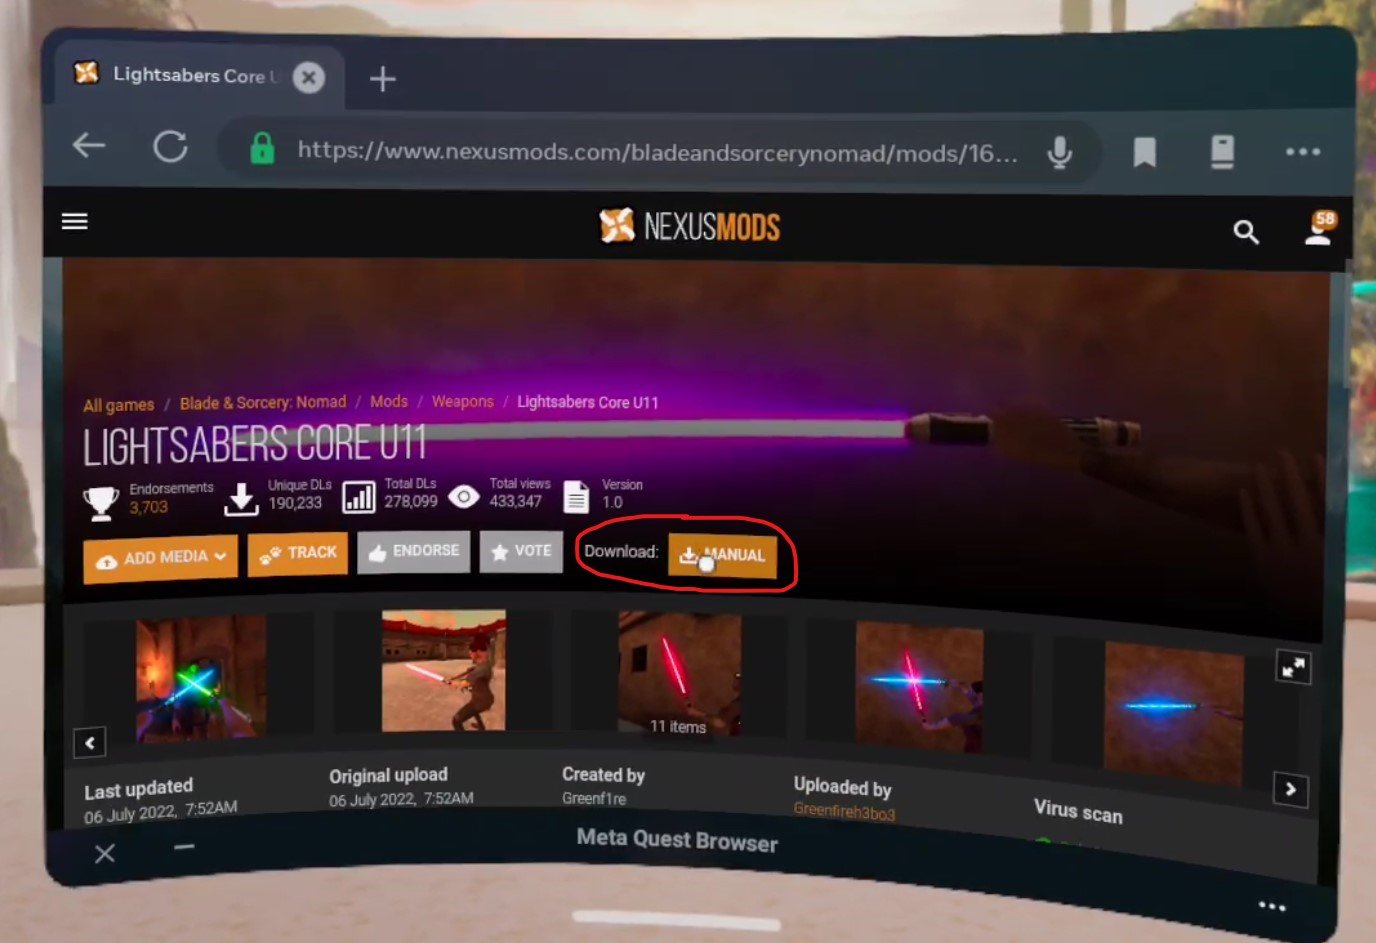
When you’re on the mod page select the “Download: MANUAL” button or go to the Files tab and download from there. One unfortunate thing here is that even on a Quest 2, Nexus Mods will force you to log into an account in order to download a file. Luckily the accounts are free, though putting your login information into a Quest 2 can be a little annoying. Either way once you select the Download button and are logged in, select the “Slow Download” button if you’re using a free account.

The page will change and you’ll have to wait about 5 seconds for the download to begin, but once it does you’ll see a little popup on your screen that will tell you how it’s going and when it is done. Once you’ve downloaded whatever Blade and Sorcery mods you want it’s time to install them!
How To Install Blade & Sorcery: Nomad Mods Manually
So now you’ve got your .zip files downloaded and you’re ready to install your shiny new mods directly on to your Quest 2 without a PC. To help you with this you’ll need a new App on your Quest. Don’t worry, it doesn’t cost any money and is completely free. It’s called Mobile VR Station and you can install it through the Quest store when using your headset, or through the Quest mobile app, just like you would any other Quest app on the App Lab.
Keep in mind that Mobile VR Station is on the App Lab, so it may be a little harder to find than most Quest applications in the store. Make sure to type in the entire name of the app letter for letter or it may not appear. Anyway, once you’ve got Mobile VR Station downloaded and installed (it shouldn’t take long, it’s not a very big app) go ahead and launch it.

Now that you’re in go to Local Files, and then Downloads. So the File Path at the top of the screen will show Available Content / Local Folders at the top, with the name of the Folder you are in “Download” in big letters below it. This is where the mod you downloaded before ended up.

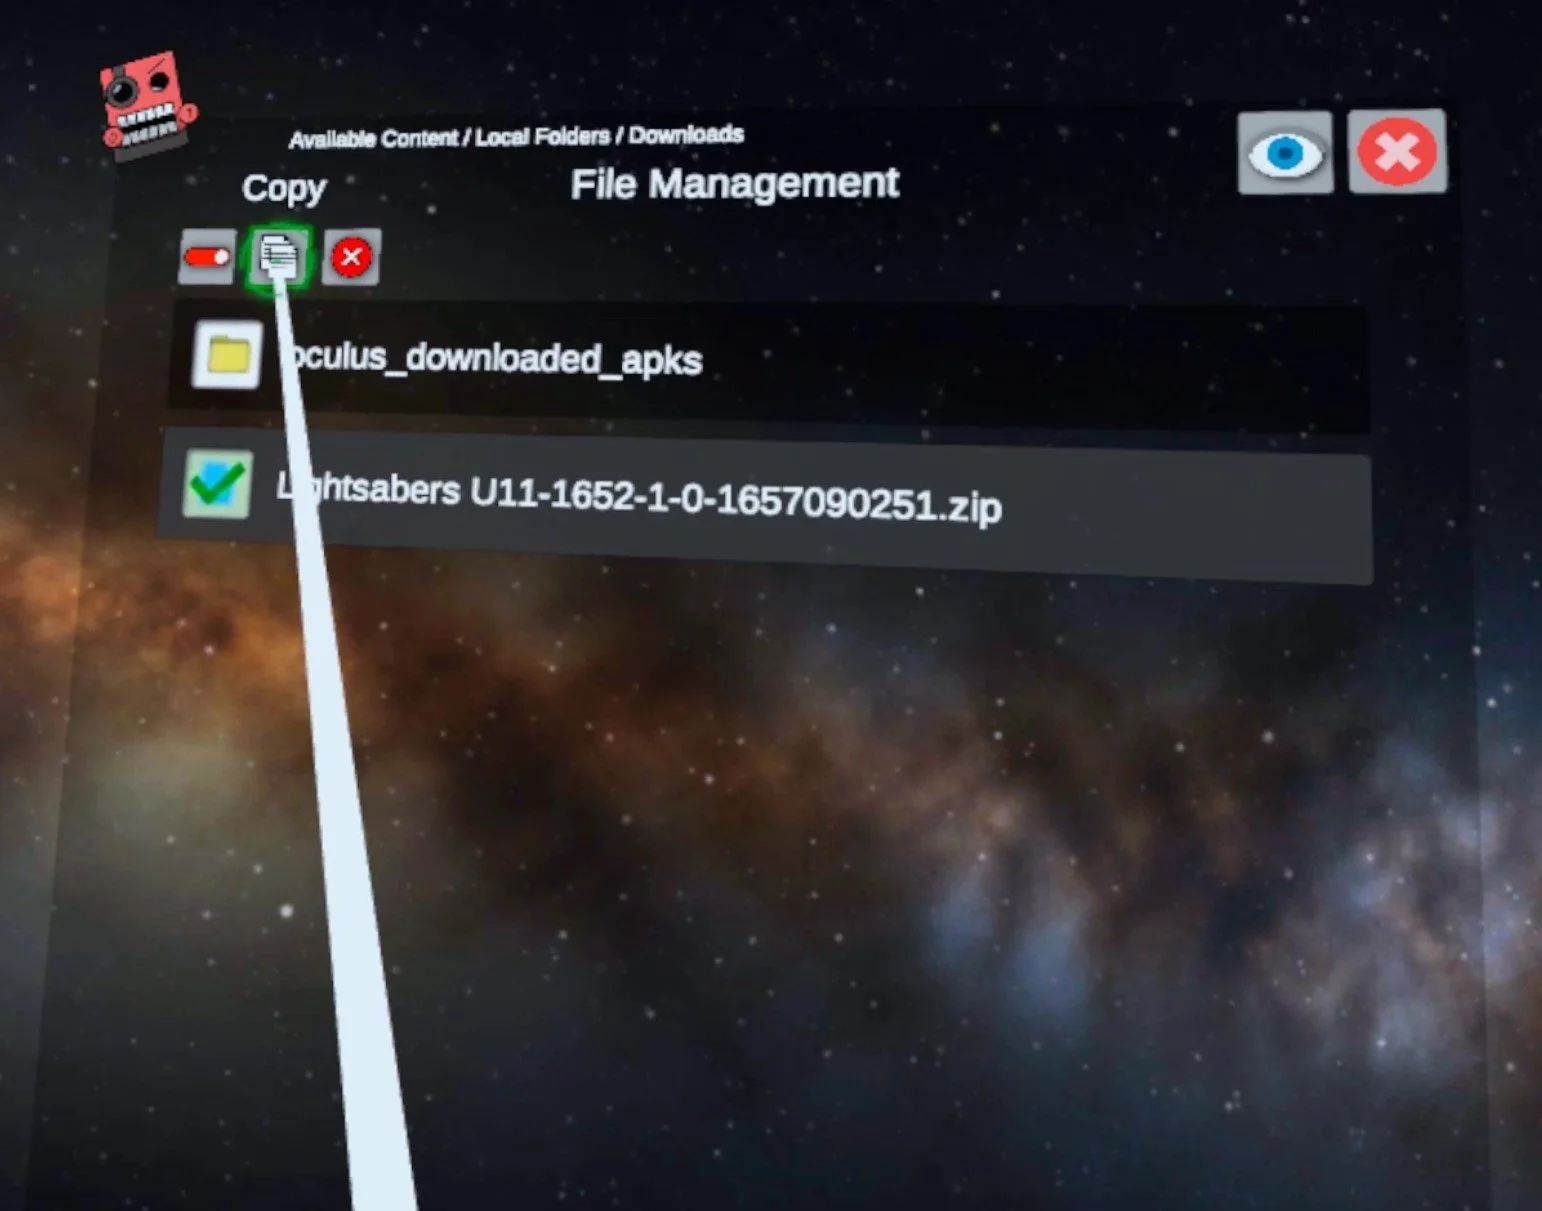
Now that you can access the .zip folder for your mod, click the blue View/Edit Toggle in the top left corner. Once you hit it you’re given new options to affect the files in the folder you are in. Click the .zip file for your mod. When you do that it will have a green check mark over its file icon. Then hit the copy button in the top left corner (it looks like two sheets of paper). Then click the View/Edit Toggle again, it will be red now.
Now that you’ve copied the mod file and exited View/Edit mode, hit the Arrow pointing upwards in the top left corner, you’ll see text saying “Previous Folder” when your pointer is over it. Do this twice, so you’re back in “Local Folders” where you started. Now go to “All Folders” at the top, and you’ll be shown all of the Folders of files in your Oculus device.
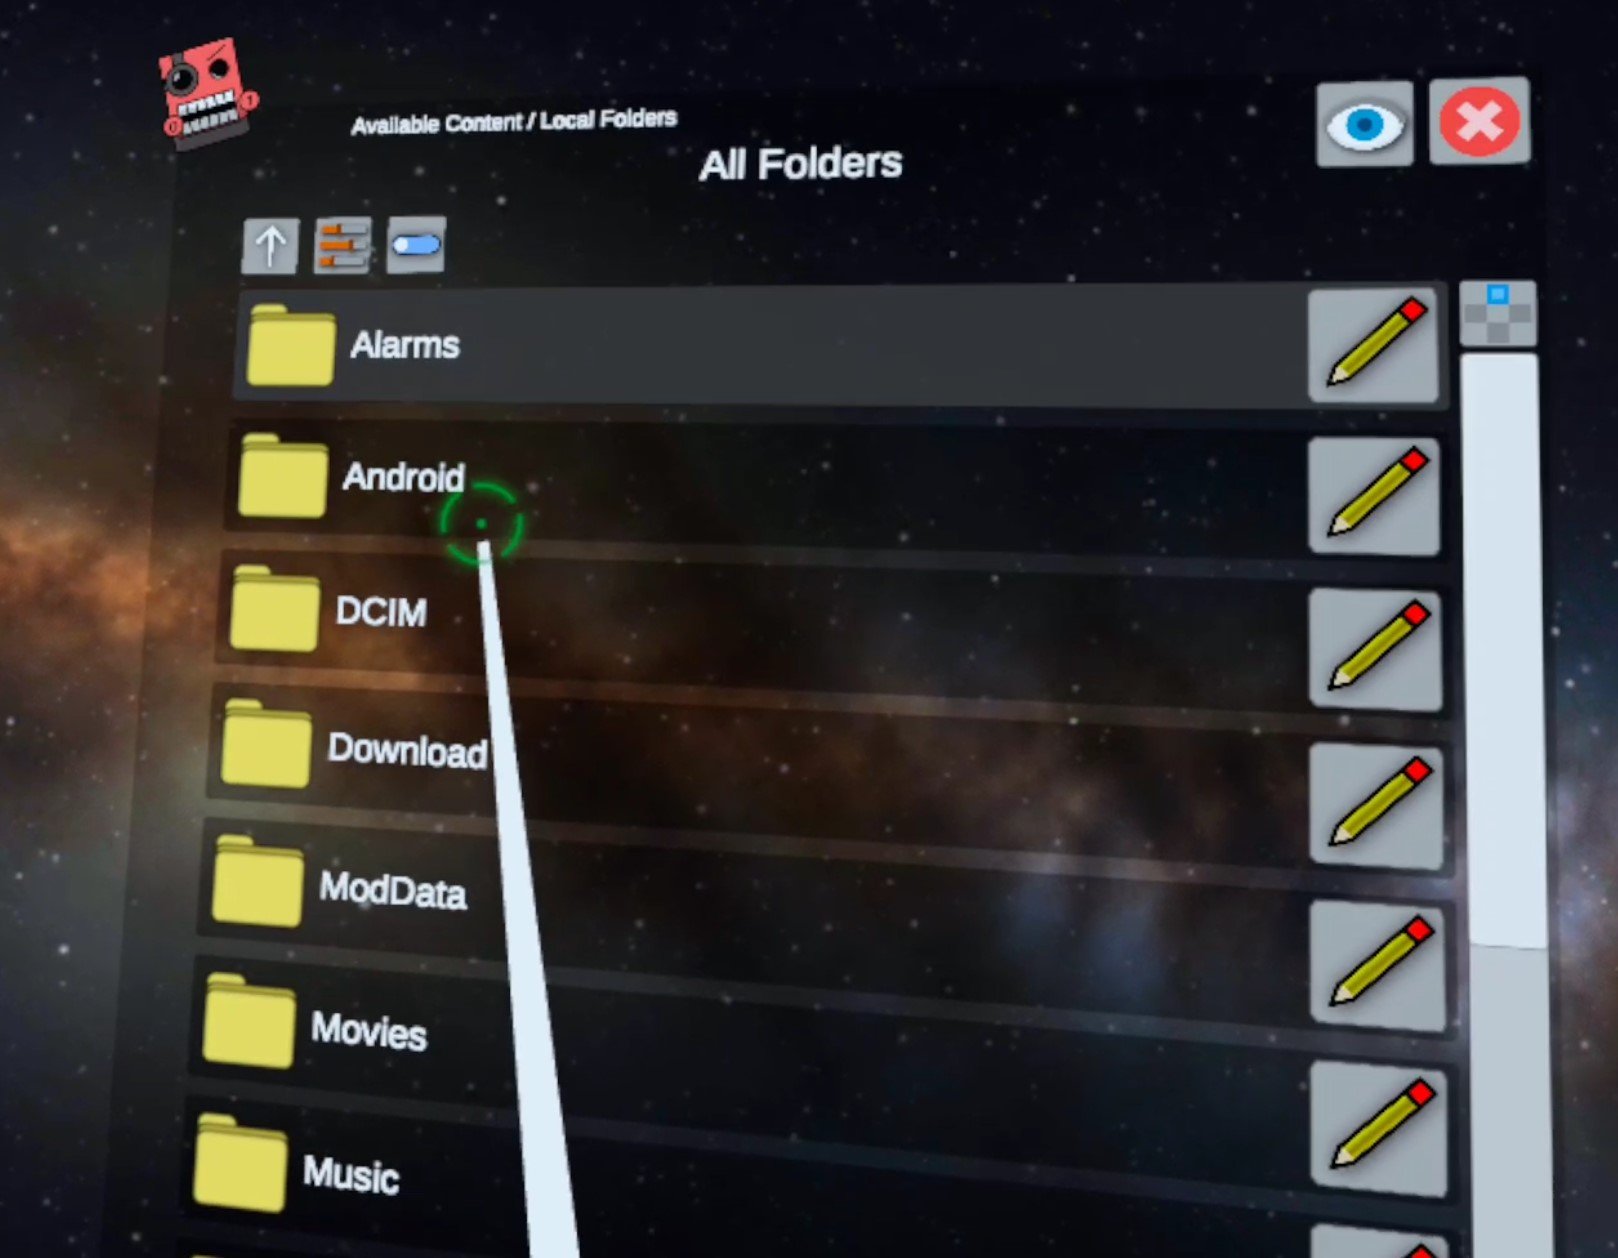
Luckily what we’re looking for will be at the top again, go to “Android” then “data” and you’ll now have a list of every installed application on your Meta Quest 2. Scroll around until you find the “com.Warpfrog.BladeAndSorcery” folder and select it.

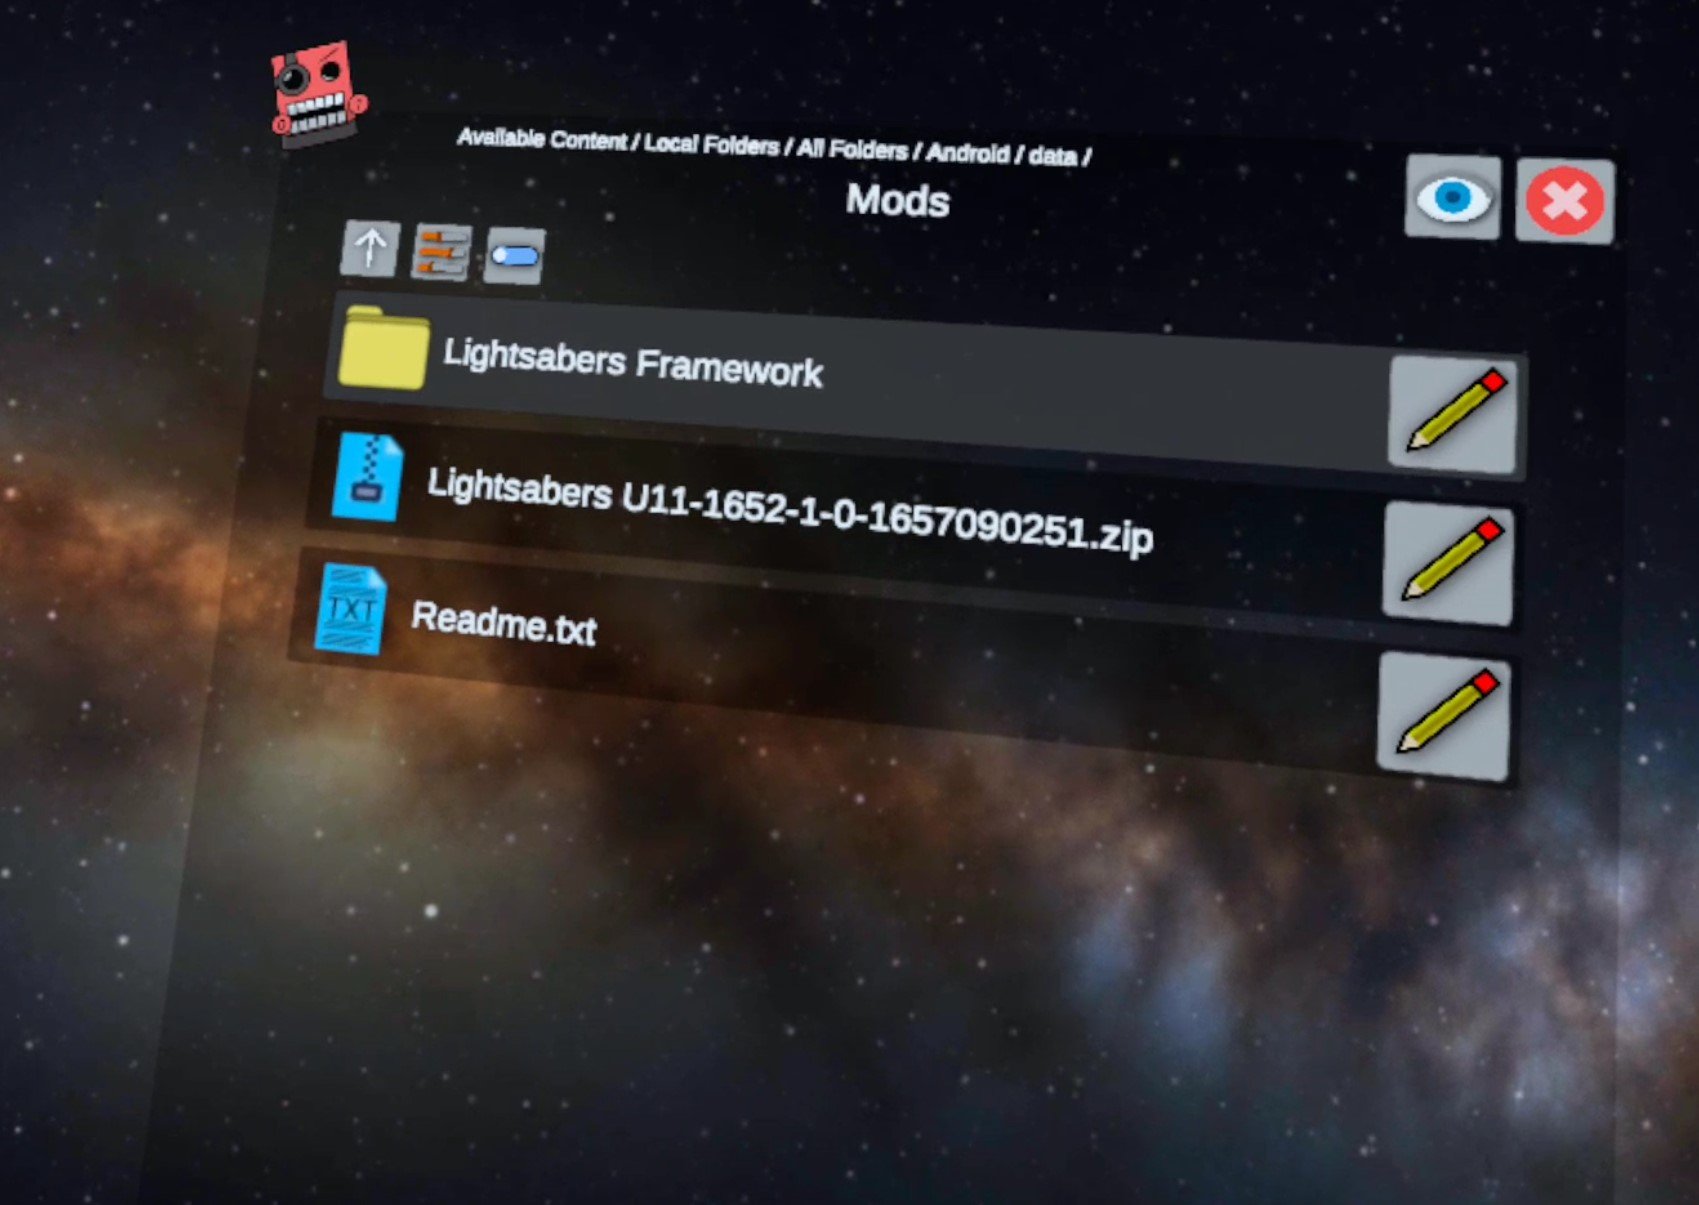
When you’re in the Blade And Sorcery folder, finally go to “files” and then “Mods” which will bring you to your destination, the folder we’ll need to extract our Blade and Sorcery: Nomad Mods to. If you’ve never installed a mod before it will only have a Readme.txt file in it.

All that’s left to do is paste your copied mod folder here and unzip it. So hit the blue View/Edit Toggle in the top left again and select the Paste (Move) button that looks like a clipboard with a piece of paper that has a pair of scissors drawn on it. A green checkmark button with “Finished” beside it will appear, press that too. Hit the View/Edit Toggle to exit View/Edit mode. Now you’ve moved your .zip Blade & Sorcery: Nomad Mod into the Blade & Sorcery: Nomad mod folder!

Now that the .zip is where you want it to be, just click on it’s file icon (no need to hit the View/Edit Toggle) then select the new “Extract Files” button that shows up. After a brief wait it will say “Files Extracted” then click the Okay button that appears beneath it. You should now see a regular folder for your mod in this folder.
Congratulations! Your mod is now successfully installed. Exit out of Mobile VR Station and go to Blade and Sorcery: Nomad to check it out. In the game we can confirm that the lightsaber mod is installed successfully by starting a Sandbox game and checking the book that you spawn weapons from for a new category.

From here we can spawn our new Lightsabers and go to town with them. Of course other types of mods may appear elsewhere, like the Enemy spawning book or the Map Menu, depending on what type of mod it is.
Hopefully this helps you enjoy Blade and Sorcery: Nomad Mods more conveniently since you won’t need to chain your Quest 2 to a PC to download and install them. Have fun out there!

Easily Install Gorilla Tag Mods Step by Step
Welcome to this step by step guide on how to install Gorilla Tag Mods! Gorilla Tag is an extremely fun VR game, and it’s even better with mods. So keep reading to find out how to install Gorilla Tag mods as easily as possible.
Welcome to this step by step guide on how to install Gorilla Tag Mods! Gorilla Tag is an extremely fun VR game, and it’s even better with mods. So keep reading to find out how to install Gorilla Tag mods as easily as possible.
Installing Gorilla Tag Mods on the Oculus Quest 2
A quick note for all Oculus Quest 2 lovers that are wondering how to get mods directly on your Quest 2. Unfortunately Gorilla Tag mods can no longer be installed on the Quest 2. There are also currently no plans to bring Quest 2 modding back to Gorilla Tag. Sorry, but if you want to mod Gorilla Tag then you’ll have to do it on PCVR. Look at this screenshot from the Gorilla Tag modding discord.

If you see a guide that says you can install mods, probably using the QuestPatcher tool, then they won’t tell you that you won’t be able to play Gorilla Tag on your Meta Quest 2 after using QuestPatcher. It simply won’t work, and will constantly tell you that you have an outdated version of the game that has to be restored to the newest version.
If you have a Quest 2 and want to play Gorilla Tag on PCVR then you could set up and use Oculus Airlink. The thing about Airlink is that it can drop a ton of frames and be very choppy and look horrible if your internet setup to your PC isn’t very good. If you want to use Oculus Airlink, then make sure your PC is connected to your Router or Modem with an ethernet cable.
If you can’t or don’t want to use Airlink then you’ll need to be able to connect your headset to your PC directly. This is possible with an Oculus Quest 2 using an Oculus Link Cable or comparable USB 3 cable. If you don’t have one there are plenty online that are not as expensive as the official Link Cable, but are possibly not as good.
Monke Mod Manager for PCVR Gorilla Tag Mods
The first step in installing PCVR Gorilla Tag mods is downloading and installing the Monke Mod Manager. This is a useful program that you can use on your PC to install Gorilla tag mods. Go to the Monke Mod Manager github page that you can find at this link. Click on the MonkeModManager.exe link under “Assets” to download the installer.

After Monke Mod Manager is downloaded, launch it to start the installer. You might get a prompt like the one you see here if the installer can’t find where your Gorilla Tag launcher is.

That’s alright. If you run Gorilla Tag through Steam click OK and then find and select GorillaTag.exe at C:\Program Files (x86)\Steam\steamapps\common\Gorilla Tag. If you run Gorilla Tag through the Oculus app then you can find and select GorillaTag.exe at C:\Program Files (x86)\Oculus\Software\Software\another-axiom-gorilla-tag (your filepath might be a little different depending on where you have Steam or Oculus installed, just find the “Steam” or “Oculus” folder and follow the rest of the path from there).
Whether Monke Mod Manager found the path automatically or you had to find it yourself, it will start up and you’ll see a menu with a bunch of check boxes. Scroll up and down the mods available and check whichever mods you want to install. Then hit “Install/Update” in the bottom right corner, and in a couple of seconds the mods will be installed.
This example here shows how to install the Gorilla Cosmetics mod, which you can use to add a bunch of great new cosmetics to your monke from a little cosmetics selector in your treehouse in Gorilla Tag.

You can also highlight a mod by clicking on its text, and then selecting “View Mod Info” in the bottom middle to open that mods github page, which you can manually download the mod from or read the README about it.
A great mod to install is “Monke Map Loader” which lets you load custom Gorilla Tag maps through the Computer in your treehouse in game. Just select the “Monke Map Loader” program on the ingame computer and you can select from all the maps you have installed. You can find more custom maps to download at this link.
You can install these new custom maps by moving them into your game's BepInEx/plugins/MonkeMapLoader/CustomMaps folder. If you don’t want to go looking for your game folder, just select the “Game Folder” button in the Monke Mod Manager Utilities tab.

Avoiding Bans
Be careful to disable mods that affect gameplay by selecting their checkbox and hitting “Disable Mods” before joining Public Lobbies. Most will disable automatically on joining a public Gorilla Tag lobby, but there might be a bug that keeps some on and your account might get banned by using them in a public lobby.
How To Get More Gorilla Tag Mods
If the mods that come with Monke Mod Manager aren’t enough for you, you can find more in the Gorilla Tag modding discord at this link. There are also a bunch of github repositories for Gorilla Tag PC Mods.
Some mods are a little different in how you should install them, so make sure to read the README for the mod. For most you can just download the mods .zip and extract it to a regular folder, then move that folder to your Gorilla Tag game folder. If the mod is just .dll files, then you should move them to the BepInEx/plugins folder.